manuals.online logo
Brands
  1. Home
  2. •
  3. Brands
  4. •
  5. Ergotron
  6. •
  7. Rack & Stand
  8. •
  9. Ergotron MXV User manual

Ergotron MXV User manual

1 of 20
888-45-364-W-00 rev. F • 03/19
MXV
Wall Mount Monitor Arm
Includes
Constant Force™
Technology
www.ergotron.com | USA: 1-800-888-8458 | Europe: +31 (0)33-45 45 600 | China: 400-120-3051 | Japan: [email protected]
English, Español, Français, Deutsch, Nederlands, Italiano, Svenska, 日本語, 汉语
若需最新的用户安装指南,请访问:www.ergotron.com
最新のユーザー インストール ガイドは、www.ergotron.com でご確認いただけます。
Die aktuellste Anleitung für die Montage durch den Benutzer fi nden Sie hier: www.ergotron.com
Pour la dernière version du Guide d’installation de l’utilisateur, visitez : www.ergotron.com.
Para acceder a la última versión de la Guía de instalación para el usuario, ingrese a www.ergotron.com
For the latest User Installation Guide please visit: www.ergotron.com
2 of 20
888-45-364-W-00 rev. F • 03/19
警告:由于安装表面材质差异很大,必须确保安装表面足以支撑所安装的产品和设备。
小心:
为了避免夹住线缆,请务必遵守本手册中的布线说明。不遵守本警告指示可能导致设备损坏或人身伤害。
安全性
警告:取り付け表面の材質にはさまざまな種類があるため、取り付け表面が取り付け製品や器具に対応した強さであることを必ず確認してください。
注意:
ケーブルの挟まりを防ぐため、必ず本マニュアルのケーブル配線手順に従ってください。この指示に従わないと、機器の損傷や怪我を招く恐れが
あります。
安全性
WarnungWeildieMaterialienderBefestigungsflächenstarkvariierenkönnenmüssenSieunbedingtgewährleistendassdie
BefestigungsflächestarkgenugistumdasmontierteProduktunddieAusrüstungzutragen
Vorsicht
DamitkeineKabeleingeklemmtwerdenkönnenmüssenSiedieAnweisungenzurKabelführungindiesemHandbucheinhaltenEin
MissachtendieserAnweisungenkannzuGeräteschädenoderVerletzungenführen
Sicherheit
AvertissementDanslamesureoùlesmatériauxdessurfacesdemontagevarientvousdevezimpérativementvousassurerquelasurface
estsuffisammentsolidepoursupporterleproduitetl'équipementmonté
Aention
Pouréviterderisquerdepincerlescâblesilestimportantdesuivrelesinstructionsd’acheminementdescâblesdecemanuelLenon
respectdeceeconsignepeutentraînerdesdommagesmatérielset/oudesblessures
Sécurité
AdvertenciaDadoquelosmaterialesdelasuperficiedemontajepuedenvariarenormementeesimprescindiblequesecercioredequela
superficiesealosuficientementeresistentecomoparasostenerelequipoyelproductomontados
Precaución
ParaevitarlaposibilidaddequesedoblenloscablesesimportanteseguirlasinstruccionesdeorganizacióndeloscablesdeestemanualEn
casodenorespetarestasinstruccionespodríanproducirsedañosenelequipoolesionessicas
Seguridad
WarningBecausemountingsurfacematerialscanvarywidelyitisimperativethatyoumakesuremountingsurfaceisstrongenoughto
handlemountedproductandequipment
Caution
ToavoidthepotentialtopinchcablesitisimportanttofollowthecableroutinginstructionsinthismanualFailuretofollowtheseinstructions
mayresultinequipmentdamageorpersonalinjury
Safety
3 of 20
888-45-364-W-00 rev. F • 03/19
"mm 




Portrait/Landscape Rotation.
Front View
lbskglbskg
特点和规格
注意:请勿超过所列的最大可承重量。否则可能导致重伤或设备损坏!
特長と仕様
注意:積載物は記載の最大積載重量を超えてはなりません。重大な人体
の怪我や機器の損傷を招く恐れがあります。
Produkteigenschaen&TechnischeDaten
VORSICHTDIEANGEGEBENEMAXIMALETRAGFÄHIGKEITNICHT
ÜBERSCHREITENDIESKANNSCHWEREVERLETZUNGENODER
SACHSCHÄDENZURFOLGEHABEN!
Caractéristiquesetspécifications
ATTENTIONNEPASDÉPASSERLACAPACITÉNOMINALE
MAXIMALEMENTIONNÉEDESÉRIEUSESBLESSURESOUDES
DOMMAGESMATÉRIELSPOURRAIENTSEPRODUIRE!
Característicasyespecificacionestécnicas
PRECAUCIÓNNOSUPERELACAPACIDADDEPESOMÁXIMA
INDICADAPODRÍAOCURRIRDAÑOSMATERIALESGRAVESO
LESIONESFÍSICAS
Features&Specifications
CAUTIONDONOTEXCEEDMAXIMUMLISTEDWEIGHT
CAPACITYSERIOUSINJURYORPROPERTYDAMAGEMAY
OCCUR!
4 of 20
888-45-364-W-00 rev. F • 03/19
ABC
1
2
3
4
M8 x 80mm
1x
2x M4 x 10mm
M4 x 10mm
2x
2x
M8
2.5mm
1/8"
5mm
4mm
Ø/"mm Ø/"mm
2
1
13mm
4mm
M3 x 6mm
2x
1x
1x
1x
1x
1x
1x
4x
4x
4x
10-24 x 5/8"
部件
需要的工具
水泥质
木质
螺栓探测器
構成部品
必要なツール
コンクリート
木
スタッド ファインダー
Komponenten
BenötigtesWerkzeug
SOLIDEHOLZBALKENTRÄGER MASSIVBETON
Auswahl von Montagematerial
Composants
Outillagerequis
BOIS BÉTON
Stud Finder
Componentes
Herramientasnecesarias
MADERA CONCRETO
Localizador de largueros de madera
Components
ToolsNeeded
WOOD CONCRETE
Stud Finder
5 of 20
888-45-364-W-00 rev. F • 03/19
2.5mm
a
b
6 of 20
888-45-364-W-00 rev. F • 03/19

6”
(152 mm)
这个安装高度是适应站姿高度为 '"'"cm和坐姿高度为 ’”’”cm的用户的人体工程学工作站的推荐安装高
度。
如果用户身高在此范围以外,您应更改安装高度以适应用户身高。(用户身高每相差一英寸则安装高度更改一英寸)。
人体工程学工作站的安装高度
安装高度假设您的显示器安装孔中心与屏幕顶部之间的距离为 6” (152 mm)。如果您的距离更小,您应相应增加安装高
度,如果您的距离更大,您应相应降低您的安装高度。
この取り付け高さは、立位向けに設定する場合は身長'''"cmのユーザー、座位向けに設定する場合は身長’”’”
cmのユーザーが使用する人間工学ワークステーションを対象とした推奨値です。
ユーザーの身長がこの範囲外の場合、そのユーザーの身長に合わせて取り付け高さを調節する必要があります(ユーザーの身長がこ
れより3cm高い/低い場合は、取り付け高さを3cm高く/低く調節します)。
人間工学ワークステーションの取り付け高さ
取り付け高さは、モニター取り付け穴の中心から画面の上端までに152mm(6”)の距離があることを前提としていま
す。この距離がこれより近い場合はさらに高い位置に取り付ける、またこれより遠い場合はさらに低い位置に取り付け
る必要があります。
DieseMontagehöhewirdfüreinenergonomischenArbeitsplatzempfohlenderfürBenutzermiteinerKörpergrößezwischen'"'"
cmbeieinerEinrichtungfürsArbeitenimStehenundzwischen’”’”cmbeieinerEinrichtungfürsArbeitenimSitzen
geeignetist
WenndieKörpergrößedesBenutzersnichtindiesemBereichliegtsolltenSiedieMontagehöheandieKörpergrößedesBenutzers
anpassenVerändernSiedieMontagehöheumjeweilscmprocmUnterschiedbeiderKörpergröße
MontagehöhefürergonomischenArbeitsplatz
Bei der Bestimmung der Montagehöhe wird von einem Abstand von 152 mm (6”) zwischen der Mie der Monitormontagelöch-
er und der Oberkante des Bildschirms ausgegangen. Wenn der tatsächliche Abstand kleiner ist, sollten Sie die Montagehöhe
entsprechend vergrößern; wenn er größer ist, sollten Sie ihn entsprechend verringern.
Ceehauteurdemontageestunerecommandationpourunpostedetravailergonomiquepourlesutilisateursmesurantentre'"'"
cmenconfigurationdeboutetentre’”’”cmenconfigurationassise
Silatailledel’utilisateursesitueendehorsdecesfourcheesvousdevezmodifierlahauteurdeposepourl’adapteràceetaille
Changezlahauteurdeposed’uncentimètrepourchaquecentimètrededifférencedetailledel’utilisateur
Hauteurdemontagepourunpostedetravailergonomique
Cee hauteur de montage suppose une distance de 152 mm entre le centre des trous de montage de votre moniteur et le
haut de l’écran. Si la distance est plus petite, vous devrez augmenter la hauteur de montage en conséquence; si la distance
est plus grande, vous devez réduire la hauteur de montage en conséquence.
Serecomiendaestaalturademontajeparaunaestacióndetrabajoergonómicaqueseadapteaestaturasdeusuariode'"'"
cmparatrabajardepieyde’”’”cmparatrabajarsentado
SilaestaturadelusuarioesdiferentesedebemodificarlaalturademontajedemodoqueseadaptealaestaturadelusuarioCambiar
laalturademontajeunapulgadaporcadapulgadadediferenciaenlaestaturadelusuario
Alturademontajedelaestacióndetrabajoergonómica
Para la altura de montaje se asume que hay una distancia de 152 mm (6 pulgadas) entre el centro de
los orificios de montaje del monitor y la parte superior de la pantalla. Si la distancia es menor, se debe
aumentar la altura de montaje según corresponda; si la distancia es mayor, se debe disminuir la altura
de montaje en consecuencia.
Thismountingheightisarecommendationforanergonomicworkstationthataccommodatesuserheightsof'"'"
cmwhensetupforstandinganduserheightsof’”’”cmwhensetupforsiing
IfuserheightsaredifferentthanthisyoushouldchangemountingheighttoaccommodateuserheightsChangemounting
heightoneinchforeveryoneinchdifferenceinuserheights
MountingHeightforErgonomicWorkstation
Mounting height assumes there is a 6” (152 mm) distance between the center of your monitor mounting
holes and the top of the screen. If your distance is smaller, you should increase mounting height
accordingly, if your distance is larger, you should decrease your mounting height accordingly.
7 of 20
888-45-364-W-00 rev. F • 03/19
5’0”- 6’1”
(152-185cm)
5’0”- 6’4”
(152-193cm)
31”
(79 cm)
46”
(117 cm)
人体工程学工作站的安装高度
人間工学ワークステーションの取り付け高さ
MontagehöhefürergonomischenArbeitsplatz
Hauteurdemontagepourunpostedetravailergonomique
Alturademontajedelaestacióndetrabajoergonómica
MountingHeightforErgonomicWorkstation
8 of 20
888-45-364-W-00 rev. F • 03/19

"mm
"mm
"mm
"mm
"mm
"mm
"mm
"mm
"mm
"mm
"mm
确定安装位置:
显示从墙壁拉出时运动范围的俯视图。
将支臂向后推靠墙的正视图。
モニターを壁から離した状態での動作範囲を示す上面図。
取り付け位置の決定:
アームを壁側に引いた状態の正面図。
BlickvonobenzeigtBewegungsbereichnachHerausziehenausderWand
MONTAGEPOSITIONBESTIMMEN
BlickvonvornemitgegendieWandgedrücktemArm
Vuededessusmontrantl’amplitudedesmouvementslorsqu’ilestdégagédumur
DÉTERMINEZL’EMPLACEMENTDEPOSE
Vuedefaceavecbraspoussécontrelemur
Vistasuperiorquemuestraelrangodemovimientocuandosealejadelapared
DETERMINEELLUGARDEINSTALACIÓN
Vistafrontalconelbrazoretraídocontralapared
DETERMINEMOUNTINGLOCATION
Topviewshowingrangeofmotionwhenpulledoutfromthewall
Frontviewwitharmpushedbackagainstthewall
9 of 20
888-45-364-W-00 rev. F • 03/19

0°
4x
4x
M4 x 10mm
M4 x 10mm
WARNING
M3 x 6mm
1x
注意:VESA 板仅接受 75mm 或 100mm VESA 模式。
安装显示器
警告! 储能危险: 支臂机构处于受力状态,在拆除所安装的设备后会自行快速上升。 因此,在将支臂移到最高位置之前,不要拆除设备! 不遵守
本规定可能导致严重的人身伤害和/或设备损坏!
注:VESAプレートは、75mmまたは100mmのVESAパターン以外は対応していません。
ノート型パソコンを取付ける
警告: 蓄積エネルギーの危険: アームメカニズムには張力が作用しており、付属機器を取り外すと自動的に素早く上に跳ね上がります。 そのた
め、付属機器を取り外す前にアームは一番上の位置に移動してください。 この指示を無視すると、重大な人体への傷害や機器の損傷を招く恐れが
あります。
HINWEIS: Die VESA-Platte lässt ausschließlich das 75 mm oder 100 mm VESA-Muster zu.
MONTAGEDESDISPLAYS
WAARSCHUWING! Rischiodaenergiaimmagazzinatailmeccanismodelbraccioèsootensioneesimuoverapidamentedasénonappenasitogliel’apparecchiaturaacuiè
collegatoPerquestomotivoNONrimuoverel’apparecchioamenocheilbracciononsiastataportatosullaposizionepiùaltaLamancataosservanzadiquestaprecauzione
puòcausareinfortunigravie/odanniall’apparecchiatura
REMARQUE: La plaque VESA acceptera seulement les modèles VESA à écartement de 75 mm ou 100 mm.
FIXERL’ECRAN
AVERTISSEMENT!Risqued’énergieaccumuléeLemécanismedubrasestsoustensionetselèverarapidementtout
seuldèsquelematérielestretiréPourceeraisonNEPASretirervotrematérielàmoinsquelebrasn’aitétémisàla
positionlaplusélevée!Risquedeblessurecorporelleet/oud’endommagementdumatérielencasdenonrespectdecee
instruction!
NOTA: La placa VESA únicamente aceptará patrones VESA de 75 mm o de 100 mm.
ATORNILLEMONITOR
ADVERTENCIA RiesgodeenergíaalmacenadaElmecanismodelbrazoestábajotensiónysemoverárápidamentehacia
arribaporsímismotanprontocomoseretireelequipoacopladoPorelloNOretireelequipoamenosqueestécolocado
ensuposiciónmáselevadaElincumplimientodeestainstrucciónpuedeprovocarlesionespersonalesgravesydañarel
equipo
NOTE: VESA plate will only accept 75mm or 100mm VESA pattern.
ATTACHDISPLAY
WARNING! StoredEnergyHazardThearmmechanismisundertensionandwillmoveuprapidlyonitsownassoonas
aachedequipmentisremovedForthisreasonDONOTremoveequipmentunlessthearmhasbeenmovedtothehigh
estposition!Failuretofollowthisinstructionmayresultinseriouspersonalinjuryand/orequipmentdamage!
10 of 20
888-45-364-W-00 rev. F • 03/19

注: 長期間にわたり部品を取り付けたり、外したりしていると、その振動でファスナーが緩んでくることがあります。 定期的に取り
付け部品を点検し、緩んでいるファスナーがないかどうかを確認してください。 ファスナーの緩みを防止するために、適宜、取り
付けの前にネジ山を固定する市販の接着剤を使用してもよいでしょう。
注意:请确保壁挂式安装支架水平、平直并紧贴墙壁。不要过度拧紧螺栓。
警告:确保墙体结构能够支撑四倍于安装设备的总重量。安装到不符合本标准的墙面可能造成不稳定、不安全的情况,进而导致人员伤害及/或财产损害。如果您对
具体应用还存有疑惑,请咨询建筑专业人士。
安全性
注:長期間にわたり部品を取り付けたり、外したりしていると、その振動でファスナーが緩んでくることがあります。定期的に取り
付け部品を点検し、緩んでいるファスナーがないかどうかを確認してください。ファスナーの緩みを防止するために、適宜、取り
付けの前にネジ山を固定する市販の接着剤を使用してもよいでしょう。
注意:壁取り付けブラケットが壁の表面に水平に接触してぴったりおさまっているか確認してください。ボルトは締め付けすぎないようにしてください。
警告: 壁の構造が取付ける機器の四倍の重量をサポートする強度が必要です。この基準に適合しない壁表面に取付けるとけが及び/または物的損害の原因とな
る不安定で危険な状況となりかねません。特定用途に壁の強度の良し悪しが懸念される場合は建設業者にご相談ください。
安全性
HINWEISDieBefestigungsschraubenkönnensichdurchVibrationenbeiderBewegungderBefestigungslösungimLaufderZeitlockern
ÜberprüfenSiedieBefestigungslösungregelmäßigaufgelockerteBefestigungsschraubenSiekönnendieBefestigungsschraubenmit
einemGewindekleberfürgeringeBelastungenfixierenumeinLockernzuvermeiden
VORSICHT: Bitte versichern sie sich, dass die Wandhalterung gerade befestigt ist und dabei dicht and derWand anliegt. DIE SCHRAUBEN NICHT ZU STRAFF AN-
ZIEHEN.
Achtung: Stellen Sie sicher, daß die Wand an der Sie das Display montieren wollen mindestens das vierfache Gewicht der zu befestigenden Geräte tragen kann.
Eine Befestigung an Oberächen, die nicht in der Lage ist, dieses Kriterium zu erfüllen, könnte zu einem instabilen und/oder unsicheren Zustand führen, welcher Per-
sonen- oder Sachschaden zur Folgen haben könnte.
Sicherheit
REMARQUEavecletempslesfixationspeuventserelâcheràcausedesvibrationsduesauxmouvementsdelasolutiondefixationVérifiez
lesfixationsdelasolutionrégulièrementSivouslesouhaitezvouspouvezappliquerunadhésifdeverrouillagelégersurlesfixationsavant
l’installationpourévitercegenredeproblème
AVERTISSEMENT : assurez vous que le support moral soit bien à plat et contre la surface du mur. NE PAS SERRER EXCESSIVEMENT LES BOULONS.
ATTENTION: Assurez vous que le mur sur lequel vous allez monter est capable de supporter 4 fois le poids total du matériel. Un montage sur une surface critique
peut générer une faiblesse dans l’installation et causer des dommages corporels et/ou matériels. En cas de doute, contactez un professionnel.
Sécurité
NOTALosfijadorespuedenllegarasoltarsedebidoalavibracióngeneradaporelmovimientodelasolucióndemontajeconelpasodel
tiempoInspeccionedeformarutinarialasolucióndemontajeparaversihayfijadoressueltosSilodeseaapliqueunadhesivodebloqueo
deroscasparaaplicacionesnointensasenlosfijadoresantesdeinstalarlosparaimpedirquesedesenrosquen
PRECAUCIÓN: Asegúrese de que la jación de la montura en pared está nivelada, iguálela y ajústela respecto a la pared. NO RETIRAR ESTA ETIQUETA!
AVISO:Verique que la pared donde vaya a instalar el Soporte de pared es capaz de soportar 4 veces el peso total del equipamiento a instalar. El montaje del
monitor en una pared que no cumpla estos requisitos puede conducir a una instalación inestable e insegura y derivar en daños personales y/o de la pared y el monitor.
Consulte a un instalador profesional si tiene dudas respecto de su caso particular.
Seguridad
NOTEFastenersmayunwindduetovibrationcausedbymovementofmountingsolutionovertimeInspectmountingsolutionforloose
fastenersonaroutinebasisIfdesiredapplyalightdutythreadlockingadhesivetofastenersbeforeinstallationtopreventbackout
CAUTION: Make sure the wall mount bracket is level, ush and snug to the wall surface. DO NOT OVERTIGHTEN THE BOLTS.
WARNING: Ensure that the wall structure is capable of supporting four times the total weight of mounted equipment. Mounting to wall surfaces that do not meet
this criteria may result in an unstable, unsafe condition which could lead to personal injury and/or property damage. Consult a construction professional if you have
any doubt about what this means in regard to your particular application.
Safety
11 of 20
888-45-364-W-00 rev. F • 03/19

14
12
13
"mm
"mm
"mm
"mm
"
mm
"
mm
Ø"mm
Ø"mm
4x
10-24 x 5/8"
1/8"
水泥质
木质
选取安装方法.
ERGOTRON产品
墙轨和托架单独出售。
コンクリート
木
取り付け方法の選択.
エルゴトロン製品
ウォールトラックおよびブラケット別売
SOLIDEHOLZBALKENTRÄGER
MASSIVBETON
WÄHLENSIEDIEBEFESTIGUNGSMETHODE
ERGOTRONPRODUKT
Alu-Profilschiene und Bügel Separat erhältlich
BOIS
BÉTON
CHOISISSEZUNEMÉTHODEDEFIXATION
PRODUITERGOTRON
Montant mural et fixation Vendu séparément
MADERA
CONCRETO
ELIJAELMÉTODODEMONTAJE
PRODUCTOERGOTRON
Guía y soporte de pared Vendido por separado
WOOD
CONCRETE
CHOOSEMOUNTINGMETHOD
ERGOTRONPRODUCT
Wall Track and Brackets sold separately.
12 of 20
888-45-364-W-00 rev. F • 03/19

cd e
13mm
ab
Ø/"mm
Ø/"mm
M8 x 80mm
2x
14
木质
螺栓探测器
木
スタッド ファインダー
SOLIDEHOLZBALKENTRÄGER
Auswahl von Montagematerial
BOIS
Stud Finder
MADERA
Localizador de largueros de madera
WOOD
Stud Finder
13 of 20
888-45-364-W-00 rev. F • 03/19

bc
d
a
13mm
1
2
Ø/"mm
Ø/"mm
M8 x 80mm
2x 2x
M8
2x
M8
14
水泥质
警告:安装孔的深度至少 3-1/8” (80mm) 并且必须位于硬水泥墙面,而不是灰泥或覆盖材料。如果钻孔碰到不牢固的水泥区,要重新找安装孔,直到锚拴能够完全嵌入硬水泥中!
警告:没有完全嵌入的锚拴无法支撑重量,结果造成不稳定、不安全的情况,这会导致人员及或财产伤害。如果您对具体应用还存有疑
惑,请咨询建筑专业人士。
コンクリート
警告:マウントホールは最低3-1/8”(80mm)の深さが必要です。外壁がモルタルやその他の材質で、内壁がコンクリートの壁にドリルで穴を開ける場合、両方のアンカーがコンクリート内壁に完全に挿入さ
れるよう、マウントホールを再調整します。
警告:アンカーがコンクリート内壁にしっかり収まっていない場合、加重重量をサポートできず、けが及び/または物的損害の原因となる不安定で危険な状況となりかねません。特定用途に壁の強度の良し悪
しが懸念される場合は建設業者にご相談ください。
MASSIVBETON
ACHTUNG: Die Bohrlöcher müssen mindesten 80 mm tief sein und sollten in Massivbeton gebohrt werden, nicht in Mörtel oder Abdeckmaterialien. Sollten Sie beim Bohren feststellen, dass Sie in
Beton bohren, der Hohlräume enthält, so wiederholen Sie den Vorgang bis sich alle vier Bohrlöcher vollständig in massivem Beton befinden.
ACHTUNG: Verankerungen die sich in nicht vollständig massivem Beton befinden, werden das Gewicht der angehängten Last nicht tragen und zu einem instabilen, unsicheren Zustand führen, der zu
Personen- und/oder Sachschaden führen kann.
BÉTON
ATTENTION : Les trous que vous allez percer doivent être d’une profondeur minimale de 80 mm et correctement placés dans le béton (pas dans les joints). Si vous percez dans une partie insuffisam-
ment résistante, repositionnez la platine pour que les 2 trous soient tous situés dans le béton!
WARNING: Anchors that are not fully set in solid concrete will not support the applied load resulting in an unstable, unsafe condition which could lead to personal injury and/or property damage.
Consult a construction professional if you have any doubt about what this means in regard to your particular situation.
CONCRETO
AVISO: Los taladros deben tener una profundidad mínima de 80 mm. y deben realizarse en la capa sólida de ladrillo u hormigón y no en el revestimiento o capa de enlucido. Si taladra en una zona
poco sólida, coloque de nuevo los 2 huecos para el montaje de forma que queden dispuestos en una capa sólida.
AVISO: Los tacos deben introducirse por completo en el ladrillo u hormigón, pues de otro modo no soportarán el peso de su monitor, dando lugar a una instalación inestable e insegura que puede
ocasionar lesiones personales y / o daños en el monitor y la pared. Consulte a un instalador profesional si tiene dudas al respecto de su caso particular.
CONCRETE
WARNING: Mounting holes must be at least 3-1/8” (80mm) deep and must be located within solid concrete, not
mortar or covering material. If you drill into an area of concrete that is not solid, reposition mounting holes until both anchors can be fully inserted into solid concrete!
WARNING: Anchors that are not fully set in solid concrete will not support the applied load resulting in an unstable, unsafe condition which could lead to personal injury and/or property damage.
Consult a construction professional if you have any doubt about what this means in regard to your particular situation.
14 of 20
888-45-364-W-00 rev. F • 03/19

c
ab
2.5mm
15 of 20
888-45-364-W-00 rev. F • 03/19

2x
注:保持线缆有足够的松驰度以便全方位移动。
小心:为了避免夹住线缆,请务必遵守本手册中的布线说明。不遵守本警告指示可能导致设备损坏或人身伤害。
注:ケーブルが自由に動くよう、たるませた状 態で 配 線します。
注意:ケーブルの挟まりを防ぐため、必ず本マニュアルのケーブル配線手順に従ってください。この指示に従わないと、機
器の損傷や怪我を招く恐れがあります。
HINWEISLassenSiefürdasKabelausreichendSpielraumumeineuneingeschränkteBewegungzugewährleisten
VorsichtDamitkeineKabeleingeklemmtwerdenkönnenmüssenSiedieAnweisungenzurKabelführungindiesem
HandbucheinhaltenEinMissachtendieserAnweisungenkannzuGeräteschädenoderVerletzungenführen
REMARQUELaissezsuffisammentdemoudanslecordonpourpermereaumouvementdehautenbasdesefaire
surtoutelahauteur
AentionPouréviterderisquerdepincerlescâblesilestimportantdesuivrelesinstructionsd’acheminementdes
câblesdecemanuelLenonrespectdeceeconsignepeutentraînerdesdommagesmatérielset/oudesblessures
NOTADejesuficienteholguraenloscablesparapermitirsurangocompletodemovimiento
PrecauciónParaevitarlaposibilidaddequesedoblenloscablesesimportanteseguirlasinstruccionesde
organizacióndeloscablesdeestemanualEncasodenorespetarestasinstruccionespodríanproducirsedañosen
elequipoolesionessicas
NOTELeaveenoughslackincabletoallowfullrangeofmotion
CautionToavoidthepotentialtopinchcablesitisimportanttofollowthecableroutinginstructionsinthismanual
Failuretofollowtheseinstructionsmayresultinequipmentdamageorpersonalinjury
16 of 20
888-45-364-W-00 rev. F • 03/19

17 of 20
888-45-364-W-00 rev. F • 03/19

a
b
调整步骤
重要说明!本产品安装完成后需要调节。在尝试进行调节之前,确保所有设备都正确安装在产品上。本产品应能在整个动作范围内灵活自如地移动,并能固定在所设定
的位置。如果移动过于容易或过于困难,或者产品不能固定在想要的位置上,请按照调节说明操作,使动作灵活自如。根据您所用产品及调节方式,可能需要旋转几圈
后才能注意到差别。每次添加或者从本产品上拆除设备时,都会使安装负荷重量发生变化,您应该重复调节步骤,确保运行状态安全、最佳。
升降(上下)
倾斜(前后)
調節ステップ
重要!本製品は取り付け後に調整する必要があります。調整を行う前に、すべての機器が本製品に適切に取り付けられていることを確認してください。本製品は可動範囲内でスムー
ズかつ簡単に動く必要があり、選定した位置にしっかり固定されなければなりません。製品が簡単に動きすぎる場合、動きがぎこちない場合、あるいは目的の位置に固定されない場
合は、説明書に従いスムーズに動くように 調 整してください 。お使いの製品や調整によっては、違いがはっきりするまで何回か回さなければならないこともあります。本製品に機器を追
加したり、機器を取り外したことで積載重量が変わった場合は、安全かつ最適な操作を実現するために調節手順を繰り返してください。
リフト(上下)
チルト(前後)
Einstellschri
Wichtig!SiemüssendiesesProduktnachdemZusammenbauentsprechendeinstellenAchtenSiedaraufdassalleIhreGeräterichtigaufdemProdukt
installiertwurdenbevorSieirgendwelcheEinstellungenvorzunehmenversuchenDiesesProduktsolltesichinseinemgesamtenBewegungsbereich
ruckfreiundohneSchwierigkeitenbewegenlassenundanderStellebleibenanderesabgestelltwirdWenndieBewegungenzuleichtodernurmitgroßer
AnstrengungdurchgeführtwerdenkönnenoderdasProduktnichtindervorgesehenenPositionbleibtbeachtenSiedieEinstellanleitungumruckfreieund
einfacheBewegungenzuermöglichenJenachIhremProduktundderjeweiligenEinstellungkönnenzahlreicheManipulationenerforderlichseinbevorSie
einenUnterschiedfeststellenZurSicherstellungeinersicherenundoptimalenProduktfunktionsolltenSiedieseEinstellschrieimmerdanndurchführen
wennGerätehinzugefügtoderentferntwerdenwaseineVeränderungderTraglastzurFolgehat
Höhenverstellung – rauf und runter
Neigung – vor und zurück
Étapederéglage
Important!Vousdevezajusterleproduitunefoisl’installationterminéeAssurezvousquel’équipementestcorrectementinstallésurleproduitavantde
procéderauxajustementsCeproduitdoitpouvoirêtredéplacésansdifficultésurtoutelaplagedemouvementetresterimmobiliséàl’endroitoùilestréglé
Silemouvementesttropfacileoutropdifficileousileproduitnerestepasdanslespositionssouhaitéesprocédezselonlesinstructionsderéglagepour
harmoniserlesmouvementsEnfonctiondevotreproduitetduréglageplusieurstourspeuvents’avérernécessairepourremarquerladifférenceChaque
foisqu’unepièced’équipementestajoutéeouretiréedeceproduitaffectantenconséquencelepoidsdelachargemontéevousdevezrépétercesétapes
deréglageafindegarantiruneutilisationsécuriséeetoptimaleduproduit
Ajustement en hauteur : bas et haut
Inclinaison : Avant et arrière
Etapadeajuste
¡Importante!TendráqueajustaresteproductounavezquehayaterminadolainstalaciónAsegúresedequetodosuequipoestéinstaladocorrectamente
enelproductoantesdeintentarllevaracaboalgúnajusteEsteproductodebepodermoversedemanerafácilyfirmedentrodelaamplituddemovimiento
permitidaymantenersedondeustedlofijeSilosmovimientossondemasiadofácilesodicilesosielproductonosemantieneenlasposicionesdeseadas
sigalasinstruccionesdeajusteparaconseguirmovimientossuavesyfácilesDependiendodelproductoyelajusteesposiblequedebahacermuchos
intentoshastapoderobservarladiferenciaCadavezqueañadaoretireequiposdeesteproductoyqueproduzcauncambioenelpesodelacargadebe
repetirestospasosdeajusteparagarantizarunfuncionamientoseguroyóptimo
Elevación (arriba y abajo)
Inclinación (adelante y atrás)
AdjustmentStep
Important!YouwillneedtoadjustthisproductaerinstallationiscompleteMakesureallyourequipmentisproperly
installedontheproductbeforeaemptingadjustmentsThisproductshouldmovesmoothlyandeasilythroughthefull
rangeofmotionandstaywhereyousetitIfmovementsaretooeasyordifficultorifproductdoesnotstayindesired
positionsfollowtheadjustmentinstructionstocreatesmoothandeasymovementsDependingonyourproductandthe
adjustmentitmaytakemanyturnstonoticeadifferenceAnytimeequipmentisaddedorremovedfromthisproduct
resultinginachangeintheweightofthemountedloadyoushouldrepeattheseadjustmentstepstoensuresafeand
optimumoperation
Li – Up and down
Tilt – Forward and Backward
18 of 20
888-45-364-W-00 rev. F • 03/19
a
4mm

增大升力
如果安装重量过重,或者升起本
产品时,产品不停留在升起位
置,那么您需要增大升力:
减小升力
如果安装重量过轻,或者降下本产
品时,产品不停留在降下位置,那
么您需要减小升力:
小心:不要过度拧紧固定器。过度拧紧可能会损坏设备。
升降(上下)
リフト強 度 の 増 大
積載重量が重すぎる場合、または本
製品の位置を上げても下がってくる
場合には、リフト強 度 を 高 める 必 要
があります。
リフト強 度 の 低 減
積載重量が軽すぎる場合、または本
製品の位置を下げても上がってくる
場合には、リフト強 度 を 弱 める 必 要 が
あります。
注意: 調節ネジは締めすぎないようにしてください。強く締め付けすぎると、器具が破損する原因となります。
リフト(上下)
Hubkra erhöhen
Wenn die installierten Geräte zu
schwer sind oder das angehobene
Produkt nicht oben bleibt, muss die
Hubkra erhöht werden:
Hubkra senken
Wenn die installierten Geräte zu
leicht sind oder das abgesenkte
Produkt nicht unten bleibt, muss die
Hubkra reduziert werden:
WARNUNGZu festes Anziehen der Schrauben kann zu Beschädigungen führen.
Höhenverstellung – rauf und runter
Augmenter la force de levage
Si le poids installé est trop lourd
ou si le produit ne reste pas en
place une fois soulevé, vous devez
augmenter la force de levage:
Réduire la force de levage
Si le poids installé est trop faible ou
si le produit ne reste pas en place
une fois abaissé, vous devez réduire
la force de levage:
Aention: ne forcez pas le serrage de la vis, cela pourrait endommager l’écran et/ou les aaches.
Ajustement en hauteur : bas et haut
Aumentar la fuerza de elevación
Si el peso colocado es demasiado o
si el producto no se mantiene arriba
cuando se eleva, debe aumentar la
fuerza de elevación:
Reducir la fuerza de elevación
Si el peso colocado es muy poco o
si el producto no se mantiene abajo
cuando se baja, tendrá que disminuir
la fuerza de elevación:
Cuidado:: No sobreapriete los tornilllos, pues podría causar un daño al equipo.
Elevación (arriba y abajo)
Increase Li Strength
If the mounted weight is too heavy
or this product does not stay up
when raised, then you'll need to
increase Li Strength:
Decrease Li Strength
If the mounted weight is too light
or this product does not stay down
when lowered, then you'll need to
decrease Li Strength:
CAUTION: DO NOT overtighten fasteners. Overtightening may cause damage to your equipment.
Li – Up and down
19 of 20
888-45-364-W-00 rev. F • 03/19
b5mm
增加摩擦力
如果该产品太易于移动,那么您
将需要增加摩擦力:
减少摩擦力
如果该产品太难于移动,那么您将
需要降低摩擦力:
倾斜(前后)
摩擦力の増大
製品がわずかな力で簡単に動いて
しまう状 態 であれば 、摩擦力を高め
る必要があります。
摩擦力の低減
製品がスムーズに動かない場合には、
摩擦力を弱める必要があります。
チルト(前後)
Reibung erhöhen
Wenn sich dieses Produkt zu leicht
bewegen lässt, muss die Reibung
erhöht werden:
Reibung senken
Wenn sich dieses Produkt nur unter
großem Kraaufwand bewegen
lässt, muss die Reibung reduziert
werden:
Neigung – vor und zurück
Augmenter le froement
Si ce produit se déplace
trop facilement, vous devrez
augmenter la friction:
Réduire le froement
Si ce produit est trop difficile à
déplacer, vous devrez diminuer la
friction:
Inclinaison : Avant et arrière
Aumentar la fricción
Si este producto se mueve con
demasiada facilidad, tendrá que
aumentar la fricción:
Disminuir la fricción
Si resulta demasiado dicil mover
este producto, tendrá que disminuir
la fricción:
Inclinación (adelante y atrás) Increase Friction
If this product moves too easily, then
you'll need to increase friction:
Decrease Friction
If this product is too difficult to move,
then you'll need to decrease friction:
Tilt – Forward and Backward
20 of 20
888-45-364-W-00 rev. F • 03/19
Learn more about ergonomic computer use at:
www.computingcomfort.org
© 2016 Ergotron, Inc. All rights reserved. Constant Force™ is a registered trademark of Ergotron, Inc.
www.ergotron.com |
USA: 1-800-888-8458
|
Europe: +31 (0)33-45 45 600
|
China: 400-120-3051
|
Japan: [email protected]
™
注: 联系客服时,请提供序列号。
若需当地客户服务电话号码,请访问: http://contact.ergotron.com
对于上门服务: www.ergotron.com
为保证参观: www.ergotron.com/warranty
注: カスタマー サービスにご連絡の際は、シリアル番号をお知らせください。
最寄りのカスタマー ケアの電話番号については、こちらをご覧ください: http://contact.ergotron.com
サービスをご覧ください: www.ergotron.com
保証書をご覧ください: www.ergotron.com/warranty
HINWEIS: Halten Sie bei der Kontaktaufnahme mit dem Kundendienst die Seriennummer griff bereit.
Örtliche Telefonnummern für den Kundendienst fi nden Sie hier: http://contact.ergotron.com
Für Servicebesuch: www.ergotron.com
Für Garantie Besuch: www.ergotron.com/warranty
REMARQUE : Lorsque vous contactez le service à la clientèle, veuillez donner le numéro de série.
Pour les numéros de téléphone du service client local, visitez : http://contact.ergotron.com
Pour le service client, visitez: www.ergotron.com
Pour la garantie, visitez: www.ergotron.com/warranty
NOTA: Cuando se ponga en contacto con el servicio de atención al cliente, haga referencia al número de serie.
Para conocer los números telefónicos locales de atención al cliente, visite: http://contact.ergotron.com
Para servicio, visite: www.ergotron.com
Para Garantía, visite: www.ergotron.com/warranty
NOTE: When contacting customer service, reference the serial number.
For local customer care phone numbers visit: http://contact.ergotron.com
For Service visit: www.ergotron.com
For Warranty visit: www.ergotron.com/warranty

Other manuals for MXV

2

This manual suits for next models

1

Other Ergotron Rack & Stand manuals

Ergotron DS100 Series Dimensions

Ergotron

Ergotron DS100 Series Dimensions

Ergotron 9" Vertical Lift User manual

Ergotron

Ergotron 9" Vertical Lift User manual

Ergotron LX Desk Mount LCD Arm User manual

Ergotron

Ergotron LX Desk Mount LCD Arm User manual

Ergotron WorkFit-P User manual

Ergotron

Ergotron WorkFit-P User manual

Ergotron 97-585 User manual

Ergotron

Ergotron 97-585 User manual

Ergotron AnthroBench 293 Series User manual

Ergotron

Ergotron AnthroBench 293 Series User manual

Ergotron Neo-Flex Mobile MediaCenter VHD User manual

Ergotron

Ergotron Neo-Flex Mobile MediaCenter VHD User manual

Ergotron StyleView SV31 User manual

Ergotron

Ergotron StyleView SV31 User manual

Ergotron FX30 Dimensions

Ergotron

Ergotron FX30 Dimensions

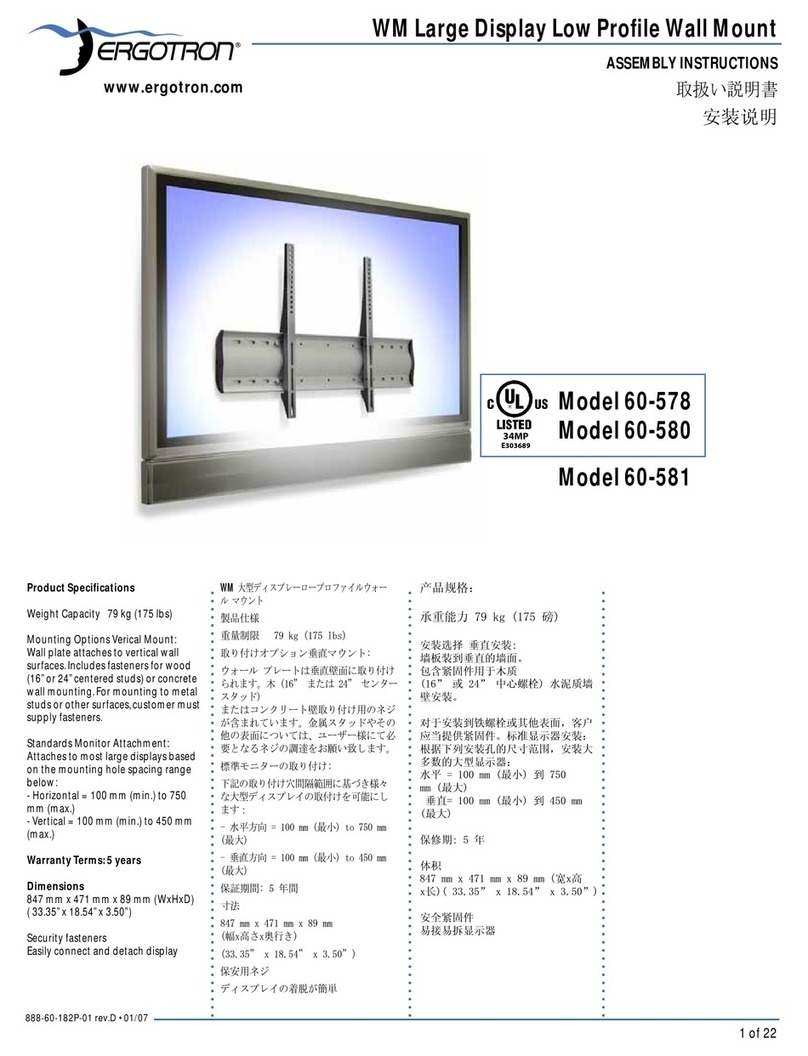
Ergotron 60-578 User manual

Ergotron

Ergotron 60-578 User manual

Ergotron LX Desk Mount LCD Arm User manual

Ergotron

Ergotron LX Desk Mount LCD Arm User manual

Ergotron WORKFIT User manual

Ergotron

Ergotron WORKFIT User manual

Ergotron OmniMount OS80FM User manual

Ergotron

Ergotron OmniMount OS80FM User manual

Ergotron LX Sit-Stand Collar Kit User manual

Ergotron

Ergotron LX Sit-Stand Collar Kit User manual

Ergotron C-Clamp Under Mount User manual

Ergotron

Ergotron C-Clamp Under Mount User manual

Ergotron StyleView User manual

Ergotron

Ergotron StyleView User manual

Ergotron Neo-Flex Slide-out User manual

Ergotron

Ergotron Neo-Flex Slide-out User manual

Ergotron LX User manual

Ergotron

Ergotron LX User manual

Ergotron Neo-Flex User manual

Ergotron

Ergotron Neo-Flex User manual

Ergotron Neo-Flex User manual

Ergotron

Ergotron Neo-Flex User manual

Ergotron NeoFlex 18-931 User manual

Ergotron

Ergotron NeoFlex 18-931 User manual

Ergotron Grommet Mount Kit User manual

Ergotron

Ergotron Grommet Mount Kit User manual

Ergotron StyleView Sit Stand Combo System User manual

Ergotron

Ergotron StyleView Sit Stand Combo System User manual

Ergotron Neo-Flex Series User manual

Ergotron

Ergotron Neo-Flex Series User manual

Popular Rack & Stand manuals by other brands

ricoo TS9711 Assembly manual

ricoo

ricoo TS9711 Assembly manual

Sanus Systems MF110 Assembly instructions

Sanus Systems

Sanus Systems MF110 Assembly instructions

König 21411 manual

König

König 21411 manual

Elkay MPW201 instructions

Elkay

Elkay MPW201 instructions

MAVIG Portegra2 Instructions for use

MAVIG

MAVIG Portegra2 Instructions for use

Fleximounts WR26MB installation guide

Fleximounts

Fleximounts WR26MB installation guide

BlueSky Designs Mount'n Mover DP-T2 instructions

BlueSky Designs

BlueSky Designs Mount'n Mover DP-T2 instructions

Axis T91K61 installation guide

Axis

Axis T91K61 installation guide

Monacor RACK-12/SW instructions

Monacor

Monacor RACK-12/SW instructions

CONEN RLI10070PBK Assembly instruction

CONEN

CONEN RLI10070PBK Assembly instruction

DeWalt DXST10000 instruction manual

DeWalt

DeWalt DXST10000 instruction manual

Tow Tuff TTF-4TBBC owner's manual

Tow Tuff

Tow Tuff TTF-4TBBC owner's manual

NeoMounts CPU-D200BLACK instruction manual

NeoMounts

NeoMounts CPU-D200BLACK instruction manual

Vivo MOUNT-PC05M instruction manual

Vivo

Vivo MOUNT-PC05M instruction manual

Kolpin Outdoors 35-2000 Assembly & installation manual

Kolpin Outdoors

Kolpin Outdoors 35-2000 Assembly & installation manual

Nanit Flex Stand user guide

Nanit

Nanit Flex Stand user guide

Philips SB7G17S/00 quick start guide

Philips

Philips SB7G17S/00 quick start guide

ricoo S2011 quick start guide

ricoo

ricoo S2011 quick start guide

manuals.online logo
manuals.online logoBrands
  • About & Mission
  • Contact us
  • Privacy Policy
  • Terms and Conditions

Copyright 2025 Manuals.Online. All Rights Reserved.