Erzi 51123 User manual
Herstellernachweis bitte aufbewahren!
Aufbau nur durch Erwachsene.
Please keep manufacturers reference.
Assembly by adults only.
Erzi®Qualitätsprodukte aus Holz GmbH
Lengefelder Straße 16
09579 Grünhainichen
Germany
www.erzi.de
Sicherheitshinweise:
• Aufbau nur durch Erwachsene oder fachkundiges
Personal, da verschluckbare Montageteile.
• Nur unter Aufsicht verwenden.
• Beschädigtes Spielzeug ist sofort zu entfernen.
Pflegehinweise:
• Verwenden Sie bitte keine Scheuermittel.
• Wischen Sie nur mit einem nebelfeuchten Tuch ab.
• Reiben Sie sofort trocken nach.
• Verwenden Sie für leichte Kratzer eine handelsübliche
Möbelpolitur.
• Achten Sie bitte auf umweltfreundliche Reinigungs-
mittel.
Informieren Sie Ihr Raumpflegepersonal über diese
Pflegehinweise.
Wartungshinweise:
• Verschraubungen und Beschläge bitte regelmäßig auf
Festsitz prüfen
• Regelmäßige Kontrolle auf festen Sitz der Abdeck-
kappen (Halbkugeln)
• Eventuell beschädigte Bauteile tauschen
• Auf Sauberkeit und einwandfreie Funktionalität ist
stets zu achten.
WARNUNG! Bei fehlerhafter Montage können bei der
Benutzung Gefahren entstehen. Die Montage darf nur
durch fachkundiges Personal durchgeführt werden.
Achtung! NIE einzelne Elemente aufstellen - KIPPGEFAHR!
Folgende Babypfadelemente sind zur Zeit erhältlich:
51110 Babypfad Unterwasserwelt
51111 Babypfad Werkzeugkiste
51119 Babypfad Gitarre
51120 Babypfad Fühlen
51121 Babypfad Farbspiel
51126 Babypfad Spiegel-Duo
51142 Babypfad Regenbogen
51143 Babypfad Spiegel
51144 Babypfad Klingklang
51145 Babypfad Spur
51147 Babypfad Jahreszeiten
Safety Advice:
• Assembly / mounting by qualified adult staff only, set
includes small parts a child might swallow.
• Use only under supervision.
• Remove damaged toys immediately.
Care instructions:
• Please do not use abrasive cleaners.
• Wipe only with a damp cloth.
• Rub dry immediately after cleaning.
• Use a commercial furniture polish for light scratches.
• Please use environmentally friendly cleaning
products.
Inform your cleaning staff about care instructions.
Maintenance:
• Regularly check tight fit of screws and other
hardware
• Regularly check tightness of the (hemispheric) caps
• Replace any damaged components.
• Make sure the climbing wall is always clean and
works properly.
WARNING: Wrong assembly may put users at risk. The
baby trail should only be assembled by qualified
personnel. Attention! NEVER set up single elements -
RISK OF TIPPING!
The following baby trail elements are currently available:
51110 Baby path Underwater World
51111 Baby path Tool Kit
51119 Baby path Guitar
51120 Baby path Touch & Feel
51121 Baby path Play of colours
51126 Baby path Mirror duo
51142 Baby path Rainbow
51143 Baby path Mirror
51144 Baby path Tinkle
51145 Baby path Track
51147 Baby path Four Seasons
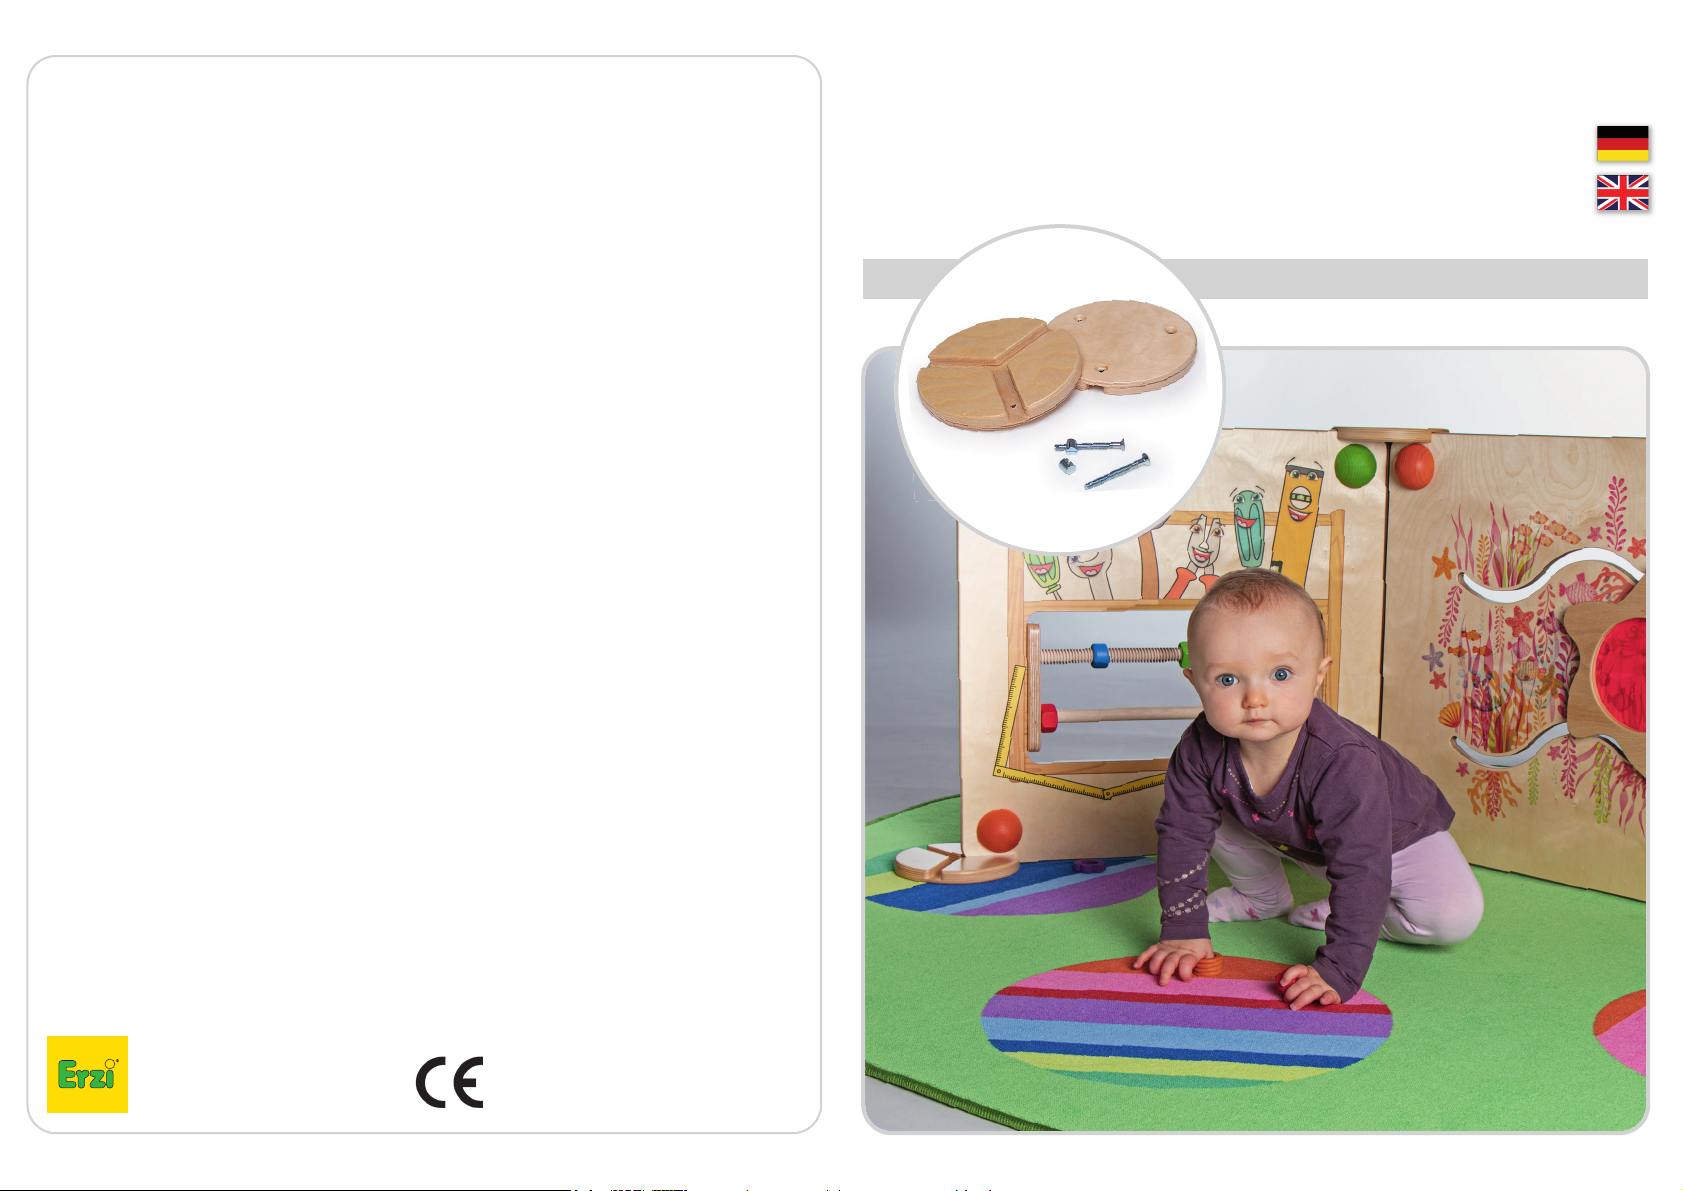
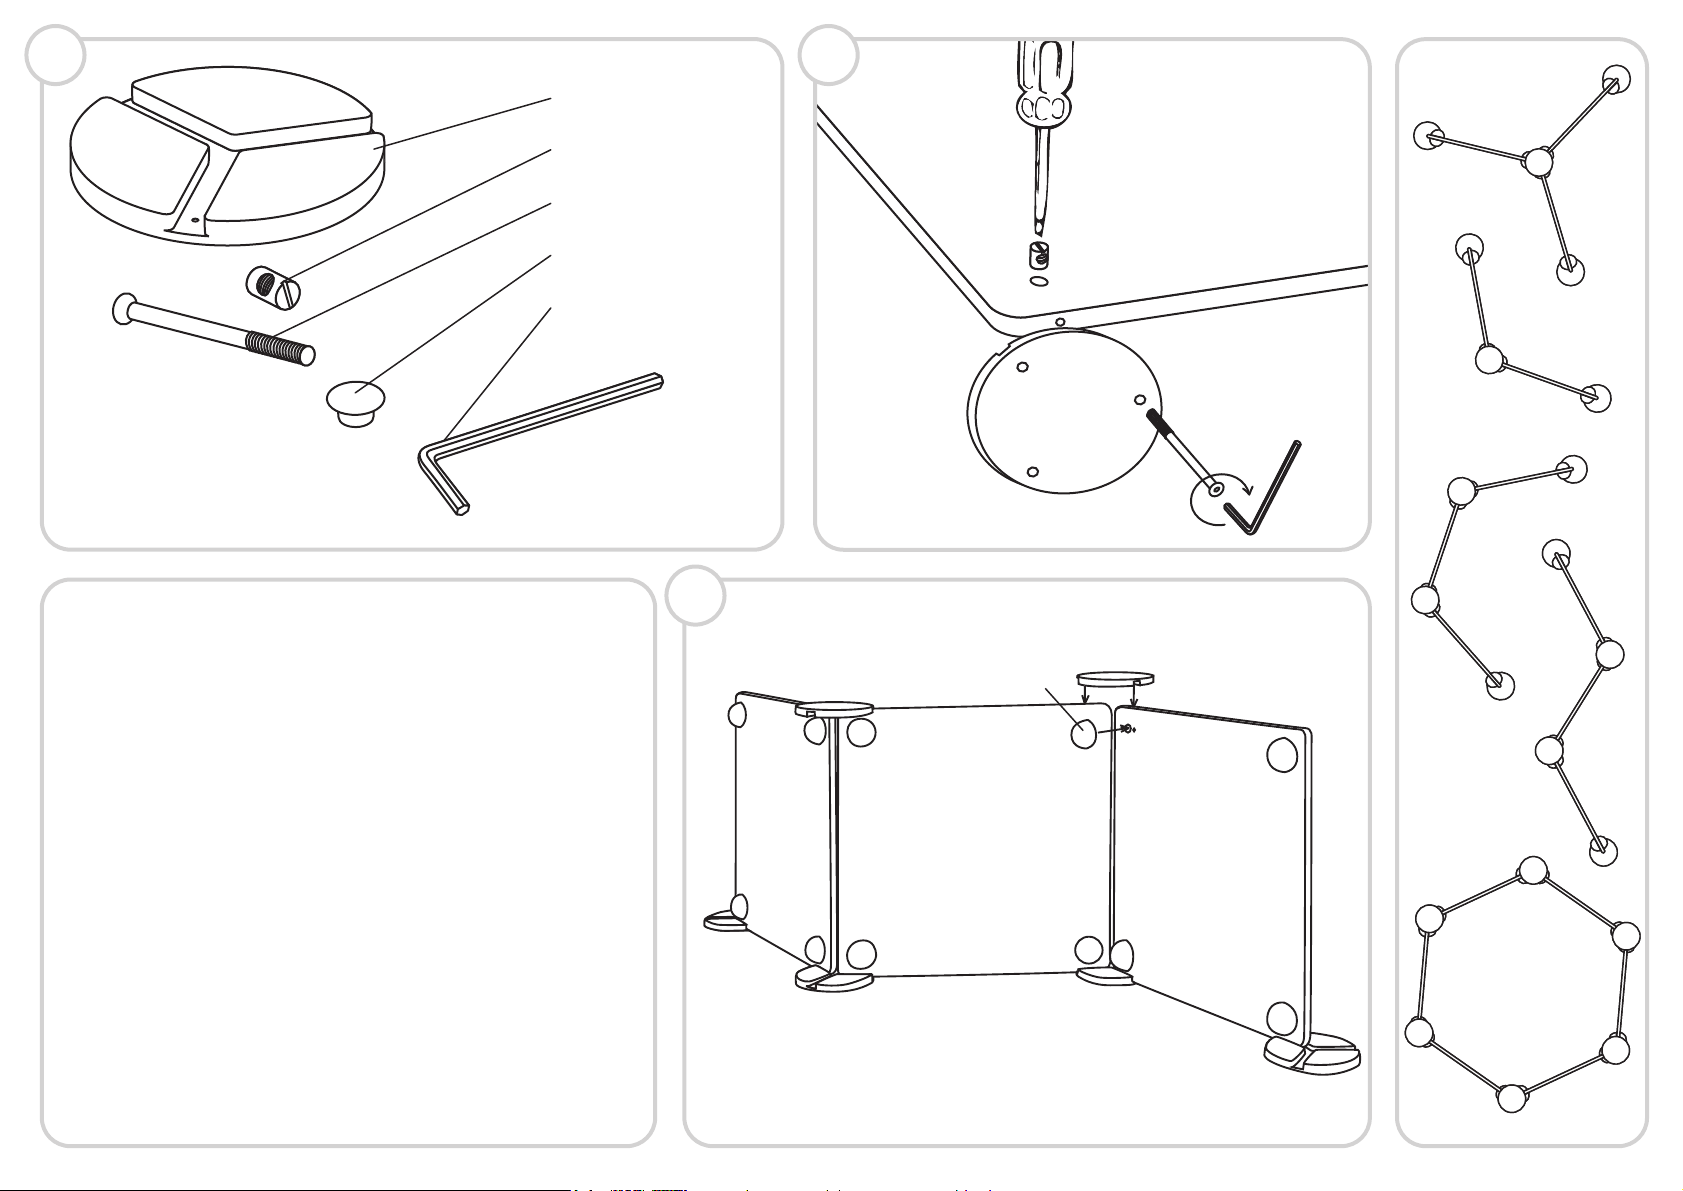
51123
Assembly instructions: Assembly discs baby‘s path
Aufbauanleitung: Aufstellscheiben Babypfad

2x
4x
4x
1x
1x
You need one set of assembly discs per play element. ... and so on
1
Lay out all parts and check completeness. Also lay out baby‘s path parts. You will need the
play element and the corresponding hemispheres.
Insert one transversal threaded bolt into one of the bottom holes of a play element. With a
screwdriver you may control the orientation of the screw hole.
Insert a screw from the bottom through a hole in an assembly disc and then into the hole of
the play element to which the transversal bolt is located at right angle. Insert screw into bolt
and tighten.
Mount a second assembly disc to the play element in the same way. Now you may add
further elements at angles of 60 ° or 120 ° one after another (see sample drawing).
In the same way, mount assembly discs on top at all places where two or three elements
come together.
Attention! NEVER put up only one element - it may tip over.
Once again tighten all screws! Now put on the hemispheres as caps.
Please close any remaining holes with the enclosed caps.
3
2
baby‘s path element
Hemisphere
Halbkugel
positioning examples
Senkkopfschraube
countersunk head screw
Aufstellscheiben
assembly discs
Sie benötigen pro Spielelement ein Satz Aufstellscheiben.
... und so weiter
Quergewindebolzen
transversal threaded bolt
Abdeckkappe
cap
Sechskantschlüssel
Allen key
Legen Sie alle Teile bereit, und kontrollieren Sie deren Vollständigkeit. Legen Sie auch die Teile
der Babypfade bereit. Davon benötigen Sie jeweils das Spielelement und die dazugehörigen
Halbkugeln.
Stecken Sie einen Quergewindebolzen in eines der unteren Löcher eines Spielelementes. Mit
einem Schraubendreher können sie die Ausrichtung der Schrauböffnung kontrollieren.
Stecken Sie eine Schraube von unten durch ein Loch einer Aufstellscheibe, und dann in die
Bohrung des Spielelementes zu der sich senkrecht der Quergewindebolzen befindet. Die
Schraube wird dann in den Quergewindebolzen geschraubt.
An das erste Spielelement montieren Sie so bitte auch eine zweite Aufstellscheibe. Weitere
Elemente können Sie in einem Winkel von 60° oder/und 120° aneinanderreihen (siehe
Beispiele Skizze).
Montieren Sie in gleicher Weise an den Oberseiten je dort eine Aufstellscheibe, wo zwei oder
drei Elemente aufeinandertreffen.
Stellen Sie NIE nur ein Element auf - Achtung Kippgefahr!
Ziehen Sie jetzt noch einmal alle Schrauben fest! Stecken Sie nun die Halbkugeln als
Abdeckkappen auf. Sollten Löcher als Öffnungen freibleiben, schliessen Sie diese bitte mit
den beiliegenden Abdeckkappen
Babypfadelement
Aufstellbeispiele

Erzi®Qualitätsprodukte aus Holz GmbH
Lengefelder Straße 16
09579 Grünhainichen
Germany
www.erzi.de
Opbouwhandleiding: opstelschijven babypad
Notice de montage : Disques parcours de jeu pour bébés
51123
Conserver l'identification du fabricant.
Seuls des adultes sont en droit de procéder à l’assemblage.
Fabrikantbewijs bewaren a.u.b.
Montage alleen door volwassenen.
Consignes de sécurité :
• Montage réservé aux adultes ou à du personnel
compétent, car petites pièces susceptibles d’être
ingérées.
• Utilisation uniquement sous surveillance.
• Un jouet endommagé est à éliminer immédiatement.
Consignes d’entretien :
• Ne jamais utiliser des détergents.
• Essuyer uniquement avec un linge légèrement humide
et sécher immédiatement avec un linge sec.
• Pour des rayures légères, utiliser un polish pour
meubles du commerce.
• Utiliser des produits nettoyants écologiques.
Informer le personnel chargé de l’entretien de ces
consignes d’entretien.
Consignes d’entretien :
• Vérification régulière de la fixation correcte des vissages
et des armatures.
• Contrôle régulier de la bonne fixation des capuchons
(demi-sphères).
• Remplacement des composants endommagés, le cas
échéant.
• Toujours veiller à la propreté et au fonctionnement
correct.
AVERTISSEMENT ! Un mauvais montage peut produire
des dangers lors de l’utilisation.
Le montage ne doit être effectué que par du personnel
compétent.
Attention ! NE JAMAIS poser des éléments de manière
isolée – RISQUE DE BASCULEMENT !
Les éléments de parcours de jeu suivants sont actuelle-
ment disponibles :
51110 L´éveil des sens Monde sous-marin
51111 L´éveil des sens Caisse à outils
51119 L´éveil des sens Guitare
51120 L´éveil des sens Toucher
51121 L´éveil des sens Jeu de couleurs
51126 L´éveil des sens Miroirs Duo
51142 L´éveil des sens Arc en ciel
51143 L´éveil des sens Miroir
51144 L´éveil des sens Ding Dong
51145 L´éveil des sens Trace
51147 L´éveil des sens Saisons
Veiligheidsinstructies:
• Opbouw alleen door volwassenen of vakkundig
personeel wegens inslikbare montageonderdelen.
• Alleen onder toezicht gebruiken.
• Beschadigd speelgoed dient onmiddellijk verwijderd
te worden.
Verzorgingsinstructies:
• Gelieve geen schuurmiddelen te gebruiken.
• Alleen schoonvegen met een nevelvochtige doek.
Onmiddellijk daarna droogwrijven.
• Gebruik voor lichte krassen een in de handel
verkrijgbaar meubelvernis.
• Gelieve op milieuvriendelijke reinigingsmiddelen te
letten.
Informeer uw schoonmaakpersoneel over deze
verzorgingsinstructies.
Onderhoudsinstructies:
• Gelieve schroefverbindingen en beslag
regelmatig op vaste zitting te controleren.
• Regelmatige controle op vaste zitting van de
afdekkappen (halve bollen).
• Eventueel beschadigde bouwelementen
wisselen.
• Op reinheid en een foutloze functionaliteit
dient steeds gelet te worden.
WAARSCHUWING! Bij een verkeerde montage kunnen
er bij het gebruik gevaren ontstaan.
De montage mag alleen door vakkundig personeel
uitgevoerd worden.
Let op! NOOIT afzonderlijke elementen opstellen -
KANTELGEVAAR!
Volgende babypadelementen zijn tegenwoordig
verkrijgbaar:
51110 Babypad Onderwaterwereld
51111 Babypad Gereedschapskoffer
51119 Babypad Gitaar
51120 Babypad Voelen
51121 Babypad Kleurenspel
51126 Babypad Spiegel-duo
51142 Babypad Regenboog
51143 Babypad Spiegel
51144 Babypad Tingtang
51145 Babypad Spoor
51147 Babypad Seizoenen
U hebt per speelelement één set opstelschijven nodig. … en zo verder
1
Leg alle onderdelen klaar en controleer de volledigheid daarvan. Leg ook de onderdelen van de
babypads klaar. Daarvan hebt u telkens het speelelement en de bijhorende halve bollen nodig.
Steek een dwarse schroefdraadbout in één van de onderste gaten van een speelelement. Met
een schroevendraaier kunt u de positionering van de schroefopening controleren.
Steek een schroef langs onder door een gat van een opstelschijf en dan in de boring van het
speelelement, tegenover welk de dwarse schroefdraadbout zich loodrecht bevindt. De schroef
wordt dan in de dwarse schroefdraadbout geschroefd.
Gelieve aan het eerste speelelement ook een tweede opstelschijf te monteren. Nog andere
elementen kunt u in een hoek van 60° en/of 120° aaneenrijgen (zie voorbeelden schets).
Monteer op dezelfde manier aan de bovenzijden telkens één opstelschijf daar, waar twee of
drie elementen bijeenkomen.
Stel NOOIT slechts één element op – Let op: kantelgevaar!
Draai nu nogmaals alle schroeven stevig aan! Steek er nu de halve bollen als afdekkappen op.
Indien gaten als openingen vrij dienen te blijven, dient u deze met de bijgevoegde afdekkap-
pen te sluiten.
3
2
Babypadelement
Halve bol
Demi-sphère
Voorbeelden van
een opstelling
Chaque élément de jeu nécessite un jeu de disques de montage.
... etc.
Préparez toutes les pièces et contrôlez leur intégralité. Préparez également les pièces du
parcours de jeu. Vous aurez respectivement besoin de l’élément de jeu et des demi-sphères
correspondantes.
Passez un boulon fileté transversal dans un des trous inférieurs d’un élément de jeu. Vérifiez
avec un tournevis l’alignement des passages de vis.
Glissez une vis par le bas dans un trou d’un disque de montage, puis dans la perforation de
l’élément de jeu sur lequel se trouve le boulon fileté transversal en position verticale. Vissez
ensuite la vis dans le boulon fileté.
Montez un deuxième disque sur le premier élément de jeu. Vous pouvez rajouter d’autres
éléments dans un angle de 60° ou/et de 120° (voir croquis).
Installez, de la même manière, respectivement un disque de montage sur les bords
supérieurs, là où deux ou trois éléments se rencontrent.
NE posez JAMAIS un seul élément – Attention ! Risque de basculement !
Pour terminer, resserrez toutes les vis. Emboitez les demi-sphères comme capuchons. Les
trous non utilisés pour le montage sont à fermer avec les capuchons fournis.
Elément parcours de jeu
Exemples de montage
2x
4x
4x
1x
1x
vis à tête fraisée
platverzonken schroef
disques de montage
opstelschijven
boulons filetés transversaux
dwarse schroefdraadbout
capuchon
afdekkap
clé hexagonale
inbussleutel

Erzi®Qualitätsprodukte aus Holz GmbH
Lengefelder Straße 16
09579 Grünhainichen
Germany
www.erzi.de
Manual de montaje: Discos de montaje camino para bebé
Istruzioni di montaggio: Dischi di montaggio Percorso bambino
51123
Conservare l’attestato del produttore.
Montaggio devono essere effettuati solo da parte di adulti.
¡No es ningún juguete! ¡Aparato de deporte!
El montaje solo puede ser realizado por adultos.
Indicazioni di sicurezza:
• Il montaggio deve essere effettuato solo da parte di
adulti o personale qualificato poiché i pezzi di montaggio
potrebbero essere ingeriti.
• Usare solo sotto la supervisione di adulti!
• I giocattoli danneggiati devono essere rimossi
immediatamente.
Istruzioni per la cura:
• Si prega di non usare abrasivi.
• Pulire solo con un panno umido. Asciugare subito dopo.
• Utilizzare un lucido per mobili disponibile sul mercato
per graffi leggeri
• Si prega di prestare attenzione ai detergenti ecocompati
bili.
Informare il personale addetto alle pulizie in merito a
queste istruzioni per la cura.
Prescrizioni per la manutenzione:
• Controllare periodicamente la tenuta dei collegamenti a
vite e dei raccordi.
• Controllare regolarmente il buon fissaggio dei tappi
(emisferi).
• Sostituire eventuali componenti danneggiati.
• Prestare sempre la massima attenzione alla pulizia e alla
funzionalità perfetta.
ATTENZIONE! Un'installazione errata può comportare
rischi durante l'uso. Il montaggio deve essere effettuato
solo da personale qualificato.
Attenzione! Non impostare MAI singoli elementi - RISCHIO
DI RIBALTAMENTO!
I seguenti elementi di percorso per bambini sono
attualmente disponibili:
51110 Percorso bambino Mondo sottomarino
51111 Percorso bambino Cassetta degli attrezzi
51119 Percorso bambino Chitarra
51120 Percorso bambino Toccare e sentire
51121 Percorso bambino Gioco dei colori
51126 Percorso bambino Specchio-Duo
51142 Percorso bambino Arcobaleno
51143 Percorso bambino Specchio
51144 Percorso bambino Carillon
51145 Percorso bambino Pista
51147 Percorso bambino Le quattro stagioni
Indicaciones de seguridad:
• El montaje solo puede ser realizado por adultos o
personal especializado, ya que hay piezas de montaje
que se pueden tragar.
• Utilizar solo bajo supervisión.
• Quitar de inmediato el juguete dañado.
Indicaciones de cuidado:
• No utilice productos abrasivos.
• Limpie solo con un paño humedecido. Seque de
inmediato.
• Utilice un pulidor de muebles convencional para los
pequeños arañazos.
• Utilice productos de limpieza respetuosos con el
medio ambiente.
Informe al personal de limpieza sobre estas indicaciones
de cuidado.
Indicaciones de mantenimiento:
• Comprobar el firme asiento de las uniones roscadas y
los herrajes.
• Controlar periódicamente el firme asiento de las
tapas (semiesferas).
• Cambiar los componentes que puedan estar dañados.
• Prestar especial atención a la limpieza y al funciona-
miento correcto.
¡ADVERTENCIA! Un montaje inadecuado puede poner
en riesgo al usuario. El montaje solo puede ser realizado
por personal calificado.
¡Atención! No colocar NUNCA elementos individuales -
¡PELIGRO DE VUELCO!
Actualmente hay disponibles los siguientes elementos
camino para bebé:
51110 Camino para bebé El mundo submarino
51111 Camino para bebé Caja de herramientas
51119 Camino para bebé Guitarra
51120 Camino para bebé Palpar
51121 Camino para bebé Juego de colores
51126 Camino para bebé Espejo Duo
51142 Camino para bebé Arcoíris
51143 Camino para bebé Espejo
51144 Camino para bebé Tintineo
51145 Camino para bebé Rastro
51147 Camino para bebé Cuatro Estaciones

Necesita un juego de discos de montaje por elemento de juego. ... etcétera
1
Prepare todas las piezas y compruebe que no falta ninguna. Prepare también las piezas de los
caminos para bebé. Necesitará el elemento de juego y sus semiesferas.
Introduzca un perno roscado transversal en uno de los agujeros inferiores de un elemento de
juego. Con un destornillador puede controlar la orientación de la abertura del tornillo.
Introduzca un tornillo por debajo en un agujero del disco de montaje, y luego en el orificio del
elemento de juego donde está ubicado el perno roscado transversal en ángulo recto. A
continuación, el tornillo se enrosca en el perno roscado transversal.
Monte en el primer elemento de juego una segundo disco de montaje. Los demás elementos
puede colocarlos en fila con un ángulo de 60° o/y 120° (véase como ejemplo el croquis).
Monte de igual manera en los lados superiores un disco de montaje, donde se encuentran dos
o tres elementos.
NUNCA coloque solo un elemento - ¡Atención peligro de vuelco!
¡Vuelva a apretar bien todos los tornillos! Coloque ahora las semiesferas como tapas. Deberían
quedar libres tantos agujeros como aberturas. Ciérrelos con las tapas adjuntas.
3
2
Elemento camino para bebé
Semiesfera
Emisfero
Ejemplos de colocación
Sarà necessario un set di dischi di montaggio per ogni elemento di gioco.
... ecc.
Preparare tutte le parti e controllare la loro completezza. Preparare anche le parti dei percorsi
bambino. Di queste si ha bisogno del rispettivo elemento di gioco e degli emisferi corrispon-
denti.
Inserire una spina filettata trasversale in uno dei fori inferiori di un elemento di gioco. Verificare
con un cacciavite l'orientamento del foro filettato.
Passare una vite dal basso attraverso un foro in un disco di montaggio, inserendola poi nel foro
dell'elemento di gioco sul quale si trova la spina filettata trasversale in posizione verticale. La
vite viene quindi avvitata nella spina filettata trasversale.
Montare nello stesso modo un secondo disco di montaggio sul primo elemento di gioco. Altri
elementi possono essere accostati ad un angolo di 60° o/e 120° (vedi immagine).
Montare allo stesso modo rispettivamente un disco di montaggio sui lati superiori, laddove si
incontrano due o tre elementi.
Non installare MAI un solo elemento - Attenzione! Pericolo di ribaltamento!
Stringere ora nuovamente tutte le viti! Inserire adesso gli emisferi come tappi. Se alcuni fori
rimangono aperti, chiuderli con i tappi di copertura inclusi nella fornitura.
Elemento del percorso per bambini
Esempi di montaggio
2x
4x
4x
1x
1x
vite a testa svasata
Tornillos avellanados
dischi di montaggio
Discos de montaje
spine filettate trasversali
Pernos roscados transversales
tappo
Tapa
chiave a brugola
Llave hexagonal
Other Erzi Toy manuals


Popular Toy manuals by other brands

Meccano
Meccano 18208 instructions

Eduard
Eduard Zoom OV-10D interior S.A. Assembly instructions

Lionel
Lionel Holiday Special Train Set owner's manual

PLAYMOBIL
PLAYMOBIL Country 70518 Assembly instruction

Beyblade
Beyblade Wing Defenser instructions

Fisher-Price
Fisher-Price PIXTER COLOR B7711 owner's manual


Eduard
Eduard MH-60L quick start guide

Little Partners
Little Partners DEVELOPMENTAL ACTIVITY BOARD LP4545 quick start guide

Glow Bricks
Glow Bricks Land Rover Defender Lego 42110 installation guide

Black Horse Model
Black Horse Model P47 Thunderbolt Instruction manual book

TILLIG BAHN
TILLIG BAHN H0-ELITE-EKW quick start guide

SAB
SAB Goblin 700 manual