Erzi Baby path User manual
Herstellernachweis bitte aufbewahren!
Aufbau nur durch Erwachsene.
Please keep manufacturers reference.
Assembly by adults only.
51126
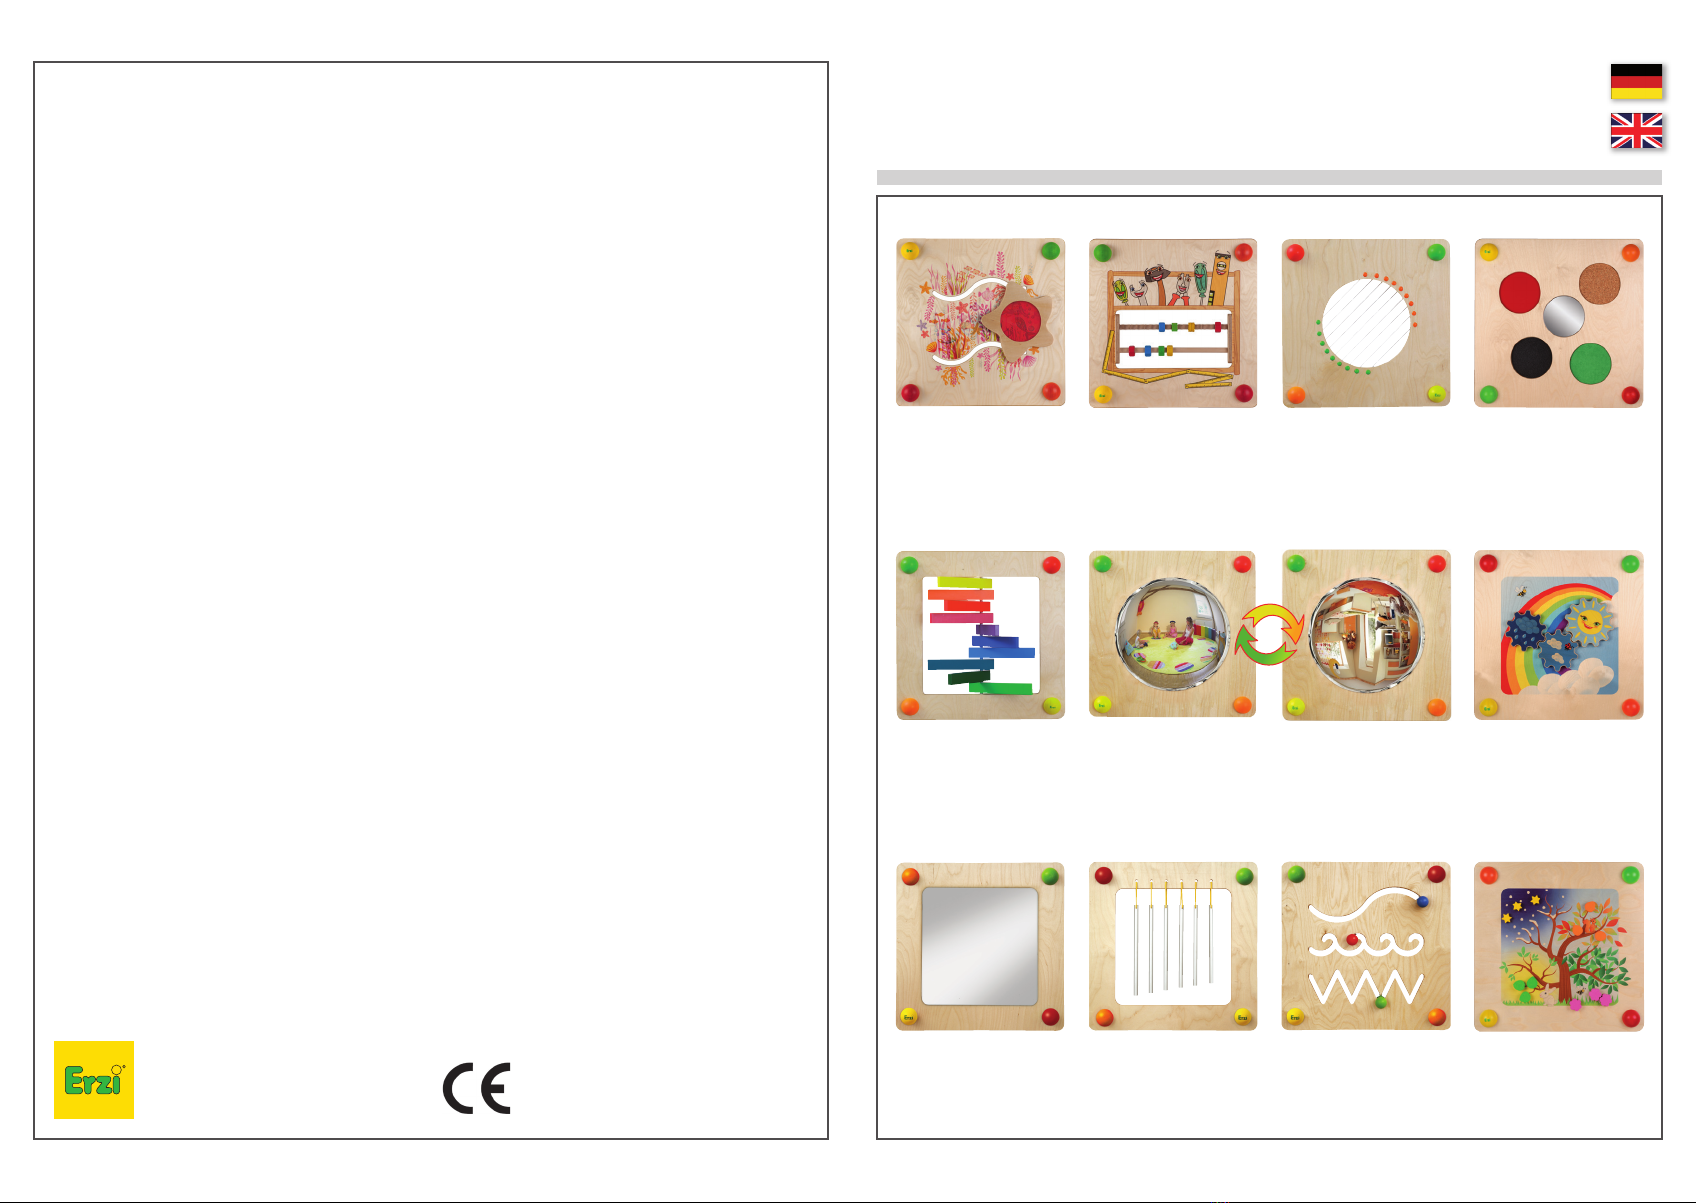
Babypfad Spiegel-Duo
Baby path Mirror duo
51121
Babypfad Farbspiel
Baby path Play of colours
51144
Babypfad Klingklang
Baby path Tinkle
51145
Babypfad Spur
Baby path Track
51119
Babypfad Gitarre
Baby path Guitar
51111
Babypfad Werkzeugkiste
Baby path Tool Kit
51110
Babypfad Unterwasserwelt
Baby path Underwater World
51143
Babypfad Spiegel
Baby path Mirror
51147
Babypfad Jahreszeiten
Baby path Four Seasons
51142
Babypfad Regenbogen
Baby path Rainbow
Erzi®Qualitätsprodukte aus Holz GmbH
Lengefelder Straße 16
09579 Grünhainichen
Germany
www.erzi.de
Assembly instructions: Baby path
Aufbauanleitung: Babypfad
Sicherheitshinweise:
• Aufbau/Anbringung nur durch Erwachsene oder
fachkundiges Personal, da bei unsachgemäßem
Gebrauch Verletzungsgefahr besteht.
• Nur unter Aufsicht verwenden.
• Beschädigtes Spielzeug ist sofort zu entfernen.
Pflegehinweise:
• Verwenden Sie bitte keine Scheuermittel.
• Wischen Sie nur mit einem nebelfeuchten Tuch ab.
• Reiben Sie sofort trocken nach.
• Verwenden Sie für leichte Kratzer eine handelsüb-
liche Möbelpolitur.
• Achten Sie bitte auf umweltfreundliche Reinigungs-
mittel.
Informieren Sie Ihr Raumpflegepersonal über diese
Pflegehinweise.
Wartungshinweise:
• Verschraubungen und Beschläge bitte regelmäßig
auf Festsitz prüfen.
• Regelmäßige Kontrolle auf festen Sitz der
Abdeckkappen (Halbkugeln).
• Eventuell beschädigte Bauteile tauschen.
• Auf Sauberkeit und einwandfreie Funktionalität ist
stets zu achten.
WARNUNG! Bei fehlerhafter Montage können bei
der Benutzung Gefahren entstehen.
Die Montage darf nur durch fachkundiges Personal
durchgeführt werden.
Vor der Montage müssen Sie den Untergrund
(Mauerwerk) auf Tragfähigkeit überprüfen. Das
mitgelieferte/dazugehörige Befestigungsmaterial ist
für Stahlbetonwände oder massiv gemauerte
Wände geeignet. Bei anderen Wänden müssen Sie
entsprechende Dübel und Schrauben verwenden, so
sind für leichtes u. poröses Mauerwerk (z.B.)
Porenbeton o. Hochlochziegel) ggf. Spezialdübel
nötig. Offene Montagelöcher, die nicht zur Befesti-
gung oder Verbindung benötigt werden, müssen mit
den mitgelieferten Verschlusskappen verschlossen
werden.
Safety Advice:
• Assembly / mounting by qualified adult staff only ,
since improper use may cause injury.
• Use only under supervision.
• Remove damaged toys immediately.
Care and Cleaning Instructions:
• Never use abrasive cleaners!
• Only wipe over with a spray-moistened cloth.
• Rub dry immediately afterwards.
• Treat minor scratches with a commercial furniture
polish.
• Give preference to environmentally friendly
cleaning products.
Please inform your staff concerning these care and
cleaning instructions.
Maintenance:
• Regularly check tight fit of screws and other
hardware.
• Regularly check tightness of the (hemispheric)
caps.
• Replace any damaged components.
• Make sure the climbing wall is always clean and
works properly.
WARNING! Wrong assembly may put users at risk.
The baby‘s path should only be assembled by
qualified personnel.
Check the stability of the floor before starting
assembly. The supplied mounting hardware is
suitable for walls of reinforced concrete or solid
masonry. On other walls, use appropriate plugs and
screws; light and/or porous masonry (for example,
aerated concrete, vertically perforated bricks) may
require special plugs. Open mounting holes not
required for mounting or connecting must be sealed,
using the supplied caps.
51120
Babypfad Fühlen
Baby path Touch & Feel

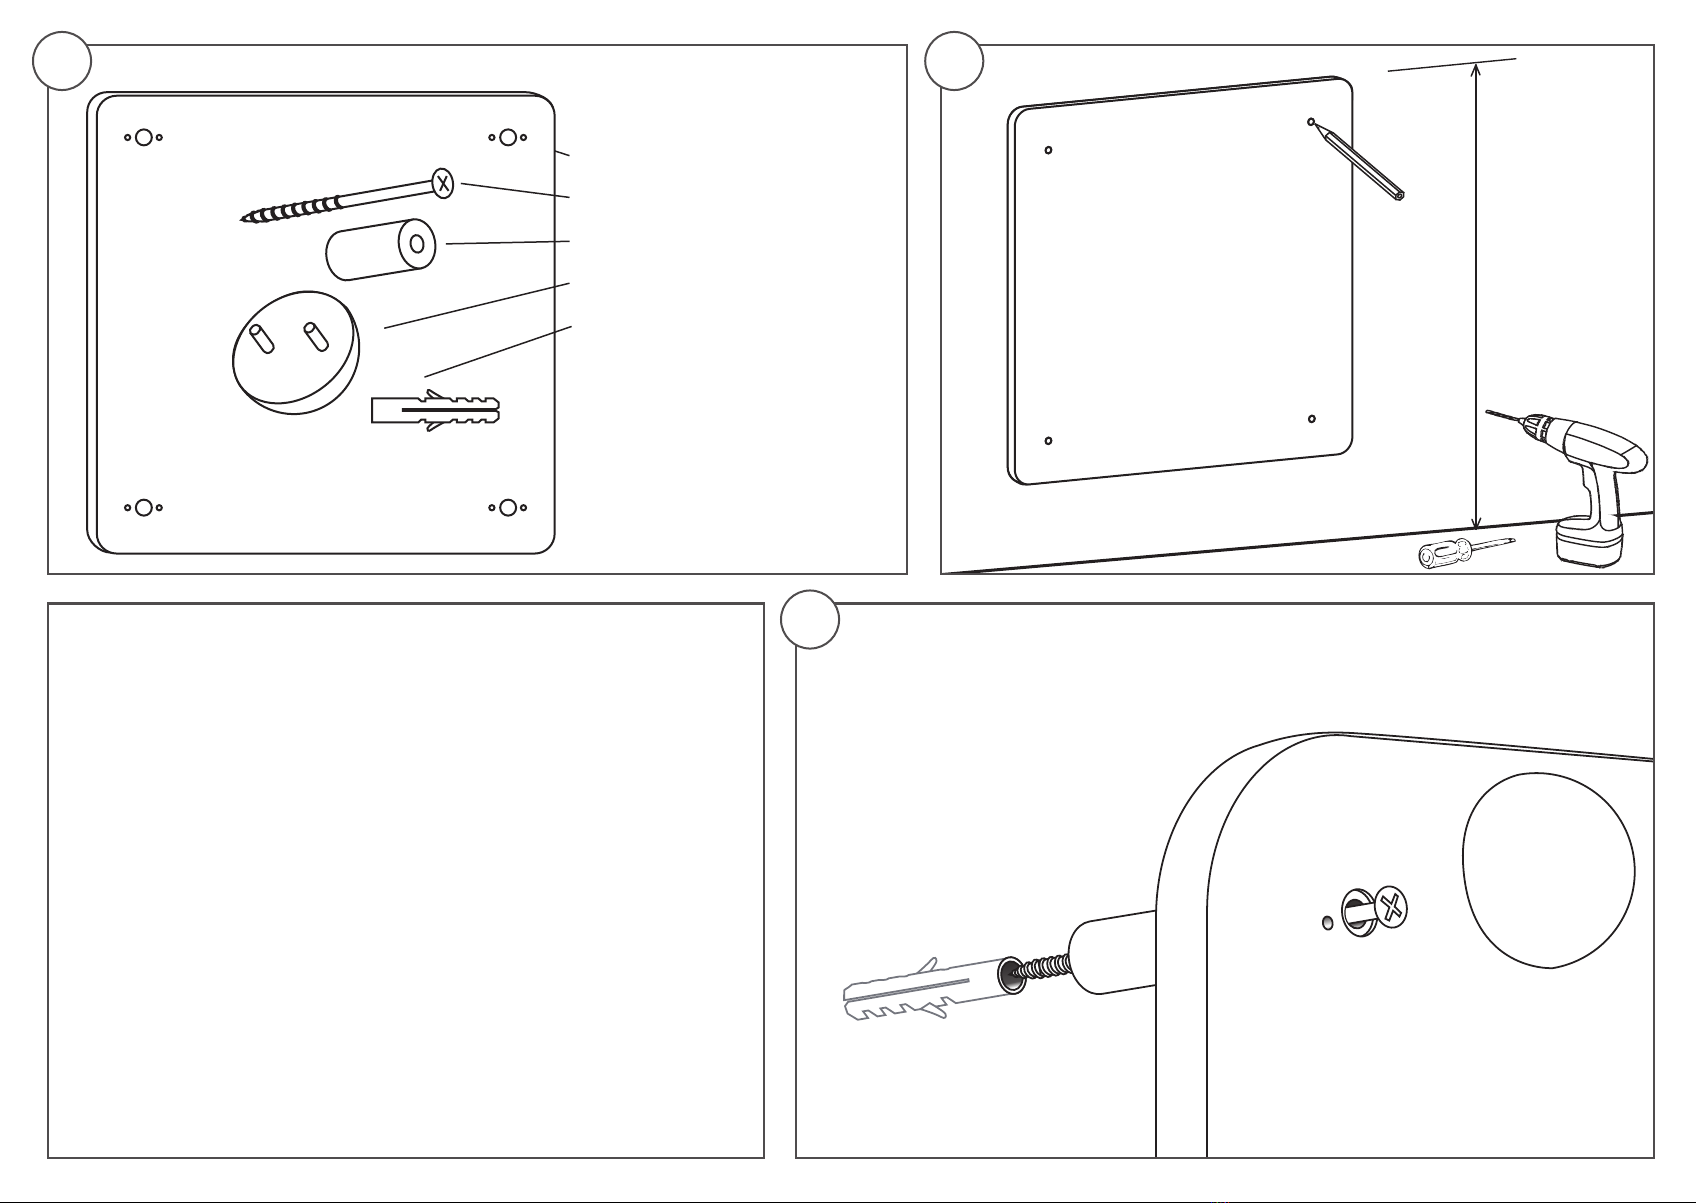
4x Wandabstandshülse
1x Babypfadelement
4x Dübel
4x Spaxschraube
4x Halbkugel als Abdeckkappe
1 2
ca. approx. 80-90 cm
- Legen Sie alle Teile bereit, und kontrollieren Sie deren Vollständigkeit.
- Zeichnen Sie mit Hilfe des Spielelementes die Bohrungen für die Wandbefestigung im Lot an die Wand
(Oberkante Platte ca 80-90cm zum Boden) und bohren Sie ein entsprechendes Loch. Auf feste
Wandbeschaffenheit achten!
- Schlagen Sie die mitgelieferten Dübel in die Wand ein.
- Führen Sie nun einzeln je eine Schraube von vorne durch die beiden oberen Löcher des Babypfades
und stecken Sie dann die Wandabstandshülsen auf.
- So stecken Sie die beiden Schrauben in die vorbereiteten Dübel und fixieren zunächst das Brett mit
Hilfe ein paar Umdrehungen eines Kreuzschlitzschraubendrehers an der Wand.
- Jetzt können Sie unten jeweils die Wandabstandshülse zwischen Platte und Wand halten und dann die
Spaxschraube von vorn durchstecken und mittels eines Kreuzschlitzschraubendrehers festschrauben.
- Ziehen Sie jetzt noch einmal alle Schrauben fest!
- Stecken Sie nun die Halbkugeln als Abdeckkappen auf.
3
4x wall spacer sleeve
1x Baby‘s path element
4x plug
4x Spax screw
4x hemisphere as a cap
- Lay out all parts and check completeness.
- Use play element to draw wall mounting holes plumb on the wall (top board at a distance of about
80-90cm from the floor) and drill a corresponding hole. Make sure the wall is solid!
- Hammer supplied plugs into wall.
- Now insert each screw from the front through both top holes of
baby path and slip on wall spacer sleeves.
- Insert two screws into prepared plug and fix board to the wall first with a couple of revolutions of
Phillips-head screwdriver.
- Now you may hold the wall spacer sleeve between board and wall at the bottom, insert Spax screws
from the front and tighten with Phillips-head screwdriver.
- Once again tighten all screws!
- Now put on the hemispheres as caps.
Conserver l'identification du fabricant.
Seuls des adultes sont en droit de procéder à l’assemblage.
Fabrikantbewijs bewaren a.u.b.
Montage alleen door volwassenen.
51126
L´éveil des sens Miroirs Duo
Babypad Spiegel-duo
51121
L´éveil des sens
Jeu de couleurs
Babypad Kleurenspel
51144
L´éveil des sens
Ding Dong
Babypad Tingtang
51145
L´éveil des sens Trace
Babypad Spoor
51119
L´éveil des sens
Guitare
Babypad Gitaar
51111
L´éveil des sens
Caisse à outils
Babypad Gereedschapskoffer
51110
L´éveil des sens
Monde sous-marin
Babypad Onderwaterwereld
51143
L´éveil des sens Miroir
Babypad Spiegel
51147
L´éveil des sens Saisons
Babypad Seizoenen
51142
L´éveil des sens Arc en ciel
Babypad Regenboog
Erzi®Qualitätsprodukte aus Holz GmbH
Lengefelder Straße 16
09579 Grünhainichen
Germany
www.erzi.de
Opbouwhandleiding: Babypad
Instructions de montage : L´éveil des sens
Consignes de sécurité :
• Montage/fixation réservé aux adultes ou à du
personnel compétent, car risque de blessures en
cas d’utilisation inappropriée.
• Utilisation uniquement sous surveillance.
• Un jouet endommagé est à éliminer immédiatement.
Consignes d’entretien :
• Ne jamais utiliser des détergents.
• Essuyer uniquement avec un linge légèrement
humide et sécher immédiatement avec un linge sec.
• Pour des rayures légères, utiliser un polish pour
meubles du commerce.
• Utiliser des produits nettoyants écologiques.
Informer le personnel chargé de l’entretien de ces
consignes d’entretien.
Consignes d’entretien :
• Vérification régulière de la fixation correcte des
vissages et des armatures.
• Contrôle régulier de la bonne fixation des
capuchons (demi-sphères).
• Remplacement des composants endommagés, le
cas échéant.
• Toujours veiller à la propreté et au fonctionnement
correct.
AVERTISSEMENT ! Un mauvais montage peut
produire des dangers lors de l’utilisation.
Le montage ne doit être effectué que par du
personnel compétent.
Avant le montage, vérifier le support (mur) sur sa
capacité de charge. Le matériel de fixation fourni/cor-
respondant est adapté pour un montage sur des
murs en béton armé ou des murs massifs en pierres.
Pour les autres types de murs, utiliser des chevilles
et vis adaptées ; donc pour des murs légers ou
poreux (par ex. béton cellulaire ou briques perforées)
des chevilles spéciales peuvent s’avérer nécessaires.
Des trous de montage ouverts non utilisés pour la
fixation ou l’assemblage, sont à fermer avec les
capuchons fournis.
Veiligheidsinstructies:
• Opbouw/plaatsing alleen door volwassenen
of vakkundig personeel, omdat er bij een
onvakkundig gebruik letselgevaar bestaat.
• Alleen onder toezicht gebruiken.
• Beschadigd speelgoed dient onmiddellijk
verwijderd te worden.
Verzorgingsinstructies:
• Gelieve geen schuurmiddelen te gebruiken.
• Alleen schoonvegen met een nevelvochtige doek.
Onmiddellijk daarna droogwrijven.
• Gebruik voor lichte krassen een in de handel
verkrijgbaar meubelvernis.
• Gelieve op milieuvriendelijke reinigingsmiddelen te
letten.
Informeer uw schoonmaakpersoneel over deze
verzorgingsinstructies.
Onderhoudsinstructies:
• Gelieve schroefverbindingen en beslag
regelmatig op vaste zitting te controleren.
• Regelmatige controle op vaste zitting van de
afdekkappen (halve bollen).
• Eventueel beschadigde bouwelementen
wisselen.
• Op reinheid en een foutloze functionaliteit
dient steeds gelet te worden.
WAARSCHUWING! Bij een verkeerde montage
kunnen er bij het gebruik gevaren ontstaan.
De montage mag alleen door vakkundig personeel
uitgevoerd worden.
Vóór de montage moet u de ondergrond (metsel-
werk) op draagvermogen controleren. Het bijgelever-
de/bijhorende bevestigingsmateriaal is geschikt voor
wanden van gewapend beton of massief gemetselde
wanden. Bij andere wanden moet u passende
pluggen en schroeven gebruiken, zo zijn er voor licht
en poreus metselwerk (bv. cellenbeton of geperfore-
erde baksteen) eventueel speciale pluggen nodig.
Open montagegaten die niet voor de bevestiging of
verbinding benodigd worden, moeten met de
bijgeleverde afsluitdoppen afgesloten worden.
51120
L´éveil des sens Toucher
Babypad Voelen

4x écarteurs muraux
1x 1 élément L´éveil des sens
4x chevilles
4x vis Spax
4x demi-sphères comme capuchons
1 2
environ ongeveer 80-90 cm
- Préparez toutes les pièces et contrôlez-les sur leur intégralité.
- A l’aide de l’élément de jeu, marquez les perforations pour la fixation murale à l’aplomb sur le mur (bord
supérieur de la plaque env. 80-90 cm par rapport au sol) et percez un trou correspondant. Veillez à la
bonne qualité du mur !
- Enfoncez les chevilles fournies avec un marteau.
- Introduisez alors respectivement une vis par l’avant dans les deux trous supérieurs du parcours de jeu,
puis montez les écarteurs muraux.
- Placez les deux vis dans les chevilles préparées et fixez la planche au mur en effectuant d’abord
quelques rotations avec un tournevis à tête en croix.
- Maintenant, vous pouvez tenir l’écarteur mural du bas entre la plaque et le mur, puis introduire la vis
Spax par l’avant et la visser avec le tournevis à tête en croix.
- Pour terminer, resserrer toutes les vis !
- Emboitez les demi-sphères comme capuchons.
3
4x wandafstandshuls
1x babypadelement
4x plug
4x Spax schroef
4x halve bol als afdekkap
- Leg alle onderdelen klaar en controleer de volledigheid daarvan.
- Teken met behulp van het speelelement de boringen voor de wandbevestiging in het peillood aan de
wand (bovenkant paneel ca. 80-90 cm tot de grond) en boor een passend gat. Let op de stevige
hoedanigheid van de wand!
- Klop de bijgeleverde pluggen in de wand.
- Leid nu afzonderlijk telkens één schroef langs voren door de beide bovenste gaten van het babypad en
steek er dan de wandafstandshulzen op.
- Zo steekt u de beide schroeven in de voorbereide pluggen en bevestigt u eerst de plank met behulp van
een paar omwentelingen van een kruiskopschroevendraaier aan de wand.
- Nu kunt u onderaan telkens de wandafstandshuls tussen paneel en wand houden en dan de Spax
schroef langs voren erdoor steken en door middel van een kruiskopschroevendraaier vastschroeven.
- Draai nu nogmaals alle schroeven stevig aan!
- Steek nu de halve bollen als afdekkappen erop.

Conservare l’attestato del produttore.
Montaggio devono essere effettuati solo da parte di adulti.
¡No es ningún juguete! ¡Aparato de deporte!
El montaje solo puede ser realizado por adultos.
51126
Percorso bambino Specchio-Duo
Camino para bebé Espejo Duo
51121
Percorso bambino
Gioco dei colori
Camino para bebé
Juego de colores
51144
Percorso bambino Carillon
Camino para bebé Tintineo
51145
Percorso bambino Pista
Camino para bebé Rastro
51119
Percorso bambino Chitarra
Camino para bebé Guitarra
51111
Percorso bambino
cassetta degli attrezzi
Camino para bebé
caja de herramientas
51110
Percorso bambino
mondo sottomarino
Camino para bebé
El mundo submarino
51143
Percorso bambino Specchio
Camino para bebé Espejo
51147
Percorso bambino
Le quattro stagioni
Camino para bebé
Cuatro Estaciones
51142
Percorso bambino Arcobaleno
Camino para bebé Arcoíris
Erzi®Qualitätsprodukte aus Holz GmbH
Lengefelder Straße 16
09579 Grünhainichen
Germany
www.erzi.de
Manual de montaje: Camino para bebé
Istruzioni di montaggio: Percorso bambino
Indicazioni di sicurezza:
• Il montaggio/fissaggio deve essere effettuato solo
da parte di adulti o personale qualificato, perché
esiste il rischio di lesioni in caso di uso inadeguato!
• Usare solo sotto la supervisione di adulti!
• I giocattoli danneggiati devono essere rimossi
immediatamente.
Istruzioni per la cura:
• Si prega di non usare abrasivi.
• Pulire solo con un panno umido. Asciugare subito
dopo.
• Utilizzare un lucido per mobili disponibile sul
mercato per graffi leggeri
• Si prega di prestare attenzione ai detergenti
ecocompatibili.
Informare il personale addetto alle pulizie in merito a
queste istruzioni per la cura.
Prescrizioni per la manutenzione:
• Controllare periodicamente la tenuta dei collega-
menti a vite e dei raccordi.
• Controllare regolarmente il buon fissaggio dei tappi
(emisferi).
• Sostituire eventuali componenti danneggiati.
• Prestare sempre la massima attenzione alla pulizia
e alla funzionalità perfetta.
ATTENZIONE! Un'installazione errata può comport-
are rischi durante l'uso.
Il montaggio deve essere effettuato solo da
personale qualificato.
Prima del montaggio si deve controllare la capacità
portante del supporto (muratura). Il materiale di
fissaggio fornito è adatto per pareti in cemento
armato o per pareti murate in modo massiccio. Per
altre pareti, ad esempio per la muratura leggera o
porosa (come calcestruzzo alveolare o mattoni forati
trasversalmente), se necessario, si devono utilizzare
tasselli e viti adeguati.
I fori di montaggio aperti, non necessari per il
montaggio o il collegamento, devono essere chiusi
con i tappi forniti.
Indicaciones de seguridad:
• El montaje/colocación solo puede ser realizado por
adultos o personal especializado, ya que existe
peligro de lesión por un uso inadecuado.
• Utilizar solo bajo supervisión.
• Quitar de inmediato el juguete dañado.
Indicaciones de cuidado:
• No utilice productos abrasivos.
• Limpie solo con un paño humedecido. Seque de
inmediato.
• Utilice un pulidor de muebles convencional para los
pequeños arañazos.
• Utilice productos de limpieza respetuosos con el
medio ambiente.
Informe al personal de limpieza sobre estas
indicaciones de cuidado.
Indicaciones de mantenimiento:
• Comprobar el firme asiento de las uniones
roscadas y los herrajes.
• Controlar periódicamente el firme asiento de las
tapas (semiesferas).
• Cambiar los componentes que puedan estar
dañados.
• Prestar especial atención a la limpieza y al
funcionamiento correcto.
¡ADVERTENCIA! Un montaje inadecuado puede
poner en riesgo al usuario.
El montaje solo puede ser realizado por personal
calificado.
Antes del montaje debe comprobar la capacidad de
carga de la superficie (muro). El material de fijación
suministrado/correspondiente es apropiado para
paredes de hormigón armado o paredes macizas de
mampostería. Para cualquier otra pared, debe utilizar
los tacos y tornillos correspondientes; los muros
porosos y ligeros (p. ej. hormigón celular o ladrillos
con perforaciones verticales) requieren tacos
especiales. Los agujeros de montaje abiertos, que no
se requieran para fijar o conectar, deben cubrirse con
los tapones suministrados.
51120
Percorso bambino
Toccare e sentire
Camino para bebé Palpar
4x distanziatori da parete
1x elemento percorso bambino
4x tasselli
4x viti Spax
4x emisferi come tappi
1 2
ca. aprox. 80-90 cm
- Preparare tutte le parti e controllare la loro completezza.
- Con l’aiuto dell’elemento di gioco, tracciare a piombo i fori per il fissaggio sulla parete (bordo superiore
della piastra a circa 80-90cm dal pavimento) e praticare un foro adeguato. Badare che la struttura della
parete sia solida!
- Inserire i tasselli forniti nella parete.
- Ora introdurre individualmente una vite alla volta dalla parte anteriore attraverso i due fori superiori del
percorso per bambini e di seguito collocare i distanziatori da parete.
- Inserire le due viti nei tasselli preparati e fissare la piastra alla parete effettuando innanzitutto alcuni giri
con l'aiuto di un cacciavite per viti con intaglio a croce.
- Ora si può tenere il rispettivo distanziatore da parete tra la piastra e la parete nella parte inferiore, quindi
passare la vite Spax dalla parte anteriore e avvitarla utilizzando un cacciavite per viti con intaglio a croce.
- Stringere ora nuovamente tutte le viti!
- Montare adesso gli emisferi come tappi.
3
4x Espaciador de pared
1x Elemento camino para bebé
4x Tacos
4x Tornillos Spax
4x Semiesferas como tapas
- Prepare todas las piezas y compruebe que no falta ninguna.
- Dibuje con ayuda del elemento de juego los orificios para la fijación en la pared, de modo que quede a
plomo (placa borde superior a una distancia aprox. 80-90cm del suelo) y realice el agujero correspon-
diente. ¡Tener en cuenta la calidad de la pared!
- Introduzca los tacos suministrados en la pared.
- Inserte ahora un tornillo por la parte frontal en cada uno de los dos agujeros superiores del camino para
bebé y coloque luego los espaciadores de pared.
- Inserte los dos tornillos en los tacos preparados para ello y fije primero la tabla a la pared realizando un
par de giros con el destornillador en cruz.
- Ahora puede sujetar en la parte inferior los espaciadores entre la placa y la pared, y, luego, hacer pasar
los tornillos Spax por delante y apretar bien con un destornillador en cruz.
- ¡Vuelva a apretar bien todos los tornillos!
- Coloque ahora las semiesferas como tapas.
This manual suits for next models
11
Other Erzi Toy manuals


Popular Toy manuals by other brands

Trends UK
Trends UK The Adventures of Paddington instruction manual

Mr. Christmas
Mr. Christmas Gold Label ANNIVERSARY CAROUSEL manual

Smoby
Smoby 99511791F quick start guide

Mega Bloks
Mega Bloks HELLO KITTY 10931 manual

Radica Games
Radica Games 20Q P6624 instruction manual

TOMAHAWK SPORT
TOMAHAWK SPORT FOX 21100 instruction manual


LeapFrog
LeapFrog My Own LEARNING LEAP 20047 Parent Guide and Instructions

Extreme Flight
Extreme Flight Edge 540T EXTREME FLIGHT 88 instruction manual

RC GROUP
RC GROUP Flaglor Sky Scooter Build guide

Eduard
Eduard Panzer IV Ausf. H schurzen Assembly instructions

Hirobo
Hirobo SUPERCOBRA AW-1W instruction manual

Multiplex
Multiplex ROXXY Roxxoo 35WP operating instructions