ES manufacturing G9601L2.5 User manual
G960-2.5 w/2 liter High Pressure Spray Gun
Pistola de alta Presión (G9602L2.5)
Includes:
1 G960 Spray Gun w/ 2.5mm Nozzle
1 PT20 2 Liter Pressure Tank
1 AH15 Orange Air Hose 1.5m
1 MH15 Blacke Material Hose 1.5mm
1 PT20-012 Plated Steel Handle w/Nut
1 PT20-005 Tank Lid Seal (EP)
1 Tool Kit, (Stamped Wrench & Hex Key)
Safety Warnings & Precautions:
1. Keep work area clean.
2. Keep children away from this equipment and your work area.
3. Do not operate this equipment under the influence of alcohol or drugs.
4. Do not operate this equipment near open flames or other heat sources.
5. Read all safety information for material to be sprayed.
6. Read all safety information for cleaning materials to be used.
7. Check all seals before connectiing to air supply. Make sure lid is fully attached to the cup,
retaining is screwed past the first thread, air pressure plug is fully tightened and air supply is
sealed and firmly attached.
8. Use eye protection at all times.
9. Wear properly fitting protective clothing at all times.
10. Replace any component that looks warn or damaged immediately.
11. Use only approved ES Manufacturing components.
12. Follow all company saftey policies, and contact your supervisor with any questions.
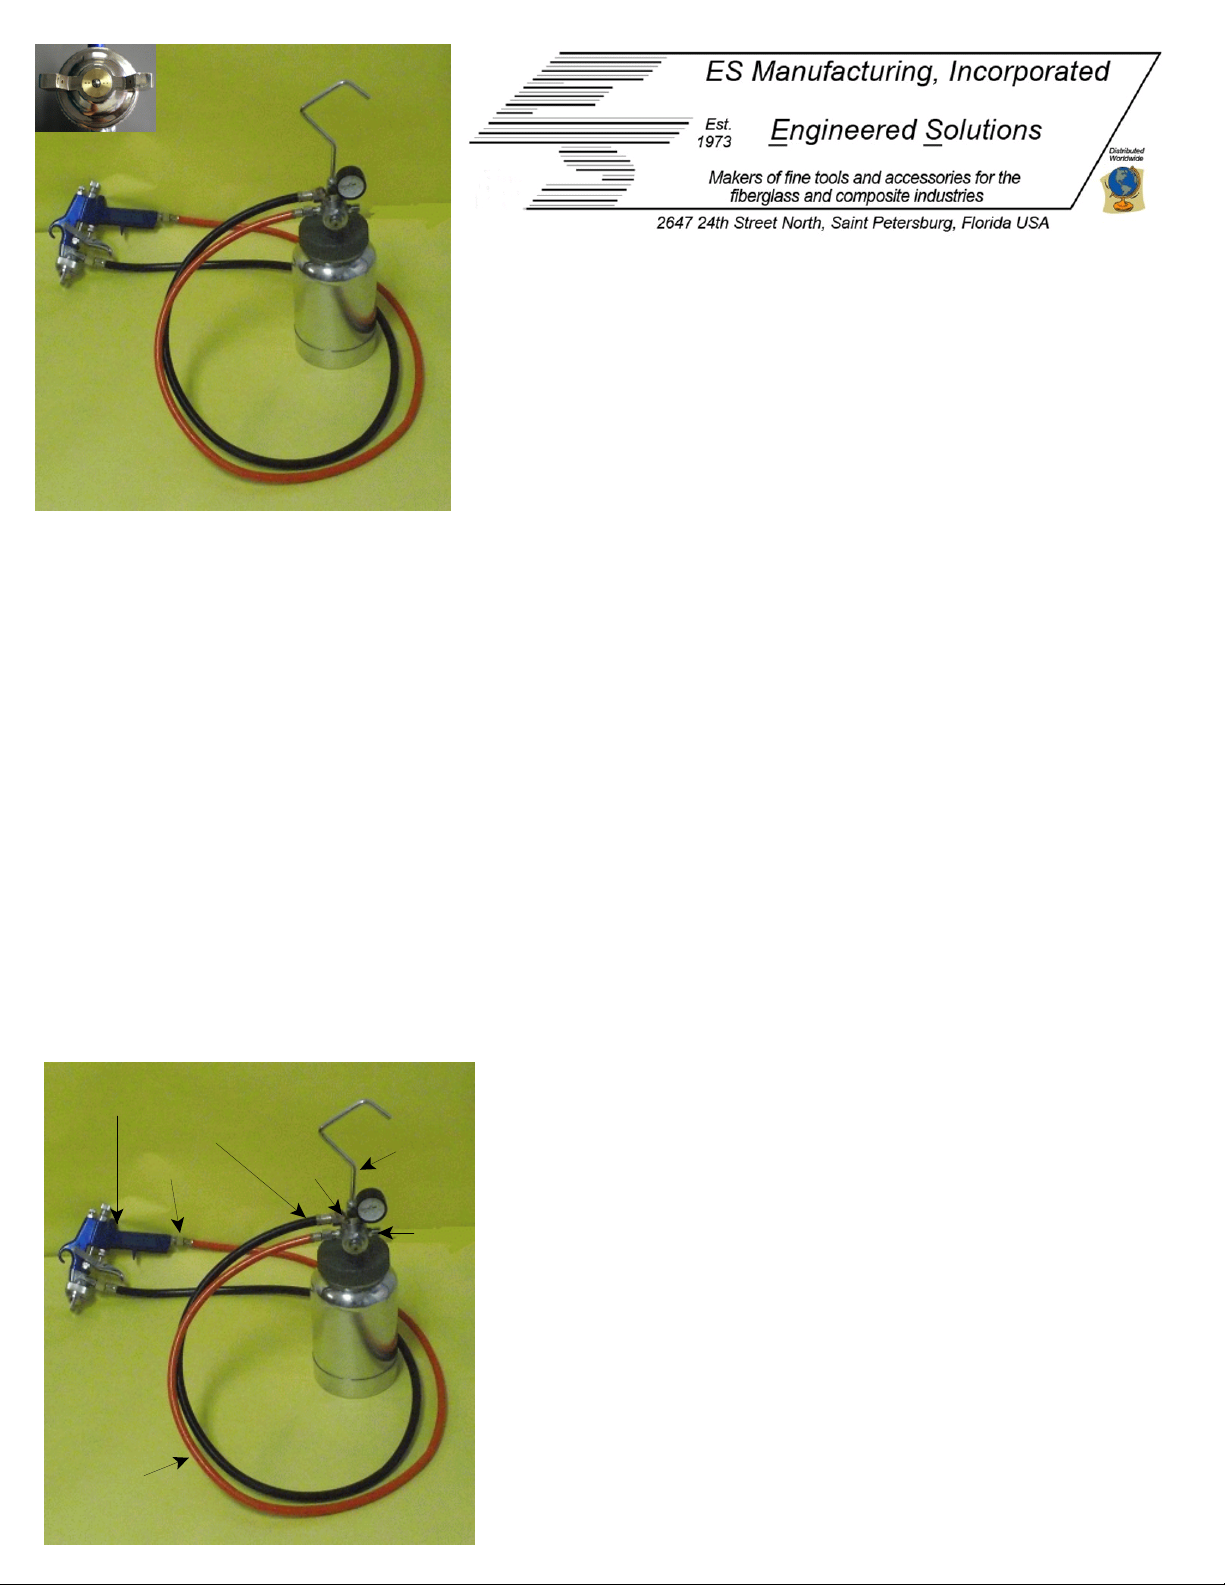
Air
Connection
G960 Spray Gun
w/2.5mm Nozzle PT20
MH15
PT20
AH15
Air
Inlet
PT20
012
Assembly
Reference Figure 1
1. Connect black material hose (PT20-MH15) to the
material outlet as shown, using the supplied wrench.
2. Connect the other end of the black hose to the both of
the G960 spray gun head, just below the air cap, using
the supplied wrench.
3. Connect the orange air hose (PT20-AH15) toe the air
connection point on the regulator assembly as shown.
4. Connect the other end of the orange hose to the bottom
of the G960 spray gun, at the bottom of the handle as
shown. Using teflon sealing tape on these connection
will reduce the chance for air leaks.
Material
Outlet
Figure 1

Assembly
Reference Figure 2
1. Connect plated steel handle (PT20-012) to the
top of the centerpost assemble as seen is Figure 1.
2. Lock the supplied plated steel hex nut (PT20-013) to
secure steel handle
3. Close the air adjustment cap on the regulator assembly
by turning it clockwise.
4. Connect the air hose from your compressor to the air
connection point using a 1/4" NPT coupling and a
minimum 3/8" hose barb. It is not recommended to use
“quick-connect” style fittings, as they will restrict air flow to
the tank & gun.
5. Regulate air source to approximately 50 P.S.I.
PT20-013
PT20-012
Air
Adjustment
Cap
Coupling /
Hose Nipple
(Sold Seperately
)
Figure 2
Operation
Reference Figure 3
1. Unscrew and remove tank cover assembly from the
aluminum cup.
2. Premix gel coat or resin in cup per manufacturers
instructions. Bag liner is optional.
3. Close the air adjustment cap on the regulator assembly
by turning it clockwise.
4. Fill cup to 3/4 full mark shown in Figure 4.
5. Lower and assemble tank cover to aluminum cup.
6. Set compressors regulator to the correct setting.
7. Connect the regulators iar connection to the your air
source hose. Inspect for leaks and re-seal if neccessary.
Figure 3
Tank Cover
Assembly
2 Liter
Aluminum
Cup
Caution:
When the cup contains material, always keep the spray gun upright. This will keep material
from conaminating portions of the spray gun it was not intended to go. Never leave catalyzed
gel coat or resin to remain in the aluminum cup.
Caution:
For thorough cleaning, the cup may be fully immeersed in solvent. Do not leave the cup in
solvent for more than 24 hours. Never immerse your spray gun in solvent. When cleaning, only
brush solvent onto exterior parts only.

100%
50%
8
"
For Most uses, e.g. painting walls benches.
Wehicles. Etc., the best results are obtained by
spraying thin, even coats of paint. Let the layers
dry in between coats.
As with any manual process, practice leads to
perfection. Th followint are a few general rules
that may be of help in perfecting your process:
* Use the lowest pressure setting recomended
by the paint manufacturer.
*Keep the gun perpendicular.
*Maintain a distance of about 8" from the work
ad shown in Figure 6.
*Make smooth, thin and even strokes across the
work. Overlap each stroke by about 50%. (See
Figure 7)
*Let each coat dry before re-coating.
Spraying Techniques
Figure7-Overlapping strokes
Figure 6-Distance from wall
Maintenance
General Maintenance:
Checking & Replacing the Needle
Needle wear is expected and inspection during cleaning will ensure the
continued top performance of your Air Paint Sprayer. If needle tip wear is
noted:
Step 1. Unscrew and remove the adjusting Screw
Step 2. Using a Pair of pliers or other suitable device, carefully pull and twist
the Needle until it has been removed.
Step 3. Purchase an identical replacement Needle from ESMFG.
Step 4. By hand, carefully insert the Needle into the Housing and push until the
tip has exited the hole in the NK Air Cap nozzle.
Step 5. Insert the Needle and insert it into the Housing.
Step 6. Replace the adjusting Screw and readjust its settings to the position it
was in before removed (refer to Step 1).
Caution:
Always keep the Cove (g960001)
tight when connected to air source

Cleaning:
Step 1. Depressurize the Cup (g960001) and disconnected the house.
Step 2. Remove the Cover Assembly from the Cup as Described in OPERATION.
Step 3. Empty the paint or coating from the Cup.Dipose of properly.
Step 4. Pour a small amount of clean solvent ( as Specified by the paint
manufacturer) in the Cup. See Saftey Warnings and Caustions #5.
Step 5. Place the Cover Assembly into the Cup and tighten until the assembly is
sealed.
Step 6. Reconnect the air hose to the Regulator and pressurize the cup.
Step 7. Clean the Air Paint Sprayer by Shaking continuously and spraying the solvent
though the gun.
Step 8. Repeat steps 1 through 7 until the sprayed solvent appears clean and clear.
Step 9. After depressurizing disconnect the regulator from the air supply.
Step 10.Remove the Cover Assembly From the Cup and dispose of the surplus
solvent.
Step 11. Wipe the Cup clean with a dry, lint-free cloth.
Warning:
Always dispose of paints, coating and other chemicals in a proper and
responsible fashion. If you have questions regarding the propper disposal of any
chemical, contact the chemical manufacturer for instructions.
Caution:
For thorough cleaning, the CUP may be fully immersed in solvent. DO
NOT LEAVE SOLVENT FOR MORE THAN 24HOURS as damage may occur.
NEVER IMMERSE THE AIR PAINT SPRAYER IN SOLVENT. When cleaning,
brush solvent onto extiorior parts only.

Lubrication:
Before and after each use of a G960-2L, perform the following lubrication process,
using a non-silicon, spray gun lubricant:
Step 1. Put 2 or 3 drops of lubircant on the Part of NK, infront of the
Trigger(g960015). Tip the gun backward and allow the lubricant to drip into the front
of the gun housing.
Step 2. Put 2 or 3 drops of lubircant on the Air Valve (g960024). Tip the gun
backward and allow the lubricant to drip into the front of the gun housing.
Step 3. Put 2 or 3 drops of lubircant on the Fan Adjuster(g960014). Tip the gun
backward and allow the lubricant to drip into the front of the gun housing.
Step 4. Put 1 drops of lubercant on the Trigger Stud (g960016) and another on the
Trigger Screw (g960017). Work the Trigger to allow the lubricant to coat the parts.
Step 6. Put 1 drops of lubercant on the regulator Adjusting Cap(g960009). Tip it
sideways and allow the lubricant to drip into the Air Cap.
Step 1 Step 4
Step 5
Step 2
Figure 8 - Lubricating the G960-2L
Step 3

.
www.esmfg.com
ES Manufacturing, Inc.
PO Box 11692
St. Petersburg, FL 33733-1692
USA
Fold Here G9601L2.5 G9602L2.5 G9609L2.5
______________________________________________________________________
Date of Purchase____/____/_____
Your email address______________________________________________________
Your Company’s Name __________________________________________________
Mailing Address __________________________________________________
__________________________________________________
City / State / Postal Code__________________________________________________
Phone #___________________________ Fax #_______________________________
Web Site__________________________ Email _______________________________
Primary Lines of Business_________________________________________________
_________________________________________________
How many employees at this location 1-10 11-20 21-100 100 or more
Primary use for this Spray Gun (Circle one) Gelcoat Resin
If “Other” please describe: ________________________________________________
Is this your first G960 Gun? Yes No
Is this your first ES Mfg. product? Yes No
Name of distributor this unit was purchased ___________________________________
What was your purchase price?_ ___________________________________________
Did you purchase additional nozzles? Yes No
If so what size? ________________________________________________________
Which was more important to your purchase? Simplicity Effectiveness Price
Would you like us to send you a free catalog? Yes No
Comments_____________________________________________________________
______________________________________________________________________
______________________________________________________________________
______________________________________________________________________
Important Notice: You should copy this sheet and keep it and your original sales
receipt. Return this form with a copy of your sales invoice. Failing to return this form
will void your warranty.
Note: Visit our website for duplicate copies of parts diagrams or instructions.
This manual suits for next models
2
Table of contents
Other ES manufacturing Paint Sprayer manuals


Popular Paint Sprayer manuals by other brands

Multi-Clean
Multi-Clean E-Spray Hand Held quick start guide

Collomix
Collomix VIBA X.30 instructions

POLINS
POLINS GARDEN PRO 12 Original instructions

Nordson
Nordson Encore HD Customer product manual

CountyLine
CountyLine TS30G-CL Operation instructions manual & user guide

California Air Tools
California Air Tools CAT-33000 owner's manual


