Esoteric Esoteric G-03X User manual
D00980458A
Master Clock Generator
OWNER’S MANUAL
2
CAUTION
<DO NOT REMOVE THE EXTERNAL CASES OR CABINETS TO
EXPOSE THE ELECTRONICS. NO USER SERVICEABLE PARTS
ARE WITHIN!
<IF YOU ARE EXPERIENCING PROBLEMS WITH THIS PRODUCT,
CONTACT TEAC FOR A SERVICE REFERRAL. DO NOT USE THE
PRODUCT UNTIL IT HAS BEEN REPAIRED.
WARNING: TO PREVENT FIRE OR SHOCK
HAZARD, DO NOT EXPOSE THIS APPLIANCE
TO RAIN OR MOISTURE.
IMPORTANT SAFETY INSTRUCTIONS
1) Read these instructions.
2) Keep these instructions.
3) Heed all warnings.
4) Follow all instructions.
5) Do not use this apparatus near water.
6) Clean only with dry cloth.
7) Do not block any ventilation openings. Install in accordance
with the manufacturer’s instructions.
8) Do not install near any heat sources such as radiators, heat
registers, stoves, or other apparatus (including amplifiers) that
produce heat.
9) Do not defeat the safety purpose of the polarized or
grounding-type plug. A polarized plug has two blades with
one wider than the other. A grounding type plug has two
blades and a third grounding prong. The wide blade or the
third prong are provided for your safety. If the provided plug
does not fit into your outlet, consult an electrician for
replacement of the obsolete outlet.
10) Protect the power cord from being walked on or pinched
particularly at plugs, convenience receptacles, and the point
where they exit from the apparatus.
11) Only use attachments/accessories specified by the
manufacturer.
12) Use only with the cart, stand, tripod,
bracket, or table specified by the
manufacturer, or sold with the apparatus.
When a cart is used, use caution when
moving the cart/apparatus combination to
avoid injury from tip-over.
13) Unplug this apparatus during lightning storms or when
unused for long periods of time.
14) Refer all servicing to qualified service personnel. Servicing is
required when the apparatus has been damaged in any way,
such as power-supply cord or plug is damaged, liquid has
been spilled or objects have fallen into the apparatus, the
apparatus has been exposed to rain or moisture, does not
operate normally, or has been dropped.
CAUTION: TO REDUCE THE RISK OF ELECTRIC SHOCK,
DO NOT REMOVE COVER (OR BACK). NO USER-
SERVICEABLE PARTS INSIDE. REFER SERVICING TO
QUALIFIED SERVICE PERSONNEL.
The lightning flash with arrowhead symbol, within an
equilateral triangle, is intended to alert the user to the
presence of uninsulated “dangerous voltage” within
the product’s enclosure that may be of sufficient
magnitude to constitute a risk of electric shock to
persons.
The exclamation point within an equilateral triangle is
intended to alert the user to the presence of important
operating and maintenance (servicing) instructions in
the literature accompanying the appliance.
<Do not expose this apparatus to drips or splashes.
<Do not place any objects filled with liquids, such as vases, on
the apparatus.
<Do not install this apparatus in a confined space such as a
book case or similar unit.
<The apparatus draws nominal non-operating power from the
AC outlet with its STANDBY/ON switch in the standby
position.
<The apparatus should be located close enough to the AC
outlet so that you can easily grasp the power cord plug at any
time.
<An apparatus with Class
!
construction shall be connected to
an AC outlet with a protective grounding connection.
<Batteries (battery pack or batteries installed) shall not be
exposed to excessive heat such as sunshine, fire or the like.
<Excessive sound pressure from earphones and headphones
can cause hearing loss.
3
Contents
This equipment has been tested and found to comply with the
limits for a Class B digital device, pursuant to Part 15 of the
FCC Rules. These limits are designed to provide reasonable
protection against harmful interference in a residential
installation. This equipment generates, uses, and can radiate
radio frequency energy and, if not installed and used in
accordance with the instructions, may cause harmful
interference to radio communications. However, there is no
guarantee that interference will not occur in a particular
installation. If this equipment does cause harmful interference
to radio or television reception, which can be determined by
turning the equipment off and on, the user is encouraged to
try to correct the interference by one or more of the following
measures:
• Reorient or relocate the equipment and/or the receiving
antenna.
• Increase the separation between the equipment and
receiver.
•Connect the equipment into an outlet on a circuit different
from that to which the receiver is connected.
•Consult the dealer or an experienced radio/TV technician
for help.
CAUTION
Changes or modifications to this equipments not expressly
approved by TEAC CORPORATION for compliance will void the
user’s warranty.
For U.S.A.
For European customers
Disposal of your old appliance
1. When this crossed-out wheeled bin symbol is
attached to a product it means the product is
covered by the European Directive
2002/96/EC.
2. All electrical and electronic products should be disposed of
separately from the municipal waste stream via designated
collection facilities appointed by the government or the
local authorities.
3. The correct disposal of your old appliance will help prevent
potential negative consequences for the environment and
human health.
4. For more detailed information about disposal of your old
appliance, please contact your city office, waste disposal
service or the shop where you purchased the product.
Thank you for choosing Esoteric. Read this manual
carefully to get the best performance from this unit.
Contents. . . . . . . . . . . . . . . . . . . . . . . . . . . . . . . . . . . . . . . . . . 3
Features . . . . . . . . . . . . . . . . . . . . . . . . . . . . . . . . . . . . . . . . . . 4
Before Use . . . . . . . . . . . . . . . . . . . . . . . . . . . . . . . . . . . . . . . . 4
Identifying the Parts . . . . . . . . . . . . . . . . . . . . . . . . . . . . . . . . . 5
Connection. . . . . . . . . . . . . . . . . . . . . . . . . . . . . . . . . . . . . . . . 6
Basic Operation. . . . . . . . . . . . . . . . . . . . . . . . . . . . . . . . . . . . . 8
Dimmer . . . . . . . . . . . . . . . . . . . . . . . . . . . . . . . . . . . . . . . . . . 9
Specifications . . . . . . . . . . . . . . . . . . . . . . . . . . . . . . . . . . . . . 10
Troubleshooting . . . . . . . . . . . . . . . . . . . . . . . . . . . . . . . . . . . 10

4
Features
Clock Generation by High-Precision Crystal
Oscillator
The G-03X uses an internal high-precision crystal oscillator to
generate a word sync clock.
Equipped with OCXO
The master clock serving as the reference for this unit is
equipped with an oven-controlled crystal oscillator (OCXO)
offering superior temperature stability. This OCXO contains a
built-in crystal unit and oscillation circuit in an internal
temperature- controlled, compact constant-temperature bath,
resulting in the realization of an extremely high degree of
frequency stability (within ±0.1 ppm at –20°C to 70°C). The
central frequency when shipped from the factory is within
±0.1 ppm.
Up to 192 kHz Word Sync clock production
The G-03X can output following word clocks (sync signals):
44.1 kHz, 88.2 kHz, 176.4 kHz,
48 kHz, 96 kHz, 192 kHz,
Universal clock (100 kHz)
As an additional plus, the output circuitry consists of 3
separate channels with a total of 6 output terminals, thus
offering the capability of handling a variety of audio
equipment controlled by different word clocks. Also, each of
the 3 output channels is switch-selectable between 1xFs, 2xFs
and 4xFs, so you can, for example, get an 88.2 kHz and a
176.4 kHz machine synchronized by connecting them to the
single G-03X.
Universal Clock Output
A universal clock output (100 kHz) has been provided for
Esoteric’s original format. Connection with a universal clock-
compatible device makes it possible to support various
frequency sources.
Ready for connection to external oscillators
Clocks can also be generated by inputting an external 10
MHz reference signal. This system can be further upgraded by
connecting, for example, a rubidium oscillator or an ultra-
high-precision cesium atomic oscillator.
User-Friendly Front Panel for Easy Operation
All functions can be easily controlled simply by pressing a
button located on the front panel, and operating status can
be confirmed at a glance from the highly legible display unit.
Before Use
Read this before operation
<Be careful to avoid injury when moving the unit, on account
of its weight. Get someone to help you if necessary.
<To protect easily scratched furniture, you may stick the felt
supplied with the unit to the feet.
<As the unit may become warm during operation, always leave
sufficient space around the unit for ventilation.
<The voltage supplied to the unit should match the voltage as
printed on the rear panel. If you are in any doubt regarding
this matter, consult an electrician.
<Choose the installation location of your unit carefully. Avoid
placing it in direct sunlight or close to a source of heat. Also
avoid locations subject to vibrations and excessive dust, heat,
cold or moisture.
<Do not place the unit on the amplifier/receiver.
<Do not open the cabinet as this might result in damage to the
circuitry or electrical shock. If a foreign object should get into
the unit, contact your dealer or service company.
<When removing the power plug from the wall outlet, always
pull directly on the plug, never yank the cord.
<Do not attempt to clean the unit with chemical solvents as
this might damage the finish. Use a clean, dry cloth.
<Keep this manual in a safe place for future reference.
Maintenance
If the surface of the unit gets dirty, wipe with a soft cloth or
use diluted neutral cleaning liquid. Be sure to remove any
fluid completely. Do not use thinner, benzine (naphtha) or
alcohol as they may damage the surface of the unit.
5
A B C
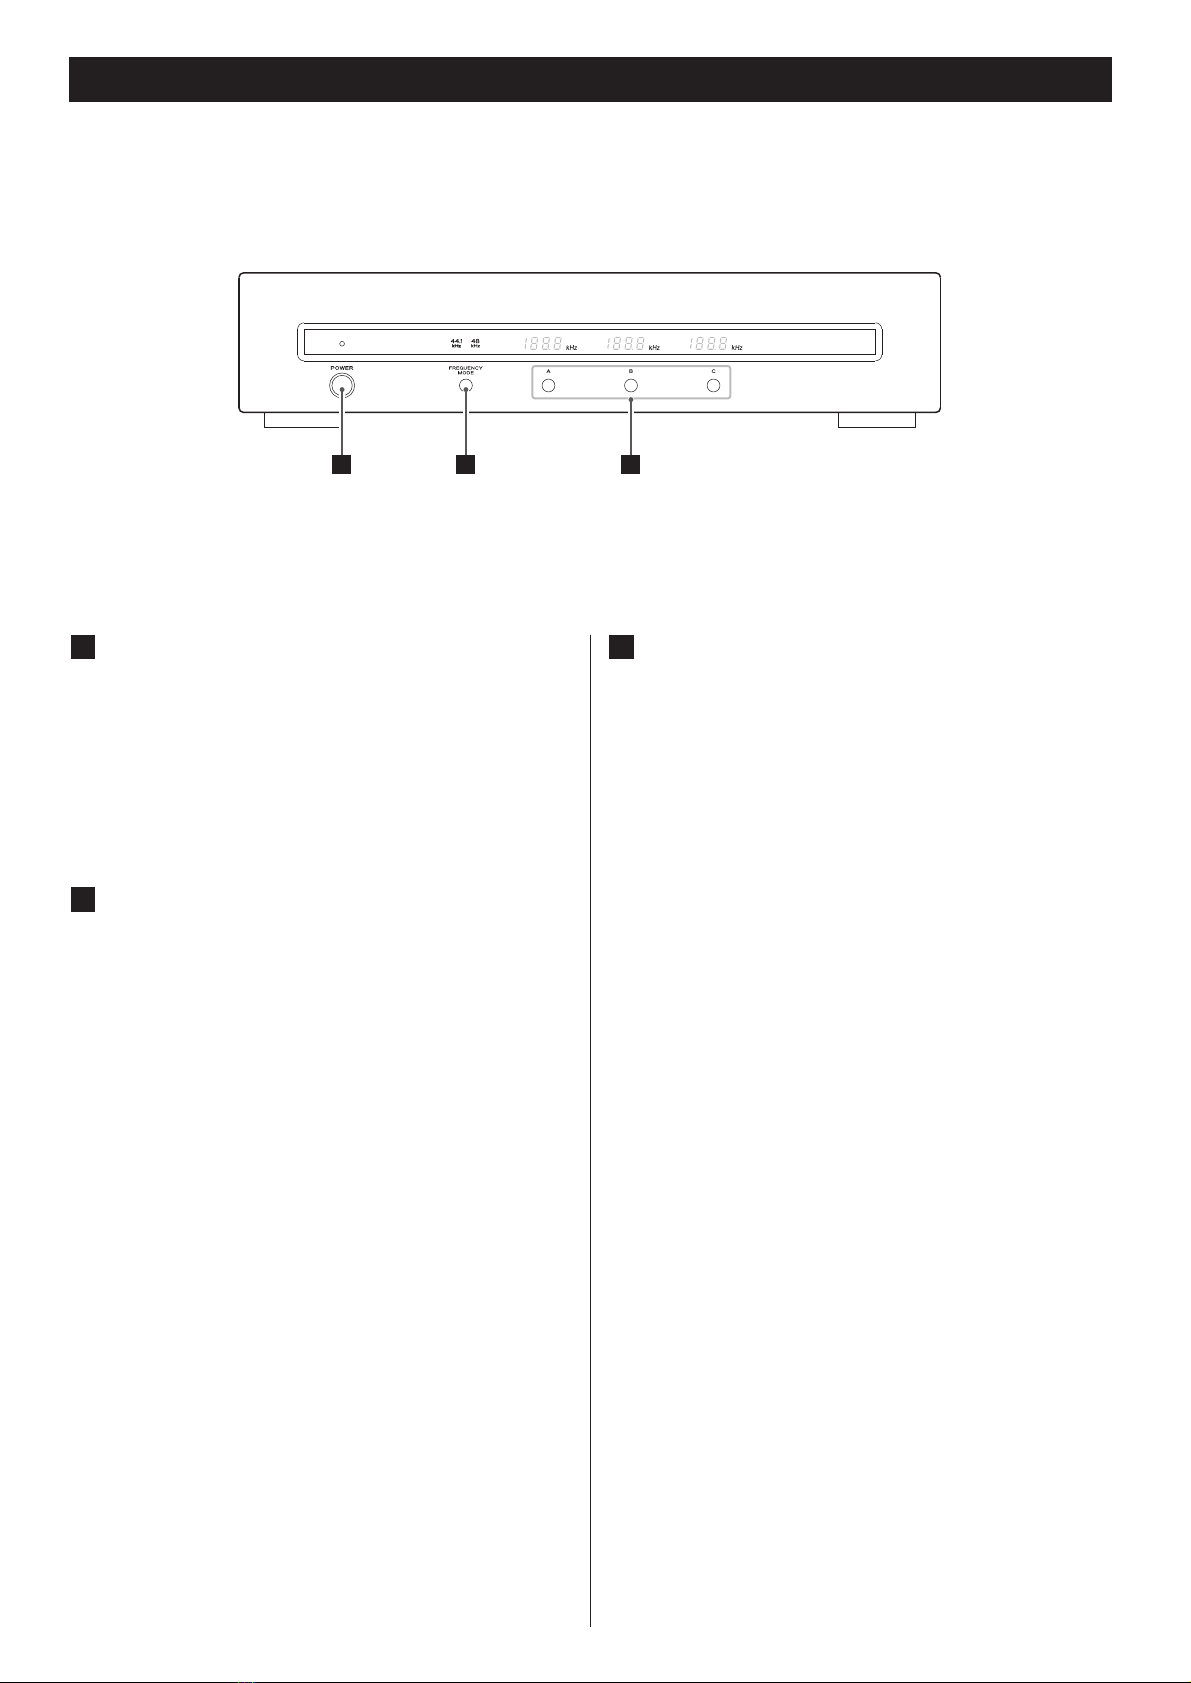
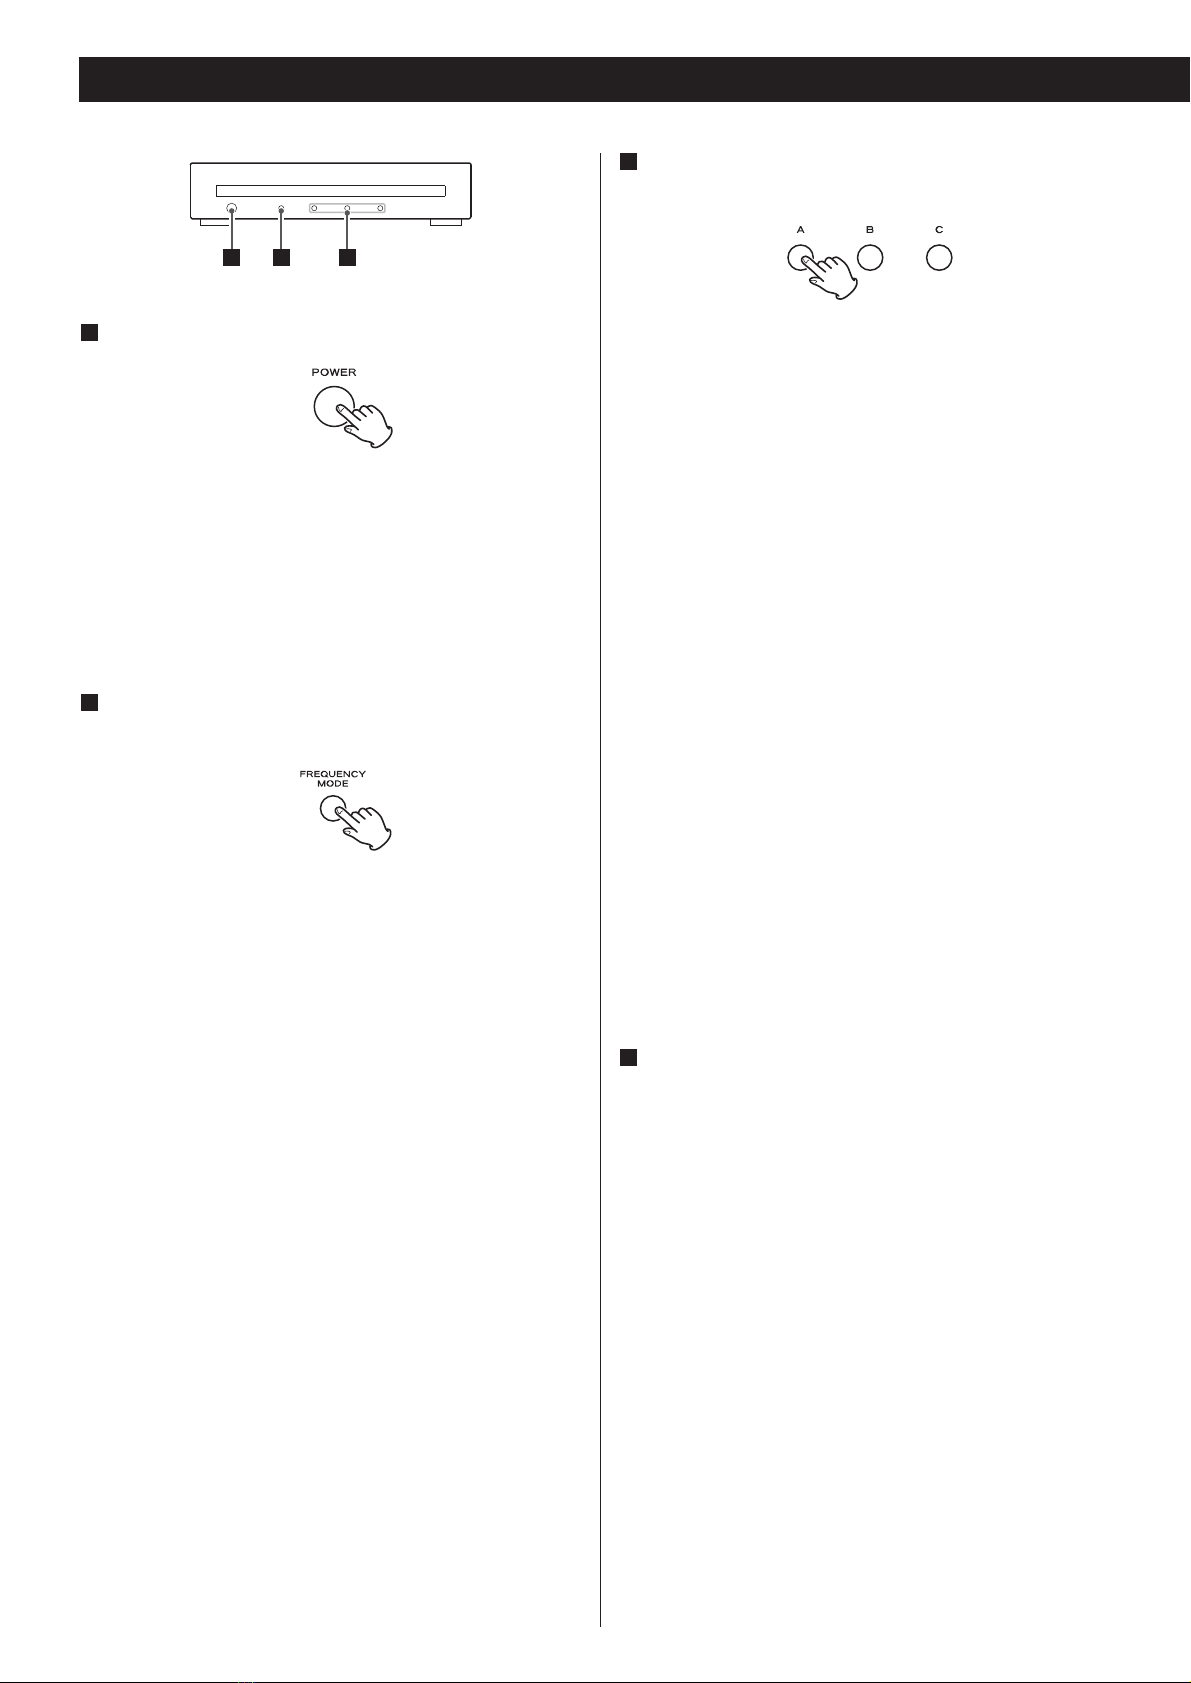
Identifying the Parts
POWER switch
Use this switch to turn the unit on and off.
<When the G-03X is turned on, the process of pre-heating
the oscillator to its operating temperature gets started. It
takes a few minutes before the oscillator is ready for
operation.
FREQUENCY MODE button
Use this to select the fundamental frequency of the word
clock.
44.1 kHz:
Select this for playback of CD, Super Audio CD, etc.
48 kHz:
Select this for playback of DVD, DAT, etc.
<Hold down this button for more than 2 seconds to dim the
display on the front panel (see page 9).
B
A
Frequency change buttons [A/B/C]
The frequency of the each line (A/B/C) is changeable.
Following frequency can be selected for each FREQUENCY
MODE.
When OFF is selected, the indicator turns off.
When the FREQUENCY MODE is set to 44.1 kHz:
44.1 kHz, 88.2 kHz, 176.4 kHz, 100 kHz, OFF
When the FREQUENCY MODE is set to 48 kHz:
48 kHz, 96 kHz, 192 kHz, 100 kHz, OFF
C
WORD SYNC IN WORD SYNC IN
10 MHz OUT
AB
DC
6
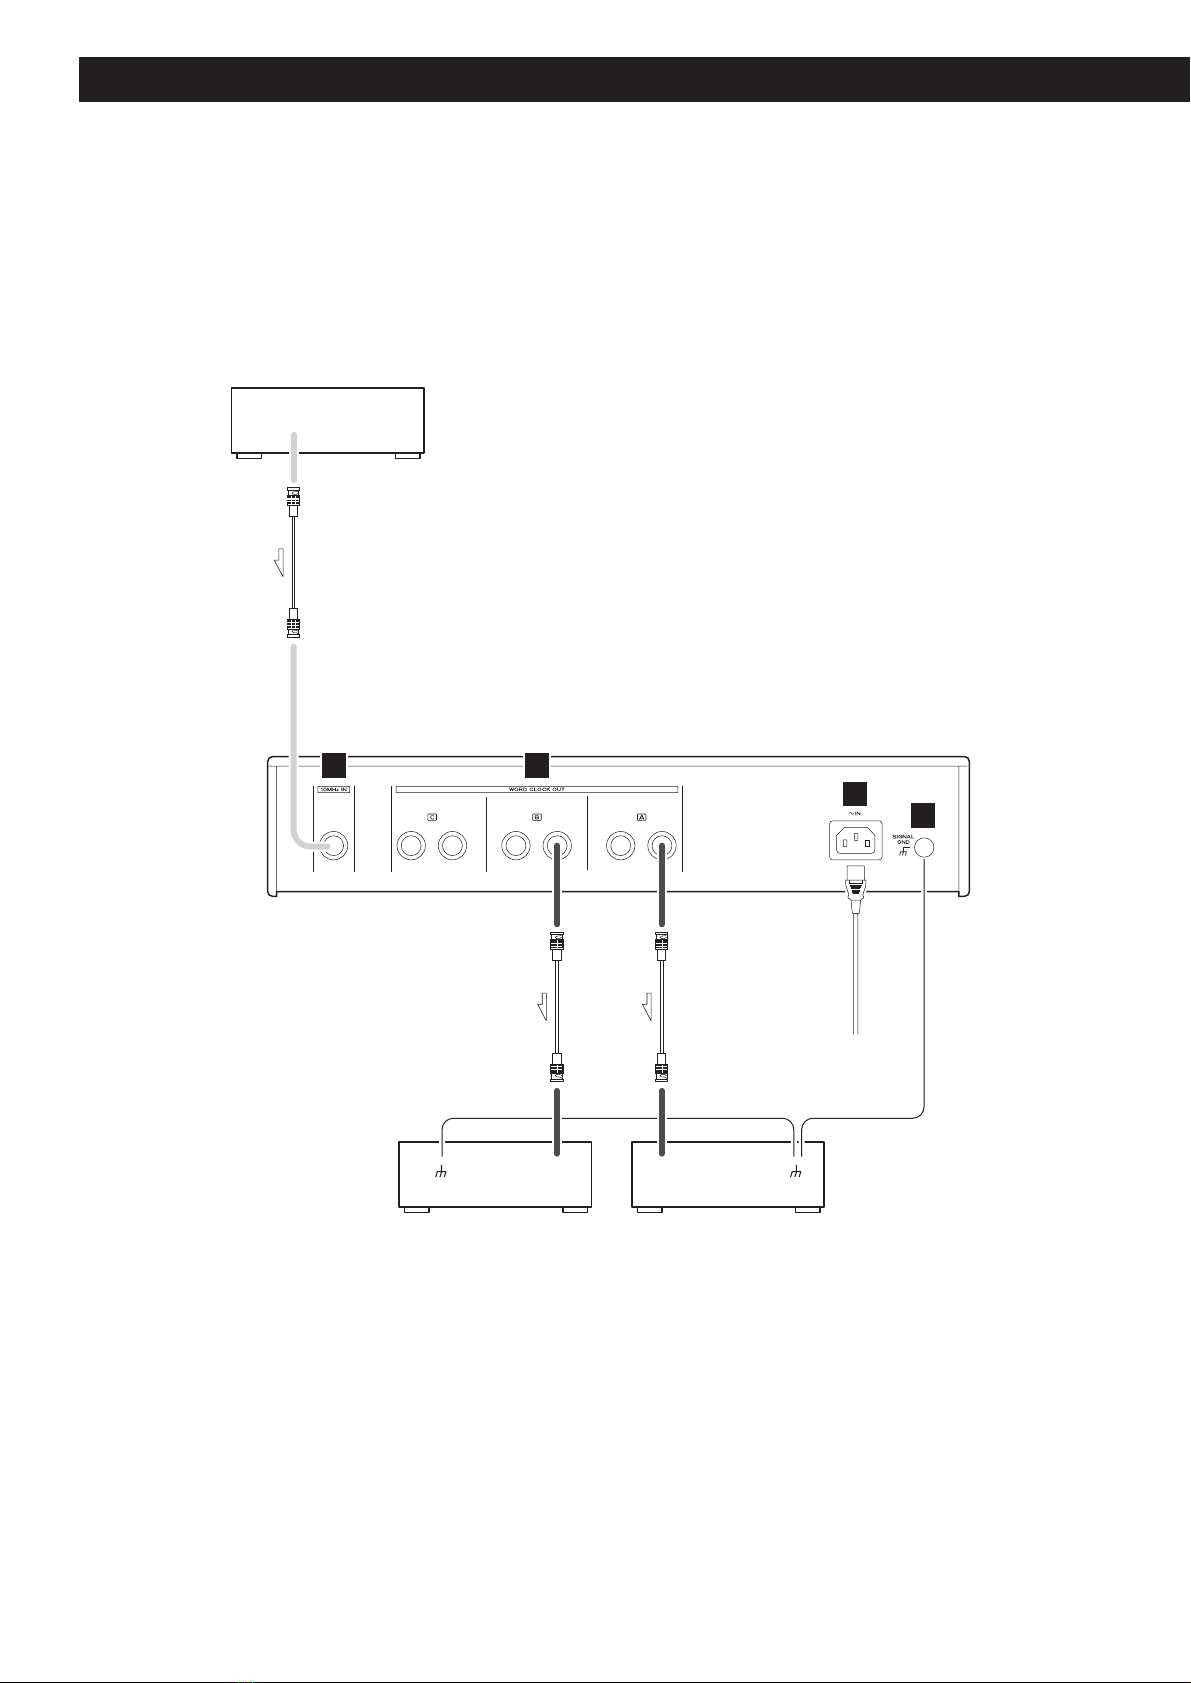
Connection
CAUTION:
<Switch off the power to all equipment before making connection.
<Read the instructions of each component you intend to use with this unit.
<For other connections, read the instructions of each component you intend to use with this unit.
Supplied power cord
Wall socket
Universal player etc.
BNC coaxial cable (75Ω)
BNC coaxial cable (75Ω)
BNC coaxial cable (75Ω)
External rubidium 10MHz oscillator etc.
D/A converter etc.

7
WORD CLOCK OUT terminals
These terminals output precise word synchronization signals. Connect these OUT terminals to the
WORD SYNC IN terminals of the other digital equipment (CD player, D/A converter, etc.), using a
commercially available BNC coaxial cable (75 ohms).
<Each of the A, B, and C channels is switch-selectable between 1xFs, 2xFs, 4xFs and 100 kHz. So
you can, for example, connect an 88.2 kHz and a 176.4 kHz machine to the single G-03X and
synchronize them. Three buttons (A, B, and C) are provided on the front panel for each channel.
10MHz IN terminal
You can use the input of external 10MHz reference frequency. Connect this terminal to the
output terminal of the external 10MHz oscillator. Use a commercially available BNC coaxial cable
for connection.
When a 10 MHz signal is input to this terminal, the unit automatically generates a clock using an
external 10 MHz oscillator (instead of the internal crystal oscillator).
<If the output level of the oscillator is outside the allowable input range of this unit, the oscillator
cannot be used. Refer to the oscillator manual for information on the output level and accuracy
of the oscillator.
SIGNAL GND connection
Audio quality might be slightly improved by connecting the SIGNAL GND terminal of another
device using commercially available vinyl-coated wire.
<Note that this is NOT an electrical safety ground (earth).
Power cord receptacle
After all other connections have been made, insert the supplied AC power cord into this
receptacle, then connect the other end of the power cord into the wall socket.
<Ensure that your AC voltage corresponds to the voltage marked on the rear panel of the unit.
Consult a qualified electrician if you are in doubt.
<Use only the supplied Esoteric power cord. Use of other power cords may result in fire or electric
shock. Unplug the power cord when you are not going to use the unit for an extended period of
time.
D
C
B
A
8
Basic Operation
Turn the G-03X on.
The power indicator on the display lights up.
<When the G-03X is turned on, the process of pre-heating the
oscillator to its operating temperature gets started. It takes a
few minutes before the oscillator is ready for operation.
During the process of pre-heating, “44.1 kHz” or “48 kHz”
indicator blinks on the display.
Select the appropriate frequency mode using the
FREQUENCY MODE button.
44.1kHz:
Select this for playback of CD, Super Audio CD, etc.
48kHz:
Select this for playback of DVD, DAT, etc.
<When you intend to select 100 kHz in step 3, either 44.1 kHz
or 48 kHz may be selected.
2
1
Select the frequency of the word clock for each line by
pressing the A, B or C button.
When the connected device is compatible with a universal
clock (100 kHz):
“100 kHz” is recommended.
Although the CD and Super Audio CD frequencies are
multiples of 44.1 kHz while the DVD frequency is a multiple
of 48 kHz, the universal clock (100 kHz) enables
compatibility with any disc. The lack of the need to switch
the frequency mode for each disc results in considerable
convenience.
<Please refer to the manual or other references in advance to
determine whether or not the connected device is
compatible with a universal clock (100 kHz).
The following models are not compatible with a universal
clock:
P-0, P-0s, P-70, P-70 (upgraded), D-70, D-70 (upgraded)
When the connected device is NOT compatible with a
universal clock (100 kHz):
Set the frequency as high as the connected units will allow for
synchronization.
Note:
Select 44.1 kHz for the P-0 or P-0s.
Select 88.2 kHz for the P-70.
Set the connected units to the slave mode (word
synchronization input mode).
Read the instructions of each component to turn Word Sync
on.
Example:
D-01: select “Rb IN” using the WORD button.
D-70 upgraded: select “WORD+RAM” using the CLOCK
MODE switch (front panel), then select “IN M1” using the
remote control unit.
P-01: select “Rb IN” using the WORD button.
P-70/P-70 upgraded: turn ON the WORD SYNC switch (front
panel), then set the PLL filter switch (back panel) to
“MODE2”.
X-01: select “Word M1 ON” using the CLOCK MODE button.
4
3
1 2 3

9
Hold down the FREQUENCY MODE button for more than 2
seconds to dim the display on the front panel to suit the
environment in which you listen to music.
Full brightness (normal mode)
z
Medium brightness
z
Minimum brightness
z
All the illuminations are turned off except the power
indicator.
<This setting is stored even when power is turned off and the
unit is unplugged.
<When you turn on the power or you operate other buttons,
the display temporarily lights at full brightness. It is dimmed
after the clock signal is stabilized (after “44.1 kHz” or “48
kHz” indicator stops blinking and lights steadily).
NOTE:
If you connect this unit to other manufacturers units, be sure
to read the manuals of those devices to confirm the frequency
range of synchronization.
Dual AES connection will require you to set the clock
frequency at one half of the audio signal frequency.
<Settings are stored even when power is turned off and the
unit is unplugged.
<When not in use, turn the G-03X off.
<Once settings have been made, those settings can be used
simply by turning on the power the next time the unit is used.
Switch the frequency mode using the FREQUENCY MODE
button depending on the disc to be played or device.
<Although the CD and Super Audio CD frequencies are
multiples of 44.1 kHz while the DVD frequency is a multiple
of 48 kHz, the universal clock enables compatibility with any
disc. The lack of the need to switch the frequency mode for
each disc results in considerable convenience.
Dimmer

10
Troubleshooting
In case you experience any problem with this unit, please take
the time to look through this chart and see if you can solve the
problem yourself before you call your dealer.
No power
eCheck the connection to the AC power supply. Check and
make sure the AC source is not a switched outlet and that,
if it is, the switch is turned on. Make sure there is power to
the AC outlet by plugging another item such as a lamp or
fan.
eTurn on the POWER switch.
Not synchronized
eCheck to see if the current word clock output is supported
by the connected players. If necessary, select a word clock
frequency that is appropriate for the individual players.
There are occasions where the word clock available for
synchronization varies depending on the connection and
settings of the individual players. For details, consult the
manual for each player.
Desired frequency not selectable with A, B, and C buttons
eSelect the proper fundamental frequency in FREQUENCY
MODE before operating the buttons.
If normal operation cannot be obtained, unplug the power
cord from the outlet and plug it again. This resets the
internal micro-computer which can be disturbed during
electrical storms, power interruptions, et cetera.
Specifications
Clock outputs
44.1 kHz lines . . . . . . . . . . . . . 44.1 kHz, 88.2 kHz, 176.4 kHz
48 kHz lines . . . . . . . . . . . . . . . . . . . 48 kHz, 96 kHz, 192 kHz
Universal clock. . . . . . . . . . . . . . . . . . . . . . . . . . . . . . 100 kHz
Terminals . . . . . . . . . . . . . . . . . . . . . . . . . . . . . . . BNC coaxial
Output. . . . . . . . . . . . . . . . . rectangular wave (TTL level/75Ω)
Accuracy . . . . . . . Under ±0.1ppm (factory setting, ppm: 10-6)
Stabilized time of the output clock
When the G-03X is turned on. . . . . . . . . . . . About 2 minutes
When the FREQUENCY MODE button is pressed
Less than 30 seconds
Frequency input
Frequency . . . . . . . . . . . . . . . . . . . . 10 MHz (under ±10 ppm)
Terminal. . . . . . . . . . . . . . . . . . . . . . . . . . . . . . . . BNC coaxial
Input level . . . . . . . . . . . . . . . . Sine wave: 0.5 - 1.0 Vrms/50Ω
Rectangular wave: 1.5 - 3.0 Vpp/50Ω
General
Power supply
Europe model . . . . . . . . . . . . . . . . . . . . . AC 230 V, 50 Hz
U.S.A./Canada model. . . . . . . . . . . . . . . . AC 120 V, 60 Hz
Korea model . . . . . . . . . . . . . . . . . . . . . . AC 220 V, 60 Hz
Power consumption . . . . . . . 12 W (maximum), 7 W (nominal)
Weight. . . . . . . . . . . . . . . . . . . . . . . . . . . 9.1 kg (20 1/16 lbs)
External dimensions (W x H x D) . . . . . . 442 x 97.5 x 353 mm
(17 3/8” x 3 7/8” x 13 7/8”)
Operating temperature. . . . . . . . . . . . . . . . . . . . +5˚C - +35˚C
Accessories
Power cord x 1
Felt x 3
Warranty card x 1
Owner’s manual x 1
•Design and specifications are subject to change without
notice.
•Weight and dimensions are approximate.
•Illustrations may differ slightly from production models.


0407.MA-1206A
This appliance has a serial number located on the rear panel. Please record
the model number and serial number and retain them for your records.
Model number Serial number
TEAC ESOTERIC COMPANY 3-7-3, Nakacho, Musashino-shi, Tokyo 180-8550, Japan Phone: (0422) 52-5132 e-mail: [email protected]
TEAC AMERICA, INC. 7733 Telegraph Road, Montebello, California 90640 Phone: (323) 726-0303
TEAC CANADA LTD. 5939 Wallace Street, Mississauga, Ontario L4Z 1Z8, Canada Phone: (905) 890-8008
TEAC MEXICO, S.A. De C.V Campesinos N°184, Colonia Granjas Esmeralda, Delegacion Iztapalapa, CP 09810, México DF Phone: (525) 581-5500
TEAC UK LIMITED Unit 19 & 20, The Courtyards, Hatters Lane, Watford, Hertfordshire, WD18 8TE, U.K. Phone: (0845) 130-2511
TEAC EUROPE GmbH Bahnstrasse 12, 65205 Wiesbaden-Erbenheim, Germany Phone: 0611-71580
Other manuals for Esoteric G-03X
1
This manual suits for next models
1
Table of contents
Other Esoteric Inverter manuals


