Esoteric G-02 User manual

D01168821D
G-02
Master Clock Generator
OWNER’S MANUAL.................... 5
MODE D’EMPLOI.......................19
MANUAL DEL USUARIO........... 33


3
CAUTION
oDO NOT REMOVE THE EXTERNAL CASES OR CABINETS TO EXPOSE
THE ELECTRONICS. NO USER SERVICEABLE PARTS ARE INSIDE.
oIF YOU ARE EXPERIENCING PROBLEMS WITH THIS PRODUCT,
CONTACT THE STORE WHERE YOU PURCHASED THE UNIT FOR A
SERVICE REFERRAL. DO NOT USE THE PRODUCT UNTIL IT HAS BEEN
REPAIRED.
oUSE OF CONTROLS OR ADJUSTMENTS OR PERFORMANCE OF
PROCEDURES OTHER THAN THOSE SPECIFIED HEREIN MAY RESULT
IN HAZARDOUS RADIATION EXPOSURE.
WARNING: TO PREVENT FIRE OR SHOCK HAZARD,
DO NOT EXPOSE THIS APPLIANCE TO RAIN OR
MOISTURE.
IN NORTH AMERICA USE ONLY ON 120 V SUPPLY.
CAUTION: TO REDUCE THE RISK OF ELECTRIC SHOCK, DO NOT
REMOVE COVER (OR BACK). NO USER-SERVICEABLE PARTS
INSIDE. REFER SERVICING TO QUALIFIED SERVICE PERSONNEL.
The lightning flash with arrowhead symbol, within an
equilateral triangle, is intended to alert the user to the
presence of uninsulated “dangerous voltage” within the
product’s enclosure that may be of sufficient magnitude to
constitute a risk of electric shock to persons.
The exclamation point within an equilateral triangle is
intended to alert the user to the presence of important
operating and maintenance (servicing) instructions in the
literature accompanying the appliance.
For Canada
Industry Canada’s Compliance Statement:
This Class B digital apparatus complies with Canadian ICES-003.
Cet appareil numérique de la classe B est conforme à la norme
NMB-003 du Canada.
For U.S.A.
This equipment has been tested and found to comply with the
limits for a Class B digital device, pursuant to Part 15 of the FCC
Rules. These limits are designed to provide reasonable protection
against harmful interference in a residential installation. This equip-
ment generates, uses, and can radiate radio frequency energy and,
if not installed and used in accordance with the instructions, may
cause harmful interference to radio communications. However,
there is no guarantee that interference will not occur in a particular
installation. If this equipment does cause harmful interference to
radio or television reception, which can be determined by turning
the equipment off and on, the user is encouraged to try to correct
the interference by one or more of the following measures:
• Reorient or relocate the equipment and/or the receiving
antenna.
• Increase the separation between the equipment and receiver.
• Connect the equipment into an outlet on a circuit different
from that to which the receiver is connected.
• Consult the dealer or an experienced radio/TV technician for
help.
CAUTION
Changes or modifications to this equipment not expressly
approved by TEAC CORPORATION for compliance will void the
user’s warranty.
China RoHS
oThe information in the following table is only applicable to products for sale in the People’s Republic of China.
oThe products sold in the European area are manufactured in accordance with the European RoHS Directive.
*
IMPORTANT SAFETY PRECAUTIONS

4
1) Read these instructions.
2) Keep these instructions.
3) Heed all warnings.
4) Follow all instructions.
5) Do not use this apparatus near water.
6) Clean only with dry cloth.
7) Do not block any ventilation openings. Install in accordance with
the manufacturer's instructions.
8) Do not install near any heat sources such as radiators, heat
registers, stoves, or other apparatus (including amplifiers) that
produce heat.
9) Do not defeat the safety purpose of the polarized or grounding-
type plug. A polarized plug has two blades with one wider than
the other. A grounding type plug has two blades and a third
grounding prong. The wide blade or the third prong are provided
for your safety. If the provided plug does not fit into your outlet,
consult an electrician for replacement of the obsolete outlet.
10) Protect the power cord from being walked on or pinched
particularly at plugs, convenience receptacles, and the point
where they exit from the apparatus.
11) Only use attachments/accessories specified by the manufacturer.
12) Use only with the cart, stand, tripod, bracket, or
table specified by the manufacturer, or sold with
the apparatus. When a cart is used, use caution
when moving the cart/apparatus combination
to avoid injury from tip-over.
13) Unplug this apparatus during lightning storms
or when unused for long periods of time.
14) Refer all servicing to qualified service personnel. Servicing is
required when the apparatus has been damaged in any way, such
as power-supply cord or plug is damaged, liquid has been spilled
or objects have fallen into the apparatus, the apparatus has been
exposed to rain or moisture, does not operate normally, or has
been dropped.
oThe apparatus draws nominal non-operating power from the
AC outlet with its POWER or STANDBY/ON switch not in the ON
position.
oThe mains plug is used as the disconnect device, the disconnect
device shall remain readily operable.
oCaution should be taken when using earphones or headphones
with the product because excessive sound pressure (volume) from
earphones or headphones can cause hearing loss.
oDo not expose this apparatus to drips or splashes.
oDo not place any objects filled with liquids, such as vases, on
the apparatus.
oDo not install this apparatus in a confined space such as a book
case or similar unit.
oThe apparatus should be located close enough to the AC outlet
so that you can easily reach the power cord plug at any time.
oIf the product uses batteries (including a battery pack or
installed batteries), they should not be exposed to sunshine, fire
or excessive heat.
oCAUTION for products that use replaceable lithium batteries:
there is danger of explosion if a battery is replaced with an
incorrect type of battery. Replace only with the same or
equivalent type.
Products with Class construction are equipped with a power
supply cord that has a grounding plug. The cord of such a product
must be plugged into an AC outlet that has a protective
grounding connection.
CAUTION
WARNING
MEXCEL is a registered trademark of Mitsubishi Cable Industries, Ltd. in
Japan and other countries.
ESOTERIC is a trademark of TEAC CORPORATION, registered in the U.S.
and other countries.
Company names, product names and logos in this document are the
trademarks or registered trademarks of their respective owners.
IMPORTANT SAFETY INSTRUCTIONS

5
English
For European Customers
Disposal of electrical and electronic equipment
(a) All electrical and electronic equipment should be disposed of
separately from the municipal waste stream via collection facili-
ties designated by the government or local authorities.
(b)
By disposing of electrical and electronic equipment correctly,
you will help save valuable resources and prevent any potential
negative effects on human health and the environment.
(c)
Improper disposal of waste electrical and electronic equipment
can have serious effects on the environment and human health
because of the presence of hazardous substances in the
equipment.
(d) The Waste Electrical and Electronic Equipment (WEEE)
symbol, which shows a wheeled bin that has been
crossed out, indicates that electrical and electronic
equipment must be collected and disposed of sepa-
rately from household waste.
(e) Return and collection systems are available to end users. For
more detailed information about the disposal of old electri-
cal and electronic equipment, please contact your city office,
waste disposal service or the shop where you purchased the
equipment.
Disposal of batteries and/or accumulators
(a) Waste batteries and/or accumulators should be disposed of
separately from the municipal waste stream via collection facili-
ties designated by the government or local authorities.
(b)
By disposing of waste batteries and/or accumulators correctly,
you will help save valuable resources and prevent any potential
negative effects on human health and the environment.
(c) Improper disposal of waste batteries and/or accumulators can
have serious effects on the environment and human health
because of the presence of hazardous substances in them.
(d) The WEEE symbol, which shows a wheeled bin that
has been crossed out, indicates that batteries and/
or accumulators must be collected and disposed of
separately from household waste.
If a battery or accumulator contains more than the specified
values of lead (Pb), mercury (Hg), and/or cadmium (Cd) as
defined in the Battery Directive (2006/66/EC), then the chemi-
cal symbols for those elements will be indicated beneath the
WEEE symbol.
(e) Return and collection systems are available to end users. For
more detailed information about the disposal of waste batter-
ies and/or accumulators, please contact your city office, waste
disposal service or the shop where you purchased them.
Pb, Hg, Cd

6
Before use
Check to be sure the box includes all the supplied accessories
shown below.
Please contact the store where you purchased this unit if any
of these accessories are missing or have been damaged during
transportation.
Power cord x 1
Owner’s manual x 1
Warranty card x 1
CAUTION
0Do not put anything on top of the unit.
0Avoid placing the unit in direct sunlight or close to any source of
heat, such as a radiator, heater, open fireplace or amplifier. Also
avoid locations that are subject to vibrations or exposed to exces-
sive dust, cold or moisture.
0Place the unit in a stable location near the audio system that you
will use with it.
0Do not move the unit during use.
0Be careful to avoid injury when moving the unit due to its weight.
Get someone to help you if necessary.
0The voltage supplied to the unit should match the voltage as
printed on the rear panel. If you are in any doubt regarding this
matter, consult an electrician.
0As the unit could become warm during operation, always leave
sufficient space around it for ventilation. Make sure there is at least
20 cm (8”) of open space above and at least 5 cm (2”) of open
space on each side of the unit. DO NOT place anything, not even
CDs, CD-Rs, LP records or cassette tapes, on top of the unit.
0Do not open the body of the unit as this might result in damage to
the circuitry or cause electric shock. If a foreign object should get
into the unit, contact your dealer.
0When removing the power plug from the wall outlet, always pull
directly on the plug, never yank on the cord.
0Depending on the electromagnetic waves of television broadcasts,
interference might appear on television screens when this unit’s
power is on. This does not indicate that this unit or the TV is mal-
functioning. If this occurs, turn this unit’s power off.
Contents
Thank you for choosing Esoteric. Read this manual carefully
to get the best performance from this unit.
Before use ...........................................................6
Identifying the parts.................................................7
Connections.........................................................8
Basic operation ....................................................10
Clock output frequency setting.....................................11
Setting mode ......................................................14
Messages...........................................................15
Troubleshooting....................................................16
Restoring factory default settings...................................16
Maintenance .......................................................17
Specifications ......................................................17
Rear panel ..........................................................18
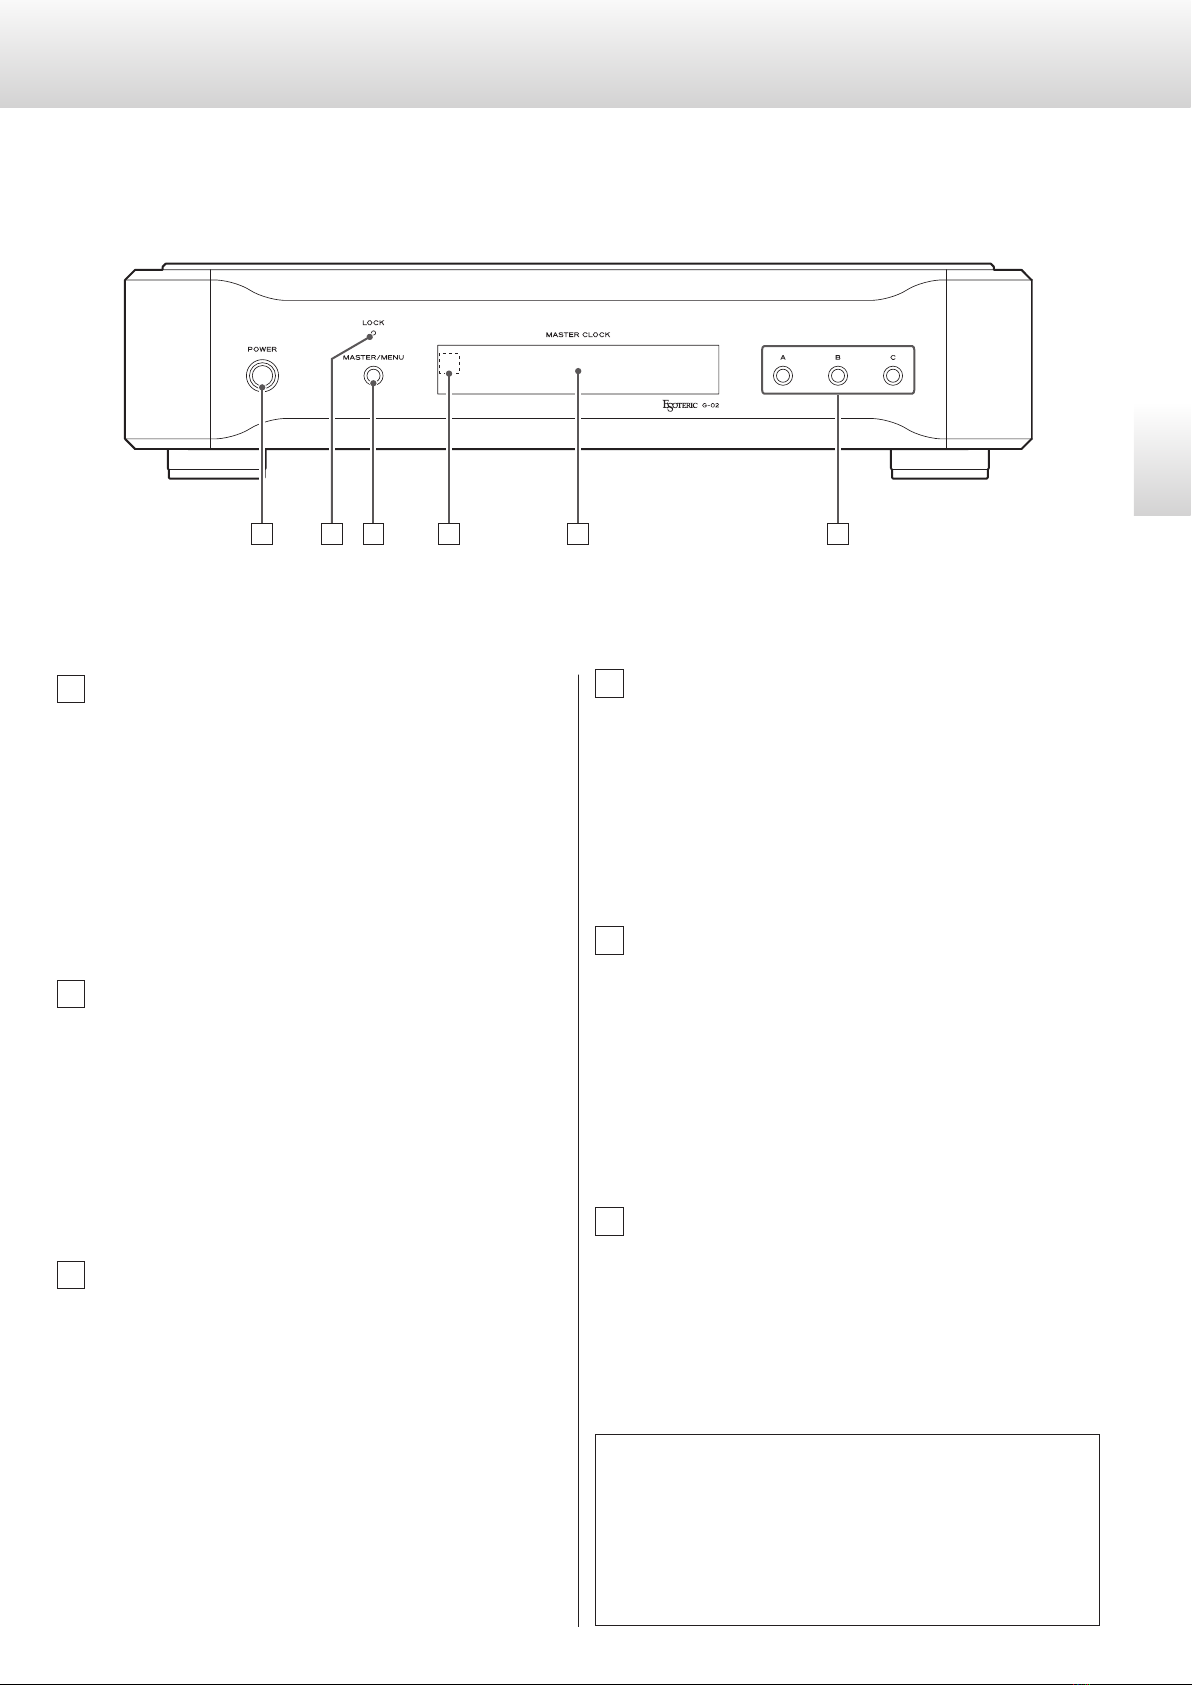
A C D E FB
7
English
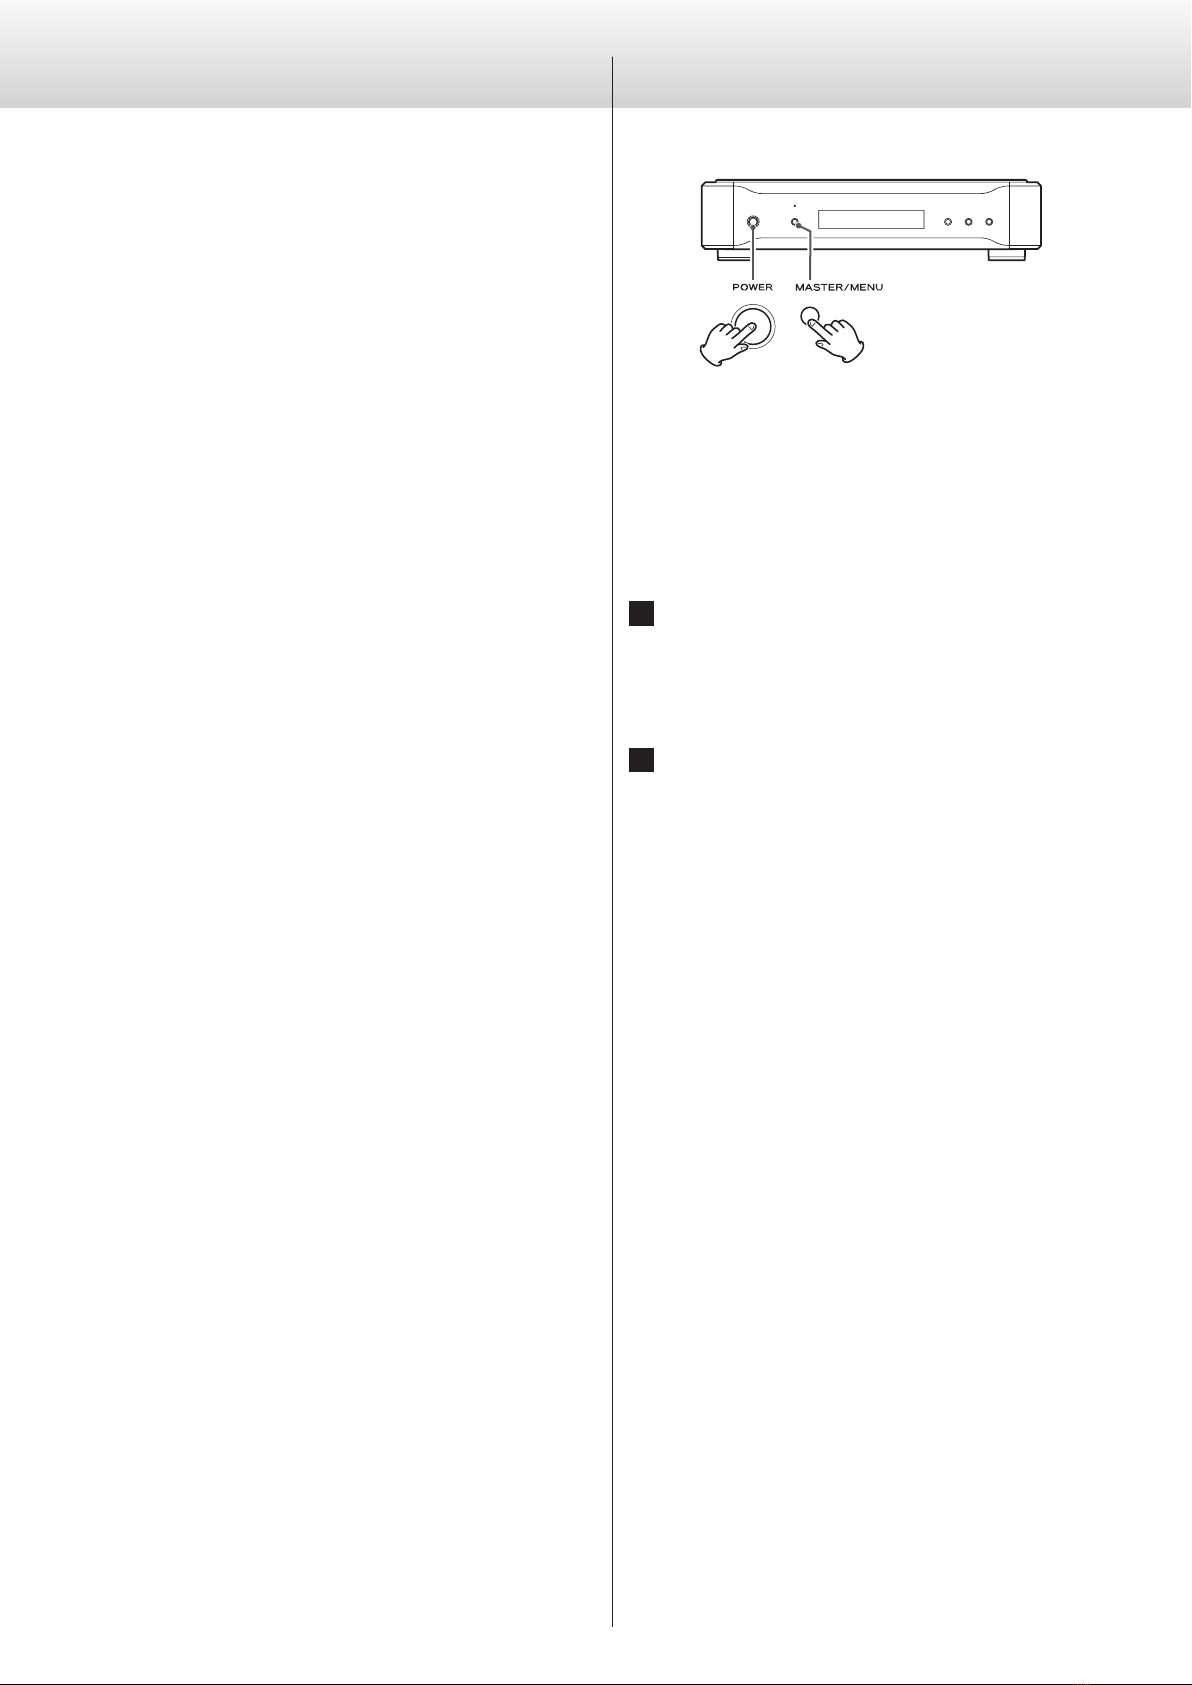
Identifying the parts
APOWER button
Press this to turn the unit on and off.
When on, the ring around the button lights blue.
0After the power is turned on, the oscillator is preheated to its
operating temperature. It takes 15 minutes for the oscillator
frequency to stabilize.
VTurn this unit’s power off when you do not plan to use it for
an extended period.
BLOCK indicator
This shows the clock status.
This blinks when locking or when an error occurs. It stays lit when
locked completely.
The indicator color depends on the clock source.
It lights blue when using the internal clock source (INT OCXO
setting), and it lights green when using an external 10 MHz refer-
ence frequency input through the EXT IN connector (EXT 10M-IN
setting).
CMASTER/MENU button
Use this to set the mode (see page 14).
Press for 2 seconds or more to set the reference clock (see page 10).
DRemote control signal receiver
Signals sent from remote controls are received here. When using
a remote, point it toward this spot.
0This unit does not include a remote control.
0A remote control included with another Esoteric product can
be used to adjust the brightness of this unit (see page 15).
EDisplay
This shows the output clock frequency (ordinary display), setting
screens and error messages.
0During ordinary display, if any output is ON, the name and
output frequency of the one that was last set is shown.
0When all clock outputs are OFF, “A/B/C OFF” appears on the
display.
FFrequency selection [A/B/C] buttons
Use these to set the clock frequency output from the CLOCK OUT
connectors (see page 11).
0In setting mode, use these buttons for the following functions.
A button: Exit setting mode
B and C buttons: Select setting items
OCXO
This unit uses an Oven Controlled Crystal Oscillator (OCXO) that
has outstanding temperature stability to generate its reference
master clock. This OCXO contains a crystal oscillator and oscillation
circuit in a small thermostatic chamber that controls the internal
heat to realize an extremely high frequency stability of ±0.01 ppm
at temperatures ranging from −20°C to +70°C.
8
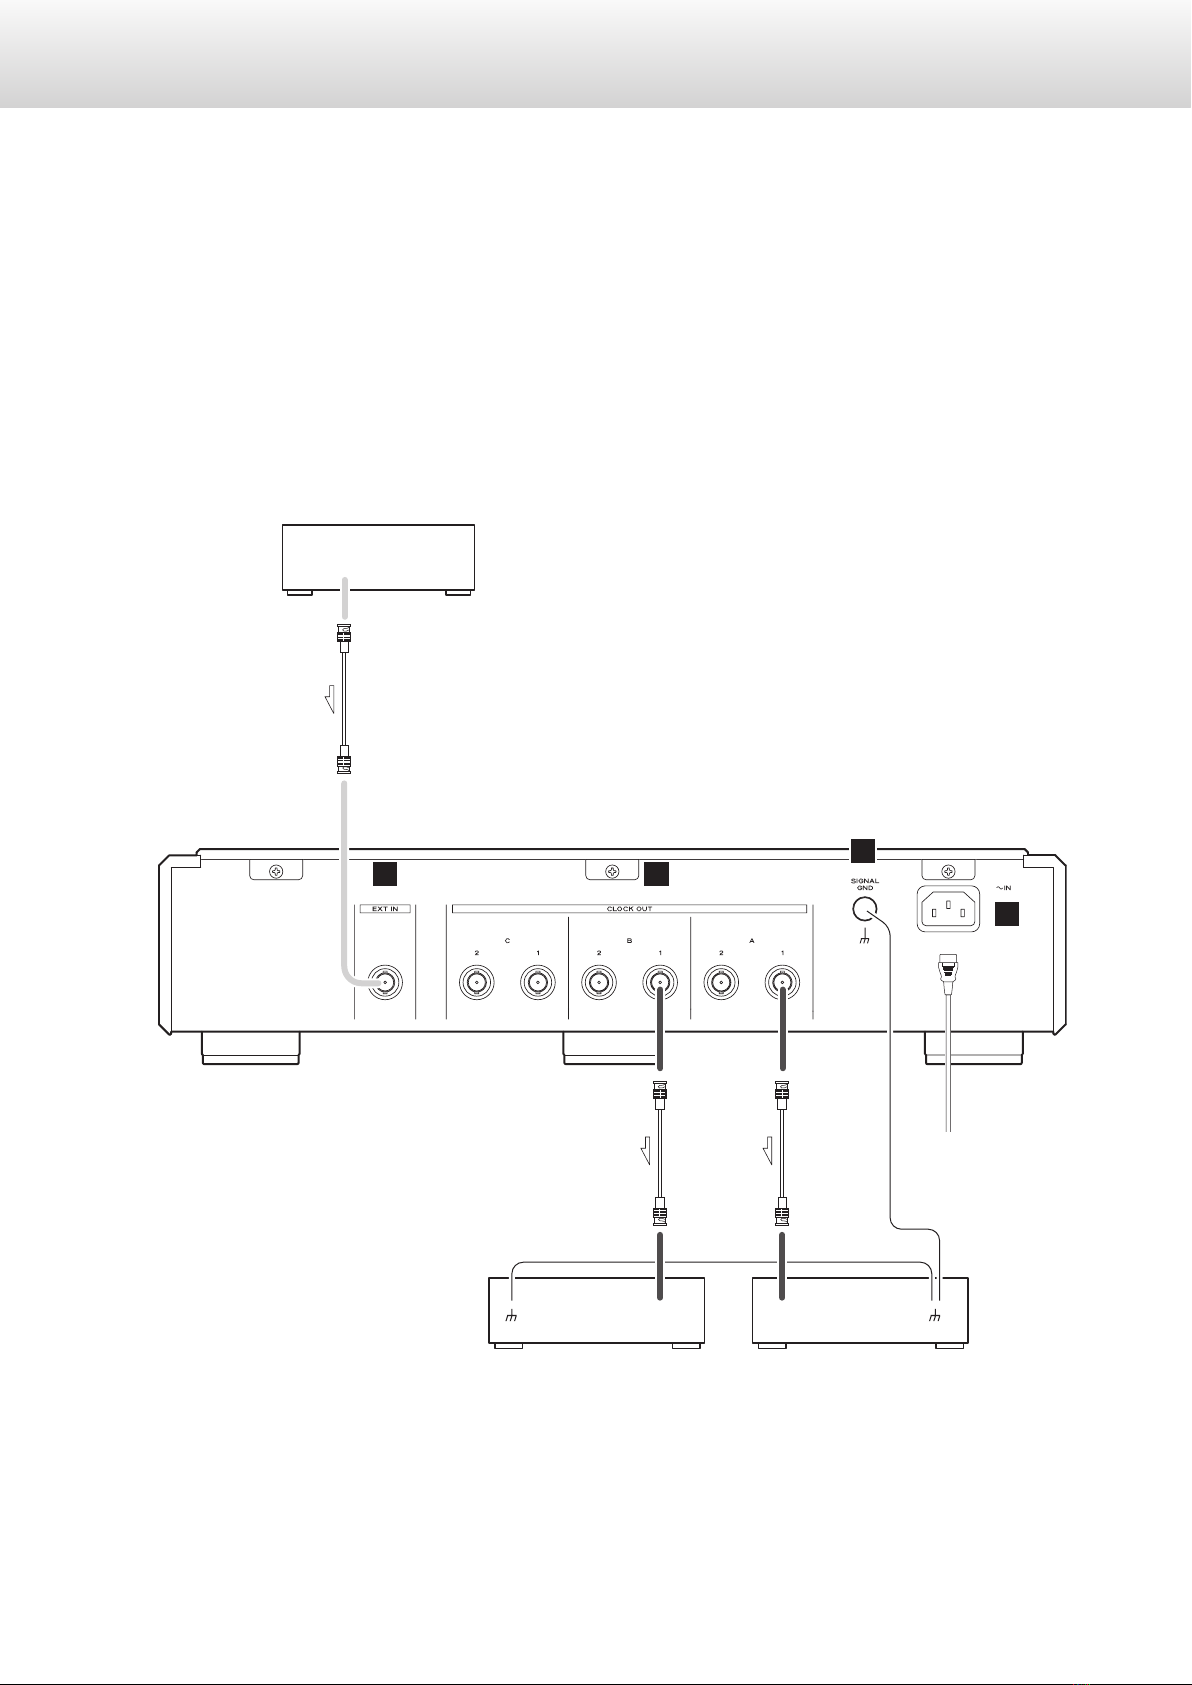
Connections
VPrecautions when making connections
0Complete all other connections before connecting power plugs to power outlets.
0Read the owner’s manuals of all devices that will be connected, and follow their instructions.
0For connections other than clock/word sync, refer to the owner’s manuals of the other devices.
0When using separate components, such as a CD transport and a D/A converter, together, send this unit’s CLOCK OUT signal to
each component.
Super Audio CD
transport, player, etc.
CLOCK SYNC IN
D/A converter, etc.
CLOCK SYNC IN
Reference oscillation
frequency output
(10 MHz)
External reference
signal generator, etc.
50 Ω
BNC coaxial cable
75 Ω
BNC coaxial cable
75 Ω
BNC coaxial cable
Grounding wire
AB
D
C
Wall socket

9
English
AReference frequency input connector [EXT IN]
To use an external reference signal generator (10 MHz output) for
the reference frequency, connect the output connector of the
reference signal generator to this EXT IN connector using stan-
dard BNC coaxial cables (50 Ω impedance).
0If the output level of the external oscillator is outside the
allowable input range of this unit, it cannot be used. Refer to
the oscillator manual for information on the output level and
accuracy of the oscillator.
BCLOCK OUT connectors
These connectors output the clock signal.
Connect these CLOCK OUT connectors to the clock/word sync
inputs of CD players, D/A converters and other digital equipment
using standard BNC coaxial cables (75 Ω impedance).
0Use the A, B and C buttons on the front panel to change their
frequencies (see page 10).
0Use the frequency mode setting (FREQ) to set the clock refer-
ence frequency (see page 14).
CGround connector [SIGNAL GND]
Audio quality might be improved by making ground connections
with connected devices such as digital equipment and amplifiers.
0This is NOT an electrical safety ground.
DAC power inlet
Connect the included power cord to this inlet. After completing
all other connections, plug the power plug into the AC power
outlet.
0This unit uses a 3-pin power cord socket, but the grounding
pin does not connect to the chassis of the unit.
VUse only the supplied Esoteric power cord.
Use of other power cords could result in fire or
electric shock.
Unplug the power cord from the outlet when
you are not planning to use the unit for an
extended period of time.
At Esoteric, we use Esoteric MEXCEL stressfree cables for
reference.
For detailed information, access the following website.
http://www.esoteric.jp/products/esoteric/accessory/indexe.html

10
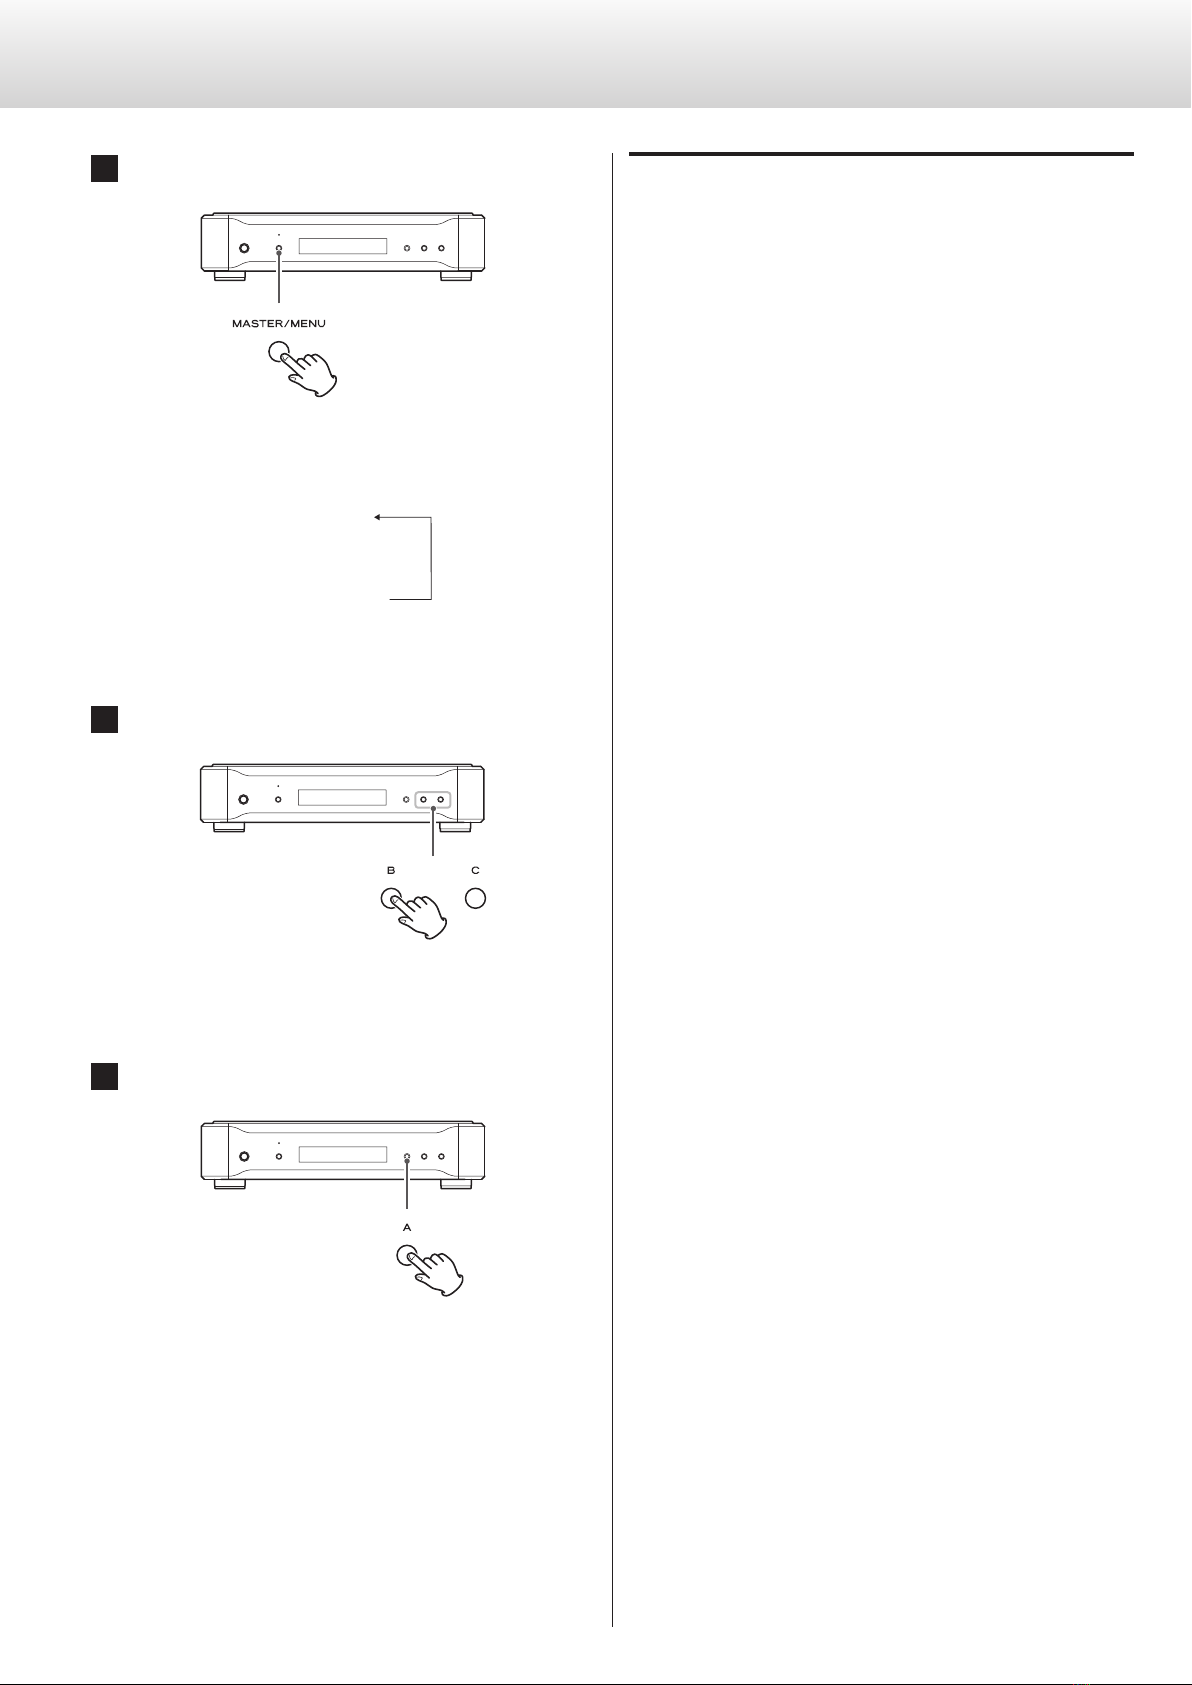
Basic operation
1 2 3 43
1Turn the power on.
The power indicator will light.
0When the power is turned on, the unit starts preheating the
oscillator to its operating temperature. It takes 15 minutes for
the oscillator frequency to stabilize.
2
Press the MASTER/MENU button for 2 or more seconds
to select the clock source.
The clock source changes each time you press the MASTER/
MENU button for 2 or more seconds.
INT OCXO
The internal OCXO is used for the reference clock.
EXT 10M-IN
The 10 MHz signal input through the EXT IN is used as the ref-
erence clock
.
3Set the clock reference frequency to 44.1 or 48 kHz.
Press the MASTER/MENU button to open the FREQ menu and
use the B and C buttons to set the frequency mode (see page 14).
44 (44.1kHz)
Use for playback of CDs, Super Audio CDs and other 44.1 kHz
sources.
48 (48kHz)
Use for playback of DVDs, DATs and other 48 kHz sources.
(Some DVDs and DATs are recorded at 44.1 kHz. In this case,
use the 44.1 kHz setting.)
0When using only universal clock (100 kHz or 10 MHz), either
setting is fine.
0Only use 44EXP or 48EXP for frequencies that are not covered
by the 44 and 48 modes (see pages 12-13).
4Use the A, B and C buttons to set the frequencies
sent to connected devices (see page 11).
5On the connected devices, turn clock/word sync ON
(or set to slave mode).
Read the owner’s manual for each device for instructions on how
to set their clock/word sync status properly.
NOTE
0When this unit is not in use, turn its power off.
0Settings are retained even when the power is turned off.
0Once settings have been made, those settings can be used when
the power is turned on again.
Set the frequency mode according to the type of disc to be played
or device being used (see page 14).

11
English
You can set the clock frequency output from the CLOCK OUT connectors.
0This unit has 3 pairs (A, B and C) of clock outputs that can be sepa-
rated further into 6 individual outputs (A1, A2, B1, B2, C1 and C2).
You can set the clock frequency independently for each of these
outputs.
0By default, the A, B and C outputs are set to be used as pairs.
Setting A, B and C outputs by pair (default)
When you change the A setting, the output frequency is set for
both A1 and A2 simultaneously.
Likewise, setting B or C affects B1 and B2 or C1 and C2, respectively.
When “A >”, “B >” or “C >” appears, pressing the A, B or C button
changes the output frequency of that pair. Press repeatedly to
cycle through the options.
0Press and hold the A, B or C button for at least two seconds to set
A2, B2 or C2, respectively. (See “Setting A2, B2 or C2” on the right.)
0If you do not press any buttons for 10 or more seconds, setting
mode will end and the display will return to normal. (If DISP is
set to SHORT, this will happen after 3 seconds.)
If you connect this unit to devices from other manufacturers, be
sure to read the manuals of those devices to confirm the clock fre-
quencies that they can receive.
Some devices require the clock frequency to be set to the same
value as the audio signal sampling frequency.
Some dual AES connection might require that the clock frequency
be set to half of the audio signal frequency.
Clock output frequency setting (1)
Setting A1, A2, B1, B2, C1 and C2 independently
Press the A button for at least two seconds until “A2>” appears.
Then, press the A button to change the A2 setting. You can set
different clock frequencies for A1 and A2. The same is true for the
B and C pairs.
Setting A1, B1 or C1
When A2 is set to any value that is not the same as the A1 setting,
when “A1>” appears, press the A button to change just the A1
output frequency. Follow the same procedure for B1 and C1.
Setting A2, B2 or C2
Press 2 or more seconds
Press the A, B or C button for at least two seconds to set A2, B2
or C2.
When “A2>” appears, press the A button to change just the A2
output frequency. Follow the same procedure for B2 and C2.
0To set A1 after setting A2, press the A button again after return-
ing to the ordinary display.
0If you set A2 to the same value as A1, “A” will appear again, and
you can set the output frequency used by both outputs in the
A pair simultaneously. Follow the same procedure for B and C
pairs. (See “Setting A, B and C outputs by pair” on the left.)

12
Frequency setting options
The frequency setting options depend on the frequency mode (FREQ)
setting (see page 14).
When the frequency mode (FREQ) is set to 44:
OFF
No clock signal is output.
44.1k
44.1 kHz clock frequency is output.
88.2k
2 × 44.1 kHz (88.2 kHz) clock is output.
176.4k
4 × 44.1 kHz (176.4 kHz) clock is output.
22.5MHz
512 × 44.1 kHz (22.5792 MHz) clock is output.
100kHz
100 kHz clock is output.
10MHz
10 MHz clock is output.
A2 = A1
The A2 clock output matches the A1 clock output and will be
switched with the A1 setting.
This only appears for the A2 clock setting.
B2 = B1
C2 = C1
These settings for B2 and C2 function in the same way as the “A2 =
A1” setting.
When the frequency mode (FREQ) is set to 48:
OFF
No clock signal is output.
48kHz
48 kHz clock frequency is output.
96kHz
2 × 48 kHz (96 kHz) clock is output.
192kHz
4 × 48 kHz (192 kHz) clock is output.
24.5MHz
512 × 48 kHz (24.576 MHz) clock is output.
100kHz
100 kHz clock is output.
10MHz
10 MHz clock is output.
A2 = A1
The A2 clock output matches the A1 clock output and will be
switched with the A1 setting.
This only appears for the A2 clock setting.
B2 = B1
C2 = C1
These settings for B2 and C2 function in the same way as the “A2 =
A1” setting.
Clock output frequency setting (2)

13
English
When the frequency mode (FREQ) is set to 44EXP:
OFF
No clock signal is output.
44.1k
44.1 kHz clock frequency is output.
88.2k
2 × 44.1 kHz (88.2 kHz) clock is output.
176.4k
4 × 44.1 kHz (176.4 kHz) clock is output.
352.8k
8 × 44.1 kHz (352.8 kHz) clock is output.
705.6k
16 × 44.1 kHz (705.6 kHz) clock is output.
1.4MHz
32 × 44.1 kHz (1.4112 MHz) clock is output.
2.8MHz
64 × 44.1 kHz (2.8224 MHz) clock is output.
5.6MHz
128 × 44.1 kHz (5.6448 MHz) clock is output.
11.2MHz
256 × 44.1 kHz (11.2896 MHz) clock is output.
22.5MHz
512 × 44.1 kHz (22.5792 MHz) clock is output.
100kHz
100 kHz clock is output.
10MHz
10 MHz clock is output.
A2 = A1
The A2 clock output matches the A1 clock output and will be
switched with the A1 setting.
This only appears for the A2 clock setting.
B2 = B1
C2 = C1
These settings for B2 and C2 function in the same way as the “A2 =
A1” setting.
When the frequency mode (FREQ) is set to 48EXP:
OFF
No clock signal is output.
48kHz
48 kHz clock frequency is output.
96kHz
2 × 48 kHz (96 kHz) clock is output.
192kHz
4 × 48 kHz (192 kHz) clock is output.
384kHz
8 × 48 kHz (384 kHz) clock is output.
768kHz
16 × 48 kHz (768 kHz) clock is output.
1.5MHz
32 × 48 kHz (1.536 MHz) clock is output.
3.0MHz
64 × 48 kHz (3.072 MHz) clock is output.
6.1MHz
128 × 48 kHz (6.144 MHz) clock is output.
12.2MHz
256 × 48 kHz (12.288 MHz) clock is output.
24.5MHz
512 × 48 kHz (24.576 MHz) clock is output.
100kHz
100 kHz clock is output.
10MHz
10 MHz clock is output.
A2 = A1
The A2 clock output matches the A1 clock output and will be
switched with the A1 setting.
This only appears for the A2 clock setting.
B2 = B1
C2 = C1
These settings for B2 and C2 function in the same way as the “A2 =
A1” setting.
14
Frequency mode setting
(FREQ>***)
Set the clock reference frequency to 44.1 kHz or 48 kHz. Use an EXP
mode to increase the range of output frequency options that can be
used.
0Set the reference frequency according to the playback source.
44.1kHz
Use for playback of CDs, Super Audio CDs and other 44.1 kHz
sources.
48kHz
Use for playback of DVDs, DATs and other 48kHz sources.
(Some DVDs and DATs are recorded at 44.1 kHz. In this case, use
the 44.1kHz setting.)
0100 kHz and 10 MHz clock output can be set and output with either
setting.
44
Sets the reference frequency to 44.1 kHz.
The frequency can be set to 44.1, 88.2 or 176.4 kHz or 22.5792 MHz.
48
Sets the reference frequency to 48 kHz.
The frequency can be set to 48, 96 or 192 kHz or 24.576 MHz.
44EXP
Sets the reference frequency to 44.1 kHz.
The frequency can be set to 44.1, 88.2, 176.4, 352.8 or 705.6 kHz or
1.4112, 2.8224, 5.6448, 11.2896 or 22.5792 MHz.
48EXP
Sets the reference frequency to 48 kHz.
The frequency can be set to 48, 96, 192, 384 or 768 kHz or
1.536, 3.072, 6.144, 12.288 or 24.576 MHz.
Setting mode
1Press the MASTER/MENU button.
Press the MASTER/MENU button again to cycle through the set-
ting items.
FREQ>***
↓
DISP>***
↓
(DIMMER>***)
0The DIMMER item only appears when DISP is set to ON.
2Use the B and C buttons to change the settings.
For explanations of each setting, see the right column and page 15.
3Press the A button to exit setting mode.
If you do not press any buttons on the unit for 10 seconds, the
unit will exit setting mode and the display will resume showing
its usual contents.
0When DISP is set to SHORT, after 3 seconds without use the
unit will exit setting mode and the display will resume show-
ing its usual contents (see page 15).
0Settings are retained even when the power is turned off.
15
English
Display illumination time setting
(DISP>***)
You can set the amount of time that the clock frequency is shown on
the display to ON, LONG or SHORT.
0If the display backlight (FL) is left ON with the same indication for a
long time, brightness irregularities might occur. For this reason, we
recommend that you set this to LONG or SHORT.
ON
In this mode, the display always stays lit.
LONG
When ordinary display continues without any operation being
conducted for about 20 seconds, the backlight (FL) will automati-
cally turn off.
SHORT
When ordinary display continues without any operation being
conducted for about 3 seconds, the backlight (FL) will automati-
cally turn off.
Dimmer setting
(DIMMER>***)
You can set the brightness of the backlight (FL) and indicators to one
of four levels.
You can only set this when the DISP setting is set to ON.
0You can also change this setting using the DIMMER button on a
remote control that is included with another Esoteric product such
as the P-05 or K-05.
3 (Standard brightness)
2
1
0 (Unlit)
0When set to 0 (unlit), display and indicators will not be lit.
0When unlit, pressing a button will cause the display to light for a
few seconds.
0Even when set to a value other than 3, standard brightness will be
used when an error message or settings menu item is shown.
Messages
PLL LCKING
The internal crystal oscillator (OCXO) or the 10 MHz clock source
input by the EXT IN is being locked by the internal PLL circuit.
When locking completes, this message will disappear.
0Ordinarily, only a few seconds are needed until locking completes
(PLL locking time), but it can take up to a minute depending on
the operating temperature and other factors.
0If locking cannot be completed because input conditions are
not met when set to EXT 10M-IN, the message will continue to
be displayed.
In this case, check the input clock source.
NO 10M-IN!
No 10 MHz reference clock signal is being input to the reference fre-
quency input connector (EXT IN).
Check the input clock source.
When not using an external clock source, set it to INT OCXO (see
page 10).
16
Troubleshooting
If you experience a problem with the unit, please take a moment to
review the following information before requesting service.
If it still does not operate correctly, contact the retailer where you pur-
chased the unit.
The power will not turn on.
e
Check that the power cord is plugged into a working power outlet.
eCheck that the power cord is properly connected to this unit.
The clock output is not synchronizing another device.
e
Confirm that the clock being output is supported by the device
connected to this unit. (Select a clock frequency that the connected
device can use.)
The input and synchronization of clock signals might vary according
to the device. Refer to the owner’s manual of each device for how to
connect and set them.
The desired frequency cannot be selected when pressing the A,
B and C buttons.
eSet the reference frequency with the frequency mode setting
(FREQ) first, and then use the A, B and C buttons (see page 14).
Settings are retained even after the power cord has been disconnected.
If you have made changes using the settings menu, and want to
restart with the original settings, restore the unit to the default factory
settings as follows.
1Turn the unit off.
If the unit is on, press the POWER button to turn it off and wait for
more than 30 seconds.
2
Press the POWER button while holding down
the MASTER/MENU button.
0Release the MASTER/MENU button when the unit turns on
and the display lights.
Restoring factory default settings

17
English
SpecificationsMaintenance
Clock outputs
44.1 kHz setting ......................44.1, 88.2, 176.4, 352.8, 705.6 kHz
1.4112, 2.8224, 5.6448, 11.2896, 22.5792 MHz
48 kHz setting ................................48, 96, 192, 384, 768 kHz
1.536, 3.072, 6.144, 12.288, 24.576 MHz
Both settings .........................................100 kHz, 10 MHz
Connectors.......................................................BNC
Output level.........................Rectangular wave: TTL level/75 Ω
Frequency stability ................Within ±0.01 ppm (−20°C to +70°C)
Frequency precision ...........Within ±0.01 ppm (when shipped new)
(ppm = 10−6)
Output clock stabilization (approximate time in minutes)
Until oscillator stabilizes after power turned on ..................15
PLL locking time..................................................1
Master clock input
Input frequency .............................10 MHz (within ±10 ppm)
Connector........................................................BNC
Input levels ...............................Sine wave: 0.5-1.0 Vrms/50 Ω
Square wave: 1.5-3.0 Vpp/50 Ω
General
Power supply
Europe/Hong Kong model .........................AC 230 V, 50 Hz
U.S.A./Canada model...............................AC 120 V, 60 Hz
Korea model .......................................AC 220 V, 60 Hz
Power consumption .........................14 W (while warming up)
10 W (when stable)
Dimensions (W × H × D) (including protrusions)
445 × 106.5 × 360 mm (17 1/2”× 4 2/8”× 14 1/8”)
Weight ..............................................10.2 kg (22 1/2 lb)
Operating temperature range ..........................+5°C to +35°C
Included accessories
Power cord × 1
Owner’s manual × 1
Warranty card × 1
0Specifications and appearance are subject to change without
notice.
0Weight and dimensions are approximate.
0Illustrations in this Owner’s Manual might differ slightly from pro-
duction models.
If the surface of the unit gets dirty, wipe with a dry soft cloth. If it
becomes very dirty, dampen a soft cloth slightly with a diluted neu-
tral cleanser and remove any excess fluid from the cloth thoroughly
before wiping the unit.
Q
For safety, disconnect the power cord from the socket
before cleaning.
0Never spray liquid directly on this unit.
0Do not use thinner or alcohol as they could damage the surface of
the unit.
0Avoid allowing rubber or plastic materials to touch this product for
long periods of time, because they could damage the cabinet.

18
Rear panel

19
Français
Pour les consommateurs européens
Mise au rebut des équipements électriques et électroniques
(a) Tout équipement électrique et électronique doit être traité
séparément de la collecte municipale d'ordures ménagères
dans des points de collecte désignés par le gouvernement ou
les autorités locales.
(b)
En vous débarrassant correctement des équipements
électriques et électroniques, vous contribuerez à la sauvegarde
de précieuses ressources et à la prévention de potentiels effets
négatifs sur la santé humaine et l'environnement.
(c)
Le traitement incorrect des déchets d'équipements électriques
et électroniques peut avoir des effets graves sur l'environnement
et la santé humaine en raison de la présence de substances
dangereuses dans les équipements.
(d) Le symbole de déchets d'équipements électriques et
électroniques (DEEE), qui représente une poubelle à
roulettes barrée d'une croix, indique que l'équipement
électrique et électronique doit être collecté et traité
séparément des déchets ménagers.
(e)
Des systèmes de retour et de collecte sont disponibles pour
l'utilisateur final. Pour des informations plus détaillées sur la mise
au rebut des vieux équipements électriques et électroniques,
veuillez contacter votre mairie, le service d'ordures ménagères
ou le magasin dans lequel vous avez acquis l'équipement.
Mise au rebut des batteries et/ou accumulateurs
(a)
Les batteries et/ou accumulateurs hors d'usage doivent être
traités séparément de la collecte municipale d'ordures
ménagères dans des points de collecte désignés par le
gouvernement ou les autorités locales.
(b) En vous débarrassant correctement des batteries et/ou
accumulateurs hors d'usage, vous contribuerez à la sauvegarde
de précieuses ressources et à la prévention de potentiels effets
négatifs sur la santé humaine et l'environnement.
(c)
Le traitement incorrect des batteries et/ou accumulateurs hors
d'usage peut avoir des effets graves sur l'environnement et la
santé humaine car ils contiennent des substances dangereuses.
(d) Le symbole de déchets d'équipements électriques et
électroniques (DEEE), qui représente une poubelle à
roulettes barrée d'une croix, indique que les batteries
et/ou accumulateurs doivent être collectés et traités
séparément des déchets ménagers.
Si une batterie ou un accumulateur contient plus que les valeurs
spécifiées de plomb (Pb), mercure (Hg) et/ou cadmium (Cd) telles
que définies dans la directive sur les batteries (2006/66/EC), alors
les symboles chimiques de ces éléments seront indiqués sous le
symbole DEEE.
(e)
Des systèmes de retour et de collecte sont disponibles pour
l'utilisateur final. Pour des informations plus détaillées sur la mise
au rebut des batteries et/ou accumulateurs, veuillez contacter
votre mairie, le service d'ordures ménagères ou le magasin dans
lequel vous les avez achetés.
Pb, Hg, Cd
INSTRUCTIONS DE SÉCURITÉ IMPORTANTES
oN'exposez pas cet appareil aux gouttes ni aux éclaboussures.
oNe placez pas d'objet rempli de liquide sur l'appareil, comme
par exemple un vase.
oN’installez pas cet appareil dans un espace confiné comme une
bibliothèque ou un meuble similaire.
oL’appareil tire un courant nominal de veille de la prise secteur
quand son interrupteur POWER ou STANDBY/ON n’est pas en
position ON.
oL’appareil doit être placé suffisamment près de la prise de courant
pour que vous puissiez à tout moment atteindre facilement la
fiche du cordon d’alimentation.
oLa fiche secteur est utilisée comme dispositif de déconnexion
et doit donc toujours rester disponible.
oLes produits de Classe sont équipés d'un cordon d'alimentation
ayant une fiche de terre. Le cordon de ces produits doit être
branché dans une prise de terre.
oSi le produit utilise des batteries (y compris un pack d'accus ou
des piles), elles ne doivent pas être exposées au soleil, au feu ou
à une chaleur excessive.
oPRÉCAUTION pour les produits utilisant des batteries au
lithium remplaçables: il existe un danger d'explosion en cas de
remplacement par un type de batterie incorrect. Remplacez-les
uniquement par des modèles identiques ou équivalents.
oDes précautions doivent être prises pour l'emploi d'écouteurs
ou d'un casque avec le produit car une pression acoustique
(volume) excessive dans les écouteurs ou dans le casque peut
provoquer une perte d’audition.
English

20
Avant l’utilisation
Vérifiez que vous disposez bien de tous les accessoires indiqués
ci-dessous.
Veuillez contacter le magasin dans lequel vous avez acheté cette unité
si l'un de ces accessoires manque ou a été endommagé durant le
transport.
Cordon d’alimentation x 1
Mode d’emploi x 1
Carte de garantie x 1
ATTENTION
0Ne posez rien sur l’unité.
0Évitez d'exposer l'unité directement au soleil et de la placer près
d'une quelconque source de chaleur telle qu'un radiateur, une
bouche de chauffage, une cheminée ou un amplificateur. Évitez
aussi les endroits sujets aux vibrations ou exposés à une poussière
excessive, au froid et à l’humidité.
0Placez l'unité sur une surface stable près du système audio que
vous allez utiliser avec elle.
0Ne déplacez pas l'unité durant l'utilisation.
0En raison du poids de l'unité, prenez garde à ne pas vous blesser
quand vous la déplacez. Faites vous aider si nécessaire.
0La tension d’alimentation doit correspondre à la tension imprimée
sur le panneau arrière. Si vous avez des doutes à ce sujet, consultez
un électricien.
0Il est possible que l’unité chauffe durant l’utilisation, laissez donc
toujours un espace suffisant autour d'elle pour sa ventilation.
Veillez à ce qu’il y ait un espace libre d’au moins 20 cm au dessus
de l’unité et d’au moins 5 cm de chaque côté. NE placez RIEN sur
le dessus de l'unité, pas même des CD, CD-R, disques vinyle ou
cassettes.
0N’ouvrez pas le boîtier de l'unité car cela peut endommager le
circuit ou causer un choc électrique. Si un objet étranger pénètre
dans l’unité, contactez votre revendeur.
0Quand vous débranchez le cordon d'alimentation de la prise sec-
teur, tirez toujours sur la prise, jamais sur le cordon.
0En fonction des ondes électromagnétiques de télédiffusion, des
parasites peuvent apparaître sur les écrans de télévision quand
cette unité est sous tension. Ce n'est pas un mauvais fonctionne-
ment de cette unité ou du téléviseur. Si cela se produit, éteignez
cette unité.
Sommaire
Nous vous remercions d’avoir choisi Esoteric. Lisez ce mode
d'emploi avec attention pour tirer les meilleures perfor-
mances de cette unité.
Avant l’utilisation ...................................................20
Identification des parties ...........................................21
Branchements......................................................22
Fonctionnement de base ..........................................24
Réglage de fréquence de sortie d'horloge ..........................25
Mode de réglage ...................................................28
Messages...........................................................29
Guide de dépannage ...............................................30
Restauration des réglages d'usine...................................30
Entretien ...........................................................31
Caractéristiques techniques ........................................31
Face arrière .........................................................32
Table of contents
Languages:
Other Esoteric Inverter manuals


Popular Inverter manuals by other brands

Omnik
Omnik Omniksol-2k-TL3-S user manual

SEW-Eurodrive
SEW-Eurodrive MOVIDRIVE modular Compact operating instructions

SolaX Power
SolaX Power X1-Hybrid Quick installation guide

Stanley
Stanley PC809 instruction manual

BASI
BASI SHN200 Mounting & operating instructions

HIDROCONTROL
HIDROCONTROL R-DRIVE Series user manual


