EspressoWorks 30 PC All-In-One BARISTA PRO Series User manual

FAQs can be found at www.espresso-works.com
Email us for any unanswered questions: cs@espresso-works.com
FOR PRODUCT REGISTRATION, PLEASE VISIT WWW.ESPRESSO-WORKS.COM
Read this booklet thoroughly and save these instructions.
QUICK START
GUIDE
30
30 PC All-In-One
BARISTA PRO SERIES
ESPRESSO & CAPPUCCINO MAKER
1

1. Read all instructions before using.
2. Before connecting the appliance
to the power supply, check that the
voltage indicated on the appliance
corresponds with the voltage in your
home.
3. The attached base can only be used
for its intended function of beverage
frothing /heating.
4. Do not operate the appliance empty,
to avoid damaging the heat elements.
5. Unplug from outlet when not in use
and before cleaning. Allow to cool
before putting on or taking off parts,
and before cleaning the appliance.
6. Do not let the cord hang over the
edge of the table or counter, or touch
hot surfaces.
7. Do not place on or near a hot gas or
electric burner, or in a heated oven.
8. Ensure that the appliance is used
of reach of children. This will prevent
the appliance from overturning and
prevent damage or injury.
9. Keep hands and utensils out of
container while in use to reduce the
risk of severe injury to persons or
damage to the frother.
10.
shock and injury to persons do
not immerse cord, plugs, or other
electrical parts in water or other liquid.
11. Close supervision is necessary
when any appliance is used by or near
children.
12. Do not touch the hot surfaces. Use
handles or knobs.
13. Extreme caution must be used when
moving an appliance containing hot water.
14. Avoid contacting moving parts.
15. The use of accessory attachments
not recommended by the appliance
shock or injury to persons.
16. Do not operate any appliance
with a damaged cord or plug or after
the appliance malfunctions, or has
been damaged in any manner. Return
appliance to the nearest authorized
service facility for examination, repair
or adjustment.
17. The appliance should only be used for
coffee and milk. Do not use the appliance
for other than the intended use.
18. This appliance has been
incorporated with a grounded plug.
Please ensure the wall outlet in your
house is well earthed.
19. This appliance is not intended for
use by persons (including children)
with reduced physical, sensory or
mental capabilities, lack of experience
and knowledge, unless proper
supervision or instruction is given
concerning use of the appliances by a
person responsible for their safety.
20. Always operate the coffee maker
with lid in place.
21. Never place this appliance on or
near a hot gas or an electric burner
or anywhere it could touch a heated
appliance.
Warning : When using electrical appliances, basic safety
precautions should always be followed, including the following:
IMPORTANT SAFEGUARDS
2

22.This appliance is intended for
household use only.
23. Children should be supervised to
ensure that they do not play with the
appliance.
24. Do not use outdoors.
25. Always attach plug to appliance
To disconnect, turn any control to “off,”
then remove plug from wall outlet.
26. Scalding may occur if the lid is
removed during the brewing cycles.
27. Be sure that handles are
assembled and fastened properly.
28. See instructions regarding Handles
on below pages.
29. WARNING: To avoid the risk of
injury, do not open the brew chamber
during the brew process.
30.Turn the appliance OFF,
then unplug from the outlet when
not in use, before assembling or
disassembling parts and bef ore
cleaning. To unplug, grasp the plug
and pull from the outlet. Never pull
from the power cord.
31. Avoid contact with any moving
parts. Do not attempt to defeat any
safety interlock mechanisms.
32.The use of attachments not
recommended or sold by the
shock or injury.
33. Do not let cord hang over edge of
table or counter.
a) A short power supply cord is provided to reduce risks resulting from
becoming entangled in or tripping over a longer cord.
b) Longer detachable power supply cords or extension cords are available and
may be used if care is exercised in their use.
c) If a long detachable power supply cord or extension cord is used:
1) The marked electrical rating of the detachable power supply cord or
extension cord should be at least as great as the electrical rating of the
appliance;
2) If the appliance is of the grounded type, the extension cord should be
grounding-type 3-wire cord; and
3) The longer cord should be arranged so that it will not drape over the
counter top or table top where it can be pulled on by children or tripped
over.
SAVE THESE INSTRUCTIONS
POWER CORD INSTRUCTIONS
3

INCLUDED IN YOUR PURCHASE
GRIND SIZE
EASY CLEAN
REMOVABLE
DRIP TRAY
3 SILICONE
STRAWS with
CLEANING BRUSH
3 STAINLESS STEEL
STRAWS with
CLEANING BRUSH
PORTAFILTER with
BAKELITE HANDLE
SINGLE FILTER
BASKET
DOUBLE FILTER
BASKET
15-BAR ESPRESSO MACHINE
with THERMOBLOCK HEATING
SYSTEM CONICAL BURR GRINDER
with 0.5 lbs/250g
BEAN HOPPER
BUILT-IN CUP
WARMER
77oz/2.3L LARGE
DETACHABLE WATER
TANK with HANDLE &
REMOVABLE LID
TAMPER POWER
CORD
2 HIGH QUALITY
DOUBLE WALLED
CAPPUCCINO
GLASSES
STEAM WAND
2 PREMIUM
DOUBLE WALLED
ESPRESSO CUPS
5 CAPPUCCINO ART
STENCIL SETS
2 POWDER SHAKERS
STEAM WAND
CLEANING PIN
PORTAFILTER
CLEANING BRUSH
GRINDER
CLEANING BRUSH
STAINLESS STEEL
FROTHING CUP
ESPRESSO MEASURING
SHOT GLASS
LATTE CAPPUCCINO
ART PEN
ESPRESSO
MACHINE COVER
2 MICROFIBER
CLEANING
CLOTHS
GROUNDS
KNOCK BOX
4

1. Unpack the items supplied and check them for completeness and transport damage. If the machine or the power cord has
damage, do not use the machine. Contact our customer service department at cs@espresso-works.com
2.
NOTES
• Place the device on a dry, level, non-slip surface.
• Keep the original packaging during the warranty period of the machine so that the machine can be properly packaged up if
it needs to be returned. The warranty claim shall lapse if any damage is caused during transport.
KEY
1 Bean hopper
2 Grinder chute
3 Grinder button
4 Cover for the drip tray
5 Drip tray
6 Water tank lid
7Water tank
8 Cup warmer
9Control panel
10 Brew head
11
12
13 Steam wand handle
14 Steam wand nozzle
TECHNICAL DATA
Model number: AEW-6000
Voltage supply: 120 V ~ 60 Hz
Power: 1350W
Pressure: 15-bar pump pressure system
Conical burr grinder
with 0.5 lbs/250g hopper
Capacity:
• Water tank: max. 77oz / 2.3 liters
• Cappuccino glasses: 310 ml
• Espresso cup: 80 ml
• Filter (single cup): 16g coffee powder
• Filter (double cup): 22g coffee powder
CONTROL PANEL
ON / OFF button
Red indicator light
Blue indicator light
Blue indicator light
START/STOP button
LCD screen
MENU
button
CLEAN
button
SIZE
button
CUPS
button
DIAL
UNPACKING AND SETTING-UP
START
STOP
GRIND
01
SEC
40
(ML)SINGLE
1
CUPS
SIZE
MENU CLEAN SIZE CUPS
ON/OFF
SET/CONFIRM
6
8
7
9
1
2
3
4
5
10
11
12
14
13
5

1.
tray and all other accessories with a little mild detergent and clean water.
2. Set up the machine in a suitable location, following the safety instructions and the notes provided in this guide.
3. Completely unwind the mains cable and plug into a properly installed power outlet that is easily accessible.
NOTE
•
odor to be produced. This is normal and not a machine defect.
• Do not place the machine below kitchen wall units or similar cupboards. The rising steam could cause damage to them.
• The surfaces of furniture may possibly contain elements which can damage and weaken the base of the machine.
If necessary, place a suitable pad below the base.
• Do not operate the machine without water. If this does happen, the machine issues an error message (the "blue" indicator
light on the START/STOPNO WATER warning appears on the LCD screen). Please refer to the
Troubleshooting Your Machine chapter on page 21-23.
• Do not pour milk or other liquids into the water tank. Use only water to make coffee.
•
• Do not use the machine without a suitable container below the brew head and/or the steam wand.
COFFEE GRINDER
• Never use attachments or accessories that are not recommended by the manufacturer. They may cause malfunction or injury.
• Make sure there is no hard object in the grinder chamber before use. This may cause damage to the appliance and personal
injury to persons.
• This appliance can be used by children aged 8 years old and above and persons with reduced physical, sensory or mental
capabilities or lack of experience and knowledge if they have been given supervision or instruction concerning use of the
appliance in a safe way and understand the hazards involved. Children shall not play with the appliance. Cleaning and user
maintenance shall not be made by children without supervision.
• This appliance is for household use only. Do not use it for professional catering.
• Do not use the appliance outdoors.
BEFORE INITIAL USE
MOUNTING THE BEAN HOPPER
• This machine is only intended to be used to make specialty coffees using coffee powder and cold milk.
• This machine is only designed for use in a personal household and is not intended for commercial applications.
• The machine should only be used as described in the operating instructions. Any other use is deemed to be improper.
INTENDED USE
STEP 1
The line markings on the two rings at
the bottom of the bean hopper must be
aligned with each other.
STEP 2
Place the bean hopper on the grinder
so that the open lock symbol and the
line markings are positioned above the
▲GRIND SIZE marking on the machine.
STEP 3
Turn the bean hopper clockwise beyond
the small notch until the ▲GRIND SIZE
marking is aligned within the 1-15
number range.
6

POWERING UP YOUR MACHINE
STEP 3
Plug the machine into a 110/120V
power outlet.
STEP 1
heat-resistant surface.
STEP 4
Press the ON/OFF button. The heating
process will start and the "red" indicator
light on the ON/OFF
for 60 seconds. When the light stops
done. You may start using the machine
to make your coffee brew of choice.
STEP 2
Open the water tank located at the back of the machine.
Open the lid and lift out the tank using the provided built-in
handle. Fill it with water and do not exceed the marking.
Carefully slide the water tank back in position. Once secured,
close the tank lid.
AUTO OFF FUNCTION
The machine will turn off automatically
after 30 minutes of no usage. Press the
ON/OFF button to switch it on again.
1. Plug the machine into a power source.
2. Fill the water tank with water.
3. Press the ON/OFF button to switch on the machine. The red indicator light will
4. After 60 seconds, the "red" indicator light on the ON/OFF button will become
steady.
5. Place a suitable sized cup or container under the brew head and steam wand.
6. Press the CLEAN button and press the START/STOP button afterwards. The
machine will draw water through the brew head and steam wand.
The QUICK CLEANING process will take up to 4 minutes.
7. The machine is now cleaned and ready for use. Enjoy!
FIRST TIME USE
GRIND SIZE
NOTE
• There may still be some production residue on the machine. Please clean the
• Remove any stickers on the machine and accessories before use.
7

GRINDING THE COFFEE
STEP 2
CHANGING THE FILTER
STEP 1 SETTING THE DEGREE OF GRINDING
Rotate the bean hopper on the grinder clockwise until the ▲GRIND SIZE marking points to the desired degree of grinding on
the bean hopper.
NOTES
• Use the SINGLE FILTER for normal cappuccino, latte macchiato or single espresso.
Use the DOUBLE FILTER for stronger cappuccino, latte macchiato or double espresso.
»For a SINGLE espresso, you need approx 14~16g coffee powder.
»For a DOUBLE espresso, you need approx 20~22g coffee powder.
IMPORTANT
The grinder will NOT function if the ▲GRIND SIZE marking is not within the 1-15 number range.
NOTES
•
rules apply to the preparation of espresso:
»
bitter, grind the coffee coarser.
»The coarser the degree of grinding, the faster the extraction time. If the espresso tastes too
»The optimal degree of grinding also depends on the type of espresso.
• The following info can serve as a guide:
DEGREE OF GRINDING USE
VERY FINE
MEDIUM
COARSE French Press
8

TAMPING THE COFFEE POWDER
INSTALLING THE PORTAFILTER
STEP 1
Distribute the coffee powder evenly on
and spread it out without pressure, for
example with a teaspoon.
STEP 3 GRINDING THE COFFEE
chute. You may choose to set the grinding time or simply tilt
continues to function as long as the grinder button is held down.
STEP 2
straight on the coffee powder from
above and press it down evenly.
STEP 4
slightly full of coffee powder. Wait until no more coffee
of the holder.
STEP 3
Carefully lift off the tamper. Wipe off any
loose ground coffee powder from the
TIPS
• Even pressure is more important than strong pressure.
• A pressure of approx. 11~15kg is optimal. You can practice this using a personal scale.
• After tamping, the coffee powder should not extend beyond the
•
STEP 1
INSERT marking on the
slots.
STEP 2
until the handle aligns with the LOCK TIGHT marking on the
brew head.
9
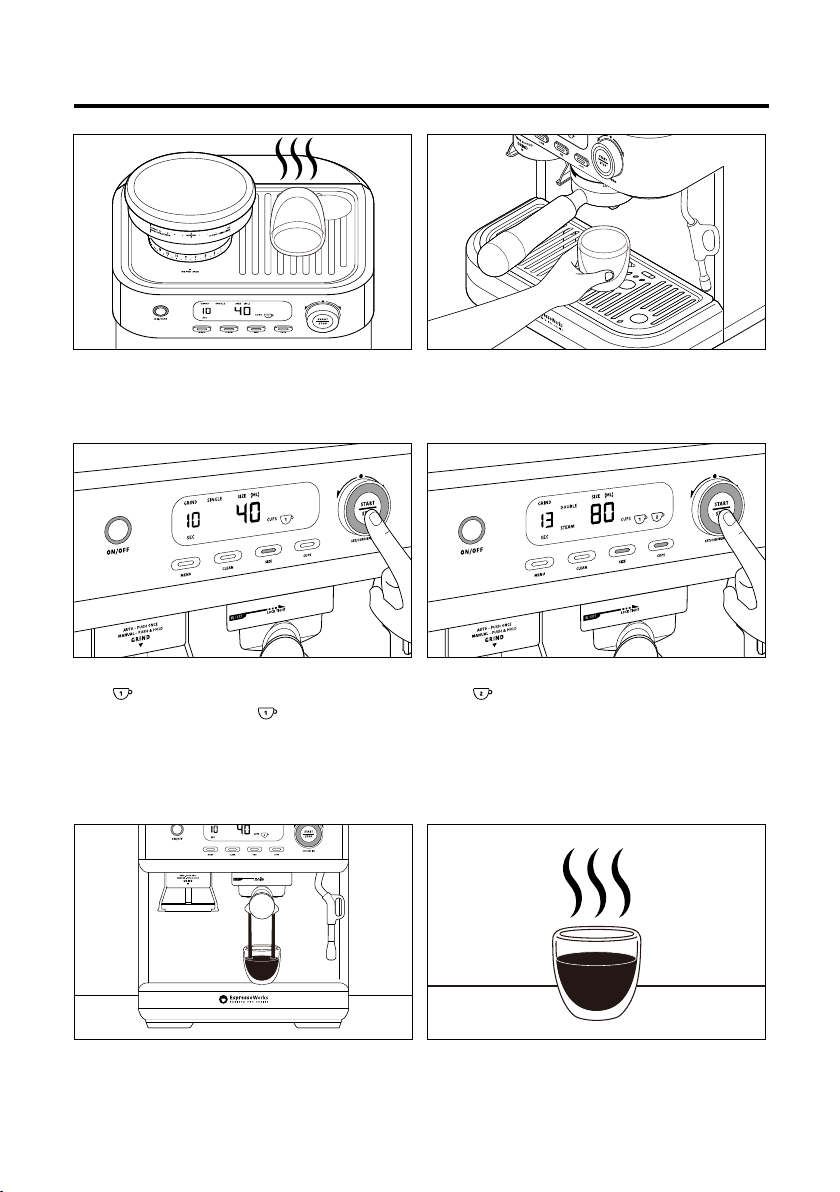
PREPARING SINGLE / DOUBLE ESPRESSO
GRIND SIZE
2 CUPS - DOUBLE
1. Press the CUPS button once.
2. Press the SIZE button and turn the DIAL to adjust the
volume to “60~90ml”
3. Press the START/STOP button to initiate the coffee brewing
process (preset to 80ml).
STEP 1
If desired, pre-heat the cups by placing them on the cup
warmer for about 5-10 minutes.
STEP 4
The coffee will begin to pour out of the brew head. The
START/STOP button will show a solid "blue" indicator light
during the duration of the process.
STEP 2
Place a cup under the brew head.
STEP 5
Once the brewing process is done, coffee will stop pouring
and the "blue" indicator light on the START/STOP button will
turn off.
STEP 3
1 CUP - SINGLE
1. The machine is preset to 1 CUP once you turn it on.
2. Press the SIZE button and turn the DIAL to adjust the
volume to “30~50ml”
3. Press the START/STOP button to initiate the coffee brewing
process (preset to 40ml).
10

STEP 1
Fill the stainless steel frothing pitcher 1/3 of the way with
fresh, cold milk. Please use skimmed milk for best results.
STEP 3
Move the steam wand away from the drip tray and hold the
frothing pitcher at an angle so that the top of the steam wand
sits just below the surface of the milk. Once you're ready,
press the START/STOP button to start steaming. A countdown
on the LCD screen will initiate once the process starts.
STEP 4
When the foam starts to increase in volume, immerse the
steam wand deeper into the frothing cup. When the foam
is at the desired level, push the START/STOP button to stop
the process. Once steaming has completed, the "blue"
indicator light on the START/STOP button will turn off and
the countdown on the LCD screen will reset.
CLEANING THE STEAM WAND
To avoid clogging, make sure the steam wand is cleaned
immediately after each use. You may use the provided
Steam wand cleaning pin located in the drip tray slot.
STEP 5
Pour the steamed froth on your coffee brew of choice. Enjoy!
FROTHING THE MILK
TIPS
• Immerse the steam nozzle just below the surface so that air is introduced into the milk ( drawing phase ).
Do not dip the steam nozzle into the centre of the pitcher, but to the side, so that a vortex is created.
• When the volume of the milk has visibly increased, dip the steam nozzle a little deeper. The vortex should remain.
WARNING
• BE CAREFUL! the steam wand gets very hot while in use. Move it using the steam wand handle.
• DO NOT move the steam wand over the surface of the milk to avoid hot milk from spalshing out.
STEP 2
Press the MENU button to set the program to STEAM, and
wait until the STEAM
time using the DIAL. ( see the section in the Program Display/
Functions chapter in Page 13)
SET/CONFIRM
START
STOP
30
STEAM
SEC
SET/CONFIRM
START
STOP
11
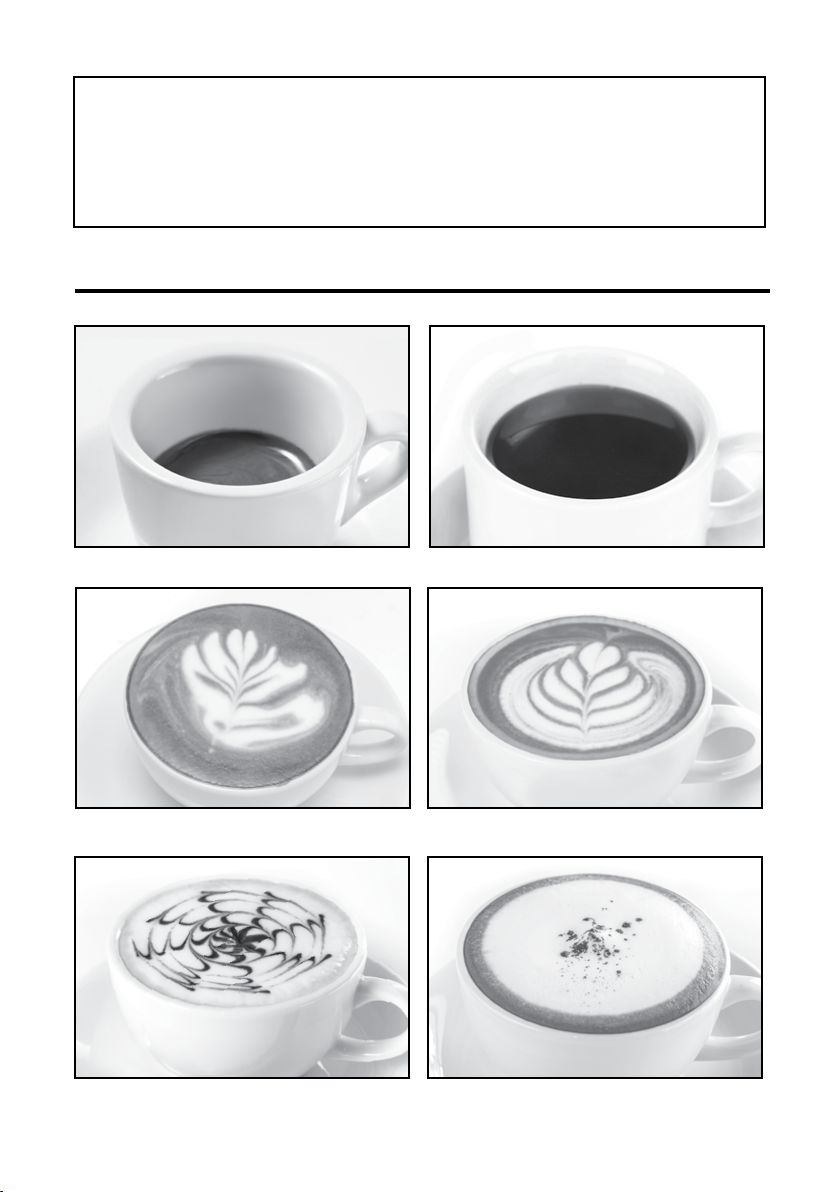
ESPRESSO
CAFE LATTE
AMERICANO
CAPPUCCINO
FLAT WHITE
MACCHIATO
DIFFERENT BREWS WITH YOUR MACHINE
EXTRA TIPS
• We suggest to try milk from different producers.
• Milk with higher protein yields a creamier foam.
• Always use cold milk from the refrigerator ( approx. 5 oC ).
• When foaming, the milk should not become hotter than approx. 60 oC. Higher temperatures change the taste and cause
the milk foam to disintegrate.
•
12

1. The machine is preset to 1 CUP once you turn it on.
2. Turn the DIAL to set the grinding time. Grind time for
1 CUP is preset to 10 seconds.
3. Press the SIZE button. Size (ml) is preset to 40 ml. Turn the
DIAL to set the desired amount.
4. Press the START/STOP button to start the brewing process.
1. Press the CUPS button once.
2. Turn the DIAL to set the grinding time. Grind time for
2 CUPS is preset to 13 seconds.
3. Press the SIZE button. Size (ml) is preset to 80 ml. Turn the
DIAL to set the desired amount.
4. Press the START/STOP button to start the brewing process.
1. Press the MENU button twice.
2. The HOT WATER icon will appear on the LCD screen.
The drip time is preset to 60 seconds.
3. Turn the DIAL to set the HOT WATER drip time as needed.
4. Press the START/STOP button to start the process.
A countdown on the LCD screen will initiate once the
process starts.
1. Press the MENU button 4 times. The GRIND icon will
appear on the LCD screen.
2. Turn the DIAL to set the Grinding Time as needed.
3. Press the START/STOP
down to press the "grinder button" under the grinder chute
to start the process. A countdown on the LCD screen will
initiate once the process starts.
1. Press the MENU button 3 times. The STEAM icon will
appear on the LCD screen. Steaming time is preset to 30
seconds.
2. The STEAM
3. Turn the DIAL to set the steam time as needed.
4. Press the START/STOP button to start the steaming process.
A countdown on the LCD screen will initiate once the
process starts.
PROGRAM DISPLAY/FUNCTIONS
GRIND
SEC
40
(ML)SINGLE
1
CUPS
SIZE
01
MENU CLEAN SIZE CUPS
ON/OFF
SET/CONFIRM
START
STOP
60
HOT WATER
HOT WATER
SEC
MENU CLEAN SIZE CUPS
ON/OFF
SET/CONFIRM
START
STOP
SET/CONFIRM
GRIND
SEC
51
MENU CLEAN SIZE CUPS
ON/OFF
START
STOP
30
STEAM
SEC
MENU CLEAN SIZE CUPS
ON/OFF
SET/CONFIRM
START
STOP
MENU CLEAN SIZE CUPS
ON/OFF
80
(ML)SIZEGRIND
3
SEC
DOUBLE
STEAM
1 2
CUPS
SET/CONFIRM
START
STOP
GRIND
SEC
30
(ML)SINGLE
1
CUPS
SIZE
01
MENU CLEAN SIZE CUPS
ON/OFF
SET/CONFIRM
START
STOP
GRIND
3
SEC
60
(ML)
DOUBLE
1 2
CUPS
SIZE
MENU CLEAN SIZE CUPS
ON/OFF
SET/CONFIRM
START
STOP
CUPS & VOLUMES
HOT WATER
GRINDING
STEAM
1 CUP - SINGLE 2 CUPS - DOUBLE
NOTE
»Grind time for 1 CUP ranges from 2~15 seconds.
»Size (ml) for 1 CUP ranges from 30~50ml.
NOTE
»Grind time for 2 CUPS ranges from 2~20 seconds.
»Size (ml) for 2 CUPS ranges from 60~90ml.
NOTE
»Steaming time can range from 10~90 seconds.
NOTE
»Drip time can range from 10~99 seconds.
»HOT WATER comes out of the STEAM WAND.
NOTE
»Grinding time can range from 2~30 seconds.
13
ABOUT THE SAFETY INSTRUCTIONS
and safety instructions carefully and keep them for future reference. If
the machine is given to someone else, these operating instructions
should also be handed over with it. The manufacturer and importer do
not accept any liability if the information in these operating instructions
is not complied with.
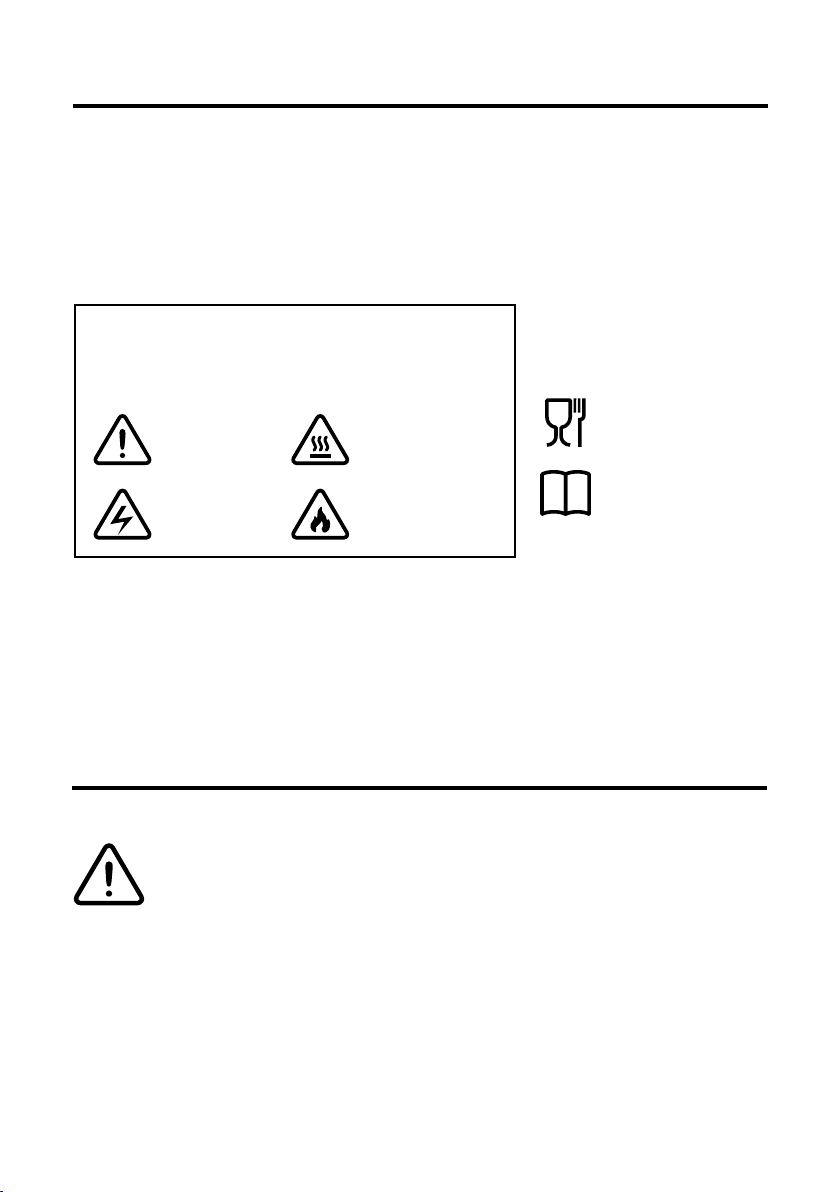
EXPLANATION OF THE SIGNAL WORDS
DANGER Warns of serious injuries and danger to life.
WARNING Warns of possible serious injuries and danger to life.
CAUTION Warns of slight to moderate injuries.
NOTE Warns of damage to property.
Danger
symbol
Electric
shock risk
Beware of hot
surfaces
The symbols below indicate risks of
injury. Read through the associated safety
instructions carefully and follow them.
EXPLANATION OF
THE SYMBOLS
Read operating
instructions
before use
Suitable for
food use
The machine is equipped with safety features. Nevertheless,
it may still present dangers if it is not used in the intended
way and / or is utilized in some other way. Comply with
the following safety instructions and procedures that are
• This machine may be used by children aged 8 and over and by
people with reduced physical, sensory or mental abilities or a lack of
experience and/or knowledge if they are supervised or have received
instruction on how to use the machine safely and have understood
the dangers resulting from failure to comply with the relevant safety
precautions.
• Children must not play with the machine.
SAFETY INSTRUCTIONS
14

• Cleaning and user maintenance may not be performed by children,
unless they are older than 8 years of age and are supervised.
• Children younger than 8 years of age and animals must be kept away
from the machine and the mains cable.
• Keep children and animals away from the packaging material to avoid
any danger of suffocation.
WARNING : Danger of Scalding from Heat,
Hot Steam or Condensation
• Avoid coming into contact with the rising steam. Keep your hands and
head away from the steam outlet openings during the brewing process.
•
•
• Never pour water into the water tank when the machine is switched
on or during the brewing process. Always switch off the machine and
been inserted correctly before switching it on again.
• Make sure that the is pointing into the cup below the brew head to
prevent any accidental, uncontrolled emission of hot milk from the milk
nozzle.
• Do not move the machine during the brewing process.
• The specialty coffees that are prepared are hot. Be careful when
handling hot liquids.
CAUTION : Hot Surfaces
The machine and the accessories are very hot during and
shortly after use. Only touch the handles and controls while it
is in operation. Allow them to cool down completely before
cleaning.
• The machine is not designed to be operated with an external timer or a
separate remote control system.
• Never immerse the machine, mains cable or power cord in water or
other liquids and ensure that they cannot fall into water or become wet.
• The machine must always be disconnected from the mains when it is left
15

the water tank or milk reservoir or cleaning it.
• In the interest of your own safety, check the machine, the mains
cable and the power cord for damage every time before use. Use the
machine only if it is in working order.
•
mains cable yourself. If the machine, the mains cable or the power
cord of the machine is damaged, they must be replaced by the
manufacturer, customer service department or authorized retailers in
order to avoid any hazards.
• Please follow the instructions in the Cleaning and Maintenance
chapter on page 18.
DANGER : Electric Shock from Water
• Use the machine only in closed rooms. Do not use the machine in
rooms with high humidity.
• Should the machine fall into water, switch off the power supply
immediately. Do not attempt to pull it out of the water while it is still
connected to the mains power.
• Never touch the machine, power cord with wet hands when these
components are connected to the mains power.
• Make sure that the steam which emerges is not aimed directly at
electrical machines and equipment containing electrical components.
WARNING : Danger of Electric Shock from
Damage and Inappropriate Use
• Only connect the machine to a socket with safety contacts that are
properly installed and matches the technical data of the machine. The
socket must also be readily accessible after connection so that the
connection to the mains can quickly be isolated.
• Do not use the machine in conjunction with extension cables.
DANGER : Risk of Fire
• Do not use the machine in rooms containing easily ignitable dust or
poisonous and explosive fumes.
16

• Do not connect the machine along with other consumers (with a high
wattage) to a multiple socket in order to prevent overloading and a
• Do not operate the machine in the vicinity of combustible material. Do
not place any combustible materials (e.g. cardboard, paper, wood or
plastic) in or on the machine.
• Do not cover the machine during operation.
•
NOTE : Risk of Damage to Material
and Property
• The machine should only be used when it is correctly assembled. Before
• Lay the mains cable in a way that it does not become squashed or bent
and does not come into contact with hot surfaces (also applies to the
hot surfaces of the machine).
• To avoid the machine from being pulled down, the mains cable must not
hang down from the surface on which the machine is placed.
• Switch off the machine and pull the power cord out of the power outlet
if an error occurs during operation, when there is a power cut or before
a thunderstorm.
• Never pull or carry the machine by the mains cable. When you pull it out
of the power outlet, always pull on the power cord and never the mains
cable.
•
temperatures, persistent moisture, wet conditions and impacts.
• Use only original spare parts from the manufacturer.
17

1. Unplug your espresso machine from the power outlet and allow for it to completely cool off before cleaning.
2.
3. Regularly run the cleaning program to clean the steam wand and the brew head.
4. Wipe down the housing with a damp cloth. If necessary, use a little mild detergent to remove tougher stains.
5.Thoroughly dry the machine and all accessories before assembling it again.
6. Check the mains cable regularly for any damage.
IMPORTANT
• Before cleaning, read the safety instructions in the Important Safeguards and Safety Instructions chapters on page 2
and page 14 respectively.
• Do not use any toxic or abrasive cleaning agents or scouring sponges to clean the machine. These can damage the surface.
• Never immerse the machine in water.
• Do not use the machine without a suitable container below the brew head and/or the steam wand.
• The water tank, bean hopper and drip tray are not suitable for dishwasher. Only wash by hand.
CLEANING AND MAINTENANCE
1. Fill water into the water tank. Do not exceed the
marking.
2. Press the CLEAN button within 3 seconds.
3. Press the START/STOP button and the cleaning process will
begin. The whole process will take up to 4 minutes.
1. Fill water into the water tank. Do not exceed the
marking.
2. Press the CLEAN button for 3 seconds and the button light
3. Press the START/STOP button and the cleaning process will
begin. The whole process will take up to 7 minutes.
CLEANING button
presetting screen
04
CLEAN
MIN
MENU CLEAN SIZE CUPS
ON/OFF
SET/CONFIRM
START
STOP
07
CLEAN
MIN
MENU CLEAN SIZE CUPS
ON/OFF
SET/CONFIRM
START
STOP
QUICK CLEANING
DEEP CLEANING
NOTE
• For QUICK CLEANING:
The machine will drip water out of the brew head
and steam wand alternately for 3 cycles in the span
of 4 minutes.
»Brew Head = 40s/cycle
»Steam Wand = 40s/cycle
• For DEEP CLEANING:
The machine will drip water out of the brew head
and steam wand alternately for 5 cycles in the span
of 7 minutes.
»Brew Head = 40s/cycle
»Steam Wand = 40s/cycle
IMPORTANT
• A full tank of water is recommended for BOTH
cleaning modes.
• To stop the procedure, simply press the
START/STOP button.
• DEEP CLEANING is recommended when using a
“Descaling Agent”.
DESCALING
the espresso.
Limescale deposits have an adverse effect not only on the quality of the espresso and the water, but they also cause power
We therefore recommend regularly removing limescale deposits with a descaling agent in accordance with the water quality in
your area and how often the machine is used (approx. every 2 – 6 weeks).
STORAGE
Disconnect the machine from the mains power when it's not going to be used for a prolonged period. Clean the machine
again if necessary and let it dry completely.
Store the machine and all accessories in a dry, clean, frost-free place that is protected from direct sunlight and cannot be
accessed by children or animals. Use the machine cover to prevent dust build-up.
18

1. Always switch off and unplug the machine
before cleaning.
2. Carefully remove the bean hopper from
the machine.
3. Clean the lid and hopper with water and
mild detergent.
4. Rinse thoroughly afterwards.
5. Wipe the bean hopper with a dry cloth,
then dry thoroughly.
CLEANING THE BEAN HOPPER
1.
coffee powder or any debris remaining on the
2. In case of clogging, you may use the other end of
holes.
CLEANING THE PORTAFILTER AND FILTERS
CLEANING THE CONICAL BURR GRINDER
STEP 1
Unlock the burr grinder by rotating it clockwise. Carefully
remove the top burr.
STEP 2
Remove any debris and clean the top burr with the
grinder brush.
STEP 3
Remove any debris and clean the lower burr with the
grinder brush. You may use a stick to pry out any stuck debris
in between the grinder blades.
STEP 4
Declog and remove any stuck debris in the grinder chute
using the other end of your grinder brush.
REMOVING BLOCKAGES FROM THE STEAM NOZZLE
1. Use the Steam wand cleaning pin located inside the drip
tray slot.
2. Poke the small hole at the bottom of the steam nozzle using
the pin to remove blockages.
3. Hold a container under the steam wand and run
HOT WATER for 30 seconds to rinse out the dissolved
residues.
GRIND SIZE
GRIND SIZE
19

WARRANTY
PRODUCT REGISTRATION
EspressoWorksTM strongly encourages you to register your purchase. You can register online at www.espresso-works.com
Registering your purchase will allow EspressoWorksTM to better serve you with any of your customer service needs.
WHO CAN SEEK WARRANTY COVERAGE
This warranty is extended by EspressoWorksTM to the owner of this machine for personal household use only. This warranty
does not apply to products used for commercial, rental or re-sale purposes.
WHAT IS COVERED
EspressoWorksTM warrants to the owner that if this machine fails within 1 year from the date of purchase on the purchase
receipt due to a defect in material or workmanship, EspressoWorksTM will repair or replace the failed machine or component
part of the machine. Shipping and handling charges may apply. Please retain the original purchase receipt for the duration of
the warranty period. EspressoWorksTM reserves the right to refuse a warranty repair if proof of purchase cannot be provided. In
the event of a warranty claim, please return the product with the original purchase receipt.
WHAT IS NOT COVERED
This warranty does not apply to machines that have been used commercially or in non-household applications. This warranty
does not cover cosmetic changes that do not affect performance, such as discoloration or the effects of the use of abrasives or
cleaners or food build up. This warranty is only valid if the machine is used and maintained in accordance with the instructions,
operating or assembly instructions.
EspressoWorksTM will not be responsible for the cost of any unauthorized warranty repairs.
NO EMPLOYEE OR REPRESENTATIVE OF ESPRESSOWORKSTM IS AUTHORIZED TO MAKE ANY ADDITIONAL WARRANTY
OR ANY MODIFICATION TO THIS WARRANTY WHICH MAY BE BINDING UPON ESPRESSOWORKSTM. ACCORDINGLY,
PURCHASER SHOULD NOT RELY UPON ANY ADDITIONAL STATEMENTS MADE BY ANY EMPLOYEE OR REPRESENTATIVE
OF ESPRESSOWORKSTM. IN NO EVENT, WHETHER BASED ON CONTRACT, INDEMNITY, WARRANTY, TORT (INCLUDING
NEGLIGENCE), STRICT LIABILITY OR OTHERWISE, SHALL ESPRESSOWORKSTM BE LIABLE FOR ANY SPECIAL, INDIRECT,
INCIDENTAL OR CONSEQUENTIAL DAMAGES, INCLUDING, WITHOUT LIMITATION, LOSS OF PROFIT OR REVENUE.
Some states do not allow limits on warranties. In such states, the above limitations may not apply to you. Outside the U.S.A. and
Canada, other warranties may apply.
For more information, visit www.espresso-works.com
20
Table of contents
Other EspressoWorks Coffee Maker manuals


