Travel Chef GRIND XPRESS User manual

Part No. TRC25134
GRIND XPRESS™
The Travel Chef®Grind Xpress™uses the ‘drip’ or
‘pour over’ method and relies on hot water travelling through
the coffee using gravity.
GRIND XPRESS™

2
USER MANUAL AND PRODUCT SPECIFICATIONS
GRIND XPRESS™
GENERAL WARNINGS;
IMPORTANT: This user manual contains important safety information and
operating instructions. Please read this manual carefully to familiarise yourself
with the product and accessories before use. Keep this manual in a safe place
for future reference.
• Do not place in the dishwasher, hand wash ONLY and ensure all components
are dry before storing
• Do not microwave any components
• Do not apply heat in an attempt to boil cold water in the plastic pouring cup
• Caution should be taken when lling the pouring cup with hot water as to
avoid burning of the skin
• Care should be taken if children are nearby
• Follow the instructions within this manual carefully, to not cause harm to
yourself or others
• Care should be taken when handling the ceramic burrs, they are extremely
brittle and can shatter if dropped
• This product must not be used by children or by an adult who has reduced
physical or mental capabilities.
3
USER MANUAL AND PRODUCT SPECIFICATIONS
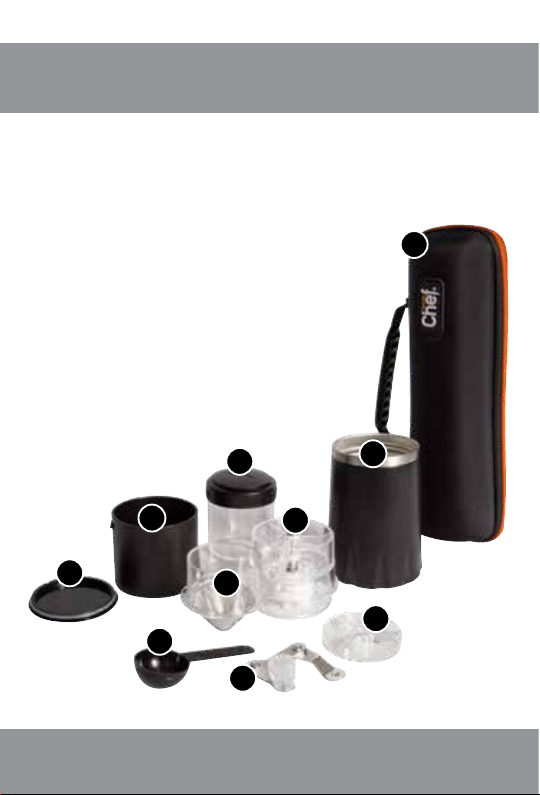
UNDERSTANDING YOUR GRIND XPRESS™
PORTABLE COFFEE MAKER
1 Lid
2Hot water pouring cup
(also storage for the grinder handle)
3Grinder handle
4 Coffee bean hopper cover
5Coffee bean hopper and grinding
burr mechanism (main body)
6Mesh ‘Drip’ lter basket
7Tumbler base
870g coffee bean storage container
97g measuring spoon
10 Carry case
3
6
5
2
8
10
4
1
7
9

4
USER MANUAL AND PRODUCT SPECIFICATIONS
GRIND XPRESS™
QUICK GUIDE
OPERATION - SETUP
Step 1
Inspection and clean;
Remove the Grind Xpress™and accessories from the original packaging.
Check for any damage before use.
Note: If damage is found on any part, it is highly recommended that
they are replaced with genuine parts available from Companion Brands.
Please contact Companion Brands Customer Service (details are at
the back of this booklet) if spare parts are required.
It is recommended to thoroughly hand wash all components with mild
dishwashing detergent and warm water to remove any contaminants from the
manufacturing process. Ensure all components are completely dry before
attempting to grind your coffee beans.
1. Grind Xpress™
2. Remove the pouring cup, grinder handle and measuring spoon from inside the tumbler.
3. Add 2 scoops (14g) of coffee beans to the hopper and replace the cover
4. Grind the beans using either the pouring cup or the grinder handle.
5. Remove the coffee bean hopper (main body)
6. Pour 2 cups (260ml) of hot water over the ground coffee
7. Remove the mesh lter basket.
8. The result, a hot cup of coffee. Drink straight from the tumbler or transfer to a cup or mug.
Add milk of sweeten to taste.
3 652 841 7

5
USER MANUAL AND PRODUCT SPECIFICATIONS
Step 2
Calibrate the grinding burns;
To achieve the ideal brewing (drip or pour over) time of around 3 minutes, it may
be necessary to adjust the ‘grain’ or ‘grind’ size of the beans to allow the hot
water to ow through the ground beans either faster or slower. If the water ow
rate is too fast, the coffee grain size needs to be smaller or if too slow, the grain
size needs to be larger.
It is a simple to adjust the grain size by either opening or closing the gap
between the top and bottom ceramic burrs.
The factory gap setting between the burrs should be ok as a starting point.
However, if it is necessary to adjust the burr setting, simply follow these steps;
• Place the grinder handle (item 3) over the ‘hex’ centre axis bolt of the main
body (item 5) as it would be to grind the coffee beans.
• Invert the main body to expose the adjustment nut underneath and at the
same time supporting the grinder handle to prevent rotational movement,
turn the adjusting nut ‘clockwise’ until the ‘gap’ between the top and bottom
burrs are just touching*
• Now, rotate the adjustment nut again in the opposite anti-clockwise direction
approximately 1.5 turns.
Obviously, taste is the key to a good coffee, so the above setting is only a guide.
Please feel free to adjust the grain size to suit your taste. It is not necessary to
lock the adjustment nut, as it will automatically stay in the set position.
*Warning: The ceramic burrs are
extremely brittle, care should be
taken as to not collide the ‘top’
and ‘bottom’ burrs together while
making the gap adjustment.
Coarse Fine

6
USER MANUAL AND PRODUCT SPECIFICATIONS
GRIND XPRESS™
OPERATION - BREWING THE COFFEE
Step 1:
Grind the coffee beans;
An expresso from a café will have about 7g of nely ground coffee to 30ml of
water however, an expresso machine forces hot water through the ground coffee
under high pressure to get the best avours out of the coffee.
The Grind Xpress™uses the ‘drip’ or ‘pour over’ method and relies on hot water
travelling through the coffee using gravity. This means the ratio of ground coffee
to hot water will need to be increased to achieve a better tasting coffee.
Place the tumbler base (item 7) onto a rm surface, then place the mesh lter
basket (item 6) inside, then screw the main body (item 5) in position which
incorporates the bean hopper.
It is worth experimenting with the amount of coffee beans placed into the bean
hopper (item 5) to accommodate your taste. To start, it is recommended to place
two 7g scoops (14g) of coffee beans into the hopper using the measuring spoon
provided (item 9). Place the coffee bean hopper cover (item 4) in position to
prevent the beans from escaping while grinding.
Take the grinder handle (item 3) and position the ‘hex’ shaped hole over the
centre axis bolt on the main body (item 5), while rmly supporting the tumbler
base with one hand, rotate the grinder handle in either direction at the same time
until all the beans are fully ground and fallen through to the mesh lter basket
below.
Step 2:
Infusion, drip or over pour;
Unscrew the main body (item 5) and place it to one side. Take the hot water
pouring cup (item 2) and ll with hot water to the maximum 130ml line. Ensuring
not to over ll as the water will start to come out of the pouring hole on the side
and then place the lid (item 1) on top for better control while pouring.
You will now see a pyramid shape mound of freshly ground, coffee in the mesh
lter basket. Give the mesh lter basket a light tap to evenly distribute the
ground coffee. At this point, briey remove the mesh lter basket, pour a small
amount of hot water into the tumbler base to preheat, immediately discard the
water and reposition the mesh lter basket.

7
USER MANUAL AND PRODUCT SPECIFICATIONS
Then, take the hot water pouring cup and gently pour about 30ml of water
over the ground coffee in a circular motion to infuse or wet the coffee, this is
an important step and will bring out the avour of the coffee. Wait about 30
seconds and then pour the remaining water over the ground coffee, again in
a circular motion. Remove the lid from the hot water pouring cup, rell for the
second time with hot water to the maximum 130ml, ret the lid and continue
pouring until all of the 260ml of water has passed through.
The ideal timing for the drip process after infusion is around 3 minutes for the
260ml of water to lter through. Refer to the ‘Operation – Setup, Step 2 if any
adjustments are required.
Step 3:
Enjoying your hot cup of coffee;
Remove the mesh lter basket from the tumbler base, discard the used ground
coffee and rinse the lter to clean. You can drink the freshly brewed coffee
straight from the tumbler base or if you prefer, pour the coffee into a separate
preheated cup or mug. Hint; if you are transferring the brewed coffee from the
tumbler base, suspend the cleaned mesh lter basket over the separate cup or
mug and pour the brewed coffee back through the lter too further remove any
unground particles.
MAINTENANCE
It is recommended to hand wash all components with mild dishwashing
detergent and warm water after each use. Ensure all components are completely
dry before placing the Portable Coffee Maker back into its storage case.
TROUBLESHOOTING
Not a lot can really go wrong. It’s a case of using more or less coffee beans and
or hot water and adjusting the grind size to suit your individual taste.
Other than that……Enjoy!

TC003
Distributed by
Companion Brands
Bundoora Victoria 3083
www.companionbrands.com.au
This manual suits for next models
1
Table of contents


