Essential Garden S-PG11D1NK User manual

CURVED PERGOLA WITH CANOPY
Product code: 0-05605615-3
UPC code: 769455 767028
Vendor Item: S-PG11D1NK
Date of purchase: _____/ _____/ _____
1
garden
USE AND CARE GUIDE

Thank you for your purchase
Thank you for your purchase
We are pleased that you have chosen Kmart for your outdoor furniture purchase.
We hope that you enjoy the unmatched quality, comfort, and style of your new patio
set. Every piece is meticulously considered all the way down to the smallest details,
exclusively for you, by our world class design team. We know you have a choice when
it comes to your patio furniture needs, so from our team to yours, thank you for letting us
be a part of your outdoors.
Table of Contents
Table of Contents.................................... 2
Safety Information................................... 3
Set Up your Furniture Properly..............3
Examine your furniture..........................3
Warranty................................................... 3
Care and Maintenance............................ 4
Special Warning ..................................... 4
Pre-Assembly.......................................... 5
Planning Assembly.............................. 5
Hardware Included.............................. 5
Assembly Instructions
Package Contents................................. 6
Pergola................................................... 7
Customer Service..................................13
2

Safety Information
SET UP YOUR FURNITURE PROPERLY
Ensure that all parts are assembled properly and fully tightened as per the instructions.
When placing in the desired location, ensure that all legs are resting on the same
surface. You may adjust the legs levelers as required to ensure that the item stands
in a rigid position.
EXAMINE YOUR FURNITURE
Examine occasionally to ensure that there are no loose parts. If loose parts are found,
they must be retightened fully before additional use.
Warranty
WARRANTY
We warrant our products to be free of manufacturing defects to the original purchaser for
the period listed below. We reserve the right to make substitutions with similar merchandise,
if the model in question is no longer in production.
EXCLUSIONS
This warranty does not cover: Furniture used for commercial or non-residential purposes;
failures caused by improper care; unreasonable or abusive use; freeze damage; acts of
nature. Steel products are not covered against rust. Tempered glass table tops are not
covered against breakage.
FINISH
Frame finish is warranted to be free of manufacturing defects for a period of one (1) year.
Discoloration or fading of the finish as a result of exposure to the elements, chemicals, or
spills is not covered.
FABRIC
Fabric is warranted to be free of manufacturing defects for a period of one (1) year.
Discoloration or fading of the finish as a result of exposure to the elements, chemicals, or
spills is not covered.
FRAMES
Frame is warranted to be free from defects in material or workmanship for a period of
one (1) year for steel frame.
FREIGHT & PACKAGING
Freight and packaging are the responsibility of the original purchaser.
CUSTOMER SERVICE
3
In case of a problem, call 1-800-457-4652 between 9:00 am to 5:00 pm Eastern standard
time Monday through Friday or contact us at www.numarkcustomerservice.com for
any question or problems you may have.

Care and Maintenance
4
Though its powder-coated finish is rust-resistant, steel is prone to rust over time with
exposure to the elements. In case of rust or scratches, lightly sand the affected area
and apply touch-up paint. Periodically treat frames with a liquid wax for added protection
against UV rays. Wash with a mild solution of soap and water; rinse thoroughly. Dry
frames completely. Do not use bleach or solvents. Cover furniture with outdoor-furniture
covers when not in use. Disassemble and store gazebo indoors during winter months.
Wash with a mild solution of soap and water; rinse thoroughly. Dry completely. Do not
use bleach or solvents. Store canopy indoors during winter months to prevent collapse.
Always assemble your gazebo on a soft, non-abrasive surface. The gazebo is heavy;
use care when handling. Assembly by two adults is recommended. Follow
manufacturer’s instructions carefully.
Special Warning
Assemble your pergola on a soft, non-abrasive surface to avoid damage. The pergola is
heavy. Use care when handling. Assembly by six adults is recommended. The pergola is
not intended to be a permanent structure. Take it down during high winds or it may be
damaged.
KEEP ALL FLAME AND HEAT SOURCES AWAY FROM CANOPY FABRIC
The canopy is made with flame-resistant fabric which meets CPAI-84 specifications. It is
not fireproof. The canopy fabric will burn if left in continuous contact with flame source.
The application of any foreign substance to the canopy fabric may render the
flame-resistant properties ineffective.
Special Warning
Caution
This pergola is made for the explicit purpose of providing limited outdoor sun shade and
is not to be used as a toy, shelter or tent. This pergola is not intended for inclement
weather in any form including, but not limited to: rain, hail, sleet, snow and/or wind. Do
not locate structure near any open flame. Do not use structure as a support. Do not
shake, lean or climb on structure. Children under age of 10, near the structure, should
be supervised by a competent adult at all times.
Estimated Assembly Time: 90 minutes
Assembly by six people is recommended.

Read through all the instructions before beginning assembly. Unpack and identify all the parts.
Place them on a flat, non-abrasive surface.
PLANNING ASSEMBLY
HARDWARE INCLUDED
NOTED: Hardware not shown
to actual size.
Safety Information
Do not completely tighten bolts until indicated in assembly step.
Pre-Assembly
5
Ma (8 + 1 spare)
Short Countersunk Bolt
Mb (4 + 1 spare)
Long Countersunk Bolt
Mi (16)
Lawn Stake
Mh (24)
Large Metal Washer
Mm (2)
Connected Plate
Mj (2)
Allen Wrench
Mc (26 + 1 spare)
M6 Short Bolt
Md (20 + 1 spare)
M6 Long Bolt
Me (16 + 1 spare)
M8 Short Bolt
Mg (46)
Small Metal Washer
Mk (4)
Decorative Finial
Ml (2)
Open Hex Wrench
Mn (2)
Connected Plate
Mf (8 + 1 spare)
M8 Long Bolt
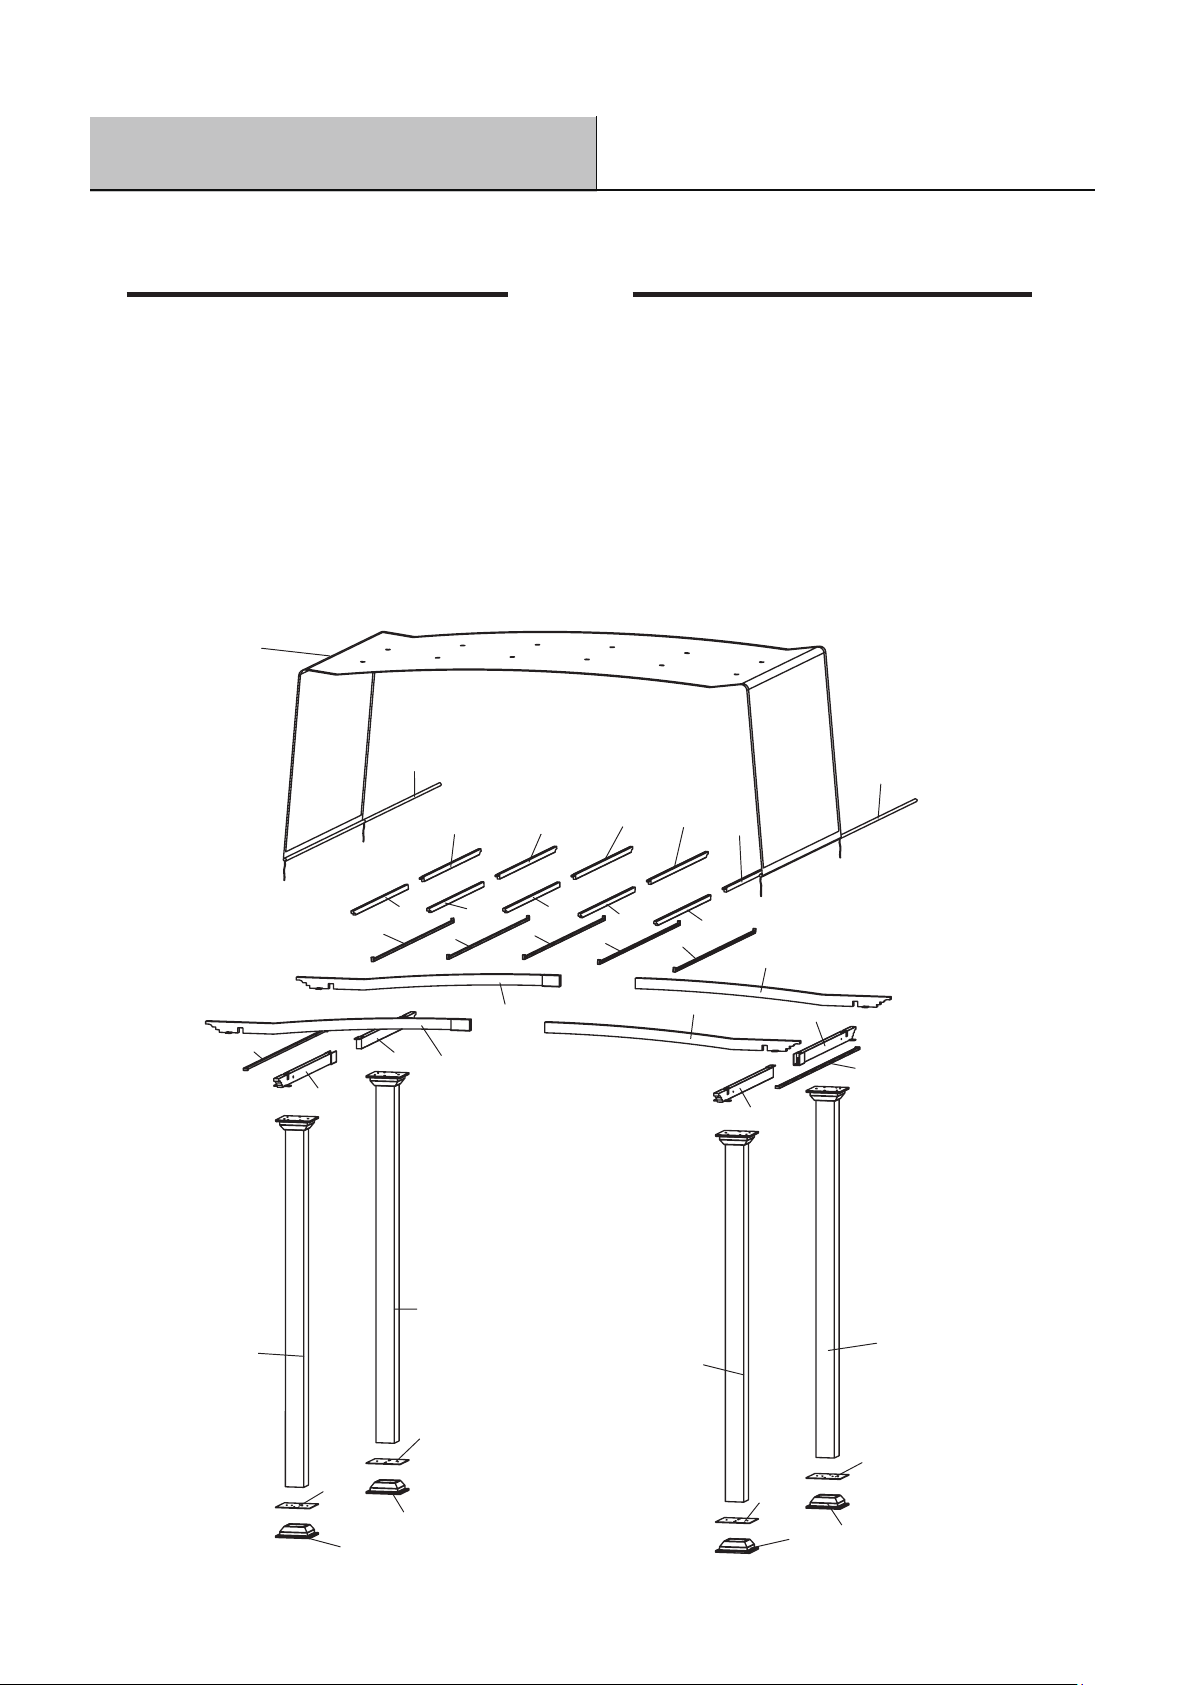
Package Contents
6
Assembly Instructions
A
B
C
D
E
F
ITEM DESCRIPTION QUANTITY ITEM DESCRIPTION QUANTITY
L
L
A
A
A
G
B
J
BBB
C
C
E
CC
E
C
D
D
F
F
G
B
H
I
I
JJ
A
JJ
J
J
K
KK
K
L
L
Leg Post
Slim Crossbar
Slim Crossbar
Top Crossbar
Top Crossbar
Top Crossbar
4
5
5
2
2
2
G
H
I
J
K
L
Top Crossbar
Canopy Fabric
Canopy Side Bar
Canopy Top Bar
Post Base
Base Plate
2
1
2
7
4
4
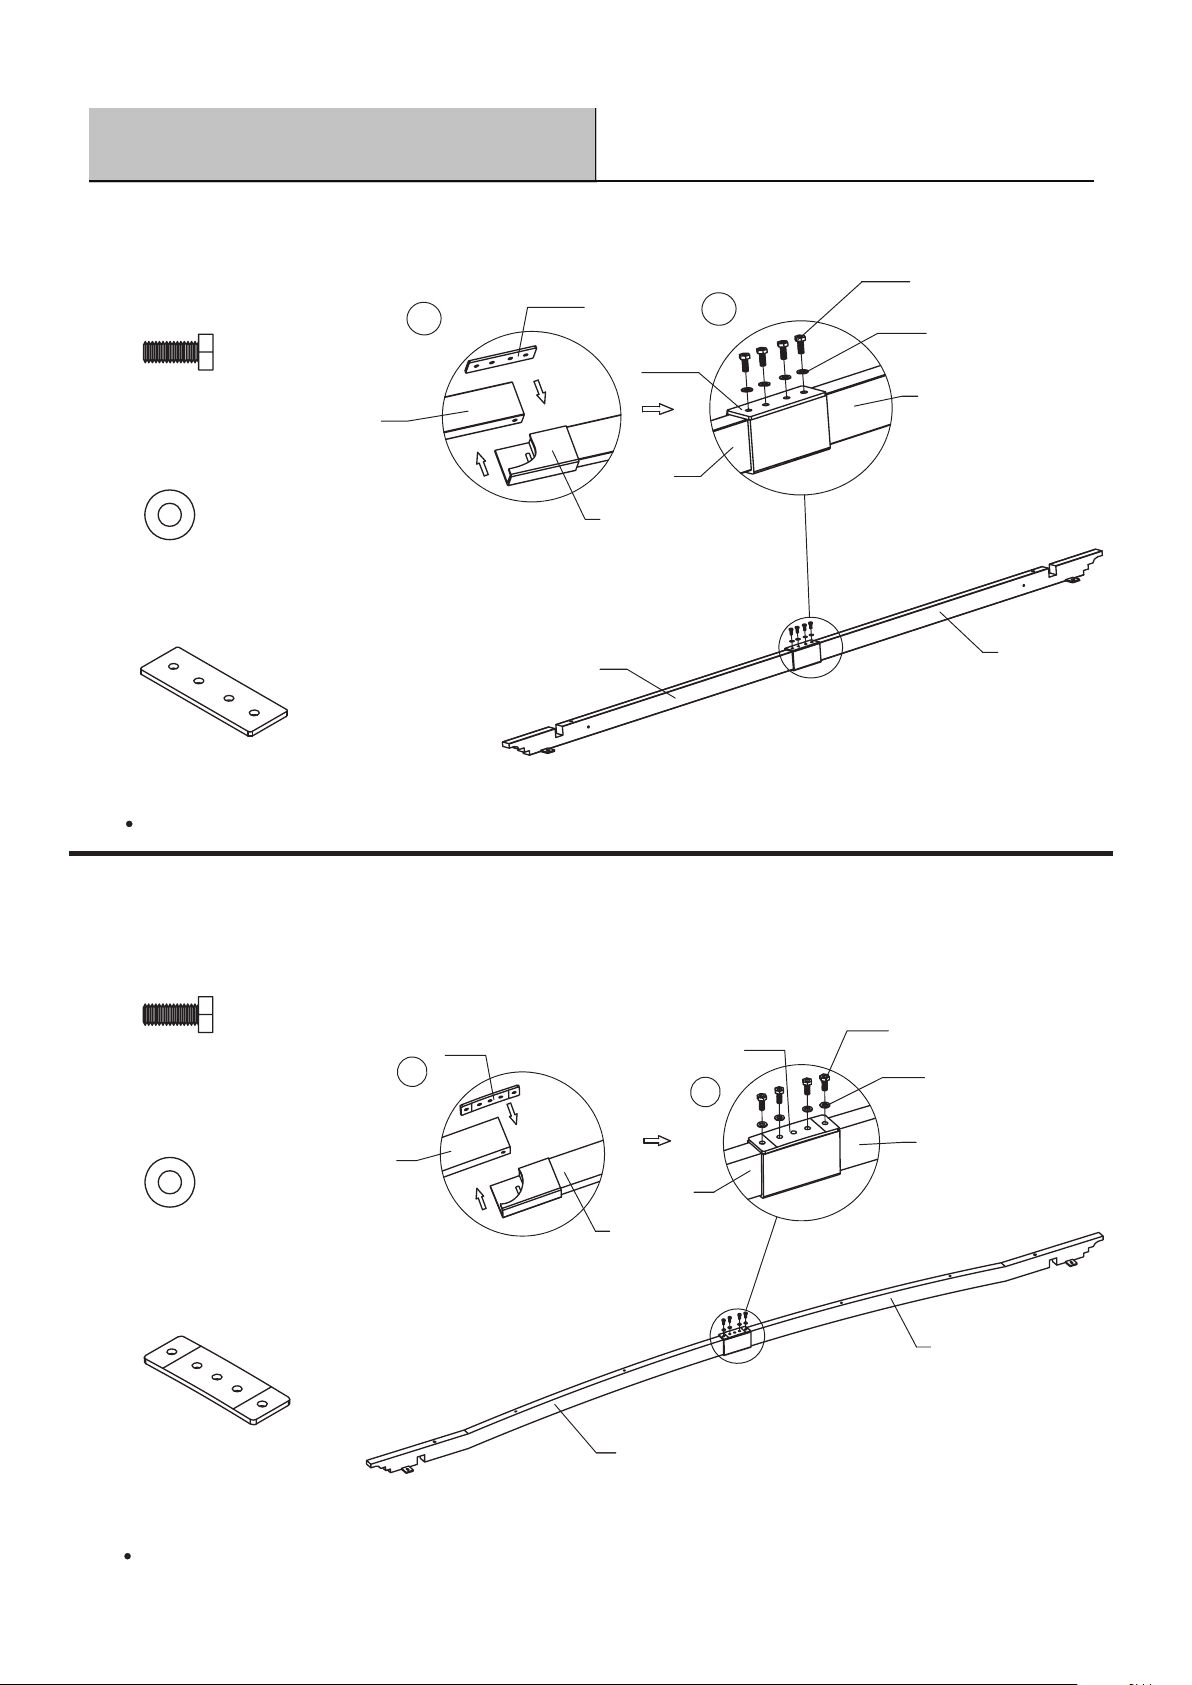
Assembly Instructions
7
2
Mc x 8
M6 Short Bolt
Mg x 8
Small Metal Washer
Mm x 2
Connected Plate
F
Mc
G
2Mg
Mm
1
GF
G
F
Mm
Repeat procedure for the other pair of crossbars (G&F).
1Attaching the top crossbar to the top crossbar
Mc x 8
M6 Short Bolt
Mg x 8
Small Metal Washer
Mn x 2
Connected Plate
Mc
E
D
4
Mg
Mn
D
E
3
Mn
E
D
Repeat procedure for the other pair of crossbars (D&E).
Attaching the top crossbar to the top crossbar

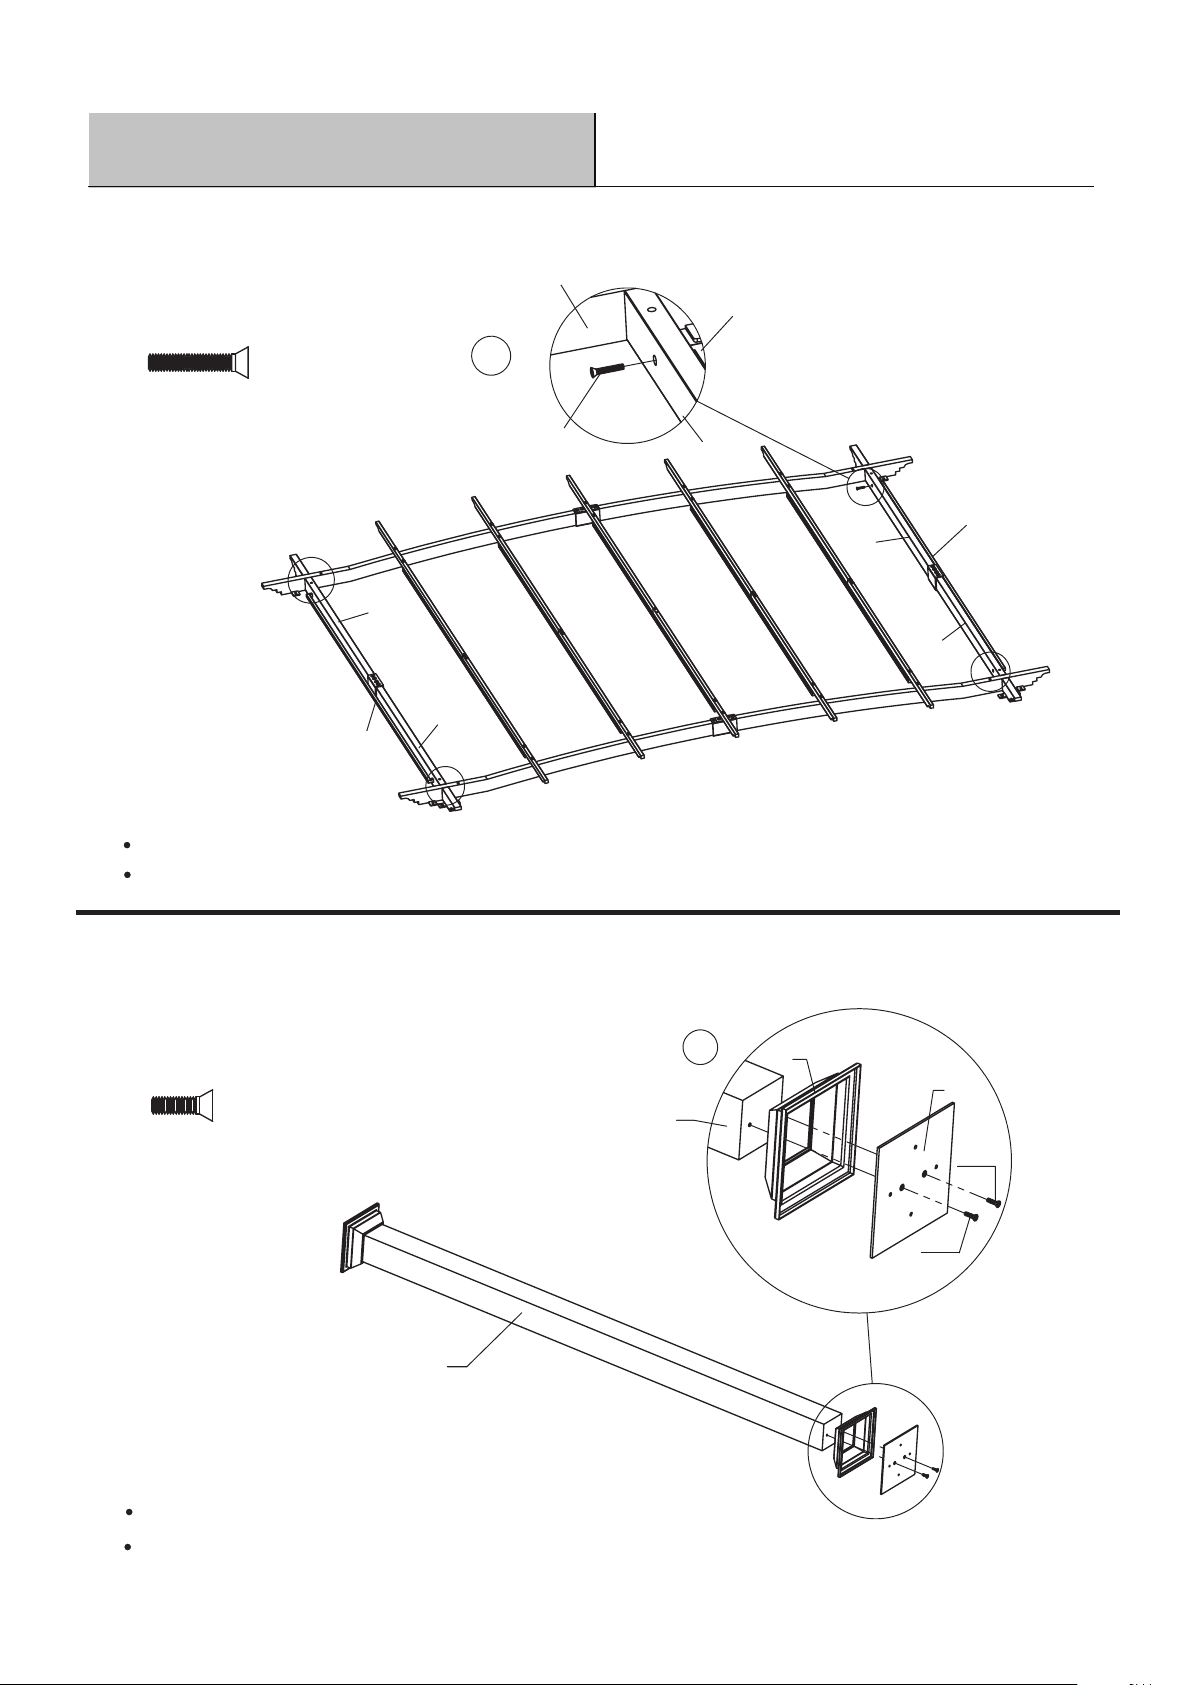
Assembly Instructions
3Attaching the slim crossbar to the slim crossbar
Mc x 10
M6 Short Bolt
Mg x 10
Small Metal Washer B
C
C
B
5
C
Mc
B
6Mg
Repeat procedure for the remaining four pairs of slim crossbars (B&C).
4Attaching the canopy top bar to the assembled slim crossbars
Md x 10
M6 Long Bolt
Mg x 10
Small Metal Washer
Repeat procedure for the remaining four pairs of slim crossbars (B&C).
B
J
C
Md
C
Mg
J
7
8

Assembly Instructions
5Attaching the assembled top crossbars to the assembled top crossbars
NOTE: The side with the label “inside” should face inside.
Repeat procedure for remaining cross bars.
G
E
9
G
E
D
E
G
F
F
G
E
D
INS
IDE
8
6Attaching the canopy top bar to the assembled top crossbars
Md x 10
M6 Long Bolt
Mg x 10
Small Metal Washer
B
D
E
Md
Mg
Mn
BMd
D
11 Mg
B
C
C
F
C
B
D
D
E
E
G
C
G
F
J
J
J
B
JJ
B
C
B
10
9
Assembly Instructions
7Tightening all bots on the assembled body
Mb x 4
Long Countersunk Bolt
Repeat procedure for remaining three inside corners.
Securely tighten all bolts .
J
F
G
G
J
F
D
Mb
J
F
INSIDE
12
8Attaching the post base and base plate to the leg post
Ma x 8
Short Countersunk Bolt
A
A
K
L
Ma
13
Ma
Securely tighten all bolts .
Repeat procedure for the remaining three leg posts.
10
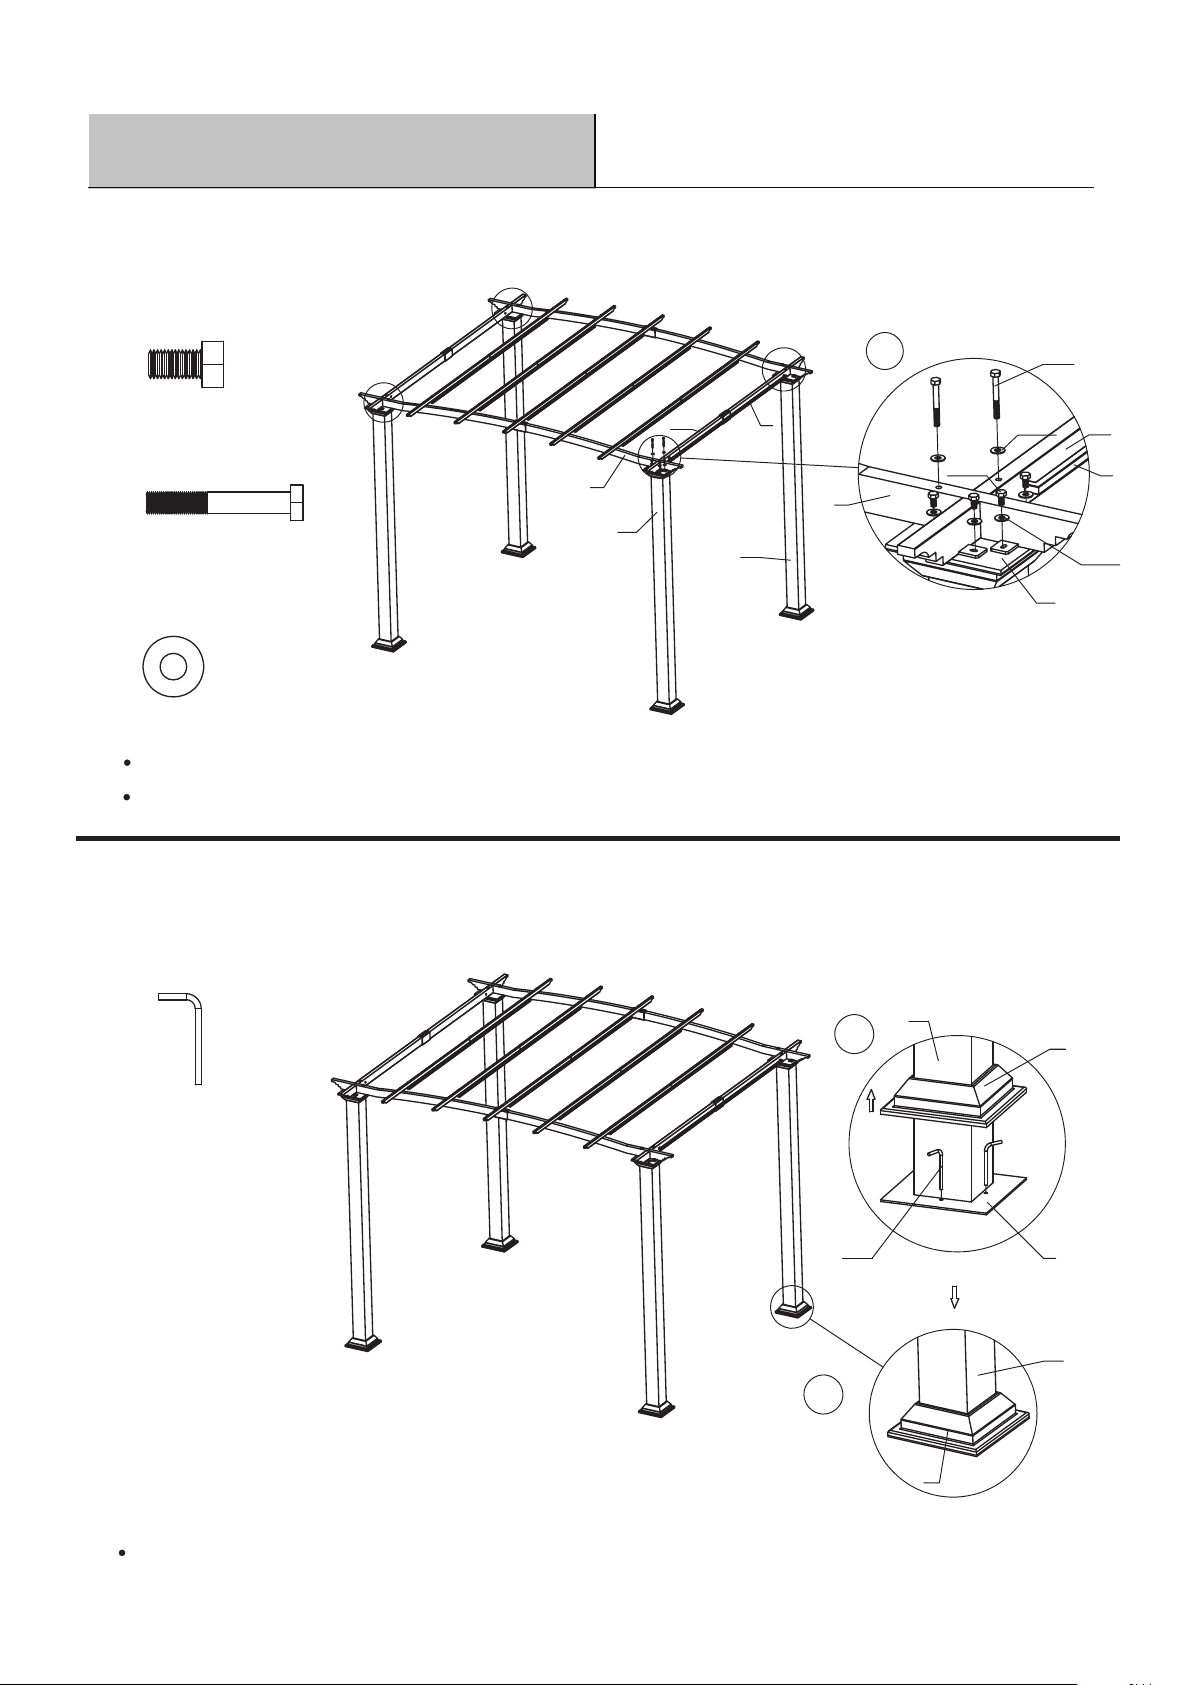
Assembly Instructions
9Attaching the assembled body to the leg post
Me x 16
M8 Short Bolt
Mh x 24
Large Metal Washer
Mf x 8
M8 Long Bolt
Repeat procedure for the remaining three leg posts.
Tighten all bolts diagonally.
J
A
E
G
A
J
Mh
Mh
Me
A
E
G
Mf
14
10 Securing the leg posts to the ground
Mi x 16
Lawn Stake
Repeat procedure for remaining three leg posts.
A
K
15
A
K
Mi L
16
11

Assembly Instructions
11 Passing the canopy through slim crossbars
FJ
H
J
18
H
J
BBBB
C
C
B
C
C
C
JJ
H
J
C
19
17
J
G
12 Placing the canopy side bar to the canopy and adding
the finials into the canopy side bar
Mk x 4
Decorative Finial
Repeat procedure for remaining side bars and finials.
Mk
I
20
H
12
Assembly Instructions
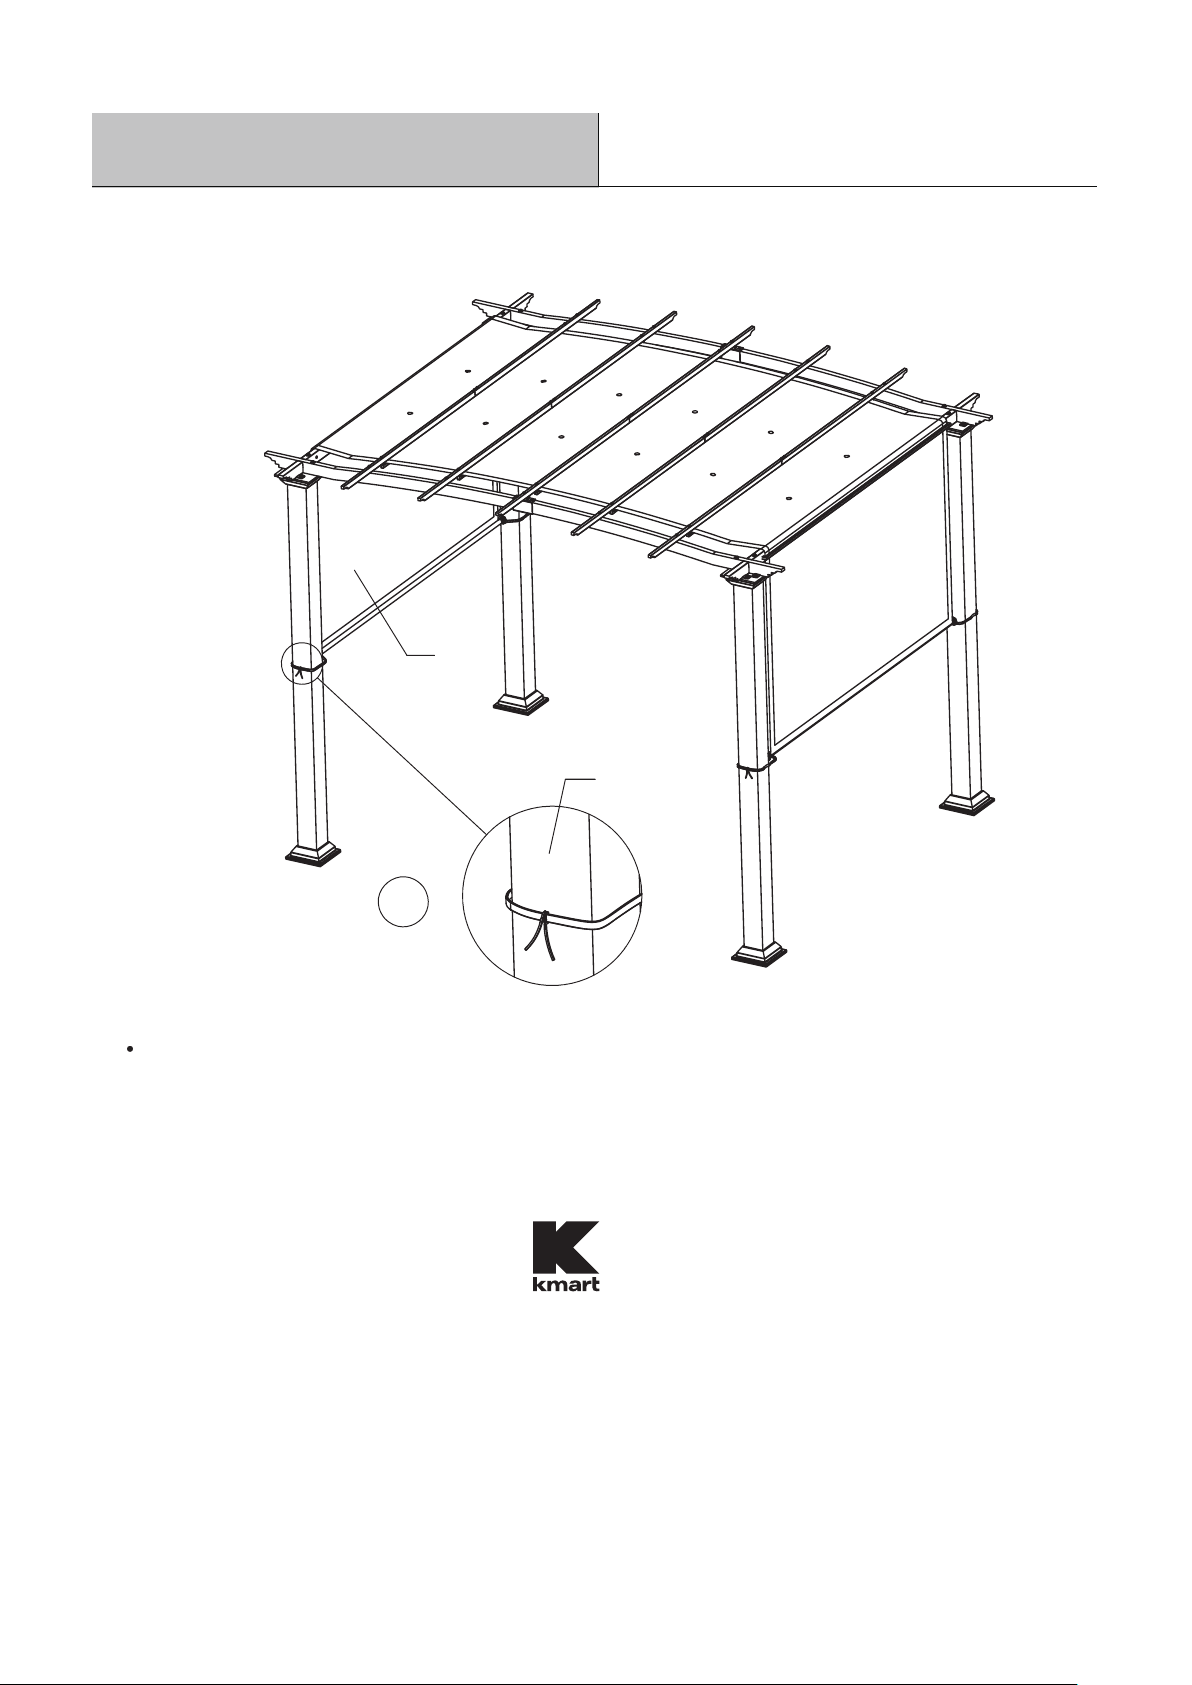
13 Fastening all lashings on leg posts
Your pergola with canopy is now ready for use! Enjoy!
H
A
21
13
Made in / Hecho en CHINA for Kmart Corporation, Hoffman Estates, IL 60179
For questions or comments about product:
Call toll-free: 1-800-457-4652
between 9:00 am to 5:00 pm Eastern standard time Monday through Friday
or contact us at www.numarkcustomerservice.com
Please refer to part numbers when reordering
See our extensive assortment of outdoor living products
on-line at www.sears.com and www.kmart.com
This manual suits for next models
1
Table of contents
Other Essential Garden Lawn And Garden Equipment manuals


Popular Lawn And Garden Equipment manuals by other brands

Sunforce
Sunforce SOLAR user manual

GARDEN OF EDEN
GARDEN OF EDEN 55627 user manual

Goizper Group
Goizper Group MATABI POLMINOR instruction manual

Rain Bird
Rain Bird 11000 Series Operation & maintenance manual

Cub Cadet
Cub Cadet BB 230 brochure

EXTOL PREMIUM
EXTOL PREMIUM 8891590 Translation of the original user manual


Vertex
Vertex 1/3 HP Maintenance instructions

GHE
GHE AeroFlo 80 manual

Land Pride
Land Pride Post Hole Diggers HD25 Operator's manual

Yazoo/Kees
Yazoo/Kees Z9 Commercial Collection System Z9A Operator's & parts manual

Premier designs
Premier designs WindGarden 26829 Assembly instructions

Snapper
Snapper 1691351 installation instructions