Estarling Impact V Specification sheet

CONTENTS:
…………………………………………………………………………………………
User notes……………………………………………………………………………………….1
1. Preparation before using…………………………………………………………………….2
2. Pay attention…………………………………………………………………………………3
Product Specification…………………………………………………………………………...4
Appearance Reference …………………………………………………………………………5
1. On-board buttons…………………………………………………………………………….5
2. Buttons of Remote Control…………………………………………………………………..6
Frame Set-up…………………………………………………………………………………….7
1. Before set-up…………………………………………………………………………………7
2. Setting up your wireless network and your connected WI-FI digital frame………………….7
Operation Instruction……… …………………………………………………………………..10
1. Menu………………………………………………………………………………………….10
2. Settings………………………………………………………………………………………..11
Performance Parameters of the Album…………………………………………………………14
-01-
User Notes
…………………………………………………………………………………………………………………………
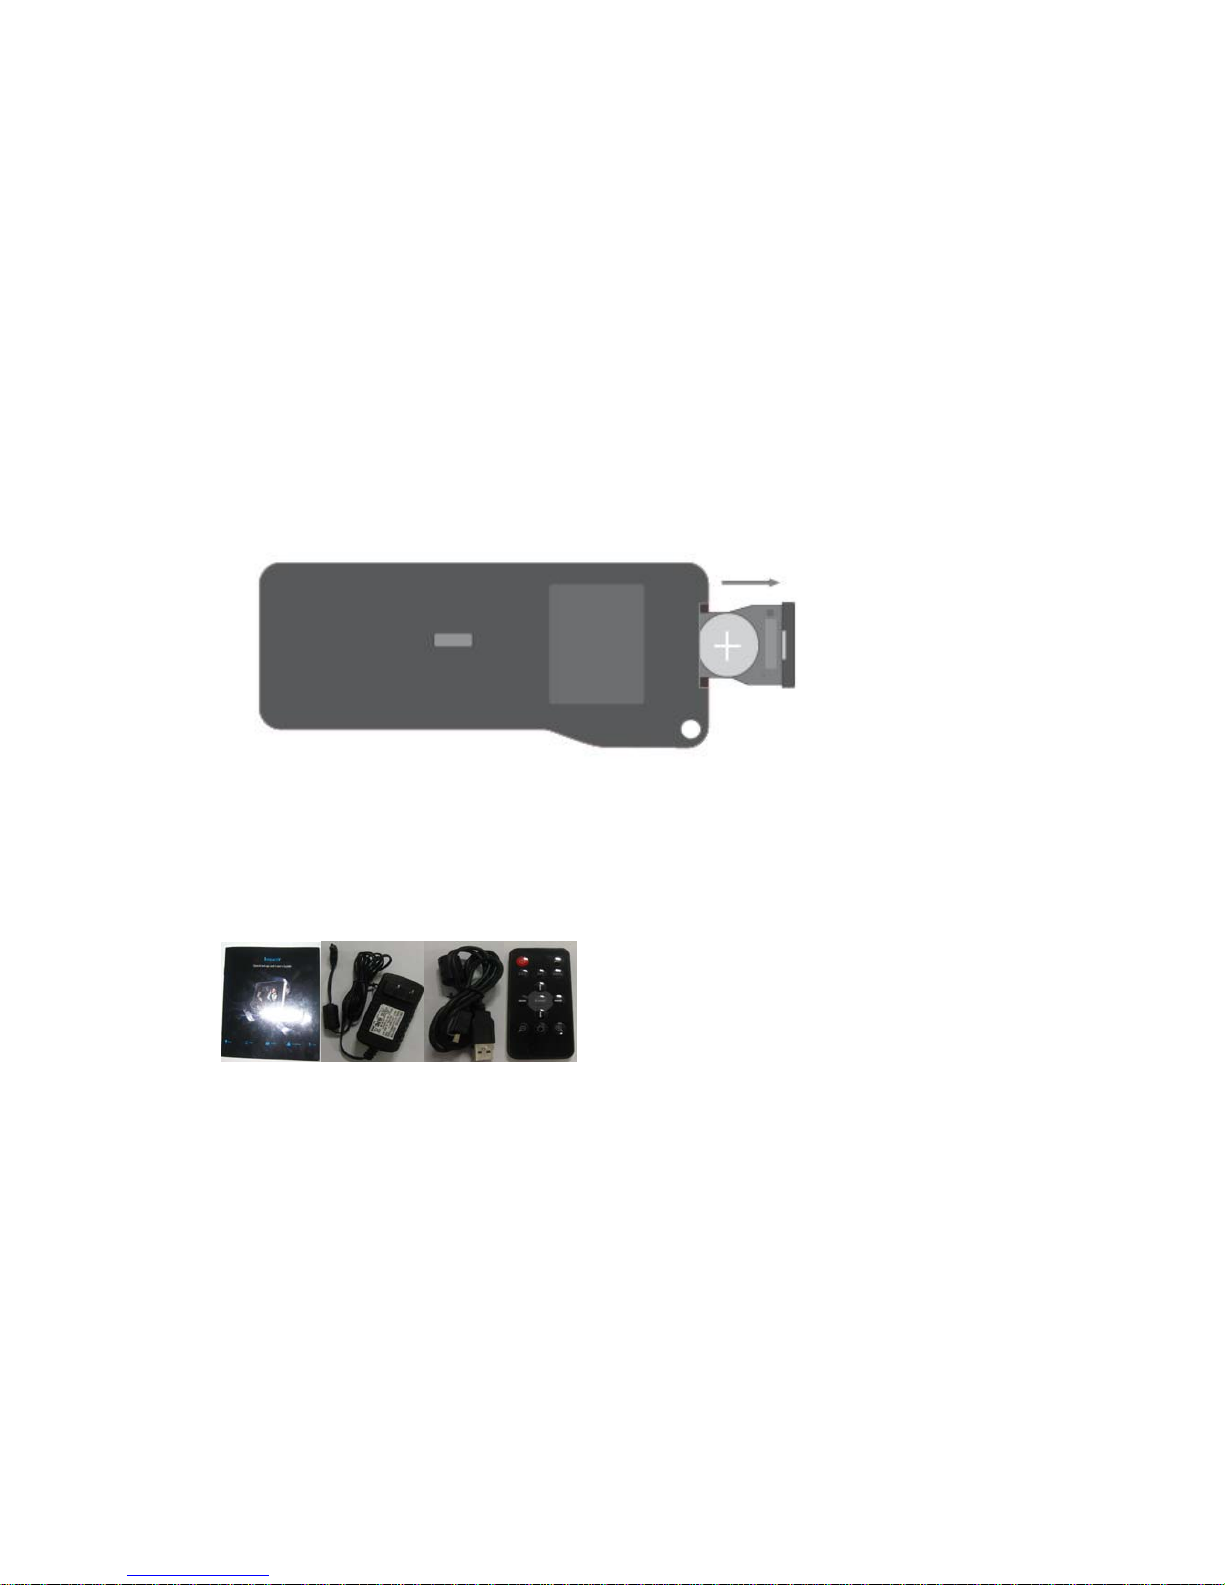
In order to avoid the consuming of battery for the first-time use of this album, there is a plastic
paper of insulation which separates the battery on the cover of control remote of the packing box;
please pull the plastic paper down before using. The method of installing and changing the battery:
it needs to change the battery when the album is used for a long time or the remote control is not
sensitive or the distance of remote control is very close. The press-key of remote control should be
placed down and pull out the battery slot of remote control to take out the waste battery; use the
“CR2025-3V” new battery of the same size with the “+” electrode up to put in the battery slot and
then close the battery slot.
Preparations before using
After unpacking, please check carefully whether the accessories are complete as the pictures
showing below:
Please read the User Manual carefully to get the operating methods and notes before using the
frame.
-02-

Pay attention
zOnly working in the defined range of AC/DC power supply. AC adapter inputs
100-240V~50/60Hz and outputs DC of 9V, 1.5A. Do not use power adapter which does not
meet the requirement. If not using the album for a long time, please cut off the AC power of
the adapter to ensure safety.
zWhile plugging into or pulling out of the power socket, the plug should be grasped firmly and
the power cord shall not be pulled.
zPlace the product on a flat and stable surface and pull out the rear stand, the power should not
be turned on until the product has been supported stably. Do not put the album on rugged
surface which is easy to be vibrated while using it.
zAvoid direct sunlight as well as using under the sunshine, do not use in environment with
high temperature nor beside the radiator or heater. Neither using in bathroom nor natatorium
under humid temperature. Prevent rain or water drops entering into the album.
zIf moving the product from environment of outdoor low temperature to the indoor high
temperature, or in case the difference in temperature is tremendous, please wait for 30 to 60
minutes before turning on the product.
zSince the LCD is made from brittle glasses, it is prohibited to knock the display with sharp
objects or hand, do not flap nor fling the album while using, in order to prevent breaking the
album or personal hurt.
zDo not wipe the display surface with dry cloth or objects including chemical detergent. The
display surface could only be wiped lightly by soft cloth.
-03-

Product Specification
……………………………………………………………………………………………………......
•LCD Display: 8-Inch LCD screen (800 X 600 pixels)
•Communications: Internal 802.11b/g (WEP64, WEP128, WPA1, WPA2)
•Interface: MMC/SD/MS card slot; USB 2.0 client port
•Memory Size: On-board FLASH memory 256M
•Remote Control for PC-less easy setup
•Touch Border design for easy navigation
•DVD quality video play
•Frame with its own email address, Email video clips to the frame
•Acceleration feature to get photo to frame from social networks and photo sharing sites in
minutes
•Simply the best end-to-end platform to share photos and short videos with family and
friends far away
•iPhone direct to frame enabled
•Weight: 3.0Lbs
-04-

Appearance Reference
………………………………………………………………………………………………………..
On board buttons
zEsc button: Go back to the upper menu
zUp button: Press it going upwards
zDown button: Press it going downwards
zLeft button: Press it going to the left direction
zRight button: Press it going to the right direction
zEnter button: It functions as the OK button under the menu and the settings
-05-

Buttons of Remote control
zPower button: Press it to turn on the power and then turn off the power
zPlay/Pause button: it functions as the play and pause switch when playing pictures, videos; it
can use as the selective play under the status of picture browsing.
zEsc button: Go back to the upper menu
zDel button: Delete files you don’t like
zMenu button: The return function can be implemented when processing this button while
playing pictures and videos.
zUp button: Press it going upwards
zDown button: Press it going downwards
zLeft button: Press it going to the left direction
zRight button: Press it going to the right direction
zEnter button: It functions as the OK button under the menu and the settings
zVolume button: It can adjust the volume when playing videos.
zMute button: Press it to turn down the sound and then turn up the sound when playing video.
-06-

Frame set up
Before set-up
Please have the following items ready before you begin the setup of your Connected Wi-Fi
Digital Frame:
zYour Connected Wi-Fi Digital Frame, along with the power supply, USB cable.
zInternet connected Wi-Fi network with known SSID (network name), authentication
type and the corre. sponding encryption key (WEP) or Pre-Shared Key, PSK ( WPA), if
encryption is implemented.
STEP1:
Power up your connected Wi-Fi Digital Frame by plugging in the power cord. The below
message will appear on the frame indicating that the frame is searching for an available Wi-Fi
signal.
-07-
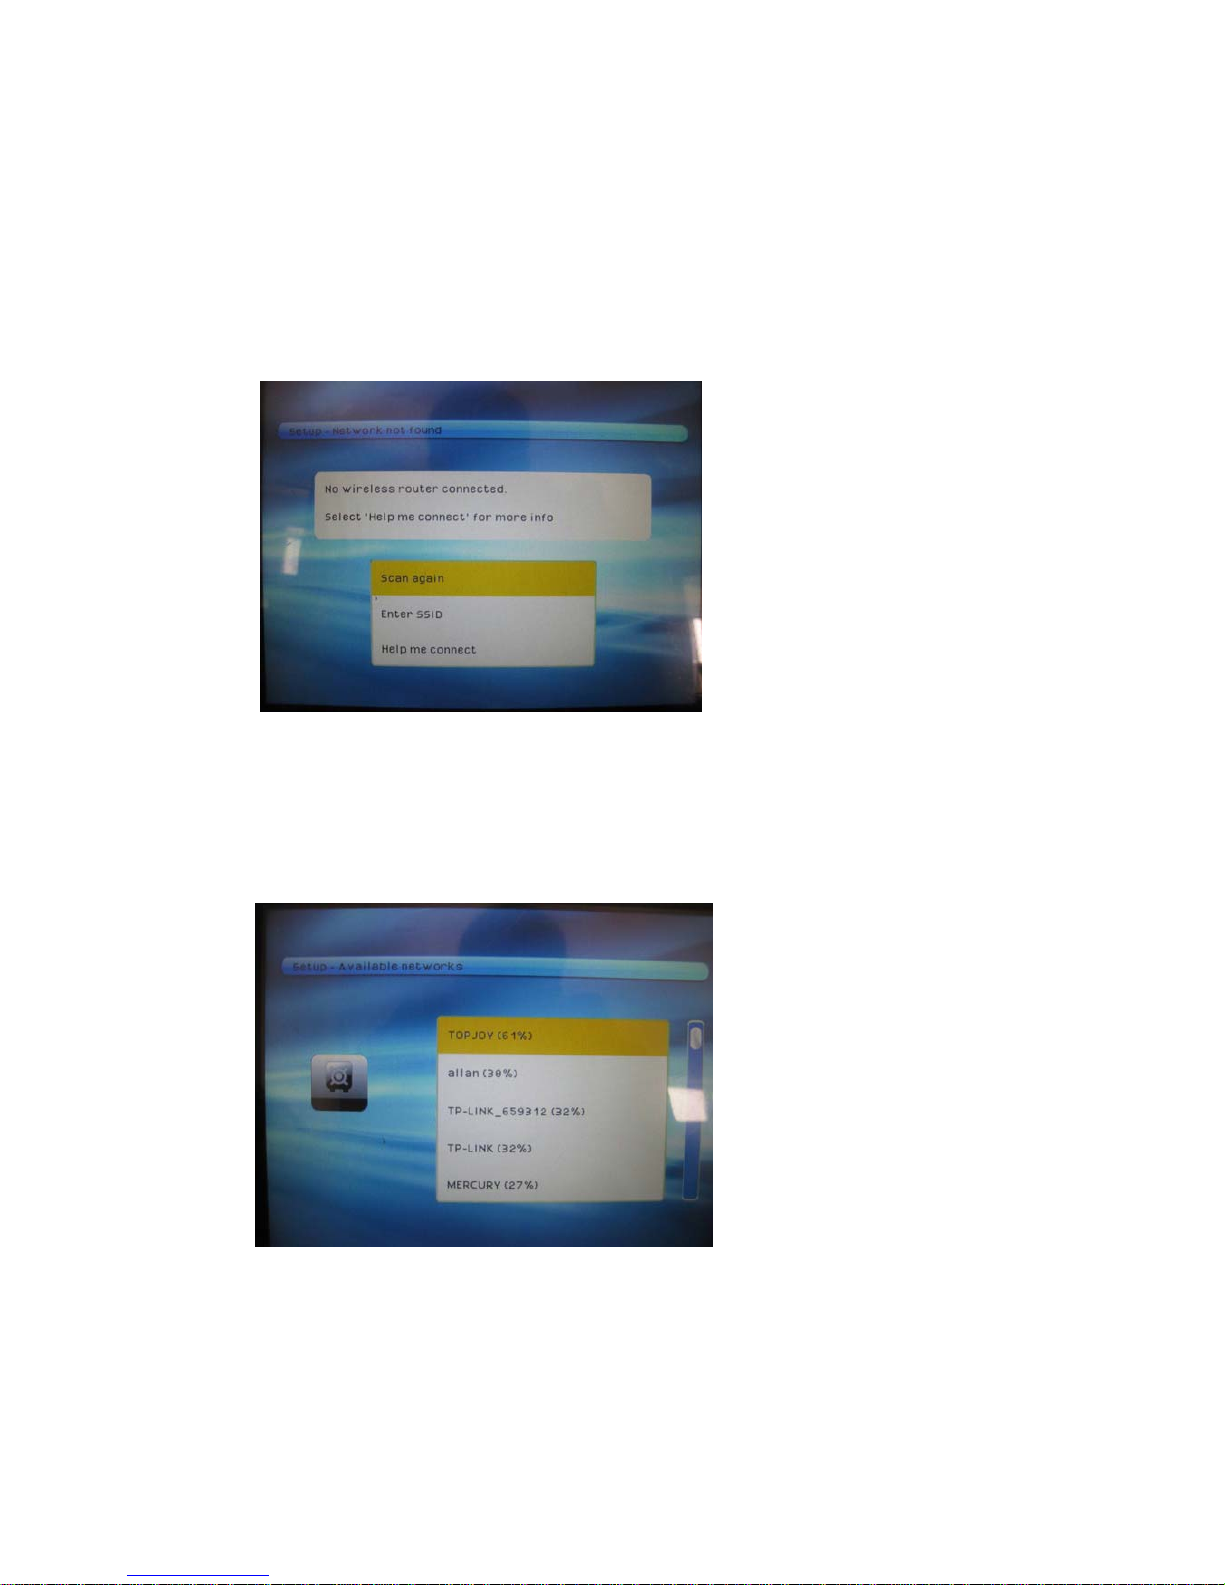
STEP2:
If your frame cannot locate a Wi-Fi signal, it will show a message indicating that no Wi-Fi
network is connected. Please press the Enter button on your Remote Control with Scan
again.
STEP3:
The frame will scan for any available Wi-Fi networks automatically. Press to highlight your
specified Wi-Fi network, and then press Enter:
-08-
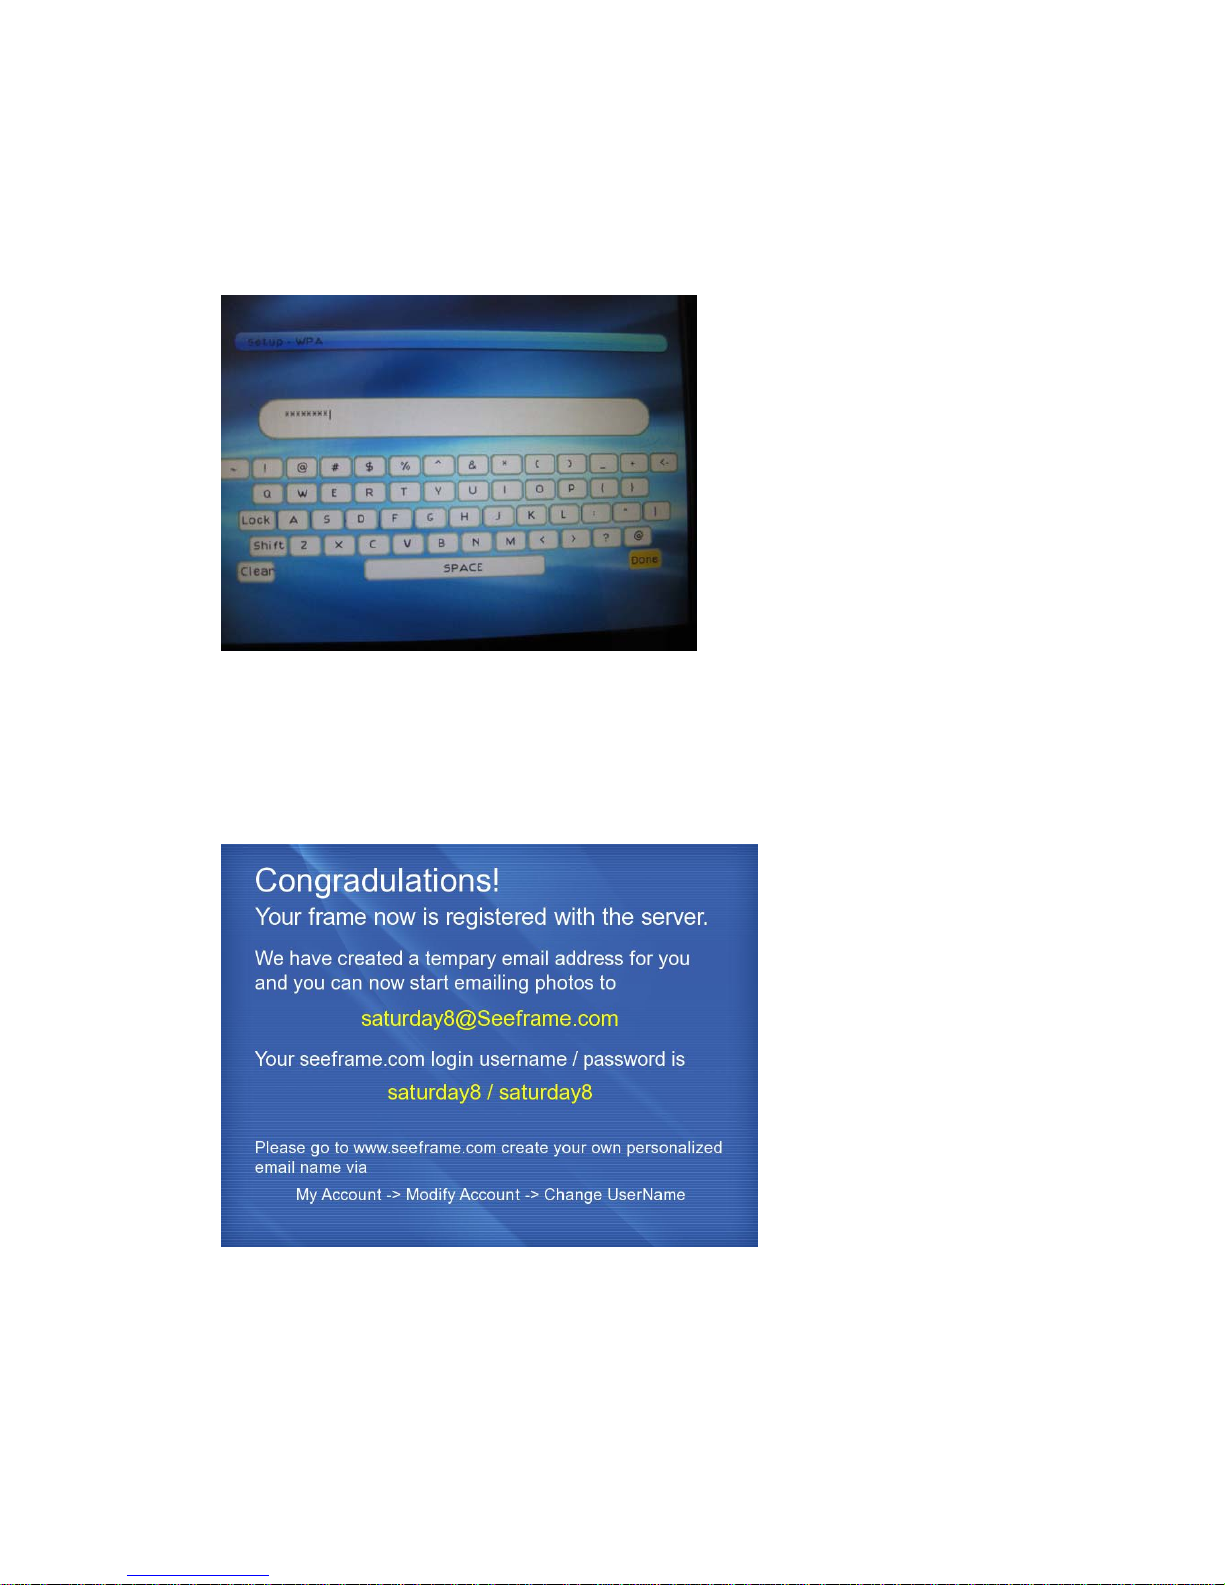
Step4:
Please enter your password by pressing the virtual keyboard buttons displayed on the
screen by pressing to highlight your entries and then press Enter.
Step5:
Once the Wireless Network has been completed, the following message will be displayed on the
frame:
You have now completed the set-up process and are ready to start enjoying your Connected
Wi-Fi Digital Frame.
-09-

Operation Instruction
……………………………………………………………………………………………………......
Menu
Place the frame well and connect it into the power adapter and the network, the main menu of
power-on picture will appear when pressing the ESC button on the board.:
Use the direction key to select the function icon and enter into it by pressing the Enter button.
Connected Play:
Select the picture and video icon at the menu of function selection and press Enter button to enter
into picture and video playing.
-10-

Settings:
zWi-Fi Networking: Press it to check the network status; scan for wireless networks and then
exit wireless networks.
zTime and clock:
On/off schedule: Select the Enable button; press up/down button to set the time of power on;
press the left/right button to move the cursor; press up and down button to set the time of
power off and press Enter after setting.
-11-

Set time: Set the time by pressing up/down button, press the left/right button to move the
cursor and press Enter after setting.
zSlideshow Speed:Adjust the slideshow speed by pressing the up/down button. .
-12-

zSlideshow Effect: There are 5 effects of slide playing; press the up and down to select needed
effects and press Enter to confirm.
zBrightness: Adjust the brightness by pressing the left/right button.
-13-

Performance Parameters of the Frame
………………………………………………………………………………………………………..
1) LCD Display: 8-Inch LCD screen
2) Resolution: 800 X 600 pixels contrast: 4:3
3) Communications: Internal 802.11b/g (WEP64, WEP128, WPA1, WPA2)
4) Picture format supported: JPEG.
5) Video formats supported: MPEG1, MPEG2, MPEG 4 file (AVI, WAV, and WMA).
6) Interface: MMC/SD/MS card slot; USB 2.0 client
7) Memory Size: On-board FLASH memory 512M (support up to 1GB)
8) Remote Control for PC-less easy setup
9) Touch Border design for easy navigation
10) Email video clips to the frame
11)Search&sendvideoclipsfromPhotobucket,YouTube,andmore
12) DVD quality video pla
y
13) simply the best end-to-end platform to share photos and short videos with family and
friends far away
14) Power supply: Input: 100-240V~50/60Hz AC; Output: 9V/1.5A DC
15) Operating temperature:-4 to 140 degrees F (-20 to 60 degrees C);
Storage temperature: -22 to 185 degrees F (-30 to 85 degrees C).
16) Warranty: 12months
17) Weight: 3.0 Lbs 18)Certificate: CE/FCC/RoHs
Accessories: Shipping Info.
UserManual cartonsize:53.5*41.6*37cm
ACpoweradapter quantity/carton:10pcs
Remotecontrol G.W./carton:14.2kg
USBcable loadingqty(20’’):3846pcs
-14-

PF Digital Inc.
6819 Elm St, Suite 16
Mclean, Virginia 22101, USA
Customer Care: support@estarling.com
Comments about our products: info@estarling.com

FCC warning statement
This device complies with part 15 of the FCC Rules. Operation is subject to the
following two conditions: (1) This device may not cause harmful interference, and (2)
this device must accept any interference received, including interference that may
cause undesired operation.
This equipment complies with FCC radiation exposure limits set forth for an
uncontrolled environment. This equipment should be installed and operated with
minimum 20 cm between the radiator and your body. This transmitter must not be
collocated or operating in conjunction with any other antenna or transmitter unless
authorized to do so by the FCC.
This equipment has been tested and found to comply with the limits for a Class B
digital device, pursuant to part 15 of the FCC Rules.
These limits are designed to provide reasonable protection against harmful
interference in a residential installation.
This equipment generates, uses and can radiate radio frequency energy and, if not
installed and used in accordance with the instructions, may cause harmful interference
to radio communications. However, there is no guarantee that interference will not
occur in a particular installation. If this equipment does cause harmful interference to
radio or television reception, which can be determined by turning the equipment off
and on, the user is encouraged to try to correct the interference by one or more of the
following measures:
—Reorient or relocate the receiving antenna.
—Increase the separation between the equipment and receiver.
—Connect the equipment into an outlet on a circuit different from that to which
the receiver is connected.
—Consult the dealer or an experienced radio/TV technician for help.
Table of contents
Other Estarling Digital Photo Frame manuals


