Etac Convaid Metro Troubleshooting guide

Metro
Fixed-Tilt
ENGLISH
User and Service Manual
SAVE THIS BOOK FOR FUTURE REFERENCE
READ INSTRUCTION BEFORE USING

i
CONVAID USER’S GUIDE
Notice:
The information contained in this document is subject to change without notice.
No part of this document may be photocopied, reproduced, transmitted, transcribed, stored in a
retrieval system or translated to another language or computer language, in any form or by any means,
electronic, mechanical, magnetic, optical, chemical, manual or otherwise without the prior written
consent of Convaid.
Use only Convaid accessories and parts on Convaid products. Convaid parts are not interchangeable
with other manufacturers’ products. Replace any worn parts immediately.
© Copyright 2020 by Convaid. All rights reserved.
Before Calling:
Please ll in the following. Customer Service will be able to help you more
quickly if the information indicated below is readily available.
Serial number of chair:__________________________________________
Model of chair:_________________________________________________
Date purchased:________________________________________________
Customer Service Support
Toll Free: 1-844-US Mobility (844-876-6245)
Phone: (310) 618-0111
Fax: (310) 618-8811
Email: [email protected]
Website: www.etac.us.com
Technical assistance or repair information hours are:
Monday-Friday, 6 a.m. to 4:30 p.m. PST

1
CONVAID USER’S GUIDE
Product Overview
Denition of Symbols…………………………………………………... ……………………… 1
Warnings…………………………………………………………………..………………………... 4
EZ Rider Overview…………………………………………………………………..…………… 5
Setting Up
Unpacking the chair………………………………………………………..…………………… 6
Unfolding……………………………………………..…………………………..………………... 7
Folding………………………………………..............……………..………………………….... 8
Fitting Guide
Seat Back Height……………………………..........................................………………. 9
Seat Width……………………………......................................................……………… 9
Seat Depth……………………………..........................................................………….. 10
Wheels
Quick Release Wheels……………………………………………………..………………….. 11
Locking and Unlocking……………………………………………………..…………………. 12
Operating Instructions
Three-Point Positioning Belt………………......................................….................. 13
Depth Adjustable Crotch Strap…………………………………………………............... 13
Headrest Extension………………......................................…………….................... 13
Footplate Depth Adjustment…………………………………………………….........….... 14
Foot Positioners………………......................................…..............…............…...... 14
Footplate Height Adjustment………………......................................…..............… 15
Accessories
Underseat Storage Basket…………………………………..………………………………. 16
Transit Models
Transit Option…………………………….................................................……………… 17
Important Information
Maintenance, Operating & Safety Instructions……………….............……………. 18
Warranty……………………………………………………………..……………………..………. Back Cover
Table of Contents

2
CONVAID USER’S GUIDE
READ BEFORE USE
Read the user’s guide completely before use and fully understand its content. Familiarize yourself with
the handling and functions of the product before use and practice them. Any caregiver that is going to
operate this chair should also read the user’s guide in full.
You are responsible for the safety of the user. The safety of the user could be affected if you do
not follow the instructions in this user’s guide. Nevertheless, not all possible circumstances and
unpredictable situations can be covered by this user’s guide. Reason, care, and circumspection are
not features of the product; they are required of persons who use the product. If instructions are not
clear and further explanation is necessary, please contact your Convaid provider. If you do not follow
all instructions and warnings, serious injury or damage to the chair may occur. The latest version of all
instructions and product safety notices are available on the Convaid website (www.etac.us.com) and
can be printed in larger sizes. Additional video instructions are also available for reference purposes.
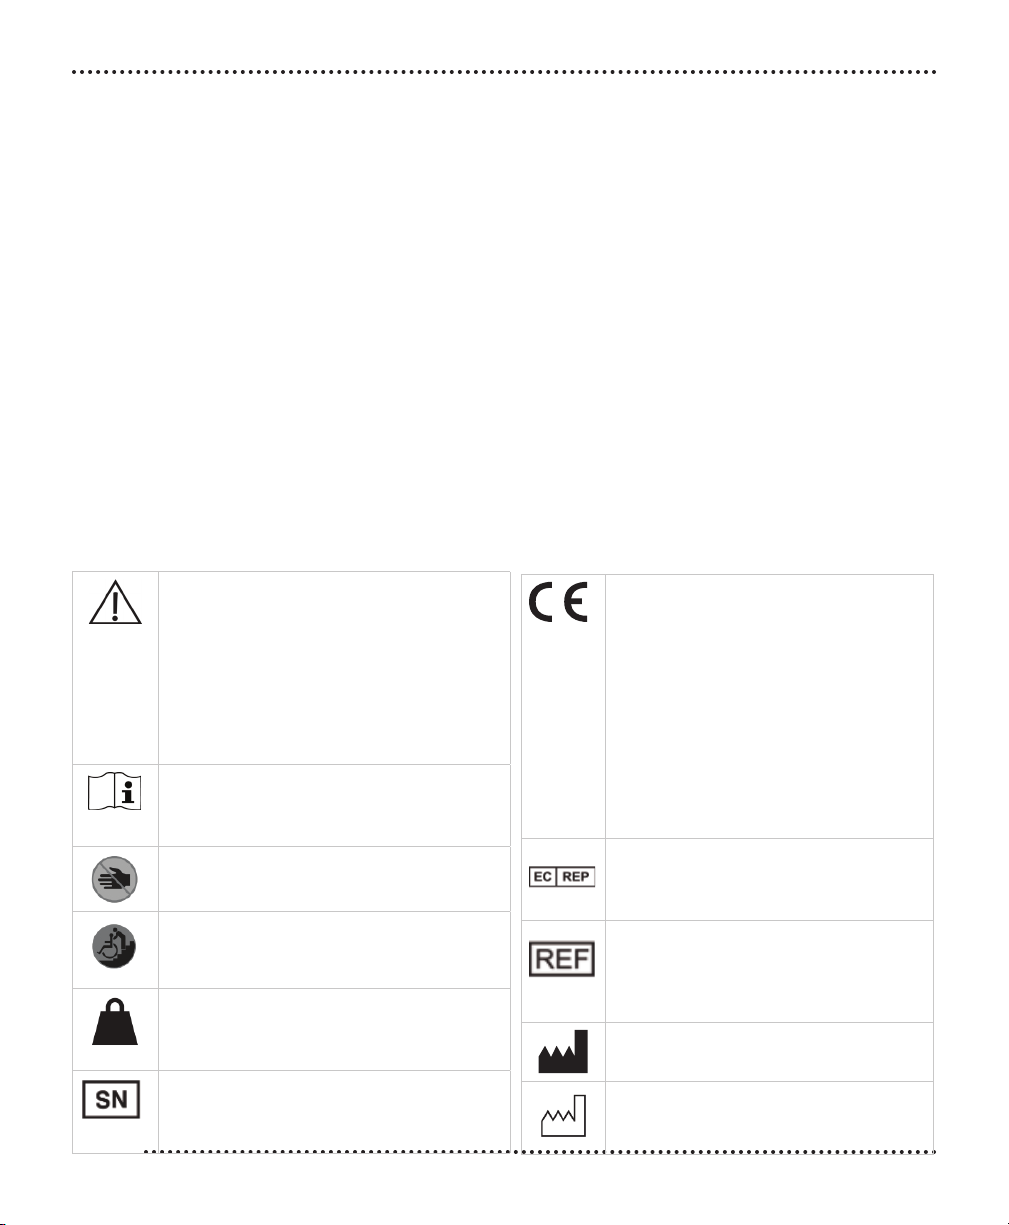
DEFINITION OF SYMBOLS
Indicates the need for the user to
consult the instructions for use for
important cautionary information such
as warnings and precautions that
cannot, for a variety of reasons, be
presented on the medical device itself.
Indicates a medical device that need
to be consulted with the instruction for
user
This symbol indicates potential nger
entrapment..
This symbol indicates correct lifting
points for safe moving and handling.
This symbol indicates maximum user’s
weight.
Indicates the manufacturer’s serial
number so that a speci c medical
device can be identi ed.
This symbol is a mandatory marking
for devices entering the European
market to indicate conformity
with the essential health and
safety requirements set out in
European Directives. The symbol
may be accompanied by a four-digit
identi cation number of the noti ed
body. The vertical dimensions may
not be less than 5 mm high.
Indicates the Authorized
representative in the European
Community.
This symbol indicates the
manufacturer’s catalogue number
so that the medical device can be
identi ed.
Indicates the medical device
manufacturer.
Indicates the date when the medical
device was manufactured.

3
CONVAID USER’S GUIDE
This symbol indicates a wheelchair which cannot be used in motor vehicle as vehicle seat.
This wheelchair does not comply with WC19 (RESNAWC-4:2012 for ISO7176-19:2008) and
cannot be used as a vehicle seat to transport the user in a vehicle.
The Symbol indicates a wheelchair which can be used in motor vehicle as vehicle seat. This
wheelchair complies with WC19 (RESNAWC-4:2012 and ISO 7176-19:2008) and can be used
as a vehicle seat to transport the user in a vehicle.
This symbol indicates the position of an anchor point when using a 4-point tide down system
(WTORS) during transit.
This symbol indicates conformity with RESNA WC-4 Section 19 requirements.
CHOOSE THE RIGHT CHAIR & SAFETY OPTIONS
There are several options available to meet the needs of the wheelchair user. Make sure that your
(and your health care provider’s) choice of chair and other added options takes into account the user’s
comfort, positioning, physical limitations, and hazards that may be encountered during daily use.
Operating the manual wheelchair outside of the recommendations provided by the manufacturer can
lead to a dangerous situation.
The wheelchair is not suitable for jogging, running, skating or similar activities. Swiveling front wheels
tend to wobble at higher speeds and can cause a sudden stop, and the wheelchair can tip over. Use
the wheelchair only at regular walking speed. Under no circumstance should you let go of the push
handle while pushing.
The durability of this product is ve years when it is used with proper care and maintenance according
to the user’s guide.
Final selection of the type of device and any accessories or adjustments rests solely with the user and
their health care provider. Some important factors to consider when choosing a conguration include,
but are not limited to:
1. The user’s disability, strength, balance, coordination, and ability limitations.
2. Neurological and orthopedic needs of the user.
3. Behavioral factors such as maturity and psychosocial development.
4. All factors should be considered when choosing a chair conguration as this can affect
performance and function of the chair.

4
CONVAID USER’S GUIDE
General Warnings
WARNING: To avoid tipping, do not hang item from ! the push handle.
WARNING: Ensure the wheels are installed properly. You will hear a “click”
when wheel locks into place.
WARNING: Always secure user with belt rst, before making any other
adjustments.
WARNING: Convaid seat belts are for positioning only and are not to be
used as a vehicle restraint.
WARNING:
• For increased safety, the seat belt should be used at all times.
• Do not leave user unattended.
• Do not strap user too tight.
• Straps should not interfere with breathing or circulation.
• Always apply wheel locks before letting go of the chair.
• If front edge of seat is at or forward of the point where tires touch the oor,
avoid using front of seat tubes for support during entry or exit from chair to
prevent tipping.
• Avoid using footplates for weight support during exit or entry of the chair.

5
CONVAID USER’S GUIDE
Metro
Metro Transit

6
CONVAID USER’S GUIDE
• Left and right footplates
• Accessories as ordered
• Hex wrench (5/32)
Unpacking the Chair
Check to see that the following items are included with the chair:
Unpacking

7
CONVAID USER’S GUIDE
WARNING: To avoid tipping, do not hang item from the push handle.
Set-up and Adjustments
Unfolding
1. Lay chair at on ground and unbuckle closure strap. Fig. 1
2. Stand chair on front caster, grasp side of Push Handle and
push down on Seat Tube. Fig. 2
3. Press down rmly on seat tubes to ensure the chair is
completely unfolded. Fig. 3
4. Using your foot, push down on Lower Rear Lock Brace until
it locks into a straight position. Fig. 4
5. Swing footplates down into position. Fig. 5 & 6
Fig. 1
Fig. 4
Fig. 2
Fig. 5
Fig. 3
Fig. 6

8
CONVAID USER’S GUIDE
Folding
1. Swing footplates to the side. Fig. 7 & 8
2. Unlock Rear Lock Brace by kicking up on center of brace with foot. Fig. 9
3. Grasp one side of Push Handle and pull up on seat fabric or seat tube with opposite hand.
Fig. 10 & 11
4. Lay chair back onto Push Handles. Push down on tubing above front tires until chair is folded.
Fig. 12
5. Buckle closure strap. Fig. 13
Fig. 7
Fig. 10
Fig. 13
Fig. 8
Fig. 11
Fig. 9
Fig. 12

9
CONVAID USER’S GUIDE
Fitting Guide
Convaid’s lightweight, folding chairs are designed to be more than just a convenient chair. Order the
correct size chair by rst determining the user’s height, weight and seating measurements.
Properly-tted, Convaid chairs will provide years of comfortable use.
Correct seating and positioning encourages good posture, which in turn aids circulation, breathing and
digestion. Please take the time to properly adjust the chair to t the user. If the user is not correctly
positioned, check the accessories section of this manual to see if one or more of our accessories
would help to facilitate posture or consult a physical therapist. Improper seating can cause problems.
Please consult a physical therapist or doctor for additional guidance.
Seat back height varies according to chair type and seat width. Headrest
extensions are available when extra height is needed to support the head.
To determine the seat back height, measure from the seat to the top of the
shoulder or the upper part of the head. Fig. 14
Proper seat width enables the user to sit comfortably and prevents problems
from developing. While user is seated on a at surface, measure from hip to
hip. Fig. 15
The user should have enough room to prevent hips and thighs from rubbing
against the frame. However, the chair should not be too wide or the user will
slide around and posture could be affected.
The seat width measurement for the Metro is taken from the actual seat
width.
Seat Back Height
Seat Width
Seat back height
Fig. 14
Fig. 15

10
CONVAID USER’S GUIDE
Measure from the most posterior portion of the buttocks to the
back of the knee. Subtract from that measurement 25 mm - 51
mm to allow adequate clearance between the seat and the back
of the knee. Fig. 16
Seat Depth
Fig. 16
seat depth

11
CONVAID USER’S GUIDE
Wheels
Quick Release Wheels
1. To remove, press down and hold the Rear Wheel Locking Pin. Grasp wheel and pull.
2. No tools are required to remove tire.
1. To install, slide wheel
onto rear axle and push
with ball of hand until it
clicks into place.
WARNING: Ensure the wheels are installed properly. You will hear a “click”
when wheel locks into place.
TIRE REMOVAL
TIRE INSTALLATION
Fig. 17 Fig. 18
Fig. 20
Fig. 19
Fig. 21

12
CONVAID USER’S GUIDE
Locking and Unlocking
Convaid manufactures two types of wheel locks: hand operated and foot operated. Check to see which
type of wheel locks is on your chair.
WARNING: Proper care and maintenance must be taken to ensure proper
function of the foot operated brakes.
WARNING: When operating the wheel lock, do not use excessive force to
engage the locks with your foot. Only light pressure is needed to fully engage
the locks.
WARNING: Teon spray should be applied to brake components weekly to
ensure proper operations.
WARNING: Excessive force or poor maintenance will cause premature failure
for foot operated brakes.
Foot Operated Wheel Locks
To Release Lock:
Lift upward on wheel lock. Fig. 22
To Lock:
Press downward on wheel lock Fig. 23

13
CONVAID USER’S GUIDE
Operating Instructions
Three-Point Positioning Belt
Depth Adjustable Crotch Strap
Headrest Extension
The three-point positioning belt is optional with your Metro chair. Adjust the belt so the user stays
securely in position. The quick-release buckle is attached to the crotch strap, and joins the crotch strap
to both belts.
The crotch strap can be adjusted by threading the strap through
the desired slot. Fig. 25
Insert Headrest Extension Tubes
into the Headrest Holding Brackets
and push down. Fig. 26 & 27
To Buckle:
Slip the metal clasps on the belt strap into the sides of the
buckle. Fig. 24
To Release:
Press the grey button on the buckle and pull out the clasps.
Fig. 24
WARNING: Always secure user with belt rst,
before making any other adjustments. Fig. 24
Fig. 25
Fig. 26 Fig. 27

14
CONVAID USER’S GUIDE
Adjustable Footplates
Footplate Depth Adjustment
Foot Positioners
Adjustable footplates can be moved fore and aft, sideways. To adjust the angle, loosen the two bolts
located on the footplate and move to desired position. Retighten the bolts. Fig. 28 - 30
Foot Positioners maybe criss-crossed over the foot to secure the whole foot Fig. 32 or can be converted
into simple ankle straps. To attach foot positioner, thread strap through footplate as shown in Fig. 33 &
34, then bolt strap to underside of footplate.
All Metro chairs offer adjustable footplate depth.
Use the hex wrench to loosen the two bolts located on the top of the
footplate.
Slide footplate forward or rearward to desired depth. Retighten bolts.
Fig. 31
Fig. 28 Fig. 29 Fig. 30
Fig. 31
Fig. 32 Fig. 33 Fig. 34

15
CONVAID USER’S GUIDE
Footplate Height Adjustment
Seat-to-footplate height is measured from the back of the knee to the bottom of the heel. Feet or heels
should rest comfortably on top of footplate. (Fig. 35) All Convaid footplates are height adjustable.
Footplates swing away for access or folding. For Metro 12, 14, 16 - Unbolt footplate tube, move
footplate up or down, reattach tube in desired position. (Fig. 36) For Metro 18 - Pull on ring to remove
metal pin holding footplate in place. Move footplate up or down, realign holes and replace pin through
holes in tube. Fig. 37
Additional Footplate Height Adjustment (For Metro 18)
In the event that the footplate height adjustment described above is inadequate, additional
adjustments can be made.
1. Pull out metal pin and remove the footplate extension tube from the frame. Fig. 38
2. Press the detent button, then pull the foot plate assembly apart. Fig. 39
3. Insert the footplate into the opposite end of the footplate extension and re-assemble. Fig. 40
Fig. 35
Fig. 38
Fig. 41
Fig. 39
Fig. 42
Fig. 40
Fig. 43
Fig. 36 Fig. 37
For additional range:
1. Using a hex wrench (included),
remove both bolts from the
housing bracket on the frame.
Flip the bracket upside down and
replace bolts. Fig. 41 & 42
2. Return the footplate extension
tube to the housing bracket and
secure with metal pin. Fig. 43

16
CONVAID USER’S GUIDE
Underseat Storage Basket
1. Connect Center Button Strap by looping it over Rear Cross Brace and snapping button to back of
basket. Fig. 44
2. Loop Side Button Strap over Chair Tubing (just above the Rear Axle Assembly), and snap button
shut. Repeat for opposite side. Fig. 45
3. Loop Front Button Strap over Chair Tubing (just above Front Cross Brace Mount), and snap button
shut. Fig. 46-48
Fig. 44
Fig. 47
Fig. 45
Fig. 48
Fig. 46
Accessories

17
CONVAID USER’S GUIDE
Transit Option
The wheelchair transport model has been crash tested and
performed satisfactorily at 30 mph/20 g deceleration. Convaid
conforms to RESNA WC19 standards. Dummy weights are:
All Metro Models
Model ME12T.......66lbs / 30kg
Model ME14T.......100lbs / 45.5kg
Model ME16T.......170lbs / 77kg
Model ME18T.......170lbs / 77kg
To reduce possibility of injury, the headrest extension must
always be used with the chair. The following instructions should
be followed to minimize impact in case of a crash:
1. Chair must be forward facing with tray and storage basket
removed.
2. Use only a tested, proven and compatible 4-point wheelchair
tie-down system (WTOT), and a 2- or 3-point occupant
restraint system in accordance with SAE J2249.
3. The wheelchair tie-downs must be securely attached to the
four black anchor points on the chair. See arrows in above
photo for anchor points.
4. The occupant restraints must include a lap and shoulder
belt, secured directly to the Metro frame and side or roof of
the vehicle.
Note: Do not over tighten this may cause damage to the frame.
Note: The storage basket must be removed during transport in bus or van, except when medically
neccessary.
Note: Convaid strongly recommends the use of all Transit Required Accessories during transportation
in a motor vehicle; which include the 3-point pelvic belt (used for positioning), Headrest Extension, and
Foot Positioners.
Q’Straint, Sure-Lok, Unwin and Ortho Safe specialize in crash-tested tie-down systems and are in no way associated with Convaid.
Q’ Straint America
Tel: 1-800-987-9987
Fax: 1-954-986-0021
5553 Ravenswood Road #110
Ft. Lauderdale, FL 33312, USA
Sure-Lok
Tel: 1-866-787-3565
Fax: 1-610-814-0644
2501 Baglyos Ci rcle
Bethlehem, NJ 18020, USA
Ortho Safe Systems, Inc.
Tel: 1-609-587-9444
Fax: 1-609-587-6780
PO Box 8865
Trenton, NJ 08650, USA
Unwin Safety Systems
Tel: +44-(0)1935-827740
Fax: +44-(0)1935-827760
Unwin House, The Horseshoe, Coat Road
Martock, Somerset, TA12 6EY, UK
WARNING: Convaid belts
are for positioning only
and are not to be used
as a vehicle restraint.
5. All oor tie-down straps must be drawn tight in the front and the back to eliminate any forward/aft
movement of the chair.
6. Wheelchair restraint manufacturers’ instructions must be followed precisely to ensure intended
performance.

18
CONVAID USER’S GUIDE
Maintenance, Operating & Safety Instructions
Important Information
WARNING:
• For increased safety, the seat belt should be used at all
times.
• Do not leave user unattended.
• Do not strap user too tight.
• Straps should not interfere with breathing or circulation
• Always apply wheel locks before letting go of the chair.
• If front edge of seat is at or forward of the point where
tires touch the oor, avoid using front of seat tubes for
support during entry or exit from chair to prevent tipping.
• Avoid using footplates for weight support during exit or
entry of the chair.
1. Waste Disposal
The shipping carton should be kept for possible return to the manufacturer/service facility for repair
or maintenance. Other paper packaging waste should be set aside for recycling. For disposition of
replaced parts or the complete chair, the materials should be separated into: plastic, rubber, steel,
aluminum, etc., and set aside for recycling.
2. Intended Use
This product is intended for use by a person with physical disabilities who is frequently or permanently
non-ambulatory. The chair is always under the control and supervision of an attendant, and the
occupant should never be left unattended.
3. Suitable Environment
The chair is intended for both indoor and outdoor use. If the chair is used in the rain, the excess water
should be wiped off with a soft cloth. If the chair is splashed with mud or corrosive substances like salt
water or road salt, the chair should be washed clean with water, wiped dry and a hypoallergenic and
biodegradable lubricant reapplied to the moving parts. The chair should never go into seawater, as it
will corrode areas that cannot be washed clean. When going from outside to inside, clean any excess
dirt or mud from the wheels to prevent soiling of inside environment.
Table of contents
Other Etac Stroller manuals