ETEK ETK110-7B User manual

USER MANUAL
UNDERWATER VIEWING SYSTEM
Read this manual carefully before operating
Please recharge the battery before your first time use
1
Introduction -------------------------------------------------- 2
Features ------------------------------------------------------- 2
Getting started ----------------------------------------------- 4
Adjusting the monitor -------------------------------------- 6
Wired control FOB and remote control ----------------- 8
-------------------------------------------
Product performance specifications --------------------- 13
Care and Maintenance ------------------------------------ 14
Battery charging 11
Table of Contents

The digital LCD screen monitor on
extrordinary sharp and clear picture under most viewing conditions.
The collapsible visor make the monitor more versatile for summer use
or while viewing outside on the open ice. Itsrecommended when viewing
outdoors, that the backlight (brightness)be increased to enhance your
viewing experience. Although classified as daylight viewable because
of the sunshield, still it is recommended that you turn the monitor away
from direct sunlight.To clean the LCD screen, use a cleaner recommended
for plastic and a soft cloth towel.
the viewing system provides an
In order to create a clear picture, the underwater camera
module.
use Sony CCD
The cable storage spool is convenient for allowing the right amount
of cable out for viewing. Also it serves as a carry handle for convenient
use.
The 360° °angle of view,press
the left rotation or the right rotation button to turn the camera left or right
for the desired coverage area. And on screen display the real- time camera
direction when the camera is circumrotating.
viewing means the camera offers a 360
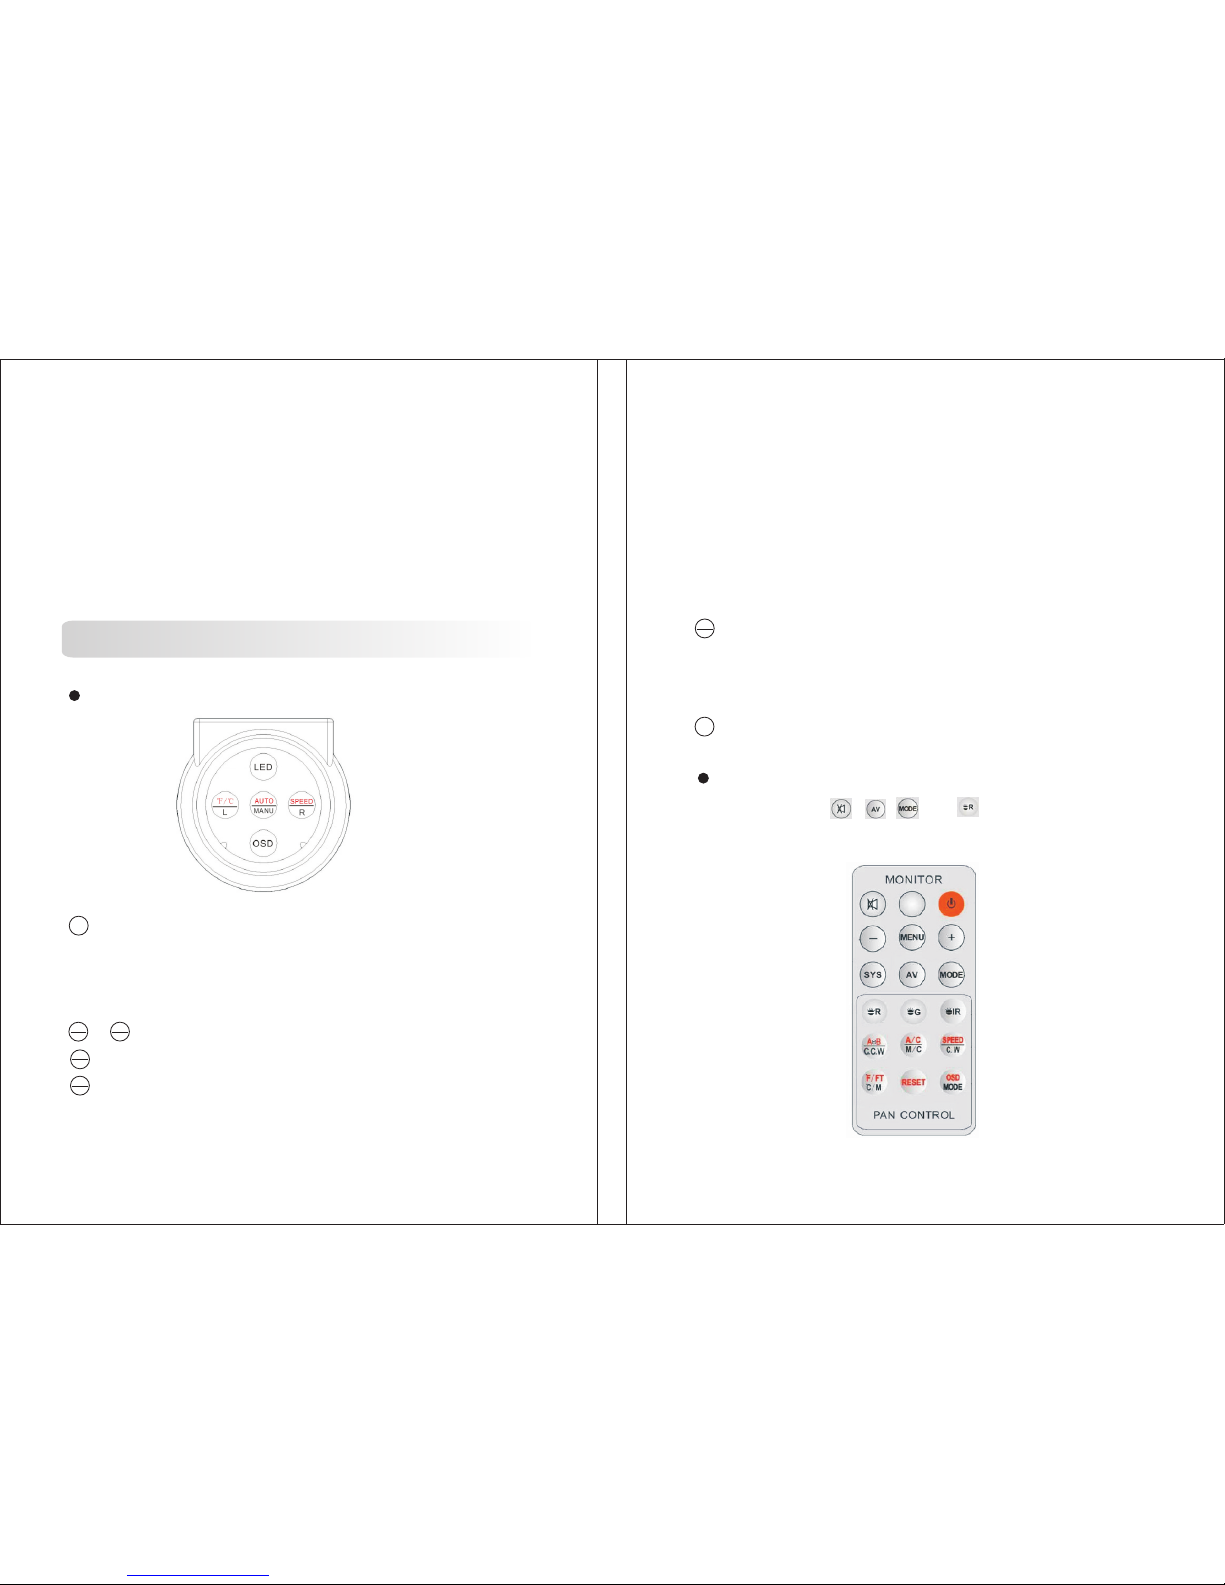
The wireless hand remote contro
convenient.
l offers a 1-3 meter distance control so
the user can operate the camera very easy and more
The 10pcs IR LED & 8pcs white LED lights can greatly reduces
particulate reflection and increases viewing distance in dark water when
power on.
3
Thank you for choosing the underwater viewing system with
rotating camera, a high resolution color video camera and monitor
system that offers multi-purpose application in aquatic environment.
It may be best use for sport fishing, search and rescue, treasure hunting,
and marine biology research. Or just for plain fun, it can offer you a
viewing pleasure by showing underwater activities. It will help bring
ones aquaticfantasies and imaginations to true life on thescreen. This
underwater viewing system includes high resolution Sony CCD with
360°rotating camera,with 7" digital LCD screen monitor, 12V 7AH
rechargeable battery, charger, suns hield screen and waterproof carrying
case: a complete set for your application.
360°
Features
7 inch digital LCD screen monitor for enhanced viewing
Collapsible visor with reinforced sides for easier viewing
Waterproof camera equipped by Sony CCD module
Super strong waterproof ABS material carrying case
High strength cable
Cable storage spool serves as a carry handle when use
360°viewing rotating camera
Wired control FOB and wireless hand remote control
10pcs IR LED & 8pcs white LED lights for low light viewing
12V7AH rechargeable Lead Acid Battery and charger
Introduction
2

Connection diagram:
be connected to the positive (red)terminal onthe battery.The negative
(black) connector only can be connected to the negative (black) terminal
on the battery.Once all the connectors are connected correctly, you can see
the image directly on the LCD screen that comes from the camera (this
will happen only when the system already being power on), or press the
button of LED on the wired control FOB to power on the system. The
underwater camera is ready for use, and can now be unwrapped from the
cable spool and deployed into the water to the desired depth.
VIDEO OUT
DC IN DC OUT VIDEO IN S D
5
The super strong ABS material
the best choice to you when used outdoors. It can protect the monitor
LCD screen, the camera and so on during transportation.
waterproof carrying case with handle is
The sealed 7.0 amp hr rechargeab
least 7 hours of continuous use during ideal conditions.Battery run time
will vary depending on the condition of the battery,use of underwater
LED lighting, level of screen backlight (brightness), use of camera
circumrotation. The 0.5 amp charger can quickly charger the battery back
to full capacity. Once charged, a small green LEDlight will be illuminated
to indicate the charger has switched to a trickle charge mode.
le lead-acid battery can provide up at
Getting started
The underwater panning camer
factory before being placed into its retail packaging.
a has been set-up and tested at the
Open the carrying case, take out &
the packaging.Once opened, you can see there are 4 female jacks on the
screen board. Firstly connect the power out male connector from camera
to the DC 12V IN jack on the screen board, and then connect the video
out male connector from camera to the video in on the screen board also.
Then connect the power output connector of the battery cable to the
power in female connector from the camera. The battery cable connectors
can now be connected to the battery by attaching the corresponding color
connectors to the correct terminal. The positive (red) connector only can
remove the underwater camera from
4

1.
the red LED will be on when the system is power on;
2. Mirror: To change the direction of the image shows on the LCD
screen,totally there are 4 directions, to have the correct display on it;
3. To change the mode between 16:9 and 4:3 on screen display;
4. Menu: To access the settings menu (BRIGHT, CONTRAST AND
COLOR);
5. V-: Decrease the numerical value of BRIGHTNESS, CONTRAST and
COLOR;
6. V+: Increase the numerical value of BRIGHTNESS, CONTRAST and
COLOR;
7. POWER: Power on & off the monitor LCD screen.
Window to receive the infrared signal from the remote control. Also
Monitor screen adjustments:
The monitor has three different adjustments that can be made
enhance the image on the monitor to the users preference. (Note: The
unit has been pre-set with factory defaults for normal viewing).To
access the settings menu, press the menu key on the monitor panel with
different times. Press the menu key one time access BRIGHT setting,
press the menu key two times access CONTRAST setting and three
times access COLOR setting. (Note: If you wait too long time before
adjustment, the menu screen will time out and disappear).After pressing
your selected menu option and it will appear on the bottom of the screen,
you can now be able to easily adjust and see the screen adjustments that
you are making. As you select "+" or "-" to make your adjustments,you
to
7
The depth of field (distance the camera can see underwater) depends
on the clarity of the water and available light at the depth the camera is
used. In clear water, the depth of field can be many feet but in cloudy or
muddy water the depth of field can be reduced to only a few inches due
to particles suspended in the water.
Adjusting the Monitor
Monitor diagram, function instruction of the buttons
MIRROR MODE MENU v-v+POWER
1 2 3 4 5 6 7
6

Note: The buttons of
current version
and are not available in the
, , ,
W ired control FOB
Wired control FOB and remote control
:Once all the connectors are connected correctly, press it to power on
the system. When the system is working, press this button to lighten
the LED or close it (including the infrared LED & white LED both),
the letters of WIR will be show and disappear on the screen.
& : Press these two buttons at the same time to close the system.
: To change between the mode of Automatic and Manual control
: In Manual control mode, press it to rotate to the left side, press it
again, the camera stop. In Automatic mode, press it to set the starting
point that will be indicated as A, and press it again to set another
When the unit has the functions of Depth and Temperature, press this
button to show the depth and temperature where the camera locates
:In Manual control mode, press it to rotate to the right side, press it
again, the camera stop. In Automatic mode, press it to adjust the
rotating speed of the camera from S1 to S7, S1 is the quickest,and S7
is the slowest
: To cancel or to show the on screen display words on the screen
Remote control
point as B, then the camera will rotating between the A & B two
points repeatedly. And then press it again to cancel the settings. The
letter of A and B will be show and disappear on the screen
will see the numbers of the selected adjustment increase or decrease
depending on the "+" or"-" key you are pressing.To accept the changes,
release the "+" or "-" butt or on and settings will be saved. Once the
settings are adjusted properly, the onscreen menu will disappear
automatically.
9
8
LED
OSD
AUTO
MANU
SPEED
R
°
F/ C
L
°
°
F/ C
L
°
SPEED
R

Note: The camera lens rotation and the LED lights would work for
several seconds when you first turn on the camera. This phenomenon is
the camera self-testing and preparation and after that you can use the
camera normally.
Battery Charging
Recharge the battery after every use is recommended. The charger that
was supplied with the camera is a 0.5-amp two-stage DC charger. To
charge your system, simply connect the positive (red) and negative
(black) female connector from the charger to the positive (red)and
negative (black) terminal at the battery. Once connected, plug the
charger into a 110-240 volt AC wall outlet. The LED indicator light on
the charger will be red when the charger is in a charging mode. The LED
indicator light on the charger will turn green when the charger switches to a
: To change the direction of the image shows on the LCD screen,
totally there are 4 directions
Monitor Control
: Power on & off the monitor LCD screen
: To access the settings menu (BRIGHT, CONTRAST AND COLOR)
: Increase the numerical value of BRIGHTNESS, CONTRAST and
COLOR
: Decrease the numerical value of BRIGHTNESS, CONTRAST and
COLOR
: To change between the mode of Automatic and Manual control
: In Manual control mode, press it to rotate to the left side, press it
again, the camera stop. In Automatic mode, press it to set the starting
point that will be indicated as A, and press it again to set another point
as B, then the camera will rotating between the A & B two points
repeatedly. And then press it again to cancel the settings.
:In Manual control mode, press it to rotate to the right side, press it
again, the camera stop. In Automatic mode, press it to adjust the
rotating speed of the camera from S1 to S7, S1 is the quickest, and
S7 is the slowest
: When the unit has the functions of Depth and Temperature, press
this button to show the depth and temperature where the camera
locates
: To cancel or to show the on screen display words on the screen
: The unit will be in default mode after pressing this button
:When the system is working, press this button to lighten the white
color LED or close it. The letter of W will be show and disappear on
the screen
:When the system is working, press this button to lighten the infrared
LED or close it. The letter of IR will be show and disappear on the
screen
PAN Control
11
10

Tip: To preserve battery run time, please disconnect the battery cable
when the system is not in use.
Product Performance Specifications
Battery 2 volt DC, 7 amp hr
Charger --------------------------------------------------- 12 volt DC, 0.5 amp
Battery cable ------------------------------- 65cm length cable with 3A fuse
Carrying case -------------------------------------------- 100% ABS material
--------------------------------------------------- 1
Camera
Image sensor ONY CCD
Power consumption ----------------------------------------------------- ≤3W
Night visibility ------------------------------------- 8pcs white LED light &
10pcs infrared LED light
Focus ------------------------------------------------------------------- 3.6mm
TV line ------------------------------------------------- 420 lines, or 700 line
Viewing angle -------------------------------------------------------------- 92°
Camera cable ----------------------------------- from 20m to 50m, or more
----------------------------------- S (1/4", or 1/3")
Note
according to the real unit
: the specs of the image sensor, TV line and camera cable vary
Monitor
Monitor 7" Digital LCD
LCD Color system ------------------------------------------------- PAL/NTSC
Power supply -------------------------------------------------------- 12 volt DC
Power consumption ----------------------------------------------------- ≤14W
Operating temperature ------------------------------------- 10℃ ~ +50℃
Storage temperature --------------------------------------- 20℃ ~ +60℃
----------------------------------------------------------
-
--
Charging connection diagram
When the green LED light is on, disconnect the charger from the
battery terminal and the wall outlet. If the green LED light does not
come on after 10 to 12 hours of charging time or the green LED light
comes on
battery will not accept a full charge. If this occurs and also your
camera run time is greatly diminished, you may need to replace with a
new battery of equal specification.
relatively soon after the charger is plugged in, this may indicate
that the
If your viewing image ap
shrink, check your battery charge. One of the major symptoms of a dead
or near-dead battery is the degrad ation of your viewing image.
Trycharging your battery or if the battery is unable to hold the charge,
replace it with a new one of similar specification.
pears cloudy, fuzzy or the screen begins to
trickle charge. The 7-amp hour, 12-volt battery that was supplied with the
system should take about 8 to 10 hours to charge from a completely
discharged state.
13
12

Make sure NOT to reverse the po
damage to both of the monitor and camera. The red power cable and
black ground cable should connect to red terminal and black terminal
of the battery respectively.
larity. It may cause permanent
Please make sure to turn off the monitor and disconnect power cable
from the battery after each use. Also wipe off any moisture at both
terminals on the battery to prevent from corrosion. This will ensurea
clean connection between cables and terminals for future use.
After using in the sea or reservoir, monitor and camera may have
like sand, mud and salty water. Please clean the camera/monitor
according to the following method.
CLEANING CAMERA
Put the camera in clean water and clean the dirt. Be careful not to put
the connector in the water.
Do not use benzene, thinner, hot water or detergent.
CLEANING MONITOR
Disconnect the cable from monitor, clean the monitor with
slightlydamp towel.
Do not use benzene, thinner, hot water or detergent
Do not put the monitor in the water
Be careful: do not let the connector get wet while it is being exposed.
dirt
Care and Maintenance System cable has shielded wires and should not be cut. If the outer
jacking of the cable is cut, moisture is allowed to enter into the
camera by means of suction or capillary action.
Should any liquid or solid object fall into the monitor cabinet,unplug
the unit and have it checked by qualified personnel beforeoperating
it further.
Do not disassemble the water-resistant housing of the camera. There
is a risk of electrical shock if you touch the internal parts.
15
14
This manual suits for next models
1
Table of contents