Effacer les associations radio / Delete associations / Zuordnungen
löschen / Borrar las asociaciones radio / Eliminare le associazioni radio /
Apagar as associações via rádio.
X2d -> X3d / X3d -> X2d
A L LG E M E I N E GARANTIEBEDINGUNGEN
>30s
... ......
3s 27s
OK
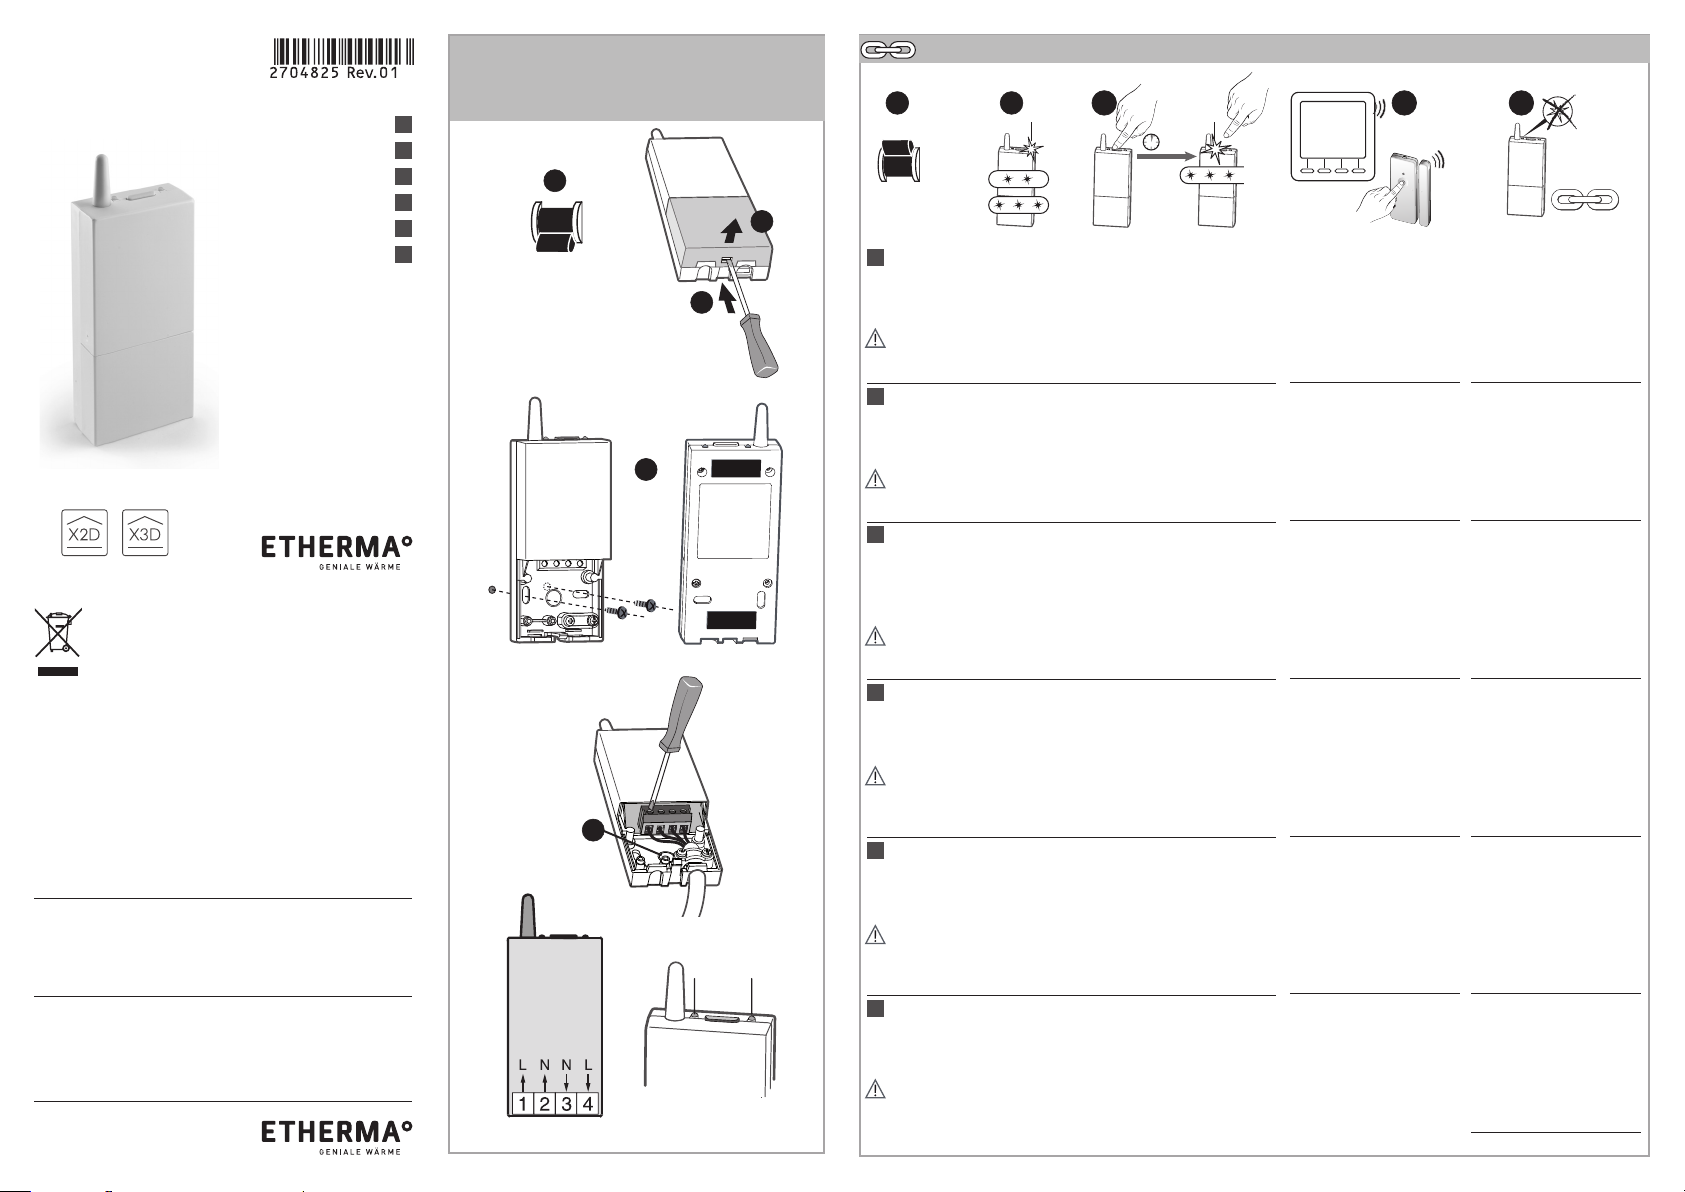
1 2
...
1 2 3
230V~
50 Hz
ON
X2D
X3D
X2D
4
>3s
L2 L1
FR
A la mise sous tension, le voyant L2 clignote 2 fois (X2D)
- Appuyez brièvement sur la touche, le voyant clignote 3
fois (X3D).
- Validez en appuyant 3 secondes sur la touche du
récepteur jusqu’à ce que le voyant L1 clignote. Relâchez.
- Procédez à l’association de l’émetteur (voir sa notice).
EN
Switch on the installation. The LED flashes 2 times (X2D)
- Press br
iefly on the button, the LED flashes 3 times
(X3D).
- Confirm by pressing the button for 3 seconds until LED
L1 flashes. Release.
- You can now associate the transmitter (see transmitter
manua
l).
FR
Maintenez appuyé 30 secondes (Ê):
- après 3 secondes, le voyant clignote lentement.
Maintenez l’appui jusqu’à ce que les 2 voyants
clignotent. Relâchez (Ë).
EN Press and hold for 30 seconds (Ê):
- after 3 seconds, the LED flashes slowly.
Keep the receiver button pressed until both
LEDs flash. Release the button (Ë).
DE
Halten Sie die Taste 30 Sekunden lang gedrückt:
- Nach 3 Sekunden blinkt die Kontrollleuchte
langsam. Halten Sie die Taste gedrückt bis die 2
Kontrollleuchten blinken. Lassen Sie die Taste
los (Ë).
ES Mantenga pulsado 30 segundos (Ê):
- después de 3 segundos, el testigo parpadea
lentamente.
Mantenga pulsado hasta que los dos testigos
parpadeen. Deje de pulsar (Ë).
IT
Mantenete premuto per 30 secondi (Ê):
- dopo 3 secondi, la spia lampeggia lenta-
mente. Mantenere premuto fino a quando le
due spie lampeggiano . Rilasciare (Ë).
PT
Prima continuamente durante 30 segundos (Ê):
- Ao fim de 3 segundos, o indicador luminoso
começa a piscar lentamente.
Continue a premir até que os 2 indicadores
luminosos comecem a piscar. Solte (Ë).
Sehr geehrter Kunde, bitte beachten Sie unsere allgemeinen Geschäftsbedingungen. Bei Garantiefällen gelten
die landesspezifischen Rechtsansprüche, die Sie bitte direkt gegenüber Ihrem Händler geltend machen.
VORBEHALT: Technische Änderungen behalten wir uns vor. Änderungen, Irrtümer und Druckfehler begründen
keinen Anspruch auf Schadensersatz.
DE
Setzen Sie die Anlage unter Spannung. Die Kontroll-
leuchte blinkt 2-mal (X2D).
- Drücken Sie kurz die Taste. Die Kontrollleuchte blinkt
3-mal (X3D).
- Bestätigen Sie, indem Sie 3 Sekunden lang auf die Taste
des Empfängers drucken, bis dessen Kontrollleuchte
L1 blinkt. Lassen Sie die Taste los.
- Sie können jetzt einen Sender zuordnen (siehe Bedi-
enungsanleitung des Senders).
ES
Conecte la alimentación.
- Espere hasta que la LED parpadee 2 veces (X2D).
- Pulse brevemente en la tecla, la LED parpadea 3 veces (X3D).
- Pulse durante 3 segundos la tecla del receptor hasta el
testigo L1 parpadee. Deje de pulsar.
-
Proceda a la asociación del emisor (ver manual de
instrucciones)
IT
Mettere l’installazione sotto tensione.
- Attendere che il LED lampeggia 2 volte (X2D).
- Premete il tasto, il LED lampeggia 3 volte (X3D).
- Confermate premendo per 3 secondi il tasto del ricevitore fino
a quando la sua spia L1 lampeggia. Rilasciate.
- Procedete con l’installazione dell’ emettitore (vedi istruzioni).
PT
Coloque a instalação sob tensão.
- Esperar até que o LED pisca 2 vezes (X2D).
- Prima brevemente a tecla do receptor durante 3 segun-
dos até que o respetivo indicador L1 luminoso comece
a piscar. Solte.
- Proceda à associação do transmissor (ver manual de
instruções).
230V~, 50 Hz - 2 VA
X2D : 868MHZ --> 868,6MHz
X3D : 868,7MHZ --> 869,2MHz
54 x 120 x 25 mm
16A, 230Veff Cos j=1
IP 44
0°C --> +40°C
Important product information (ËÍ)
Fonctionnement sans thermostat/ Special mode without thermostat / Empfän-
gerverhalten bei fehlender verbindung zum thermostat/ Funcionamiento sin el
termostato / Funzionamento senza termostato / Funcionamento sem termóstato
FR En l’absence de signal du thermostat pendant plus d’une heure, le récepteur fonctionne en mode
dégradé : (30% en régulation PI, OFF en régulation On/Off).
Les deux voyants clignotent alors simultanément.
Pour passer en mode forcé 100%, appuyez une fois sur le bouton. Le voyant 1 devient fixe, et le
voyant 2 continue de clignoter. Un nouvel appui sur le bouton repasse le récepteur dans le mode
précédent.
EN Without any signal from the thermostat for more than one hour, the receiver will work in a special
mode (30% in PI regulation, OFF in On/Off regulation).
The two LEDs will flash simultaneously. To switch to the continuous heating mode (100%), press the
receiver button once. The LED 1 will stop flashing (ON) and the LED 2 will continue to flash.
Press one more time the receiver button to go back to the previous mode.
DE Sollte es über 1 Stunde lang zu einer fehlenden bzw. fehlerhaften Kommunikation zwischen
Thermostat und Empfänger kommen, dann schaltet der Empfänger auf Notbetrieb um (d.h. 30% für
die PI-Regelung, OFF für die ON/OFF Regelung).
Beide Kontrollleuchten blinken dann gleichzeitig.
Um auf Dauerheizung umzuschalten, drücken Sie einmal auf die Taste. Die Kontrollleuchte 1 bleibt
an, die Kontrollleuchte 2 blinkt weiterhin. Sollten Sie nochmals auf die Taste drücken, dann schaltet
der Empfänger in den vorherigen Modus um.
ES En ausencia de señal del termostato durante más de una hora, el receptor funciona en modo
degradado: (30% en regulación PI, OFF en regulación on/off). Los dos indicadores parpadean
simultáneamente. Para pasar a modo forzado 100%, pulsar un vez sobre el botón.
El indicador 1 se activa de forma continua, y el indicador 2 continua parpadeando.
Al pulsar de nuevo sobre el botón devuelve el receptor en el modo anterior.
IT In caso di mancata ricezione del segnale radio proveniente dal termostato per più di un ora, il
ricevitore funzionerà in modalità ridotta : ( 30% in regolazione PI o OFF in modalità regolazione ON/
OFF). I due LED lampeggiano allora simultaneamente.
Per forzare il funzionamento al100% premere una volta sul tasto.
Il LED 1 si accende fisso e il LED 2 continua a lampeggiare. Una nuova pressione del tasto riporta il
ricevitore nella modalità precedente.
PT Na ausência de sinal do termóstato durante mais de 1 hora, o receptor passa a funcionar no modo
degradado: (30% na regulação PI, OFF na regulação On/Off).
Os dois indicadores luminosos começam então a piscar simultaneamente.
Para passar ao modo forçado 100%, prima uma vez o botão. O indicador luminoso 1 fica aceso
continuamente e o indicador luminoso 2 continua a piscar. Uma nova pressão no botão reverte o
receptor para o modo anterior.