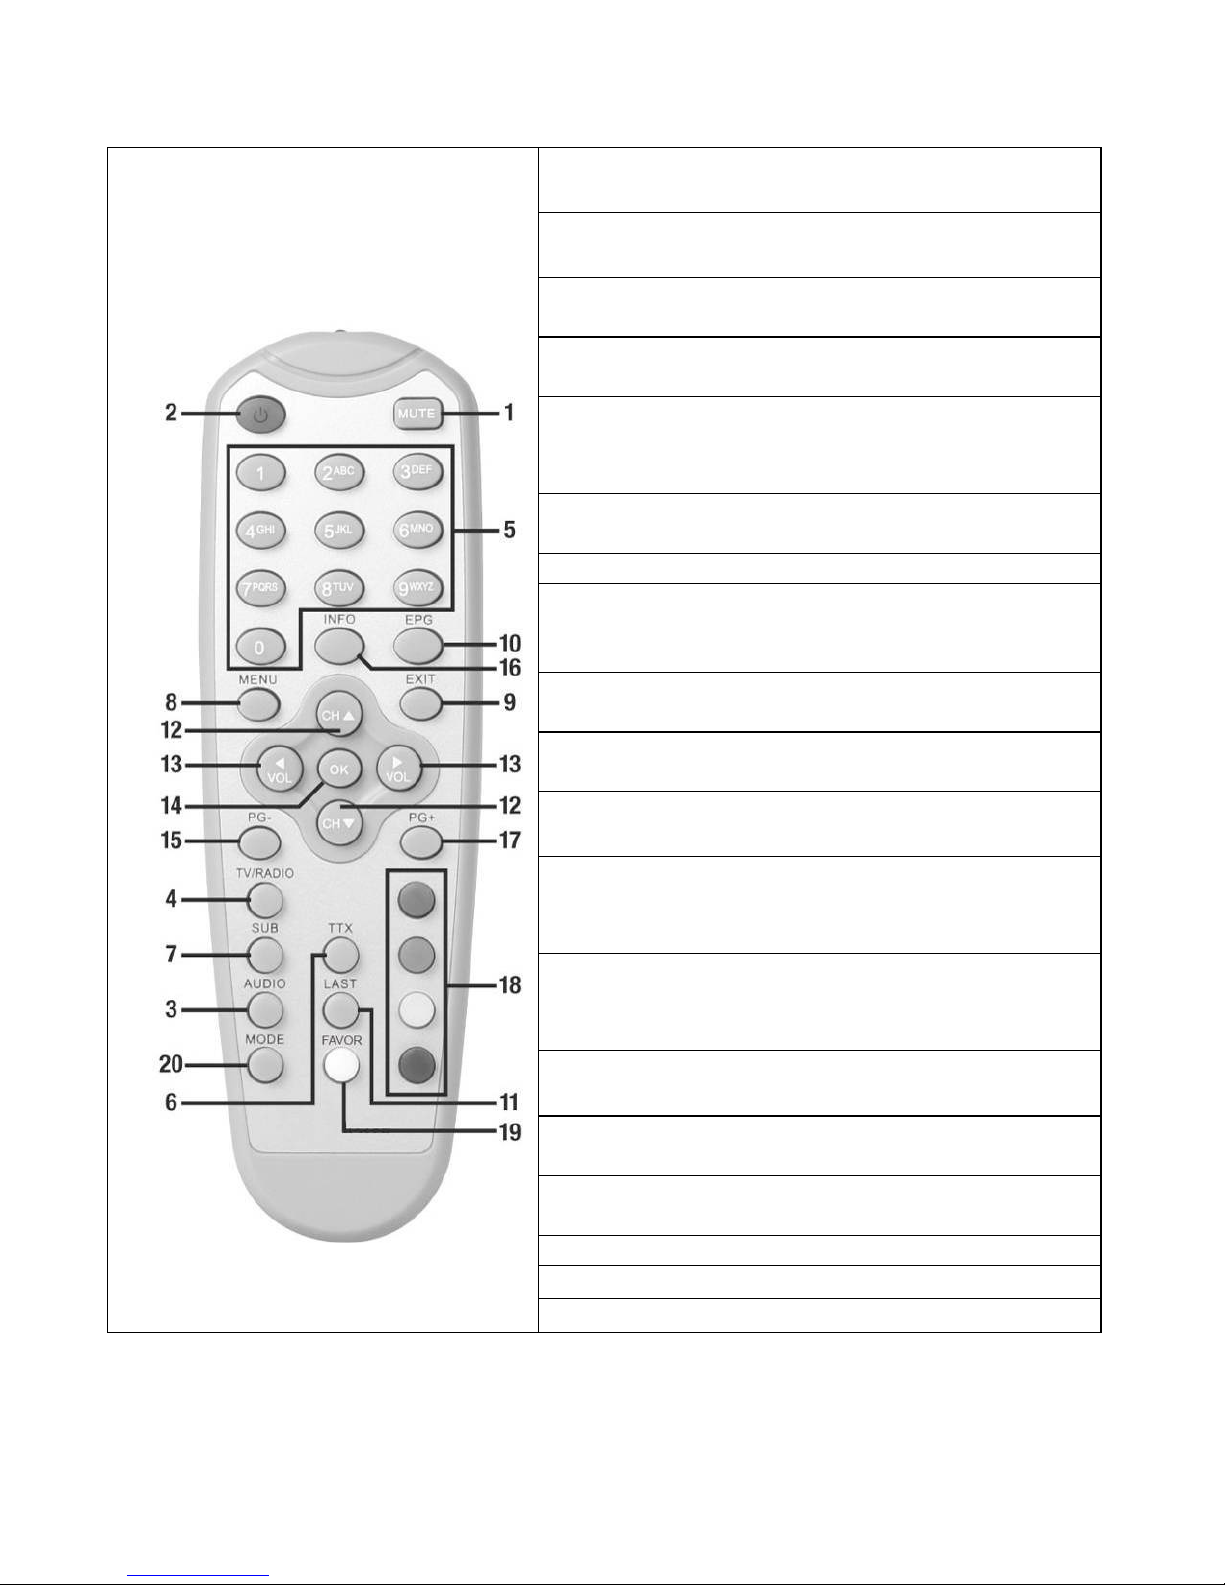
Titan TX500 User manual

TX500
Instruction Manual
Digital Satellite Receiver
For receiving free-to-air channels.

2
INTRODUCTION
This User Manual will help you to operate your Satellite Receiver in a safe
manner while enjoying all the features and benefits it provides for your
entertainment
The instructions contained in this User Manual assume that the user of the
Satellite Receiver already has a basic general knowledge on how to operate
entertainment electronic devices
This User Manual must be read by every person that is:
•Installing
•Connecting
•Operating
•Cleaning
•Disposing of this Satellite receiver
DISPOSAL OF USED ELECTRICAL AND ELECTRONIC DEVICES
The disposal of used Electrical and electronic devices must be conducted in
accordance with the rules and regulations of the European Union (EU) and that
of other European Countries
All products that are marked either directly or labelled on their packaging with
the following icon:
can not be disposed of through the normal household waste channels. These
products must be disposed of through specialised collection centres for the
recycling of electric and electronic devices
By disposing of this product as required by law, you are contributing to the
protection of the environment and the health of your fellow human beings
Incorrect disposal can be dangerous to human health and hazardous to the
environment

3
Table of contents
Introduction 2
Disposal of used electrical devices 2
Table of Contents 3
1 Explanation of the device 5
1.1 Front side of the receiver 5
1.2 Backside of the receiver 6
1.3 Remote control 7
Safety precautions 8
The right location 9
2 Operating the receiver 10
2.1 Turning on the receiver 10
2.2 Standby Mode 10
2.3 Switching channels 10
2.4 Volume adjustment 10
2.5 Channel number 11
2.6 Mute (Turning sound off) 11
2.7 Adjusting the channel sound 11
2.8 Switching between TV and radio 11
2.9 TXT (teletext) 11
2.10 SUB (subtitle) 11
2.11 EPG (Electronic Program Guide) 12
2.12 LAST 13
2.13 Channel list 13
2.14 Switching satellites 13
2.15 Information 13
2.16 Changing the screen mode 13
2.17 Favorite list 14
2.18 Sleep timer 14
3 Menu 15
Menu structure 15
3.01 Editing channels 16
3.1 TV program list 16
3.1.1
Favorites 17
3.1.2
Locking channels 17
3.1.3
Skipping channels 17
3.1.4
Moving channels 18
3.1.5
Changing channels 18
3.2 Radio program list 18
3.3 Delete all (channels) 18

4
4 Installation menu 19
4.1 Antenna connection 19
4.2 Satellite list 19
4.3 Antenna settings 20
4.4 Searching single satellites 21
4.5 Searching multiple satellites 21
4.6 TP list (transponder) 22
5 System menu 23
5.1 Language 23
5.2 TV settings 23
5.3 Time settings 24
5.4 Timer settings 24
5.5 Parental lock (passwords) 25
5.6 OSD settings 25
5.7 Favorites 25
5.8 Miscellaneous (LNB supply, channel display) 25
6 Miscellaneous 26
6.1 Information 26
6.2 Default settings 26
6.3 Upgrade via satellite (software) 26
7 Games 27
7.1 Tetris 27
7.2 Othello (Reversi) 27
8. Disassembly 28
9 Trouble-shooting 29
10 Specifications 31
Warranty 32
Declaration of Conformity 32
Glossary 33

5
1. Explanation of the device
1.1 Front side of the receiver
1 POWER button Turning on the device or switching to standby mode.
2 ▼button Switching channels backwards.
3 ▲button Switching channels forward.
4 LED POWER LED illuminates during normal and standby
operation.
5 LED LOCK LED illuminates if signal is strong enough.
6 IR Infrared receiver for signals from remote control.
7 Standby Standby indicator

6
1.2 Back side of the receiver
1 LNB IN LNB port for antenna cable.
2 LNB OUT LNB port for analogue SAT receiver (Loop-in
operation during standby only).
3 Audio Stereo Sound Output, for connecting a stereo
system.
4 TV SCART SCART connection for TV.
5 Mains cable Mains cable 230V.
6 COAXIAL Digital coaxial audio output.

7
1.3 Remote Control
1. Sound on/off Mutes the sound. Press again to turn on
sound.
2. On/Off (Standby) Press to turn off the receiver or to
switch to Standby.
3. Audio – Select sound channel Displays all available
sound channels.
4. TV/ radio operation Press once to switch between TV
or radio operation.
5. Number buttons 0 - 9 Use these buttons to switch to a
certain channel or to enter numeric values or to change
channel names and favorite lists.
6. Teletext/Videotext To display teletext or videotext
pages.
7. Subtitles To display subtitles.
8. MENU – OSD display menu To enter display menu,
with the help of which you can edit all receiver and
channel settings.
9. EXIT – Exit menu To close the current OSD menu and
to display the higher-level menu or full screen.
10. EPG – Program information To display the EPG
(Electronic Program Guide).
11. LAST To switch between the current and last viewed
program.
12. Control buttons: Channel/Switching programs To
navigate through the OSD menu (up/down) or to switch
channels in ascending and descending order.
13. Control buttons VOL/ volume adjustment To
navigate through the OSD menu (left/right) or to adjust
the volume.
14. OK/ confirmation button Press OK to confirm or
execute an action. • To display program list.
15. / 17. PG-/PG+ - program list up and down To
browse pages in program, favorite or other lists.
16. Function key i To display program information;
multi-function key during OSD operation.
18. Function key
19. FAVOR (White) Favorite programs.
20. Mode To set the screen format.

8
Safety precautions
Before operating the receiver, please read thoroughly the following safety
precautions
You are required to read all the notes, instructions and warnings contained in
this User Manual
Basic safety precautions
Connecting to the mains
·During disturbances unplug the receiver from the mains.
·To avoid the risk of fire and electric shock do not expose the receiver to rain or other
humidity.
·Never open the housing. Otherwise there is the risk of electric shock.
·Only connect the receiver to a properly installed 100-240V, 50-60 Hz mains socket.
· The total power input at the LBN IN antenna socket of the receiver must not
exceed 500mA.
· In case of non-use of the appliance for a longer period of time, please
disconnect the plug from the mains. Only pull at the plug, not at the cable.
· Disconnect the plug from the mains during thunderstorms.
· If objects or liquids enter the receiver, immediately pull the plug. Refer the
appliance to qualified service personnel before using it again. Otherwise there is
a risk of electric shock.
· Please make sure that the power supply (socket) is easily accessible.
· Do not bend or squeeze the mains cable.
· If the mains cable is damaged, you have to refer the receiver to qualified
service personnel for repair before using the receiver again. Otherwise there is
the risk of electric shock.
· Do not allow children to use the receiver without supervision or to play with the
antenna appliance.
· Always refer maintenance to qualified service personnel. Otherwise you
endanger yourself and others. Purchase spare parts from the manufacturer only.

9
The right location
Place the receiver on a stable, even surface.
Avoid placing it near:
Heating sources, like radiators,
Naked flames, like candles,
Devices with strong electromagnetic fields, like speakers.
Do not place objects filled with liquids (such as vases) on the receiver.
· Avoid direct sunlight and exceptionally dusty places.
· Never cover the ventilation openings. Ensure sufficient ventilation of the
receiver.
· Do not place heavy objects on the receiver.
· Humidity can occur inside when moving the receiver from a cold to a warm
place. In this case, wait for about 1 hour before operating the unit.
Run the antenna cable so that no one can step on or stumble across it.

10
2. Operating the receiver
Use the buttons CH▲, CH▼, VOL►and VOL◄to navigate through the menus.
Selected menu items are marked. Confirm the selection with OK button. Press
EXIT or MENU button to return to previous menu or to exit main menu. Changes
require additional confirmation. The use of the number buttons in the submenus
is moreover necessary.
Example: Set receiver to daylight saving time.
MENU button, select system settings, select time settings, OK button, select
time, OK button. Under GMT select UTC difference of +1:00. If necessary, set
daylight saving time to "On". Press EXIT to close the menu.
2.1 Turning on the receiver
Press On/Off (Power) to turn on the unit.
2.2 Standby mode:
When pressing the "Power" button, receiver will switch to standby mode. Press
"Power" once more to turn the unit on again.
To completely turn off the unit, unplug the mains cable.
2.3 Switching channels
Use CH▲, CH▼buttons to switch channels during radio or TV mode.
2.4 Volume adjustment
Use VOL◄, VOL►buttons to adjust the volume during radio or TV mode.

11
2.5 Channel number
During radio or TV mode press any number button followed by "OK" button to
directly switch on a channel.
2.6 Mute (Turning sound off)
1. Press "Mute" to switch off the sound.
2. Press "Mute" once more to switch sound on again.
2.7 Changing sound channel
Press "Audio" and select a desired
language (as long as provided by
broadcasting station) using the CH
buttons.
Press VOL buttons to select a desired
mode (Stereo/Mono/Left/Right).
2.8 TV/RADIO
Press "TV/Radio" button to switch to radio
mode. Press again to return to TV mode.
2.9 TXT
Teletext is an information system that
displays text pages on your TV screen.
To receive teletext pages the selected
channel must support this function.
When switching channels, the TXT
symbol is displayed if the channel
supports teletext. Press "TXT" button to
turn on teletext function. Press "EXIT" or
"TXT" button to turn teletext off. Enter
the desired teletext page number using
number buttons. Use CH button to turn
to next or previous page.
2.10 SUB (Subtitle)
Displaying and hiding subtitles (if provided by broadcasting station).

12
2.11 EPG
Electronic Program Guide. Not every
broadcasting station broadcasts the
electronic program guide (EPG), as is the
case with teletext. The extent also varies.
For this reason verbalizations like "as long
as provided by broadcasting station" will
have been foregone. The EPG shows an
overview of current or future broadcasts
with the respective broadcasting times. Use
OK button to display broadcast information
in a new window.
Press the button (red) to switch to "time
table" (time) display.
The navigation within the EPG overview
takes place as follows:
Back to normal view.
Back to program overview.
One broadcast backward/forward.
Two broadcasts backward/forward.
One day backward/forward.
When you find an interesting broadcast you
can save it in the timer using the (green)
button! The satellite receiver switches on at
the selected time and the broadcast can be
recorded by a video recorder. Timer
functions are explained in the further
course of this manual.

13
2.12 LAST
The receiver skips to the previously selected program when pressing "Last"
button.
2.13 Program list (OK button)
Press OK button to display a complete list
of all saved programs.
Use the CH buttons to navigate within this
list. Use the PG-/PG+ buttons to faster
"browse" the list. When you have found a
desired program, confirm with OK or press
EXIT to hide the list. Use the VOL buttons
to display the stations of the single
connected satellites.
2.14 Changing satellites
The receiver automatically switches to the next programmed satellite when
pressing "PG+" or "PG-" during normal operation.
2.15 INFO
Date/time
Program name
Broadcast title (current and next)
Teletext available/not available; satellite
name and position
Type of program list (e.g. All satellites,
Favorites)
2.16 Changing screen modes
Press "Mode" button to select color (recommended setting: "Auto"), screen
format (recommended setting: „4:3LB“) and type of video output signal
(recommended setting: „CVBS“).

14
2.17 Favorite list
Press "FAVOR" button to open
previously created favorite groups. Use
the CH buttons to select a favorite list.
Please note that after selecting a
favorite group only the stations of this
group can be switched on.
Chapter „Menu“ „TV program list“ in the further course of this manual
explains the creation of a favorite group more into detail.
1. Use "PG+" and "PG-" buttons during normal mode to switch to "All
satellites" mode, in order to return to the overview of all stations.
2. Press "EXIT" to close the menu.
2.18 Sleep timer (blue button)
Sleep timer: Set the time at which the receiver will turn off automatically. Use OK
button to select:
OFF, 10, 30, 60, 90 and 120 minutes.

15
3. Menu
Press MENU button. The main menu opens. Press EXIT to close it again.
Navigate through the menus in the following way:
Up: Menu name (function symbols are displayed thereto).
Subsequent: Submenu or menu items.
Down: The information bar displays buttons, with the help of which you
can move through the current menu
Menu structure
Main menu Sub menu
TV program list
Radio program list
Editing programs
(Symbol: TV)
Delete all
Antenna connection
Satellite list
Antenna settings
Single satellite search
Multi satellite search
Installation menu
(Symbol: Sat antenna)
TP list
Language
TV setting
Time settings
Timer settings
Parental lock
OSD settings
Favorites
System menu
(Symbol: cog wheel)
Miscellaneous
Information
Default settings
Miscellaneous
(Symbol: tool box)
Upgrade via satellite
TetrisGames
(Symbol: Dice) Othello

16
3.01 Editing programs
Press "Menu" button and select menu
item "Editing programs". Now enter
your personal password (default
setting "0000").
3.1 TV program list
In the menu "TV program list" you can
carry out the following settings:
Editing favorites (white button), locking
channels (red), skipping channels (green),
moving channels (yellow) and changing
channels (blue).
◄► List
Press VOL buttons to switch the current station group (station of a satellite or a
favorite list).

17
3.1.1 Favorites (FAV - white)
Press "FAVOR" button (white) to associate
a station to a favorite list. Now use CH
buttons to select a station you want to
associate to a favorite group. After selecting
a desired station, press OK. A new window
opens, in which you can associate the
station to a favorite list. After a station has
been associated to a favorite list, the
symbol ♥appears next to the station name
in the list.
3.1.2 Locking channels (Red)
Use the red button to mark selected
station for being locked. Please confirm
your selection with OK button. Next to the
station name in the list appears a symbol
of a key lock. Selected stations then
require a password (Parental lock).
3.1.3 Skipping channels (Green)
Use the green button to mark selected
stations for being skipped. An appropriate
symbol appears next to the station name.
Please confirm your selection with OK
button. Selected programs are skipped
when switching channels with CH▲and
CH▼buttons. Direct entry is still possible.

18
3.1.4 Moving channels (Yellow)
After having pressed yellow button and confirmed selection of the station to be
moved by OK button, use CH buttons (or PG+ and PG-) to move the station to
the desired channel position. Press OK button once more to save the station at
the desired memory location.
3.1.5 Changing channels (Blue)
A new menu window appears after pressing the blue button.
•To arrange channels (Red)
Arrange the stations according to the
following parameters:
Alphabetically (Name (A-Z))
Alphabetically backwards (Name
(Z-A))
Free or coded stations (Free/Pay TV)
Locked programs (Locked)
•Changing channel names (Green)
Change the name of a station.
Therefore use the number buttons on
your remote control (similar to a mobile phone) to enter a new name for a
station. Confirm the new name with the yellow button.
•Deleting channels (Blue)
You can delete a station for good from the program list pressing the blue
button. Use OK button to select the channel you want to delete; next to
the channel appears a cross. When exiting the menu you are asked,
whether you really wish to delete the station. After pressing OK the
channel will have been finally deleted.
3.2 Radio program list
The procedure is the same as under menu item "TV program list".
3.3 Delete all
Delete the complete program list. Confirm warning message with YES.
If you have accidentally deleted the program list, you can either carry out a
station search or reset the receiver under "Miscellaneous" "Default settings".

19
4. Installation menu
The opposite list appears after entering
the installation menu:
4.1 Antenna connection
In this menu setting you can specify,
whether your satellite system is firmly directed or contains a rotary current
motor.
4.2 Satellite list
In this menu you can change, add or delete satellites.
1. Press red button to change satellite
name and position.
2. Press green button to enter a new
satellite.
3. Press blue button to delete a
selected satellite.
4. Press OK button to add a satellite to
your list of receivable satellites. To
add the stations of the newly
added satellite to your program list,
you must start a station search via this satellite.

20
4.3 Antenna settings
In this menu you can carry out necessary
settings that comply with your satellite system.
After selecting a menu item and pressing OK
button, the possible options are displayed. The
current signal strength and signal quality are
displayed at the button of the screen.
1. Satellite: Select a satellite (example: ASTRA 1E, 1F, 1G).
2. LNB frequency:
Select LNB type and further settings (only for experts! - default setting:
digital)
3. Transponder: Select transponder directly via number.
4. DiSEqC1.0: DiSEqC position for DiSEqC1.0 switch.
5. 22 KHz: automatic setting.
6. Polarization: Auto, horizontal, vertical.
This manual suits for next models
1
Table of contents
Other Titan Receiver manuals
Popular Receiver manuals by other brands

FrSky
FrSky ARCHER PLUS R6FB instruction manual

Sony
Sony HCD-HDX265 - Dvd/receiver Component For Home Theater... Service manual

Audio Resource Group
Audio Resource Group ARG-OM-003 Manual & user guide

Kindermann
Kindermann 4K60 PoC Rx Commissioning and operating instructions

Yamaha
Yamaha RX-V461 - AV Receiver Service manual

Sirius Satellite Radio
Sirius Satellite Radio SDST5V1 user guide