manuals.online logo
Brands
  1. Home
  2. •
  3. Brands
  4. •
  5. Eton
  6. •
  7. Stereo System
  8. •
  9. Eton DUAL CONVERSION G5 User manual

Eton DUAL CONVERSION G5 User manual

Other Eton Stereo System manuals

Eton Soulra XL User manual

Eton

Eton Soulra XL User manual

Eton Rugged rukus User manual

Eton

Eton Rugged rukus User manual

Eton Soulra XL User manual

Eton

Eton Soulra XL User manual

Eton Rukus XL User manual

Eton

Eton Rukus XL User manual

Eton Rukus XL User manual

Eton

Eton Rukus XL User manual

Eton Rukus XL User manual

Eton

Eton Rukus XL User manual

Eton Rukus User manual

Eton

Eton Rukus User manual

Eton Rugged rukus User manual

Eton

Eton Rugged rukus User manual

Eton rukus Xtreme Owner's manual

Eton

Eton rukus Xtreme Owner's manual

Eton Rugged rukus User manual

Eton

Eton Rugged rukus User manual

Popular Stereo System manuals by other brands

Sony HCD-VX88 Service manual

Sony

Sony HCD-VX88 Service manual

Philips MCM398D/12 user manual

Philips

Philips MCM398D/12 user manual

Sony CMT-SPZ90DB operating instructions

Sony

Sony CMT-SPZ90DB operating instructions

LG OM4560 owner's manual

LG

LG OM4560 owner's manual

JVC UX-G3 instructions

JVC

JVC UX-G3 instructions

Odys ODYS - LOOP instruction manual

Odys

Odys ODYS - LOOP instruction manual

Aiwa NSX-AJ700 Service manual

Aiwa

Aiwa NSX-AJ700 Service manual

Panasonic SC-AK100 operating instructions

Panasonic

Panasonic SC-AK100 operating instructions

Sharp CD-G10000V Operation manual

Sharp

Sharp CD-G10000V Operation manual

Bogen NEARSCAPES 4.1 manual

Bogen

Bogen NEARSCAPES 4.1 manual

Panasonic SCPM29 - MINI HES W/CD PLAYER operating instructions

Panasonic

Panasonic SCPM29 - MINI HES W/CD PLAYER operating instructions

Meyer LD-3 operating instructions

Meyer

Meyer LD-3 operating instructions

THOMSON MIC302U manual

THOMSON

THOMSON MIC302U manual

Philips MCM530 Service manual

Philips

Philips MCM530 Service manual

Sony SS-CEP50 Service manual

Sony

Sony SS-CEP50 Service manual

Cetacea Sound CVS-II user guide

Cetacea Sound

Cetacea Sound CVS-II user guide

Sony MHC-V21D Service manual

Sony

Sony MHC-V21D Service manual

Denon UCD-250 Service manual

Denon

Denon UCD-250 Service manual

manuals.online logo
manuals.online logoBrands
  • About & Mission
  • Contact us
  • Privacy Policy
  • Terms and Conditions

Copyright 2025 Manuals.Online. All Rights Reserved.

AM/FM STEREO/
M W . S W . L W D U A L C O N V E R S I O N
G 5
O P E R AT I O N M A N U A L
www.etoncorp.com
4
5
6
8
8
10
10
13
13
14
14
15
15
16
16
17
17
17
18
18
19
22
23
23
25
27
27
27
28
28
29
29
30
31
31
31
32
32
32
32
33
34
34
42
44
TABLE OF CONTENTS
23
G5 OPERATION MANUAL
1
2
3
4
5
6
8
9
10
11
12
13
14
15
16
1
18
WHAT THE G5 NCLUDES.........................................................................................
G5 FEATURES............................................................................................................
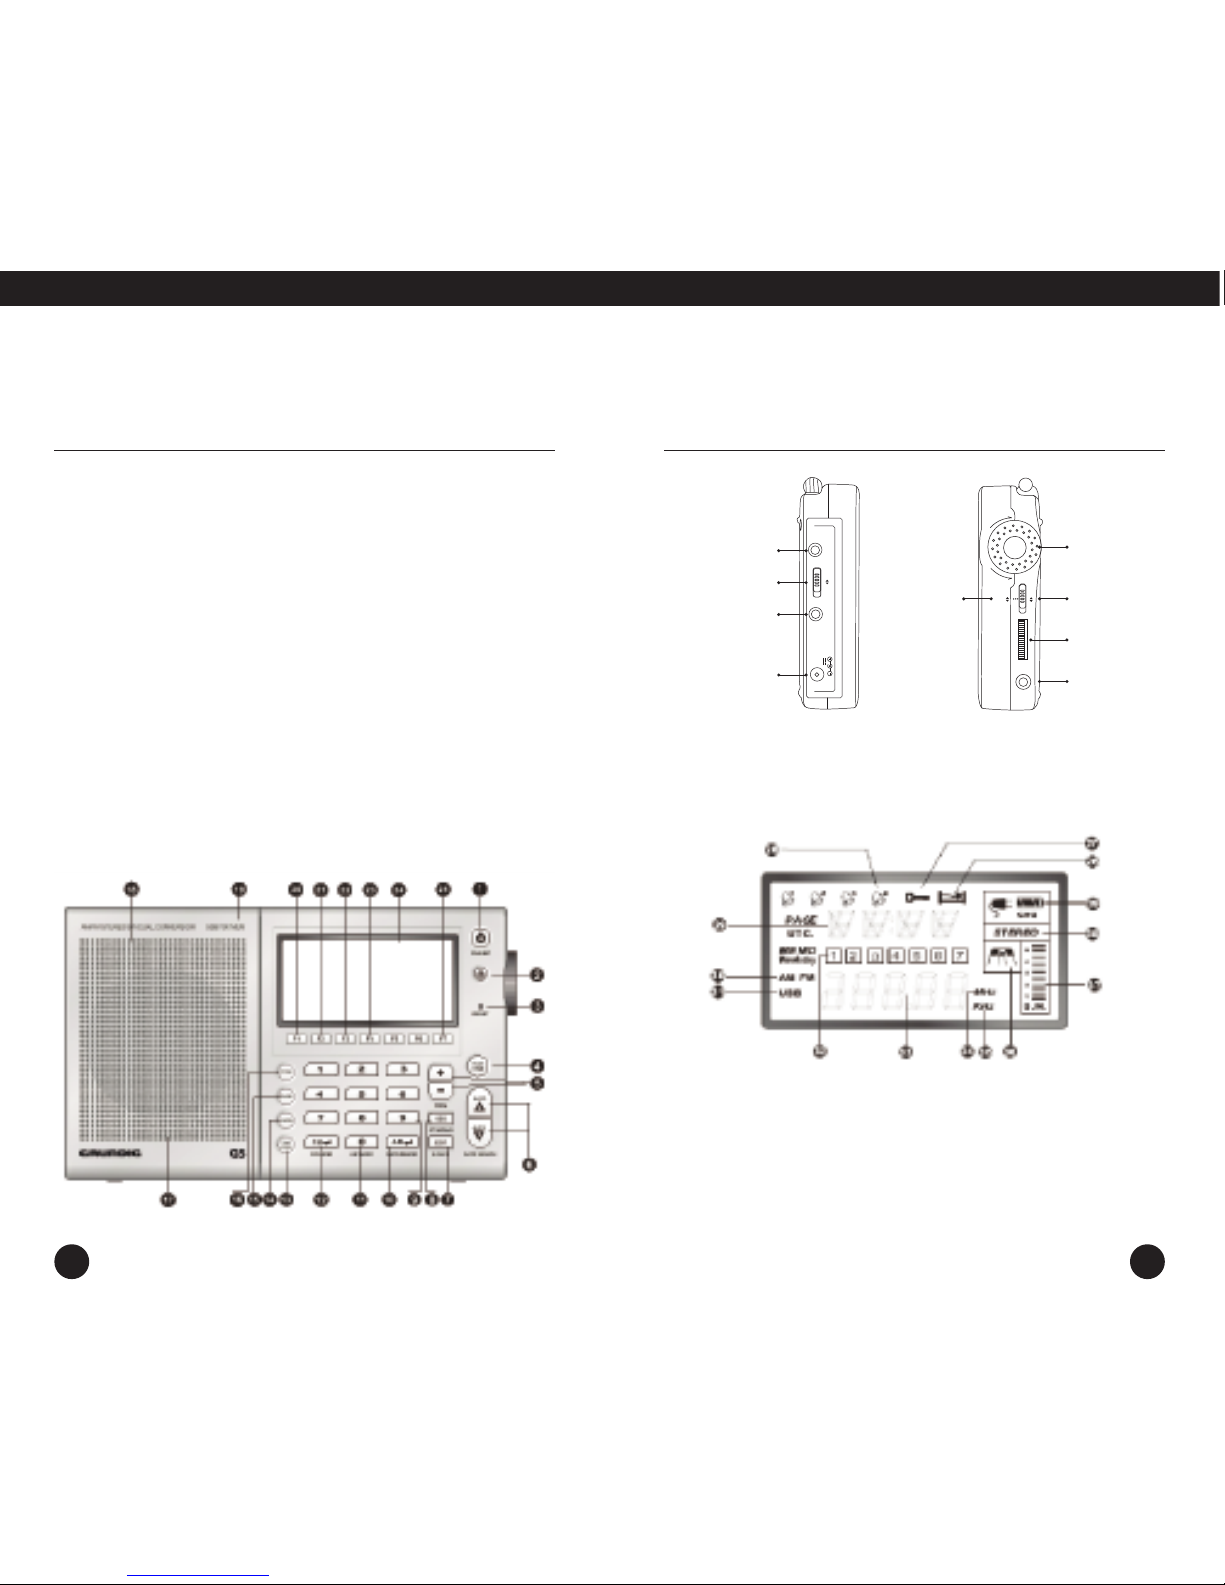
D AGRAMS...............................................................................................................
GETT NG STARTED....................................................................................................
- NSTALL NG BATTER ES AND BATTERY NFORMAT ON............................................
- AC ADAPTER NFORMAT ON.................................................................................
- CHARG NG Ni-MH BATTER ES N THE G5.............................................................
BAS C RAD O OPERAT ON.......................................................................................
- BEFORE US NG THE G5; TURN NG THE G5 ON/OFF;
US NG THE SLEEP T MER FEATURE........................................................................
- US NG THE LOCK FEATURE...................................................................................
- VOLUME CONTROL...............................................................................................
- US NG THE DX/LOCAL SW TCH.............................................................................
- SELECT NG FM, AM and SHORTWAVE (SW)...........................................................
- L STEN NG N FM STEREO.....................................................................................
- SETT NG UP AM AND FM OUTS DE OF NORTH AMER CA......................................
- TUN NG N STAT ONS............................................................................................
-  BUTTONS.....................................................................................................
- TUN NG KNOB......................................................................................................
- D RECT FREQUENCY ENTRY..................................................................................
- AUTO-SCAN TUN NG.............................................................................................
- SHORTWAVE W TH THE G5....................................................................................
- S GNAL STRENGTH ND CATOR.............................................................................
CLOCK AND T MER FEATURES................................................................................
- SETT NG THE CLOCK............................................................................................
- SETT NG/ACT VAT NG/DEACT VAT NG THE ALARMS..............................................
WORK NG W TH MEMORY......................................................................................
- STOR NG STAT ONS NTO MEMORY......................................................................
- LABELL NG MEMORY PAGES................................................................................
- ACCESS NG WHAT S STORED N MEMORY...........................................................
- CHECK NG MEMORY CAPAC TY...........................................................................
- CHECK NG PAGES AND MEMOR ES......................................................................
- US NG THE PAGE COPY/PASTE FUNCT ON............................................................
- ERAS NG MEMORY..............................................................................................
- US NG THE ATS MEMORY FEATURE......................................................................
US NG THE L GHT...................................................................................................
US NG THE EXTERNAL SHORTWAVE ANTENNA SOCKET.........................................
STEREO/MONO BUTTON.........................................................................................
MUS C/W DE and NEWS/NARROW SW TCH............................................................
L NE OUT SOCKET..................................................................................................
US NG EARPHONES................................................................................................
REAR FOLD NG STAND...........................................................................................
RESET BUTTON.......................................................................................................
NTRODUCT ON TO SHORTWAVE............................................................................
TROUBLESHOOT NG...............................................................................................
WARRANTY AND SERV CE NFORMAT ON..............................................................
DO YOU NEED HELP? Contact Us.
Etón Corporation
1015 Corporation Way
Palo Alto, CA 94303, USA. 1-800-872-2228 (U.S.); 1-800-637-1648
(Canada); 650-903-3866 (worldwide); M-F, 8:30-4:30, Pacific
Standard Time; www.etoncorp.com.
WARNING
•Do not submerge or expose for extended period to water.
• Only operate within specified temperature range (0 °C to 40 °C).
• Unplug immediately if liquid has been spilled or object have fallen
into the apparatus.
• Clean only with a dry cloth. Do not use detergents or chemical
solvents as this might damage the finish.
• Unplug and disconnect external antennas during lightning storms.
• Do not remove cover [or back].
• Refer servicing to qualified service personnel.
Disposal
According to the European Directive 2002/96/EC all electri-
cal and electronic products must be collected separately by
a local collection system.
Please act according to your local rules and do not dis-
pose of your old products with your normal household
waste.
ENVIRONMENT
45
• AC adapter
• Stereo earphones
• External wire antenna
• Carrying pouch
• Carrying strap (attached)
• Owner’s manual
NOTE: n the instructions below, numbers in parenthesis (), corre-
spond to the numbered diagrams.
• M-Stereo, AM and Full-Shortwave Coverage (1711-29999 KHz).
• PLL Dual Conversion AM/SW Circuitry With SSB.
• 700 Programmable Memory Presets.
• FM Station Auto Tuning Storage (ATS).
• Alpha-Numeric Four Character Memory Bank Labeling.
• Tunes Via Auto-Scan, Manual-Scan, Direct Key-in Entry and Tuning
Knob.
• Selectable 9/10 kHz AM Tuning Steps.
• Clock, Sleep Timer and Four Programmable Timers (for alarm
or wake-up).
• Weekday Setting.
• World Time Zone Selection.
• Shortwave Narrow/Wide Bandwidth Selection.
• AM/FM News/Music Tone Selection.
• Stereo Earphone Socket.
• Stereo Line-Out Socket.
• Socket For External Shortwave Antenna.
• Display Light.
• Button Lock Feature.
• ncluded: Owner’s Manual, One-Year Warranty, AC Adapter/Charger
and Protective Case.
• nternally Recharges Ni-MH Batteries.
• Dimensions: 6-5/8”W x 4-1/8”H x 1-1/8”D (167 x 105 x 27 mm).
• Weight: 12.2 oz. (346 g).
1WHAT THE G5 INCLUDES 2FEATURES
G5 OPERATION MANUAL
67
3DIAGRAMS
G5 OPERATION MANUAL
POWER / SLEEP
HOLD
RESET
PAGE/T ME
VOL+/VOL-
AUTO SCAN
ED T/BACKL GHT SW TCH
MONO/STEREO/SSB ND CATOR
0-9 NUMBER BUTTON
METER BAND
AM BAND
FM BAND
T ME-ZONE BUTTON
1.
2.
3.
4.
5.
6.
7.
8.
9.
10.
11.
12.
13.
14.
15.
16.
17.
18.
19.
20.
21.
22.
23.
24.
25.
CHECK BUTTON
ERASE BUTTON
STORE BUTTON
BATTERY
COMPARTMENT (REAR)
SPEAKER
SUPPORT STAND (REAR)
ALARM 1
ALARM 2
ALARM 3
ALARM 4
LCD D SPLAY
CHARGE
SLEEP
LOCK
ALARM ND CATOR
NFORMAT ON AREA
AM/FM
USB
WEEKDAY/STAT ON AREA
26.
27.
28.
29.
30.
31.
32.
FREQUENCY
MHz
KHz
W DE/NARROW
S GNAL STRENGTH
STEREO/MONO
CHARGE ND CATOR
33.
34.
35.
36.
37.
38.
39.
LCD D SPLAY
JOG D AL WHEEL: Turn the jog dial wheel, combine with other button can adjust time,
frequency, volume and memory operations.
LO DXANT
6V
AC ADAPTER
HEADPHONES
DX/LOCAL
EXT.ANTENNA
T
TUNE
+
–
NAR.WIDE
SW
NEWS MUSIC
–FINE +
LINE
OUT
SW
NARROW/
WIDE
NEWS/
MUSIC
TUNING
KNOB
—FINE +
LINE
OUT
P
R GHT S DE
LEFT S DE
89
INSTALLING BATTERIES
The hinged battery compartment (17) is located on the back of the
G5. To open it, apply thumb pressure to the ribbed, down pointing tri-
angle and slide it about 1/8 inch (about 3 mm) towards the bottom of
the radio, then pull up. nstall 4 AA batteries, observing the battery
polarity diagrams inside the compartment. When not using recharge-
able AA batteries, use alkaline or lithium batteries. Lithium AA batter-
ies yield the longest play-time.
BATTERY STRENGTH INDICATOR
The battery strength indicator appears in the upper right side of the
LCD display (24). When batteries are fresh or fully charged, it appears
solid black. As batteries wear down, the segments become clear from
right to left.
CAUTION! - PREVENT NG BATTERY AC D LEAKAGE
To avoid battery acid leakage, only use high quality alkaline, lithium
or rechargeable nickel-metal-hydride batteries. Never use old batteries
and never intermix old with new or different brands or types of
batteries, as this may cause damage to the radio and may result
in an explosion causing injury. When the G5 is not being used for a
long period of time, remove the batteries to avoid leakage. Damage
caused by battery acid leakage is not covered by this product’s warranty.
f the batteries leak, don’t throw them away and immediately contact
the manufacturer of the batteries to inquire about their battery leakage
warranty program.
CAUTION! Never attempt to recharge non-rechargeable batteries!
MORE IMPORTANT BATTERY USE INFORMATION
• When using batteries for long periods of time, disconnect the AC
adapter/charger.
• Do not attempt recharging non-rechargeable batteries. Only
recharge rechargeable Ni-MH batteries.
• Replace or recharge batteries when the sound becomes weak and
distorted or the power indicator indicates depleted.
• Stations stored in memory are permanently stored. However, when
power is removed or batteries deplete, the clock reverts to the
default 0:00 setting.
• The clock time will not be lost if batteries are replaced quickly –
within 3 minutes of removal.
POWERING THE G5 WITH THE INCLUDED AC ADAPTER/CHARGER
To power the G5 with the included AC Adapter/Charger, first plug it
into an AC wall outlet (also called ‘mains’), then plug the tip into the
6V socket (48) on the lower left side of the G5. Remove any non-
rechargeable batteries from the G5 while using the included AC
Adapter/Charger.
4GETTING STARTED GETTING STARTED continued
G5 OPERATION MANUAL
10 11
IMPORTANT AC ADAPTER/CHARGER INFORMATION
AND PRECAUTIONS
t is normal for the AC adapter/charger to feel warm during use.
When the AC adapter/charger is connected, the G5 automatically
switches to the AC adapter/charger’s power and installed batteries
are not used.
Disconnect the AC adapter/charger from the power outlet if it is not
being used.
Remove the batteries when using the AC adapter/charger for long
periods of time.
Use only the included AC adapter/charger or one specifically suggested
by Eton Corporation.
The backlight will remain illuminated when using the AC
adapter/charger.
CHARGING NI-MH BATTERIES IN THE G5
With its included AC adapter/charger connected, the G5 internally
recharges 4 Ni-MH (nickel-metal-hydride) rechargeable batteries. Note
that the G5 can still play while the batteries are charging and the
alarm functions will work.
CAUTION! Never attempt to recharge non-rechargeable batteries!
To charge batteries:
1. nstall 4 N -MH batteries, observing the polarity diagram inside the
battery compartment.
2. Connect the AC adapter/charger, first to the wall outlet, then to the
G5.
3. Assure that the G5 is turned off.
4. Press the F7 button (25) for about 3 seconds, or until CHG (39)
appears in the upper right of the display and the charging hours
appear in the display.
5. Use the tuning knob (40) to select the charging time in hours
(00-23). See chart below. Press the PAGE/T ME button (4) when
finished. Note in the display that the battery symbol’s segments
continuously activate from left to right during charging. Battery
charging terminates once the set charge time has been reached.
BATTERY CHARGING TIME CHART
The charging times in the chart are based on the following formula:
Charging hours = battery capacity (in milliamp hours) / 100mA (the
charging current).
GETTING STARTED continued GETTING STARTED continued
G5 OPERATION MANUAL
Ni-MH BATTERY CHARGING TIME
CAPACITY (in mAh) (hours)
1100 11
1500 15
1800 18
2300 23
12 13
BATTERY CHARGING NOTES AND CAUTIONS
• Never attempt to recharge non-rechargeable batteries!
• The G5 can be played while charging.
• Alarm settings and action are function while charging.
• The AC adapter/charger will not charge the batteries unless the G5
is set to charge mode.
• For improved life of rechargeable batteries, do not repeatedly
charge fully charged batteries.
• When using new rechargeable batteries or ones that have not been
in use for a lengthy period of time, charge them fully, then use
them until they are fully exhausted. Repeat this cycle several more
times to condition the batteries.
• At some point in their life cycle, all rechargeable batteries lose their
ability to charge. When this occurs, it may be all four batteries at
once, or only one of them. When this occurs, replace them all, not
one at a time. Never mix old rechargeable batteries with new and
always start with four, fresh, new Ni-MH batteries.
CAUTION! Never attempt to recharge non-rechargeable batteries!
BEFORE USING THE G5
Assure that it is powered with the AC adapter or batteries.
Assure that it is unlocked. See lock button instructions below.
Place the DX/LOCAL switch (46), on the left side of the G5, to the DX
position.
TURNING THE G5 ON AND OFF
The G5 is turned on and off with a quick, short press of the
POWER/SLEEP button (1).
USING THE SLEEP TIMER FEATURE
The sleep timer feature enables the G5 to play for a specified number
of minutes (00-99), then shut off. The sleep timer feature can be acti-
vated and programmed with the G5 turned on or off. Note that in
sleep mode, the radio plays and the sleep symbol (26) appears in the
display. There are two methods to activate and program the sleep
timer. With either method, the sleep symbol (26) appears in the dis-
play after the sleep time is set.
Method 1
1. Use the numeric keypad to enter the desired time (00-99 minutes).
2. Within 3 seconds press the SLEEP button (1). The G5 turns on and
plays for the specified time.
Method 2
1. Press the SLEEP button for about 3 seconds or until the sleep
symbol (26) appears in the display and the G5 turns on.
GETTING STARTED continued 5BASIC RADIO OPERATION
G5 OPERATION MANUAL
14 15
2. Within 3 seconds, use the tuning knob (40) to select the sleep time
(in minutes) of your choice.
3. Within 3 seconds, press the PAGE/T ME button (4) when finished.
USING THE LOC FEATURE (2)
With the G5 turned off, the lock feature prevents unwanted turn-on.
When it is turned on, the lock feature prevents unwanted frequency
changes. The lock feature also serves as an audio-mute.
G5 TURNED OFF
Giving the LOCK button (2) a short press causes the lock symbol (27)
to appear in the display and the on/off button does not work.
Deactivate it with a longer press of about 2 seconds.
G5 TURNED ON
Giving the LOCK button (2) a short press disables only the tuning
knob (40). Note that the lock symbol (27) does not appear in the
display. Giving it another short press causes the lock symbol to
appear and disables all buttons. Deactivate it with a longer press
of about 2 seconds.
VOLUME CONTROL
The volume control buttons (5) are labeled +-/VOL. To increase the
volume, push the ‘+’ button. To decrease the volume, push the ‘–‘
button. The G5’s volume is divided into levels, 0-31. When adjusting
volume, the corresponding level number appears in the display.
Volume can be adjusted with the G5 turned on or off. Volume can
also be adjusted using the numeric keypad (9).
To adjust the volume with the numeric keypad:
1. Use the numeric keypad (9) to enter the desired volume level (0-31).
2. Within 3 seconds, press either the + or – VOL button.
USING THE DX/LOCAL SWITCH (46)
The DX/LOCAL switch is located on the left side of the G5 and is labeled
DX/LO. Use DX as the default setting. This gives the G5 maximum
sensitivity to signals. f strong stations seem distorted, then use the local
setting (labeled LO). This switch does not function in FM mode.
SELECTING FM, AM AND SHORTWAVE (SW)
Turn on the G5. To select AM press the AM BAND button (11), for FM
press the ‘FM BAND’ button (12) and for shortwave sequentially press
the ‘METERBAND’ button (10) until the shortwave band of your
choice is selected. The last used frequency is automatically displayed.
The most popular shortwave bands can also be accessed with the F1-F7
buttons (F1=49m, F2=41m, F3=31m, F4=25m, F5=22m, F6=19m
and F7=16m).
See more specific information about the G5 and shortwave under the
heading SHORTWAVE W TH THE G5.
SHORTWAVE NOTE: f you’re completely new to shortwave or need
a ‘refresher’, see the special shortwave section toward the end of this
manual.
The frequency digits (33) appear in the lower center portion of the
display. AM and FM is for listening to local stations, while shortwave
brings in stations from around the world.
BASIC RADIO OPERATION continued BASIC RADIO OPERATION continued
G5 OPERATION MANUAL
When listening to FM or shortwave, fully extend the telescopic antenna
(44). t need not be extended when listening to AM stations (the AM
antenna is located inside the G5).
LISTENING IN FM STEREO
FM stereo can be heard when using earphones/headphones (47) or
when routing the audio to a stereo amplification device from the
‘L NE OUT’ socket (43). To hear FM in stereo, press the ‘ST/MONO’
button (8) while tuned to a FM station. Note that ‘STEREO’ appears
in the display (38) when the stereo mode is selected.
SETTING UP AM AND FM OUTSIDE OF NORTH AMERICA
NOTE: The G5 is factory set-up for use in North America. To use the
G5 in North America (U.S. or Canada), no changes are needed.
n North America, AM stations are spaced by 10 KHz and the AM
band extends from 520 kHz to 1710 kHz. n most other world areas,
they are spaced by 9 KHz and the band extends from 522-1710 kHz.
Follow these steps to select the 9 kHz AM spacing for outside of
North America:
1. Turn off the G5.
2. Press the F5 button for about 3 seconds, or until ‘9’ or ‘10’ flashes
in the display.
3. Release the button and give it a quick, short press to toggle to the
other setting.
4. When finished, press the ‘PAGE/T ME’ button (4) twice.
16 17
n North America, the FM band extends from 87.5-108 mHz. n other
parts of the world, it may extend from 87-108.1 or from 76-108.1. To
select the correct range for your region follow these steps:
1. Turn off the G5.
2. Press the F5 button for about 3 seconds, or until ‘9’ or ‘10’
flashes in the display.
3. Release the button and give the PAGE/T ME button (4) a quick,
short press.
4. Sequentially press the F5 button until the beginning FM
frequency of your area appears.
5. Give the PAGE/T ME button (4) a quick, short press.
TUNING IN STATIONS
Described below are four methods of tuning-in stations:   Buttons
(6), Tuning-Knob (40), Direct Frequency Entry (9) and Auto-Scan (6).
  BUTTONS (6)
Quick, short, sequential presses of the   buttons enables tuning
up or down frequency (33)(34)(35). All normal tuning for AM, FM and
shortwave stations can be performed with the   buttons. The tuning
steps used are 9 or 10 kHz in the AM band, 5 kHz in the shortwave
bands and 100 kHz in the FM band.
TUNING NOB (40)
The tuning steps are 1 kHz in AM/SW and 25 kHz FM.
BASIC RADIO OPERATION continued BASIC RADIO OPERATION continued
G5 OPERATION MANUAL
18 19
DIRECT FREQUENCY ENTRY (9)
Use this method when the desired frequency of a radio station is
known. AM and SW frequencies are entered in kilohertz (KHz), e.g.
810 KHz or 9475 KHz.; FM frequencies are entered in megahertz
(MHz), e.g. 102.9 MHz, ignoring the decimal point.
To enter a frequency:
1. Use the numeric buttons (9) to enter the frequency.
2. Within 3 seconds, press the AM ‘enter’ button (10) if it’s an AM or
SW frequency, or the FM ‘enter’ button (12) for FM frequencies.
Here’s an example for an AM station at 810 kHz (For FM, ignore the
decimal point and use the FM enter button (12)):
1. Press 8 1 0.
2. Within 3 seconds, press the AM enter button (10).
NOTE: Regardless of what type of station is currently tuned (AM,
FM or SW), direct frequency entry can be used to enter any type of
frequency.
AUTO-SCAN TUNING (6)
Auto-scan tuning starts by pressing either the (up frequency) or
(down frequency) button for about 2 seconds. The G5 has 3
selectable auto-scan modes: STOP, ATS or D-5. These are described
below. Tuning steps are 100 kHz FM, 9/10 kHz AM and 5 kHz SW.
Auto scan tuning remains in the selected band, AM, FM or shortwave
meter band.
TOP: Auto-scanning stops on the next encountered station.
D-5: Auto-scanning stops for 5 seconds on each next encountered
station, then moves on.
AT : (Auto Tuning Storage): Auto-scanning automatically stores the
strongest FM local stations This feature is describe more thoroughly in
a later section of the manual titled US NG THE ATS MEMORY FEATURE.
To select an auto-scan mode:
1. Hold down the F6 button for about 2 seconds, then release. Note
that the last chosen mode flashes in the screen.
2. While the mode flashes, perform quick, short presses of the F6
button to select alternate modes.
SHORTWAVE WITH THE G5
SHORTWAVE NOTE: f you’re completely new to shortwave or need
a ‘refresher’, see the special shortwave section toward the end of this
manual.
There are two ways to select shortwave.
1. Sequentially press the ‘METERBAND’ button (10) until the shortwave
band of your choice is selected.
2. The seven most popular shortwave bands can also be accessed
with the F1-F7 buttons (F1=49m, F2=41m, F3=31m, F4=25m,
F5=22m, F6=19m and F7=16m). n each method, the last used
frequency is automatically displayed. To tune-in shortwave stations,
use the tuning methods described earlier. Below is a band chart
showing the G5’s shortwave coverage.
BASIC RADIO OPERATION continued BASIC RADIO OPERATION continued
G5 OPERATION MANUAL