EUFAB 16257K User manual

1
Art.-Nr.: 16257K
Kfz Dashboard Kamera
Bedienungsanleitung . . . . . . . . . . . . . . . . . . . . 2
Article number 16257K
Car dashcam
Operating instructions . . . . . . . . . . . . . . . . . . . 9
Réf. 16257K
Dashcam pour voiture
Manuel de l‘opérateur . . . . . . . . . . . . . . . . . . . . . 17
Cod. art. 16257K
Videocamera Per Auto
Istruzioni per l‘uso . . . . . . . . . . . . . . . . 30
Art.nr. 16257K
Dashboard camera
Gebruiksaanwijzing . . . . . . . . . . . . . . . 24

2
WARNUNG
Lesen Sie die Bedienungsanleitung vor Inbetriebnahme sorgfältig durch und
beachtenSiealleSicherheitshinweise!Nichtbeachtungkann zuPersonenschäden,Schä-
den am Gerät oder Ihrem Eigentum führen! Bewahren Sie die Originalverpackung, den
Kaufbeleg sowie diese Anleitung zum späteren Nachschlagen auf! Bei der Weitergabe
des Produkts geben Sie auch diese Anleitung weiter. Prüfen Sie vor
Inbetriebnahme den Inhalt der Verpackung auf Unversehrtheit und Vollständigkeit!
INHALT
Die Kfz Dashboard Kamera ist eine Videokamera, um während der Fahrt aus dem Innenraum (geschützter
Bereich) heraus Filmaufnahmen zu machen.
Die Kfz Dashboard Kamera darf nur mit dem mitgelieferten Anschlußkabel betrieben werden.
Dieses Gerät ist nicht dafür bestimmt, durch Kinder und Personen mit eingeschränkten geistigen Fähigkeiten
oder ohne erforderliches Fachwissen benutzt zu werden. Kinder sind von dem Gerät fernzuhalten.
Das Gerät ist nicht für den gewerblichen Einsatz bestimmt.
Zum bestimmungsgemäßem Gebrauch gehört auch die Beachtung aller Informationen in dieser
Anleitung, insbesondere die Beachtung der Sicherheitshinweise. Jede andere Verwendung gilt als nicht
bestimmungsgemäß und kann zu Sach- oder Personenschäden führen. Die EAL GmbH übernimmt keine
Haftung für Schäden, die durch nicht bestimmungsgemäßen Gebrauch entstehen.
2. LIEFERUMFANG 1 x Saugnapfhalterung für dieWindschutzscheibe
1 x Gebrauchsanleitung
1. BESTIMMUNGSGEMÄSSER GEBRAUCH
1 x Kfz Dashboard Kamera
1 x Anschlußkabel
1 x micro-SD Karte, 32 GB, Class 10
Kfz Dashboard Kamera
1. BESTIMMUNGSGEMÄSSER GEBRAUCH 2
2. LIEFERUMFANG 2
3. SPEZIFIKATIONEN 3
4. SICHERHEITSHINWEISE 3
5. SYMBOLERKLÄRUNG 3
6. BEDIENUNGSANLEITUNG 4
6.1 ÜBERSICHT 4
6.2 SPEICHERKARTE 4
6.3 MONTAGE 4
6.4 ANSCHLIESSEN DER KAMERA 5
6.5 FUNKTIONEN 5
6.6 ABSPIELEN/ANSEHEN DER AUFZEICHNUNGEN 7
6.7 ERSETZEN DER SICHERUNG 7
6.8 FEHLERSUCHE 7
7.WARTUNG UND PFLEGE 8
8. HINWEISE ZUM UMWELTSCHUTZ 8
9. KONTAKTINFORMATIONEN 8

3
• Das Warndreieck kennzeichnet alle für die Sicherheit wichtigen Anweisungen. Befolgen Sie
diese immer, anderenfalls könnten Sie sich verletzen oder das Gerät könnte beschädigt werden.
• Kinder dürfen nicht mit dem Gerät spielen.
• Reinigung und Benutzerwartung dürfen nicht von Kindern ohne Beaufsichtigung durchgeführt
werden.
• Lassen Sie das Verpackungsmaterial nicht achtlos liegen. Dieses kann für Kinder zu einem
gefährlichen Spielzeug werden!
• Benutzen Sie dieses Produkt nur für die dafür vorgeseheneVerwendung!
• Manipulieren oder zerlegen Sie das Gerät nicht!
• Verwenden Sie zu Ihrer eigenen Sicherheit ausschließlich Zubehör oder Ersatzteile, die in der
Anleitung angegeben sind, oder derenVerwendung durch den Hersteller empfohlen wird!
• Verlängern Sie das Kabel nicht. Verwenden Sie kein anderes, als das mitgelieferte Kabel oder
anderes Zubehör.
• ZumTrennen der Stromversorgung ziehen Sie immer am Stecker, niemals am Kabel selbst.
• Setzen Sie die Kamera keiner mechanischen Beanspruchung, extremen Temperaturen, Feuch-
tigkeit, Lösungsmitteln oder Gasen aus.
• Befestigen Sie die Kamera so in Ihrem Fahrzeug, daß Sie beim Fahren nicht behindert werden.
• Die Kamera darf nicht im Bereich von Airbags montiert werden.
• Der Akku der Kamera kann nicht ausgebaut werden und darf nur in der Kamera geladen
werden. Laden Sie den Akku immer nur mit dem mitgelieferten Ladekabel, niemals mit einem
anderen externen Ladegerät.
• Beachten Sie die zusätzlichen Sicherheitshinweise in den einzelnen Abschnitten der
Gebrauchsanleitung
• Die Nutzung als Kfz-Überwachungskamera kann in einigen Ländern eingeschränkt bzw.
verboten sein. Informieren Sie sich über die gesetzlichen Regelungen, bevor Sie die
Kamera in Betrieb nehmen.
Dimensionen: 35 x 65 x 70 [mm]
Stromversorgung: 12 – 24V DC
Monitor: LCD, 5,6 cm (2,2 Zoll)
Objektiv: Weitwinkel, 120 Grad
Gewicht: 0,170 kg
Akku: Lithium Polymer,
180 mAh, 0,67Wh
Fotoformat: JPEG
4. SICHERHEITSHINWEISE
3. SPEZIFIKATIONEN
5. SYMBOLERKLÄRUNG
entspricht den
EG-Richtlinien
gekennzeichnetes Elektroprodukt
darf nicht in den Hausmüll
geworfen werden
Gebrauchs-
anleitung lesen
Videoformat: AVI
Videoauösung: 1080P FHD, HD, 720P,WVGA, VGA
Fotoauösung: max. 12 MP
Speicher: micro-SD Karte bis max. 32 GB, Class 10

4
1 EIN/AUS-Schalter
2 Steckplatz für Speicherkarte
3 Menütaste
4 Objektiv
5 Power-LED
6 Montageschuh
7 USB-Buchse
9 Display
10 OK-Taste
11 Cursor-Taste nach unten
12 Parkmodus-Taste
13 Cursor-Taste nach oben
14 Modustaste
15 Saugfuß
16 Hebel
17 Überwurfmutter / Kugelgelenk
18 Kameraaufnahme
Bild 2: Saugfußhalterung Bild 3: Ladekabel Bild 4: micro-SD Karte
Einsetzen der Speicherkarte
Stellen Sie sicher, daß die Dashboard-Kamera ausgeschaltet ist. Setzen Sie die micro-SD-Karte in den
Steckplatz (Position 2 in der Übersicht) ein. Achten Sie auf die korrekte Positionierung der Speicherkarte. Die
Kontakte der Speicherkarte müssen zum Objektiv zeigen. Drücken Sie die Speicherkarte vorsichtig in den
Steckplatz, bis die Speicherkarte mit einem leisen Klick einrastet.
Reinigen Sie den Bereich der Windschutzscheibe, an dem die Kamera angebracht werden soll. Stecken Sie
die Kameraaufnahme (Position 18 in der Übersicht) in den Montageschuh (Position 6 in der Übersicht) der
Kamera. Drücken Sie den Saugfuß (Position 15 in der Übersicht) gegen die Windschutzscheibe. Legen Sie
den Hebel (Position 16 in der Übersicht) um. Lösen Sie die Überwurfmutter (Position 17 in der Übersicht) am
Kugelgelenk. Richten Sie die Kamera aus. Ziehen Sie die Überwurfmutter wieder fest.
Entnehmen der Speicherkarte
Schalten Sie die Kamera aus. Zum Entfernen der Speicherkarte drücken Sie die Karte herunter und lassen Sie
sie wieder los. Die Karte wird freigeben und Sie können sie herausnehmen.
Das Entfernen der Speicherkarte bei eingeschalteter Kamera kann zu Datenverlust oder
Schäden am Gerät führen.
6.2 SPEICHERKARTE
6.3 MONTAGE
6. BEDIENUNGSANLEITUNG
Bild 1: Kamera
6.1 ÜBERSICHT
19 USB-Stecker
20 Kfz-Stecker
21 micro-SD Karte, 32 GB, Class 10
21

5
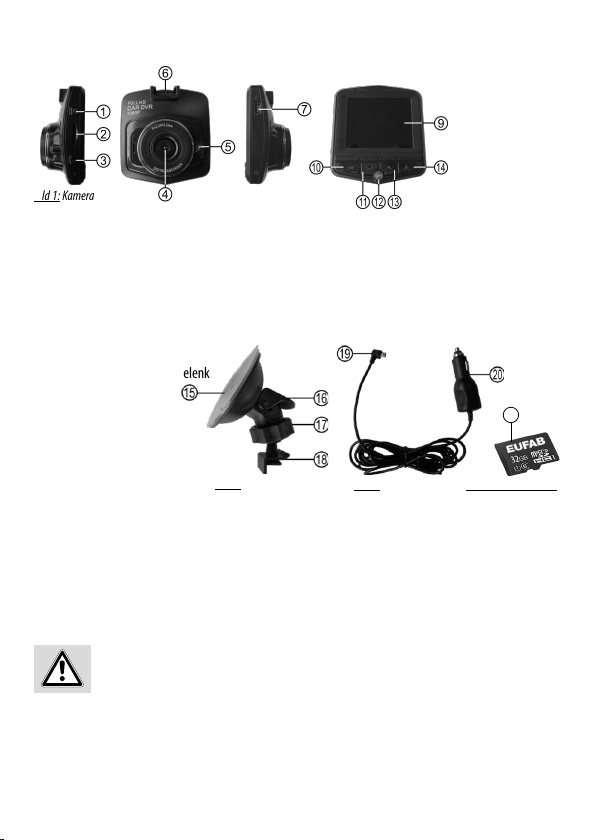
Stecken Sie den USB-Stecker (Position 19 in der Übersicht) des Ladekabels in die USB-Buchse (Position 7 in
der Übersicht) der Kamera.Verlegen Sie das Ladekabel so, daß es die Sicht nicht einschränkt und Sie während
der Fahrt nicht behindert. Stecken Sie den Kfz-Stecker (Position 20 in der Übersicht) des Ladekabels in die 12
V-Kfz-Steckdose Ihres Fahrzeugs.
Langes Drücken: Schaltet die Kamera ein / aus.
Beim Einschalten wird direkt die Videoaufzeichnung gestartet.
Kurzes Drücken: Schaltet die Power-LED (Position 5 in der Übersicht) ein / aus.
Im Standby-Modus: Kurzes Drücken startet dieVideoaufzeichnung (roter Punkt blinkt im Display)
Erneutes kurzes Drücken stoppt dieVideoaufzeichnung.
Im Photomodus: Kurzes Drücken nimmt ein Photo auf.
Im Abspielmodus: Kurzes Drücken spielt dieVideoaufzeichnung ab.
EIN/AUS-Schalter (Position 1 in der Übersicht)
OK-Taste (Position 10 in der Übersicht)
6.4 ANSCHLIESSEN DER KAMERA
6.5 FUNKTIONEN
Im Standby-Modus: Kurzes Drücken önet das Menü für die Videoeinstellungen. Mit den Cursor-
Tasten (Positionen 11 und 13 in der Übersicht) können Sie die verschiedenen
Menüpunkte auswählen. Durch Drücken der OK-Taste wird der ausgewählte
Menüpunkt geönet. Wählen Sie mit den Cursor-Tasten die Einstellung des
Menüpunkts aus und bestätigen Sie diese durch Drücken der OK-Taste.
EinstellungenVideomenü (SymbolVideokamera oben links im Display):
Auösung: FHD – HD - 720P 1280x720 -WVGA 848x480 - VGA 640x480
Loop-Aufnahme: Hier zeichnet die Kamera kurze Videos auf. Wenn der Speicher voll ist, wird
immer die älteste Aufnahme gelöscht.
ausschalten – 1 Minute – 2 Minuten – 3 Minuten
Belichtungsausgleich: Hier können Sie die Helligkeit derVideoaufnahme einstellen.
+2,0 …+0,0 … -2,0
Bewegungserkennung: Bei eingeschalteter Bewegungserkennung startet die Kamera
automatisch eineVideoaufzeichnung, wenn eine Bewegung erkannt wird.
ausschalten – einschalten
Video Audio: Ein-/Ausschalten desTons
ausschalten – einschalten
Menütaste (Position 3 in der Übersicht)
Datums-Aufkleber: Das Datum wird imVideo eingeblendet.
ausschalten – einschalten
Schwerkraft-Sensor: Bei eingeschaltetem Schwerkraft-Sensor startet die Kamera im Parkmodus
bei einem Aufprall automatisch 20 Sekunden eineVideoaufzeichnung (diese
Aufzeichnung wird nicht automatisch gelöscht). Es können drei Stufen für die
Stärke des Aufpralls eingestellt werden.
ausschalten – 2G (leichter Aufprall) – 4G – 8G (schwerer Aufprall)
Verlassen Sie das Menü drücken der Modus-Taste.

6
Einstellungen Photomenü (Symbol Photokamera oben links im Display):
Auösung: Wählen Sie die Auösung für Ihre Photos aus:
12MP – 10MP – 8MP – 5MP – 3MP – 2MP HD – 1,3MP –VGA
Bildqualität: Wählen Sie die Bildqualität für Ihre Photos aus:
Hohe Qualität – Standard – niedrige Qualität
Schärfe: Wählen Sie die Schärfeeinstellung für Ihre Photos aus:
Stark – Standard –Weich
Weißabgleich: Stellen Sie den Weißabgleich für Ihre Photos ein, um möglichst
farbechte Bilder zu erhalten.
Automatisch – Sonnenlicht – bewölkter Tag – Wolfram (Glühlampe)
– uoreszierend (Leuchtstoröhre)
ISO: Stellen Sie die Empndlichkeit der Kamera ein.
Automatisch – 100 – 200
Belichtungskorrektur: Hier können Sie die Helligkeit der Photos einstellen.
+2,0 …+0,0 … -2,0
Stabilisator: Schalten Sie den Bildstabilisator ein/aus.
ausschalten – einschalten
Im Standby-Modus: Zweimal kurzes Drücken önet das Menü für die Kameraeinstellungen. Mit
den Cursor-Tasten (Positionen 11 und 13 in der Übersicht) können Sie die
verschiedenen Menüpunkte auswählen. Durch Drücken der OK-Taste wird der
ausgewählte Menüpunkt geönet. Wählen Sie mit den Cursor-Tasten die
Einstellung des Menüpunkts aus und bestätigen Sie diese durch Drücken der
OK-Taste.
Park-Modus: Bei eingeschaltetem Park-Modus wird dieVideoaufzeichnung bei einem Aufprall
automatisch gesichert (diese Aufzeichnung wird nicht automatisch gelöscht). Es
können drei Stufen für die Stärke des Aufpralls eingestellt werden.
ausschalten – 2G (leichter Aufprall) – 4G – 8G (schwerer Aufprall)
Verlassen Sie das Menü drücken der Modus-Taste.
Einstellungen Kamera (Symbol Schraubenschlüssel oben links im Display):
Datum / Uhrzeit: Stellen Sie das Datum und die Uhrzeit mit den Cursor-Tasten ein und
bestätigen Sie jede Eingabe durch Drücken der OK-Taste. Um diesen
Menüpunkt zu verlassen drücken Sie die Menütaste.
Bildschirmschoner: Stellen Sie ein, ob oder wann der Bildschirmschoner aktiviert werden soll.
Lautstärke: 0 bis 3
Spracheinstellungen: Stellen Sie die Menüsprache ein und bestätigen Sie die ausgewählte Sprache
mit der OK-Taste.

7
Modus-Taste (Position 14 in der Übersicht)
Parkmodus-Taste (Position 12 in der Übersicht)
6.6 ABSPIELEN/ANSEHEN DER AUFZEICHNUNGEN
Durch mehrfaches drücken der Modustaste können Sie die Funktionsmodi in folgender Reihenfolge
wechseln:Videomodus – Photomodus – Abspielmodus.
Drücken Sie die Parkmodus-Taste vor dem Ausschalten der Kamera. Das „P-Symbol“ wird oben rechts im
Display angezeigt. Nach dem Ausschalten bendet sich die Kamera im Parkmodus, siehe auch
„Schwerkraft-Sensor“ im Abschnitt 6.5 Funktionen.
Um die aufgezeichneten Videos und Photos anzusehen, wechseln Sie durch Drücken der Modus-
Taste in den Abspielmodus. Mit den Cursor-Tasten wählen Sie das gewünschteVideo oder Photo aus. Drücken
Sie die OK-Taste um das ausgewählteVideo oder Photo anzusehen.
Um die Aufzeichnungen auf Ihren Computer anzusehen, stecken Sie die Speicherkarte in ein
passendes Kartenlesegerät und schließen dies an Ihrem Computer an.
6.7 ERSETZEN DER SICHERUNG
Drehen Sie die Spitze des 12 V Steckers des Ladekabels entgegen dem Uhrzeigersinn bis sich diese vom
Stecker löst und nehmen Sie diese ab. Die Sicherung wird freigegeben und kann aus dem Stecker gezogen
werden. Ersetzen Sie diese durch eine neue Sicherung gleicher Stärke und schrauben Sie die Spitze wieder
in den Stecker.
Sicherung: ø 6 x 30, 2 A, ink, 250 V
6.8 FEHLERSUCHE
Die Sicherung für die 12 V Kfz-Steckdose
hat ausgelöst und muß ersetzt werden.
Ersetzen Sie die Sicherung im Siche-
rungskasten des Fahrzeugs
Der Akku ist entladen (nur beiVerwen-
dung ohne Ladekabel)
Schließen Sie die Kamera mit dem
Ladekabel an die 12 V Kfz-Steckdose an.
Fehler / Störung Mögliche Ursache Abhilfe / Lösung
Der Stecker des Monitorkabels wurde
nicht in die 12 V Kfz-Steckdose einge-
steckt.
Stecken Sie den Stecker des Ladekabels
in die 12 V Kfz-Steckdose
Die Sicherung im Stecker des Monitor-
kabels hat ausgelöst und muß ersetzt
werden
Ersetzen Sie die Sicherung im Stecker
des Ladekabels
Keine Funktion
Frequenz: Stellen Sie die Frequenz des Stromnetzes Ihres Landes ein. 50 Hz – 60 Hz
Version: Zeigt die Softwareversion der Kamera an.
Format: Die Speicherkarte wird formatiert, alle Daten werden gelöscht.
stornieren – bestätigen
Standardeinstellung: Die Werkseinstellungen der Kamera werden wieder hergestellt.
stornieren – bestätigen

8
7.WARTUNG UND PFLEGE
8. HINWEISE ZUM UMWELTSCHUTZ
Vor der Reinigung ziehen Sie das Anschlußkabel von der Kamera ab. Reinigen Sie das Gehäuse mit einem
weichen trockenen Tuch. Verwenden Sie keine scharfen oder lösemittelhaltigen Reiniger. Lassen Sie niemals
Flüssigkeiten in das Innere des Gehäuses gelangen.
Bei Nichtgebrauch lagern Sie die Dashboard-Kamera an einem trockenen Ort. Setzen Sie die Kamera keinen
starkenTemperaturschwankungen aus. Das dabei entstehende Kondenswasser kann das Gerät beschädigen.
EntsorgenSieElektrogerätenichtmitdem Hausmüll! Elektro-und Elektronik-Altgerätemüssen
getrennt gesammelt und einer umweltgerechten Wiederverwertung zugeführt werden. Über
Entsorgungsmöglichkeiten für Elektro- und Elektronik-Altgeräte informieren Sie sich bei Ihrer
Gemeinde- oder Stadtverwaltung.
9. KONTAKTINFORMATIONEN
EAL GmbH
Otto-Hausmann-Ring 107
42115 Wuppertal, Deutschland
+49 (0)202 42 92 83 0
+49 (0) 202 42 92 83 – 160
www.eal-vertrieb.com
Die Speicherkarte ist nicht korrekt ein-
gesetzt
Setzen Sie die Speicherkarte richtig ein
Schreibschutz der Speicherkarte aktiviert Deaktivieren Sie den Schreibschutz der
Speicherkarte
Die Speicherkarte ist nicht formatiert Formatieren Sie die Speicherkarte
(Format im Abschnitt 6.5 Funktionen)
Der freie Speicherplatz ist zu gering Löschen Sie einige Dateien um
Speicherplatz freizugeben
Die Speicherkarte ist defekt Setzen Sie probeweise eine andere
Karte ein
Das Objektive der Kamera ist verschmutzt Reinigen Sie vorsichtig das Objektiv
Starkes Licht fällt direkt in das Objektiv
der Kamera
Sobald der starke Lichteinfall nachlässt,
ist die Bildqualität wieder in Ordnung
Falsche Lichtfrequenz ist eingestellt Stellen Sie die passende Lichtfrequenz
zur künstlichen Beleuchtung ein (Licht-
frequenz in Abschnitt 6.5 Funktionen)
Kein Speichern möglich
Monitor zeigt kein
klares Bild
Fehler / Störung Mögliche Ursache Abhilfe / Lösung

9
WARNING
Please read the operating instructions carefully prior to use and observe all safety
instructions!
Not observing such may lead to personal injury, damage to the device or to your
property!
Store the original packaging, the receipt and these instructions so that they may
be consulted at a later date! When passing on the product, please include these
operating instructions as well.
Please check the contents of package for integrity and completeness prior to use!
CONTENTS
The vehicle dashboard camera is a video camera designed to record moving images from the interior of the
vehicle (protected area) during the journey.
The vehicle dashboard camera may only be operated using the supplied connecting cable.
This device is not designed to be used by children or persons with limited mental abilities or without
experience and/or lack of required specialist knowledge. Keep children away from the device.
The device is not designated for commercial use.
Use according to the intended purpose also includes the observance of all information in these operating
instructions, particularly the observance of the safety notes. Any other utilisation is considered to be cont-
rary to the intended purpose and may lead to material damage or personal injuries. EAL GmbH assumes no
liability for damage resulting from improper use.
1. PROPER USE OFTHE PRODUCT
2. SCOPE OF DELIVERY
1 x Suction cup mount for the windscreen
1 x Operating instructions
1 xVehicle dashboard camera
1 x Connecting cable
1 x micro-SD card, 32 GB, class 10
Car dashcam
1. PROPER USE OFTHE PRODUCT 9
2. SCOPE OF DELIVERY 9
3. SPECIFICATIONS 10
4. SAFETY PRECAUTIONS 10
5. EXPLANATION OF SYMBOLS 10
6. OPERATING INSTRUCTIONS 11
6.1 OVERVIEW 11
6.2 MEMORY CARD 11
6.3 INSTALLATION 12
6.4 CONNECTINGTHE CAMERA 12
6.5 FUNCTIONS 12
6.6 PLAYING/VIEWING THE RECORDINGS 15
6.7 REPLACINGTHE FUSE 15
6.8TROUBLESHOOTING 15
7. MAINTENANCE AND CARE 16
8. NOTES REGARDING ENVIRONMENTAL PROTECTION 16
9. CONTACT INFORMATION 16

10
• The warning triangle indicates all instructions which are important for safety. Always follow
these otherwise you could injure yourself or damage the device.
• Children may not play with the device.
• Cleaning and user maintenance may not be carried out by children without supervision.
• Do not treat packaging material carelessly. This may become a dangerous plaything for a child!
• Only use this product for its designated purpose!
• Do not manipulate or disassemble the device!
• For your own safety, only use accessories and spare parts that are stated in these instructions or
that are recommended by the manufacturer!
• Do not misuse the cable. Do not use a cable or accessories other than those supplied.
• To disconnect the power supply, always pull on the plug itself, never on the cable.
• Do not exposethecamera tomechanical loads, extreme temperatures,damp,solventsorgases.
• Secure the camera in your vehicle in such a way that your driving is not impeded.
• The camera may not be mounted in the vicinity of air bags.
• The battery of the camera cannot be removed and may only be charged when in the camera.
Only use the supplied charging cable to charge the battery, never use another external charger.
• Observe the additional safety precautions in the individual sections of the operating
instructions
• The use as vehicle monitoring camera may be restricted or banned in some countries.
Find out about the legal regulations before using the camera.
Dimensions: 35 x 65 x 70 [mm]
Power supply: 12 – 24V DC
Monitor: LCD, 5.6 cm (2.2 inches)
Lens: Wide angle, 120 degrees
Video format: AVI
Video resolution: 1080P FHD, HD, 720P,WVGA, VGA
Photo resolution: Maximum 12 M
Memory: micro-SD card with up to a maximum of 32 GB, class 10
Weight: 0.170 kg
Battery: Lithium polymer,
180 mAh, 0.67 Wh
Photo format: JPEG
4. SAFETY PRECAUTIONS
3. SPECIFICATIONS
5. EXPLANATION OF SYMBOLS
Labelled electrical products may not
be disposed of in the household waste
Read the operating
instructions
Complies with EC
directives

11
6. OPERATING INSTRUCTIONS
Figure 1: Camera
6.1 OVERVIEW
1 ON/OFF switch
2 Slot for memory card
3 Menu button
4 Lens
5 Power-LED
6 Mounting point
7 USB socket
9 Display
10 OK-button
11 Cursor button, down
12 Parking mode button
13 Cursor button, up
14 Mode button
15 Suction base
16 Lever
17 Coupling nut / ball joint
18 Camera mount
19 USB connector
20 Vehicle connector
21 micro-SD Karte, 32 GB, Class 10
Figure 2: Suction base mount Figure 3: Charging cable
Inserting the memory card
Make sure that the dashboard camera has been switched o. Insert the micro-SD into the slot (Position 2
in the overview). Pay attention to ensure that the memory card is correctly positioned. The contacts of the
memory card must face in the direction of the lens. Carefully push the memory card into the slot until it
engages with a soft click.
6.2 MEMORY CARD
Removing the memory card
Switch the camera o. To remove the memory card, press down and release. The card will pop up and you
can remove it.
Removing the memory card with the camera switched on may result in a loss of data or
damage to the device.
Figure 4: micro-SD card
21

12
Clean the section of the windscreen where the camera is to be mounted. Put the camera mount (Position 18
in the overview) into the mounting point (Position 6 in the overview) of the camera. Press the suction base
(Position 15 in the overview) against the windscreen. Flip the lever (Position 16 in the overview). Undo the
coupling nut (Position 17 in the overview) on the ball joint. Align the camera. Tighten the coupling nut up
again.
Plug the USB connector (Position 19 in the overview) of the charging cable into the USB socket (Position 7
in the overview) of the camera. Lay out the charging cable in such a way that it does not impede visibility
and does not hinder you during the journey. Plug the vehicle connector (Position 20 in the overview) of the
charging cable into the 12V socket of your vehicle.
Long press: Switches the camera on/o.
Video recording is started directly after the camera is switched on.
Brief press: Switches the Power-LED (Position 5 in the overview) on/o.
In Standby mode: A brief press starts video recording (red dot ashes on the display)
A second brief press stops video recording.
In Photo mode: A brief press takes a photograph.
In Play mode: A brief press plays the recorded video.
ON/OFF switch (Position 1 in the overview)
OK button (Position 10 in the overview)
6.3 INSTALLATION
6.4 CONNECTING THE CAMERA
6.5 FUNCTIONS
Exposure: Here you can set the brightness of the video recording.
+2.0 …+0.0 … -2.0
Motion detection: When the motion detector is activated, the camera automatically starts
recording when motion is detected.
Switch o – switch on
Record audio: Switches the audio on/o
Switch o – switch on
Date stamp: The date is shown on the video.
Switch o – switch on
In Standby mode: A brief press opens the menu for the video settings. With the cursor buttons
(Positions 11 and 13 in the overview), you can select the various menu items.
Press the OK button to open the selected menu item. Use the cursor buttons to
select the setting in the menu item, and conrm by pressing the OK button.
Settings in the video menu (symbol shows a video camera in the top left of the display):
Menu button (Position 3 in the overview)
Resolution: FHD – HD - 720P 1280x720 - WVGA 848x480 -VGA 640x480
Loop recording: Here, the camera records short video passages. When the memory is full, the
oldest recording will always be deleted.
Switch o –1 minute –2 minutes –3 minutes
Gsensor: When the gravity sensor is switched on, a camera in Parking mode will
automatically record a 20 second video in the event of an impact (this recording
is not automatically deleted). Three levels may be set for the severity of the
impact.
Switch o – 2G (light impact) – 4G – 8G (serious impact)

13
Exit the menu using the mode button.
Settings in the photo menu (symbol shows a photo camera in the top left of the display):
Resolution: Select the resolution for your photos:
12M – 10M – 8M – 5M – 3M – 2M HD – 1,3M –VGA
Image quality: Select the image quality for your photos:
High quality – Standard – Low quality
Sharpness: Select the sharpness setting for your photos:
Strong – Standard – Soft
White balance: Set the white contrast for your photos in order to get images that are true to
colour.
Automatic –Sunlight – Cloudy day – Light bulb –Wolfram (light bulb)
– uorescent (uorescent tube)
ISO: Set the sensitivity of the camera.
Automatic – 100 – 200
Exposure compensation: Here you can set the brightness of the photos.
+2.0 …+0.0 … -2.0
Stabiliser: Switch the image stabiliser on/o.
Switch o – switch on
Exit the menu using the mode button.
In Standby mode: Briey press twice opens the menu for the camera settings. With the cursor
buttons (Positions 11 and 13 in the overview), you can select the various menu
items.PresstheOKbuttontoopentheselectedmenuitem.Usethecursorbuttons
to select the setting in the menu item, and conrm by pressing the OK button.
Park mode: If the stop mode is activated, the video recording is saved automatically in the
eventofanimpact(this recordingisnot deletedautomatically).Threelevelsmay
be set for the severity of the impact.
Switch o – 2G (light impact) – 4G – 8G (serious impact)
Camera settings (spanner symbol at the top left of the screen):
Date/Time: Set the date and time using the cursor buttons and conrm each entry by
pressing the OK button. Press the menu button to exit this menu item.
Screensaver: Set whether and when the screensaver is to be activated.
Volume: 0 to 3
Language settings: Set the menu language and conrm the selected language using the OK
button.
Light frequency: Adjust the frequency to the power supply in your country.
50 Hz – 60 Hz
Format: The memory card is formatted, all data is lost.
Cancel – Conrm
Defoult setting: The factory settings of the camera are restored.
Cancel – Conrm
Version: Shows the version of the software on the camera.
Mode button (Position 14 in the overview)
Pressing the Mode button multiple times allows you to switch the function modes in the following sequence:
Video mode – Photo mode – Play mode.

14
Parking mode button (Position 12 in the overview)
Press the Parking mode button before switching the camera o. The„P symbol“ will be shown in the top right
of the display. After the camera is switched o, it is in Parking mode, see also the„Gravity sensor“ in section
6.5 Functions.
6.6 PLAYING/VIEWING THE RECORDINGS
In order to view the recorded videos and photos, press the Mode button to switch to Play mode. Use the cursor
buttons to select the desired video or photo. Press the OK button to view the video or photo.
In order to view the recordings on your computer, insert the memory card into an appropriate card reader
and connect to your computer.
6.7 REPLACING THE FUSE
Turn the tip of the 12 V connector of the charging cable anti-clockwise until it is released from the connector
and it can be removed. The fuse is exposed and can be removed from the connector. Replace the fuse with
another of the same strength and screw the tip back into the connector.
Fuse: ø 6 x 30, 2 A, fast-blowing, 250 V
6.8 TROUBLESHOOTING
Error/Fault Possible cause Assistance/solution
The connector of the monitor cable
has not been inserted into the 12 V
vehicle socket.
Plug the connector of the charging
cable into the 12V vehicle socket.
The fuse of the monitor cable
connector has been triggered and
must be replaced.
Replace the fuse in the monitor cable
connector
The fuse of the 12V vehicle socket
has been triggered and must be
replaced.
Replace the fuse in the fuse box of
the vehicle
The battery is empty (only when
used without charging cable)
Use the charging cable to connect
the camera to the 12V vehicle
socket.
The memory card has not been
inserted correctly
Insert the memory card properly
Write protection of the memory card
has been activated
Deactivate the write protection of
the memory card
The memory card is not formatted Format the memory card (Format in
section 6.5 Functions)
There is not sucient memory space Delete some les in order to free up
memory space
The memory card is defective Try using a dierent card
No function
No saving possible

15
The lens of the camera is dirty Carefully clean the lens
Strong light is acting directly on the
lens of the camera
As soon as the strong light dissipates,
the image quality will be OK
Incorrect light frequency set Set the appropriate light frequency
for articial light (Light frequency in
section 6.5 Functions)
The monitor does not show a
clean image
7. MAINTENANCE AND CARE
8. NOTES REGARDING ENVIRONMENTAL PROTECTION
Before cleaning, disconnect the connecting cable from the camera. Clean the housing with a soft, dry cloth.
Do not use any aggressive cleaning agents or solvent-based cleaners. Never allow liquids to ingress into the
housing.
When not in use, store the dashboard camera in a dry place. Do not expose the camera to large temperature
uctuations.The condensation that occurs as a result may, under certain circumstances, damage the device.
Do not dispose of electrical devices with the household waste! Electrical and electronic scrap
must be collected separately and disposed of in an environmentally responsible manner for
recycling. Please contact your community or city administration regarding disposal options for
electrical and electronic scrap.
9. CONTACT INFORMATION
EAL GmbH
Otto-Hausmann-Ring 107
42115 Wuppertal, Germany
+49 (0)202 42 92 83 0
+49 (0) 202 42 92 83 – 160
www.eal-vertrieb.com

16
AVERTISSEMENT
Lisez attentivement la notice d‘utilisation avant la mise en service et respectez toutes les con-
signes desécurité ! Tout non-respect deces consignes peutentraîner des dommagescorporels,
endommager l‘appareil ou vos biens !
Conservez l‘emballage d‘origine, le justicatif d‘achat et la présente notice pour vous y référer
ultérieurement ! Si vous revendez ou remettez l‘appareil à des tiers, veuillez également leur
remettre cette notice d‘utilisation. Avant la mise en service, veuillez contrôler le contenu de
l‘emballage quant à l‘absence de dommages et vérier si toutes les pièces sont présentes !
SOMMAIRE
La caméra de tableau de bord pour voiture est une caméra vidéo servant à faire des enregistrements vidéo de l’extérieur
depuis l’habitacle (zone protégée).
La caméra de tableau de bord pour voiture ne peut être utilisée qu’avec le câble de raccordement fourni.
Cetappareil n‘est pas destinéà êtreutilisé pardes enfants oudes personnes aux capacités mentaleslimitées ou nedisposant
pas de l‘expérience ou des connaissances nécessaires. Les enfants doivent rester à distance de cet appareil.
L‘appareil n‘est pas destiné à une utilisation industrielle ou commerciale.
L‘utilisation conforme aux prescriptions implique également le respect de toutes les infoarmations contenues dans cette
notice d‘utilisation, en particulier le respect des consignes de sécurité. Toute autre utilisation est considérée comme non
conforme et peut entraîner des dommages matériels ou corporels. La société EAL GmbH décline toute responsabilité en cas
de dommages découlant d’une utilisation non conforme à l’emploi prévu.
1. UTILISATION CONFORME
Dashcam pour voiture
2. MATÉRIEL FOURNI
1 x Support à ventouse pour pare-brise
1 x Mode d’emploi
1 x Caméra de tableau de bord pour voiture
1 x Câble de raccordement
1 x Carte micro SD, 32 GB, classe 10
Dimensions : 35 x 65 x 70 [mm]
Alimentation en courant électrique : 12 – 24V DC
Poids : 0,170 kg
Batterie : Lithium-polymère, 180 mAh, 0,67Wh
3. SPÉCIFICATIONS
1. UTILISATION CONFORME 17
2. MATÉRIEL FOURNI 17
3. SPÉCIFICATIONS 17
4. CONSIGNES DE SÉCURITÉ 18
5. EXPLICATION DES SYMBOLES 18
6. NOTICE D‘UTILISATION 18
6.1VUE D‘ENSEMBLE 18
6.2 CARTE MÉMOIRE 19
6.3 MONTAGE 19
6.4 RACCORDEMENT DE LA CAMÉRA 19
6.5 FONCTIONS 19
6.6 LECTURE/VISIONNAGE DES ENREGISTREMENTS 22
6.7 REMPLACEMENT DU FUSIBLE 22
6.8 RECHERCHE D‘ERREURS 22
7. MAINTENANCE ET ENTRETIEN 23
8. REMARQUES RELATIVES À LA PROTECTION DE L‘ENVIRONNEMENT 23
9. DONNÉES DE CONTACT 23

17
Écran : LCD, 5,6 cm (2,2 pouces)
Objectif : grand angle, 120 degrés
Format vidéo : AVI
Résolution vidéo : 1080P FHD, HD, 720P,WVGA,VGA
Résolution photo : max. 12 M
Mémoire : carte micro SD de max. 32 GB, classe 10
• Le triangle d’avertissement indique toutes les instructions relatives à la sécurité. Respectez-les à
tout moment car vous risqueriez sinon de vous blesser ou l‘appareil risquerait d‘être endommagé.
• Les enfants ne doivent pas jouer avec l‘appareil.
• Les tâches de nettoyage et d‘entretien à eectuer chez soi ne doivent pas être exécutées par des
enfants qui ne sont pas sous surveillance.
• Ne laissez pas traîner le matériel d‘emballage. Il pourrait devenir un jouet dangereux pour les
enfants !
• N‘utilisez cet appareil qu‘aux ns pour lesquelles il a été prévu !
• Ne pas manipuler ni démonter l‘appareil !
• Pour votre propre sécurité, utilisez exclusivement les accessoires ou pièces de rechange qui sont
indiqué(e)s dans la notice d‘utilisation ou dont l‘utilisation est conseillée par le fabricant !
• Ne rallongez pas le câble. N’utilisez pas d’autres câbles ou d’autres accessoires que ceux fournis.
• Pour débrancher l’appareil de l’alimentation électrique, tirez toujours directement sur le
connecteur, jamais sur le câble.
• Ne soumettez jamais la caméra à des contraintes mécaniques, des températures extrêmes,
l’humidité, des solvants ou des gaz.
• Fixez la caméra dans votre véhicule de sorte qu’elle ne vous dérange pas lorsque vous conduisez.
• La caméra ne doit pas être montée dans la zone des airbags.
• La batterie de la caméra ne peut pas être démontée et ne doit être chargée que dans la
caméra.Rechargezlacamérauniquementaveclecâbledechargementfournietjamaisavecunautre
chargeur externe.
• Observez également les consignes de sécurité contenues dans les diérents chapitres du présent
mode d’emploi.
• L‘utilisation en tant que caméra de surveillance de voiture peut être limitée ou interdite
dans certains pays. Veuillez vous informer sur les réglementations légales avant de mettre
la caméra en service.
Format photo : JPEG
4. CONSIGNES DE SÉCURITÉ
5. EXPLICATION DES SYMBOLES
6. NOTICE D‘UTILISATION
L‘appareil électrique marqué ne peut pas
être jeté dans les ordures ménagères
Lire le mode
d‘emploi
Correspond aux
directives de la CE
Figure 1: Caméra
6.1 VUE D‘ENSEMBLE

18
1 Interrupteur MARCHE/ARRÊT
2 Emplacement pour carte mémoire
3 Touche Menu
4 Objectif
5 Power-LED
6 Patin de montage
7 Prise USB
Figure 2: Support à ventouse Figure 3: Câble de chargement
Mise en place de la carte mémoire
Assurez-vous que la caméra de tableau de bord est éteinte. Insérez la carte micro SD dans son emplacement
(position 2 dans la vue d‘ensemble). Veillez à ce qu’elle soit correctement positionnée. Les contacts de la carte
mémoire doivent pointer vers l’objectif. Enfoncez la carte mémoire dans son emplacement avec précaution
jusqu’à ce qu’elle s’enclenche et que vous entendiez un faible clic.
6.2 CARTE MÉMOIRE
9 Écran
10 Touche OK
11 Touche curseur vers le bas
12 Touche de mode de stationnement
13 Touche curseur vers le haut
14 Touche de mode
15 Ventouse
16 Levier
17 Écrou-raccord / Articulation à rotule
18 Support de la caméra
19 Port USB
20 Connecteur de voiture
21 Carte micro SD, 32 GB, classe 10
Retrait de la carte mémoire
Éteignez la caméra. Pour retirer la carte mémoire, poussez la carte vers le bas et relâchez-la. La carte est alors
libérée et vous pouvez la retirer.
Le fait de retirer la carte mémoire lorsque la caméra est allumée peut provoquer la perte de
données ou endommager l’appareil.
Nettoyez l‘endroit du pare-brise où la caméra sera installée. Insérez le support de la caméra (position 18 dans
la vue d’ensemble) dans le patin de montage (position 6 dans la vue d‘ensemble) de la caméra. Poussez la
ventouse (position 15 dans la vue d‘ensemble) contre le pare-brise. Actionnez le levier (position 16 dans la
vue d‘ensemble). Desserrez l’écrou-raccord (position 17 dans la vue d‘ensemble) de l’articulation à rotule.
Orientez la caméra. Resserrez l’écrou-raccord.
6.3 MONTAGE
Insérez le connecteur USB (position 19 dans la vue d‘ensemble) du câble de chargement dans la prise USB
(position 7 dans la vue d‘ensemble). Posez le câble de chargement de sorte qu’il n’entrave pas la visibilité et
qu’il ne vous perturbe pas lors de la conduite. Branchez le connecteur de véhicule (position 20 dans la vue
d‘ensemble) du câble de chargement dans la prise 12V de votre véhicule.
Pression longue : la caméra s’allume/s’éteint.
L’enregistrement vidéo démarre dès que la caméra est allumée.
Pression courte : La power-LED (position 5 sur la vue d‘ensemble) s’allume/s’éteint.
Interrupteur MARCHE/ARRÊT (position 1 dans la vue d’ensemble)
6.4 RACCORDEMENT DE LA CAMÉRA
6.5 FONCTIONS
Figure 4: Carte micro SD
21

19
En mode veille : Une courte pression fait démarrer l’enregistrement vidéo (un point rouge
clignote à l’écran)
Une nouvelle pression arrête l’enregistrement vidéo.
En mode photo : Une courte pression permet de prendre une photo.
En mode lecture : Une courte pression permet de lire l’enregistrement vidéo.
Touche OK (position 10 dans la vue d‘ensemble)
En mode veille : Une courte pression permet d’ouvrir le menu pour les réglages vidéo. Les
touches curseur (positions 11 et 13 dans la vue d’ensemble) permettent de
sélectionner diérents points du menu. Appuyez sur la touche OK pour ouvrir le
point de menu sélectionné. À l’aide des touches curseur, sélectionnez le réglage
du point de menu et conrmez-le en appuyant sur la touche OK.
Réglages du menu de vidéo (symbole de caméra vidéo en haut à gauche de l’écran) :
Touche Menu (position 3 dans la vue d‘ensemble)
Résolution : FHD – HD - 720P 1280x720 -WVGA 848x480 - VGA 640x480
Enregistrement en bouche : Dans ce mode, la caméra enregistre des vidéos courtes. Lorsque la mémoire est
pleine, le dernier enregistrement est eacé.
Éteindre – 1 minute – 2 minutes – 3 minutes
Compensation de l’exposition :Vous pouvez réglez la luminosité de l’enregistrement.
+2,0 …+0,0 … -2,0
La détection de mouvements :Lorsque la détection de mouvements est activée, la caméra démarre
automatiquement l’enregistrement vidéo lorsqu’un mouvement est détecté.
Éteindre – allumer
Vidéo audio : Allumage/arrêt de son
Éteindre – allumer
Label date : La date est intégrée dans la vidéo.
Éteindre – allumer
Quittez le menu en appuyant sur la touche de mode.
Capteur degravité : Lorsque le capteur de gravité est activé, la caméra en mode de stationnement
démarre un enregistrement de 20 secondes en cas de choc (cet enregistrement
n’est pas eacé automatiquement). Il est possible de régler trois niveaux de
puissance de choc.
Éteindre – 2G (choc léger) – 4G – 8G (choc puissant)
Réglages du menu photo (symbole d’appareil photo en haut à gauche de l’écran) :
Résolution : Sélectionnez la résolution de vos photos :
12M – 10M – 8M – 5M – 3M – 2M HD – 1,3M –VGA
Qualité de l’image : Sélectionnez la qualité de vos photos :
Haute qualité – Standard – faible qualité
Acuité : Sélectionnez le réglage de netteté de vos photos :
Élevée – Standard – Faible
Balance des blancs : Réglez la balance des blancs pour vos photos an d’obtenir des couleurs aussi
vraies que possibles.
Automatique – Lumière du soleil – Jour nuageux – ampoule
–Wolfram (ampoule) –uorescent (tube uorescent)

20
ISO : Réglez la sensibilité de la caméra.
Automatique – 100 – 200
Correction d’exposition : Vous pouvez régler la luminosité des photos ici.
+2,0 …+0,0 … -2,0
Stabilisateur : Activez/désactivez le stabilisateur d’image.
Éteindre – allumer
Quittez le menu en appuyant sur la touche de mode.
En mode veille : Appuyez deux fois rapidement pour ouvrir le menu des réglages de la caméra.
Les touches curseur (positions 11 et 13 dans la vue d’ensemble) permettent de
sélectionner diérents points du menu. Appuyez sur la touche OK pour ouvrir le
point de menu sélectionné. À l’aide des touches curseur, sélectionnez le réglage
du point de menu et conrmez-le en appuyant sur la touche OK.
Mode de stationnement : Lorsque le mode d’arrêt est activé, l’enregistrement vidéo est
automatiquement assurée en cas de choc (cet enregistrement n’est pas eacé
automatiquement). Il est possible de régler trois niveaux de puissance de choc.
Éteindre – 2G (choc léger) – 4G – 8G (choc puissant)
Réglages de la caméra (symbole de tournevis en haut à gauche de l’écran) :
Date /Heure : Réglez la date et l’heure à l’aide de la touche curseur et conrmez chaque
entrée en appuyant sur la touche OK. Appuyez sur la touche de menu pour
quitter le point de menu.
Économiseur d´écran : Réglez si et quand l’écran de veille doit être activé.
Volume : de 0à 3
Parameters de langue : Réglez la langue du menu et conrmez la langue choisie en appuyant sur la
touche OK.
Fréquence lumineuse : Réglez la fréquence du réseau électrique de votre pays.
50 Hz – 60 Hz
Format : La carte mémoire est formatée, toutes les données seront eacées.
Annuler - Conrmer
Touche de mode (position 14 dans la vue d’ensemble)
Touche de mode de stationnement (position 12 dans la vue d’ensemble)
Appuyez plusieurs fois sur la touche de mode pour passer entre les modes de fonctionnement dans l’ordre
suivant : Mode vidéo – Mode photo – Mode lecture.
Appuyez sur la touche de mode de stationnement avant d’éteindre la caméra. Le « Symbole P »“ apparaît
en haut à droite de l’écran. Une fois éteinte, la caméra se trouve en mode de stationnement, voir à ce sujet «
Capteur de gravité » dans le chapitre 6.5. Fonctions.
6.6 LECTURE/VISIONNAGE DES ENREGISTREMENTS
Pour visionner les vidéos et photos enregistrées, passez en mode lecture en appuyant sur la touche de mode.
À l’aide des touches curseur, sélectionnez la vidéo ou la photo souhaitée. Appuyez sur la touche OK pour
visionner la vidéo ou la photo sélectionnée.
Pour visionner les enregistrements sur votre ordinateur, insérez la carte mémoire dans un lecteur de cartes
adapté et connectez-le à votre ordinateur.
Version : Indique la version du logiciel de la caméra.
Les réglages per défaut : Les réglages par défaut de la caméra sont réinitialisés.
Annuler - Conrmer
Table of contents
Languages:
Other EUFAB Dashcam manuals