The Eureka Cooker
4
The Eureka Cooker
5
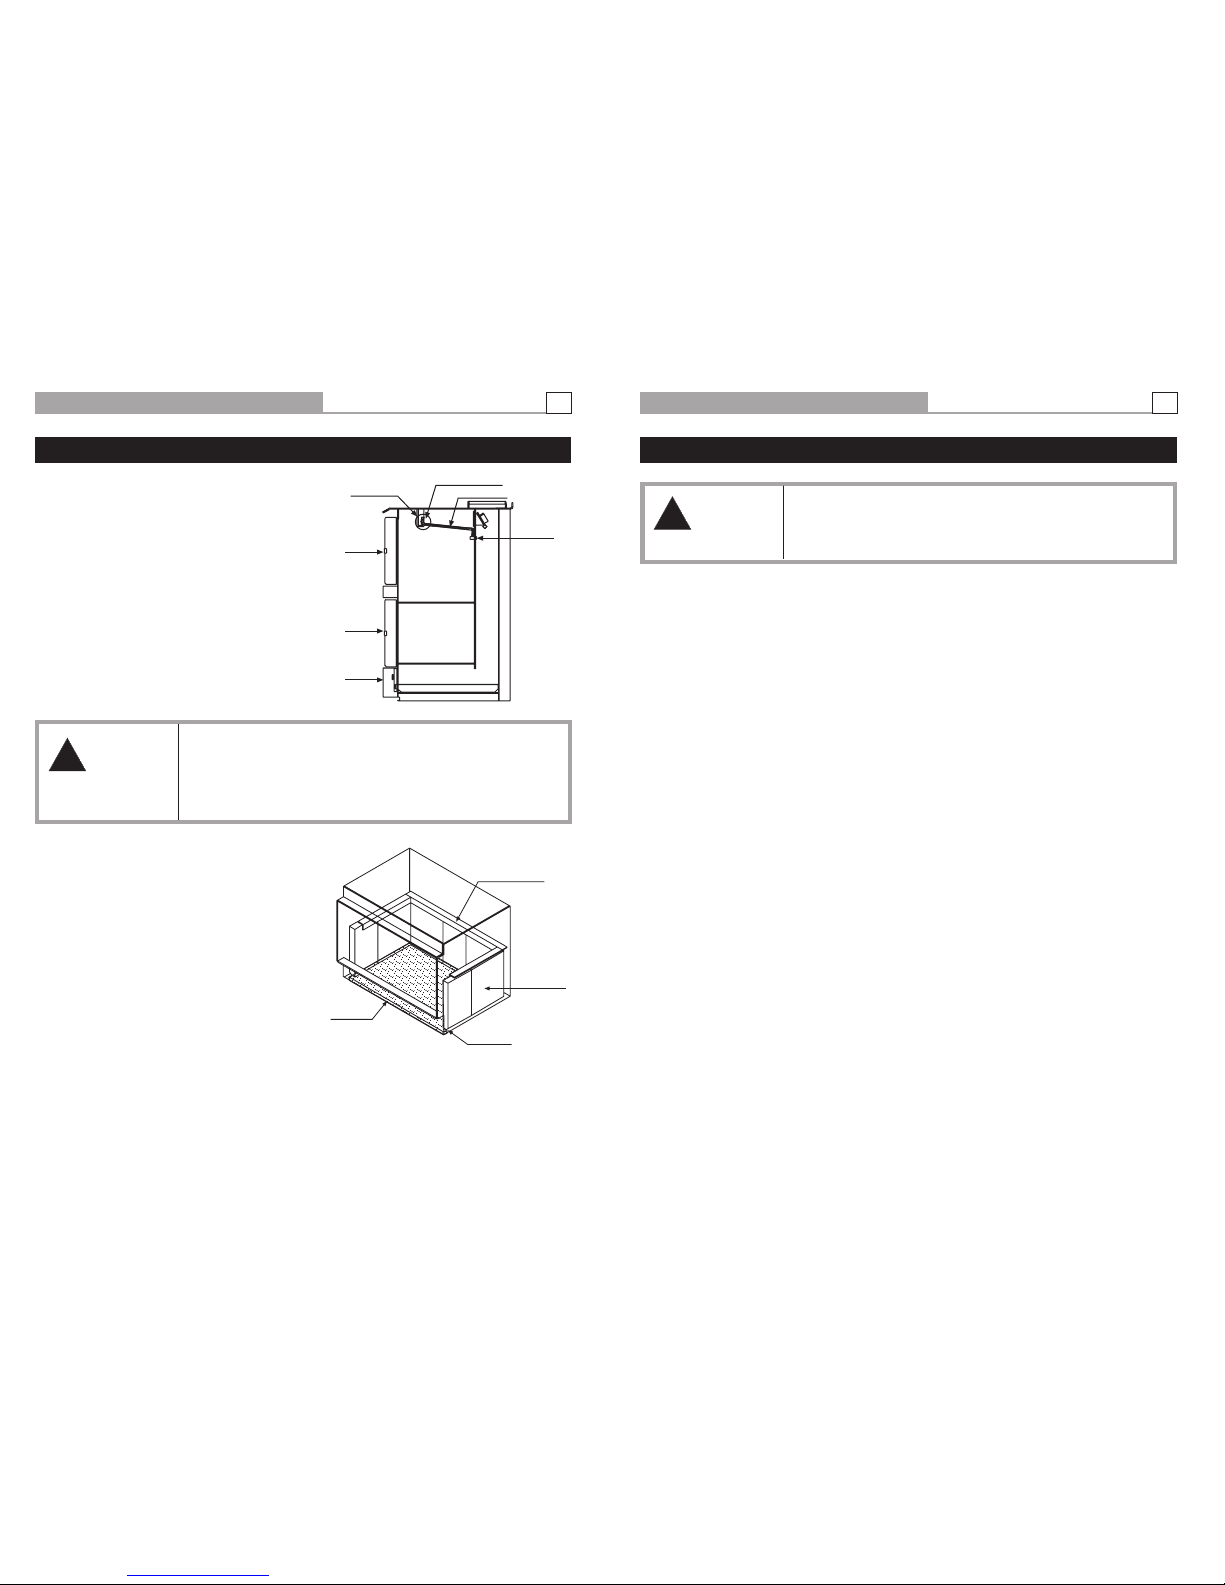
Fitting the Baffle Plate
1. Feed baffle plate through the door opening with
front edge folded up and place into the top of
angle supports.
2. Lift the rear of the baffle up onto the two pins
at rear.
3. Lower the front of the baffle down onto angle
supports.
4. Ensure baffle is hard up against the rear of the
firebox and baffle is sitting as shown in
illustration.
!
WARNING
WITH THE CURVED LIP FACING UPRIGHT AND TO THE FRONT, ENSURE THE
BAFFLE IS SITTING CORRECTLY. FAILURE TO DO SO WILL CAUSE THE APPLIANCE
TO BE LESS EFFICIENT AND OVERHEAT THE FLUE SYSTEM. IF THE BAFFLE PLATE
IS NOT SUPPORTED AT THE REAR OF THE FIREBOX AND PLACED FIRMLY
AGAINST THE BACK WALL THE BAFFLE MAY BOW CAUSING INEFFICIENT
OPERATION.
!
WARNING
DO NOT ATTEMPT TO OPERATE THIS APPLIANCE WITHOUT READING AND
UNDERSTANDING THESE OPERATING INSTRUCTIONS THOROUGHLY. FAILURE TO
OPERATE THIS APPLIANCE PROPERLY MAY CAUSE UNDUE DAMAGE TO THE
APPLIANCE OR RESULT IN A FLUE FIRE.
Take the firebricks out of the heater. They are to be placed
so that they stand on end against the rear and two side
walls of the firebox. You will notice that the bricks have a
bevel on one end.
Inside the firebox there is a “C” shaped angle iron firebrick
retaining bracket.This is designed to sit over the bricks and
hold them in place.This should be placed in the firebox so
that you see a flat face of the angle iron on both sides of
the firebox and at the rear of the firebox.
Holding the “C” frame up to the top of the firebox, insert a
whole firebrick, standing it vertically with the bevel edge
pointing down and facing inwards toward the left hand side
of the firebox. Lower the left hand side of the “C” frame
onto the firebrick. Repeat with a whole firebrick on the right hand side.
Place firebricks (2 whole firebricks and one half firebrick) using the same method against the back wall of the firebox.
Now place one extra half firebrick on either side of the firebox to complete the installation of the firebricks. (i.e. two each
side and remainder on the back wall.)
Push each brick and “C” frame firmly against the wall of the firebox.
Sand Layer
Place a 12mm (approx) layer of sand in the bottom of the heater. (Provided in the installation kit.) This is required for the
first fire.Thereafter, when cleaning out the firebox, always leave the equivalent amount of ash in the bottom.
Baffle Plate
Operating your Eureka
Your first fire
Before starting your fire ensure oven door is left open for the first three fires for paint curing of oven.
Starting your fire
Place a firelighter or paper in the bottom of the firebox and place a large amount of small kindling on top. Ignite the
paper or the firelighter. Set the air control to high and leave the main door open approximately 25mm. With flue damper
control in open position (refer illustration on page 6 for flue damper control location). When the kindling is burning, place
about four pieces of small wood on top of the burning kindling. Once the wood is alight, close the main door. After
approximately 20 minutes, turn the air control down to medium.
On the initial fire up you may detect smoke coming from the paint finish and from any oils that may be on the steel on
the outside of the firebox. This is normal. It is suggested to well ventilate your home on the initial fire up. Please refer to
our section ‘Paint curing and cure’.
The glass door
Always operate your heater with the firebox door closed and locked. The only time you can leave the firebox door open is
on initial lighting, or when reloading the heater.
Care of your glass
If you are burning good dry wood, you will have very little discolouration of your glass in normal burning cycle. If you aim
for an eight to ten hour overnight burn, you should not get much discolouration.You can control this by adjusting the air
slide control, moving from the left and slowly creeping the control to the right.After a number of days you will find the
right position to suit your requirements and the fuel that you are using.
Cleaning the glass
Generally the only time you will possibly need to clean your glass is after a long overnight burn. If you find that you have
a wet sticky black film on your glass (creosote), it is better to burn the heater as normal for one load of wood.When the
wood has burnt down to a hot bed of embers, open the door and leave it wide open until the glass cools sufficiently to
be wiped with a damp cloth. This should clean all the white smoky film off the glass. Creosote on the glass is normally a
sign that you have tried to get too long an overnight burn or you have burnt excessively wet or green wood.If the film on
the glass won’t come off with a wet cloth, you can use wet ash from the ash bed as a cleaner or commercial products
such as Crystal Clear, Johnson Foam Clean or Windex.
Normal Operations
When you get up in the morning, open up the air control of the heater to high position to start the embers glowing. Place
three or four pieces of wood on top of the embers and leave the door open 25mm. Once the fuel starts to flame close
the door. As the heater starts to heat up (approx 20 minutes) begin reducing the air control towards a lower setting. You
will find you will only need to run the heater between low and medium to maintain the temperature you desire in your
home.
For best results it is best to burn 250mm long wood and load your wood straight into the firebox front to rear. This will
give optimum efficiency and recoverable heat, and minimise creosote formation and smoke emissions.
Placement of firebricks and sand layer in firebox
Installation (Continued)
Read these instructions
Angle Supports
Firebox
Oven
Soot tray
cover
Lip facing up at front
Support pins
“C” Angle iron bracket
Fire Bricks
Bevelled edge
12mm (approx)
layer of sand