Euro Appliances EFS900DTSX User manual
EMBRACE EUROPEAN QUALI+PASSION
www. eu roa ppli a nces.com .au
cooking
USE AND
CARE GUIDE
MODELNO.
EFS900DTSX
2
The appliance was designed and made in accordance with the European standards listed below:
=> EN 30-1-1, EN 30-2-1 and EN 437 plus subsequent amendments (gas)
=> EN 60 335-1 and EN 60 335-2-6 (electrical) plus relative amendments
The appliance complies with the prescriptions of the European Directives as below:
=> 2006/95 EC concerning electrical safety (BT).
=> 2004/108 EC concerning electromagnetic compatibility (EMC)
=> 2009/142/EC concerning gas safety.
Oven accessories that could come into contact with foodstuffs are made with materials that comply with
the provisions of the 89/109 EC directive dated 21/12/88.
This product complies with EU Directive 2002/96/EC.
The crossed-out dustbin symbol reported on the appliance indicates that the appliance must be disposed
of separately from other domestic refuse at the end of its useful life. It must therefore be delivered to a
ZDVWHUHF\FOLQJFHQWUHVSHFLÀFDOO\IRUHOHFWULFDQGHOHFWURQLFHTXLSPHQWRUUHWXUQHGWRWKHUHWDLOHUDWWKHmoment of purchase of a new equivalent appliance.
The user is responsible for delivering the appliance to the appropriate collection centre at the end of its
XVHIXOOLIH)DLOXUHWRGRVRPD\UHVXOWLQDÀQHDVSURYLGHGIRUE\ODZVJRYHUQLQJZDVWHGLVSRVDODifferential collection of waste products for eventual recycling, treatment and environmentally friendly
disposal helps reduce possible negative effects on the environment and health, and also enables the
materials making up the product to be recycled.
For more detailed information on the available refuse collection systems, refer to the local Municipal
Solid Waste disposal centre or the shop where the product was purchased.
3URGXFHUVDQGLPSRUWHUVDUHUHVSRQVLEOHIRUIXOÀOOLQJWKHLUREOLJDWLRQVDVUHJDUGVUHF\FOLQJWUHDWPHQWand environmentally friendly disposal by directly or indirectly participating in the collection system.

3
ASSISTANCE AND SPARE PARTS
Before this appliance left the factory it was tested and set by specialized, expert personnel in order to guarantee
the best functioning results.
Any subsequent repairs or adjustments that may be necessary must be done with the maximum of care and
attention by authorised personnel.
For this reason we recommend you always contact us (refer below), specifying the brand, model, serial number and
W\SHRISUREOHP\RXDUHKDYLQJZLWKLW<RXZLOO¿QGWKHUHODWLYHGDWDSULQWHGRQDODEHODI¿[HGRQWKHDSSOLDQFHDQGRQWKHODEHODI¿[HGWRWKHSDFNLQJER[IMPORTANT NOTICE
The manufacturer shall not be held responsible for any damage to persons or property caused by incorrect
installation or use of the appliance.
For prompt warranty service, please ensure that the warranty registration form is completed and return posted
to us.
$GXSOLFDWHGDWDODEHODQGZLULQJGLDJUDPDUHFRQWDLQHGLQWKLVERRNOHW3OHDVHDWWDFKWKHVHODEHOVWRDQaccessible surface near by the appliance for easy reference.
You can purchase original spare parts from authorised dealers or direct from us.
DOMESTIC USE ONLY
CONTENTS
ASSISTANCE AND SPARE PART 3
IMPORTANT NOTES AND PRECAUTIONS FOR USE 4-6
DESCRIPTION OF THE APPLIANCE 7-12
INSTRUCTIONS FOR THE USER 13-22
TROUBLESHOOTING 23
INSTRUCTIONS FOR THE INSTALLER 24-32
TECHNICAL FEATURES 33-40

4
IMPORTANT NOTES AND PRECAUTIONS FOR USE
You have purchased one of our
SURGXFWVIRUZKLFKZHWKDQN\RX:HDUHFRQ¿GHQWWKDWWKLVQHZDSSOLDQFHmodern, functional and practical, made
with top quality materials, will meet all
your demands. This new appliance
is easy to use but before installing
and using it, it is important to read
this handbook through carefully.
It provides information for a safe
installation, use and maintenance. Keep
WKLVKDQGERRNLQDVDIHSODFHIRUIXWXUHreference.
The manufacturer reserves the right
WRPDNHDOOWKHPRGLÀFDWLRQVWRLWVproducts that it deems necessary
or useful, also in your interests,
without prejudicing its essential
functional and safety characteristics.
The manufacturer cannot be held
responsible for any inaccuracies due to
printing or transcription errors that may
EHIRXQGLQWKLVKDQGERRNN.B.:WKHSLFWXUHVVKRZQLQWKH¿JXUHVLQWKLVKDQGERRNDUHSXUHO\LQGLFDWLYH• The installation, adjustments,
conversions and maintenance
operations listed in section
«INSTRUCTIONS FOR THE
INSTALLER» must only be carried out
by authorised personnel .
• The installation of all-gas and combi
appliances must comply with the
standards in force.
• The appliance must only be used for
LWVRULJLQDOSXUSRVHWKDWLVFRRNLQJfor domestic use. Any other use is
considered improper and, as such,
dangerous.
• The manufacturer cannot be held
responsible for any damage to
persons or property resulting from an
incorrect installation, maintenance or
use of the appliance.
2QFHWKHSDFNDJLQJKDVEHHQremoved from the outer surfaces and
the various inner parts, thoroughly
FKHFNWKDWWKHDSSOLDQFHLVLQSHUIHFWcondition. If you have any doubts do
not use the appliance and call in an
authorised person.
7KHSDFNDJLQJPDWHULDOVXVHG(cardboard, plastic bags, polystyrene
foam, nails, etc.) must not be
left within easy reach of children
because they are a potential hazard
VRXUFH$OOSDFNDJLQJPDWHULDOVXVHGare environmentally-friendly and
recyclable.
• The electrical safety of this appliance
is only guaranteed if it is correctly
connected to a suitable earth system,
as prescribed by the electrical
safety standards. The manufacturer
disclaims all responsibility if these
instructions are not followed. Should
\RXKDYHDQ\GRXEWVVHHNWKHassistance of an authorised person.
• Before connecting the appliance
ensure that the rating plate data
corresponds to that of the gas
and electricity supply (see section
«TECHNICAL FEATURES»).
•NOT FOR USE IN MARINE CRAFT,
CARAVANS OR MOBILE HOMES
UNLESS EACH BURNER IS FITTED
WITH A FLAME SAFEGUARD.
• DO NOT MODIFY THIS APPLIANCE
•DOMESTIC USE ONLY
During use the appliance becomes
KRW&DUHVKRXOGEHWDNHQWRDYRLGtouching heating elements inside the
oven.

5
WARNING - Accessible parts may
become hot during use. To avoid
EXUQV\RXQJFKLOGUHQVKRXOGEHNHSWaway.
WARNING - Accessible parts may
become hot when the grill is in use.
&KLOGUHQVKRXOGEHNHSWDZD\• The oven door glass and the
accessible parts will become hot
when in use. To avoid burns and
scalds young children should be
NHSWDZD\•Do not use this appliance as a space
heater.
•Do not touch any electrical appliance
if hands or feet are wet or damp.
•Do not use the appliance bare footed.
•Do notSXOOWKHSRZHUOHDGWRWDNHWKHSOXJRXWRIWKHVRFNHW•Do not leave the appliance outside
under the sun, rain, etc.
• This appliance is not intended for use
by persons (including children) with
reduced physical, sensory or mental
FDSDELOLWLHVRUODFNRIH[SHULHQFHDQGNQRZOHGJHXQOHVVWKH\KDYHbeen given supervision or instruction
concerning use of the appliance by a
person responsible for their safety.
• Children should be supervised to
ensure that they do not play with
the appliance. Cleaning and user
maintenance shall not be made by
children
•WARNING - ln order to prevent
accidental tipping of the appliance, for
example by a child climbing over the
open oven door, or too high weights
are leant on the open oven door, two
FKDLQVPXVWEHVFUHZHGRQWKHEDFNRQWKHFRRNHUDQG¿[HGWRWKHZDOOZLWKKRRNV(QVXUHWKHFKDLQVDUHWDXW3OHDVHUHIHUWRLQVWUXFWLRQVIRUinstallation.. %HIRUHFRRNLQJIRUWKH¿UVWWLPHensure the oven is empty and its door
closed, heat the oven at maximum
temperature for two hours. This
will allow the protective coating on
the interior of the oven to be burnt
off and dissipate the associated
smells. Ensure adequate ventilation
LQWKHNLWFKHQZKLOVWEXUQLQJRIIDQGdon’t be alarmed by a little bit of
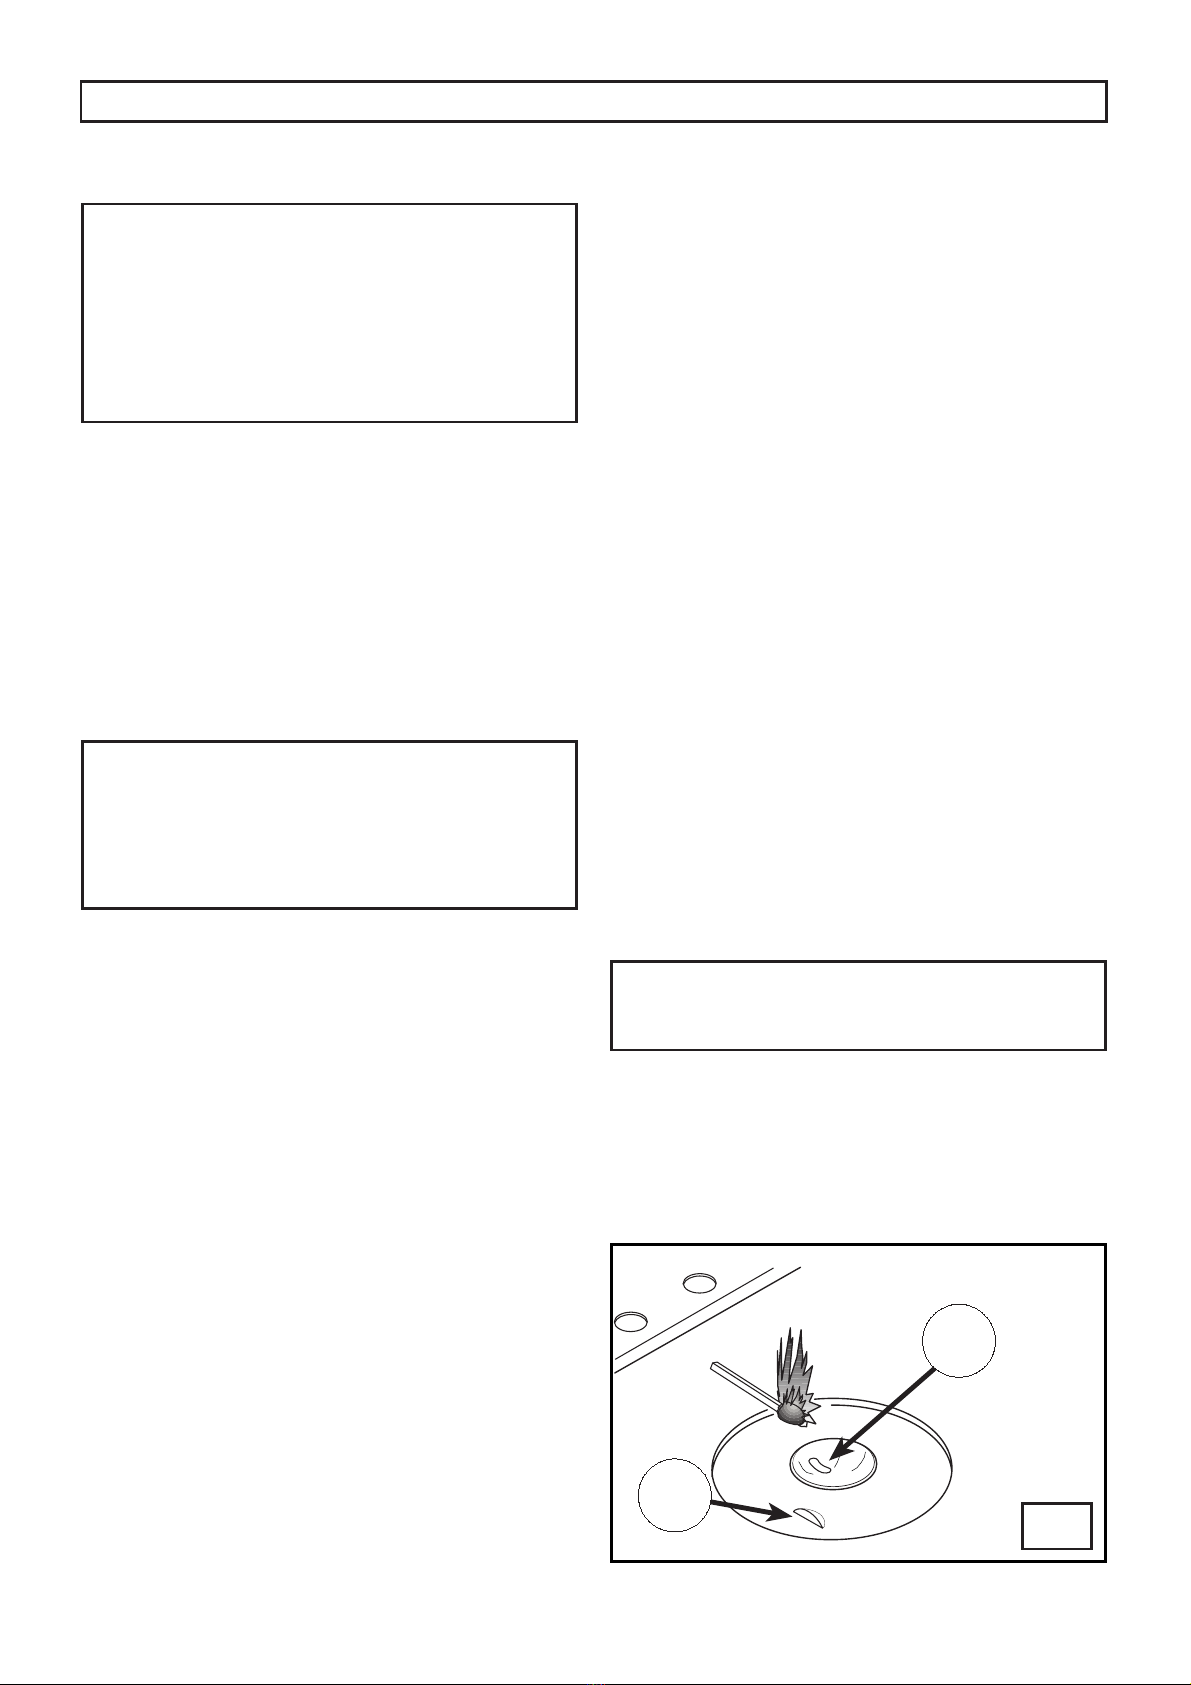
VPRNHGXULQJWKLVSURFHVV8QDWWHQGHGFRRNLQJRQDKREZLWKfat or oil can be dangerous and may
UHVXOWLQ¿UH1HYHUWU\WRH[WLQJXLVKD¿UHZLWKwater, but switch of the appliance
DQGWKHQFRYHUÀDPHHJZLWKDOLGHRUD¿UHEODQNHW'DQJHURI¿UH'RQRWVWRUHLWHPVRQWKHFRRNLQJVXUIDFHV•Do not use harsh abrasive cleaners
or sharp metal scrapers to clean
the oven glass door since they can
scratch the surface, which may
result in shattering of the glass.
• NEVER use sponges or abrasive
products, and solvents to remove
stains or adhesives on the painted
or stainless steel surfaces.
• Switch off the oven before removing
the fan guard for cleaning. Replace
the guard after cleaning in
accordance with the instructions.
• The oven can be equipped with
temperature probe. Only use the
temperature probe recommended
for this oven by our Service Centre.
• Remove any spillage from the lid
before opening.
IMPORTANT NOTES AND PRECAUTIONS FOR USE

6
• The appliance is not intended to be
operated by means of an external
timer or separate remote-control
system
• Ensure that the appliance is
switched off before replacing the
lamp to avoid the possibility of
HOHFWULFVKRFN•7KHFRRNHUVFDQEHHTXLSSHGZLWKa small compartment under the
oven that can be used for storing
things Remember that the surfaces
become hot, it is strictly forbidden to
SODFHLQÀDPPDEOHPDWHULDOVLQVLGH•Do not use a steam cleaner to
clean a hob, oven or range.
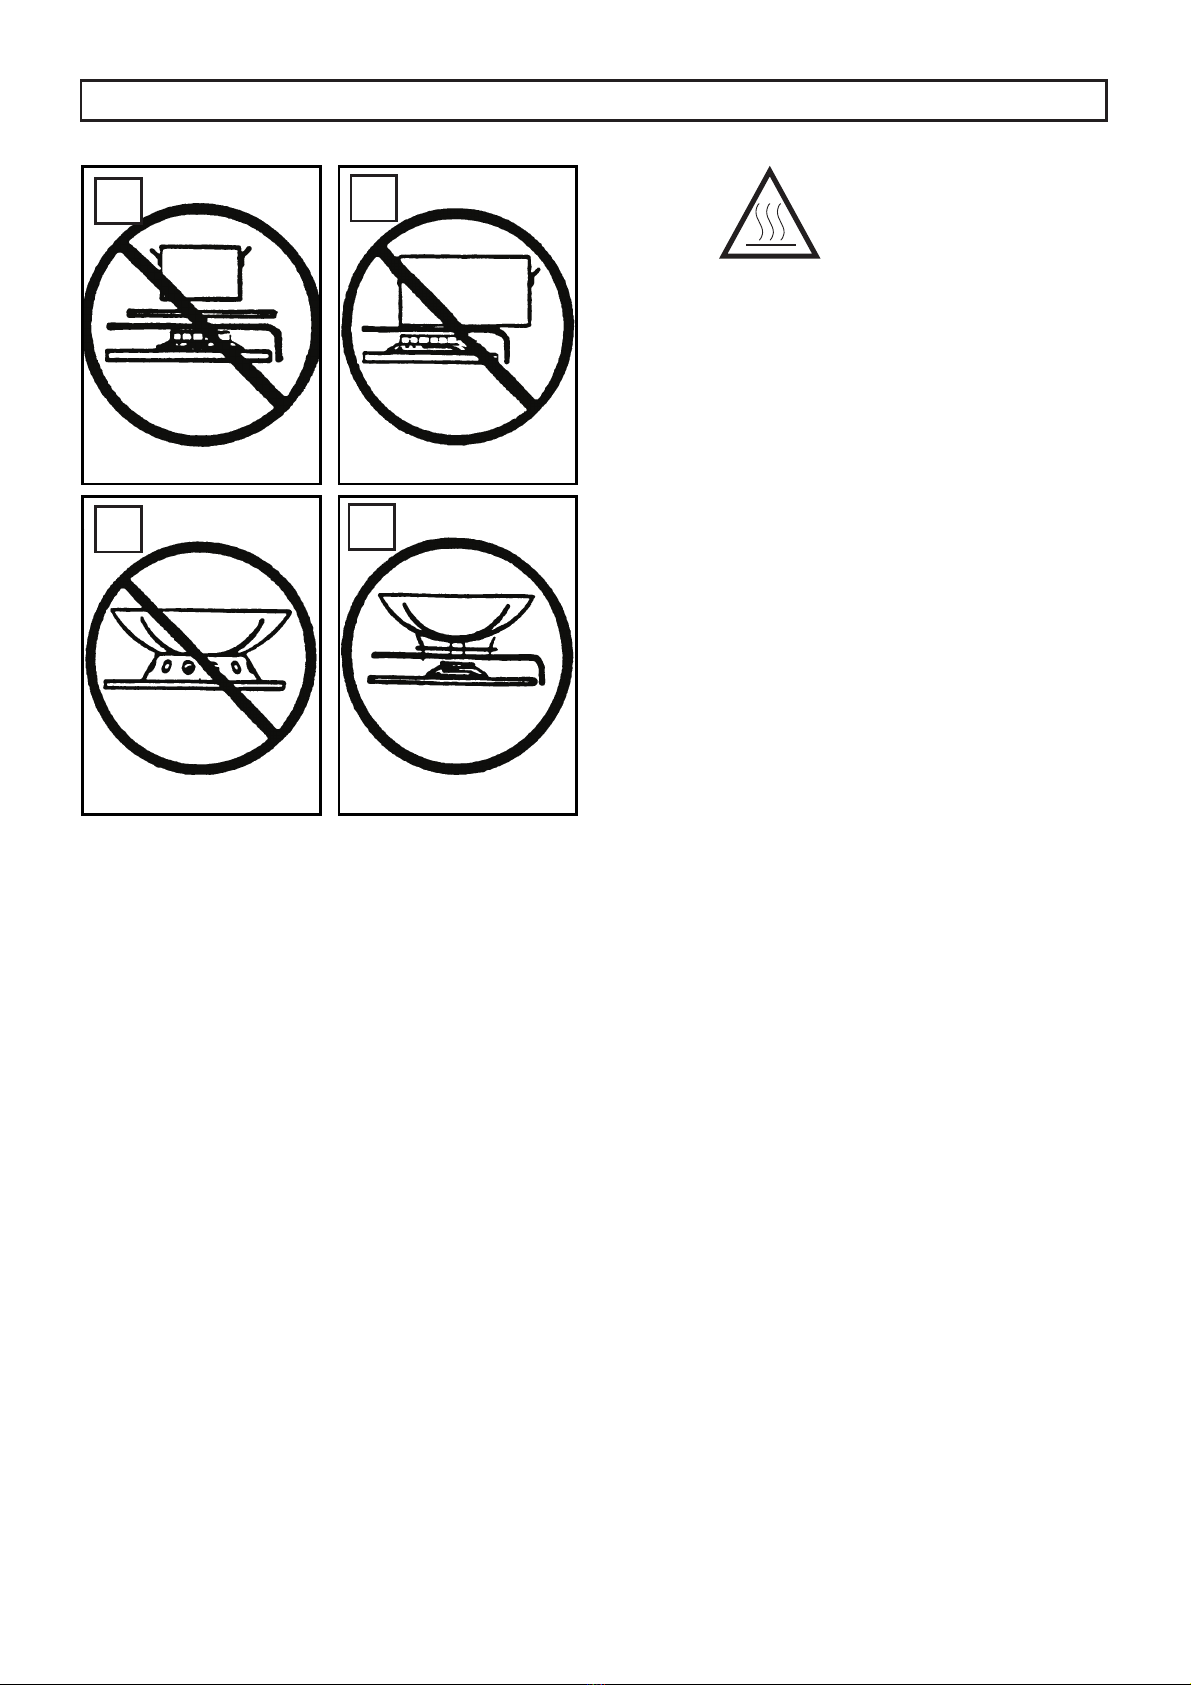
• The appliance is to be placed directly
RQWKHÀRRUDQGVKDOOQRWEHPRXQWHGon a base.
•,IWKHDSSOLDQFHLV¿WWHGZLWKDglass lid, this can shatter when
heated. Turn off all the burners or
disconnect all the plates, and allow
them to cool before closing the lid
¿J• Not suitable for installation or
RSHUDWLRQZLWKDIWHUPDUNHWOLGVRUcovers
• Avoid using the oven as a larder or as
a saucepan cupboard when you are
QRWXVLQJLWIRUFRRNLQJLIWKHRYHQLVturned on accidentally it could cause
damage and accidents.
,I\RXDUHXVLQJDQHOHFWULFDOVRFNHWQHDUWKHDSSOLDQFHPDNHVXUHWKDWWKHFDEOHVDUHQRWWRXFKLQJWKHFRRNHUand are far enough away from all hot
parts.
:KHQ\RXKDYH¿QLVKHGXVLQJWKHDSSOLDQFHFKHFNWKDWDOOWKHFRQWUROVDUHLQWKHRIIRUFORVHGSRVLWLRQFKHFNLQJWKDWWKH³´RIWKHNQREFRUUHVSRQGVWRthe “•” symbol serigraphed on the front
panel.
• Switch off the electrical supply before
you start cleaning or servicing the
appliance.
• In the case of a failure or malfunction,
turn the appliance off and switch off
the electrical supply and do not tamper
with it. All repairs or adjustments must
be carried out with maximum care and
the proper attention of an authorised
person.
• For this reason we recommend you
call our Service Centre.
IMPORTANT NOTES AND PRECAUTIONS FOR USE

7
PRESENTATION
2XUFRRNHULV¿WWHGZLWKDIXOO\JDVKRWSODWH7KLVinnovative burner hotplate offers you more scope and
YHUVDWLOLW\LQKRWSODWHFRRNLQJWKDQHYHUEHIRUH7KHround burners are graduated in their size and output
to provide the exact heat required for every style of
FRRNLQJ)RUH[DPSOHWKHODUJHRUZRNEXUQHUZLOOJLYH\RXWKHLQWHQVHKHDWUHTXLUHGIRUZRNFRRNHU\while the small simmer burner will handle the smallest
of saucepans with ease and safety. The low heat
VLPPHUVHWWLQJLVH[WUDRUGLQDULO\ORZVR\RXFDQFRRNthe most delicate sauces to perfection. This innovative,
yet very practical combination of burners allows you to
FRRNDQHQWLUHPHDORQWKHKRWSODWHDWRQFHDQGLVRIVSHFLDODVVLVWDQFHZKHQHQWHUWDLQLQJ(DFKNQRERQWKHfront panel has a diagram printed above it showing to
which burner it refers.
2XUFRRNHUVDUHÀWWHGZLWKDJDVRYHQEXUQHUDQGan electric grill or, at the same time, with a gas
oven and an electric oven multifunction.
The cookers can also be equipped with a cooling
fan in order to reduce further the temperatures
on the front controls, knobs, door handle and
electrical components. It starts automatically and
stops same minutes after the cooking end.
:LWKWKHDLGRIWKHIDQWKHRYHQFDQEHXVHGIRUQDWXUDOFRQYHFWLRQRUIRUFHGFRQYHFWLRQFRRNLQJTo guarantee
the customer a good and safe use of the appliance,
WKHFRRNHUVKDYHHTXLSSHGZLWKDVDIHW\WHPSHUDWXUHdevice, which automatically turns on in case the
PDLQWKHUPRVWDWIDLOVWRZRUN,QVXFKDQHYHQWWKHHOHFWULFLW\LVLQWHUUXSWHGWHPSRUDULO\do not attempt
to repair it yourself but turn the appliance off and
contact your nearest Assistance Centre.
DESCRIPTION OF THE APPLIANCE
1
2
7KHRYHQZDOOVDUH¿WWHGZLWKYDULRXVJXLGHEDUVRUUXQQHUV¿JRQZKLFKWKHIROORZLQJDFFHVVRULHVFDQbe placed. Supply and quantities vary from model
WRPRGHOÀJ•oven shelf rack (Gf). Ensure shelf is located with
dish and tray stop pointing upwards and at rear of
oven.
•food grill shelf (Gc) (*). Ensure shelf is located
with stop pointing upwards and at rear of oven.
•drip tray (V)
•handle (D)
•drip tray grid (E) (*)
(*) Only on certain models.
7KHFRRNHUVDUHHTXLSSHGZLWKDVPDOOFRPSDUWPHQWunder the oven that can be used for storing things.
Remember that the surfaces become hot, it is
VWULFWO\IRUELGGHQWRSODFHLQÁDPPDEOHPDWHULDOVinside.
8
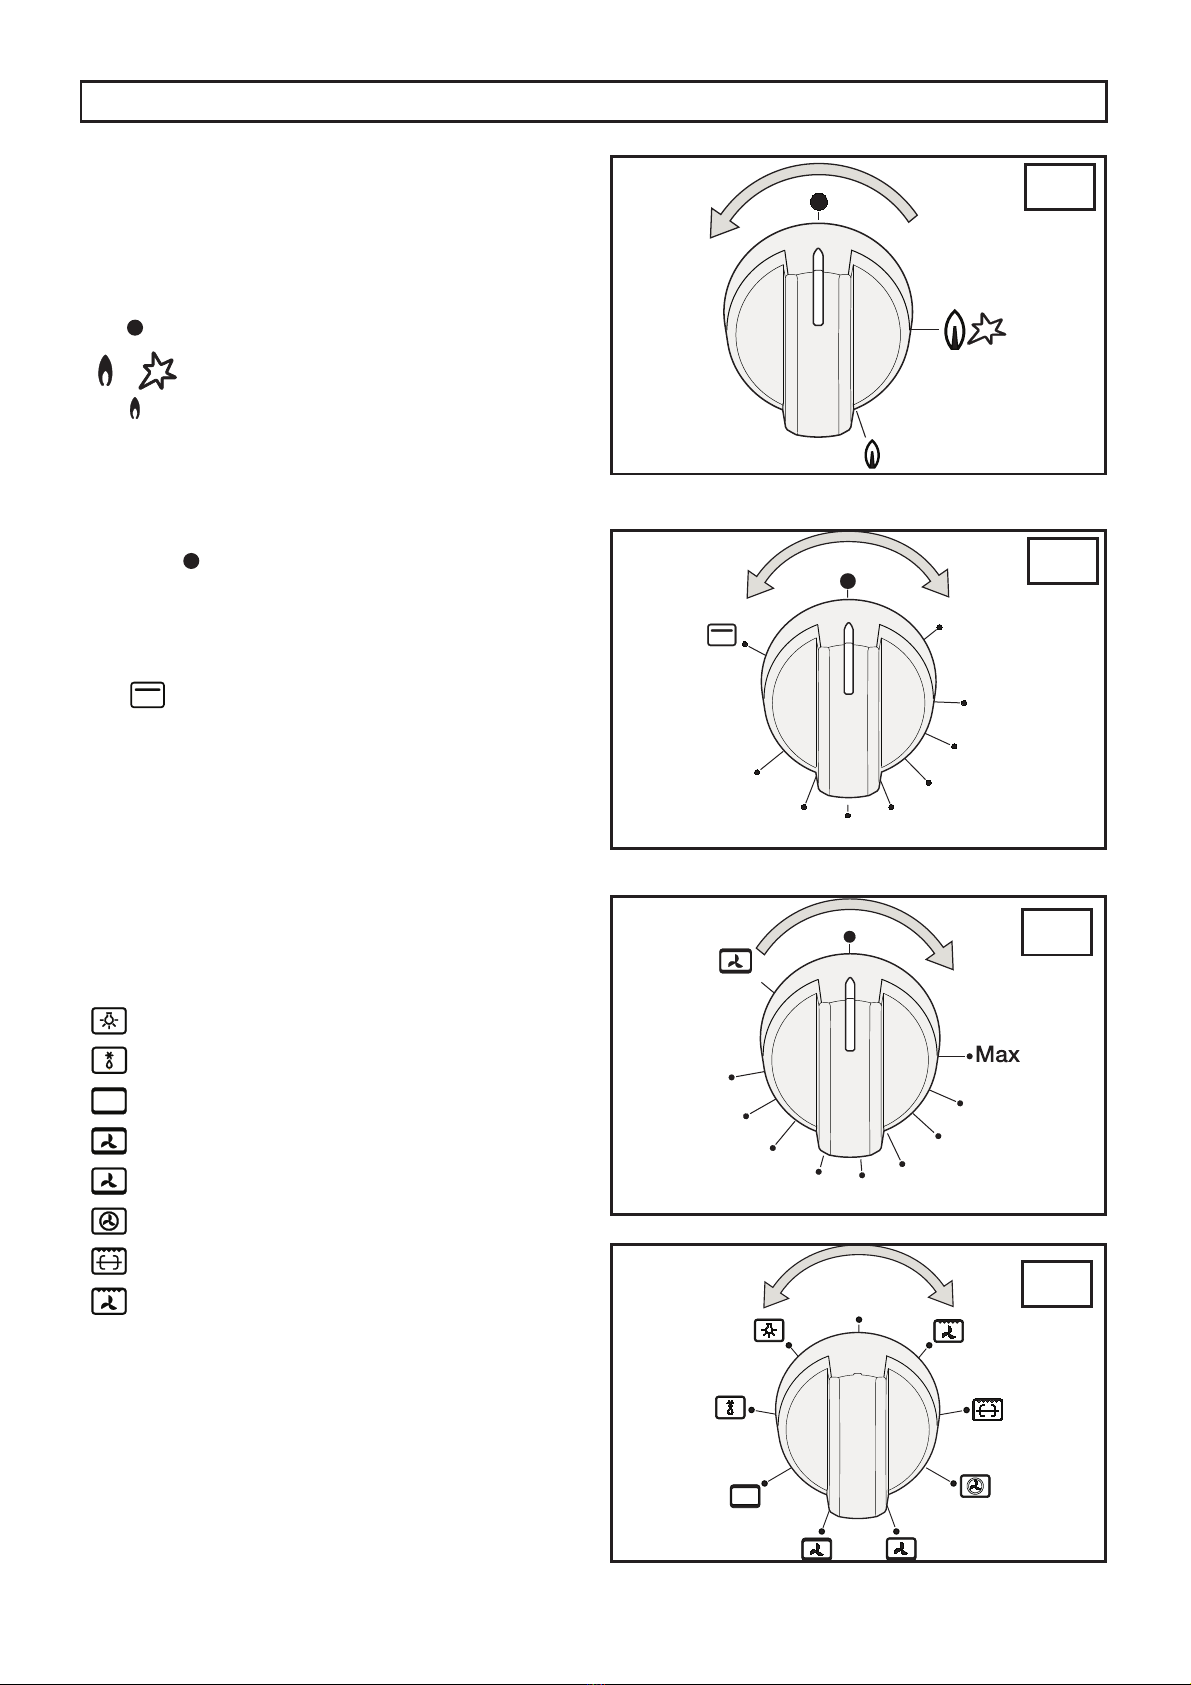
DESCRIPTION OF THE CONTROLS
HOB GAS BURNER KNOB (A)
%\URWDWLQJWKHNQRELQDQDQWLFORFNZLVHGLUHFWLRQWKHIROORZLQJV\PEROVDSSHDU= Closed position
= “Full on” position
= “Reduced rate or Low” position
GAS OVEN/ELECTRIC GRILL THERMOSTAT KNOB (B)
%\URWDWLQJWKHNQRELQDQDQWLFORFNZLVHGLUHFWLRQWKHIROORZLQJIXQFWLRQVDSSHDU= Closed position
from Min. to Maxi (260°C) = Oven temperatures
7XUQWKHNQREFORFNZLVHLI\RXZDQWWRXVHWKHHOHFWULFgrill
OVEN ELECTRIC THERMOSTAT KNOB (C)
%\WXUQLQJWKHRYHQNQREFORFNZLVHZHZLOO¿QGWKHdifferent oven temperature values (from 50°C to
Max).
OVEN FUNCTION SELECTOR KNOB (8) (D)
%\WXUQLQJWKHNQREWRWKHULJKWRUWRWKHOHIWZHZLOO¿QGWKHIROORZLQJV\PEROV0= Oven off
= Oven light on, which stays on for all functions
= Defrost
= Top and bottom heating elements
= Top and bottom heating elements and fan
= Bottom heating element and fan
= Fan forced heating element and fan
= Grill heating element + turnspit (*)
= Grill heating element and fan
(*) turnspit is only on some selected models
A
D
C
DESCRIPTION OF THE APPLIANCE
B

9
DESCRIPTION OF THE APPLIANCE
F
G
RED WARNING LIGHT
:KHQOLWLWLQGLFDWHVWKDWWKHHOHFWULFJULOOor one of the
oven electric components is on.
YELLOW WARNING LIGHT
:KHQOLWLWLQGLFDWHVWKDWHLWKHUWKHHOHFWULFRYHQRUHOHFWULFJULOOLVZRUNLQJ:KLOHWKHRYHQLVEHLQJXVHGthe light will switch off when the set temperature is
UHDFKHG'XULQJEDNLQJLWLVQRUPDOIRUWKH\HOORZOLJKWto switch on and off several times as the oven tempe-
rature is controlled.
SELECTOR KNOB LIGHT AND FAN MOTOR (E)
%\WXUQLQJWKHNQREWRWKHULJKWRUWRWKHOHIWZHZLOO¿QGWKHIROORZLQJV\PEROVENERGY REGULATOR KNOB (F-G)
%\WXUQLQJWKHNQREWRWKHULJKWZH¿QGWKHIROORZLQJV\PEROV0= heating elements off
from 1 to 12 = minimum and maximum power for single
FRRNLQJ]RQHfrom 12 to 0 PD[LPXPSRZHUIRUGRXEOHFRRNLQJ]RQHSWITCHING THE HEATING ELEMENTS
7KHFRRNLQJ]RQHVDUHFOHDUO\YLVLEOHRQWKHKREEHLQJcircular.
Only the inside of the circles traced on the glass is
heated.
The hob has a built-in warning light that switches on when
WKHWHPSHUDWXUHLQWKHFRRNLQJ]RQHH[FHHGV&7KLVwarning light will only switch off when the temperature in
WKHFRRNLQJ]RQHKDVJRQHEHORZWKLVYDOXHDQGLWLVIRUthis reason it is called the “residual heat warning”.
7KHKHDWLQJHOHPHQWVZLWKDVLQJOHFFRNLQJ]RQHDUHFRQWUROOHGE\HQHUJ\UHJXODWRUVZLWKSRVLWLRQV)WKDWpermit to obtain a big range of different temperatures.
7KHKHDWLQJHOHPHQWZLWKDGRXEOHFRRNLQJ]RQHDUHFRQWUROOHGE\SRVLWLRQHQHUJ\UHJXODWRUV*%\WXUQLQJWKHNQREIURPWRWKHSRZHUVRIWKH¿UVW]RQHRIFRRNLQJ³1” are regulated. By turning besides the
QXPEHUDUHOHDVHLWLVZDUQHGWKDWVLJQDOVWKHLQVHUWLRQRIWKHVHFRQG]RQHRIFRRNLQJ³2´¿J+,QWKLVSRVLWLRQERWKZRUNWKH]RQHRIFRRNLQJWRWKHPD[LPXPSRZHU%\WXUQLQJWKHNQREFRXQWHUFORFNZLVHto regulate its power.
Only returning on the position “0” the second zone of
FRRNLQJLVGLVFRQQHFWHGA red coloured warning light signals that the heating
elements are on.
H
E

10
DESCRIPTION OF THE APPLIANCE
ELECTRONIC CLOCK (L)
7KLVDFFHVVRU\IXQFWLRQVDVDFORFNDQGDPLQXWHcounter. The digital display always shows the time but
will display the minute counter time when this function
is set.
Setting the time (from 0.01 to 24.00 - hh,mm)
After connecting to the electricity mains or subsequent
WRDSRZHUFXWWKH¿JXUHV³´ZLOOÀDVKRQWKHGLVSOD\3UHVVSXVKEXWWRQDQGVWDUWVHWWLQJWKHFXUUHQWWLPHE\SUHVVLQJSXVKEXWWRQRU7KHIXQFWLRQZLOOVWDUWseconds after setting.
Minute counter (from 0.01 to 0.99 = hh,mm)
By selecting the time on the minute counter with push
EXWWRQWKLVIXQFWLRQZLOOEHDFWLYHDOORIWKHWLPHWLPHLVVHWLQVHFRQGXQLWV7KHWLPHZLOOGLVDSSHDUOHDYLQJthe minute counter time showing on the display and the
symbol lights up. Time is given in seconds during
countdown. At the end of the set time the buzzer goes
off, the symbol disappears and the time reappears.
You can see the time while the minute counter is
IXQFWLRQLQJE\SUHVVLQJSXVKEXWWRQBuzzer
The buzzer goes off at the end of the minute counter
IXQFWLRQDQGODVWVDERXWPLQXWHV7KHEX]]HUFDQEHVWRSSHGE\SUHVVLQJEXWWRQBuzzer intensity
7KHUHDUHWKUHHGLIIHUHQWEX]]HULQWHQVLWLHVWRVHOHFWWKHRQH\RXZDQWSUHVVSXVKEXWWRQZKHQWKHWLPHis displayed.
Correcting/cancelling the minute counter function
To correct or cancel the time set on the minute counter,
SUHVVNH\VDQGVLPXOWDQHRXVO\DQGWKHQUHOHDVHNH\¿UVW7KHWLPHFDQEHFRUUHFWHGDWDQ\PRPHQWE\SUHVVLQJSXVKEXWWRQIROORZHGE\RU
I
TIMER (I)
7RVHWFRRNLQJWLPH¿UVWZLQGWKHWLPHUXSE\WXUQLQJLWFRPSOHWHO\RQFHIURPOHIWWRULJKWDQGWKHQEDFNWRWKHnumber of minutes you want. The timer will ring when the
set time has elapsed.
L

11
ELECTRONIC PROGRAMMER TOUCH.
Setting the time.
After connecting to mains or after a power cut, sym-
ERO³$´DQGZLOOERWKÀDVKVLPXOWDQHRXVO\RQWKHdisplay.
Keep pressed for some seconds simultaneously +
and - buttons or just MODE button, till when symbol
“A” turn off.
Time can be set just when the dot between the num-
EHUVÀDVKHVProgram selection
Keep pressed for some seconds MODE button and
pressing it in turns, the following programs are selec-
WHGMinute Minder
The time turns off, the symbol
turns on and with +
and - buttons is possible to select the time alarm. At the
end of the set time, the buzzer will start and the symbol
ÀDVKHV7RWXUQRIIWKHEX]]HUDQGWXUQRIIWKHV\P-
bol keep pressed for some seconds MODE button.
The minute minder program runs independently of
other cooking programs.
DESCRIPTION OF THE APPLIANCE

12
ELECTRONIC PROGRAMMER
7KHSURJUDPPHUFDQVHOHFWWKHIROORZLQJIXQFWLRQV&ORFNVHWE\NH\VDQG- Minute counter VHWE\NH\&RRNLQJWLPHVHWE\NH\(QGRIFRRNLQJVHWE\NH\- Manual operation mode VHWE\NH\6HWWLQJWLPHEDFNZDUGVVHWE\NH\- Setting time forward VHWE\NH\The digital display (N) always shows the time and
FDQGLVSOD\FRRNLQJDQGHQGRIFRRNLQJWLPHRUWKHminute counter time by pressing the corresponding
push button.
N.B.: At the end of each setting session (except
for the minute counter) the programmer turns the
oven off. Check when next using the oven, if the
programmer is not going to be used, that the latter
is set on manual operation (see the instructions
given further on).
Setting the time (from 0.01 to 24.00 = hh,mm)
After connecting to the electricity mains or subsequent
WRDSRZHUFXW$872DQG³´ZLOOERWKÀDVKsimultaneously on the display.
3UHVVSXVKEXWWRQVDQGVLPXOWDQHRXVO\DQGVWDUWVHWWLQJWKHFXUUHQWWLPHE\SUHVVLQJSXVKEXWWRQRUOnce set the AUTO symbol will turn off and
the symbol, for manual operation, will turn on.
Minute counter (from 0.01 to 0.59 = hh,mm)
3UHVVSXVKEXWWRQDQGVHOHFWFRRNLQJWLPHZLWKSXVKEXWWRQRU7KHV\PEROWXUQVRQ$WWKHHQGRIthe set time the buzzer will go off and the symbol
turns off.
Semi-automatic operation
(with cooking time from 0.01 to 23.59 = hh,mm)
%\SUHVVLQJSXVKEXWWRQDQGVHWWLQJWKHOHQJWKRIFRRNLQJWLPHZLWKSXVKEXWWRQRUWKH$872DQGsymbols will light up and stay on all the time. At the end
of the set time the symbol will turn off, the AUTO
V\PEROZLOOÀDVKDQGWKHEX]]HUZLOOJRRIISemi-automatic operation
(with end of cooking time from 0.01 to 23.59 = hh,mm)
%\SUHVVLQJSXVKEXWWRQDQGVHWWLQJWKHHQGRIFRRNLQJWLPHZLWKSXVKEXWWRQWKH$872DQGsymbols will turn on and stay on all the time. At the end
of the set time the symbol will turn off, the AUTO
V\PEROZLOOÀDVKDQGWKHEX]]HUZLOOJRRIIAutomatic operation
(with the start of cooking time delayed)
)LUVWSURJUDPPHFRRNLQJWLPHERWKWKH$872and symbol will turn on) and then the end of
FRRNLQJWLPHWKHV\PEROZLOOWXUQRIIDVGHVFULEHGpreviously. The symbol will turn on again when
EDNLQJLQWKHRYHQVWDUWV$WWKHHQGRIFRRNLQJWLPHWKHV\PEROZLOOWXUQRIIWKH$872V\PEROZLOOÀDVKand the buzzer will go off.
Manual operation
Manual operation is only possible when the automatic
SURJUDPPLQJKDV¿QLVKHGRUDIWHUKDYLQJFDQFHOOHGLWE\SUHVVLQJSXVKEXWWRQ7KH$872V\PEROGLVDSSHDUVand the symbol turns on.
Buzzer
The buzzer will go off at the end of a programme or at
WKHHQGRIWKHPLQXWHFRXQWHUIXQFWLRQDQGODVWVDERXWminutes. The buzzer can be stopped by pressing one of
the function push buttons.
Programme start and control
The programme starts after setting. The programme
set can be controlled at any time by pressing the
corresponding push button.
Correcting/cancelling the programme setting
Anautomaticfunctionprogrammingerrorwilloccurifthetime
VKRZQRQWKHFORFNLVEHWZHHQWKHFRRNLQJVWDUWWLPHDQGFRRNLQJHQGWLPH7KLVHUURUZLOOEHVLJQDOOHGLPPHGLDWHO\E\DEX]]HUDQGWKH$872V\PEROZLOOÀDVK$VHWWLQJHUURUFDQEHFRUUHFWHGE\DOWHULQJWKHGXUDWLRQRUHQGRIFRRNLQJtime. Any programme that has been set can be corrected
at any time by pressing the corresponding programming
NH\DQGWKHQNH\RU7RFDQFHODSURJUDPPHFRUUHFWthe time set bringing it to a value of “0.00”. If functioning
time is cancelled the end of functioning is cancelled too
and vice versa. The oven turns off automatically and the
$872V\PEROÀDVKHV3UHVVNH\WRVHWWKHSURJUDPPHUon manual operation. The right time cannot be corrected
ZKHQWKHDXWRPDWLFRSHUDWLRQSURJUDPPHLVZRUNLQJDESCRIPTION OF THE APPLIANCE
13
INSTRUCTIONS FOR THE USER
HOB: GENERAL NOTES ON SAFETY
:KHQXVLQJWKHEXUQHUVGRQRWOHDYHWKHDSSOLDQFHXQVXSHUYLVHG(QVXUHWKDWFKLOGUHQDQGWKHLQ¿UPGRQRWSOD\ZLWKWKHDSSOLDQFH,QSDUWLFXODUPDNHsure that pan handles are positioned correctly and
VXSHUYLVHWKHFRRNLQJRIIRRGVZKLFKXVHRLOVDQGIDWVDVWKHVHDUHKLJKO\LQÀDPPDEOH• Do not use aerosols or sprays near the appliance
when it is in use.
• Even after use, the burners remain hot for a long
period; to avoid burning, do not place hands or
other objects on them.
• After using the appliance, ensure that all the controls
are in the closed or off position.
AUTOMATIC ELECTRIC IGNITION OF COOKTOP
BURNERS
3XVKWKHNQRE$which corresponds to burner to
be ignited and turn DQWLFORFNZLVHWRWKH³Full On”
positionWKHQGHSUHVVWKHFRQWURONQRE$XWRPDWLFDOO\WKHLJQLWLRQVSDUNVKRRWV,IWKHUHLVQRelectric power the burner may be lit with matches.
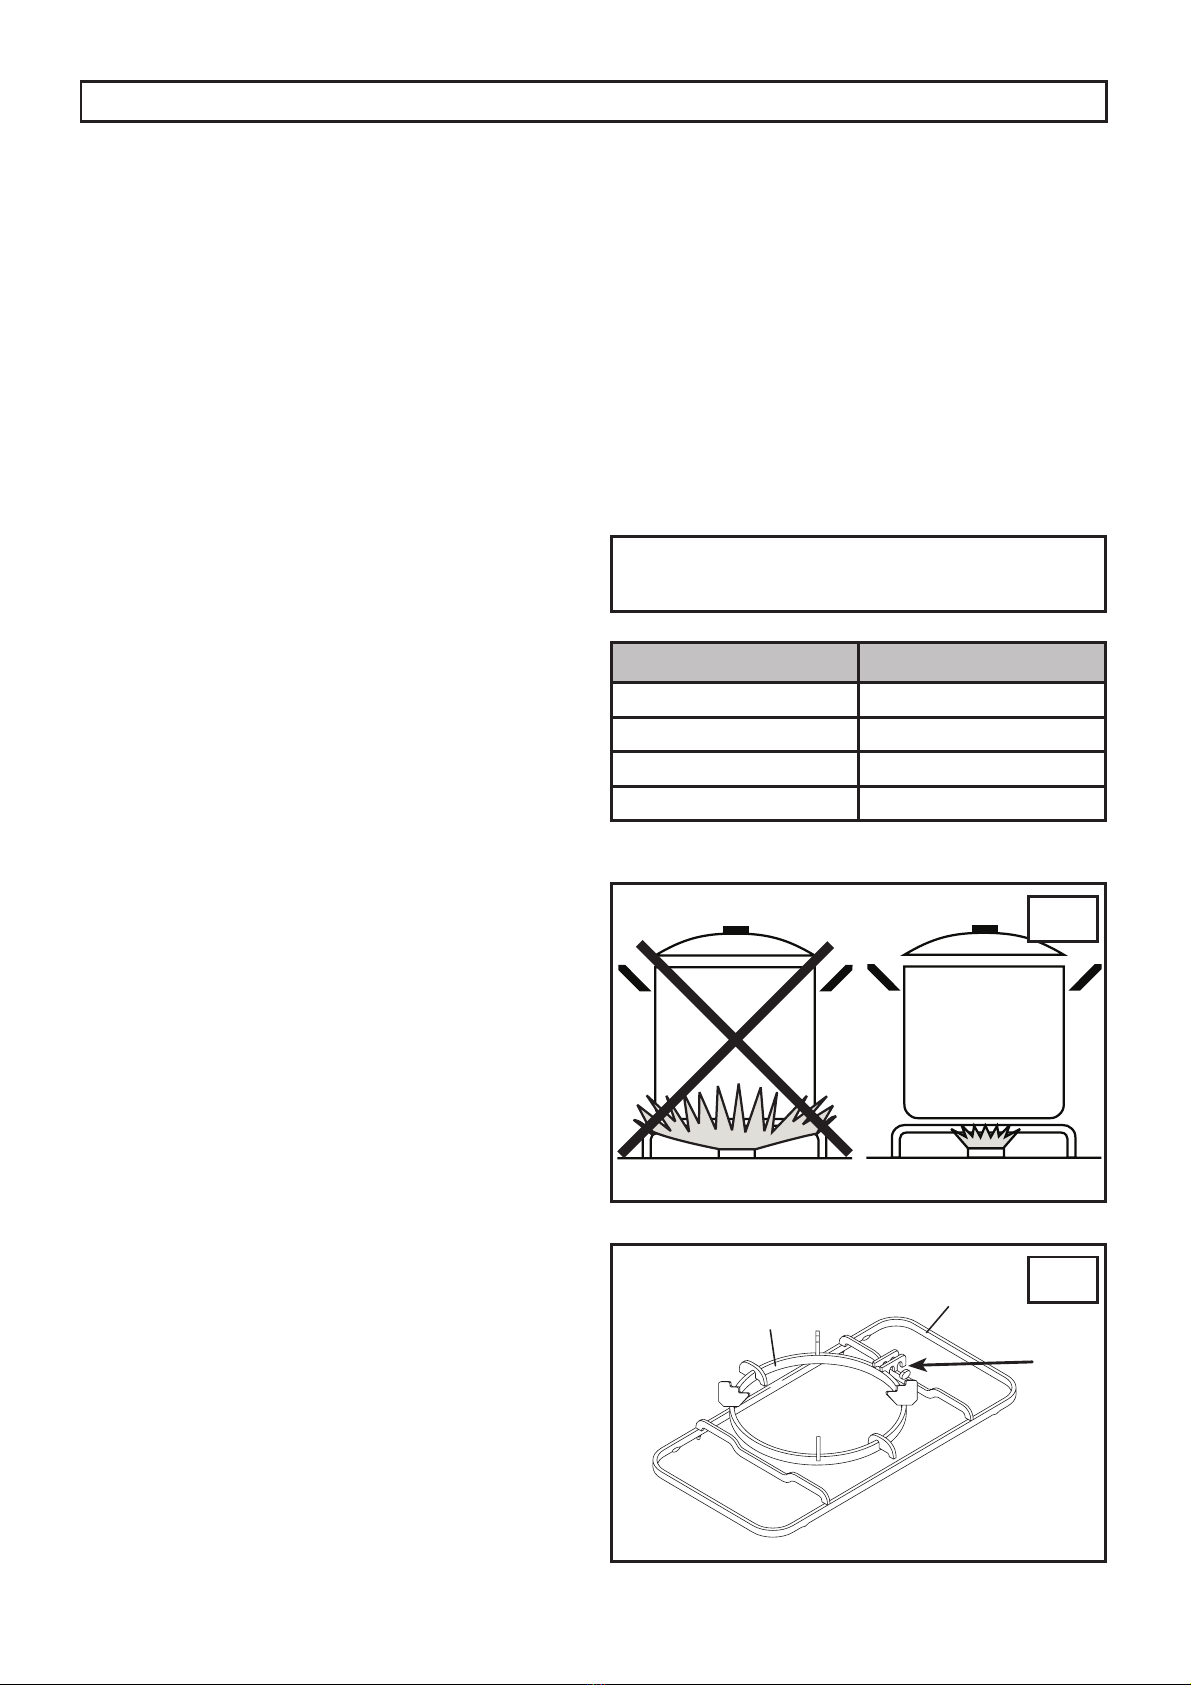
OPTIMUM USE OF COOKTOP BURNERS
,QRUGHUWRDFKLHYHPD[LPXPHI¿FLHQF\ZLWKPLQLPXPJDVFRQVXPSWLRQLWLVXVHIXOWRUHPHPEHU• Do not use large burners with pans of small diameter
LQRUGHUWRDYRLGÀDPHVVSUHDGLQJZLGHUWKDQSDQV(consult the following table) and always use pans
ZLWKOLGV¿J:KHQWKHERLOLQJSRLQWLVUHDFKHGLWLVEHVWWRWXUQWKHNQREWRWKH³Low position”.
• Avoid using over sized pans that may radiate
excessive heat and cause damage to surrounding
surfaces such as bench tops and glass lid.
• The appliance is equipped with a particular pan
VXSSRUWRQZKLFKPXVWEHSXWWKHZRNVXSSRUW7RHQVXUHVWDELOLW\SRVLWLRQWKHQRWFK$RIZRNVXSSRUWRQWKHSDQVXSSRUW¿QJHUVDVLQGLFDWHGLQ¿J'RQRWSODFHDQ\WKLQJHJÀDPHWDPHUDVEHVWRVmat, between pan and pan support, as serious
GDPDJHWRWKHDSSOLDQFHPD\UHVXOW¿J• Locate pan centrally over the burner so that is stable
DQGGRHVQRWRYHUKDQJWKHDSSOLDQFH¿J,IJDVEXUQVZLWKD\HOORZÀDPHGRQRWFRQWLQXHWRuse burner and arrange for service.
• Do not use burners without the proper pan support or
ZRNVWDQGDVWKLVZLOOFRQFHQWUDWHDQGGHÀHFWWKHKHDWRQWRWKHKRWSODWH¿JDQGVXUURXQGLQJVXUIDFHV•8VHRQO\DZRNVXSSRUWVXSSOLHGRUUHFRPPHQGHGE\WKHPDQXIDFWXUHURIWKHDSSOLDQFH¿JABNORMAL OPERATION
Any of the following are considered to be abnormal
RSHUDWLRQDQGPD\UHTXLUHVHUYLFLQJ<HOORZWLSSLQJRIWKHKREEXUQHUÀDPH6RRWLQJXSRIFRRNLQJXWHQVLOV• Burners not igniting properly.
• Burners failing to remain alight.
• Burners extinguished by the oven door.
*DVYDOYHVZKLFKDUHGLI¿FXOWWRWXUQIn case the appliance fails to operate correctly, contact
our Service Centre.
Warning: Servicing should be carried out only
by authorised personnel.
Burners Ø pan cm
:RNLarge Medium Small
3
4
14
INSTRUCTIONS FOR THE USER
6
8
5
7
• Never cover the base of the oven or the oven shelf
with aluminium foil or other materials, as this creates
D¿UHKD]DUG:KHQJULOOLQJDOZD\VSXWDOLWWOHZDWHULQWKHJULOOpan. The water prevents the grease from burning
DQGIURPJLYLQJRIIEDGVPHOOVDQGVPRNH$GGmore water during grilling to compensate for
evaporation.
• After using the appliance ensure that all the controls
are in the off position.
• WARNING - During and after use, the oven
door glass and the accessible parts will
become hot when in use. To avoid burns and
scalds children should be kept away.

15
INSTRUCTIONS FOR THE USER
GENERAL INFORMATION AND INSTRUCTIONS
FOR USING CERAMIC GLASS HOBS
&HUDPLFJODVVLVDQDWXUDOSURGXFWDQGOLNHDQ\RWKHUmaterial in ceramic, can have an uneven surface. You
might even see some bubbles inside the ceramic glass
LWVHOIWKHVHZLOOQRWLQÀXHQFHFRRNLQJRUWKHOLIHWLPHRIthe hob.
,OOXPLQDWLRQRIWKHVLQJOHFRRNLQJ]RQHVPLJKWGLIIHUThis depends on the technical characteristics of the
heating elements. This has absolutely no effect on
quality or operation.
$FFRUGLQJWRKRZ\RXORRNDWLWWKHLQFDQGHVFHQWKHDWLQJPLJKWDSSHDUWRJRRYHUWKHHGJHRIWKHFRRNLQJzone.
• Do not put very hot pans on the outer edge of the hob.
• Do not use pans with aluminum bottom.
'RQRWXVHWKHKREDVDZRUNWRSDQGWDNHFDUHQRWto let hard or sharp objects fall on it. The top could be
damaged.
• Do not put empty enamelled pans on the heat. Both
the bottom of the pan and the ceramic glass could be
damaged.
• Do not drag pans or other objects over the glass top
which could get scratched.
• Clean and dry the bottom of the pan before putting it on
the hob. Salt, sugar or grains of sand, for example, that
could be in greens, can scratch.
• Clean off immediately any spilled liquid.
'RQRWFRRNRUUHKHDWIRRGZUDSSHGLQWLQIRLORUSODVWLFcontainers. Both the tin foil and the plastic containers
M
Position of
knobs Heat intensity Possible cooking processes
0Off
1-2 Low To dissolve butter, chocolate, etc. To heat small amounts of liquid.
3-4 Moderate To heat greater quantities of liquid.
5-6 Slow Thawing frozen food and preparing stews, boiling or simmering.
7-8 Medium %ULQJLQJIRRGVWRERLOLQJSRLQW)RUGHOLFDWHURDVWVDQG¿VK9-10 Strong )RUURDVWVFKRSVDQGVWHDNV)RUODUJHDPRXQWVRIERLOHGPHDW11-12 Hot Bringing large amounts of water to the boil. Frying.
GOOD QUALITY
FLAT BASE
CONVEX
BASE TOO
CONCAVE
BASE
TOO
SMALL
TOO
LARGE 123$1ELEMENT
ZRXOGPHOWVWLFNLQJWRWKHKREN.B.: Using the glass scraper, push immediately away
from the cooking zone, any pieces of tin foil or plastic
objects that could have melted or stuck; likewise
sugar or sugary food spilled over during cooking.
+2:726$9((/(&75,&,7<ÀJ0To get the maximum yield with the minimum
FRQVXPSWLRQRIHOHFWULFLW\LWLVUHFRPPHQGHGWRNHHSWKHIROORZLQJSRLQWVLQPLQG• Switch the hob heating element on only after you
KDYHSXWWKHSDQRQWKHFRRNLQJ]RQHRUSODWH• Thoroughly dry the bottom of the pan before putting
LWRQWKHFRRNLQJ]RQHRUSODWH• Do not use pans with a diameter that is less than that
RIWKHFRRNLQJ]RQHRUSODWH:KHQ\RXDUHEX\LQJVDXFHSDQVNHHSLQPLQGWKDWWKHPDQXIDFWXUHUusually gives the largest diameter of the pan which
is normally bigger than the base diameter.
8VHSDQVZLWKÀDWWKLFNERWWRPV%RWWRPVWKDWDUHQRWÀDWZLOOPDNHFRRNLQJWLPHVORQJHU• Always put a lid on the pan.
,IFRRNLQJWLPHLVORQJHUWKDQPLQXWHV\RXFDQVZLWFKWKHSODWHRIIWRPLQXWHVEHIRUHWKHHQGRIFRRNLQJWLPHDQGPDNHXVHRIWKHUHVLGXDOKHDW• For your information only, the table gives hints on
KRZWRXVHWKHFRRNLQJ]RQHVDQGSODWHV

16
INSTRUCTIONS FOR THE USER
OVEN: GENERAL SAFETY INSTRUCTIONS
• Do not leave the oven unsupervised during use.
(QVXUHWKDWFKLOGUHQDQGWKHLQ¿UPGRQRWSOD\ZLWKthe appliance.
• Do not spray aerosols in the vicinity of this appliance
while it is operating.
• Always grip the centre of the oven door when
opening. Do not practice excessive pressures on
the door when it is open.
'RQRWVWRUHRUXVHÀDPPDEOHOLTXLGVRULWHPVLQWKHvicinity of this appliance.
• Do not worry if condensation forms on the door and
RQWKHLQWHUQDOZDOOVRIWKHRYHQGXULQJFRRNLQJ7KLVGRHVQRWFRPSURPLVHLWVHI¿FLHQF\:KHQRSHQLQJWKHRYHQGRRUEHYHU\FDUHIXORIscalding vapours.
• During use the appliance becomes hot. Care
VKRXOGEHWDNHQWRDYRLGWRXFKLQJKHDWLQJHOHPHQWVLQVLGHWKHRYHQ:HDURYHQJORYHVZKHQSODFLQJRUremoving pans from the oven or use WKHKDQGOH¿JSURYLGHG+RRNWKHKDQGOHWRWKHHGJHRIWKHWUD\and pull it out, slightly lifting it as you do so.
:KHQLQVHUWLQJRUUHPRYLQJIRRGIURPWKHRYHQFKHFNWKDWH[FHVVMXLFHVGRQRWRYHUÀRZRQWRWKHRYHQEDVHRLOVDQGIDWVDUHKLJKO\LQÀDPPDEOHwhen overheated).
• Use containers that will resist the temperatures
LQGLFDWHGRQWKHWKHUPRVWDWNQRE
17
HOW TO USE GAS OVEN
7KHRYHQEXUQHUFDQEHÀWWHGZLWKDVDIHW\thermocouple so, once the burner has been lit,
keep the knob pressed for about 15 seconds. If, at
the end of this time, the burner fails to light, release
the knob and wait at least 1 minute before trying
again. Should the burner turn out accidentally, turn
the knob round to the closed position and wait at
least 1 minute before lighting it again.
MANUAL IGNITION OF THE OVEN BURNER
Open the oven door SUHVVDQGWXUQWKHRYHQNQREFRXQWHUFORFNZLVHXQWLOLWUHDFKHVWRWKHPD[LPXPtemperature position, simultaneously placing a lighted
PDWFKWRWKHEXUQHUWKURXJKWKHKROH%¿JAUTOMATIC ELECTRIC IGNITION OF OVEN BURNER.
Open the oven dooUSXVKOLJKWO\WKHRYHQNQREDQGWXUQFRXQWHUFORFNZLVHXQWLOLWUHDFKHVWRWKHPD[LPXPWHPSHUDWXUHSRVLWLRQWKHQGHSUHVVWKHNQRE$XWRPDWLFDOO\WKHLJQLWLRQVSDUNVKRRWV0DWFKHVFDQEHXVHGWROLJKWWKHEXUQHUVLQDEODFNRXWAfter the oven burner has been lit (check through
WKHRSHQLQJ&ÀJWKDWLWKDVLJQLWHGDGMXVWthe temperature according to your needs . Close the
GRRUJHQWO\VRWKHÀDPHVZLOOQRWEORZRXWDQGZDLWPLQXWHVEHIRUHSXWWLQJDQ\IRRGLQWRFRRN2XURYHQFDQFRRNDOOIRRGVPHDW¿VKEUHDGSL]]DFDNHVHWFUSING THE OVEN
:LWKSODQQLQJDQGDFOHDUXQGHUVWDQGLQJRI\RXUDSSOLDQFH¶Vcharacteristics and capabilities you will be able to produce
superb results and larger than normal quantities. However
LQRUGHUWRREWDLQPD[LPXPHI¿FLHQF\LWLVXVHIXOWRUHPHPEHU•&RRNLQJWLPHVDQGVKHOISRVLWLRQVZLOOSUREDEO\EHdifferent from your previous oven. The size and type
RIGLVKHVXVHGZLOODIIHFWFRRNLQJWLPHVDQGWKHXVHRIDOXPLQLXPIRLOZLOOLQFUHDVHFRRNLQJWLPHV:HUHFRPPHQGGRLQJDWHVWEDNHDQGFRPSDULQJWKHtimes in the time and temperature chart to some of
\RXUIDYRXULWHUHFLSHV$GGWRGHJUHHV&ZKHQFRRNLQJODUJHUTXDQWLWLHV6KHOYHVDUHQXPEHUHGIURPWKHERWWRP¿J•Be sure to remove the enamelled grill tray when the
RYHQLVLQXVH,WLVQRWLQWHQGHGWREHXVHGIRUEDNLQJor roasting purposes and it can interfere with heat
distribution in the oven.
•Slightly more heat is generated from the bottom of the
oven upwards, with the top shelf being the marginally
cooler zone. This is the reverse of other ovens you may
KDYHXVHGDQGVRPHPLQRUDGMXVWPHQWWR\RXUFRRNLQJmethods with some dishes may be required. Most
EDNLQJZRXOGEHGRQHRQWKHPLGGOHVKHOYHVZLWKWKHContact our Service if assistance is required
with cooking results or thermostat operation
appears incorrect.
lower shelves being used for a greater degree of base
browning.
•$OZD\VSUHKHDWWKHRYHQZKHQFRRNLQJIUR]HQRUFKLOOHGfoods.
• Best results are achieved when preparing large
quantities or using two shelves simultaneously by
positioning serves with an «air space» around. More
HYHQFRRNLQJFDQEHPDGHSRVVLEOHLIWZRPHGLXPVL]HGEDNLQJWUD\VDUHXVHGSHUVKHOIOHDYLQJDFP«air space» between the trays and from the trays to the
RYHQZDOO$VLQJOHODUJHUWUD\PD\GLYHUWRUEORFNWKHXVXDOÀRZRIKRWDLUDURXQGWKHRYHQ:KHQXVLQJWZRshelves simultaneously allow an «air space» by leaving
one shelf space empty between.
•<RXFDQSODQEDWFKEDNLQJWRPDNHWKHPRVWHI¿FLHQWXVHRIWKHKRWWHUDQGFRROHU]RQHVE\FRRNLQJDGLIIHUHQWfood requiring slightly different temperature on each
VKHOIHJVPDOOFDNHVDQGVODEFDNHVRUWZRGLIIHUHQWtypes of biscuits (refer to the chart on TIME AND
TEMPERATURE CHART paragraph).
•Light weight, uncoated aluminium trays and pans are
UHFRPPHQGHGIRUJHQHUDOFRRNLQJ+HDY\JDXJHDQGGDUNFRORXUHGXWHQVLOVGRDWWUDFWH[WUDKHDWDQGPD\EHunsuitable for some foods.
•The aluminium can be easily corroded if it comes into
contact with organic acids present in the foods or added
GXULQJEDNLQJYLQHJDUOHPRQMXLFH7KHUHIRUHLWLVDGYLVHGnot to put directly the foods on aluminium or enamelled
WUD\VEXW$/:$<6XVHWKHSURSHURYHQSDSHU
9
INSTRUCTIONS FOR THE USER
18
HOW TO USE THE MULTIFUNCTION OVEN
DEFROSTING AT ROOM TEMPERATURE
7XUQWKHVHOHFWRUNQREWRWKHV\PERODQGSODFHWKHfood you want to defrost inside the oven.
The length of time required depends on the quantity
and type of food.
Selecting this function will only activate the fan. Mild
air circulation around frozen food will slowly defrost it.
,WLVSDUWLFXODUO\VXLWDEOHIRUIUXLWDQGFDNHVTRADITIONAL COOKING
7XUQWKHVHOHFWRUNQREWRWKHV\PERODQGDGMXVWWKHWKHUPRVWDWNQREWRWKHGHVLUHGWHPSHUDWXUHIf pre-heating is recommended wait till the thermostat
yellow warning light turns off before placing foods
inside the oven. This option turns on both bottom and
top heating units, evenly distributing heat on your
foods.
7KLVW\SHRIFRRNLQJLVLGHDOIRUDOONLQGRIIRRGVPHDWV¿VKEUHDGSL]]DVFDNHVCOMBINED TRADITIONAL + FAN
COOKING
7XUQWKHVHOHFWRUNQREWRWKHV\PERODQGDGMXVWWKHWKHUPRVWDWNQREWRWKHGHVLUHGWHPSHUDWXUHIf pre-heating is recommended wait till the thermostat
yellow warning light turns off before placing foods
inside the oven. This option turns on both bottom
and top heating units, and heat is distributed by fan
ventilation.
7KLVFRPELQDWLRQLVVXLWDEOHIRUUDSLGFRRNLQJDQGallows for the use of more plates positioned on the
different levels of the oven.
DEFROSTING + WARM UP BY HOT AIR
7XUQWKHVHOHFWRUNQREWRWKHV\PERODQGDGMXVWWKHWKHUPRVWDWNQREWRWKHGHVLUHGWHPSHUDWXUHWKHQplace the food inside the oven. Selecting this function
will activate the bottom heating unit and its heat is
distributed by the fan. This function is particularly
recommended to defrost and warm up ready-made
meals.
FAN FORCED COOKING
7XUQWKHVHOHFWRUNQREWRWKHV\PERODQGDGMXVWWKHWKHUPRVWDWNQREWRWKHGHVLUHGWHPSHUDWXUHWKHQplace your food inside the oven.
If pre-heating is recommended wait till the thermostat
yellow warning light turns off before placing foods
inside oven. This function activates the rear heating
unit and the fan distributes the heat produced. This
FRPELQDWLRQDOORZVIRUDIDVWDQGHYHQFRRNLQJRIseveral different foods placed on the diverse levels of
the oven.
CONVENTIONAL GRILL COOKING (turnspit
is only on some selected models)
7XUQWKHVHOHFWRUNQREWRWKHV\PERODQGDGMXVWWKHWKHUPRVWDWNQREWRWKHGHVLUHGWHPSHUDWXUHSelecting this function the top central heating element
turns on and heat is distributed directly on food
surface.
Apart from grilling, this function is ideal to add a golden
roast to your recipes or to toast bread slices.
FAN GRILL COOKING
7XUQWKHVHOHFWRUNQREWRWKHV\PERODQGDGMXVWWKHWKHUPRVWDWNQREWRWKHGHVLUHGWHPSHUDWXUHSelecting this function the top central heating
element turns on and heat is distributed by the fan.
This procedure mitigates the direct heat on food
surface and uses milder temperatures. It is therefore
UHFRPPHQGHGIRUDQHYHQJROGHQDQGFULVS\¿QLVKWRXFKLGHDOIRUZKROH¿VKDQGSRXOWU\:KHQ\RXXVHWKHJULOOGRQRWIRUJHWWRSODFHWKHdrip pan beneath it to collect any sauce dripping, as
VXJJHVWHGLQWKH³86()8/&22.,1*7,36³VHFWLRQINSTRUCTIONS FOR THE USER
COOKING WITH THE AID OF THE FAN
6RPHFRRNHUVFDQEHHTXLSSHGZLWKDIDQLQVWDOOHGin the rear part of the oven compartment. This can be
activated by pressing the fan switch .
After the fan has been activated, the heat will be
TXLFNO\DQGUHJXODUO\GLVWULEXWHGWKURXJKRXWWKHRYHQWKXVDOORZLQJGLIIHUHQWIRRGVWREHHYHQO\FRRNHGRQseveral shelves at the same time, also reducing the
FRRNLQJWLPHV

19
INSTRUCTIONS FOR THE USER
TIME AND TEMPERATURE CHART
7KHDERYHWDEOHJLYHVJXLGHOLQHVIRUFRRNLQJDUDQJHRIGLIIHUHQWIRRGVLQGLYLGXDOIRRGRUSHUVRQDOSUHIHUHQFHVPD\VOLJKWO\YDU\WKHRYHQSRVLWLRQWHPSHUDWXUHDQGFRRNLQJWLPHIURPWKRVHVXJJHVWHG3OHDVHQRWHWKDW$OOFRRNLQJWHPSHUDWXUHVVWDWHGUHIHUWRDSUHKHDWHGRYHQDOORZPLQXWHVIRUSUHKHDWLQJ7KHVKHOYHVDUHQXPEHUHGIURPWKHERWWRPLHWKHWRSVKHOILV6KHOIERWWRPVKHOILV6KHOI,IEDNLQJDODUJHUTXDQWLW\WKDQWKHH[DPSOHVKRZQLQWKHFKDUWVOLJKWO\LQFUHDVHWHPSHUDWXUHVDQGRUWLPH,IEDNLQJDVPDOOHUTXDQWLW\WKDQWKHH[DPSOHVOLJKWO\GHFUHDVHWKHWHPSHUDWXUHDQGRUWLPH5HPHQEHUWRUHPRYHJULOOWUD\IURPRYHQEHIRUHEDNLQJLQRYHQFOOD ITEM QUANTITY OVEN POSITION TEMPERATURE °C APPROXIMATE TIME
CAKES
3DWW\FDNHVSponges
%XWWHUFDNHVODE%RLOHGIUXLWFDNHFPWLQ5LFKIUXLWFDNHFPWLQRU6KHOIRU6KHOIRU6KHOIRU6KHOIRU6KHOIRUPLQVPLQVPLQVKUVKUVSCONES - plain 6KHOIPLQVBISCUITS
Anzacs
Burnt butter biscuits 6KHOIRU6KHOIRUPLQVPLQVMERINGUE - small 6KHOIRUòKUVallow to cool in oven
PASTRIES
&XVWDUGWDUWFPFruit pies - biscuit pastry,
GRXEOHFUXVWFRRNHG¿OOLQJSausages rolls 6KHOI6KHOIRUPLQVPLQVPLQVPIZZA\HDVWGRXJKFP6KHOIPLQVOVEN MEAL
Roast meat & vegetables
Fruit pies 6KHOIRU6KHOIRUas requested
PLQVBREAD ORDI6KHOIPLQVRETAIN THIS CHART FOR EASY REFERENCE
ROAST MEATS
0HDWVDUHJHQHUDOO\URDVWHGLQWKHFHQWUHRIWKHRYHQVKHOIEXWWKHSRVLWLRQPD\EHYDULHGDFFRUGLQJWRWKHVL]HRIWKHPHDWDQGWKHRWKHUIRRGVWREHFRRNHGDWWKHVDPHWLPH$PRGHUDWHWHPSHUDWXUHFDQEHXVHG&DOWKRXJKVXSHULRUUHVXOWVDUHRIWHQDFKLHYHGE\FRRNLQJPHDWTXLFNO\DWDKLJKWHPSHUDWXUHHJ&IRUPLQXWHVWRVHDUWKHPHDWWKHQFRPSOHWHWKHFRRNLQJRQDPRGHUDWHKHDW7XUNH\RURWKHUYHU\ODUJHMRLQWVRIPHDWPD\EHFRRNHGDWORZHUWKDQPRGHUDWHWHPSHUDWXUHV

20
INSTRUCTIONS FOR THE USER
USEFUL COOKING TIPS
Cakes and bread:
+HDWWKHRYHQIRUDWOHDVWPLQXWHVEHIRUH\RXVWDUWFRRNLQJEUHDGRUFDNHV'RQRWRSHQWKHGRRUGXULQJEDNLQJEHFDXVHWKHcold air would stop the yeast from rising.
:KHQWKHFDNHLVFRRNHGWXUQWKHRYHQRIIDQGOHDYHLWLQIRUDERXWPLQXWHV• Do not use the enamelled oven tray or drip pan,
VXSSOLHGZLWKWKHRYHQWRFRRNFDNHVLQ+RZGR\RXNQRZZKHQWKHFDNHLVFRRNHG"$ERXWPLQXWHVEHIRUHWKHHQGRIFRRNLQJWLPHSXWDFDNHWHVWHURUVNHZHULQWKHKLJKHVWSDUWRIWKHFDNH,ILWFRPHVRXWFOHDQWKHFDNHLVFRRNHG$QGLIWKHFDNHVLQNV"7KHQH[WWLPHXVHOHVVOLTXLGVRUORZHUWKHWHPSHUDWXUH&,IWKHFDNHLVWRRGU\0DNHVRPHWLQ\KROHVZLWKDWRRWKSLFNDQGSRXUVRPHGURSVRIIUXLWjuice or spirits on it. The next time, increase the
WHPSHUDWXUH&DQGVHWDVKRUWHUFRRNLQJtime.
,IWKHFDNHLVWRRGDUNRQWRSWKHQH[WWLPHSXWWKHFDNHRQDORZHUVKHOIFRRNLWDWDORZHUtemperature and longer.
,IWKHWRSRIWKHFDNHLVEXUQWFXWRIIWKHEXUQWOD\HUand cover with sugar or decorate it with cream,
jam, confectioner’s cream, etc..
,IWKHFDNHLVWRRGDUNXQGHUQHDWKWKHQH[WWLPHSODFHLWRQDKLJKHUVKHOIDQGFRRNLWDWDORZHUtemperature.
,IWKHFDNHRUEUHDGLVFRRNHGQLFHO\RXWVLGHEXWLVVWLOOXQFRRNHGLQVLGHWKHQH[WWLPHXVHOHVVOLTXLGVFRRNDWDORZHUWHPSHUDWXUHDQGORQJHU,IWKHFDNHZLOOQRWFRPHRXWRIWKHWLQVOLGHDNQLIHDURXQGWKHHGJHVSODFHDGDPSFORWKRYHUWKHFDNHDQGWXUQWKHWLQXSVLGHGRZQ7KHQH[WWLPHJUHDVHWKHWLQZHOODQGVSULQNOHLWZLWKÀRXURUbread crumbs.
,IWKHELVFXLWVZLOOQRWFRPHDZD\IURPWKHEDNLQJWUD\SXWWKHWUD\EDFNLQWKHRYHQIRUDZKLOHDQGlift the biscuits up before they cool. The next time
XVHDVKHHWRIEDNLQJSDUFKPHQWWRSUHYHQWWKLVhappening again.
Meat:
,IZKHQFRRNLQJPHDWWKHWLPHQHHGHGLVPRUHWKDQPLQXWHVWXUQWKHRYHQRIIPLQXWHVEHIRUHWKHHQGRIFRRNLQJWLPHWRH[SORLWWKHresidual heat (energy saving).
<RXUURDVWZLOOEHMXLFLHULIFRRNHGLQDFORVHGSDQLWZLOOEHFULVSLHULIFRRNHGZLWKRXWDOLG1RUPDOO\ZKLWHPHDWSRXOWU\DQG¿VKQHHGPHGLXPWHPSHUDWXUHVOHVVWKDQ&7RFRRN³UDUH´UHGPHDWVKLJKWHPSHUDWXUHVRYHU&DQGVKRUWFRRNLQJWLPHVDUHQHHGHG• For a tasty roast, lard and spice the meat.
,I\RXUURDVWLVWRXJKWKHQH[WWLPHOHDYHWKHPHDWto ripen longer.
,I\RXUURDVWLVWRRGDUNRQWRSRUXQGHUQHDWKWKHnext time put it on a higher or lower shelf, lower
WKHWHPSHUDWXUHDQGFRRNORQJHU<RXUURDVWLVXQGHUGRQH"&XWLWLQVOLFHVDUUDQJHWKHVOLFHVRQDEDNLQJWUD\ZLWKWKHJUDY\DQG¿QLVKFRRNLQJLWGrilling:
6SDULQJO\JUHDVHDQGÀDYRXUWKHIRRGEHIRUHgrilling it.
• Always use the grill pan to catch the juices that drip
IURPWKHPHDWGXULQJJULOOLQJ¿J• Always put a little water in the drip pan. The water
prevents the grease from burning and from giving
RIIEDGVPHOOVDQGVPRNH$GGPRUHZDWHUGXULQJFRRNLQJEHFDXVHLWHYDSRUDWHV7XUQWKHIRRGKDOIZD\WKURXJKFRRNLQJ• If you are grilling fatty poultry (goose) pierce the
VNLQVRWKHIDWFDQGULSDZD\The aluminium can be easily corroded if it
comes into contact with organic acids present
in the foods or added during baking (vinegar,
lemon juice). Therefore it is advised not to put
directly the foods on aluminium or enamelled
trays, but ALWAYS use the proper oven paper.
Table of contents
Other Euro Appliances Range manuals


