EURO EV600EESX User manual

USAGE AND
CARE GUIDE
PRODUCT CODE:
cooking
EV600EESX


SAVE THIS INSTRUCTION AT SAFETY PLACE FOR FUTURE
REFERENCE
Important Safety Warning
THESE WARNINGS ARE PROVIDED IN THE INTEREST OF SAFETY. PLEASE READ
THEM
CAREFULLY BEFORE INSTALLING OR USING THE APPLIANCE.
To maintain the EFFICIENCY and SAFETY of this appliance, we recommend:
•Call only the Service Centers authorized by store where you buy the cooker
Always use original Spare Parts
•
1. This appliance is intended for non-professional use within
the home.
2. Before using the appliance, read the instru ctions in this owne
r’s manual carefully since you should find all the in struction you
require to ensure safe installation, use and maintenance.
Always keep this owner’s manual clos e to hand since you may
need to refer to it in the future.
3. After remove the packing, check that the appliance is not
damaged. If you have any doubts, do not use the appliance,
contact your nearest Servic e Centre of the store where you
buy the appliance Never leave the packing components
(plastic bags, foamed polystyrene, nails, etc.) within the
reach of children since they are a source of potential danger.
Thank you for choosing us! Please read all instructions before using this appliance. This book contains
valuable information about operation, care and service.Keep it in a safe place for future reference. Should
the appliance be sold or transferred to another owner, or should you move house and leave the appliance,
always ensure that the book is supplied with the appliance in order that new owner can be acquainted with
the functioning of the appliance and relevant warnings.
4. The appliance must be installed only by a qualified person in
compliance with the instructions provided. The manufacturer
declines all responsibility for improper installation which may
harm persons and animals and damage property.
2

6.The electrical safety of this appliance can only be guaranteed
7.Check that the electrical capacity of the system and sockets
will support the maximum power of the hob, as indicated on
the rating label. If you have any doubts, call in a qualified
technician.
8.When the cooker is first used an odour may be emitted, this
9.Ensure that the appliance is switched off before maintenance,
by switching off the main switches and turning all knobs to
“OFF” position.
10.
The openings and slota used for ventilation and dispersion of
heat on the rear and below the control panel must never be
covered.
11.
The user must not replace the supply cable of this appliance.
Always call an after-sales servicing centre authorized by the
seller in the case of cable damage or replacement.
if the cooker is correctly and efficiently earthed, in compliance
with current regulations on electrical safety. Always ensure
that the earthing is efficient; if you have any doubts call in a
qualified electrician to check the system. The manufacturer
declines all responsibility for damage resulting from a system
which has not been earthed.
will cease after a period of use. When first using the cooker,
ensures that the room is well ventilated (e.g. open a window or
use an extractor fan) and that persons who may be sensitive
to the odour avoid any fumes. It is suggested that any pets be
removed from the room until the smell has ceased. This odour
is due to temporary finish on oven liners and elements and
also any moisture absorbed by the insulation.
3
This appliance is not intended for use by persons (including
children) with reduced physical, sensory or mental
capabilities, or lack of experience and knowledge, unless
they have been given supervision or instruction concerning
use of the appliance by a person responsible for their safety.
Children should be supervised to ensure that they do not play
with the appliance.
5.
A numbe of fundamental rules mu eb ts followed when
. hands or feet are wet.
18.arts of this appliance, cooking surfaces, retain heat for
19. Never use flammable liquids such as alcohol or gasoline,
etc. near the appliance when it is in use.
. Do not use the appliance barefooted.
. Never allow the Mains
Cable to be stretched , pulled or
damaged if the cooker is moved for cleaning etc.
. Do not use the cooker if the Mains Cable is damaged, consults
a qualified electrician.
. Do not allow the cooker to be used unsupervised by children
or persons unfamiliar with it.
. Do not grill to open the door.
12.This appliance must be used for the purpose for
which it
was
using acir tcele l appliances. The
followings are of particular
importance:
14.Always switch off the electrical supply to the cooker and
15.WARNING Ensure that the appliance is switched off before
replacing the lamp to avoid the possibility of electric shock.
16.To avoid accidental spillage do not use cookware with
uneven or deformed bottoms on the burners or on the electrical
plates.
17. care should be taken when using chip pans etc.
should not be used unattended since overheated oil may
in order to avoid splashing or spillage of hot oil. They
boil
overand could also ignite.
cons iderable periods after switching off. Care should,
therefore, be taken when touching these areas before they
hav e completely cooled down.
expressly designed. Any other use is considered to be
improper and consequently dangerous. The manufacturer
declines all responsibility for damage resulting from improper
and irresponsible use.
allow it to cool down before carrying out any cleaning operations
etc.
4

28. A steam cleaner is not to be used.
29. Accessible parts may become hot during use.
Young children should be kept away.
The appliance is not intended to be operated by means of
an external timer or separate remote-control system.
cooking on a hob with fat or o il
can be dangerous and may result in fire.
20. When using small electric appliances near the hob,
keep
t
he supply cord away from the hot parts.
try to extinguish a fire with water, but switch off
the appliance and then cover flame e.g. with a li d or a fire
blanket.
21.
ake sure the knobs are in its “OFF” position when the
22. When the appliance is in use, the heating elements and
25.Do not use harsh abrasive cleaner or sharp matal scrapers to
26. Any spillage should be removed from the lid before opening
27.If the surface is cracked, switch off the appliance to avoid
the possibil ity of electric shock. (If the hob surface is of
glass-ceramic or similar material and protects live parts.)
some parts of the oven door become extremely hot. Make
sure you don't touch them and keep children well away.
and the hob surface should be allowed to cool before closing
the lid.
clean the oven door glass since they can scratch the surface,
which may result in shattering of the glass.
24. The appliance that you have bought may be slightly different
from the one illustrated in this manual. Please refer to the
information related to the model you have.
23.If you use the power code for single phase, the minimum
cross-sectional area is 4mm 2 . For three phases, the minimum
cross-sectional area is 2.5 mm2.
appliance is not in use. Also make all potentiall
ydangerous
parts of the appliance, safe, above all for children who
could play with the appliance.
5

CAUTION: The cooking process has to be supe rvised. A
short term cooking process has to be supervised
continuously
WARNING: Danger of fire: do not store items on the cooking
surfaces.
32.WARNING:Use only hob gusrds designed by the manufacturer
33.WARNING:The appliance and its accessible parts become
hot during use.
Care should be taken to avoid touching heating elements.
Children shall be kept away unless continuously
of the cooking appliance or indicated by the manufacturer of the
appliance in the instructions for use as use of inappropriate
guards can cause accidents.suitable or hob guards incorporated
in the appliance. The use of inappropriate guards can cause
accidents.
6
supervised.
If the supply cord is damaged, it must be replaced by the
manufacturer, its service agent or similarly qualified persons
in order to avoid a hazard.

Installation
This unit may be installed and used only in permanently ventilated rooms:
Unpacking
a)
b)
c)
Installation
b)
c)
d)
e)
f)
g)
h)
The following instructions should be read by a qualified technician to ensure that the appliance
is installed, regulated and technically serviced correctly in compliance with current regulations.
Important: remember to disconnect the appliance from electricity by turn off the mains before
regulating the appliance or carrying out any maintenance work.
Positioning
Important: The hob should never be installed in proximity of a door access. People opening
and closing the door could come into contact with pots or pans cooking on the hob.
Be careful
when
unpacking
and
installing
the
appliance.Sharp
edges might
cause accidents.
The oven is heavy and care must be taken when moving it. Ensure that all packing,
both inside and outside the cooker, has been removed before the oven is used.
Unpack the oven from the carton, check and make sure it has not been damaged in any
way.If you have any doubts, do not use it, contact the service center or where you buy the
oven.
The cooker is desig ned to fit between kitchen cabinets. The space either side need only be
sufficient to allow withdrawal of the cooker for servicing. It can be used with cabinet one side or
both as well as in a corner setting. It can also be used free-standing.
The appliances can be installed next to furniture units which are no taller than the top of the
cooker hobs. If the cooker is placed touching walls or sides of neighboring cabinets, these must
be capable of withstanding a temperature rise of 50 °C above room temperature.For a correct
installation of the cooker the following precautions must be followed:
a)
The cooker may be located in a kitchen, a diner or bed sitting room, but not in a bathroom or
shower room.
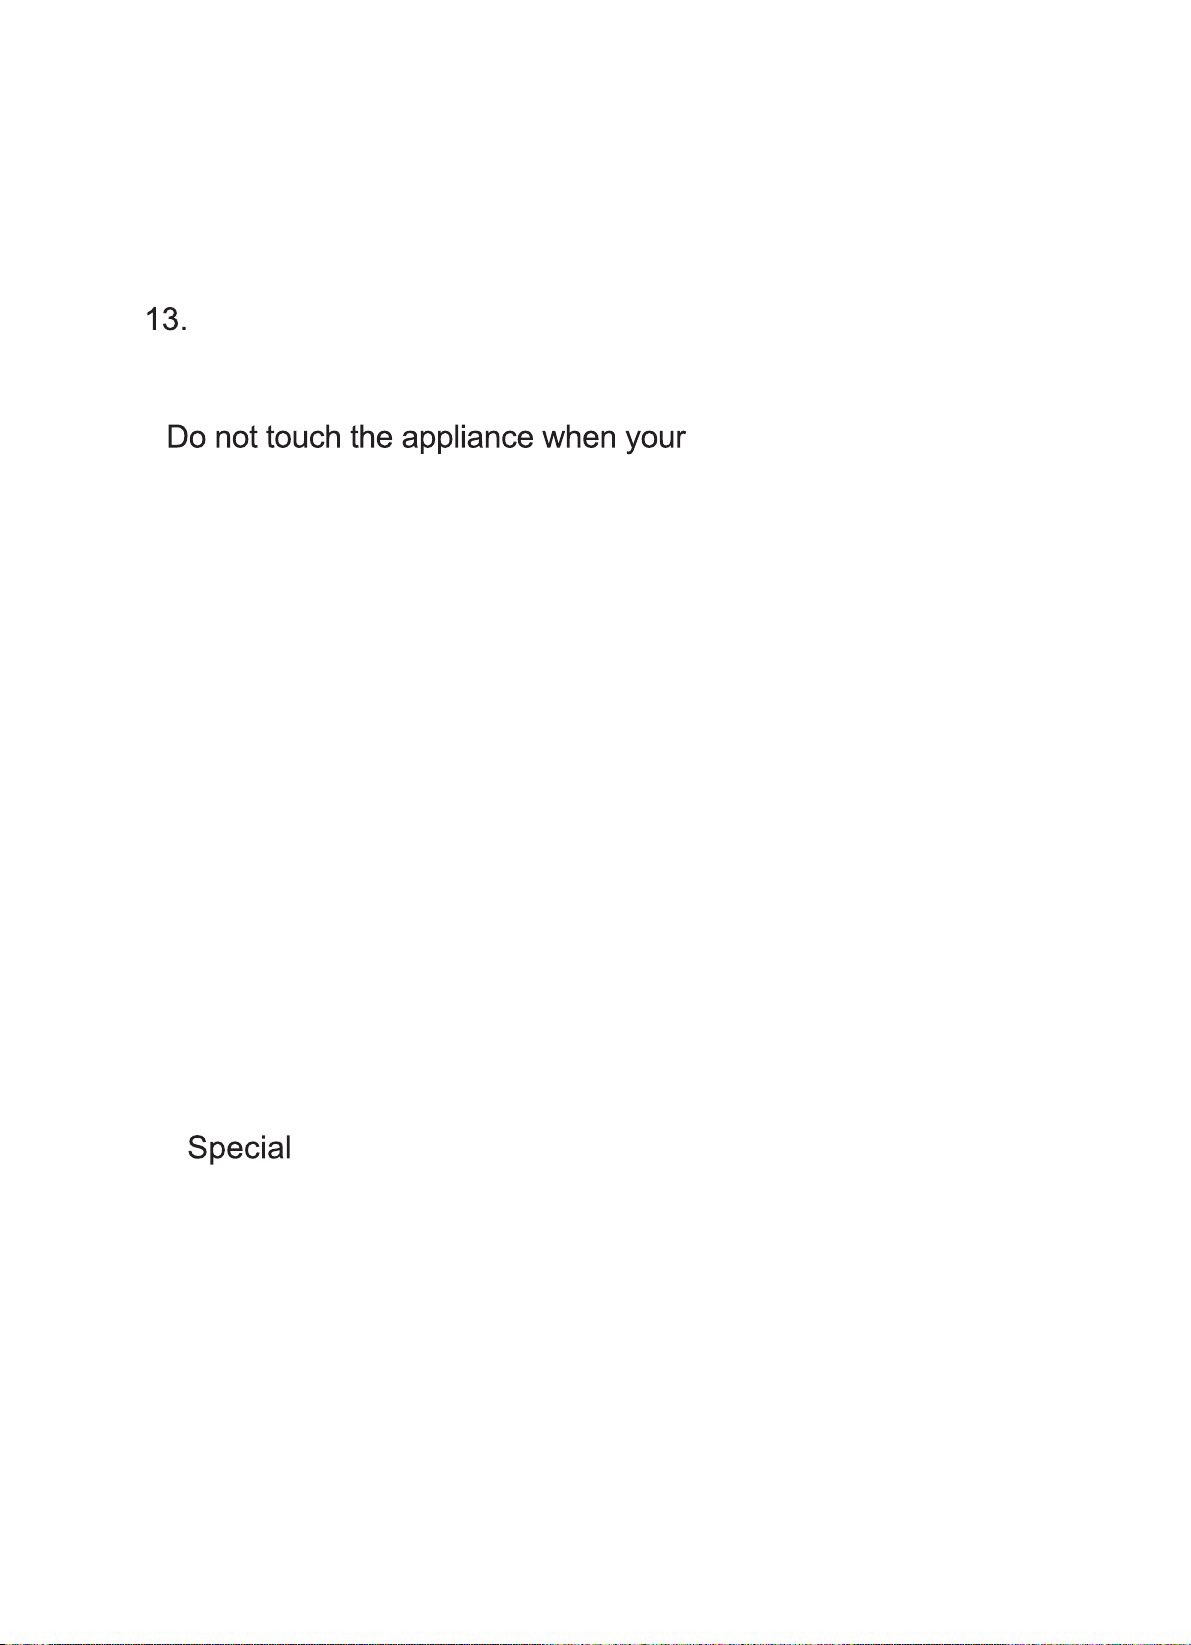
Kitchen cabinets installed next to the cooker that are taller than the top of the cooker
hobs must be situated at least 20cm from the edge of the hobs.
Hoods must be installed according to the requirements in the installation manual for
the hoods themselves and in any case at a minimum distance of 65cm.
Place the wall cabinets adjacent to the hood at a minimum height of 42cm from the hobs
as indicated in figure 1.
The hoods must be installed according to the requirements in the hood handbook.
Should the
cooker be installed beneath a wall cabinet, the latter should be situated at least 70cm away
from the hobs as indicated in figure 1.
The cut-out for the cooker cabinet should have the dimensions indicated in the figure1.
The wall in contact with the back of the cooker must be of flameproof material.
7
It is necessary to allow disconnection of the appliance fromthe supply after installation.
Leveling Your Appliance
Cooker Hood
Min
Min.
Min.42cm.
Min.42cm.
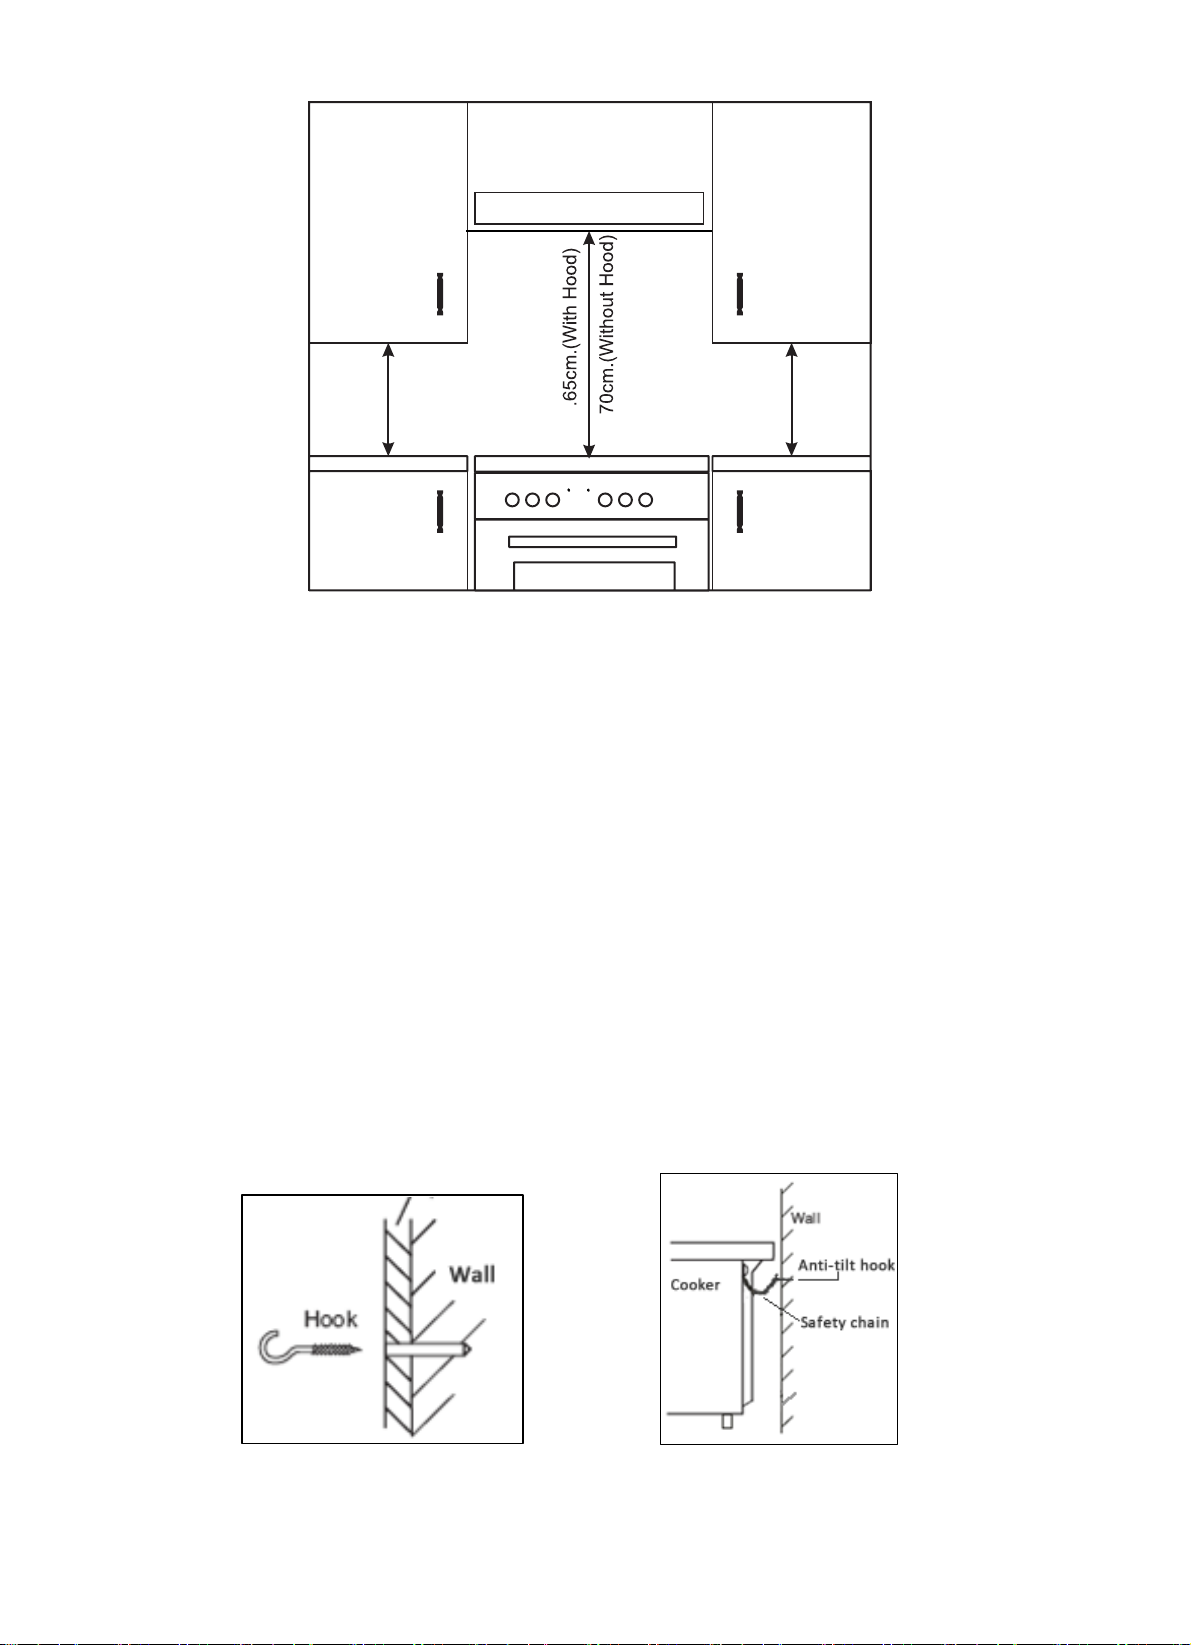
Fitting the safety chain and hook
Fix the hooks into the wall immediately behind the cooker on both sides
Secure the chain to the hook before using or cleaning the oven.
Take out of the 4 cooker feet from oven cavity, which be packed together with backing rack, and
then screw them into the 4 plinth in lower part of cooker. These feet level off the oven when
necessary. The height of the cooker can be adjusted by means of adjustable feet in the plinth.
Adjust the feet by tilting the cooker from the side. Then install the product into position. It is
essential that the cooker be standing level before installation.
To prevent the cooker from tipping forward, two lengths of chain MUST BE fixed to the back of
the cooker, which should be secured to the hooks provided at all times.
The hooks should be secured to the wall at the rear of the cooker. The chains should always
be attached to the hooks when the cooker is in position against the wall.
Figure 1
8

Leveling Your Appliance
Install Anti-tilt Bracket
Figure 2 Figure 3
Cabinet side
50mm
50mm
Back Wall
B
A
Figure
4
4
Push
Take out of the 4 cooker feet from oven cavity, which be packed together with backing rack, and then
screw them into the 4 plinth in lower part cooker. These feet l evel off the oven when necessary. The
height of the cooker can be adjusted by means of adjustable feet in the plinth. Adjust the feet by
tilting the cooker from the side. Then install the product into position. It is essential that the cooker
be standing level before installation.
Warning: In order to prevent tipping of the cooker, the anti-tilt bracket must be installed with cooker.
To install Anti-tilt bracket, use screwdriver to mount the anti-tilt bracket (1) with screws (2) to the
ground, as shows in Figure (3) After fix anti-tilt bracket, push the electric cooker inside cabinet
as show in Figure ( 4) For correct install fo toof thgir dna raer eht ,noita cooker would be clipped
by the anti-tilt bracket.
9

Ele
WAR
Pow
1. O cover.
ctrical conn
NING – T
wer supply vo
pen the term
Use the s
ection
HIS APPLIAN
oltage and fre
inal board b
crewdriver a
CE MUST BE
quency: 220
y inserting a
s a lever by
EARTHE
0-240V A.C.
screwdrive
pushing it do
D.
50Hz-60Hz.
r into the sid
wn to open
eht fo sbat e power code
The electric cooker without a power supply cable. The cooker is designed to operate on an electricity
supply which conforms to the electrical data shown on the Rating label. The cooker can be connected
to the mains only after removing the back panel of the cooker itself with a screwdriver.
Note: the following installation procedure must be carried out by a qualified electrician. For
the installation of the feeding cable carry out the following operations:
the cover
as below:
2.Connect the electricity follows the diagram as printed in the surface of power code cover.
3.Fasten the supply cable in place with the clamp and close the cover of the terminal board.
Note: The red electricity indicator on conntrol panel will illuminate once connect to electricity.
10

Sa
PLEASE READ THE PRECAUTIONS BELOW BEFORE USING YOUR APPLIANCE.
tammrofnI ytefa ion
growth.
. Keep ventilation slots clear o f obstructions.
. Refer servicing to a qualified appliance service engineer.
. Make sure the shelves are in the correc t position before switchin g on the oven.
that children may attempt to reach.
pressure can build up causing the container to burst.
store chem container in or on the appliance, or in cabinets immdeiately
above or next to the appliance.
. Never place flammable or plastic items on or near the hob.
. Never fill a deep fat frying pan more than 1/3 full of oil, or use a lid.
DO NOT LEAVE UNATTENDED WHILE COOKING.
. Never use the appliance as a room heater.
. Never use the grill to warm plates.
. Never dry any items on either the hob or oven doors.
. Never install the appliance next to curtains or other soft furnishings.
. Never use steam cleaners.
When use properly your appliance is completely safe but as with any electrical product there
are certain precautions that must be observed.
Always
. Turn controls OFF when you have finished cooking and when not in use.
. Stand back when opening an oven door to allow any build up of steam or heat to disperse.
. Use dry good quality oven gloves when removing items from the oven/grill.
. Place pans centrally over the hotplate making sure handles are kept away from the edge of the hob
. Take care to avoid heat/steam burns when operating the controls.
. Turn off the electricity supply before cleaning and allow the appliance to cool.
. Take care when removing items from the grill when the lower oven is on as the contents will be hot.
. Take care to avoid touching heating elements inside the oven, as during use the oven becomes hot.
Never
this may cause the appliance to overheat.
. Never leave children unsupervised where a cooking appliance is installed as all surfaces will be
hot during and after its use.
persons who are not familiar with the appliance to use it, without supervision.
and cannot become heate
d by other hot plate/pans.
. Take care when removing items form the grill when the lower oven is on as the contents will be hot.
. Keep the appliance clean, as a build up of grease or fat from cooking can cause a fire.
. Follow the basic principles of food handling and hygiene to prevent the possibility of bacterial
11

SAFETY ADVICE IN CASE OF A CHIP-PAN FIRE
In the event of a chip pan fire or any other pan fire.
1.TURN OFF THE COOKER APPLIANCE AT THE WALL SWITCH.
NEVER USE A FIRE EXTINGUISHER TO PUT OUT A PAN FIRE as the force of the
extinguisher is likely to tip the pan over!
Never use water to extinguish oil or fat fires!
3. LEAVE THE PAN TO COOL FOR AT LEAST 60 MINUTES BEFORE MOVING IT. Injuries
are often caused by picking up a hot pan and rushing outside with it.
2.COVER THE PAN WITH A FIRE BLANKET OR DAMP CLOTH, this will smother the flames
and exetinguish the fire.
Caution,possibility of tilting
Anti-tip restraints
WARNING:In order to prevent tipping of the appliance,this stabilising means
must be installed.Refer to instructions for installation.
Safety reminding
12
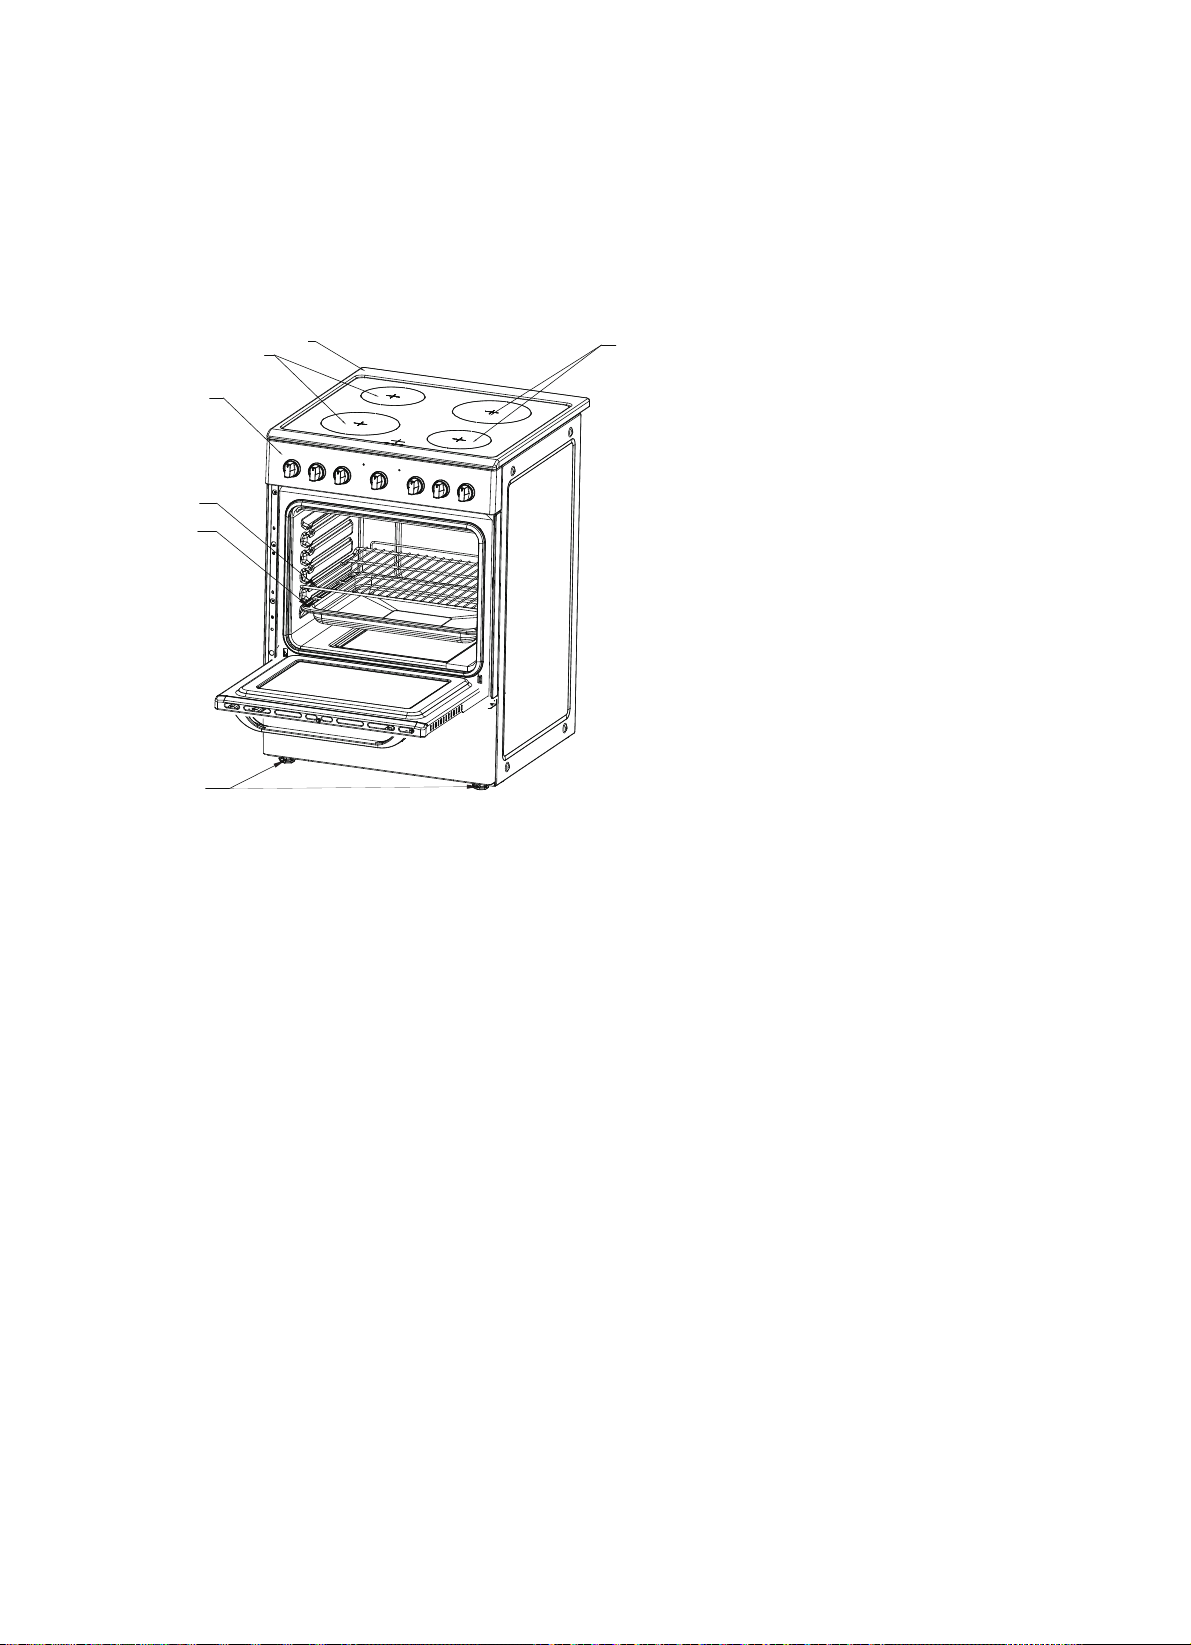
P
r
A. C
B. Vi
C. C
D.
B
E.
B
F.
r
oduc
t
ooktop
tro Ceram
ontrol Panel
aking Pan
aking Rack
Adjustable F
t
Des
c
eet
c
ription
A
BB
C
D
E
F
13
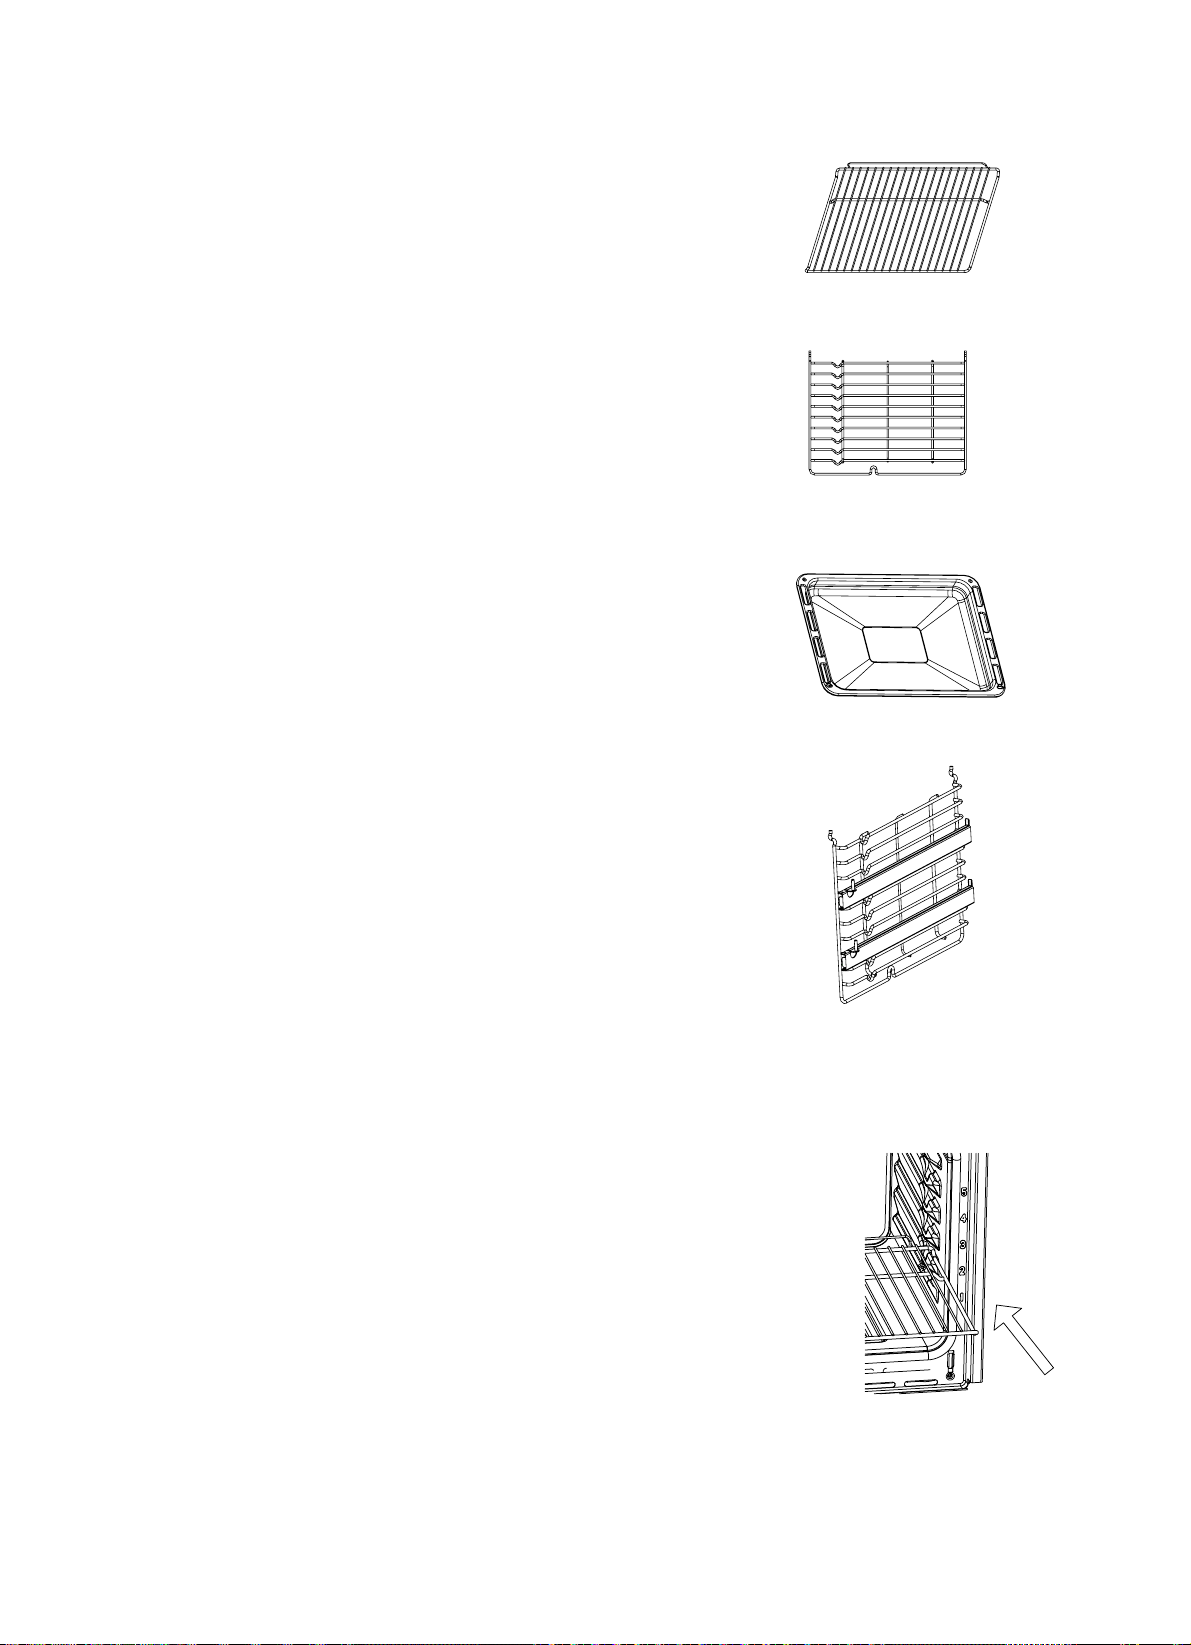
ACCESSORIES
SHELF PLACEMENT WARNING:
To ensure the oven shelves operate safely, correct
placement of the shelves between the side rail is
imperative. Shelves and the pan only can be used between
the first and fifth layers.
The shelves should be used with the right direction, it
will ensure that during careful removal of the shelf or
tray, hot food items should not slide out.
Wire shelf: For grill, dishes, cake pan with items for
roasting and grilling.
Slider bracket : For cooking larger size food, these shelf
support rails on the right and left sides of the oven can be
removed, dishes and tray can be put on the oven floor,
using functions as Radiant grilling, Double grilling,
Double grill with fan.
NOTE: When placing dishes on the oven floor, please
DO NOT use functions with bottom heater to prevent
heat gathering at bottom.
(only for specific models)
Universal pan: For cooking large quantities of food such
as moist cakes, pastries, frozen food etc
,or for collecting
fat/spillage and meat juices.
Telescopic runner: Some models might with telescopic
runners to facilitate the use of oven. These telescopic
runners and slider brackets could be disassembled by
unscrewing the screws used to fix it. After disassembled,
dishes and tray can be put on the oven floor, using
funcstions as Radiant grilling, Double grilling, Double grill
with fan.
NOTE: When placing dishes on the oven floor, please
DO NOT use functions with bottom heater to prevent
heat gathering at bottom.
(only for specific models)
14

Opperation Instructions
15
power
indicator
Oven
power
indicator

Oven controls - the function and temperature controls
To use an oven function, first select the function with the left hand dial and
then set the temperature of the function with the right hand dial. Set the timer
in the middle.The indicator light will illuminate. When the temperature inside
your oven reaches the temperature you set, the thermostat will cut off the
heating element and the indicator light will go off. When the temperature falls
below the set temperature, the heating element will again be turned on and
the indicator light will illuminate again.
The cooker could be with different functions as below, please refer to the functions for the cooker
you buy.
Note: Broil said temperature: 240°C
Broil
16
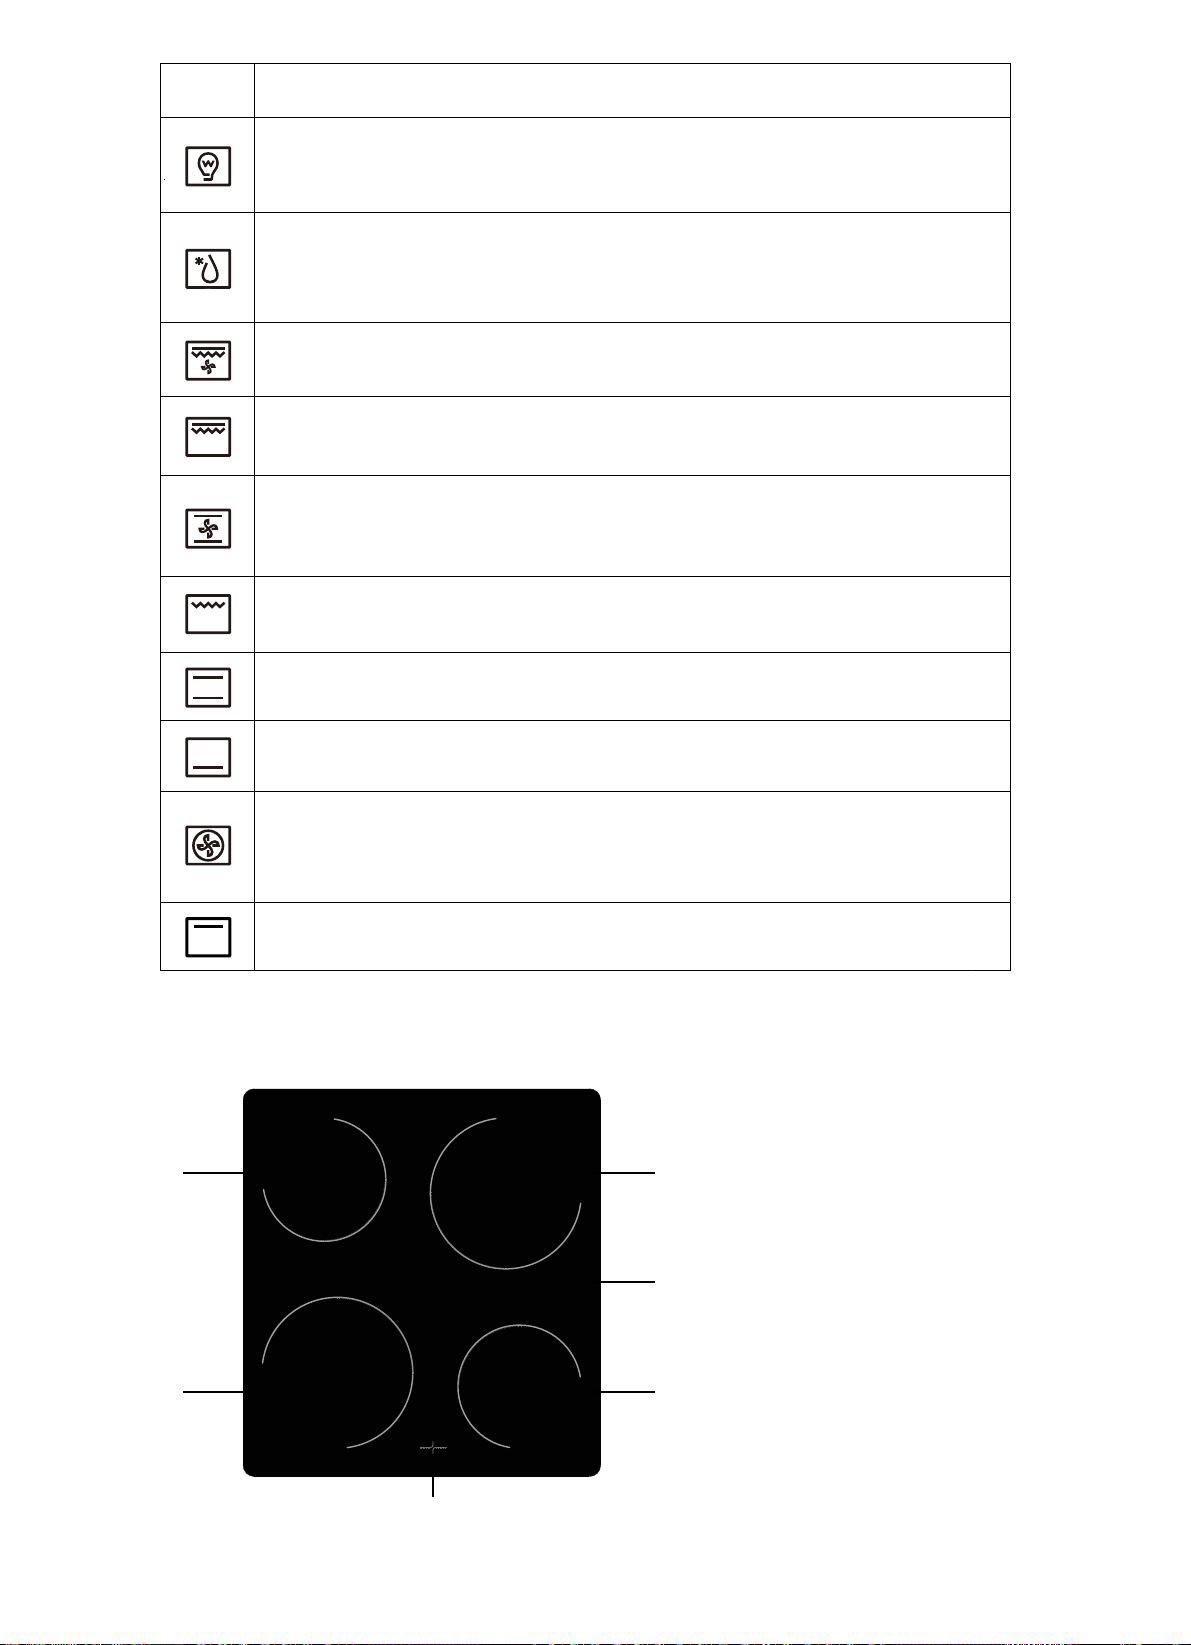
Sy
ymbol Function ddescription
2
1
3
5
4
6
1. 1800W zone
2. 1200W zone
3. 1800W zone
4. 1200W zone
5. Glass plate
6. Residual heat indicator
Oven Lamp:Enables the user to observe the progress of cooking without opening
the door.Oven lamp will lighting for all cooking functions,for the cooker with this
optional function. except ECO function.
Defrost:The circulation of air at room temperature enables quicker thawing of frozen
food,(without the use of any heat).It's a gentle but quick way to speed up the defrosting
time and thawing of ready-made dishes and cream filled produce etc.
Double grilling with fan:The insde radiant element and top element are working with
fan . This function can be work with optional rotisserie function.
Double grilling:The inside radiant element and top element are working.This function
can be work optional rotisserie function.
Convention with fan: Combination of the and both heating element provides more
even heat penetration, saving up to 30-40% of energy. Dishes are lightly browned on
the outside and still moist on the inside.
Radiant grilling:The inner grill element switches on and off to manintain temperature.
This function can be work with optional rotisserie function.
Conventional cooking: The top and bottom work together to provide conventional
cooking.
Bottom heat:: A concealed element in the bottom of the oven provides a more
concentrative heat to the base of food with out blowing.
Convection:An element around the convection fan provides an additional source
of heat for convection style cooking. In convection mode the fan automatically
comes on to improve air circulation with in the oven and creates an even heat for
cooking.
Top heater: The top heating element is working.
17

The power control lamp indicates that it goes out when all Multi-stage cooking zones controls are off.
Control settings
LO
HI
=Location of the cooking zone
=Off
=lowest setting (Keep food warm)
=Middle setting of the central zone independently(cooking,roasting)
=Highest setting of the central zone independently(cooking,roasting)
=Highest setting of the both zones (quick heating up,quick cooking,
roasting)
When finished cooking, turn the control back to the Off position .
Residual heat indicator
After switching off the cooking zone, the residual heat indicator lights up.
The lit residual heat indicator warns the user not to touch the hot cooking surface.
WARNING: Risk of burning!
Do not touch the cooking zones as long as the residual heat indicator is on.
NOTe:
Safety requirements for deep fat frying
1. Use a deep pan, large enough to completely cover the appropriate heating area.
2. Never fill the pan more than one-third full of oil.
3. Never leave oil or fat unattended during the heating or cooking period.
6. Never heat fat, or fry, with a lid on the pan.
7. Keep the outside of the pan clean and free from streaks of oil or fat.
Control settings
LO
HI
=Location of the cooking zone
=Off
=lowest setting (Keep food warm)
=Middle setting of the central zone independently(cooking,roasting)
=Highest setting of the central zone independently(cooking,roasting)
The temperature is set individually for each cooking zone, using the respective temperature controls. The
controls can be turned clockwise and back again. The desired temperature canbe adjusted continuously.
After having switched off the heating power, you may use the residual heat for different purposes,
such as heating up or keeping food warm without having to switch on the heating power.
4. Never try to fry too much food at a time, especially frozen food. This only lowers the temperature of
the oil or fat too much, resulting in greasy food.
5. Always dry food thoroughly before frying, and lower it slowly into the hot oil or fat. Frozen foods, in
particular, will cause frothing and spitting, if added to quickly.
18
Hotplates General Information Notes
Always Never
Leave an element switched on when
not cooking.
Always lift pans, do not drag.
Always use pan lids except when frying.
Do Not
Do not allow a cooking utensil to come into contact with the hob surround.
Do not leave any utensils, food or combustible items on the hob when it is not in use.
Do not place aluminum or plastic foil, or plastic containers on the hob.
Do not leave utensils partly covering the heated areas. Always ensure that they are placed
centrally over the heated areas and have the same diameter as the heating area used.
We recommend not to use a utensil with a base diameter greater than 25cm.
Pressure cookers or other large pans should be used on the front cooking areas.
Always ensure that saucepan handles are positioned safely.
Use good quality flat -based cook ware on all
electricheatsources.
Use gauze, metal pan diffusers,asbestos
mats and stands e.g. Wokstands
- they
can use overheating.
Always ensure pans have clean, dry bases
before use.
Use utensils with skirts or rims e.g.
buckets and some kettles.
Ensure pans match size of heating area. Use badly dented or distorted pans.
Remember good quality pans retain heat well, so
generally only a low or medium heat is necessary.
Ensure pan handles are positioned safely and
away from heat sources.
Cook food directly on the ceramic
glass.
Deal with spillages immediately but with care.
Drag or slide utensils, along the hob
surface.
Do not cook directly on the hob surface without a cooking utensil, as this will result in damage to the
surface of the hob.
Do not use the hob as a worktop surface as damage may occur to the smooth surface of the hob.
Do not drag or slide utensils on the hob surface, as this will cause scratches in the surface of the hob.
Do not leave the hotplates or cooking areas switched ON unless they are being used. We
recommend not to place large preserving pans or fish kettles across two heating areas.
19
Table of contents
Other EURO Oven manuals

EURO
EURO EPY60MSS Instruction sheet

EURO
EURO EO90MXS User manual

EURO
EURO ESM60TSX User manual

EURO
EURO EO605SX User manual

EURO
EURO EV45SMWB User manual

EURO
EURO ESG600SX User manual

EURO
EURO EO604SX User manual

EURO
EURO EVC60SS User manual

EURO
EURO Primera EBC8M6S User manual

EURO
EURO Valencia EP600BSS User manual


Popular Oven manuals by other brands

AEG
AEG BSK77438PT user manual

Hotpoint
Hotpoint UE89X1 UQ89I Instructions for installation and use

Prima
Prima LPR9000 Operating and installation

Bosch
Bosch HBC84K553A instruction manual

Smalvic
Smalvic FI-95 E Installation, use and maintenance instructions

Kleenmaid
Kleenmaid SOE100X Instructions for use and warranty details


