Euroclean WD 215 User manual

822 9367 020
Edition NA3 2002-11
WD 215, WD 225, MicroVac 6
INSTRUCTIONS FOR USE
MODE D'EMPLOI
INSTRUCCIONES DE USO
PRINTED IN SWEDEN, BY AB ÅMÅLSTRYCK

3
ATTENTION
WARNING
AVISO
WARNING
HEPA-filter must be installed while working with hazardous materials. Failure
to do so will expose people in the work area and others to hazardous materials
which is a serious health risk. EMPTYING
If this vacuum cleaner is used to collect hazardous material, do not attempt to
open or empty its contents without personal protective clothing and respiratory
protection. This procedure must be completed in a contained environment.
AVISO
El filtro HEPA debe ser instalado cuando trabaje con materiales peligrosos.
De no hacerlo así expondrá a las personas dentro de su zona de trabajo y a
otras ajenas a él a estos materiales peligrosos, lo cual constituye una grave
amenaza para la salud. VACIADO
Si se utiliza la aspiradora para recoger materiales peligrosos, no intente abrirla
o vaciar su contenido sin la adecuada indumentaria protectora y la protección
respiratoria.
ATTENTION
Utiliser le filtre Hepa lorsque l'on travaille avec des substances dangereuses
et nocives pour éviter que les personnes présentes ou se trouvant à proximité
n'y soient exposées et que leur santé ne soit mise en péril.
VIDAGE
Si l'appareil est utilisé pour aspirer des substances dangereuses, ne jamais
tenter de l'ouvrir ou de le vider sans porter de vêtements protecteurs et une
protection respiratoire.

4
12a 2b
2c 3 4
6
2
8a 8b
5a 5b 7

5
8c
10
Larger float system
Le grand Flotteur
Sistema flotante más grande
9a 9b
8d
10
1
2
Install
Montage
Montaje
HEPA
Exchanging of HEPA-filter
Remplacement des filtres HEPA
Cambio de HEPA-filtros
Remove
Démontage
Desmontaje
TORX T 20

6
SAVE THESE INSTRUCTIONS
GENERAL INFORMATION
BEFORE YOU PLUG IN YOUR CLEANER, check the rating plate
located on the cleaners back side to see if the rated voltage agrees
within 10% of the voltage available.
DO NOT OIL, the motor in your new cleaner is permanently
lubricated and sealed. Do not oil the motor at any time.
During shipping, the dust bag may have become dislodged. Check
the bag to insure proper seating before attempting to use the
cleaner. Do not operate the cleaner without the filters installed as
damage may result to the motor.
The machine is equipped with a thermal breaker to protect the
motor and other vital machine parts from overheating. Should this
breaker open, you will have to wait at least 5-10 minutes before
you try to start it again. While you are waiting, switch the machine
off and unplug it, then check the hose, dust bag and filters to be
sure that nothing is blocking the flow of air through the machine.
Note! It is neccessary to reset the machine by pressing the on/off
button, the machine will not start again until this is done.
For longer service life and safe use of your vacuum cleaner, we
recommend the following guidelines: Your cleaner is designed to
pick up dirt and dust particles and water. Avoid picking up hard or
sharp objects with your cleaner to avoid bag breakage, clogging or
possible motor damage.
SERVICE INFORMATION
To obtain consistent performance over the life of your vacuum,
read through these instructions and keep them handy for future
reference. If you require service, contact the dealer from whom
the vacuum was purchased, or the local authorized Service Sta-
tion. Always refer to your Service Station for complete service in-
formation. For prompt and complete service information, always
refer to the model, type and serial number indicated on the rating
plate.
WARNING
To reduce the risk of fire, electric shock, or injury, please read and
follow all safety instructions and caution markings before use. This
vacuum cleaner is designed to be safe when used for cleaning
functions as specified. Should damage occur to electrical or
mechanical parts, the cleaner and / or accessory should be repai-
red by the manufacturer or competent service station before use
in order to avoid further damage to the machine or physical injury
to the user.
• Do not use outdoors.
• Do not leave the machine when it is plugged in. Unplug from
the outlet when not in use and before servicing.
• Do not use with damaged cord or plug. To unplug grasp the
plug, not the cord. Do not handle plug or cleaner with wet
hands. Turn off all controls before unplugging.
• Do not pull or carry by cord, use cord as a handle, close a
door on cord, or pull cord around sharp edges or corners. Do
not run cleaner over cord. Keep cord away from heated
surfaces.
• Keep hair, loose clothing, fingers and all parts of the body
away from openings and moving parts. Do not put any objects
into openings or use with opening blocked. Keep openings
free of dust, lint, hair, and anything else that could reduce
the flow of air.
• Do not pick up anything that is burning or smoking, such as
cigarettes, matches, or hot ashes.
• Do not use to pick up flammable or combustible liquids such
as gasoline, or use in areas where they may be present.
• Do not allow it to be used as a toy. Close attention is
necessary when used by or near children.
• Use extra care when cleaning on stairs.
• Do not pick-up hazardous material without HEPA-filter
mounted.
• All contact with the machine, dustbag, filter and all other
accessories used when picking-up hazardous materials
should be handled according to the regulations valid for the
vacuumed material.
• If this vacuum cleaner is used to collect hazardous material,
do not attempt to open or empty its contents without
personal protective clothing and respiratory protection.
• Do not use unless filters are installed.
• If the cleaner is not working properly or has been dropped,
damaged, left out doors, or dropped into water, return it to a
service center or dealer.
• Use only as described in this manual and only with the
manufacturer’s recommended attachments.
SAFETY INSTRUCTIONS
6
THIS VACUUM CLEANER IS DESIGNED FOR COMMERCIAL USE.
ACCIDENTS DUE TO MISUSE CAN ONLY BE PREVENTED BY THOSE USING THE MACHINE.
READ AND FOLLOW ALL SAFETY INSTRUCTIONS.

7
Grounding instructions (USA, Canada)
Applicable to machines with a three-pin plug
This appliance must be grounded. If it should malfunction
or breakdown, grounding provides a path of least resistance
for electric current to reduce the risk of electric shock. This
appliance is equipped with a cord having an equipment-
grounding conductor and grounding plug. The plug must be
plugged into an appropriate outlet that is properly installed
and grounded in accordance with all local codes and
ordinances.
DANGER!
Improper connection of an equipment-grounding conductor
can result in risk of electric shock. Check with qualified
electricianorserviceperson ifyou arein doubtas towhether
the outlet is properly grounded, Do not modify the plug pro-
vided with the appliance. If it will not fit the outlet, have pro-
per outlet installed by a qualified technician.
This appliance is for use on a nominal 120 volt circuit and
has a grounding plug that looks like the plug illustrated in
Figure A. A temporary adaptor which looks like the adaptor
illustrated in Figure B may be used to connect this plug to a
two-pole receptacle, as shown, if a properly grounded outlet
is not available. The temporary adaptor should be used only
until a properly grounded outlet, Figure A, can be installed
by a qualified electrician. The green colored rigid ear, lug, or
the like extending from the adaptor must be connected to a
permanent ground such as a properly grounded outlet box
cover. Whenever the adaptor is used, it must be held in
place by a metal screw.
NOTE! This temporary adaptor is not permitted
in Canada
Servicing of double-insulated
appliances
Applicable to machines with a two-pin plug
In a double-insulated appliance, two systems of insulation
are provided instead of grounding. No grounding means is
provided on a double-insulated appliance, nor should a
meand for grounding be added to the appliance. Servicing
a double-insulated appliance requires extreme care and
knowledge of the system, and should be done only by
qualified service personnel. Replacement parts for a dou-
ble-insulated appliance must be identical to the parts they
replace. A double insulated appliance is marked with the
words
"DOUBLE INSULATION" or
"DOUBLE INSULATED."
The symbol (square within a square) may also be used on
the product.
FIGURE A FIGURE B
SERVICE INFORMATION
To obtain consistent performance over the life of your
vacuum, read through these instructions and keep them
handy for future reference. If you require service, contact
the dealer from whom the vacuum was purchased, or the
local authorized Service Station. Always refer to your Ser-
vice Station for complete service information. For prompt
andcomplete serviceinformation, alwaysrefer tothe model,
type and serial number indicated on the rating plate.
IMPORTANT
If the supply cord of this appliance is damaged, it must be
replaced by a repair shop appointed by the manufacturer
as special purpose tools are required.
GROUNDING BLADE IS LONGEST OF
THE THREE BLADES
GROUNDED OUTLET
BOX
GROUNDING
TAB
METAL
SCREW
ADAPTOR
GROUNDED
OUTLET
BOX
GROUNDING / DOUBLE INSULATION INSTRUCTIONS

8
INSTRUCTION FOR USE
Wet and dry cleaning
Donot use the machinewithoutthe main filterinstalled.
Use dustbag when picking up dry material. Remove the
dust bag before picking up liquids.
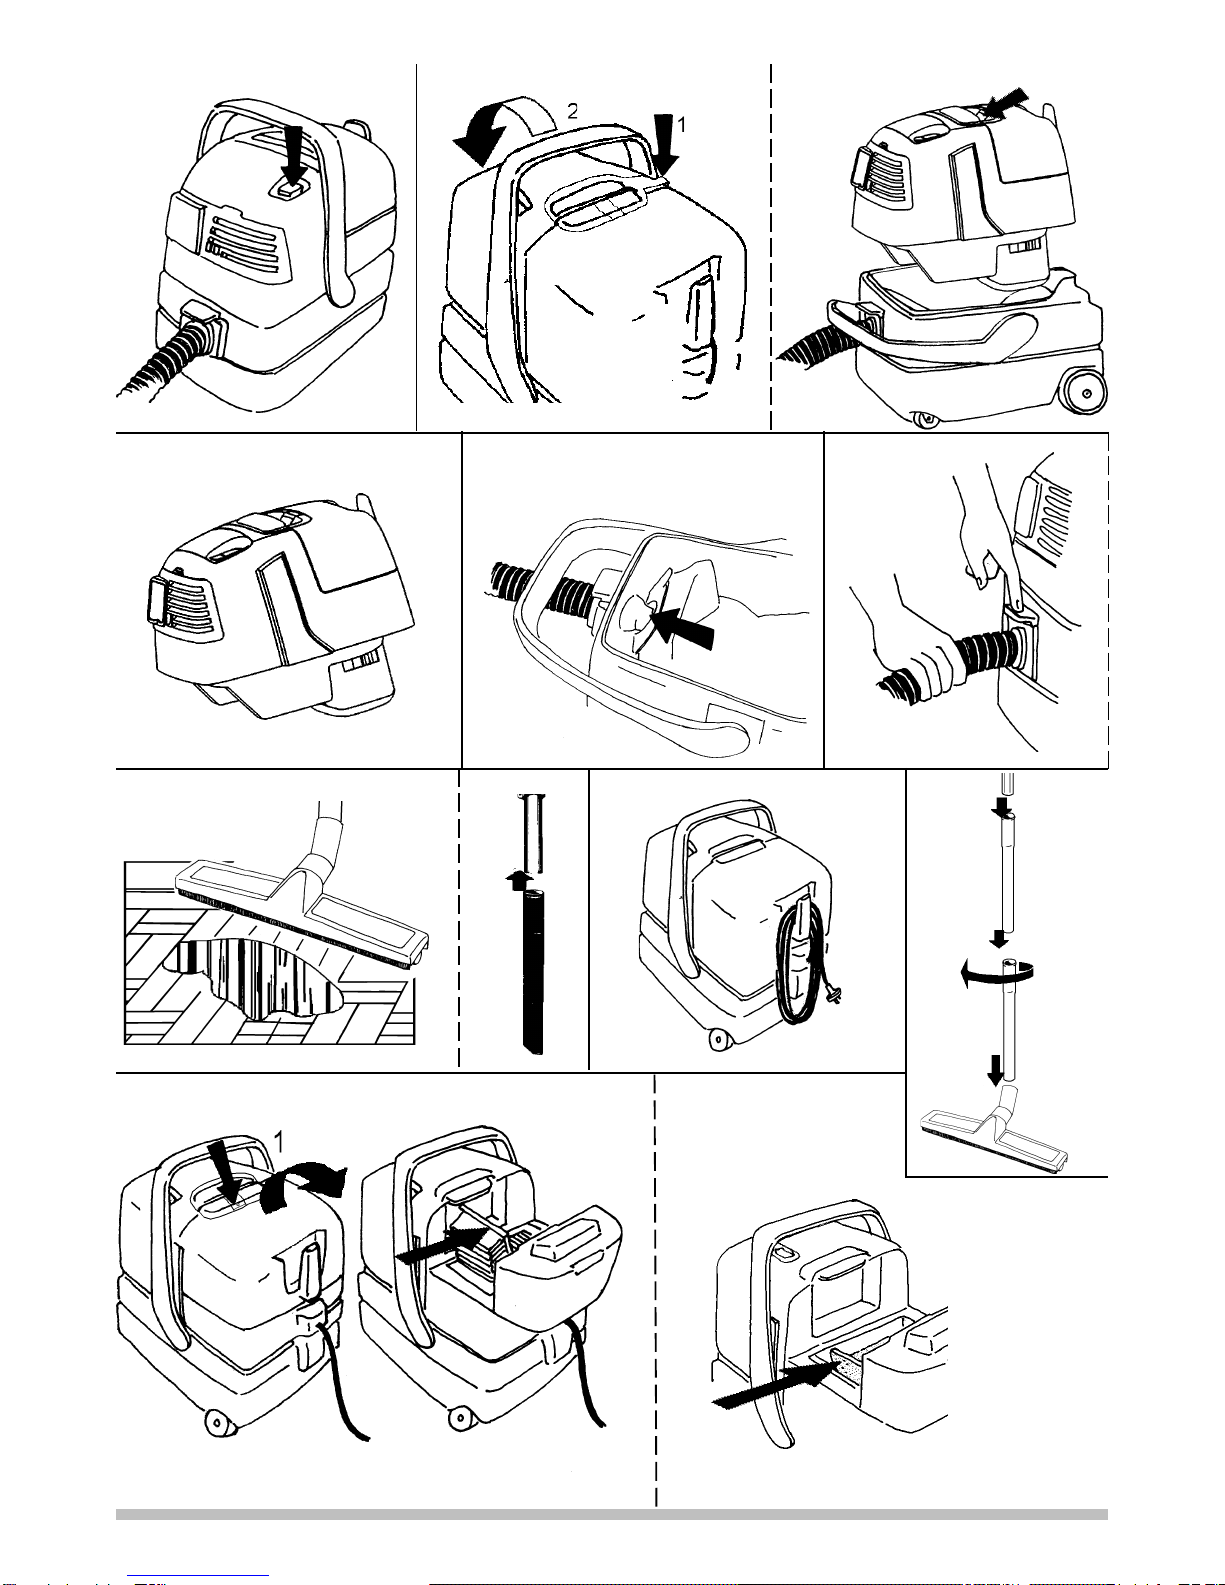
1 Start/Stop
2 How to remove the motor top
Turn off the machine and pull the plug out of the electrical outlet.
a) Press the button next to the handle, and push the handle
forward.
b) Lift the motor top by using the grip on top of the motor top.
c) Rest the motor top on a flat surface as illustrated.
3 Installing the dustbag
Use only approved original Nilfisk-Advance dust bags. When the
bagis2/3fullitshouldbereplaced.Excessiveoverfillingofthisbag
makes it difficult to remove from the vacuum tank and can result in
breakageandspills.Fitthe openingofthedustbagovertheairinlet.
Make sure the cardboard piece has been pressed all the way past
the raised bumps on the air inlet. The flap on the cardboard piece
isusedtoclosethedustbagwhenitisremoved.Placethemotortop
on the tank. Grab the handle and rotate it back to its upright
position, where it locks in place.
4 Hose connection
Push the hose coupling in to the hose connection until it locks.
Press the button on the hose connection down to remove the hose.
5 Tools
The accessories shown in the pictures may vary on different
models.
a) Universal nozzle
Can be used on all types of flooring and for both wet and dry
pickup.
b) Crevice nozzle:
Use to clean furniture, radiators and other hard to reach places.
6 Power cord storage
Windupthecordstartingatthemachine.Storeitonthehook onthe
rear of the machine.
7 Wand assembly
Fit the sections together and twist to lock in place. Clean the nylon
insertswhen needed. Separatethesections bypullingandtwisting
at the same time.
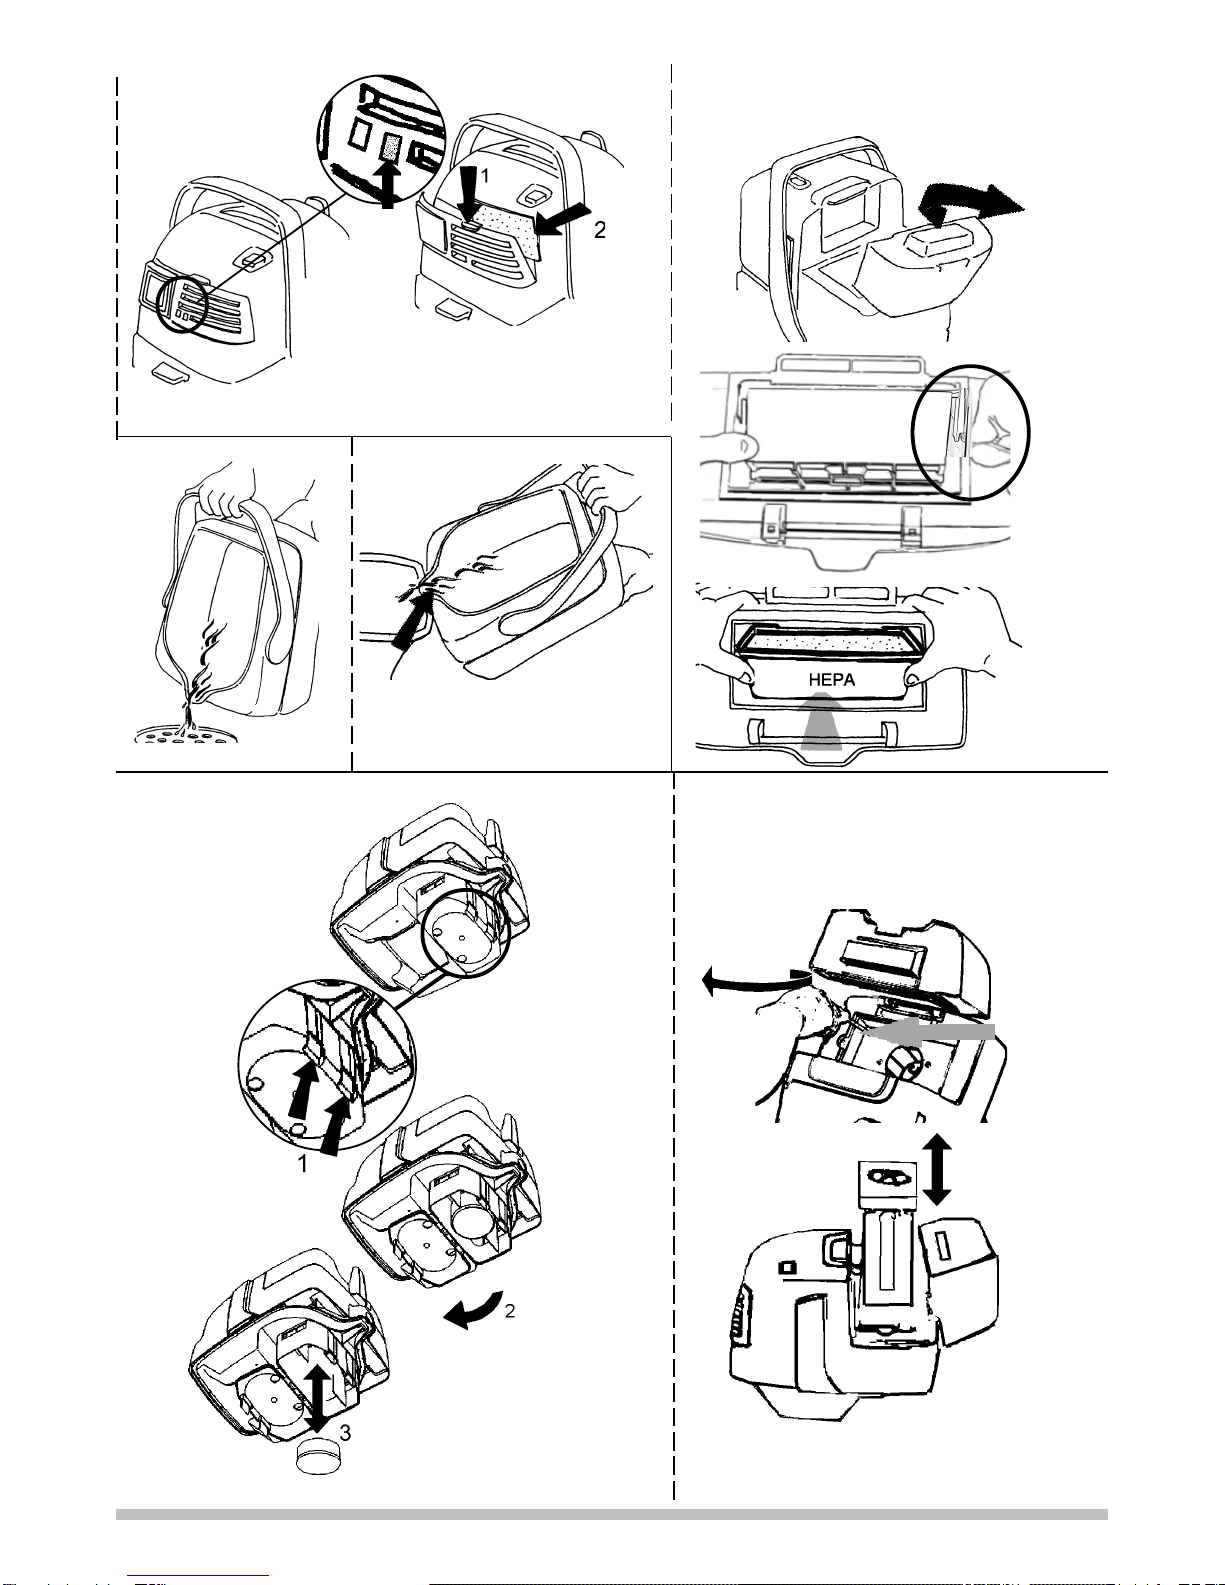
8 Filter replacement
Use only approved Nilfisk-Advance vacuum filters. Turn off and
unplug the machine before exchanging filters. The following is a
recommendedreplacementintervalforallofthefilters.Theseitems
should be replaced more often if you experience a loss of perfor-
mance.
Pre-filter – This filter should be replaced or vacuumed thoroughly
using a HEPA vacuum with every fifth change of paper bag or
whenever there is a visible collection of debris on the filter.
Main filter – This filter should be replaced with every fifth change
of the pre-filter or whenever there is a visible collection of debris
on the filter.
HEPA filter – Replace this filter at least every six months or more
often if a loss of vacuum continues after you have replaced all
other filters and the paper bag.
Motor Cooling Air Exhaust Filter - This filter should be replaced
with every fifth change of paper bag or whenever there is a visible
collection of debris on the filter.
Procedures for exchanging filters
Main filter- Open the filter cover by pressing the release button
and rotate the filter cover open. Remove the filter by pulling one
end of it out of the housing. Clean the sealing surfaces before
reinstallingthemainfilter.Installthefilterwiththe sealthatsurrounds
the filter edge facing upwards. Close the filter lid and press firmly
to lock the lid in place.
Pre-filter- Remove the main filter, as the pre-filter is located
beneath it. Make certain that the colored side of the filter is
positioned downward when installed.
HEPA filter- Open the filter cover by pressing the release button
and rotate the filter cover open. Remove the filter cover by pulling
one side of the filter cover upward/forward until it separates from
the motor housing. The HEPAfilter is attached to the filter cover by
two hooks, one at each side the plastic filter housing. Use a flat
screwdriver or similar tool, and push the outer section of the hooks
inward toward the filter until the hooks loosen from the filter cover.
Remove the filter from the cover. Clean the sealing surfaces before
reinstalling the HEPA filter. When installing the HEPA filter, always
push on the plastic housing of the filter, NEVER on the pleated
filter media. Damage will result to the filter and it will be ineffective
in filtering out substances. Position the filter into the filter cover
with the “HEPA” label facing outward. Making certain that the
bottom of the filter is correctly secured under the mounting lip at
the bottom of the filter lid, press the filter forward into the filter
cover until the hooks on each side of the filter housing snap in
place with the edges of the filter cover. If the filter is correctly
mounted, you will hear a noticeable “clicking” sound. Confirm that
the filter is secured under the mounting lip at the bottom of the
filter lid and that the filter is properly seated at the sealing surface.
Snap the filter cover back onto the hinge on the motor housing.
Close the filter lid and press firmly to lock the lid in place.
Motor Cooling Air Exhaust Filter- Remove the filter holder by
pressing the button on top of the holder. Grasp of the filter flap and
remove the filter from the filter holder. Insert the new filter, making
certain that the longest side of the filter is down and the flap is
facing toward the outside of the cleaner. Reinsert the filter holder
and snap it in place.
9 Draining the tank
When the water level in the tank reaches maximum the float valve
will shut off the air flow through the machine. You will then hear a
noticable change of the sound from the motor and notice that the
suction power decreases. When this occurs, switch the machine
off. Disconnect the machine from the power supply. Remove the
motor top according to earlier instruction (2). Always empty and
clean the tank after picking-up liquids. Allow all parts to dry
thoroughly before the motor top is reassembled.
a) Emptying in a draining gutter: Hold the tank by the carrying
handleandgrabtheemptyinggrip locatedonthebottomsideofthe
tank. Use the emptying grip to tilt the tank and empty it through the
spout.
b) Emptying in a toilet or wash-basiner etc: Lift the tank by the
handle. Let the bottom side of the spout rest on the edge. Use the
emptying grip to tilt the tank and empty it through the spout.
10 Float valve
The machine is equipped with a float valve that shuts of the air
flowthroughthemachinewhenthemaximumfluidlevelis reached.
The float system is placed at the lower edge of the motor top.
Clean the float valve when needed.
Cleaning of the smaller float system: Remove the motor top.
Open the lid on the float valve and remove the float body. Wipe
both the float valve and body with a damp cloth.
Reinstall the float body and close the lid.
Cleaning of the larger float system: Open the filter lid. Remove
the main filter and the pre-filter. Remove the rubber cover for the
screws. Use a TORX T 20 screwdriver and loosen the 4 screws
that ´s fastening the float basket to the motor top. Lift up the float
basket. Wipe both the float valve and body with a damp cloth.
Reinstall the float body and put back the pre filter and the main
filter. Close the lid.
Note! Never pick-up liquid without the float body in place in
the float. Always use a chemical defoamer when picking-up
water containing foaming detergents. Use a defoamer
recommended by the detergents manufacturer. To achieve
the best results with chemical defoamer, add the defomer
through the hose.
Inspect the filter cover sealing ring (part number 140 7249 000)
anytime the filter lid is opened to assure it is not damaged or
missing.

9
USE AND SERVICE INSTRUCTIONS
WHEN USED IN HAZARDOUS
SUBSTANCE RECOVERY
WARNING
To reduce the risk of exposure to hazardous
substances you must read and follow all safety
instructions in this Instructions for Use manual.
Attention Employer
· Please ensure the Instructions for Use manual are
provided to and understood by your employees or any
other persons who use this equipment.
· To list all toxic and hazardous substances would be
beyond the scope of these instructions. It is the
employer’s and operator’s responsibility to identify
hazardous or toxic substances which may be collected
by the equipment during operation. Such information
mustbe communicatedto operatorsand otherpotential
users of this equipment.
· This cleaner is designed for recovery and collection of
dust, debris and particulate matter only.
· This cleaner is not suitable for recovery and collection
ofanyform ofhazardous vapors.Donot usethecleaner
if these vapors are present.
· This cleaner is not suitable for recovery and collection
of flammable or explosive solvents, chemicals, or
liquids. Do not use the cleaner if these liquids are
present.
General Instructions
· Contact with the cleaner, dustbag, filter and all other
accessoriesused whenpicking-uphazardous materials
must be handled according to federal (EPA, OSHA),
state and local regulations valid for the vacuumed
substance.
·Do not use this cleaner for the removal of
hazardoussubstancesunlessyou are licensedand/
orcertified for thiswork by theall authorities having
jurisdiction.
Instructions for Use
· Operation of the cleaner when picking up hazardous
substances must be accompanied by the use of
appropriatepersonal protectiveclothing andrespiratory
protection.
· Donot pick-uphazardous substanceswithoutthe HEPA
filter in place.
· If this vacuum cleaner is used to collect hazardous
substances,donot attempttoopen orempty itscontents
without the use of personal protective clothing and
respiratory protection.
· If the cleaner is not working properly or has been
dropped,damaged, leftoutdoors, ordroppedinto water,
return it to a qualified service center or dealer.
· This cleaner circulates ambient air for cooling the
vacuum motor. Hazardous particles may accumulate
in the internal motor cooling air ducts and could be
released into the exhaust airstream at any time. If the
cleaner is used in an enclosed contaminated
environment, it should be committed exclusively to this
type of environment and not operated outside of an
enclosed and controlled environment.
· Before the cleaner and any accessories are removed
fromacontrolled environment,allexternal surfacesmust
be decontaminated according to federal (EPA, OSHA),
state and local regulations valid for the vacuumed
substance.
Filter Replacement
· All disposed filters, bags, and debris should be treated
as a hazardous substance and must be disposed in
accordancewith all federal, state,and localregulations.
· Use only approved Nilfisk-Advance vacuum filters and
bags.
· The following is a recommended replacement interval
for all of the filters and bag. These items should be
replaced more often if you experience a loss of
performance.
·Disposable paper filter bags – When the bag is 2/3
full it should be replaced. Excessive over filling of this
bag makes it difficult to remove from the vacuum tank
and can result in breakage and spills.
·Pre-filter – This filter should be replaced or vacuumed
thoroughlyusinga HEPAvacuumwith everyfifthchange
of paper bag or whenever there is a visible collection of
debris on the filter.
·Main filter – This filter should be replaced with every
fifthchangeof thepre-filter orwheneverthereisa visible
collection of debris on the filter.
·HEPAfilter – Replacethisfilter atleastevery sixmonths
or more often if a loss of vacuum continues after you
have replaced all other filters and the paper bag.
·Motor Cooling Air Exhaust Filter - This filter should
be replaced with every fifth change of paper bag or
whenever there is a visible collection of debris on the
filter.

10
·HEPA filter
Open the filter cover by pressing the release button
and rotate the filter cover open. Remove the filter
cover by pulling one side of the filter cover upward/
forward until it separates from the motor housing.
The HEPA filter is attached to the filter cover by two
hooks, one at each side the plastic filter housing.
Use a flat screwdriver or similar tool, and push the
outer section of the hooks inward toward the filter
until the hooks loosen from the filter cover. Remove
the filter from the cover. Clean the sealing surfaces
before reinstalling the HEPA filter.
When installing the HEPA filter, always push on the
plastic housing of the filter, NEVER on the pleated
filter media.Damage will result to the filter and it will
be ineffective in filtering out hazardous substances.
Position the filter into the filter cover with the “HEPA”
label facing outward. Making certain that the bottom
of the filter is correctly secured under the mounting
lip at the bottom of the filter lid, press the filter
forward into the filter cover until the hooks on each
side of the filter housing snap in place with the edges
of the filter cover. If the filter is correctly mounted,
you will hear a noticeable “clicking” sound. Confirm
that the filter is secured under the mounting lip at the
bottom of the filter lid and that the filter is properly
seated at the sealing surface. Snap the filter cover
back onto the hinge on the motor housing. Close the
filter lid and press firmly to lock the lid in place.
·Motor Cooling Air Exhaust Filter
Remove the filter holder by pressing the button on
top of the holder. Grasp of the filter flap and remove
the filter from the filter holder. Insert the new filter,
making certain that the longest side of the filter is
down and the flap is facing toward the outside of the
cleaner. Reinsert the filter holder and snap it in
place.
Service Instructions
· If this cleaner has been used to pick-up hazardous
substances in an enclosed contaminated environment,
the internal components of the powerhead may be
contaminated.
· Externaldecontaminationof thecleaner mustbe carried
out. However, external decontamination will not
eliminate any internal contamination. Any servicing of
the powerhead involving disassembly must be done
inside of a contained environment by trained service
personnelusingappropriate personalprotective clothing
and respiratory protection.
· Any replaced components or debris collected during
servicing should be treated as a hazardous substance
and must be disposed of in accordance with all federal,
state, and local regulations.
· Allsealingrings andgasketsshouldbe replacedanytime
the unit is disassembled to assure high machine
efficiency.
How to examine filters
· Filters collect and are contaminated with hazardous
substances. The inspection and or replacement of any
filter must only be done with the use of personal
protective clothing, proper respiratory protection and in
a controlled environment.
· The main filter and the HEPA filter cannot be cleaned.
Periodically make a visual inspection of each filter for a
build-up of debris or damage to the sealing surfaces. If
any filter appears to be clogged, damaged in any way,
or has changed color (should be white) which indicates
excessive dirt build-up, replace with a new filter making
sure to install new secondary and primary filters.
· If any visible dust particle emissions are observed in
the vacuum exhaust air stream, stop operations
immediately. If this occurs, the HEPAfilter has ruptured
or failed and must be replaced.
Procedures for exchanging filters
· Inspect the filter cover sealing ring (part number 140
7249 000) anytime the filter lid is opened to assure it is
not damaged or missing.
· All contaminated filters and bags must be properly
disposed of in accordance with federal, state and local
regulations.
·Main filter
Open the filter cover by pressing the release button
and rotate the filter cover open. Remove the filter by
pulling one end of it out of the housing. Clean the
sealing surfaces before reinstalling the main filter.
Install the filter with the seal that surrounds the filter
edge facing upwards. Close the filter lid and press
firmly to lock the lid in place.
·Pre-filter
Remove the main filter, as the pre-filter is located
beneath it. Make certain that the colored side of the
filter is positioned downward when installed.
Table of contents
Other Euroclean Vacuum Cleaner manuals

Euroclean
Euroclean UZ 934 User manual

Euroclean
Euroclean Back Vac 10 User manual

Euroclean
Euroclean Vacuum Cleaner User manual

Euroclean
Euroclean Back Vac 10 User manual

Euroclean
Euroclean Back Vac 10 Manual

Euroclean
Euroclean Edge 12 User manual

Euroclean
Euroclean Bravo User manual

Euroclean
Euroclean Hip Vac UZ 964 User manual

Euroclean
Euroclean WhisperClean User manual

Euroclean
Euroclean WhisperClean User manual