Eurolux EDW612X Guide

EASY DECISION
INSTALLATION, OPERATION
& MAINTENANCE INSTRUCTIONS
Model:
EDW612X

EASY DECISION
NSTALLATION, OPERATION AND MAINTENANCE INSTRUCTIONS
Thank you for buying our refrigeration products.
To enable you to use your appliance effectively and safely, please read this instruction book carefully
before using the appliance and retain for future reference.
CONTENTS
SECTION
PAGE NO.
Important Safety Instructions
3
Product Description
4
Installation
5
Operation Instruction
8
Maintenance and Cleaning
23
Troubleshooting
27
Technical Information
31
Warranty conditions
32
DISPOSAL INFORMATION
Most of the packing materials are recyclable. Please dispose of those materials through your
local recycling depot or by placing them in appropriate collection containers.
If you wish to discard this product, please contact your local authorities and ask for the
correct method of disposal.

EASY DECISION
IMPORTANT SAFETY INSTRUCTIONS
IMPORTANT: Read the assembly instruction section and safety precautions of this booklet carefully before
removing the contents of this carton.
1. This appliance is intended to be used in household and similar applications , such as:
a. staff kitchen areas in shops, offices and other working environments;
b. farm houses;
c. by clients in hotels, motels and other residentialtype environments;
d. bed and breakfast type environments.
2. The appliance is not to be used by persons (including children) with reduced physical, sensory or mental
capabilities, or lack of experience and knowledge, unless they have been given supervision or instruction. Do
not let children play with the appliance.
3. Do not leave the door in the open position since this could present a tripping hazard.
4. When loading items to be washed:
a. Locate sharp items so that they are not likely to damage the door seal.
b. WARNING: Knives and other utensils with sharp points must be loaded in the basket with their
points facing down or placed in a horizontal position.
5. If the supply cord is damaged, it must be replaced by the manufacturer or its service agent or a similarly
qualified person in order to avoid a hazard.
6. After having installed the appliance, the switched outlet must always be in an accessible position.
7. WARNING: Some dishwasher detergents are strongly alkaline. They can be extremely dangerous if
swallowed. Avoid contact with the skin and eyes and keep children away from the dishwasher when the
door is open. Check that the detergent receptacle is empty after completion on the wash cycle.
8. Do not place any heavy objects on or stand on the door when it is open. The appliance could tip forward.
9. Check that the detergent powder is empty after completion of the wash cycle.
10. Use only detergent and rinse additives designed for automatic dishwasher.
11. Do not operate your dishwasher unless all enclosure panels are properly in place.
12. Never use soap, laundry detergent, or hand washing detergent in your dishwasher.
13. The appliance is to be connected to the water mains using new hose sets and that old hose-sets should not
be re-used.
14. During installation, the power supply cord must not be excessively or dangerously bent or flattened.
15. Maximum: 9 place settings.
16. Maximum: 1 MPa inlet water pressure.
17. Minimum: 0.04 MPa inlet water pressure.
This appliance is for indoor use only, for household use only. To protect against the risk of electrical shock, do not
immerse the unit, cord or plug in water or other liquid.
Please unplug before cleaning and maintaining the appliance .Use a soft cloth moisten with mild soap, and then use
a dry cloth to wipe it again.
3

EASY DECISION
Product Description
IMPORTANT:
To get the best performance from your dishwasher, read all operating instructions before using it for the first time.
Product Overview
3
4

EASY DECISION
INSTALLATION
Electrical Shock Hazard
Disconnect electrical power before installing dishwasher.
Failure to do so could result in death or electrical shock.
The installation of the pipes and electrical equipment should be done by professionals.
For personal safety:
Do not use an extension cord or an adapter plug with this appliance.
Do not, under any circumstances, cut or remove the earthing connection from the power cord.
Electrical requirements
Please look at the rating label to know the rating voltage and connect the dishwasher to the appropriate power
supply.
Electrical connection
Ensure the voltage and frequency of the power corresponds to those on the rating plate. Only insert the plug into an
electrical socket which is earthed properly. If the electrical socket to which the appliance must be connected is not
appropriate for the plug, replace the socket, rather than using an adaptor as this could cause overheating and burns.
WARNING: Ensure that proper earthing exists before use.
This appliance must be earthed. In the event of a malfunction or breakdown, earthing will reduce the risk of an
electric shock by providing a path of least resistance of electric current. This appliance is equipped with a cord
having an equipment-earthing conductor and an earthing plug.
The plug must be plugged into an appropriate outlet that is installed and earthed in accordance with
all local codes and ordinances.
Improper connection of the equipment-earthing conductor can result in the risk of an electric shock. Check with a
qualified electrician or service representative if you are in doubt whether the appliance is properly earthed.
Do not modify the plug provided with the appliance if it does not fit the outlet. Have a proper outlet installed
by a qualifiedelectrician.
WARNING: After having installed the appliance, the switched outlet must always be in an accessible position.
5
EASY DECISION
INSTALLATION
Position the Appliance
Position the appliance in the desired location. The back should rest against the wall behind it, and the
sides, along the adjacent cabinets or walls. The dishwasher is equipped with water supply and drain
hoses that can be positioned either to the right or the left sides to facilitate proper installation.
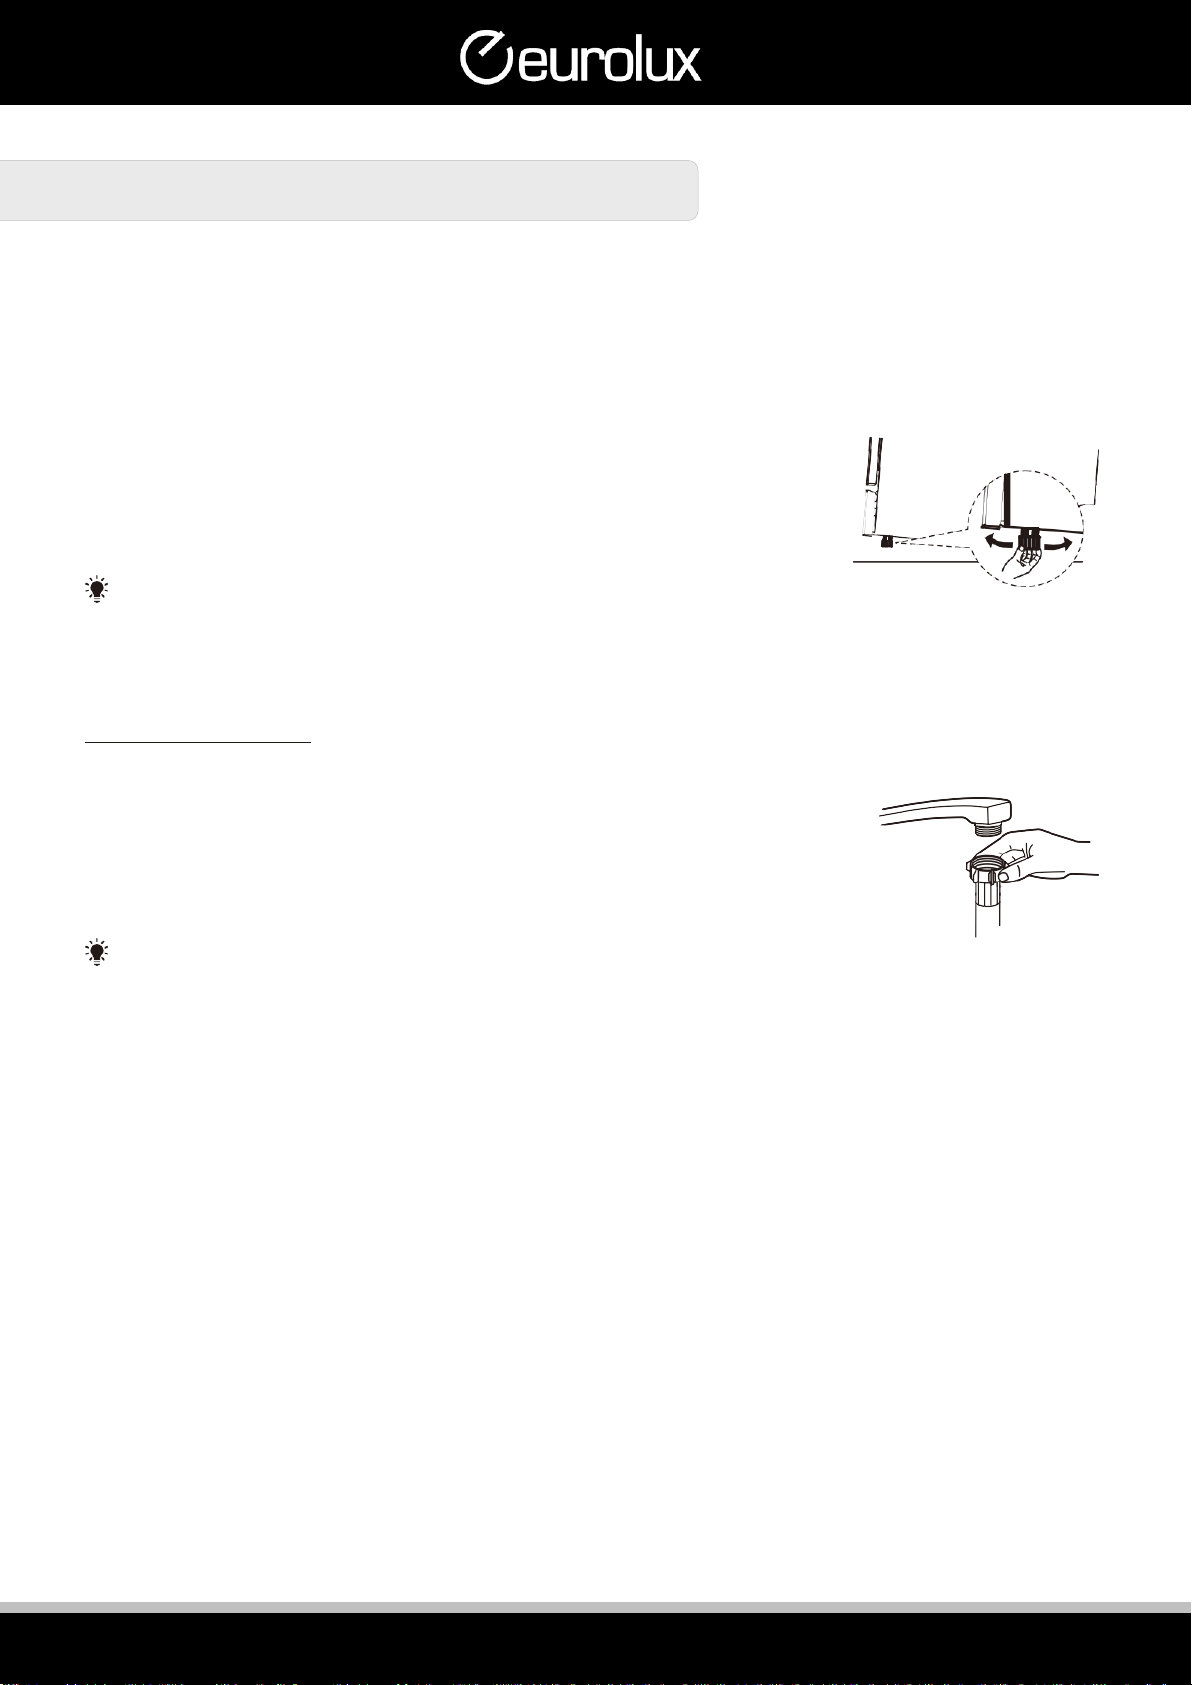
Levelling the appliance
Once the appliance is positioned for levelling, the height of the
dishwasher may be altered via adjustment of the screwing level of the
feet.
In any case, the appliance should not be inclined more than 2°.
NOTE:
Only apply to the freestanding dishwasher.
Water Supply and Drain
Cold water connection
Connect the cold water supply hose to a threaded 3/4(inch) connector and
make sure that it is fastened tightly in place. If the water pipes are new or
have not been used for an extended period of time, let the water run to
make sure that the water is clear. This precaution is needed to avoid the risk
of the water inlet to be blocked and damage theappliance.
NOTE:
Please close the hydrant after using.
6
EASY DECISION
INSTALLATION
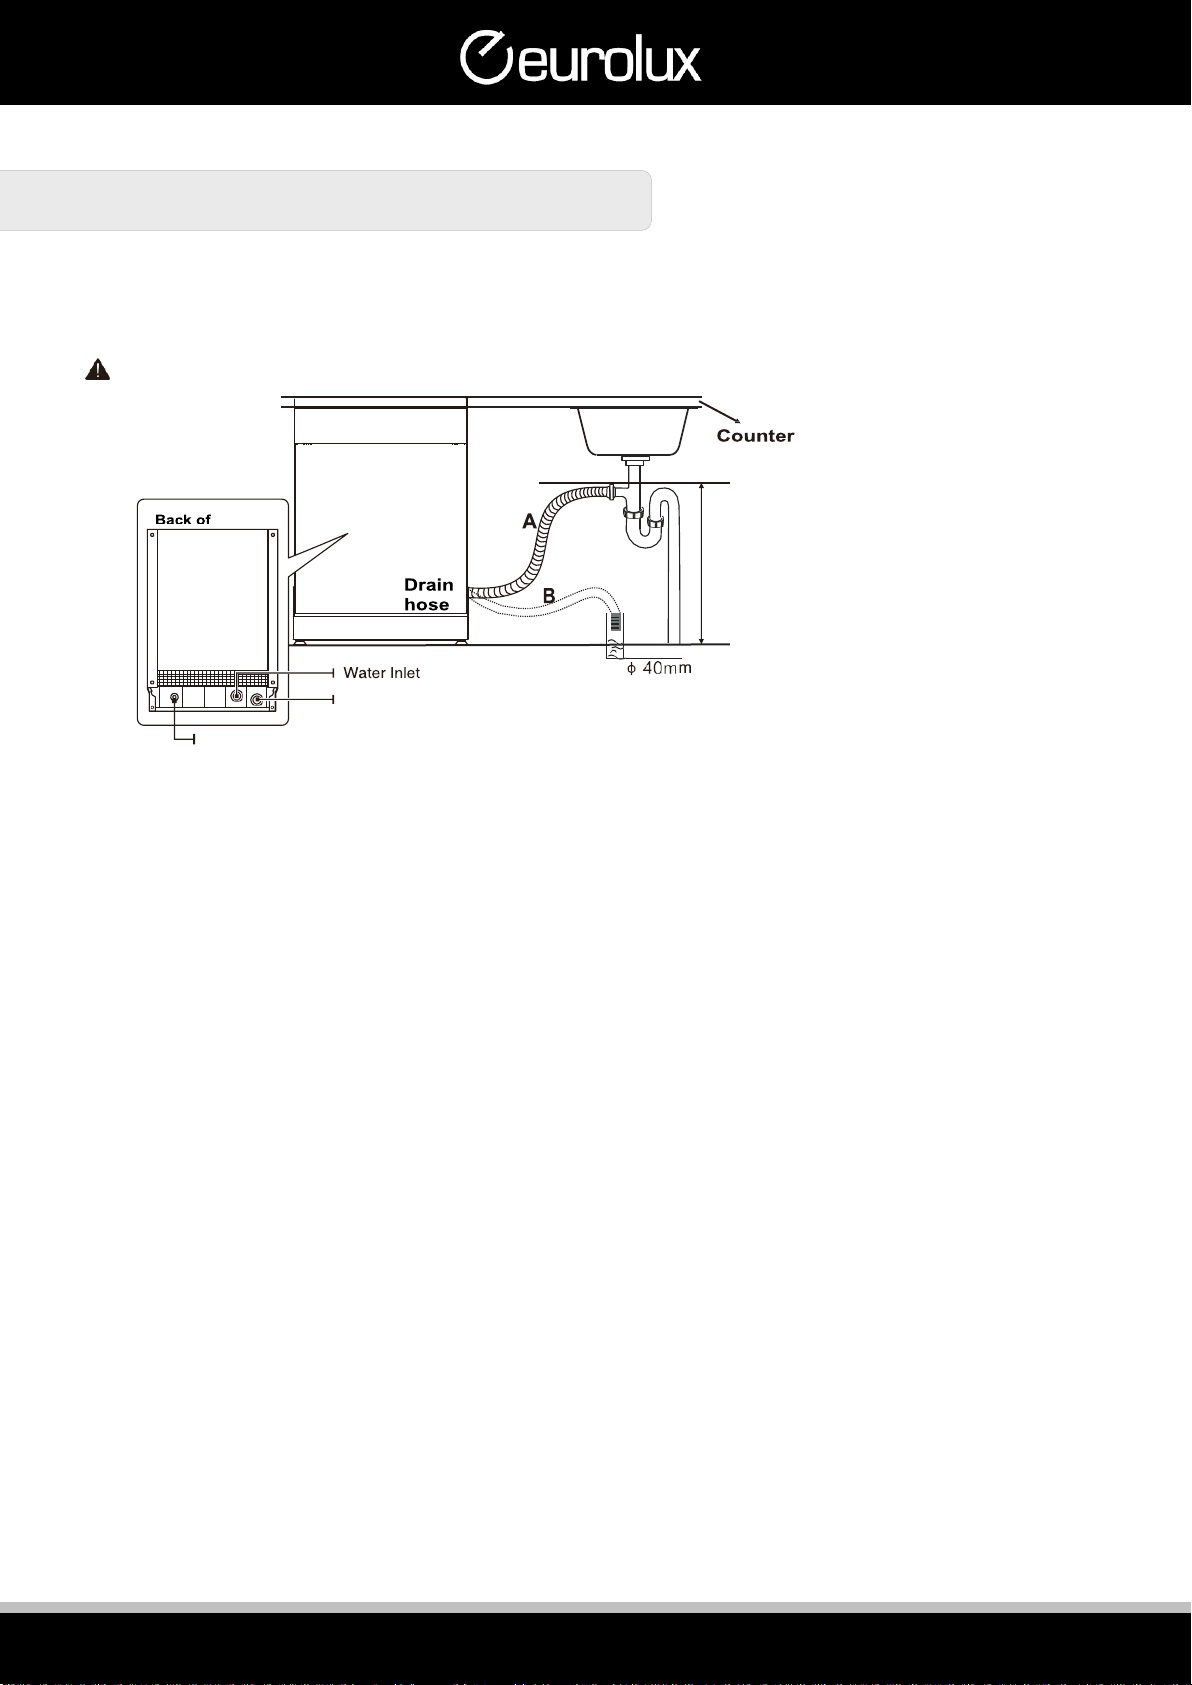
Insert the drain hose into a drain pipe with a minimum diameter of 4 cm, or let it run into the sink,
making sure to avoid bending or crimping it. The height of drain pipe must be less than 1000mm.
The free end of the hose must not be immersed in water to avoid the back flow ofit.
Please securely fix the drain hose in either position A or position B
How to drain excess water from hoses
If the sink is 1000 higher from the floor, the excess water in hoses cannot be drained directly into the
sink. It will be necessary to drain excess water from hoses into a bowl or suitable container that is held
outside and lower than the sink.
Water outlet
Connect the water drain hose. The drain hose must be correctly fitted to avoid water leaks. Ensure
that the water drain hose is not kinked or squashed.
Extension hose
If you need a drain hose extension, make sure to use a similar drain hose.
It must be no longer than 4 meters; otherwise the cleaning effect of the dishwasher could be
reduced.
Syphon connection
The waste connection must be at a height less than 100 cm (maximum) from the bottom of the
dish. The water drain hose should be fixed.
Drain Pipe
Mains Cable
MAX
1000mm
7
EASY DECISION
OPERATION INSTRUCTION
Control Panel
Operation (Button)
1
Power
Press this button to turn on your dishwasher.
2
Program
Select the appropriate washing program, the selected program indicator will
be lit.
3
Half-load
When you have about or less than 6 place setting dishware to wash, you can
choose this function to save energy and water. (It can only be used with
Intensive, ECO, Glass and 90 min.)
4
Extra Drying
For better drying result. (It can only be used with Intensive, ECO, Glass and 90
min.)
5
Child lock
This option allows you to lock the buttons on the control panel - except the
Power button - so children cannot accidently start the dishwasher by
pressing the buttons on thepanel.
To lock or unlock the buttons on the control panel, press the
Extra drying button for 3 seconds.
6
Delay
Press the Delay button to increase the delay start time. Delay a cycle for up
to 24 hours in one-hour increments.
7
Start/Pause
To start the selected washing program or pause it when the dishwasher is
working.
5
8
1 2
45
9 10 6 7

EASY DECISION
OPERATING INSTRUCTIONS
Display
Intensive
For heaviest soiled crockery, such as pots, pans, casserole dishes and dishes
that have been sitting with dried food on them for some time.
ECO
This is standard program, it is suitable to clean normally soiled loads, such as
pots, plates, glasses and lightly soiled pans, standard everyday cycle.
8
Program
indicator
Glass
For lightly soiled crockery and glass.
90 min
For lightly soiled plates and pans that need quick wash.
Rapid
A shorter wash for lightly soiled loads that do not
need drying.
Soak
To rinse dishes that you plan to wash later that day.
Rinse Aid
If the “
”indicator is lit, it means the dishwasher is low on dishwasher
rinse aid and requires a refill.
9
Warning
indicator
Program end
When the program is end, the indicator will be lit.
Water Faucet
If the “”indicator is lit, it means the water faucet closed.
10
Screen
To show the reminding time, delay time, error code etc.
9

EASY DECISION
OPERATING INSTRUCTIONS
Function of The Rinse Aid and Detergent
The rinse aid is released during the final rinse to prevent water from forming droplets on your
dishes, which can leave spots and streaks. It also improves drying by allowing water to roll off the
dishes. Your dishwasher is designed to use liquid rinse aids.
When to refill the rinse aid dispenser
Unless the rinse-aid warning light (
) on the control panel is on, you
can always estimate the amount from the colour of the optical level
indicator located next to the cap. When the rinse-aid container is full, the
indicator will be fully dark. The size of the dark dot decreases as the
rinse-aid diminishes. You should never let the rinse aid level be less than
1/4 full.
As the rinse aid diminishes, the size of the black dot on the rinse aid level indicator changes, as
illustrated below.
Full
3/4 full
1/2 full
1/4 full
Empty
Function of detergent
The chemical ingredients that compose the detergent are necessary to remove, crush and dispense all dirt
out of the dishwasher. Most of the commercial quality detergents are suitable for this purpose.
8
WARNING
WARNING
Dishwasher detergent is corrosive! Keep dishwasher detergent out of the reach
of children.
10
Optical level indicator
EASY DECISION
OPERATING INSTRUCTIONS
Filling the Rinse Aid Reservoir
NOTE:
Clean up any spilled rinse aid with an absorbent cloth to
avoid excessive forming during the next wash.
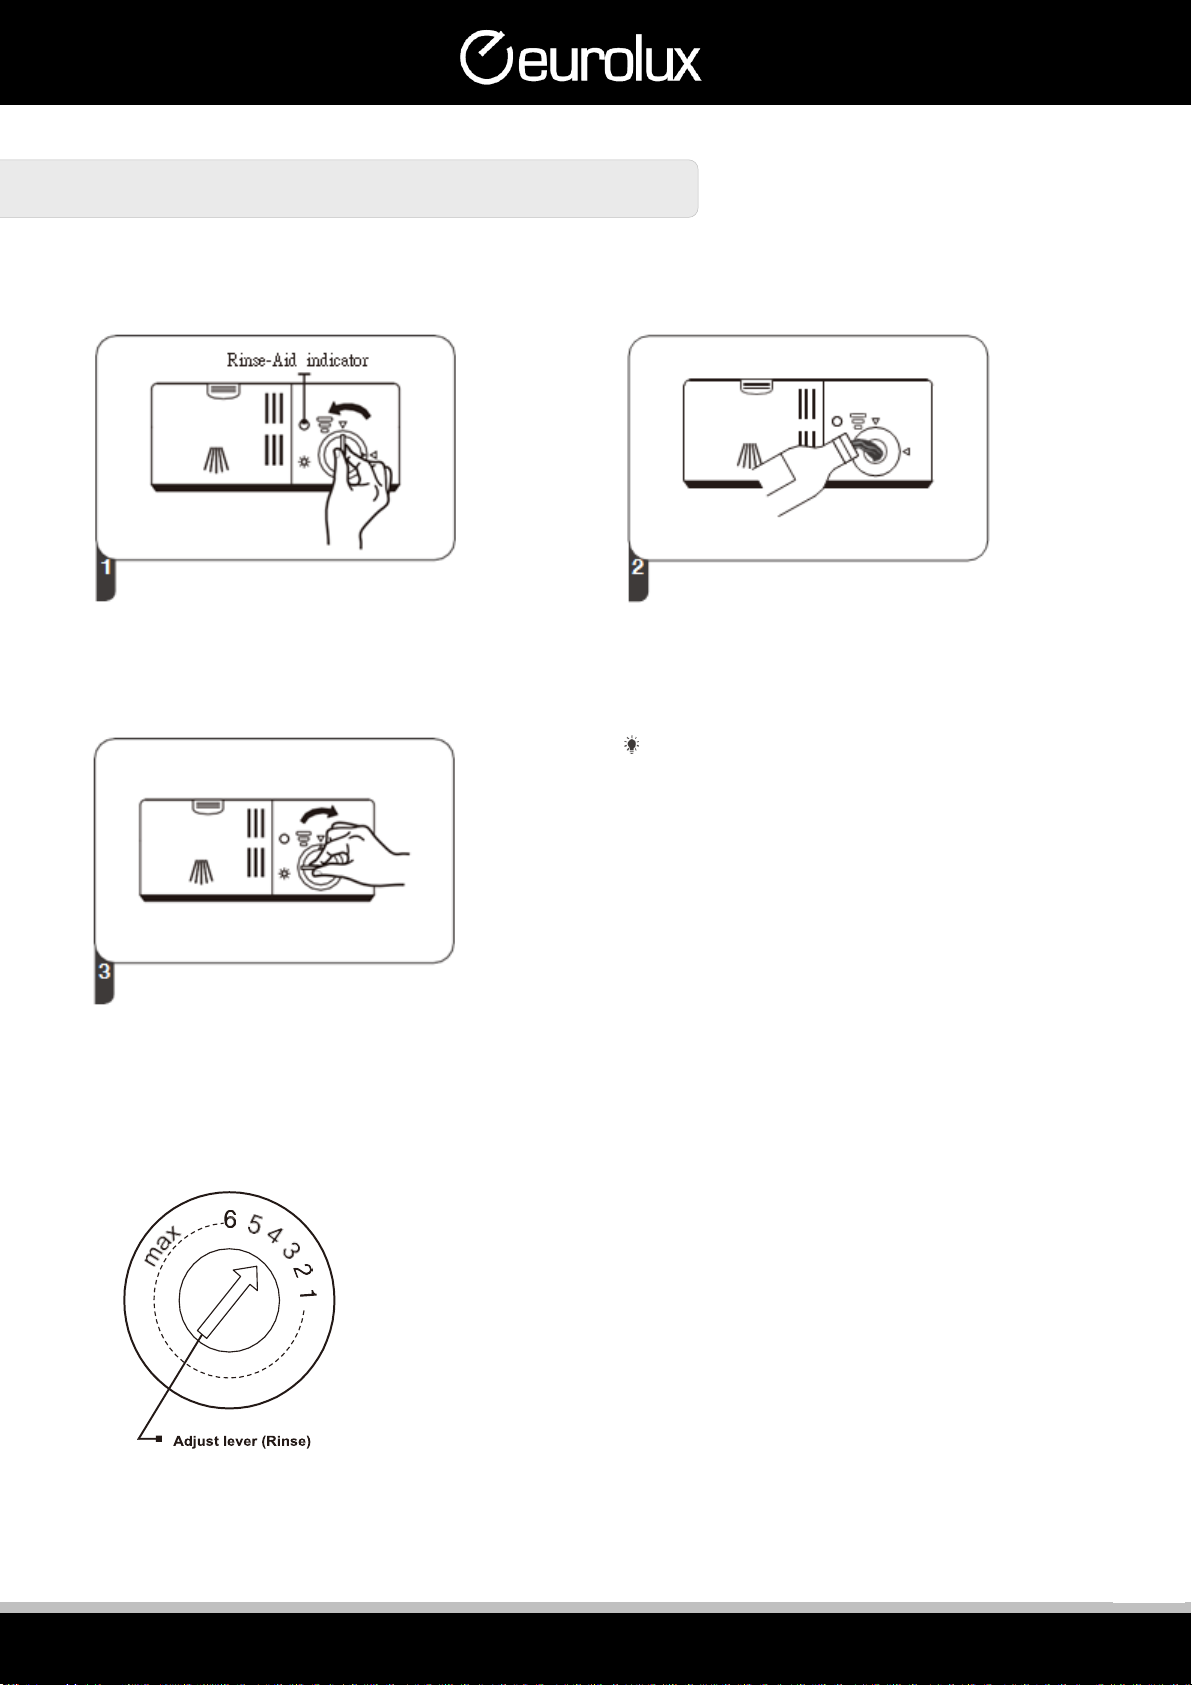
Adjusting the rinse aid reservoir
The rinse aid reservoir has six settings. Both the recommended setting and
the factory setting is 4. If the dishes are not drying properly or are spotted,
adjust the dial to the next higher number until your dishes are spot-free.
Reduce it if there are sticky whitish stains on your dishes or a bluish film on
glassware or knife blades.
To open the dispenser, turn the cap
to the “open” (left) arrow and lift it
out.
Carefully pour in the rinse-aid into
its dispenser, whilst avoiding it to
overflow.
Replace the cap by inserting it
aligned with “open” arrow and
turning it to the closed (right) arrow.
11

EASY DECISION
OPERATING INSTRUCTIONS
Filling the Detergent Dispenser
NOTE:
Be
aware that depending on the soiling of water, setting may be different.
Please observe the manufacturer’s recommendations on the detergent packaging
12
6
Press the release catch on the detergent
dispenser to open the cover.
Add detergent into the larger cavity (A) for the
main wash cycle. For more heavily soiled wash
loads, also add some detergent into the smaller
cavity (B) for the pre-wash cycle.
Close the cover and press on it until it
locks into place.

EASY DECISION
OPERATING INSTRUCTIONS
Before using your dishwasher:
Inside Outside
1.
2.
3.
Basket Use Tips
Adjusting the upper basket
The height of the upper basket can be easily adjusted to accommodate taller dishes in either the upper or lower
basket.
To adjust the height of the upper rack, follow these steps:
Pull out the upper basket.
Remove the upper basket.
Re-attach the upper basket to upper or
lower rollers.
Push in the upper basket.
13

EASY DECISION
OPERATING INSTRUCTIONS
Folding back the cup shelves
To make room for taller items in the upper basket, raise the cup rack upwards. You can then
lean the tall glasses against it. You can also remove it when it is not required for use.
Folding back the rack shelves
The spikes of the lower basket are used for holding plates and a platter. They can be
lowered to make more room for large items.
raise upwards fold backwards
14

EASY DECISION
OPERATING INSTRUCTIONS
Preparing and Loading Dishes
Consider buying utensils which are identified as dishwasher-proof.
For particular items, select a program with the lowest possible temperature.
To prevent damage, do not take glass and cutlery out of the dishwasher immediately
after the program has ended.
For washing the following cutlery/dishes
Are not suitable
Cutlery with wooden, horn china or mother-of-pearl handles
Plastic items that are not heat resistant
Older cutlery with glued parts that are not temperature resistant
Bonded cutlery items or dishes
Pewter or cooper items
Crystal glass
Steel items subject to rusting Wooden platters
Items made from synthetic fibres
Are of limited suitability
Some types of glasses can become dull after a large number of washes
Silver and aluminum parts have a tendency to discolour during washing
Glazed patterns may fade if machine washed frequently
Recommendations for loading the dishwasher
Scrape off any large amounts of leftover food. Soften remnants of burnt food in pans. It is not
necessary to rinse the dishes under running water.
For best performance of the dishwasher, follow these loading guidelines.
(Features and appearance of baskets and cutlery baskets may vary from
your model.)
Place objects in the dishwasher in following way:
Items such as cups, glasses, pots/pans, etc. are faced downwards.
Curved items, or ones with recesses, should be loaded aslant so that water can run off.
All utensils are stacked securely and cannot tip over.
All utensils are placed in the way that the spray arms can rotate freely during washing.
15
EASY DECISION
OPERATING INSTRUCTIONS
Recommendations for loading the dishwasher cont.
Scrape off any large amounts of leftover food. Soften remnants of burnt food in pans. It is not
necessary to rinse the dishes under running water.
For best performance of the dishwasher, follow these loading guidelines.
(Features and appearance of baskets and cutlery baskets may vary from
your model.)
Place objects in the dishwasher in following way:
Load hollow items such as cups, glasses, pans etc. with the opening facing downwards so
that water cannot collect in the container or a deep base.
Dishes and items of cutlery must not lie inside one another or cover each other.
To avoid damage, glasses should not touch oneanother.
The upper basket is designed to hold more delicate and lighter dishware such as glasses,
coffee and tea cups.
Long bladed knives stored in an upright position are a potential hazard!
Long and / or sharp items of cutlery such as carving knives must be positioned horizontally in
the upper basket.
Please do not overload your dishwasher. This is important for good results and for reasonable
consumption of energy.
NOTE:
Very small items should not be washed in the dishwasher as they could easily fall out of the basket.
Removing the dishes
To prevent water dripping from the upper basket into the lower basket, we recommend that
you empty the lower basket first, followed by the upper basket.
WARNING
16

EASY DECISION
OPERATING INSTRUCTIONS
Loading the upper basket
The upper basket is designed to hold more delicate and lighter dishware
such as glasses, coffee and tea cups and saucers, as well as plates, small
bowls and shallow pans (as long as they are not too dirty). Position the
dishes and cookware so that they will not get moved by the spray of water.
Loading the lower basket
We suggest that you place large items and the most difficult to clean items
are to be placed into the lower basket: such as pots, pans, lids, serving dishes
and bowls, as shown in the figure below. It is preferable to place serving dishes
and lids on the side of the racks in order to avoid blocking the rotation of the
top spray arm.
The maximum diameter advised for plates in front of the detergent dispenser is
of 19 cm, this not to hamper the opening of it.
Loading the cutlery basket
Cutlery should be placed in the cutlery rack separately from each other in the appropriate
positions, and do make sure the utensils do not nest together, this may cause bad performance.
WARNING
For the best washing result, please load the baskets refer to standard
loading
17
EASY DECISION
OPERATING INSTRUCTIONS
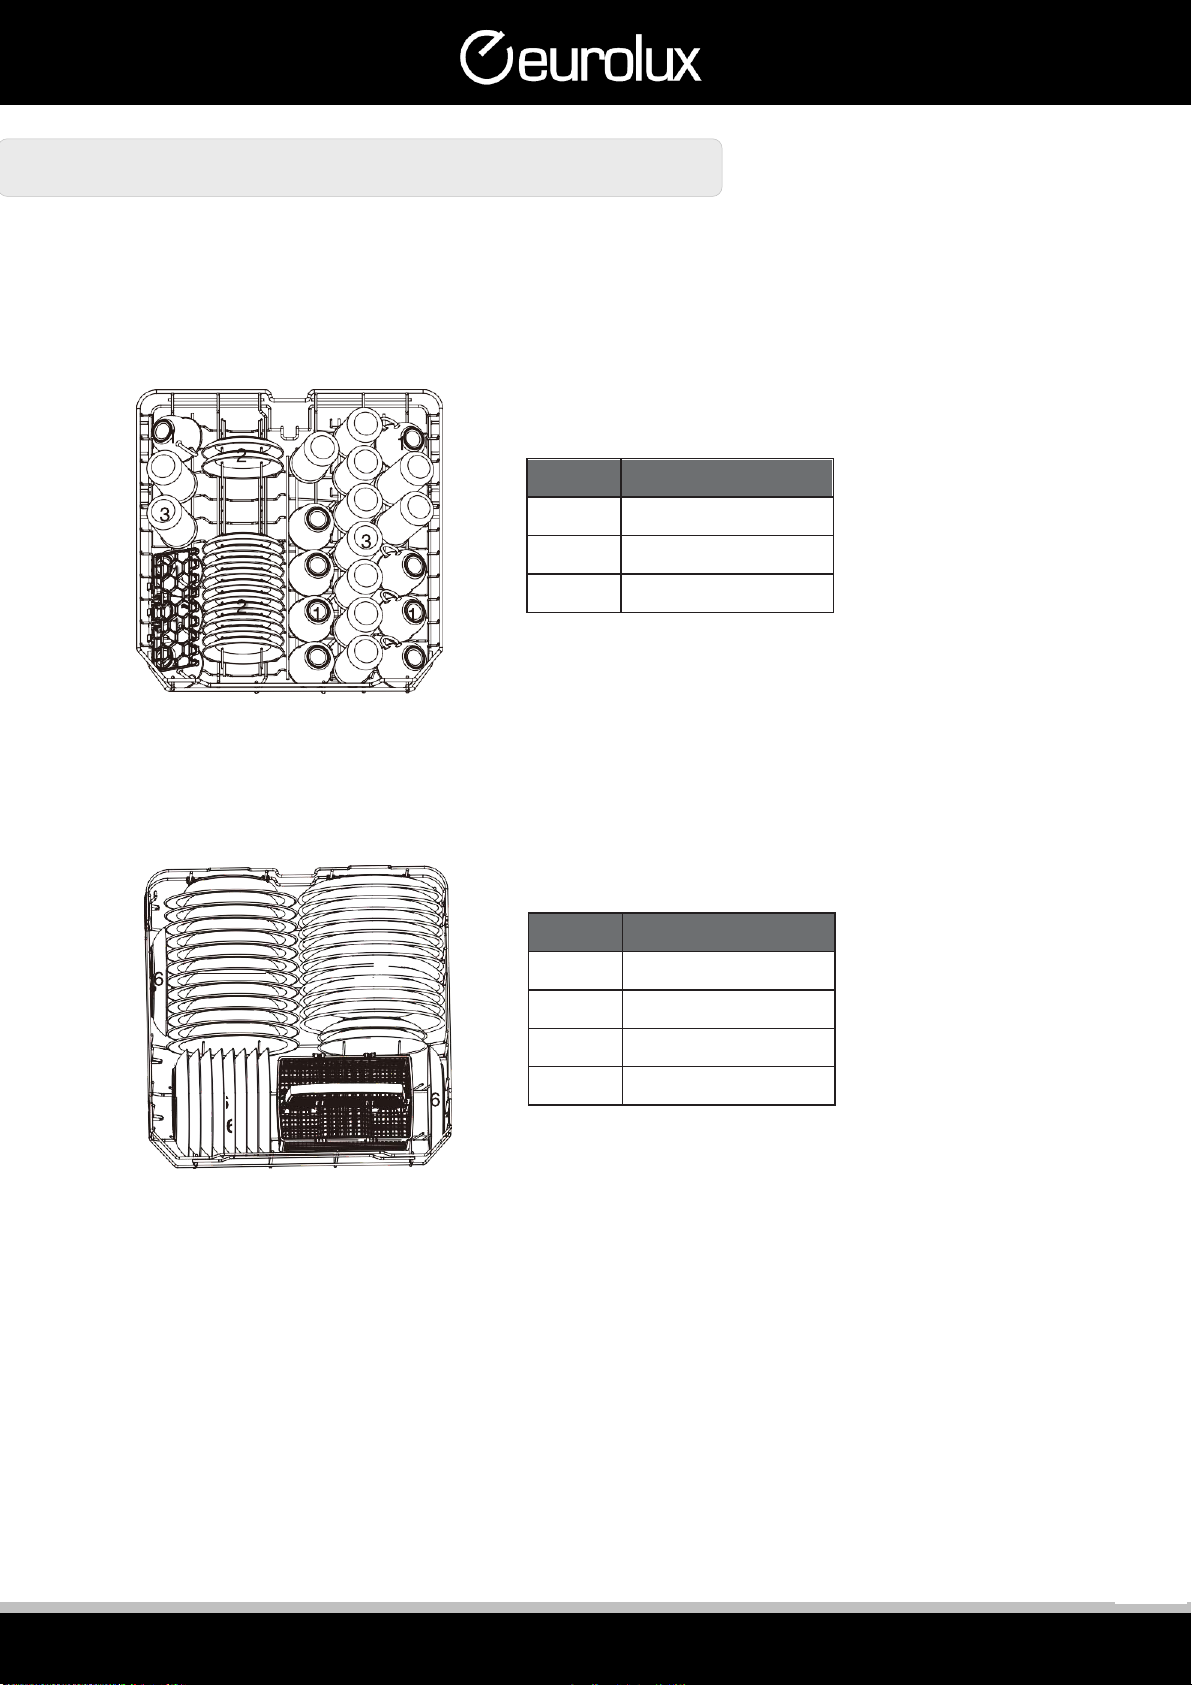
LOADING THE BASKETS ACCORDINGTO AS/NZS2007.1:
1.
Upper basket:
2.
Lower basket:
Number
Item
1
Cups
2
Saucers
3
Glasses
Number
Item
4
Dessert dishes
5
Dinner plates
6
Soup plates
7
Cutlery basket
18
5
4
6

EASY DECISION
44
OPERATING INSTRUCTIONS
3. Cutlery basket:
Information for comparability tests in accordance with (*AS/NZS
Capacity: 12 place settings
Position of the upper basket: lower position Program: ECO
Rinse aid setting: 6 Detergent(Pre/main): 5/25g
Door is open at the end of the drying cycle for the drying performance test and last
40mins.
(Door position: Open 50 mm)
Number
Item
1
Forks
2
Soup spoons
3
Dessert spoons
4
Teaspoons
5
Knives
19

EASY DECISION
OPERATING INSTRUCTIONS
PROGRAMMING THE DISHWASHER
Wash Cycle Table
The table below shows which programs are best for the levels of food residue
on them and how much detergent is needed. It also show various information about the programs.
(
) Means: need to fill rinse into the Rinse-Aid Dispenser.
Program
Description
of Cycle
Detergent
Pre/Main
Running
Time (min)
Energy
( h)kW
Water
(L)
Rinse
Aid
Pre-wash( ℃
℃
℃
℃
℃
℃
℃
℃
℃
NOTE:
AS/NZS 2007.1:This program is the test cycle. The information for comparability test in accordance with AS/NZS
2007.1
20
Table of contents
Other Eurolux Dishwasher manuals

Eurolux
Eurolux ED1 10P5 V User manual

Eurolux
Eurolux ED3 10TP7 V User manual

Eurolux
Eurolux DW12-CBE7 User manual

Eurolux
Eurolux DW12V-AAA-9 User manual

Eurolux
Eurolux ED4 15TP9 V User manual

Eurolux
Eurolux DW10VEE-A++AA-8 User manual

Eurolux
Eurolux DW9-CBE

Eurolux
Eurolux ED2 13P7 V User manual

Eurolux
Eurolux ED2 10P7 V User manual

Eurolux
Eurolux ED4 10TP9 V User manual

Eurolux
Eurolux ED3 15TP7 V User manual

Eurolux
Eurolux DW9-CBE Troubleshooting guide

Eurolux
Eurolux DW10VE-A++AA-6 User manual

Eurolux
Eurolux DW12VE - A++AA-6 User manual

Eurolux
Eurolux DW9-CBE7 User manual

Eurolux
Eurolux DW10V--AAA--6 User manual

Eurolux
Eurolux ED1 12P5 V User manual

Eurolux
Eurolux DW12-CBE4


