Eurotops Versand 50740 User manual
l
Compact DAB+/FM Radio
Art. No. 50740
User Manual

Contents
Location of controls .....................................3
Precautions ................................................
................................
6
Getting started ............................................6
7
Charging battery .........................................8
Change mode .
... ....................................9
DAB radio operation ...................................10
FM radio operation .....................................15
Statio n Preset ...........................................
......................................
.....................................
18
Q & A .................
.......... ..................................
.......................... .............
Bluetooth Playback 19
20
22
23
Declaration of Conformity
the
Technical Data
Package Disposal

- 3 -
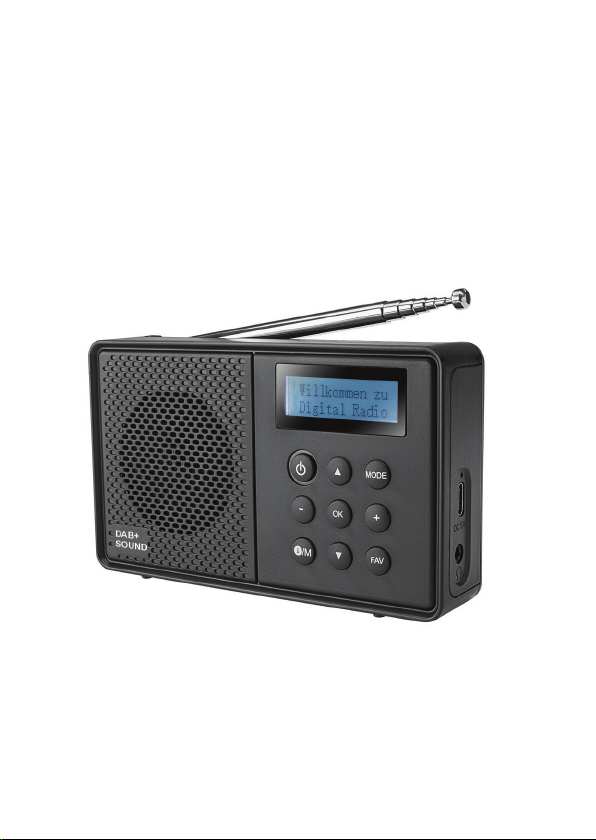
Location of controls
1
2
3
4
5
6
7
8 9 1011
12
14
15
13
DAB+
SOUND

- 4 -
Location of controls
1. Display
3. ▲
[DAB]
-
-
[FM]
-
-
-
4. MODE
5.
6. OK
-
-
-
-
2.
Press and hold to power on, press and hold it again
to power off..
[Bluetooth]
Short press to go to previous song.
Press repeatedly to cycle through various modes:
DAB / FM / Bluetooth
Under Bluetooth, press the OK button to pause the
music playing. Press the button again to continue the playing.
Enter the station list after scan
Scroll up on the menu list
Every press of the button will scan the frequency
upward by 0.05MHz.
Press and hold the button for 2 seconds, the radiscreen
will display 'Scanning', it stops to
scan until it reaches next downward available
station, and starts to play
Scroll up on the menu list
Press - to reduce the volume level
Press to confirm a selection
Press and hold the button in FM mode to initiate
an auto scan. The stations received are saved
into preset station list automatically.
Under FM, press the OK button to switch Mono
or Stereo when the screen stays in FM playing mode.

- 5 -
Location of controls
7. +
Press + to increase the volume level
8. /M
[ ]-Info
Press the button repeatedly to view various info
broadcasted by the radio station
[ M ] - Menu
Press and hold the button to enter the main menu
9. ▼
[DAB]
- Enter the station list after scan
- Scroll down on the menu list
[FM]
- Every press of the button will scan the frequency
downward by 0.05MHz
- Press and hold the button for 2 seconds, the
radio screen will display 'Scanning', it stops to
scan until it reaches next upward available
station, and starts to play.
- Scroll down on the menu list
10. FAV
- Press and hold the button to enter the list of
"Preset store”
- Press briefly to enter the list of "Preset Recall”
11. Speaker
12. Antenna
13. LED indicator for battery charging
14.
15. Earphone socket
[Bluetooth]
- Short press to go to next song.
USB Type C port for charging internal battery

- 6 -
Precautions
• The radio should not be used in a high temperature
or high humidity environment over prolonged
periods of time as this may damage the unit.
• Keep the radio away from liquids as it may get
damaged. Please switch off the radio immediately
if water or liquids is spilled into the radio. Consult
with the shop you bought this radio for any
question.
• Avoid using or storing the unit in dusty or sandy
environment.
• Do not open and repair the radio by yourself.
• Use only the specified power input voltage to
charge the battery. Connecting a power supply with
a different rating will cause permanent damage to
the radio and may be hazardous.
• Clean only with dry cloth
Getting started
The radio is powered by the built-in lithium battery. A
USB C charging cable is supplied.
Press and hold the [ ] button to power on.
To power off the radio, press and hold the same button
briefly.
- 7 -
Guidelines and Standards
This device complies with the following directives:
• CE-EMC directive 2014/30/EU
• Radio Equipment directive (RED) 2014/53/EU
• Directive 2011/65/EU (RoHS 2.0) and its amend
ment directive (EU)2015/863
Declaration of Conformity
Hereby, EUROtops Versand GmbH declares that
article 50740 Compact DAB+/FM radio complies with
the essential requirements of the European Union
Directive 2014/53/EU.
The full text of the EU declaration of conformity is
available at the following address:
Eurotops Versand GmbH
Elisabeth-Selbert-Straße 3
40764 Langenfeld, Germany
Tel: +49-(0)2173-9246888
Fax: +49-(0)2173-9990447
Email: [email protected]
Declaration of Conformity

- 8 -
Charging battery
You can check the level of battery power remains on
the radio.
When the radio is playing, press the [ /M] button
repeatedly until you see the percentage of
remaining battery power display as follow:
When battery power is low, it will prompt with
message "Battery Low" to remind for battery
charging.
To charge the battery, connect the USB-C plug to the
port at the side of the radio, connect the other end to
a power source supplied with 5.0V OUT. The LED
will light up in red indicates the battery is charging.
If the radio is in OFF mode while charging, the LED
will turn off when charging is done. If the radio is ON
when charging, the LED remains red even charging
is completed. Please check the battery indicator to
see the status of charging.
percentage of remaining
battery power
ABC dig
Battery 74

- 9 -
When the radio is powered on, press the [ MODE ]
button to switch modes of DAB / FM / Bluetooth.
Change the Mode

- 10 -
DAB radio operation
DAB scan
The first time you power on the radio, it will scan the
DAB radio stations automatically. It will display and
play the first station after the scan is done.
In case it displays "No DAB Station", it will enter into
main menu automatically and display the "Full Scan"
option, press [OK] to start scanning.
Tune DAB station
After the scan is done, press the [ ▲/▼ ] button will
enter into the station list, select the station you want
to listen.
Highlight it and it will start to play.
DAB main menu
There are other options available under DAB mode.
Press and hold the [ /M ] button, it will enter into
the menu as follow.
Note: Always use the [ ▲/▼ ] button to select and
press [OK] to confirm a selection.
Use the [ /M ] button to exit to the last level of
menu.
When an Asterisk * displayed on the top right corner
along an option, it means that option is being
selected in the setting.
• Full scan
It will pick up the DAB stations available in your
area.
DAB
<Full scan >

- 11 -
• Manual tune
This function allows you to check whether a specific
frequency can be received in your area and it's
signal strength. When this option is selected, it will
show a list of DAB frequencies. Choose the desired
frequency and it will display the signal strength.
• DRC
Dynamic Range Control (also known as DRC) can
make quieter sounds easier to hear when your radio
is used in a noisy environment.
DRC Off – No compression
DRC High – Maximum compression
DRC Low – Medium compression
Setting the compression to maximum will 'boost' the
quiet sounds, whilst keeping the loudest sounds at
their original level.
• Prune
Choose "Yes" on this option, it will delete the DAB
stations from your station list that are no longer valid
or stop service.
• System
More options available for the system setting:
Ø Alarms
There are 2 alarm settings on the radio, Alarm 1
and Alarm 2.
Important! Alarm works only when a power supply
is connected. Please ensure the time is set /
synchronized to the actual time.
DAB radio operation

- 12 -
- Select Alarm 1 or Alarm 2 by the up/down
button. Press OK to confirm.
- Choose "On" or "Off" by the up/down button to
activate the Alarm or disable it, then press OK.
- Set the time by the up/down button. Set the
"Hour" first, press and hold the up/down button
to fast skipping the numbers. Press OK when
done and then set the "Minutes" the same way.
- After the time is set, choose the alarm source by
the up/down button. The sources are DAB, FM
or Buzzer. Press OK to confirm.
- The next is to set the Alarm Cycle, use the
up/down button to choose the option: Once,
Daily Workday or Weekends. Press OK when
done.
- The last step is to set the Alarm Volume. Use the
up/down button to choose the desired sound
level. Press OK to complete the setting.
Note: If there is no operation in 10 seconds
during the setting , it will return to the station
playing screen automatically.
Cancelling alarm / Activating Snooze
When the alarm goes off, press any of the buttons
(except Power button) will activate the Snooze.
Pressing the Power button will cancel the alarm.
DAB radio operation
10:58:16
10-08-2022

- 13 -
Duration of Snooze
When the Snooze is activated, the "Snooze 5
minutes" will appear and blink for a few seconds.
The 5 minutes is set by default.
While it is blinking, press the up/down button to
choose other duration time of 10/15/30 minutes.
After selecting the desired option, it will blink for
a few seconds followed by the countdown timer.
ØSleep
You can set the sleep timer to switch off the radio
after a period of time. Timer options are
15/30/45/60/90 mins. Choose the timer by [▲/▼]
button, and press [OK] to confirm. To view the
time remains before sleep, enter the Sleep
setting again and it will display the remaining
time.
ØLanguage
There are 4 languages available, German,
Italian, French and English. German is set by
default. Choose the language by [ ▲/▼ ] button,
and press [OK] to confirm.
ØFactory Reset
By selecting this option, use [ ▲/▼ ] button to
DAB radio operation
Snooze:
5 Minutes
Set sleep time
14 Minutes

- 14 -
DAB radio operation
choose "YES" and press [OK] to confirm, the
radio will reboot and all settings will be resumed
factory's default (all previous settings/presets
will be erased).
SW Version
This is to show software version of the radio.
DAB radio information
When the radio station is playing, press the [ /M ]
button repeatedly to cycle through the information
broadcasted by the radio as follow:
• DLS (Dynamic Label Segmenting): Radio text
broadcasted from the DAB station such as the
news, songs being played…etc. if any. If no such
information is available, it will just show "playing.
• PTY (Programme Type): shows which type of
programme you are listening to, "Music", "Talk",
"News" etc. If there is no information, it will display
"Programme Type".
• Channel/Frequency – The frequency of DAB is
displayed such as "11C 220.352MHz".
• Audio info: The display shows the digital audio bit
rate of the current reception.
• Signal error: The signal strength is displayed
graphically.
• Time/Date – The time and date are set
automatically.
Note: The time and date accuracy depends on the
info broadcasted from the radio station.

- 15 -
FM radio operation
FM scan
Press the [ MODE] button to switch to FM.
To enable Auto Scan, press and hold the [OK]
button, it will scan the available stations according
to the scan setting selected in the menu, and store
to the preset list automatically (see below section
for scan setting).
To manual scan, use the [ ▲/▼ ] button and it will
fine tune the frequency in a step of 0.05MHz.
Alternatively, press & hold the [▲/▼] button, the
radio screen displays 'Scanning', it stops to scan
until it reaches next downward/upward available
station, and starts to play.’
FM main menu
Always use the [▲/▼] button to select and press
[OK] to confirm the selection.
Use the [ /M ] button to exit to the last level of
menu.
There are other options available under FM mode.
Press and hold the [ /M ] button, it will enter into
the menu as follow:
• Scan setting
There are two types of scan available. The scan is
carried out according to "Strong station" or "All
station". If "Strong station" is selected, it will scan
only the channels with strong reception signal
where the radio is placed. If "All station" is selected,

- 16 -
it will scan out both the strong and weak channels.
• Audio setting
You can choose to have "Forced Mono" or "Stereo
allowed". If the signal is weak and stable stereo
reception is not possible, select "Forced Mono"
have better reception.
When a FM station is playing, press the [OK] button
can access to change the audio setting. When it
appears with "St" , it means it's stereo. To select
Mono, press [OK] again. The "ST" will disappear
and it means Mono is selected.
Note: As the radio is a mono, it is suggested to use
"Forced Mono" to gain a quality reception.
• System
The options available are same as DAB. Please
refer to the DAB section as described above.
FM radio information
When the radio station is playing, press the [ /M ]
FM radio operation
FM
<Scan setting >
Scan setting*
<All stations >
Scan setting*
<Strong stations >
90.5MHz St P1
[No radioText]
Stereo

- 17 -
FM radio operation
button repeatedly to cycle through the information
broadcasted by the radio as follow:
• Name of the radio station
• RT (Radio text): Text broadcasted from the FM
station(if any).
• Program type (PTY)
• Radio Frequency – the FM frequency for the radio
station in playing.
• Signal error: The signal strength is displayed
graphically.
• Stereo/Mono: According to the audio setting
• Percentage of remaining battery power
• Time: The time is set automatically according to
the data broadcasted by the radio station.
• Date: The date is set automatically according to
the data broadcasted by the radio station
Note: The time and date accuracy depends on the
info broadcasted from the radio station.

- 18 -
Station Preset
To preset a station, press and hold the [FAV] button,
it will enter the list of "Preset Store". If the preset is
available, it will show "Empty". Use the [ ▲/▼ ]
button to choose the preset number and press [OK]
to confirm. It will display "Preset x stored".
To recall the preset station, simply press the [FAV]
button briefly, use the [ ▲/▼ ] button to navigate and
press [OK] to confirm.
There are 20 presets available for DAB and 20
presets for FM. To save more than 20 stations,
please decide which of the existing one to be
replaced with new station.

- 19 -
Bluetooth Playback
Notice
Before transmission between your BT device and the
radio is possible, both devices must be coupled. This
process is called "pairing". The radio is served as a
music stream to play on the radio.
Press the <Mode> button to cycle through the different
operating modes, ultimately selecting BT mode.
Switch on your BT device to which you want to connect
the radio to and activate the pairing mode. The device
scans for BT devices within the reception range.
When the radio is found, your BT device shows its
name “HS-D003”.
Select the radio on your BT device. If the pairing is
successful, a beep will sound and “BT Connected”
will appear on the display.
Open a media player App on the smart phone /
tablet and start playback.
Adjust the volume on both devices.
Basic functions such as play/pause and title selec-
tion can be controlled via the Bluetooth connection.
The available control functions depend on the
selected media player App. Possibly not all functions
are available.
receiver, to receive

- 20 -
Q & A
If you are experiencing problems with your DAB
radio there are some quick and easy checks that you
can do, which may help to solve the problem.
No DAB reception
- If it displays "No DAB Station", please carry out
"Factory Reset" on the radio and fully extend the
antenna to get the reception.
- Move the radio close to the window.
Radio reception is poor
- Please check that the antenna is extended for the
maximum signal strength and improved reception.
Move the antenna around with different directions
to get the best signal.
- Check that you do not have other electrical
equipment too close to your radio or close to any
sources of interference such as microwaves,
fluorescent lights, etc which causing interference.
No sound
- Check if the volume is mute. Adjust the volume
level.
- Check that the radio is power on.
- Try changing to another radio station.
The radio does not turn on
- The battery is flat. Please charge the battery and
make sure the cable is well connected and the Red
LED comes on when charging.
Table of contents
Other Eurotops Versand Radio manuals


