Eurotops 23510 User manual

RECHAREABLE POCKET SHAVER
CAT. NO. 23510
INSTRUCTIONS AND PRECAUTIONS
PARTS LIST & DIAGRAM
Part
Description
Qty.
1
Shaver
1
2
Foils
2 (the outer one is titanium plated, the
inner one made of plain stainless steel)
3
Foil Holder
1
4
Cover
1
5
Charger
1
6
Brush
1
7
Carrying Sleeve
1
8
Power Switch
1
9
Adaptor
1
Note: Some parts are listed and shown for illustration purposes
only, and are not available individually as replacement parts.

2
UNPACKING
When unpacking, make sure that the item is intact and undamaged.
If any parts are missing or broken, please call at the number shown
on the delivery documents as soon as possible.
SPECIFICATIONS
Charging Time 5-7 Hours
Speed 9000 OPM (Oscillations Per Minutes)
Charger Input 3VDC
Internal Battery Ni-Mh, 500mah
IMPORTANT SAFETY INFORMATION
1. Do not expose to moisture while charging.
2. Do not reach for a plugged in Shaver (1) that is Connected to
the charger if has fallen into water. Unplug immediately and
drain the water away.
3. Do not charge near heaters or in direct sunlight.
4. Do not use if the Charger (5) or Charger cord has been
damaged.
5. Do not attempt to remove Foil (2) covering with a screwdriver
or other tools.
6. Do not use without the Foil (2) and Foil Holder (3) in place.
7. This product is not a toy. Do not allow children to play with
this item.
8. Use as intended only.
9. Inspect before every use; do not use if parts are loose or
damaged.
10. Turn off the Shaver before charging.
11. Do not charge immediately after prolonged use. Allow it to
cool before charging.
12. Rinse the Shaver after each use and keep stored in dry cool
environment and out of children’s reach.

3
Read the ENTIRE IMPORTANT SAFETY INFORMATION
section at the beginning of this document before using this
product.
CHARGING INSTRUCTIONS
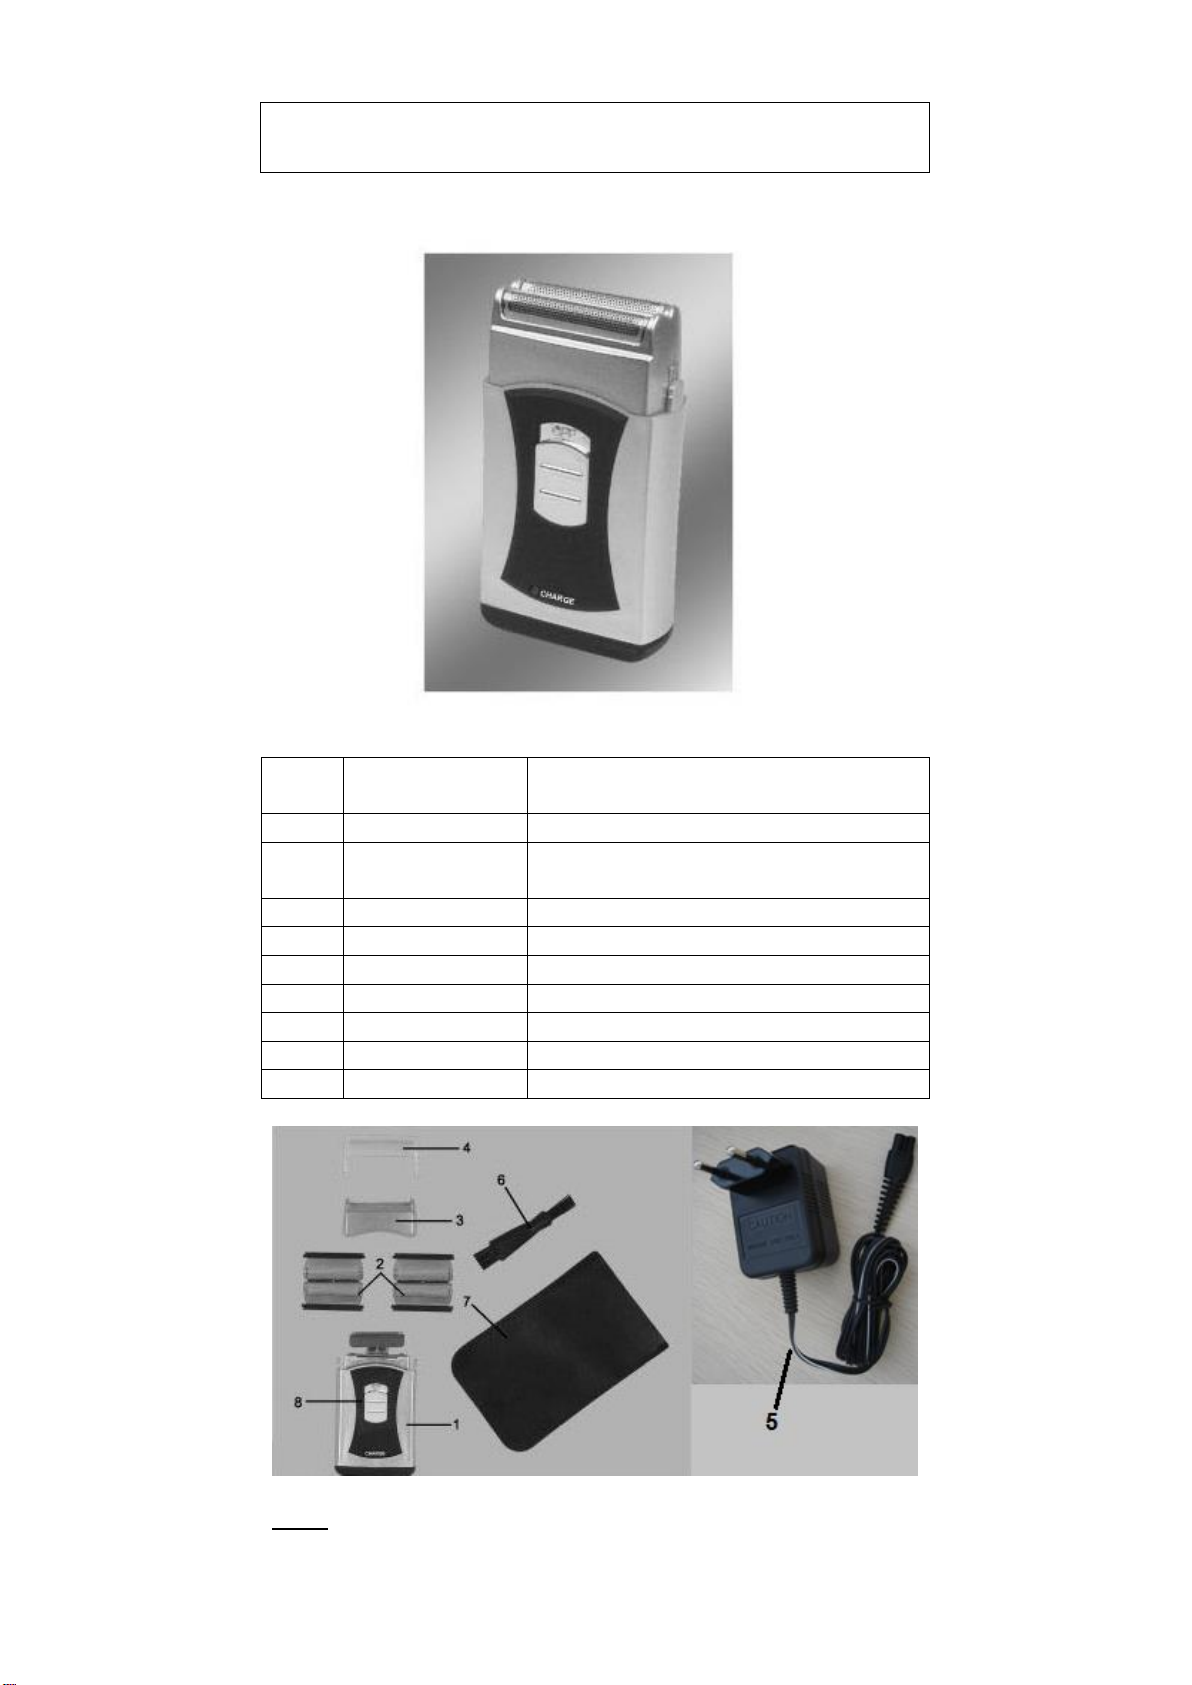
1. Attach the power cord of the Charger (5) into the bottom of the
Shaver (1). Plug the Charger into an electrical outlet that is
away from any source of water. Note: Make sure the Shaver
Switch (8) is turned to OFF.
2. Once plugged in, the LED charger light on the front of Shaver
housing will activate.
3. Charge for 5 to 7 hours. Do not charge for longer than the
required charge time.
OPERATING INSTRUTIONS
1. Once fully charged, remove the Charger cord from the
housing, remove the Cover (4) and turn the switch to ON.
2. Gently guide Shaver over your skin. Use short back and
forward strokes and do not apply too much pressure
.
3. If you have not used an electric shaver before your skin may
become irritated. This is a natural reaction that may last for a
few days until your skin adjusts to the shaver.
4. When finished shaving, turn the switch to OFF.
5. Slide the Cover onto the Shaver head until ready to use again.
When travelling keep the shaver in the Carrying Sleeve (7).
CLEANING THE SHAVER
1. After each use cuttings will collect in the Foil.
2. Clean the Foil by rinsing the Shaver head under cool running
water.
3. WARNING! Only clean when Shaver is disconnected from
the Charger and the switch is turned to OFF.
4. Hair trimmings may get under Foil and/or it may be necessary
to replace Foil. First, press down on the tabs on either side of
the Foil Holder (3).
5. Slide Foil Holder off of the top of Shaver housing, exposing
the Shaver cutting heads.
6. If necessary, use the Brush (6) to clean trimmings from the
exposed Shaver cutting heads.
6. If required, slide the old Foil from out of the Foil Holder and
rinse the trimmings away.
7. If the Foil needs replacing, slide the new Foil into the Foil
Holder so that small hole in the centre of the Foil slides over
the small tab in the middle of the Foil Holder cross bar. This
will hold the Foil in place.

4
8. If the Foil needs replacing, slide the new Foil into the Foil
Holder so that small hole in the centre of the Foil slides over
the small tab in the middle of the Foil Holder cross bar. This
will hold the foil in place.
9. Slide the Shaver housing into the Foil Holder until it snaps into
place.
10. Slide the Cover onto Shaver head.
REMOVING THE BATTERY
1. By law, the battery must be removed from the housing before
the Shaver is disposed of.
2. Use a screwdriver to unscrew the Shaver Head from the top of
the housing.
3. Peel off the label from the under the housing and unscrew the
housing.
4. Remove the front panel off the Power Switch and remove the
screw from the front panel.
5. Slide the battery holder out of housing. Remove and dispose of
the battery.
DISPOSAL:
The packaging material is reusable. Dispose of the packaging in an
environmentally friendly way by putting it in the appropriate
recyclable waste collection containers.
Dispose of the product and the batteries in view of
the environment if you want to separate. The device
and the batteries must not be thrown in with domestic
waste. Take them to a recycling center for used
electrical and electronic devices. For more
information you can consult your local government.
Remove batteries first.
Eurotops Versand GmbH
Elisabeth-Selbert-Straße 3
40764 Langenfeld, Germany
If technical support is needed, please call ...
in Switzerland 044 . 28 36 125 or info@eurotops.ch
* 14 Cents/minute via German landline, max. 42 cents/minute via mobile phone
network
**34 Cents/minute via French landline
A possible return of products should be addressed to the return
address stated on your invoice.
The manual only reflects the technical conditions available under
printing. Any changes in technology and equipment are reserved.
© 18.09.2013
Table of contents
Other Eurotops Electric Shaver manuals