Eve Audio SC Series User manual

EVE AUDIO PRODUCT MANUAL
EVE AUDIO 产品说明书
Dec 2022
2022
年
12
月
SC2070

SAFETY INSTRUCTIONS 安全须知
To avoid the risk of electrical shock, do not attempt to open the unit. There are no user-serviceable parts inside.
Do not attempt to service the equipment yourself. In case of problems, please contact your local dealer or
distributor.
为避免触电,请勿试图打开箱体。箱体内没有可供用户自行维修的元部件,请勿尝试自行修理产品。如遇
到问题,请联系当地经销商或代理商。
This unit should be connected to a grounded power outlet. If you use extension cords and power distributors they
should be grounded as well.
此产品所连接电源插座应该接地。假如您使用的是外接线和配电器,那么请确保它们也是接地的。
Verify that the specified operating voltage on the rear side matches the local mains voltage. If these values do not
match you will have to adjust the loudspeaker setting appropriately and change the fuse type.
请确保产品背面上标注的操作电压符合使用环境当地电压。假若两者电压不匹配,请调整音箱设定并更换
保险丝。
Use only the fuse types specified on the rear side of the unit. Never bypass the fuse.
请使用产品背面上标注的保险丝类型,不要忽视保险丝。
Make sure that no liquids wet the inside of the cabinet. Never spray, pour or spill liquids directly onto the unit.
请避免液体弄湿箱体内部。请不要直接喷洒、灌注或泄漏液体在产品表面。
Do not use a wet cloth nor flammable or acid chemicals for cleaning.
请勿使用湿布、可燃或酸性化学试剂清洁产品。
Do not touch the diaphragms of the loudspeaker and do not obstruct the bass reflex ports.
请勿触碰单元的振膜,也不要遮挡低音反射端口。
Make sure there is enough air flow behind the loudspeaker to maintain the electronic components cool.
请确保音箱后方留有足够空气流动区域,以维持电子元件的正常温度。
Do not expose this product to extreme temperatures.
请勿将产品置放于极端温度环境下。
The diaphragms build up a magnetic field around the loudspeaker.
振膜会在音箱周围建立起一个磁性区域。
High sound pressure levels can damage your hearing permanently! Avoid standing close to loudspeakers producing
high sound pressure levels.
高强度的声压级会对您的听力造成永久性损坏!在大音量播放时请避免离音箱过近。

EVE Audio product manual
EVE Audio 产品手册
TABLE OF CONTENTS 目录内容
1.
INTRODUCTION 介绍.................................................................................. 4
2.
QUICK START 快速启动 ...............................................................................5
2.1.
First Steps 初始步骤 ................................................................................................... 5
2.2.
Speaker Connection
扬声器连接
................................................................................5
2.3.
Powering On
开机
........................................................................................................ 5
3.
OPERATION 操作 ........................................................................................ 6
3.1.
First Steps 初始步骤.....................................................................................................6
3.2.
Operating Modes 运行模式 ........................................................................................7
3.3.
Powering on/off: Standby Mode
开/关机:待机模式
........................................... 7
3.4.
Volume Mode 音量模式 ............................................................................................. 7
3.5.
Settings Menu 设置目录 ............................................................................................. 9
3.6.
Filters 滤波器 ...............................................................................................................9
3.7.
Low Filter
低通滤波器
................................................................................................ 9
3.8.
High Filter
高通滤波器
............................................................................................. 10
3.9.
Mid Filter 中值滤波器............................................................................................... 10
3.10.
Desk Filter 桌面滤波器..............................................................................................11
3.11.
LED Mode
LED 模式
.................................................................................................11
3.12.
Saving Your Settings
保存设置
................................................................................. 12
3.13.
Power Switch 电源开关............................................................................................. 12
3.14.
DIP Switches
DIP 开关
............................................................................................. 13
3.15.
Mains Voltage Selector主电压选择器...................................................................... 13
3.16.
Power Connector (IEC) 电源连接器(IEC)......................................................... 13
4.
POSITIONING 摆位....................................................................................14
4.1.
Speaker Positioning + Rubber Feet
扬声器位置+橡胶脚垫
................................. 14
4.2.
Height and Distance
高度和距离
.............................................................................15
4.3.
Stereo Setup 立体声设置.......................................................................................... 15
4.4.
Stereo Setup + Subwoofer (2.1)
立体声设置+低音炮(2.1)
........................... 16
4.5.
Multichannel Setup (5.1) 多通道设置(5.1)........................................................17
4.6.
Mixer/Workplace Reflections 调音台/工作场所反射............................................18
4.7.
Room Acoustics
室内声学
........................................................................................ 19
5.
TECHNICAL SPECIFICATIONS 技术参数 ...............................................20
6.
DECLARATION OF CONFORMITY 符合标准声明 .................................21
7.
WARRANTY 保修........................................................................................22
3

1.INTRODUCTION
Th ank you for your time and int erest in the EV E Audio product ra nge.
非常感谢您对 EVE Audio 产品所给予的兴趣和付出的时间。
EV E Aud io is a loudspeaker manufacturer based in Berli n, Germany , that sp ecializes in the
development and de sig n of un ique studio monito rs.
EVE Audio 是一家基于德国柏林的音箱制造商,专注于设计和研发独特的录音室监听。
Th e us e of first-class compon ents is ou r hig hest priority beca use we firml y beli eve thi s is the
only way to manufactu re fir st-c las s produc ts.
使用最优质的元件是我们生产的第一要求,我们坚信这是制造最高质量产品的唯一途径。
Yo u have chosen a loud speaker from our Silvercon e SC se ries. Th e SC2070 was conceived as a
two-wa y system . The features all ow multipl e applic ations for use in prof essi onal reco rding
st udios as well as home studios.
您选择的是我们 SilverCone SC 系列。SC2070 被设计为双分频系统,产品特性可以让其在专业录音室和家庭
录音室中使用。
Th e SC2070 combines a 6.5 ” Silve rCo ne chas sis with the Air Motio n Tran sformer developed by
EV E Audio fo r the RS series . The loudspea ker sys tem is complet ed by hig h-performance
amp lif ier s and high- resolution DSP te chno log y. The woofer of the SC2070 is powered by a
dedica ted 15 0W amplifie r, while the tweeter is fed by a 100W amplifier.
SC2070 结合了一个 6.5 英寸的 SilverCone 低音单元,以及 EVE Audio 为RS 系列产品研发的 Air Motion
Transformer(气动高音头)。扬声器系统由高解析度 DSP 芯片支撑。SC2070 的低音单元由一个专业150
瓦功放供电,高音单元则是一个100 瓦的功放支持。
We wish you enjo y your new EVE Audio monit or. If you have any questions regardin g our
products, do not hesitate to contact your nearest deal er or get direc tly in touch with us... We
will be more than happy to help you out !
衷心希望您对 EVE Audio 监听感到满意。若有任何产品相关的疑问,请联系离您最近的经销商,或直接与
我们联系。我们非常愿意对您提供帮助!
Al l the best fro m Berli n.
来自柏林的美好问候。
Th e EVE Audio Team
EVE Audio 团队

2.QUICK START 快速启动
If you alrea dy have experi ence with stud io monitors, the Quick Start guide ought to be more
than enough to get you started.
假如您有使用录音室监听的经验,那么快速启动指南应该可以让您获得除简单操作以外更多的内容。
Fo r un ex pe ri en ce d us er s we re com me nd re ad i ng th e wh ol e us er ’ s ma nu al in or der to pr ev en t
any misuse.
对于零经验的用户,我们建议您阅读整本用户手册,以防止任何误操作。
2.1 First Steps 初始步骤
Ch e ck th e pac ka ge co mpon en ts (l ouds pea ke r, us er ’ s ma nua l, po wer co rd, g ri d , rubb er fe et ).
检查包装内的原件(扬声器、用户手册、电源线、网格、橡胶脚垫)。
Ch e ck th e vol tag e se t ti ng (s ee “ Ma in s V ol ta ge Sel ec to r ”).
检查电压设置(参见 "电源电压选择器")。
Ch eck the set ting of the DIP Switc hes (var iab le).
检查 DIP 开关的设置(可调)。
2.2 Speaker Connection扬声器连接
Co nnect on e of the monit or inputs on the rear side (RCA or XLR) to the line output of a
pla yba ck sour ce, for instance an audio interf ace. Th e outpu t level shou ld be as low as pos sible.
将后面板的其中一个监听输入(RCA或XLR)连接到播放源的线路输出,例如一个音频接口。输出电平应尽
可能的低。
2.3 Powering On开机
En gage th e Power swi tch on the rear si de of the loudspeaker to turn it on or of f.
按位于扬声器后面板的开关键,即可开启或者关闭扬声器。
Th e LE Ds around the Volume cont rol on the fr ont pane l will light up clockwise. If the LED on
the right en d is di mly lit, this indica tes that the louds peaker is in Sta ndby Mode. Press the
Volume contro l to turn the loudspeaker on. If you tur n the Volume control counter clockwise
until the LE D on the le ft end li ghts up dimly the loudspeaker will be muted.
环绕在前面板Volume音量旋钮的 LED 会顺时针亮起。如果右侧最底端的 LED 颜色较暗,则代表扬声器处于
Standby待机模式。单击Volume音量旋钮,开启扬声器。如果逆时针转动Volume音量控制旋钮,直至左侧
LED 颜色变暗,可以使扬声器静音。
In crease the out put leve l on the sourc e devic e until the LED ring starts to blink, then reduce
the output level a bit. The ma ximum operating level for the inp ut (i.e. the analog to digital
converter ) is now set opt imally. To set the desir ed listenin g vol ume use the Volume control on
the loudsp eaker.
增加音源或声卡的输出电平直至扬声器的LED 开始闪烁,然后减少一点音源的输出电平,最大的输入电平
(模拟至数字转换器)就被设置好了,这时可以随意使用扬声器上的Volume音量旋钮调节音量。
The LED ring indicates the volume setting. If the LED ring starts to blink, reduce the output level on the signal
source.
LED 灯环代表音量位置。如果 LED 环开始闪烁,请降低信号源的输出电平。

Analog Input 模拟输入
Unbalanced 非平衡
Volume 音量
Filter 滤波器
Max. Input 最大输出
not used 未使用
locked 锁定
variable 可变
Balanced 平衡
Rear connectors & DIP switches
后面板的连接器和DIP开关
Check the package components (loudspeaker, user’s manual, power cord, grid, rubber feet).
检查包装内的原件(音箱、用户手册、电源线、橡胶脚垫)。
Check the voltage setting (see “Mains Voltage Selector”).
检查电压设置(详见“主电压器”章节)。
Check the setting of the DIP Switches (variable).
检查 DIP 开关的设置(可变)。
Connections: there are two input connectors on the rear side. These allow the connection of
balanced sources with XLR connectors or unbalanced sources with RCA connectors.
连接:在设备背面有两个输入接口,可以连接 XLR 插孔的平衡信号源或 RCA 插头的非平衡信号源。
•Pin assignment XLR: 1 = Shield, 2 = hot (+), 3 = cold(-).
Pin 分配 XLR: 1 = 屏蔽, 2 = 热(+),3 = 冷(-)
•Pin assignment RCA: Center conductor = Signal, Ring = Shield.
Pin 分配 RCA: 中心导线 =信号,环 =屏蔽
Both analog inputs can be used simultaneously, whereby the signals are summed.两个模拟输入可被
同时使用,信号将汇合至一起。
The maximum level of the source signal should not exceed 8dBu. If the input is overloaded the LED
ring will start blinking.
信号源的最大电平不应超过 8 dBu。若输入超载,则 LED 开始闪烁。
EVE Audio product manual
EVE Audio 产品手册
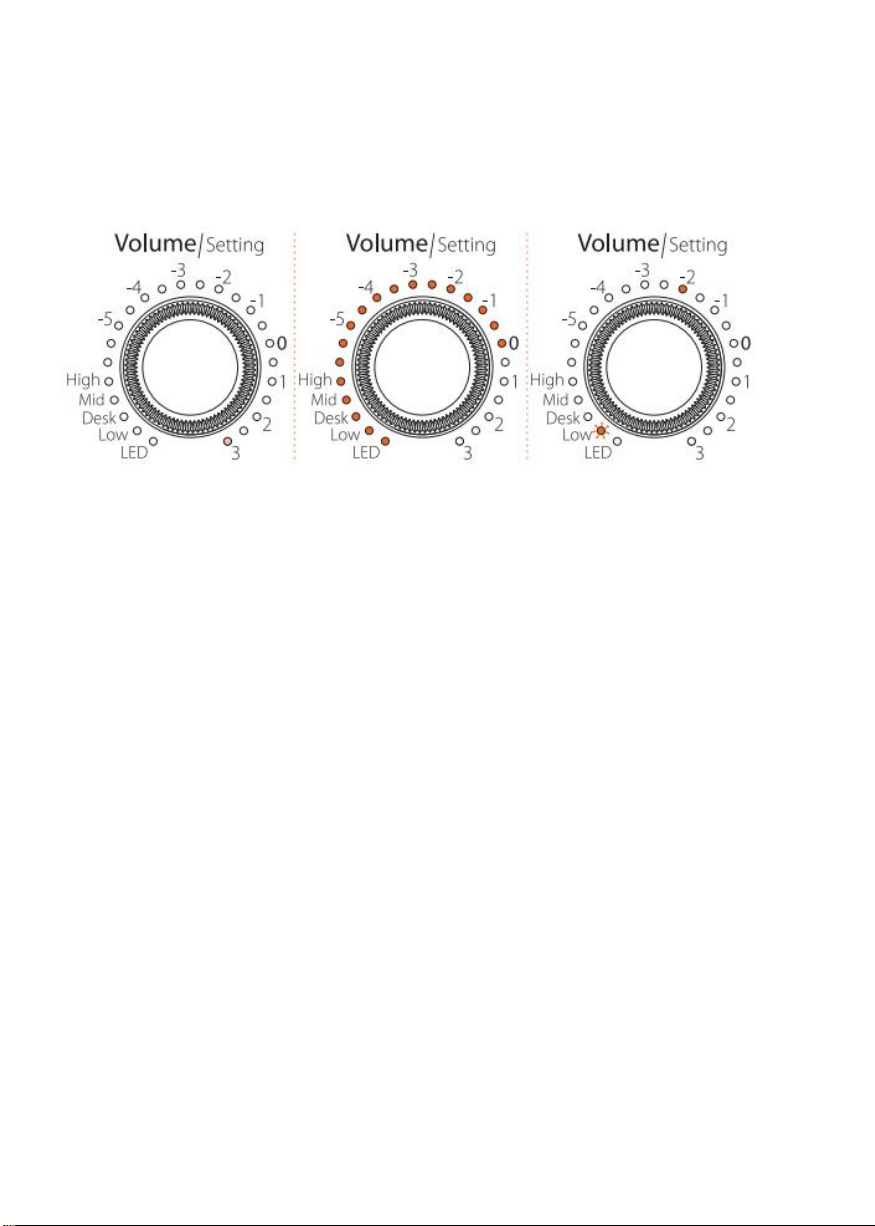
3.2 Operating Modes 运行模式
Standby Mode | Volume Mode (-10dB) | Setting Menu (Low filter @ -2dB)
待机模式|音量模式(-10dB)|设置菜单(低通滤波@-2dB)
3.3 Powering on/off: Standby Mode 开/关机:待机模式
Press and hold the control three seconds in order to put the monitor in Standby Mode. The volume
will decrease gradually while the LED ring lights up once around the Volume control. Afterwards,
the LED on the right end will light dimly and the power consumption is reduced to 1 watt.
按住按钮 3秒钟可进入”Standby Mode”待机模式。此时音量将逐渐降低,LED 圈将围绕音量旋钮依
次亮起。接下来位于最右侧底部的一格 LED 将会变暗,同时待机功耗将降低至 1瓦特。
!To exit the Standby Mode press briefly the Volume control once again. The level will increase
gradually.
再次单击Volume音量控制按钮,即可退出”Standby Mode ”待机模式,设备电平将逐渐增加。
3.4 Volume Mode 音量模式
•Level adjustment 电平调整
The maximum input level for balanced (XLR) and unbalanced signals (RCA)
is +7dBu or +22dBu, depending on the position of the Max. Input switch
on the rear panel (see DIP Switches). Higher levels produce distortion due
to the overloading of the analog to digital converter.
平衡信号(XLR)和非平衡信号(RCA)的最大输入电平是 +7dBu或+22dBu,这取决于最大输入开关的位置。
在后面板上的输入开关(见DIP开关)。由于模数转换器的过载,较高的电平会产生失真。
Given that some professional studio devices can produce in excess of
+22dBu, the LED ring will start blinking whenever the AD converter is
overloading. If that is the case, the output level of the source should be
reduced.
考虑到许多专业录音室设备的输出都高于 +22dBu,在 A/D 转换过载时LED 将开始闪烁。当这种情况
发生时,请减少声源的输出电平。

•
Volume adjustment
音量调整
Turn the knob to adjust the volume. Depending on the LED mode selected (see LED Mode), the volume will be
displayed as a dim/bright circle or as a dim/bright point.
转动音量旋钮对音量进行调整。根据所选择的 LED 模式(详见“LED 模式”),音量将会显示为微暗
/明亮的一圈或者是昏暗/明亮的点。
The control’s response curve is not linear. The increments become finer as the volume increases:
-80dB (minimum) to -48dB: 2dB
-48dB to -20dB: 1dB
-20dB to 0dB (maximum): 0.5dB
该控制器的反应曲线不是线性的。随着音量的增加,增量变得更精细:
-80dB(最小)到 -48dB:2dB
-48dB到-20dB:1dB
-20dB到0dB(最大): 0.5dB
•Mute 静音
To mute the monitor, turn the Volume control counter clockwise until you reach the minimum level. When the LED
on the left end lights up dimly the Mute Mode is activated.
要静音监听,逆时针转动音量控制,直到达到最低电平。当左端的LED灯亮起时,激活Mute Mode 静
音模式。
! To exit the Mute Mode simply turn the control clockwise until you reach the desired volume.
要退出静音模式,只需顺时针转动控制器,直到达到所需的音量。

EVE Audio product manual
EVE Audio 产品手册
3.5 Settings Menu 设置菜单
Press the control once to enter the Settings menu. Here you can set four different filters (High, Mid,
Desk, Low), as well as the LED ring’s behavior. The LED of the currently active function will blink.
按控制键进入Settings设置菜单。在这里,你可以设置四个不同的滤波器(高频、中频、桌面、低
频),以及LED灯环的反应。当前激活的功能,LED灯会闪烁。
Turn the control to choose the filter or LED mode desired. The blinking LED indicates the function
selected while the steady-on LED indicates the value assigned to that function.
转动控制键,选择所需的滤波器或LED 模式。闪烁的LED代表所选的功能,而持续的LED代表分配给该
功能的数值。
Press the control to confirm your selection. The blinking will stop once the selection is confirmed.
按控制键确认你的选择。一旦选择被确认,闪烁将停止。
Turn the control to adjust the filter or the LED behavior.
转动控制器来调整滤波器或LED 的行为。
When you are satisfied with the setting, press the control again to go back to the Settings menu. You
can then select and edit another function.
当你对设置感到满意时,再按一下控制键,就可以回到Settings设置菜单。接着你可以选择和编辑另
一个功能。
!To exit the Settings menu press and hold the control for three seconds or simply wait 10 seconds.
The loudspeaker will then return automatically to the Volume Mode.
请按住控制键三秒钟,或仅等待10秒钟,可退出 "Settings"菜单。然后扬声器将自动返回到 Volume
音量模式。
3.6 Filters 滤波器
The filters of the EVE Audio monitors were specially developed to offer you the possibility of adjusting
your monitoring system to the characteristics of your room.
EVE Audio监听的滤波器是专门根据房间的特点,提供调整监听系统的可能性而开发的。
These filters help correct the alterations to the frequency response produced by the room acoustics
and listening distance. Do bear in mind that correcting bad room acoustics with filters will only
achieve average results. In any case, you should try to use the filters as little as possible.
这些滤波器有助于校正由房间声学特点和聆听距离所产生的频率响应的变化。请注意,房间声学很差,
用滤波器校正只能达到一般效果。在任何情况下,你都应该尽量少使用滤波器。
3.7 Low Filter 低频滤波器
The Low-Shelf Filter allows you to boost or attenuate frequencies below 300Hz in 0.5dB steps. Use this
filter whenever the acoustics of your room cause problems in the low frequency range.
低频滤波器可以以0.5dB为单位,提升或衰减300Hz以下的频率。当你房间的声学特性在低频范围内
引起问题时,就可以使用这个滤波器。

If the low frequencies are boosted by the room, you can attenuate them with the Low-Shelf Filter. The
reasons for this boost could be the room modes or the loudspeakers being too close to the walls. In
the same way, if the low frequencies are to weak, you can boost them to balance the frequency
response.
如果低频由于房间的声学被提升了,你可以用Low-Shelf低频滤波器来衰减调整它们。造成这种提升
的原因,可能是房间模式或扬声器离墙太近。同样地,如果低频太弱,你可以提升它们以平衡频率响
应。
3.8 High Filter 高通滤波器
The High-Shelf Filter allows you to boost or attenuate frequencies above 3kHz in 0.5dB steps. High
frequencies are affected depending on the distance from the sound source to the listening position.
The further you are from the loudspeakers, the weaker the high frequencies. In such cases the filter
should be set to boost them. In desktop applications, distances can be as short as 1m (3ft), which
results in the high frequencies being boosted. To compensate for this effect you should use the High-
Shelf Filter to attenuate the high frequencies.
High-Shelf Filter 高通滤波器可以以0.5dB的一步(的距离),提升或衰减3kHz以上的频率。影响高频,
与声源到聆听位置的距离有关。你离扬声器越远,高频就越弱。在这种情况下,应该设置滤波器为提
升。在桌面应用中,距离可以短至1米(3英尺),这样高频会提升。为了抵消这个效果,你应该削弱
高频。
If you have a very dead room, it might be wise to boost the high frequencies in order to have a more
balanced overall sound. When the listening position is too close to the loudspeakers or the room has
reflective surfaces, it is reasonable to attenuate the high frequencies.
如果是在消声室,提升高频可能有一个更平衡的整体声音。当聆听位置离扬声器太近,或房间有反射
面时,削弱高频是合理的。
3.9 Mid Filter
中频滤波器

The Mid Filter is a bell filter with 1kHz center frequency. It allows you to boost or cut the mid
range up to +/-3dB in 0.5dB steps.
中频滤波器是一个中心频率为
1kHz
的钟形滤波器。它以
0.5dB
的一步(的距离)提升或削减中频
范围,最高可达
+/-3dB
。
This frequency range is very important for the balance between lower mid and higher mid
frequencies. Use the Mid filter to adjust the balance between fundamental and harmonic
frequencies in the music material. Depending on the acoustics of your room, some of the sound
energy produced by the monitors may be reflected by surfaces like walls, floor and/or ceiling in
the room, thus altering the perceived sound.
这个频率范围,对于中低频和中高频之间的平衡是非常重要的。使用中频滤波器,调整音乐素材
中的基频和谐波频率之间的平衡。根据房间的声学情况,监听产生的一些声音能量,可能会被房
间里的墙壁、地板和
/
或天花板等表面反射,因此改变了所感知的声音。
3.10 Desk Filter
桌面滤波器
The Desk Filter has two functions. When turned down it acts as a narrow- band EQ set to 170Hz.
Desk Filter
桌面滤波器有两个功能。当衰减时,它作为一个窄频
EQ
,范围设置为
170Hz
。
The reflections of mixers and similar surfaces usually result in the boosting of low mids. With the
Desk Filter you can lessen this effect by turning down the filter gain.
调音台和类似表面的反射,通常会提升中低频。使用桌面滤波器,可以通过调低滤波器增益来减
少这种效果。
When turned up, the Desk Filter also works as an EQ but this time set to 80Hz. This allows you to
give more punch to the lower frequencies.
当调高时,
Desk Filter
桌面滤波器还可以作为一个均衡器使用,这次设置为
80Hz
。可以给低频更
多的冲击力。
!
The following applies to the Low, High and Desk filters:
•Every step represents a 0.5dB increment.
•Maximal boost is +3dB and maximal attenuation is -5dB.
•Refer to the chapter on POSITIONING to set the filters of your EVE Audio monitors effectively.
以下内容适用于低、高和桌面滤波器:
•
每一步(的距离)代表
0.5dB
的增量。
•
最大的提升是
+3dB
,最大的衰减是
-5dB
。
•
请参考
"POSITIONING"
摆位章节,有效设置
EVE Audio
监听扬声器的滤波器。
3.11 LED Mode LED
模式
The LED Mode determines in which of the four available fashions the LED ring displays the
volume level. The LEDs represent given levels, which are displayed and adjusted according to
four steps. Intermediate steps are indicated by the brightness between two adjacent LEDs.
LED Mode
模式决定了
LED
环,显示四种可用的音量大小方式。
LED
代表所对应的电平,按照四个
步骤显示和调整。中间的步骤,由相邻的两个
LED
灯之间的亮度来表示。

Bright Ring
亮环
All LEDs up to the selected volume level light up brightly. The louder the signal, the longer
the brightly lit-up ring.
所选的音量电平的
LED
会亮起来。信号越强,灯亮范围越大。
Bright Point
亮点
Only the LEDs corresponding to the selected volume level light up brightly. The louder the
signal, the further up the brightly lit-up point moves.
只有与所选的音量电平相对应的
LED
灯亮起。信号越强,亮点就会越扩。
Dim Ring
暗环
All LEDs up to the selected volume level light up dimly. The louder the signal, the longer the
dimly lit-up ring. In this mode, the LEDs light up brightly momentarily while you adjust the
volume level.
所选定的音量电平的
LED
将会微暗地亮起。信号越强,灯亮范围越大。在此模式下,调整音量电
平时
LED
亮起。
Dim Point
暗点
Only the LEDs corresponding to the selected volume level light up dimly. The louder the
signal, the further up the dimly lit-up point moves.
只有与已选音量电平一致的
LED
会亮起。信号越强,亮灯的位置越大。
!
Intermediate steps are indicated by the lighting of two adjacent LEDs. The level
ranges from -60dB to +10dB, taking “0 dB ” as reference point.
中间步骤由两个相邻的
LED
代表。电平范围由
-60 dB
至
+10 dB
,以
0 dB
为参考点。
3.12 Saving Your Settings 保存设置
All settings on the front and rear panels are automatically saved. The loudspeakers can be
disconnected anytime without the settings being lost.
所有前面和背面板的设置,都是自动保存的。扬声器断电后而不会影响设置。
3.13 Power Switch 电源开关
The power switch on the rear panel disconnects the loudspeaker completely from the power grid.
When powered off all loudspeaker settings are saved and the power consumption is reduced to 0
watts.
位于背面板的电源开关,完全将扬声器与插线板分开。当电源关闭时,所有设置会被保存,并且
能耗将降低至
0
瓦特。
After powering on again, the loudspeaker will return to the state it was in before being turned
off (Standby Mode, Mute Mode or a given volume level). Even if powered off via a multiple
outlet power strip, the monitor will return to the state it was in before being turned off.
再次开机后,扬声器将恢复到关闭前的状态。
(
待机模式、静音模式或一个特定的音量)。
即便断电时通过多插座电源板,监听也会回到关闭前的状态。
!
In order to prevent switching noise with your monitoring system keep in mind the
following rules:
!为了避免监听系统的开关噪音,请遵循下列原则:
Power all audio sources on first and your loudspeakers last.
首先打开所有音源的电源,最后再打开扬声器的电源。
When turning off your system, power off your loudspeakers first and then all audio sources.
关闭系统时,先关闭扬声器的电源,然后再关闭所有音源。

3.14 DIP Switches DIP开关
On the rear panel of your EVE Audio monitors you will find three DIP Switches. These allow you to secure
your loudspeaker settings to prevent them from being changed inadvertently.
在
EVE Audio
监听后面板上,有三个
DIP
开关。这些可以保护你的扬声器设置,以防止不经意间
地改变。
Volume 音量
When set to “lock,” this DIP Switch secures the current volume setting. The LED ring on the front panel
indicates the volume setting, but it cannot be modified. When set to “variable,” the volume setting can be
changed by simply turning the knob.
当设置为
“locked
(锁定)
”
,这个
DIP
开关将锁定当前的音量设置不被修改。前面板上的
LED
灯
代表音量,这时无法更改。当设置为
“variable
(可变)
”
时,音量可通过旋转旋钮进行更改。
Filter 滤波器
When set to “lock,” this DIP Switch secures the current filter settings. The filter settings can be read on the
LED ring, but they cannot be modified. When set to “variable,” the filters can be modified freely.
设置为
“locked
(锁定)
”
时,这个
DIP
开关确保了当下滤波器设置的安全。滤波器设置可以通过
LED
环读取,但是无法进行更改。当设置为
“variable
(可变)
”
,滤波器可以自由更改。
Max. Input 最大.输入
This DIP Switch determines the input sensitivity of the SC2070. In a studio environment, the reference
level (0dB) ought to be 4dBu. In such environments, leave the setting at “+7dBu.” However, some studio gear
allow much higher output levels. If it were impossible to reduce the output level of such devices, set the
switch to “+22dBu.”
The “+7dBu” setting ought to be suitable for most situations.
这个
DIP
开关决定了
SC2070
的输入灵敏度。在录音室环境中,参考电平(
0dB
)应该是
4dBu
。在
这样的环境中,把设置留在
"+7dBu"
。然而,一些演播室设备允许更高的输出电平。如果不可能
降低这种设备的输出电平,就把开关设置为
"+22dBu"
。
"+7dBu"
的设置应该适用于大多数情况。
3.15 Mains Voltage Selector 主电压选择器
The Mains Voltage Selector allows you to adjust the operating voltage of your EVE Audio monitors to the local
power grid. Set it to “230” if your local power grid is 220-240 volts or “115” if it is 110-120 volts.
主电压选择器可以根据当地电网调整
EVE Audio
监听的工作电压。若使用当地电网为
220-240
伏特,
则将其设定为
“230 ”
;若使用为
110-120
伏特,则将其设定为
“115”
。
If you change the mains voltage value you also have to replace the fuse of the IEC connector with an appropriate
one. The corresponding fuse values are printed on the unit underneath the IEC connector.
如果改变了主电压值,那么需要更换电源连接器(
IEC
)的电阻。相配的电阻型号标注在电源连接
器(
IEC
)的底部。
3.16 Power Connector (IEC) 电源连接器 (IEC)
Use the power cord supplied to connect your EVE Audio monitors to the power grid. The IEC connector includes an
integrated fuse. If your EVE Audio monitors stop working and the fuse seems to be the problem, proceed as follows:
使用电源线,将
EVE Audio
监听连接到电网上。
IEC
连接器包括一个集成保险丝。如果你的
EVE
Audio
监听停止工作,而且保险丝似乎是有问题的,请按以下步骤进行:
Turn the loudspeaker off.
关掉扬声器。
Disconnect it from the power grid.
将扬声器与电源插口断开。
Detach the IEC connector from the unit.
将扬声器与IEC连接器分开。

Remove the fuse.
移除保险丝。
Change the fuse. The replacement fuse should comply with the values stated on the loudspeaker.
更换保险丝。新的保险丝应符合扬声器上注明的规格。
4 POSITIONING 摆位
4.1 Speaker Positioning + Rubber Feet 扬声器摆位 +橡胶脚垫
Ideally, there should be no objects or obstacles between the loudspeakers and the listening position. Furthermore,
a symmetrical positioning is important. This applies to the distance between speakers as well as to the walls, ceiling
and floor. In order to have a symmetrical stereo image it is also important to have symmetrical reflections. We
recommend to keep a distance of at least 0.5m (19 inches) to the walls, in order to avoid low frequency boosting.
理想情况是,在扬声器与聆听位置之间,应该没有任何物体或障碍物。此外,对称的摆位也很重要。这适
用于扬声器之间的距离,以及墙壁、天花板和地板。为了有一个对称的立体声图像,均衡的反射也很重要。
我们建议,摆放位置与墙壁保持至少0.5米(19英寸)的距离,以避免低频提升。
EVE Audio monitors can also be flush-mounted in a wall, in which case there should be enough air flow. This is
important to keep the electronic components cool but also to allow for the best performance of the bass reflex
ports. We recommend to keep at least 3cm (1 in) to the sides and top.
The SC2070 monitor was especially designed to be placed vertically. Fix the supplied rubber feet to the bottom side
of the monitor and place it on an even and steady surface.
EVE Audio 监听也可以安装在墙上,在这种情况下,需要房间有足够的空气流动。这对保持电子元件的冷却
是很重要的,而且低音反射也能达到最佳。我们建议摆放侧面和顶部,至少保持3厘米(1英寸)的距离。
SC2070监听是专为垂直放置而设计的。橡胶脚垫需要固定在监听的底面,并将其放置在一个平稳的表面上。
If the room conditions force you to place the SC2070 monitor in horizontal position, make sure that the tweeter is
pointing to the outside and that the loudspeakers are angled towards the listening position. In any case, you should
also try placing the tweeters pointing to the inside. Regardless of the position, always mind the symmetry (both
tweeters should point either to the inside or to the outside)!
如果房间的条件,只能将SC2070监听放置在水平位置,请确保高音扬声器指向外部,同时扬声器的角度朝
向聆听位置。在任何情况下,高音扬声器应该尝试指向内部。无论如何摆放,都要注意对称性(两个高音
单元都应指向内部,或外部)!这就是为什么我们要在扬声器上安装 "高音单元"。
Rubber feet: your EVE Audio monitors are supplied with four self-adhesive rubber feet. Fix them to the bottom of
your loudspeakers to place the monitors safely on an even surface. Furthermore, the rubber feet improve the
acoustic decoupling of the loudspeakers from the surface.
橡胶脚垫:EVE Audio监听提供了四个可粘贴的橡胶脚垫。需要将它们固定在扬声器的底部,以便将监听放
置在一个安全平稳的表面上。此外,橡胶脚垫还能改善扬声器与表面的声学耦合。
EVE Audio product manual
EVE Audio
产品手册
4.2 Height and Distance 高度和距离
The tweeter of your EVE Audio monitors should be ideally placed at the same height as your ears. If this is not
possible tilt the monitors so that the tweeter is directed to your ears.
EVE Audio监听的高音单元最好与你的耳朵处于同一高度。如果无法做到这一点,请倾斜监听,让高音单元
对准你的耳朵。
The ideal distance between the SC2070 and the listening position is 1-2 m (3.4-6.5 ft).
SC2070和聆听位置之间的理想距离是1-2米(3.4-6.5英尺)。
!These values are only meant as a reference and depend a lot on the characteristics of the room. In live
rooms you will be forced to reduce the distance, while in dead rooms the distance to the loudspeakers can be
larger.
这些数据只作为一个参考,在很大程度上还要根据房间声学特点。在现场的房间里,你需要缩短距离,而
在消音室里,与扬声器的距离可以更大些。
4.3 Stereo Setup 立体声设置
The so-called “stereo triangle”is the best way to place speakers in a stereo setup, i.e. the monitors and the
listening position should form an equilateral triangle. Try the following:
在立体声设置中的 "stereo triangle(立体三角形) ",是扬声器最佳的摆位,即监听和聆听位置应形成一个
等边三角形。请试试以下方法:
Establish the ideal distance to the listening position (see “Height & Distance”).
建立与聆听位置的理想位置(请见 "高度和距离")。
Place the monitors in such a way that the distance from each other and to the listening position is the same.
监听放置的间距,以及与聆听位置之间的距离相同。
Turn both monitors so that their front panels are pointed towards the listening position (all angles of the stereo
triangle should be 60º).
转动两个监听,使其前面板指向聆听位置(立体声三角形的所有角度应是60º)。

Stereo-Setup (left) & Stereo-Setup + Subwoofer (right)
立体声
-
设置(左)
&
立体声
-
设置
+
低音炮(右)
2.14.4Stereo Setup + Subwoofer (2.1) 立体声设置 +低音炮( )
In such a setup, the subwoofer is fed by the stereo signal source. The subwoofer filters the low frequency
components of the stereo channels and sums them to produce a mono signal which it then reproduces. The high
frequencies are forwarded to the full-range satellite speakers.
这样的设置中,超重低音炮由立体声信号源供给。低音炮过滤立体声音轨的低频,并将其相加,产生一个
单声道信号,然后进行重现。高频会送到全音域卫星扬声器系统。
Ideally, such a system would comprise two EVE Audio SC2070 monitors plus one EVE Audio TS110 or TS112
subwoofer, or even two TS108 subwoofers. All these subwoofers allow you to set the crossover frequency for the
satellite speakers and the subwoofer.
理想情况下,这样的系统由两个 EVE Audio SC2070 监听加上一个 EVE Audio TS110 或TS112 超低音,甚至两
个TS108 超低音组成。所有这些超重低音扬声器,可以为卫星扬声器系统和超重低音炮设置分频频率。
The positioning of the two satellites should be done in the same manner as in a stereo setup (see “Stereo Setup”).
两个卫星的摆位,应该按照立体声设置的方式进行(请见 "Stereo Setup 立体声设置")。
The subwoofer should be placed on the ground between both satellites. Considering that low frequencies are
omnidirectional, the subwoofer does not have to be centered exactly between the two satellites. The subwoofer
can be moved back a bit so that it is at the same distance from the listening position as the satellites. This
guarantees all transducers are aligned in time.
低音炮应放置在两个卫星之间的地面上。考虑低频是全向性的,所以低音炮不必精确地放置在两个卫星之
间的中心位置。低音炮可以向后移动一点,它与聆听位置的距离和卫星相同。这就确保所有单元音量在时
间上是一致的。
EVE Audio product manual
EVE Audio 产品手册
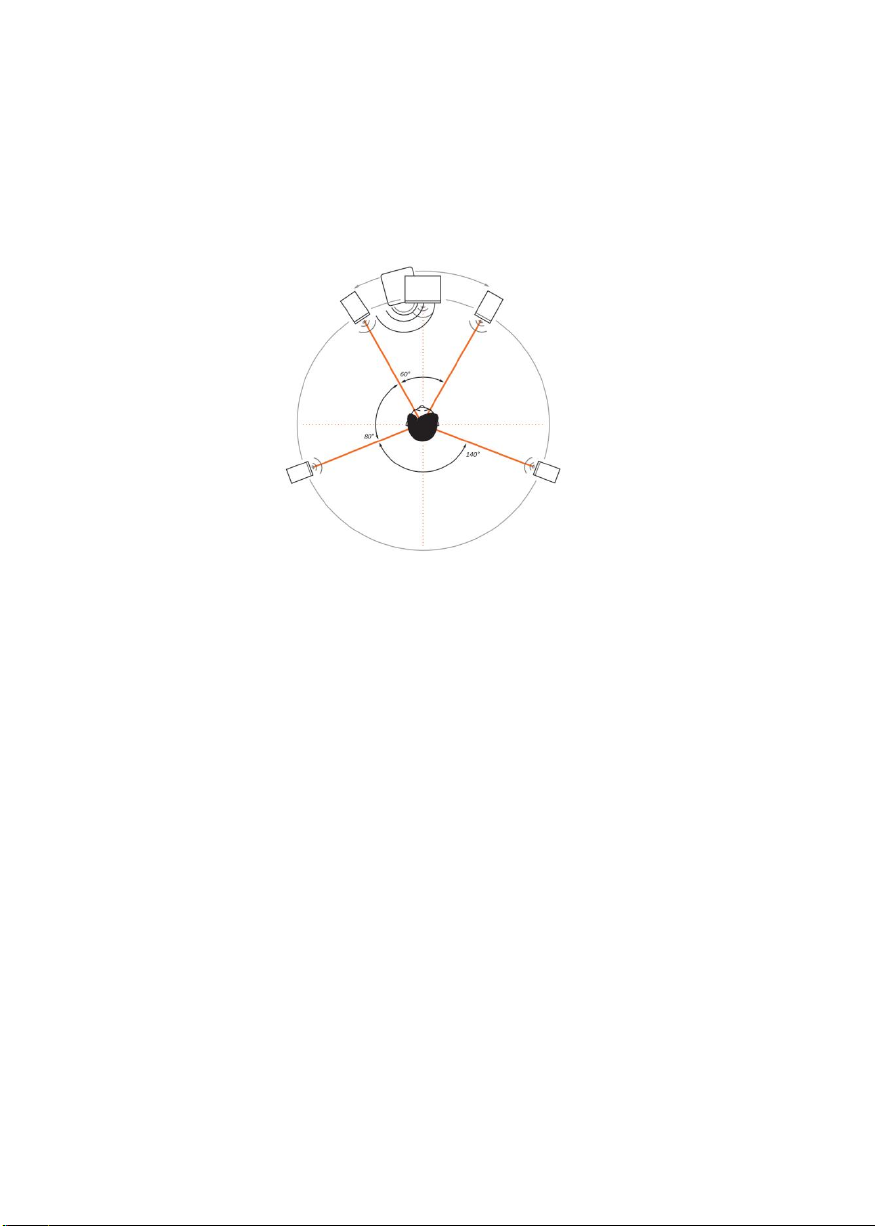
4.5 Multichannel Setup (5.1) 多通道设置 (5.1)
The most common 5.1 systems consist of three front channels (left, right and center), two surround channels
(left/right) and a subwoofer for the low frequencies. The speakers form a circle around the listening position.
最常见的 5.1 系统,是由三个前置声道(左、右、中央)、两个环绕声道(左/右)和一个用于低频的重低
音炮组成的。扬声器周围呈圆形环绕聆听。
Ideally, a 5.1 system would comprise five EVE Audio SC2070 and a TS110 or TS112 subwoofer. Other combinations
are also possible.
理想情况下,一个5.1系统需要包括五个EVE Audio SC2070和一个TS110或TS112重低音扬声器。其他组合也是
可能的。
The positioning of the two front speakers and the subwoofer should be done in the same manner as in a stereo
setup with a subwoofer (see“Stereo Setup + Subwoofer“).
在一个带有低音炮的立体声设置中,两个前置扬声器和一个低音炮的位置应该使用同种方式完成(详见 “立
体声设置 +低音炮”章节)。
Place the center monitor directly in front of the listening position, i.e. right in the center between both front
satellites.
将中央监听放在聆听位置的正前方,即在两个前置卫星之间的正中央。
The rear satellites should form an isosceles triangle with the listening position forming an angle of 140º.
Verify that all speakers are at the same distance from the listening position, so that they are aligned in time.
背面的卫星扬声器,应该与聆听位置形成一个140°角的等腰三角形。
核实所有扬声器与聆听位置的距离是否相同,以便它们在时间上保持一致。

4.6 Mixer/Workplace Reflections 调音台/工作室反射
Regardless of whether the monitors are to be used in a recording studio with a mixing desk and meter bridge or
in a desktop environment, hard surfaces can produce annoying reflections that alter the natural reproduction of
the loudspeakers. Especially in the low-mid frequency range.
无论监听是在带有调音台和电平表的录音室中使用,还是在桌面环境中使用,硬表面都会出现烦人的反射,
改变扬声器的自然再现。特别是在中低频范围。
If this is the case with your setup, use the Desk Filter of your EVE Audio monitors to reduce the impact of the
reflections from the desk or mixer.
如果这正是你的设置情况,请使用EVE Audio监听的桌面滤波器,可以减少桌面或调音台的反射。

EVE Audio product manual
EVE Audio 产品手册
4.7 Room Acoustics 房间声学
In order for the described measures to work effectively, we recommend that you put special attention to the room
acoustics.
为了使所述方法有效地发挥作用,我们建议要特别关注房间的声学效果。
The size, contents, wall parallelism, proportion, and reflective behavior of the room, as well as the corners, the
building materials and their characteristics play a very important role in the acoustics of a room.
房间的大小、内容、墙壁的平行度、比例和反射,以及角落、建筑材料和它们的特性,在房间声学中起着
非常重要的作用。
Room acoustics is a science in itself and it is unfortunately out of the scope of this manual. However, we have put
together a short bibliography for you:
房间声学本身就是一门科学,很遗憾它不包括在本手册的范围内。然而,我们已经准备了一份简短的书目:
„Recording Studio Design“ (Englisch), Philip Newell. ISBN: 0-240-51917-5
《录音室录音设计》(英文),作者 Philip Newell。ISBN 号:0-240-51917-5
„Home Recording Studio – Build it like the Pros“ (Englisch), Rod Gervais. ISBN: 1-59863-034-2
《家庭录音——像专家一样建造》(英文),作者 Rod Gervais。ISBN 号:1-59863-034-2
„Studio Akustik“ (German), Andreas Friesecke. ISBN: 978-3-932275-81-4
《录音声学》(德文),作者 Andreas Friesecke。ISBN 号:978-3-932275-81-4
„Praktische Raumakustik“ (German), Thomas Hentschel. ISBN 978-3-8364- 6800-8
《Praktische Raumakustik》(德文),作者 Thomas Hentschel。ISBN 号:978-3-8364- 6800-8
„Handbuch der Tonstudiotechnik“ Band 1 (German), Michael Dickreiter. ISBN 3-598-11321-8
《Handbuch der Tonstudiotechnik》第一段(德文),作者 Michael Dickreiter。ISBN 号:3-598-11321-8
„Handbuch der Audiotechnik“ (German), Stefan Weinzierl (Ed). ISBN 978- 3-540-34300-4
《Handbuch der Audiotechnik》(德文),作者 Stefan Weinzierl (Ed)。ISBN 号:978- 3-540-34300-4

5 TECHNICAL SPECIFICATIONS 技术参数
Product 产品 SC2070
Description 描述:2-Way Monitor
Dimensions (WxHxD) (mm) 体积(WxHxD)(毫米): 230 x 345 x 304
Dimensions (WxHxD) (“) 体积(WxHxD)(英寸):9.05 x 13.58 x 11.96
Free-field frequency range (-3dB) 消声室频率范围: 38Hz - 25kHz
Tweeter 高音单元:AMT TW-RS7
Woofer 低音单元: 165mm / 6.5”
Crossover frequency 分频点: 2,200Hz
Maximum SPL @ 1m 最大SPL @1米:116dB
Number of amplifiers 功放数量: 2
Total short-term output power 总短期输出功率: 250W
Short-term out power (woofer) 短期输出功率(低音单元):150W
Short-term out power (tweeter) 短期输出功率(高音单元):100W
Protection limiter 保护限制: yes 是的
Settings 设置
Volume 音量: -inf. – +6dB
High-shelve filter (-5db – +3dB) 高架滤波器(-5dB - +3dB): > 3kHz
Mid EQ (-5db – +3dB) 中频均衡器: 1kHz
Desk filter boost (0db – +3dB) 桌面滤波器提升(0db – +3dB):80Hz
Desk filter cut (-5db – 0dB) 桌面滤波器衰减 (-5db –0dB) :170Hz
Low-shelve filter (-5db – +3dB) 低架滤波器 (-5db – +3dB) :< 300Hz
LED brightness setting LED的亮度设置: yes 是的
Max. Input dip switch 最大.输入dip开关:+7dBu / +22dBu
Level-lock dip switch 电平锁定 dip 开关: yes 是的
Filter-lock dip switch 滤波器锁定 dip 开关:yes 是的
Connectors 连接器
XLR in (impedance) XLR 输入(抗阻): yes 是的 (10kΩ)
RCA in (impedance) RCA 输入(抗阻): yes 是的 (10kΩ)
Power consumption 能耗
Standby 待机: < 1W
Full output 全输出:170VA
Misc.
Weight kg / lb. 重量 公斤/磅: 11 / 24
This manual suits for next models
1
Table of contents
Other Eve Audio Speakers manuals

Eve Audio
Eve Audio SC204 User manual

Eve Audio
Eve Audio SC407 User manual

Eve Audio
Eve Audio SC305 User manual

Eve Audio
Eve Audio SC204 User manual

Eve Audio
Eve Audio sc3010 User manual

Eve Audio
Eve Audio SC4070 User manual

Eve Audio
Eve Audio SC3070 User manual

Eve Audio
Eve Audio SC207 User manual

Eve Audio
Eve Audio ThunderStorm TS110 User manual


