EVE OWL User manual

Built-in Oven
Instruction Manual
OW
L


ŏ
*0!* ! ŏ1/!
.*%*#
1/!/ŏ+"ŏ )#!
ă
ŏŏŏ
!*0%"5%*#ŏ0$!ŏ,,(%*!
ĈăĀ
+),+*!*0
!"+.!ŏ1/%*#ŏ0$!ŏ,,(%*!
5,!/ŏ+"ŏ$!0%*#ŏ
/%*#ŏ5+1.ŏ,,(%*!
ĈăĀ
+),+*!*0
!"+.!ŏ1/%*#ŏ0$!ŏ,,(%*!
5,!/ŏ+"ŏ$!0%*#ŏ
/%*#ŏ5+1.ŏ,,(%*!
!)+ŏ3%0$ŏ/0ŏ)+ !
ŏŏ
ŏŏ
ŏŏ
ŏŏŏŏ
ŏ
ŏŏ
ŏ
'!/
.! ŏĒŏ,%66
!0
ŏŏŏŏŏćĀăĆĀġā
ŏŏŏŏŏćĀăĆĀġā
ŏŏŏ
ŏĨŏćĆĥĂĀāąŏĒŏŏććĥĂĀāąĩ
ŏŏŏ
Ă
Ă
ć
Ċ
Ċ
ĉ
Ċ
Ċ
āĀ
āā
āĆ
āć
āĈ
āĂ
āĉ
āĆ
ĂĀ
Ăā
25
ĂĈ
ĂĈ
Ăć
ĂĈ
ăĀ
ăĈ
ąā
ąĂ
ąą
ąćŏ
ąĈ
ąć
ąą
ąĉ
ąĆ
ąĉ

ŏ
*0!* ! ŏ/!ŏ
Thank you for buying Midea Built-in Oven. Before unpacking
it, please read these instructions carefully. Only then will you
be able to operate your appliance safely and correctly.
Warmly recommend retain the instruction manual and
installation instructions for future use or for subsequent
owners.
The appliance is only intended to be fitted in a kitchen.
Observe the special installation instructions.
Check the appliance if there is any damage after unpacking
it. Do not connect the appliance if it has been damaged. Only
a licensed professional may connect appliances without
plugs. Damage caused by incorrect connection is not
covered under warranty. Only use this appliance indoors.
The appliance must only be used for the preparation of food
and drink. The appliance must be supervised during
operation. This appliance may be used by children over the
age of 8 and by persons with reduced physical, sensory or
mental capabilities or by persons with a lack of experience
or knowledge if they are supervised or are instructed by a
person responsible for their safety how to use the appliance
safely and have understood the associated hazards.
Children must not play with, on, or around the appliance.
Children must not clean the appliance or carry out general
maintenance unless they are at least 8 years old and are
being supervised.
Keep children below the age of 8 years old at a safe distance
from the appliance and power cable.
And please always slide accessories into the cavity the right
way round.
2
%/'ŏ+"ŏ!(!0.%ŏ/$+'ē
1. Incorrect repairs are dangerous. Repairs may only be
carried out and damaged power cables replaced by one of
our trained after-sales technicians. If the appliance is
defective, unplug the appliance from the mains or switch
o the circuit breaker in the fuse box. Contact the
2.
3.
4.
%/'ŏ+"ŏ1.*/ē
aftersales service.
The cable insulation on electrical appliances may melt
when touching hot parts of the appliance. Never bring
electrical appliance cables into contact with hot parts of
the appliance.
Do not use any highpressure cleaners or steam cleaners,
which can result in an electric shock.
A defective appliance may cause electric shock. Never
switch on a defective appliance. Unplug the appliance
box. Contact the after-sales service.
1. The appliance becomes very hot. Never touch the interior
surfaces of the appliance or the heating elements.
Always allow the appliance to cool down.
Keep children at a safe distance.
Accessories and ovenware become very hot. Always use oven
gloves to remove acces sories or ovenware from the cavity.
Alcoholic vapors may catch fire in the hot cooking
compartment. Never prepare food containing large
5.
2.
3.
4.
3

%/'ŏ+"ŏ/( %*#ē
1.
2.
3.
%/'ŏ+"ŏ%*&1.5ē
1. Scratched glass in the appliance door may develop into a
crack. Do not use a glass scraper, sharp or abrasive
cleaning aids or detergents.
2. The hinges on the appliance door move when opening
and closing the door, and you may be trapped. Keep your
hands away from the hinges.
%/'ŏ+"ŏ"%.!ē
1. Combustible items stored in the cavity may catch fire.
Never store combustible items inthe cavity. Never open
the appliance door if there is smoke inside. Switch o the
quantities of drinks with high alcohol content. Only use
small quanti ties of drinks with high alcohol content. Open
the appliance door with care.
The accessible parts become hot during operation. Never
touch the hot parts. Keep children at a safe distance.
When you open the appliance door, hot steam can
escape. Steam may not be visible, depending on its
temperature. When opening, do not stand too close to
the appliance. Open the appliance door carefully. Keep
children away.
Water in a hot cavity may create hot steam. Never pour
water into the hot cavity.
4

appliance and unplug it from the
circuit breaker in the fuse box.
A draught is created when the appliance door is opened.
Greaseproof paper may come into contact with the
heating element and catch fire. Do not place greaseproof
paper loosely over accessories during preheating. Always
weight down the greaseproof paper with a dish or a
baking tin. Only cover the surface required with
greaseproof paper. Greaseproof paper must not protrude
over the accessories.
2.
6. ŏ 1!ŏ0+ŏ)#*!0%/)ēŏ
Permanent magnets are used in the control panel or in the
ectronic implants, e.g.
heart pacemakers or insulin pumps. Wearers of electronic
implants must stay at least 10 cm away from the control
panel.
5

1/!/ŏ+"ŏ)#!
1. Accessories, foil, greaseproof paper or ovenware on the
cavity floor: do not place accessories on the cavity floor.
Do not cover the cavity floor with any sort of foil or
greaseproof paper. Do not place ovenware on the cavity
floor if a temperature of over 50 ºC has been set. This will
cause heat to accumulate. The enamel will be damaged.
2. Aluminum foil: Aluminum foil in the cavity must not come
into contact with the door glass. This could cause
permanent discoloration of the door glass.
3. Silicone pans: Do not use any silicone pans, or any mats,
covers or accessories that contain silicone. The oven
sensor may be damaged.
4. Water in a hot cooking compartment: do not pour water
into the cavity when it is hot. This will cause steam. The
temperature change can cause damage to the enamel.
5. Moisture in the cavity: Over an extended period of time,
moisture in the cavity may lead to corrosion. Allow the
appliance to dry after use. Do not keep moist food in the
closed cavity for extended periods of time. Do not store
food in the cavity.
6. Cooling with the appliance door open: Following operation
at high temperatures, only allow the appliance to cool
down with the door closed. Do not trap anything in the
appliance door. Even if the door is only left open a crack,
the front of nearby furniture may become damaged over
6

time. Only leave the appliance to dry with the door open if
a lot of moisture was produced while the oven was
operatingċ
7. Fruit juice: when baking particularly juicy fruit pies, do not
pack the baking tray too generously. Fruit juice dripping
8.
9. Appliance door as a seat, shelf or worktop: Do not sit on
the appliance door or place or hang anything on it. Do not
place any cookware or accessories on the appliance door.
1
0
.Inserting accessories: depending on the appliance model,
accessories can scratch the door panel when closing the
appliance door. Always insert the accessories into the
cavity as far as they will go.
11. Carrying the appliance: do not carry or hold the appliance
by the door handle. The door handle cannot support the
weight of the appliance and could break.
1
2
.If you use the residual heat of the switched
keep food warm, a high moisture content inside the cavity
can occur. This may lead to condensation and can cause
corrosion damage of your high quality appliance as well as
harm your kitchen. Avoid condensation by opening the
door or use “Defrost” mode.
"rom the baking tray leaves stains that cannot be
removed. If possible, use the deeper universal pan.
Extremely dirty seal: If the seal is very dirty, the appliance
door will no longer close properly during operation. The
"ronts of adjacent units could be damaged. Always keepŏ
the seal clean.
7
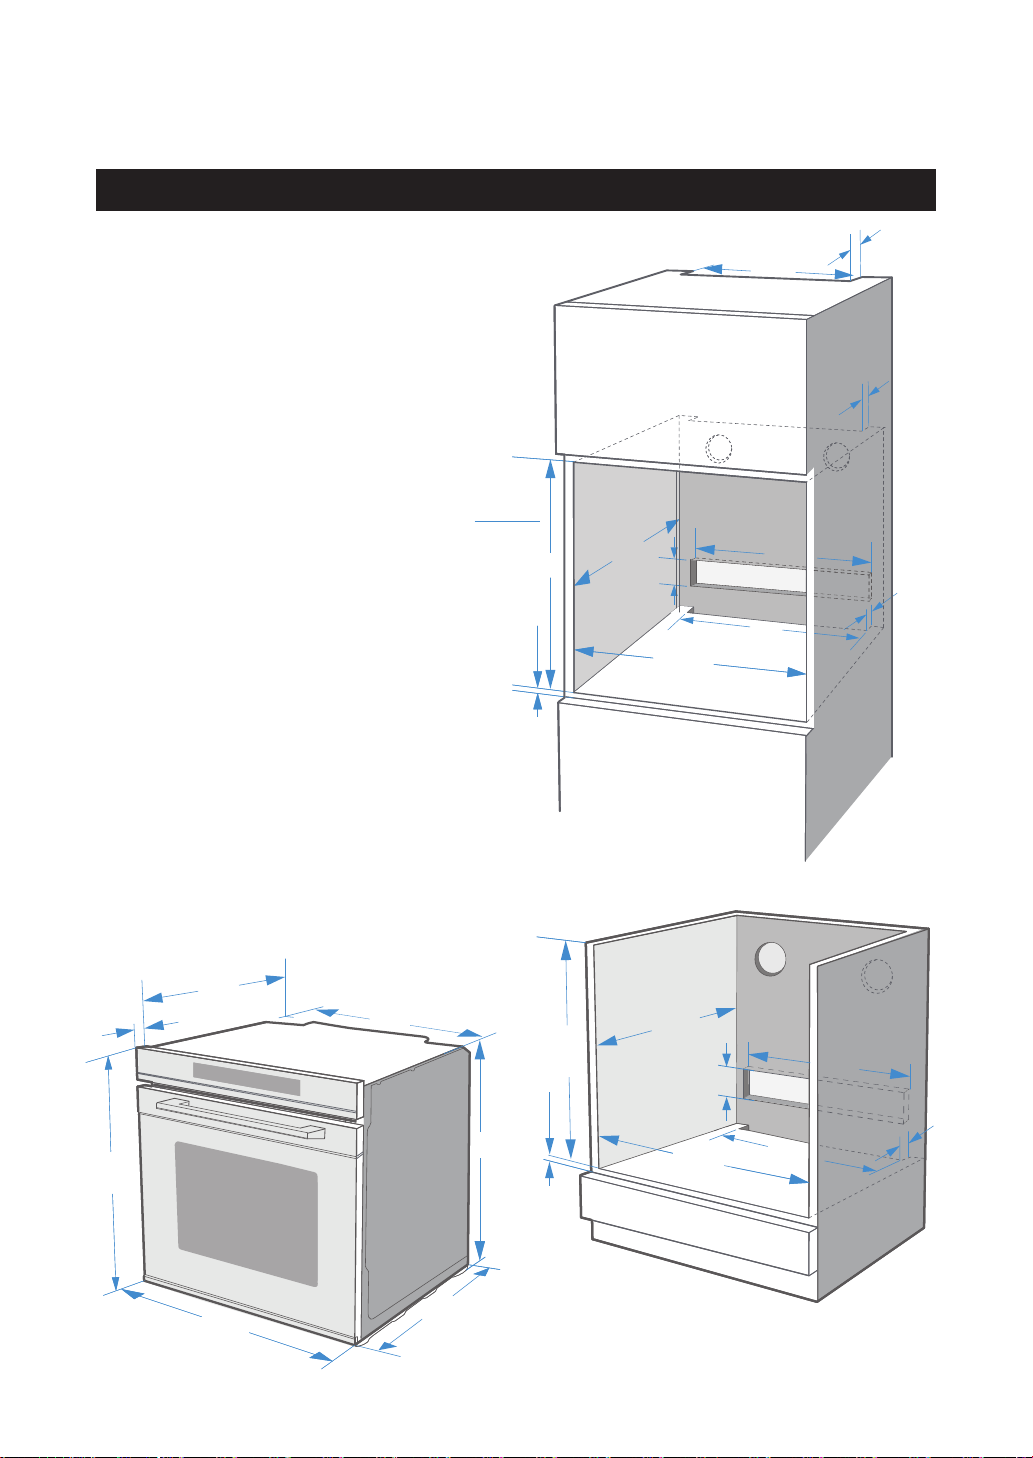
ŏ
To operate this appliance safe , please
be sure that it has been installed to a
professional standard respecting the
installation instructions . Damages occur
because of incorrect installation are not
within the warranty.
While doing the installation , please
wear protective gloves to prevent
yourself from getting cut by sharp
edges .
Check the appliance if there is any
damage before installation and do not
connect the appliance if there is .ŏ
Before turning on the appliance , please
clean up all the packaging materials and
adhe-sive film from the appliance.
The dimensions attached are in mm.
It is necessary to have the plug
accessible or incorporate a switch in the
fixed wiring, in order to disconnect the
appliance from the supply after
installation when necessary.ŏ
Warning:The appliance must not be
installed behind a decorative door in
order to avoid overheating.
566
20
55 7 6
55 99 55
55 99 66
546
560
min.35
500
min.35
min.585
max.595 min.
min.
590 550
550 446600
105
min.35
500
560
560+ 88
mmiinn.. 55
min.
min.
600
600
88
min.35
560
560 +
446600
500
105
min.
min.
550
550
mmiinn.. 55
8
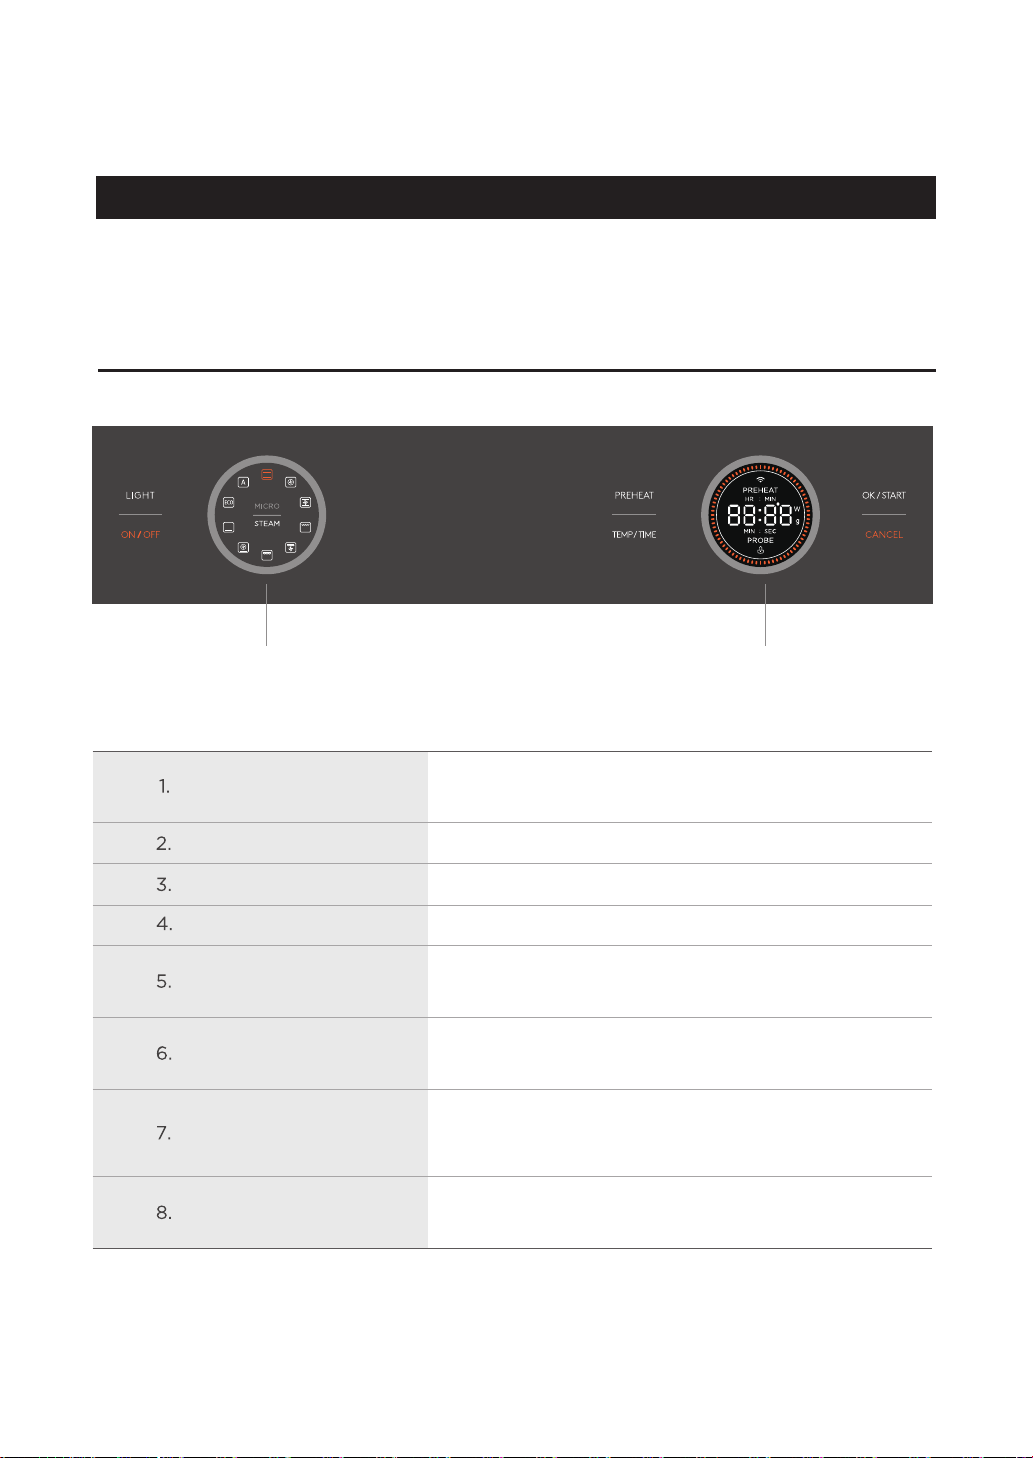
ŏŏ
knob 1 knob 2
General operation: select function, adjust time or temperature, start cooking.
LIGHT Click, turn on/o the stove lamp;Long press 3s to
enter or exit the child lock function.
ON/OFF Switch on and o oven.
Knob 1 Rotate, select function.
Knob 2 Rotate, adjust cooking time or temperature.
PREHEAT Under the setting state, press this button to turn
on and o the preheating function;
TEMP/TIME Click to adjust the clock, temperature, probe
temperature, cooking time.
In the Settings state, click to start cooking;In the
parameter adjustment state, click to confirm the
parameters.
OK/START
CANCEL
NOTE:
Do not operate the machine for 5 minutes, the machine will automatically enter the
state of power saving. Click ON/OFF to return to standby mode.
Unsets the current Settings and returns to standby
mode.
9
&RQILJXUHSDQHO

ŏŏŏ
%./0ŏ1/%*#ŏ"+.ŏ0$!ŏ"%./0ŏ0%)
!"+.!ŏ1/%*#ŏ0$!ŏ,,(%*!ŏ0+ŏ,.!,.!ŏ"++ ŏ"+.ŏ0$!ŏ"%./0ŏ0%)!Čŏ5+1ŏ)1/0ŏ(!*ŏ0$!
2%05ŏ* ŏ!//+.%!/ċ
āċ
Ăċ
ăċ
ąċ
Ćċ
ćċ
Ĉċ
ĉċ
!0%*#ŏ+ !
!),!.01.!
%)!
ĂĆĀł
ā$
!00%*#/
"0!.ŏ0$!ŏ,,(%*!ŏ$/ŏ++(! ŏ +3*č
(!*ŏ0$!ŏ/)++0$ŏ/1."!/ŏ* ŏ0$!ŏ ++.ŏ3%0$ŏ/+,5ŏ30!.ŏ* ŏŏ %/$ŏ(+0$ċŏ
.5ŏ((ŏ/1."!/ċ
*/0((ŏ0$!ŏ/% !ġ.'/ċ
āċ
Ăċ
ăċ
Setting the time
Before using the oven, you need to set the clock;
1.. In standby mode, click "TEMP/TIME" to enter the clock setting stat
2.. Rotate the right knob to adjust the hour position, and click "TEMP/TIME" to confir
3.. Rotate the right knob to adjust the minute position, and click "TEMP/TIME" to comple
the clock setting.
!)+2!ŏ((ŏ/0%'!./Čŏ/1."!ŏ,.+0!0%+*ŏ"+%(/ŏ* ŏ0.*/,+.0ŏ,.+0!0%+*ŏ,.0/ċŏ
!)+2!ŏ((ŏ!//+.%!/ŏ* ŏ0$!ŏ/% !ġ.'/ŏ".+)ŏ0$!ŏ2%05ċ
(!*ŏ0$!ŏ!//+.%!/ŏ* ŏ0$!ŏ/% !ġ.'/ŏ0$+.+1#$(5ŏ1/%*#ŏ/+,5ŏ30!.ŏ* ŏŏ %/$ŏ
(+0$ŏ+.ŏ/+"0ŏ.1/$ċ
*/1.!ŏ0$0ŏ0$!ŏ2%05ŏ +!/ŏ*+0ŏ+*0%*ŏ*5ŏ(!"0+2!.ŏ,'#%*#Čŏ/1$ŏ/ŏ,+(5/05.!*!ŏ
,!((!0/ŏ+.ŏ3++ !*ŏ,%!!ŏ3$%$ŏ)5ŏ1/!ŏ.%/'ŏ+"ŏ"%.!
%,!ŏ0$!ŏ/)++0$ŏ/1."!/ŏ%*ŏ0$!ŏ2%05ŏ* ŏ0$!ŏ ++.ŏ3%0$ŏŏ/+"0Čŏ3!0ŏ(+0$ċ
+ŏ.!)+2!ŏ0$!ŏ*!3ġ,,(%*!ŏ/)!((Čŏ$!0ŏ1,ŏ0$!ŏ,,(%*!ŏ3$!*ŏ!),05ŏ* ŏ3%0$ŏ0$!ŏ
+2!*ŏ ++.ŏ(+/! ċ
!!,ŏ0$!ŏ'%0$!*ŏ$%#$(5ŏ2!*0%(0! ŏ3$%(!ŏ0$!ŏ,,(%*!ŏ%/ŏ$!0%*#ŏ1,ŏ"%./0ŏ0%)!ċŏ!!,ŏ
$%( .!*ŏ* ŏ,!0/ŏ+10ŏ+"ŏ0$!ŏ'%0$!*ŏ 1.%*#ŏ0$%/ŏ0%)!ċŏ(+/!ŏ0$!ŏ ++.ŏ0+ŏ0$!ŏ &!*0ŏ
.++)/ċ
&1/0ŏ0$!ŏ/!00%*#/ŏ%* %0! ċŏ+1ŏ*ŏ"%* ŏ+10ŏ$+3ŏ0+ŏ/!0ŏ0$!ŏ$!0%*#ŏ05,!ŏ* ŏ0$!ŏ
0!),!.01.!ŏ%*ŏ0$!ŏ*!40ŏ/!0%+*ċ
10
+0!/
"0!.ŏ0$!ŏ,+3!.ŏ%/ŏ+**!0! Čŏ%"ŏ0$!ŏ(+'ŏ%/ŏ*+0ŏ/!0Čŏ0$!ŏ(+'ŏ3%((ŏ*+0ŏ!ŏ0%)! ŏĨ %/,(5ŏĀĀčĀĀĩċ
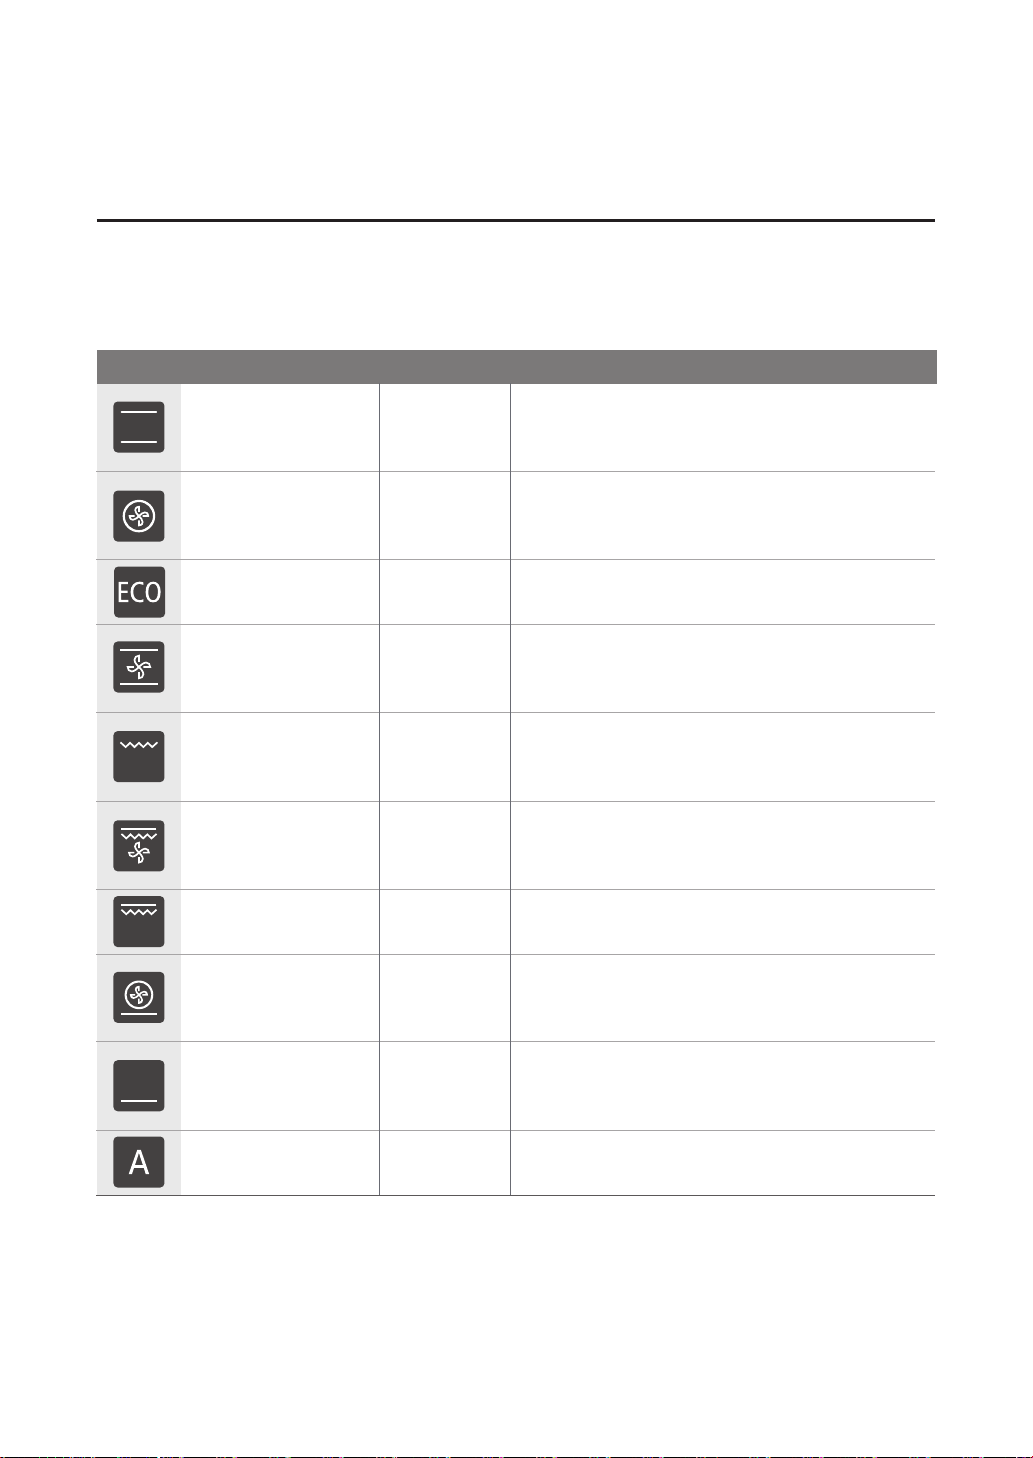
ŏŏŏ
+1.ŏ,,(%*!ŏ$/ŏ2.%+1/ŏ+,!.0%*#ŏ)+ !/ŏ3$%$ŏ)'!ŏ5+1.ŏ,,(%*!ŏ!/%!.ŏ0+ŏ1/!ċŏ
+ŏ!*(!ŏ5+1ŏ0+ŏ"%* ŏ0$!ŏ+..!0ŏ05,!ŏ+"ŏ$!0%*#ŏ"+.ŏ5+1.ŏ %/$Čŏ3!ŏ$2!ŏ!4,(%*! ŏ0$!
%ł!.!*!/ŏ* ŏ/+,!/ŏ+"ŏ,,(%0%+*ŏ$!.!ċŏ
5,!/ŏ+"ŏ!0%*# !),!.01.! /!
+*2!*0%+*(
+.ŏ0. %0%+*(ŏ'%*#ŏ* ŏ.+/0%*#ŏ+*ŏ+*!ŏ
(!2!(ċŏ/,!%((5ŏ/1%0(!ŏ"+.ŏ'!/ŏ3%0$ŏ
)+%/0ŏ0+,,%*#/ċŏ
+*2!0%+*
+.ŏ'%*#ŏ* ŏ.+/0%*#ŏ+*ŏ+*!ŏ+.ŏ)+.!ŏ
(!2!(/ċŏ!0ŏ+)!/ŏ".+)ŏ0$!ŏ.%*#ŏ$!0!.ŏ
/1..+1* %*#ŏ0$!ŏ"*ŏ!2!*(5ċŏ
+.ŏ!*!.#5ġ/2! ŏ++'%*#ċ
+*2!*0%+*(ŏŇŏ*
+.ŏ'%*#ŏ* ŏ.+/0%*#ŏ+*ŏ+*!ŏ+.ŏ)+.!ŏ
(!2!(/ċŏ$!ŏ"*ŏ %/0.%10!/ŏ0$!ŏ$!0ŏ".+)ŏ0$!ŏ
$!0%*#ŏ!(!)!*0/ŏ!2!*(5ŏ.+1* ŏ0$!ŏ2%05ċŏ
%*0ŏ!0
+.ŏ#.%((%*#ŏ/)((ŏ)+1*0/ŏ+"ŏ"++ ŏ* ŏ"+.ŏ
.+3*%*#ŏ"++ ċŏ(!/!ŏ,10ŏ0$!ŏ"++ ŏ%*ŏ0$!ŏ
!*0!.ŏ,.0ŏ1* !.ŏ0$!ŏ#.%((ŏ$!0%*#ŏ!(!)!*0ċŏ
+1(!ŏ.%((ŏŇŏ*
+.ŏ#.%((%*#ŏ"(0ŏ%0!)/ŏ* ŏ"+.ŏ.+3*%*#
"++ ċŏ$!ŏ"*ŏ %/0.%10!/ŏ0$!ŏ$!0ŏ!2!*(5ŏ
.+1* ŏ0$!ŏ2%05ċŏ
!".+/0 Ĥ+.ŏ#!*0(5ŏ !".+/0%*#ŏ".+6!*ŏ"++ ċ
+1(!ŏ.%(( +.ŏ#.%((%*#ŏ"(0ŏ%0!)/ŏ* ŏ"+.ŏ.+3*%*#ŏ"++
%66
+.ŏ,%66ŏ* ŏ %/$!/ŏ3$%$ŏ*!! ŏŏ(+0ŏ+"ŏ
$!0ŏ".+)ŏ1* !.*!0$ċŏ$!ŏ+00+)ŏ$!0!.ŏ
* ŏ.%*#ŏ$!0!.ŏ3%((ŏ3+.'ċŏ
+00+)ŏ!0
+.ŏ ŏ!40.ŏ.+3*%*#ŏ0+ŏ0$!ŏ/!/ŏ+"ŏ
,%66/Čŏ,%!/Čŏ* ŏ,/0.%!/ċŏ!0%*#ŏ+)!ŏ
".+)ŏ0$!ŏ+00+)ŏ$!0!.ċŏ
30嗣250Ď
50嗣250Ď
140嗣240Ď
50嗣250Ď
150嗣250Ď
50嗣250Ď
150嗣250Ď
50嗣250Ď
30嗣220Ď
11
&RQILJXUHSDQHO

ŏŏŏ
+1.ŏ,,(%*!ŏ$/ŏ2.%+1/ŏ+,!.0%*#ŏ)+ !/ŏ3$%$ŏ)'!ŏ5+1.ŏ,,(%*!ŏ!/%!.ŏ0+ŏ1/!ċŏ
+ŏ!*(!ŏ5+1ŏ0+ŏ"%* ŏ0$!ŏ+..!0ŏ05,!ŏ+"ŏ$!0%*#ŏ"+.ŏ5+1.ŏ %/$Čŏ3!ŏ$2!ŏ!4,(%*! ŏ0$!
%ł!.!*!/ŏ* ŏ/+,!/ŏ+"ŏ,,(%0%+*ŏ$!.!ċŏ
5,!/ŏ+"ŏ!0%*# !),!.01.! /!
+*2!*0%+*(
+.ŏ0. %0%+*(ŏ'%*#ŏ* ŏ.+/0%*#ŏ+*ŏ+*!ŏ
(!2!(ċŏ/,!%((5ŏ/1%0(!ŏ"+.ŏ'!/ŏ3%0$ŏ
)+%/0ŏ0+,,%*#/ċŏ
+*2!0%+*
+.ŏ'%*#ŏ* ŏ.+/0%*#ŏ+*ŏ+*!ŏ+.ŏ)+.!ŏ
(!2!(/ċŏ!0ŏ+)!/ŏ".+)ŏ0$!ŏ.%*#ŏ$!0!.ŏ
/1..+1* %*#ŏ0$!ŏ"*ŏ!2!*(5ċŏ
+.ŏ!*!.#5ġ/2! ŏ++'%*#ċ
+*2!*0%+*(ŏŇŏ*
+.ŏ'%*#ŏ* ŏ.+/0%*#ŏ+*ŏ+*!ŏ+.ŏ)+.!ŏ
(!2!(/ċŏ$!ŏ"*ŏ %/0.%10!/ŏ0$!ŏ$!0ŏ".+)ŏ0$!ŏ
$!0%*#ŏ!(!)!*0/ŏ!2!*(5ŏ.+1* ŏ0$!ŏ2%05ċŏ
%*0ŏ!0
+.ŏ#.%((%*#ŏ/)((ŏ)+1*0/ŏ+"ŏ"++ ŏ* ŏ"+.ŏ
.+3*%*#ŏ"++ ċŏ(!/!ŏ,10ŏ0$!ŏ"++ ŏ%*ŏ0$!ŏ
!*0!.ŏ,.0ŏ1* !.ŏ0$!ŏ#.%((ŏ$!0%*#ŏ!(!)!*0ċŏ
+1(!ŏ.%((ŏŇŏ*
+.ŏ#.%((%*#ŏ"(0ŏ%0!)/ŏ* ŏ"+.ŏ.+3*%*#
"++ ċŏ$!ŏ"*ŏ %/0.%10!/ŏ0$!ŏ$!0ŏ!2!*(5ŏ
.+1* ŏ0$!ŏ2%05ċŏ
!".+/0 Ĥ+.ŏ#!*0(5ŏ !".+/0%*#ŏ".+6!*ŏ"++ ċ
+1(!ŏ.%(( +.ŏ#.%((%*#ŏ"(0ŏ%0!)/ŏ* ŏ"+.ŏ.+3*%*#ŏ"++
%66
+.ŏ,%66ŏ* ŏ %/$!/ŏ3$%$ŏ*!! ŏŏ(+0ŏ+"ŏ
$!0ŏ".+)ŏ1* !.*!0$ċŏ$!ŏ+00+)ŏ$!0!.ŏ
* ŏ.%*#ŏ$!0!.ŏ3%((ŏ3+.'ċŏ
+00+)ŏ!0
+.ŏ ŏ!40.ŏ.+3*%*#ŏ0+ŏ0$!ŏ/!/ŏ+"ŏ
,%66/Čŏ,%!/Čŏ* ŏ,/0.%!/ċŏ!0%*#ŏ+)!ŏ
".+)ŏ0$!ŏ+00+)ŏ$!0!.ċŏ
30嗣250Ď
50嗣250Ď
140嗣240Ď
50嗣250Ď
150嗣250Ď
50嗣250Ď
150嗣250Ď
50嗣250Ď
30嗣220Ď
11
&RQILJXUHSDQHO

+0!/
10%+*
āċ
Ăċ
"ŏ5+1ŏ+,!*ŏ0$!ŏ,,(%*!ŏ ++.ŏ 1.%*#ŏ*ŏ+*ġ#+%*#ŏ+,!.0%+*Čŏ0$!ŏ+,!.0%+*ŏ3%((ŏ*+0ŏ!ŏ
,1/! ċŏ(!/!ŏ!ŏ!/,!%((5ŏ.!"1(ŏ3%0$ŏ0$!ŏ.%/'ŏ+"ŏ1.*/ċ
+ŏ*+0ŏ+2!.ŏ0$!ŏ2!*0%(0%+*ŏ/(+0/ċŏ0$!.3%/!Čŏ0$!ŏ,,(%*!ŏ)5ŏ+2!.$!ċ
+ŏ)'!ŏ0$!ŏ,,(%*!ŏ++(/ŏ +3*ŏ)+.!ŏ-1%'(5ŏ"0!.ŏ0$!ŏ+,!.0%+*Čŏ0$!ŏ++(%*#ŏ"*ŏ
)5ŏ+*0%*1!ŏ0+ŏ.1*ŏ"+.ŏŏ,!.%+ ŏ"0!.3. /ċŏŏ
āċ
Ăċ
ăċ
+ŏ !".+/0ŏ%#ŏ,+.0%+*/ŏ+"ŏ"++ Čŏ%0ŏ%/ŏ,+//%(!ŏ0+ŏ.!)+2!ŏ0$!ŏ/% !ġ.'/ŏ* ŏ,(!ŏ0$!ŏ
+*0%*!.ŏ+*ŏ0$!ŏ2%05ŏ"(++.
+ŏ3.)%*#ŏ0(!3.!Čŏ%0ŏ%/ŏ!*!"%%(ŏ0+ŏ.!)+2!ŏ0$!ŏ/% !ġ.'/ŏ* ŏ0$!ŏ$!0%*#ŏ)+ !/ŏ
ė+0ŏ%.ŏ.%((%*#Ęŏ* ŏė*ŏ!0%*#Ęŏ3%0$ŏ0!),!.01.!ŏ/!00%*#ŏ+"ŏĆĀłŏ.!ŏ1/!"1(ċŏė+0ŏ
%.ŏ.%((%*#Ęŏ/$+1( ŏ!ŏ1/! Čŏ%"ŏ)+.!ŏ0$*ŏ$("ŏ+"ŏ0$!ŏ2%05ŏ"(++.ŏ%/ŏ+2!.! ŏ5ŏ0$!ŏ
0(!3.!ċ
1!ŏ0+ŏ*ŏ+,0%)1)ŏ!2!**!//ŏ+"ŏ$!0ŏ %/0.%10%+*ŏ%*/% !ŏ0$!ŏ2%05ŏ 1.%*#ŏė*ŏ!0ġ
%*#ĘČŏ0$!ŏ"*ŏ3%((ŏ3+.'ŏ0ŏ!.0%*ŏ0%)!/ŏ+"ŏ0$!ŏ$!0%*#ŏ,.+!//Čŏ0+ŏ#1.*05ŏ0$!ŏ!/0ŏ
,+//%(!ŏ,!."+.)*!ċŏŏŏ
!".+/0%*#ŏ* ŏŅŅŏ"1*0%+*/ŏ**+0ŏ!ŏ,.!$!0! ŏ-1%'(5ŏċ
++(%*#ŏ"*
$!ŏ++(%*#ŏ"*ŏ/3%0$!/ŏ+*ŏ* ŏ+""ŏ/ŏ.!-1%.! ċŏ$!ŏ$+0ŏ%.ŏ!/,!/ŏ+2!ŏ0$!ŏ
++.ċ
12
ąċ

USING YOUR APPLIANCE
3..
4. When the preheat is complete, put the food into the oven and click "OK/START" to START
the cooking.
Change during cooking
If you need to change the cooking TIME or temperature during the cooking process,
please click "TEMP/TIME" and adjust it through knob 2.
If you have extensive cooking experience, you can adjust the parameters to your
personal preference and start cooking.
If you don't have extensive cooking experience, start cooking with TYPICAL RECIPES
in the directions.
2.
NOTE:
After setting the temperature, click "TEMP/TIME" and rotate the adjusting knob to set the time.
Notes
1.
General operation
1.
2.
3.
In standby mode, turn knob 1 to select the function;
Adjust cooking TIME or temperature by using "TEMP/TIME" button and knob 2;
Click the "OK/START" button to START cooking.
Quick preheat
Quick preheating can be used to shorten the cooking time.The specific steps are as follows:
a djust the TIME, and click "TEMP/TIME" to complete the parameter setting;
Click the "PREHEAT" key to warm u
1..
2..
Rotate the knob 1 to select the functio
Rotate the knob 2 to adjust the temperature, click "TEMP/TIME", rotate the knob 2
13
Caution!
1. To avoid burns, after cooking, please wear heat-proof gloves and take out the food.
2.. After cooking;Do not touch the surface or heating element of the machin
3.. Please wait for the oven to cool before taking out the accessorie
4.. To avoid burns, children should keep a safe distance from the machin
5.
. In order to avoid the oven door glass burst, the oven door can not be used to p10
other things.

Childproof lock
Your appliance has a childproof lock so that children cannot switch it on accidentally or
change any settings.
1.. In standby mod long press the "LIGHT" button for 3 seconds to enter the childproof
lock function.
2. In the state of child lock, long press the "LIGHT" button for 3 seconds to exit the
childproof lock function.
14
!)+ŏ)+ !
!)+*/0.0%+*ŏ)+ !Čŏ3%0$ŏ,+3!.ġ+""ŏ/2%*#ŏ 0ŏ"1*0%+*ċŏ+3!.ŏ+""ŏ/2%*#ŏ"1*0%+*čŏ
"+.ŏ!4),(!Čŏ3$!*ŏ0$!ŏ !)+ŏ)+ !ŏ%/ŏ/!0ŏ0+ŏ+*Čŏ,+3!.ŏ+""ŏ* ŏ0$!*ŏ+*ŏ%/ŏ/0%((ŏ+*ċŏ"0!.ŏ
0$!ŏ !)+*/0.0%+*ŏ)+ !ŏ%/ŏ01.*! ŏ+*Čŏ0$!ŏ$!0%*#ŏ,%,!ŏ +!/ŏ*+0ŏ3+.'ċŏŏ
ā ċċ
0$ŏ)+ !
0$ŏ)+ !ŏ$/ŏ0$!ŏ"1*0%+*ŏ+"ŏ,+3!.ġ+""ŏ/2%*#ŏ 0ċŏ2!ŏ++'%*#ŏ 0ŏ!2!.5ŏĂĆŏ
)%*10!/ċŏ"ŏ0$!ŏ,+3!.ŏ%/ŏ10ŏ+""ŏ 1.%*#ŏ+,!.0%+*Čŏ"0!.ŏ,+3!.ŏ+*ŏ#%*Čŏ0$!ŏ0$ŏ
)+ !ŏ3%((ŏ+*0%*1!ŏ0+ŏ.1*ŏ1*0%(ŏ0$!ŏ++'%*#ŏ0%)!ŏ%/ŏĀČŏ+.ŏ,.!//ŏ0$!ŅĥŅ'!5ŏ0+ŏ.!01.*ŏ0+ŏŏ
/0* 5ŏ)+ !ċŏ
1.*!ŏ(),/ŏ"1*0%+*
*ŏ*5ŏ/00!ŏĨ!4!,0ŏ"+.ŏ/1ġ(+'ŏ* ŏ"(/!ŏ(.)ĩČŏ(%'ŏ0$!ŏŅ(),Ņŏ100+*ŏ0+ŏ/3%0$ŏ0$!ŏ
"1.*!ŏ(),ċ
1 .. In standby mode, long press "ON/OFF" for 5 seconds to enter the demo mode and
display "OFF";
Turn the knob 2 to open or close the demo mode. When it is ON, display "ON"; when it
is OFF, display "OFF".
After setting, you can click "ON/OF" to exit the setting, or wait 3 seconds for the demo
mode to exit automatically and return to standby mode.
2.
3.
Note:
When the demo mode is on, the " " icon is lit to indicate that the demo mode is running.
After starting the function, the heating tube will not work.
When in standby mode with no selection function, long press the "PREHEAT" button forŏ
3 seconds to enter Sabbath mode. The left screen will display "A" and the right screen
will display "5A8"Ď
Click "TEMP/TIME" and adjust the TIME by turning knob 2Ď
Click "OK/START" to START Sabbath mode;
At run time, click 'ON/OFF' or 'CANCEL' to run back to standby.
Ăċ
ăċ
ąċ

ŏ
+1.ŏ,,(%*!ŏ%/ŏ+),*%! ŏ5ŏŏ.*#!ŏ+"ŏ!//+.%!/ċŏ!.!Čŏ5+1ŏ*ŏ"%* ŏ*ŏ+2!.2%!3
+"ŏ0$!ŏ!//+.%!/ŏ%*(1 ! ŏ* ŏ%*"+.)0%+*ŏ+*ŏ$+3ŏ0+ŏ1/!ŏ0$!)ŏ+..!0(5ċŏ
!//+.%!/ŏ%*(1 ! ŏ
+1.ŏ,,(%*!ŏ%/ŏ!-1%,,! ŏ3%0$ŏ0$!ŏ"+((+3%*#ŏ!//+.%!/č
%.!ŏ'
+.ŏ+2!*3.!Čŏ'!ŏ0%*/ŏ* ŏ
+2!*,.++"ŏ %/$!/ċŏ+.ŏ.+/0/ŏ* ŏ
#.%((! ŏ"++
'%*#ŏ.5
+.ŏ0.5ŏ'!/ŏ* ŏ/)((ŏ
'! ŏ,.+ 10/ċ
āĆ

āċ
Ăċ
*/!.0%*#ŏ!//+.%!/
$!ŏ2%05ŏ$/ŏ"%2!ŏ/$!("ŏ,+/%0%+*/ċŏ$!ŏ/$!("ŏ,+/%0%+*/ŏ.!ŏ+1*0! ŏ".+)ŏ0$!ŏ+00+)ŏ1,
$!ŏ!//+.%!/ŏ*ŏ!ŏ,1((! ŏ+10ŏ,,.+4%)0!(5ŏ$("35ŏ3%0$+10ŏ0%,,%*#ċŏ
+0!/
*/1.!ŏ0$0ŏ5+1ŏ(35/ŏ%*/!.0ŏ0$!ŏ!//+.%!/ŏ%*0+ŏ0$!ŏ2%05ŏ0$!ŏ.%#$0ŏ35ŏ.+1* ċ
(35/ŏ%*/!.0ŏ0$!ŏ!//+.%!/ŏ"1((5ŏ%*0+ŏ0$!ŏ2%05ŏ/+ŏ0$0ŏ0$!5ŏ +ŏ*+0ŏ0+1$ŏ
0$!ŏ,,(%*!ŏ ++.ċŏŏ
+1ŏ*ŏ1/!ŏ0$!ŏ0.5ŏ0+ŏ,(!ŏ(%-1% ŏ+.ŏ++'%*#ŏ"++ ŏ3%0$ŏ&1%!ċ
*(5ŏ1/!ŏ+.%#%*(ŏ!//+.%!/ċŏ$!5ŏ.!ŏ/,!%((5ŏ ,0! ŏ"+.ŏ5+1.ŏ,,(%*!ċŏ
+1ŏ*ŏ15ŏ!//+.%!/ŏ".+)ŏ0$!ŏ"0!.ġ/(!/ŏ/!.2%!Čŏ".+)ŏ/,!%(%/0ŏ.!0%(!./ŏ+.ŏ+*(%*!ċ
+0!
$!ŏ!//+.%!/ŏ)5ŏ !"+.)ŏ3$!*ŏ0$!5ŏ!+)!ŏ$+0ċŏ$%/ŏ +!/ŏ*+0ŏł!0ŏ0$!%.ŏ"1*0%+*ċŏ
*!ŏ0$!5ŏ$2!ŏ++(! ŏ +3*ŏ#%*Čŏ0$!5ŏ.!#%*ŏ0$!%.ŏ+.%#%*(ŏ/$,!ċŏ
ă
ā
Ă
Ć
ą
ă
Ă
ā
ą
ā
ăą
āĈ
Table of contents
Other EVE Oven manuals


