EVER BRIGHT FC2580 User manual
Model: FC2580
After-sales service
Thank you for purchasing everbright's water flosser, please
note the following matters:
Maintenance Records
Name of customer Tel.
Product type
Date of maintenance
Delivery address
Date of purchase
Product color
Where to buy? (seller)
Water Flosser
Instruction Manual
OZ
16
500
350
200
12
8
ML
1. Request the seller to issue effective sale evidence to be the proof of
maintenance during your purchase.
2. The product is freely maintained and repaired due to non-artificial
reason within one year in accordance with related regulations of the
State (based on the invoice date of purchasing);
3. If the following situation occurs within the warranty period, certain
maintenance cost will be charged:
①. Damage caused by consumer's misuse, incorrect maintenance and
improper management;
②. Damage caused by any unauthorized repairman;
③. There is no relevant receipt or invoice, and the product has
exceeded the production date for one year;
④. Damage caused by using for business purpose.
⑤. Damage caused by force majeure (such as earthquake and fire).
4. Please carefully complete the following table, and send it to the
manufacturer's designated maintenance site, and attach the product
with the repair requirement
Tandenborstel.com B.V.
Heusdensebaan 50, 5061 PS Oisterwijk, Netherlands
Tel: 31 (0) 88 - 52 51 500
Web: www.tandenborstel.com

UL standard
READ ALL INSTRUCTIONS BEFORE USING.
IMPORTANT SAFEGUARDS
DANGERS:
To reduce the risk of electrocution:
·Do not handle charger with wet hands.
·Do not immerse in water or other liquid.
·Do not use while bathing.
·Do not place or store product where it can fall or be pulled into a
tub, shower stall or sink.
·Do not reach for a product that has fallen into water.
Unplug immediately.
·Check the charger cord for damage before thefirst use and during
the life of the product.
When using electrical products, especially whenchildren are present,
the basic safety precautionsbelow should always be followed.
To reduce the risk of burns, electric shock, fire,
serious injury or damage issues:
·Do not plug this device into a voltage system that is different from the
voltage system specified on the device or charger.
·Do not use this product if it has a broken cord or plug. In case of not
working properly, or it has been dropped into any liquid, contact your
local distributor.
·Do not direct water flow under the tongue, into the ear, nose or other
delicate organs. This product is capable of producing pressures that
may cause serious damage to these organs. Refer to operating
instructions for correct usage.
·Use this product onIy as indicated in these instructions or suggestions
by your dental professional. It’s normal phenomenon if gum bleed a
little when using water flosser for the first time. If bleed much, please
stop using and ask for your dentist advice.
·Fill reservoir with water or other solutions recommended by dental
professional.
·Do not drop or insert any foreign object into the product.
Keep charger and cord away from heated surfaces.
·Do not operate where oxygen or aerosol sprays are being used.
·Do not use mouth washes/rinses that contain iodine, bIeach, or tea
treeoiI.
·Do not use while wearing any oral jewelry. Please put off prior to use.
·Do not use if you have an open wound on your tongue or in your
mouth.
·If your physician advise you to receive antibiotic premedication, you
shouId consuIt your dentist before using this instrument or any other
oral hygiene aid.
·For household use only. Do not use outdoors.
·Closely instruct and supervise children and individualswith special
needs in the proper use of this product.
·Children should be supervised to ensure that they donot play with the
appliance.
21
43
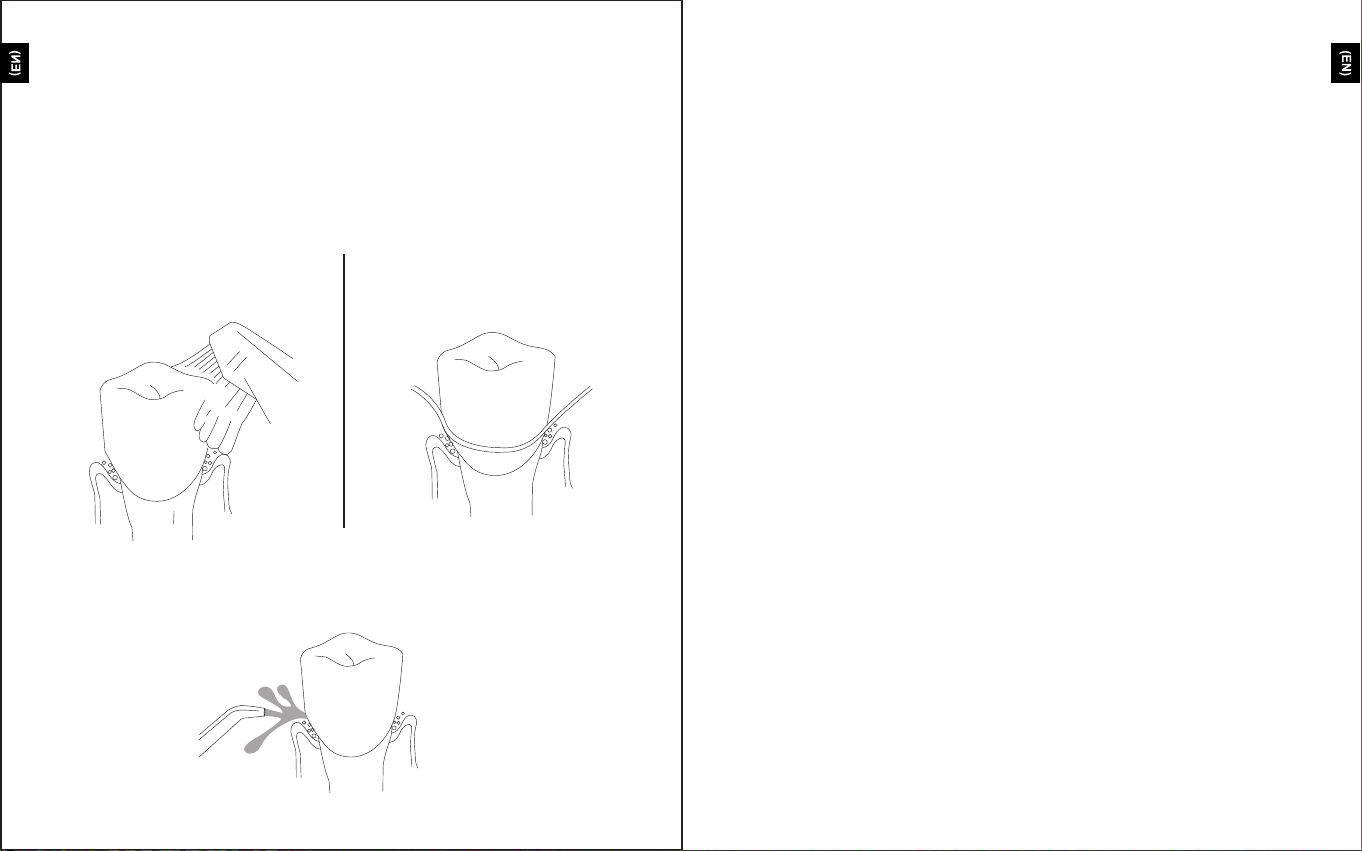
Traditional toothbrush cannot
clean away deeply hidden food
particles and harmful bacteria.
It could take away the harmful bacteria that being deeply hidden
under and the gum lines the inter-dental.
The toothbrush could only
touch limited location
under the gum line.
Traditional oral care:
Everbright Water Water Flosser
Thank you for purchasing our Water Flosser! Catalog
Welcome to use "everbright" Water Flosser, it would bring you
healthier teeth and brighter smile!
The water flosser use pulse flow to clean teeth, which could clean
harmful bacteria that deeply hidden under gum, inter-dental --
these area cannot be cleaned by only brushing your teeth.
The Company reserves the right of final interpretation for any misprint or
misunderstanding of the operation manual. In case of product or information
update will be included in the new manual without prior notice; if there is any
change in the color of the product, the actual goods in package shall prevail.
UL standard------------------------------------------- 1
Product structure -------------------------------------- 3
Product accessories ------------------------------------ 4
Instructions ------------------------------------------- 5
Inserting and removing the tip ----------------------------- 6
Adjusting water pressure --------------------------------- 6
Using Water Flosser ------------------------------------ 7
Connecting the base and the handle-------------------------7
Working time and charging--------------------------------8
Installation and un-installation----------------------------- 8
Using tips---------------------------- ----------------9
Pause-----------------------------------------------10
Common trouble shooting--------------------------------12

65
Product structure
1. Water tank lid 2. Jet Tip
3. Tip Rotating knob 4. Jet Tip Eject Button
5. Water tank 6. Handle
7. Water pressure switch 8. Power
9. Base 10. Body
11. Water pipe
S/N Name Quantity Picture
Standard Jet tip
Main Device
Charging cable
Instruction manual
Handle
Bag
2
1
1
1
1
1
2
3
4
5
6
1
Product accessories
OZ
16
500
350
200
12
8
ML
11
10
Because gingiva condition differs from people to people, the first use
of the Water Flosser may have gum bleeding symptom. This is normal.
Please feel free to use it! However, it gum bleeding too much, and last
long time, please advise your dentist.
Model: FC2580
Water Flosser
Instruction Manual
OZ
16
500
350
200
12
8
ML

87
IMPORTANT! Please fully charge the Water Flosser for the first use
by plugging the USB cable into the charging socket with power. The
product cannot be used while charging.
Instructions
Insert the jet tip in the hole of the tip knob top,.make sure that the jet
tip is inserted in position till a clicking sound. If needing to remove the
tip from the handle, press the eject button while pull off jet tip from
the handle.
Inserting and removing the tip
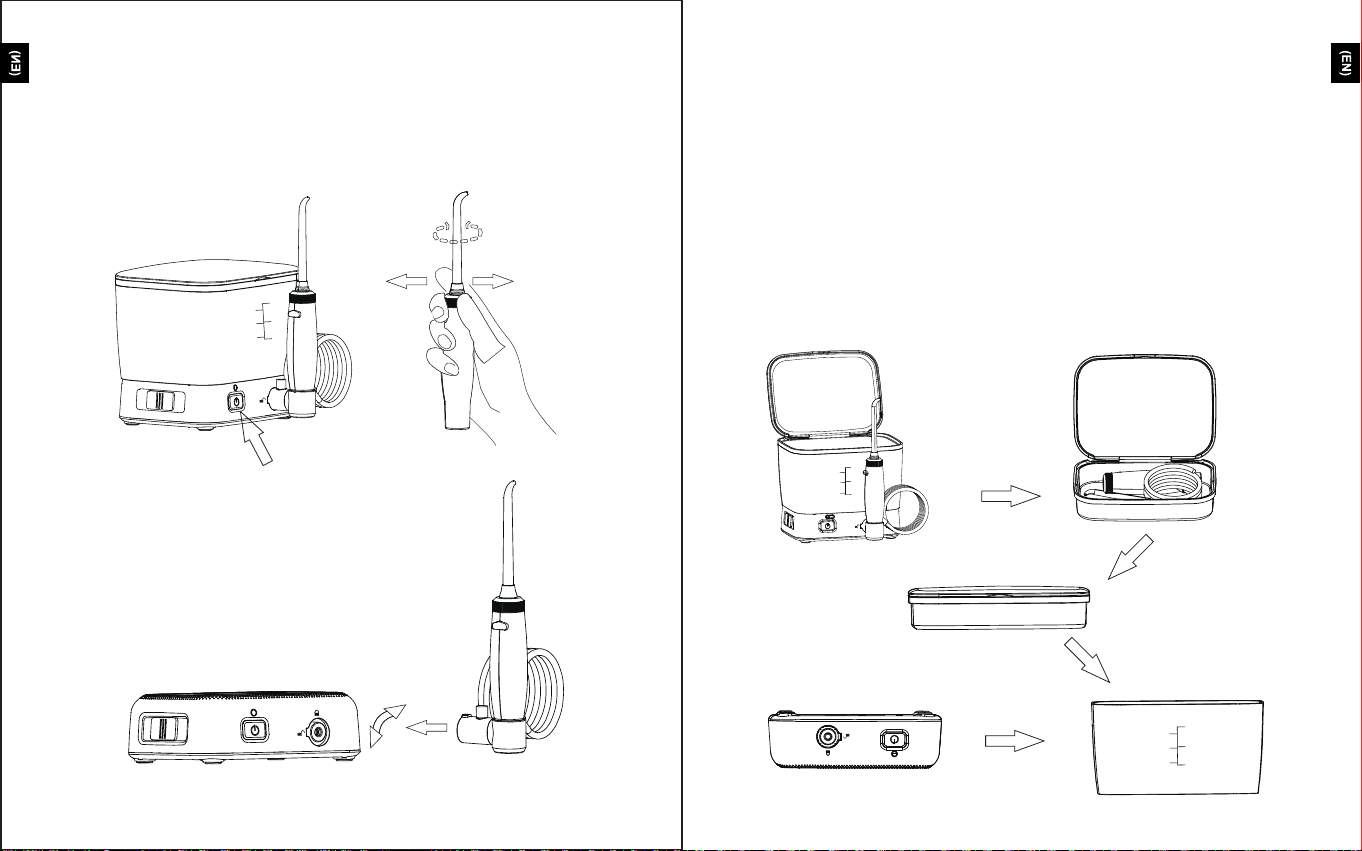
Push forward the button to increase water
pressure, push back to decrease it.
Adjusting water pressure
Remove the water tank and water
tank lid from the base.
Fill pure water into the water tank,
place it on the base and lightly
press it down.
Filling water
OZ
16
500
350
200
12
8
ML
OZ
16
500
350
200
12
8
ML
109
Bend your body to the washbasin, put the jet tip into your mouth to
aim it to your teeth, press the switch with the other hand and set your
preferred pressure.
Rotating the knob at the top of the handle to change water flow
direction.
Using Water Flosser
Connecting the base and the handle
Insert the end of the handle to the outlet of the device base
as marking, then rotate 90° in clockwise direction to erect the
handle. There shall not have leakage from the connection.
When taking off the handle from the base, , rotate the
handle base for 90° in anticlockwise direction till listening
the sound, then it can be taken away.
Working time and charging
The regular working time of the product is 150s, if you need to use it
for more time, turn on power again. It could be stopped by pressing the
switch during working.
When low battery,the white indicator will flash quickly. There will be a
white indicator flashing slowly during charging, when the indicator is
lighted for a long time, it means full charge. The product cannot be used
during charging.
Installation and un-installation
The water tank lid can accommodate the handle and jet tip, the tank
can contain device base, then cover water tank lid.
OZ
16
500
350
200
12
8
ML
OZ
16
500
350
200
12
8
ML
OZ
16
500
350
200
12
8
ML
Note the direction
1211
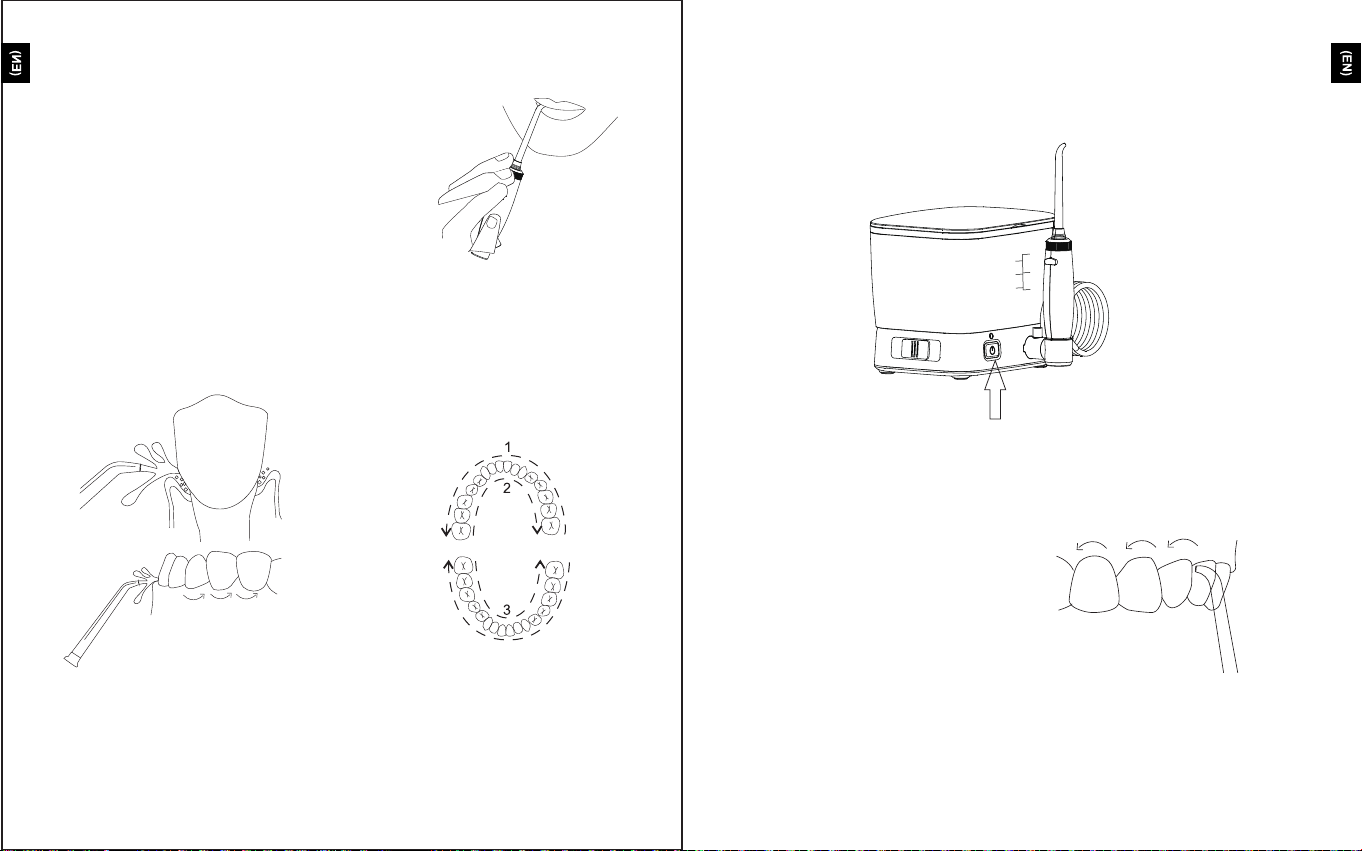
Aiming at the gingiva by the water flow in 90°
direction, slightly close your mouth to prevent
the water splash everywhere, but allow the
water to flow along the corner of your mouth
to the basin. For better cleaning, you should
start the cleaning from your molar tooth to
incisor. Lightly move the jet tip along the
gingiva and stay for a while. Repeat the same
operation till everywhere of your teeth are
cleaned.
Using tips
Instruction of the tip
Standard Jet tip
You could stop the machine by pressing the power button or turning
the pressure pushing to minimum value.
Pause
360° clean. And the place which cannot be
cleaned by the toothbrush.It is more effective
than the dental floss and is healthier for your
gingiva.。
OZ
16
500
350
200
12
8
ML

1413
Cleaning:
Maintenance
If any specific solution is stored in the water tank, take little time to clean the water
tank after using.
Fill some warm(not hot) water into the water tank and point jet tip to the washbasin.
Switch on the machine to run it till the water is emptied. This helps to prevent the
blocking and increase the life of the product.
When there is necessary for washing, clean the product with soft cloth and neutral
wear-free detergent.
1、After using the Water Flosser every time, invert the water tank, till no water or
cleaner and dried, and place it in cool and dry place with cleaned device. If the
machine is not used for a long time, it should be put into the package and store well.
2、When there is something wrong with the machine, you could consult the retailer.
3、Please do not dismantle or try to disassemble the product by yourself, and the
failure caused by this will not be included the warranty.
4、If the charge cable is broken, please repair it at the repair shop designated by the
Company or the shop with relevant repair qualification.
5、We still supply service for the Water Flosser that has exceeded the warranty
period, but material cost and little manual service fee will be charged.
Common trouble shooting
The Company assures to the original consumers and owners of this new
product that the product has no defects in material and process, and the
warranty period is one year from the date of purchase.
Thank you once again for purchasing everbright Water Flosser!
Leakage between the
jet tip and handle
Water tank leakage
Insufficient pressure Incorrect location for
the installation of the
water tank
Mount the water tank
again with downward
pressure
Failure to start Motor failure
Ensure whether the
power supply is
switched on; contact
with the sales repair
It might be no valve at
the bottom of tank, or
the valve is mounted in
an opposite way
Replace the valve or
mounted in the right
direction.
Leakage from the
water pipe Damaged pipe
Replace it through the
seller or repair it by the
customer service
The jet tip is not installed
in place
Remove the tip and
install it in right place
Error phenomena Reason Treatment method

2
1
(DE)
(DE)
Modellnummer: FC169
Traditionelle Zahnbürsten können tief
verborgene Speisereste und schädliche
Bakterien nicht entfernen.
Es könnte die schädlichen Bakterien, die tief verborgen sind, entfernen, und das
Zahnfleisch klebt das Interdental.
Die Zahnbürste konnte nur eine
begrenzte Stelle unter der
Zahnfleischlinie berühren.
Traditionelle Mundpflege:
Nicefeel Wasser Flosser
Vielen Dank für den Kauf unseres Wasserflossers!
Willkommen bei "Nicefeel" Wasser Flosser, es wird Ihnen gesündere Zähne und ein
helleres Lächeln bringen!
Der Wasserflosser verwendet einen Impulsfluss zur Reinigung der Zähne, wodurch
schädliche Bakterien, die tief unter Zahnfleisch versteckt sind, gereinigt werden
können. Diese Bereiche können nicht durch Zähneputzen gereinigt werden.
Katalog
Produktstruktur ---------------------------------------- 3
Produktzubehör --------------------------------------- 4
Anleitung -------------------------------------------- 5
Einsetzen und Entfernen der Spitze -------------------------6
Wasserdruck einstellen ---------------------------------- 6
Verwenden Sie den Wasser Flosser------------------------- 7
Basis und Griff verbinden---------------------------------7
Arbeitszeit und Aufladung-------------------------------- 8
Installation und Deinstallation----------------------------- 8
Tipps zum verwenden--------------------- --------------9
Pause-----------------------------------------------10
Häufige Fehlersuche------------------------------------12
Das Unternehmen behält sich das Recht auf endgültige Interpretation für
Druckfehler oder Missverständnisse in der Bedienungsanleitung vor. Die
Produkt-Aktualisierung und die Aktualisierung der Informationen werden
ohne vorherige Ankündigung in das neue Handbuch aufgenommen. Wenn
sich die Farbe des Produkts ändert, hat die tatsächliche Ware in der
Verpackung Vorrang.

34
(DE)
(DE)
Produktstruktur
1. Wassertankdeckel
3. Spitzen Drehknopf
5. Wassertank
7. Wasserdruckschalter
9. Basis
11. Wasserrohr
OZ
16
500
350
200
12
8
ML
10
2. Jet Spitze
4. Jet-Spitze-Auswurftaste
6. Griff
8. Spannung
10. Gehäuse
S/N Name Menge Bild
Standard Jet Spitze
Hauptgerät
Aufladekabel
Bedienungsanleitung
Griff
Tasche
2
1
1
1
1
1
2
3
4
5
6
1
Produktzubehör
Model: FC2580
Water Flosser
Instruction Manual
OZ
16
500
350
200
12
8
ML
Da das Zahnfleisch von Mensch zu Mensch unterschiedlich ist, kann
es bei der ersten Anwendung des Wasserflossers zu Zahnfleischblu-
tungssymptomen kommen. Das ist normal. Bitte zögern Sie nicht, es
zu benutzen! Wenn es jedoch zu stark blutet, informieren Sie Ihren
Zahnarzt.
56
(DE)
(DE)
WICHTIG! Laden Sie den Wasserflosser vor dem ersten Gebrauch
vollständig auf, indem Sie das USB-Kabel mit Adapter in die Lade-
buchse stecken. Das Produkt kann nicht während des Ladevorgangs
verwendet werden.
Anleitung
Entfernen Sie den Wassertank und
den Wassertankdeckel von der
Basis.
Füllen Sie den Wassertank mit
reinem Wasser, setzen Sie ihn auf
die Basis und drücken Sie ihn leicht
nach unten.
Wasser einfüllen
OZ
16
500
350
200
12
8
ML
OZ
16
500
350
200
12
8
ML
Setzen Sie die Düsenspitze in das Loch der Düsenspitze ein, und stellen
Sie sicher, dass die Düsenspitze bis zum Klicken einrastet. Wenn Sie
die Spitze vom Griff entfernen möchten, drücken Sie die Auswurftaste,
während Sie die Düsenspitze vom Griff abziehen.
Einsetzen und Entfernen der Spitze
Drücken Sie den Knopf nach vorne, um den
Wasserdruck zu erhöhen, drücken Sie ihn
zurück, um ihn zu verringern.
Wasserdruck einstellen
OZ
16
500
350
200
12
8
ML

8
78
7
(DE)
(DE)
Biegen Sie Ihren Körper zum Waschbecken, stecken Sie die Düsenspi-
tze in den Mund, um ihn auf Ihre Zähne zu richten, drücken Sie den
Schalter mit der anderen Hand und stellen Sie Ihren bevorzugten Druck
ein.
Drehen Sie den Knopf oben am Griff, um die Richtung des Wasser-
flusses zu ändern.
Verwenden Sie den Wasser Flosser
Basis und Griff verbinden
Führen Sie das Ende des Griffs mit der Markierung in den
Auslass der Gerätebasis ein, und drehen Sie ihn dann im
Uhrzeigersinn um 90 °, um den Griff aufzurichten. An der
Verbindung darf kein Leck auftreten.
Wenn Sie den Griff von der Basis abnehmen, drehen Sie
die Griffbasis um 90 ° gegen den Uhrzeigersinn, bis Sie
den Ton hören.
OZ
16
500
350
200
12
8
ML
Arbeitszeit und Aufladung
Die reguläre Arbeitszeit des Produkts beträgt 150 Sekunden. Wenn Sie
es länger brauchen, schalten Sie den Strom wieder ein. Sie kann durch
Drücken des Schalters während der Arbeit angehalten werden.
Bei schwachem Akku blinkt die weiße Anzeige schnell. Während des
Ladevorgangs blinkt eine weiße Anzeige langsam. Wenn die Anzeige
längere Zeit leuchtet, bedeutet dies, dass der Ladevorgang vollständig
ist. Das Produkt kann nicht während des Ladevorgangs verwendet werden.
Installation und Deinstallation
Der Wassertankdeckel kann den Griff und die Düsenspitze aufnehmen,
der Tank kann die Gerätebasis enthalten.
OZ
16
500
350
200
12
8
ML
OZ
16
500
350
200
12
8
ML
Beachten Sie die Richtung.

910
910
(DE)
(DE)
Schließen Sie den Mund leicht an, um das
Zahnfleisch durch den Wasserstrom in 90 °
-Richtung zu zielen, damit das Wasser nicht
überall spritzt, aber lassen Sie das Wasser
entlang der Mundwinkel in das Becken fließen.
Zur besseren Reinigung sollten Sie die Reini-
gung von Ihrem Backenzahn bis zum Schnei-
dezahn beginnen. Bewegen Sie die Düse
vorsichtig am Zahnfleisch entlang und bleiben
Sie eine Weile an einem Platz. Wiederholen Sie
den gleichen Vorgang, bis alle Zähne gereinigt
sind.
Spitzte verwenden
4
Anleitung für die Spitze
Standard Jet Spitze
Sie können die Maschine anhalten, indem Sie den Ein- / Ausschalter
drücken oder den Druck auf den Mindestwert stellen.
Pause
360 ° sauber. Und die Stelle, die nicht
mit der Zahnbürste gereinigt werden kann.
Sie ist wirksamer als Zahnseide und ist
für Ihr Zahnfleisch gesünder.
OZ
16
500
350
200
12
8
ML

12
11 12
11
(DE)
(DE)
Reinigung:
Instandhaltung
Wenn sich im Wasserbehälter eine bestimmte Lösung befindet, nehmen Sie sich
nach der Verwendung des Wasserbehälters etwas Zeit, um ihn zu reinigen.
Füllen Sie warmes (nicht heißes) Wasser in den Wassertank und richten Sie die
Düsenspitze auf das Waschbecken. Schalten Sie die Maschine ein, um sie laufen
zu lassen, bis das Wasser geleert ist. Dies verhindert das Blockieren und erhöht
die Lebensdauer des Produkts.
Wenn reinigen erforderlich ist, reinigen Sie das Produkt mit einem weichen Tuch
und einem neutralen, verschleißfreien Reinigungsmittel.
1. Drehen Sie den Tank nach jedem Gebrauch des Wasserflossers um, bis kein
Wasser oder Reinigungsmittel mehr vorhanden ist, stellen Sie ihn an einen kühlen,
trockenen Ort und verwenden Sie ein sauberes Gerät. Wenn das Gerät längere Zeit
nicht benutzt wird, sollte es in die Verpackung gelegt und gut gelagert werden.
2. Wenn mit der Maschine etwas nicht stimmt, wenden Sie sich an den Händler.
3. Bitte zersetzten Sie das Produkt nicht selbst und versuchen Sie nicht, das Produkt
selbst zu reperieren. Andernfalls wird ein Fehler dadurch, nicht in die Garantie
einbezogen.
4. Wenn das Ladekabel beschädigt ist, reparieren Sie es bitte bei der von der Firma
benannten Reparaturwerkstatt oder der Werkstatt mit entsprechender Reparaturqual-
ifikation.
5. Wir bieten immer noch einen Service für Wasserflosser an, der die Garantiezeit
überschritten hat. Materialkosten und geringe manuelle Servicegebühren werden
jedoch in die Rechnung gestellt.
Häufige Fehlersuche
Das Unternehmen sichert den ursprünglichen Verbrauchern und Eigentümern dieses
neuen Produkts zu, dass das Produkt keine Material- und Prozessfehler aufweist. Die
Gewährleistungsfrist beträgt ein Jahr ab Kaufdatum.
Nochmals vielen Dank für den Kauf von Nicefeel Wasser Flosser!
Leck zwischen
Düsenspitze und Griff
Wassertankleck
Unzureichender Druck Falscher Standort für
die Installation des
Wassertanks
Montieren Sie den
Wassertank wieder mit
Druck nach unten
Fehler beim Start Motorausfall
Stellen Sie sicher, dass
die Stromversorgung
eingeschaltet ist. Kontakt
mit der Verkaufsreparatur
Möglicherweise befindet
sich kein Ventil am Boden
des Tanks oder das Ventil
ist in entgegengesetzter
Richtung montiert
Ersetzen Sie das Ventil
oder montieren Sie es
in die richtige Richtung.
Leck aus der
Wasserleitung Beschädigtes Rohr
Ersetzen Sie es durch den
Verkäufer oder reparieren Sie
es durch den Kundendienst
Die Düsenspitze
ist nicht installiert
Entfernen Sie die Spitze
und installieren Sie sie
an der richtigen Stelle
Probleme Grund Behandlungsmethode

2
1
La brosse à dents traditionnelle ne peut
pas nettoyer les particules alimentaires
profondément cachées et les bactéries
nocives.
Il peut enlever les bactéries nocives qui se cachent profondément sous les
gencives et les lignes de la gencive inter dentaire.
Le fil dentaire ne peut toucher
qu'un endroit limité sous la ligne
de la gencive.
Soins bucco-dentaires traditionnels :
Brosse à dent à eau everbright
Merci d'avoir acheté notre brosse à dent à eau !
Bienvenue à utiliser Water Flosser "everbright", il vous apporterait des dents en
meilleure santé et un sourire plus éclatant!
Le flosser à eau utilise pulsflow pour nettoyer les dents, ce qui pourrait éliminer les
bactéries nocives cachées profondément sous les gencives, entre les dents - parce
que ces zones ne peuvent pas être nettoyées en se brossant simplement les dents.
Catalogue
Structure du produit ------------------------------------ 3
Accessoires du produit ---------------------------------- 4
Mode d'emploi -----------------------------------------5
Mise en place et retrait de l'embout -------------------------6
Utilisation de la brosse à dent à eau ------------------------ 6
Utilisation de Flosser ----------------------------------- 7
Raccordement de la base et de la poignée--------------------7
Temps de travail et charge--------------------------------8
Installation et désinstallation-------------------------------8
Conseils d'utilisation-------------------- ----------------9
Pause-----------------------------------------------10
Dépannage courant------------------------------------ 12
La Société se réserve le droit d'interprétation finale pour toute erreur
d'impression ou de compréhension du manuel d'utilisation. En cas de
mise à jour d'un produit ou d'informations, celles-ci seront incluses
dans le nouveau manuel sans préavis ; en cas de changement de
couleur du produit, les produits réels dans l'emballage prévaudront.
34
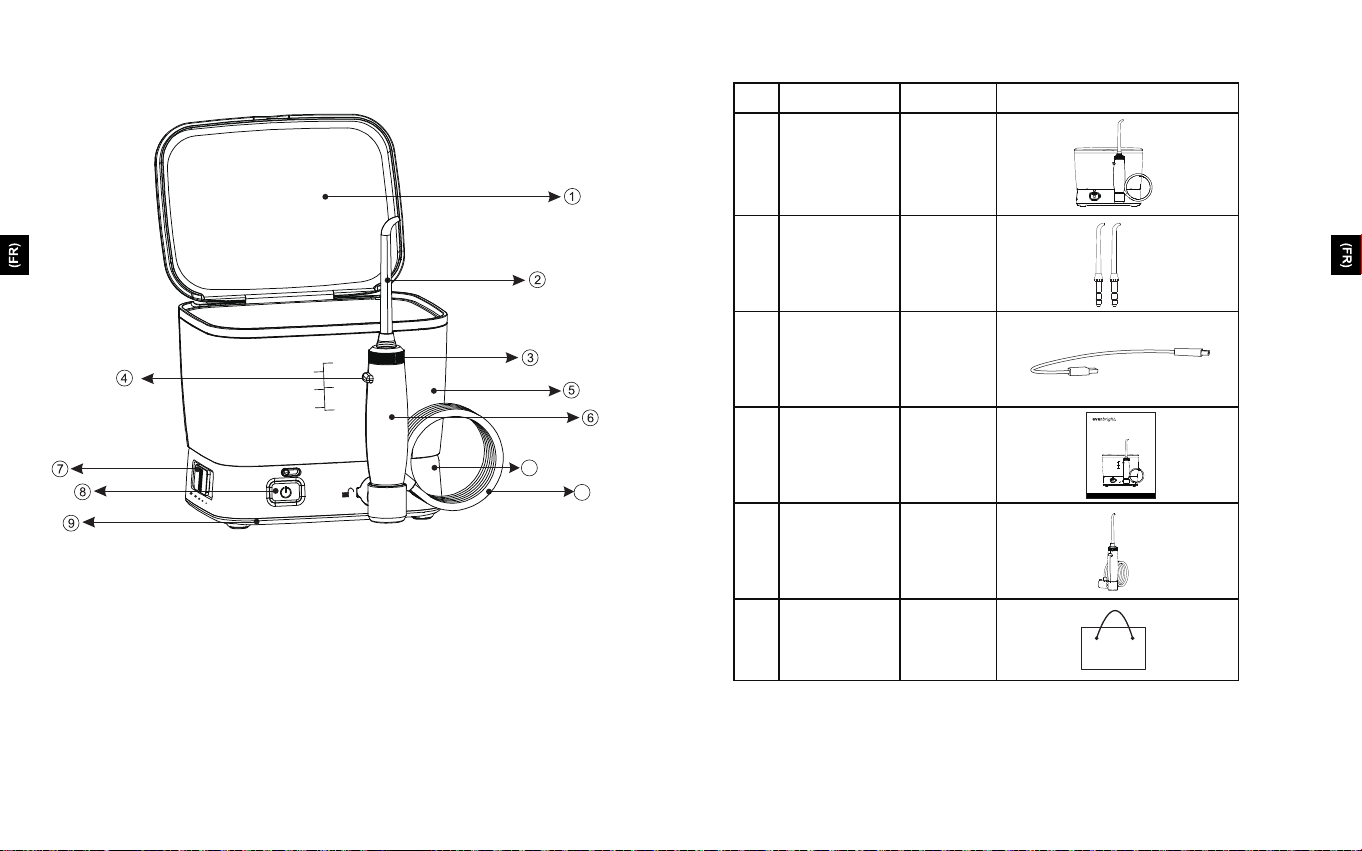
Structure du produit
1. Couvercle du réservoir d'eau
3. Bouton rotatif de l’embout
5. Réservoir d'eau
7. Pressostat d'eau
9. Base
11. Tuyau d'eau
OZ
16
500
350
200
12
8
ML
11
10
2. Embout du jet
4. Bouton d'éjection
de l’embout Jet
6. Poignée
8. Puissance
10. Corps
S/N Nom Quantité Image
Embout jet standard
Appareil principal
Câble de chargement
Manuel d'utilisation
Poignée
Sac
2
1
1
1
1
1
2
3
4
5
6
1
Accessoires produits
Model: FC2580
Water Flosser
Instruction Manual
OZ
16
500
350
200
12
8
ML
56
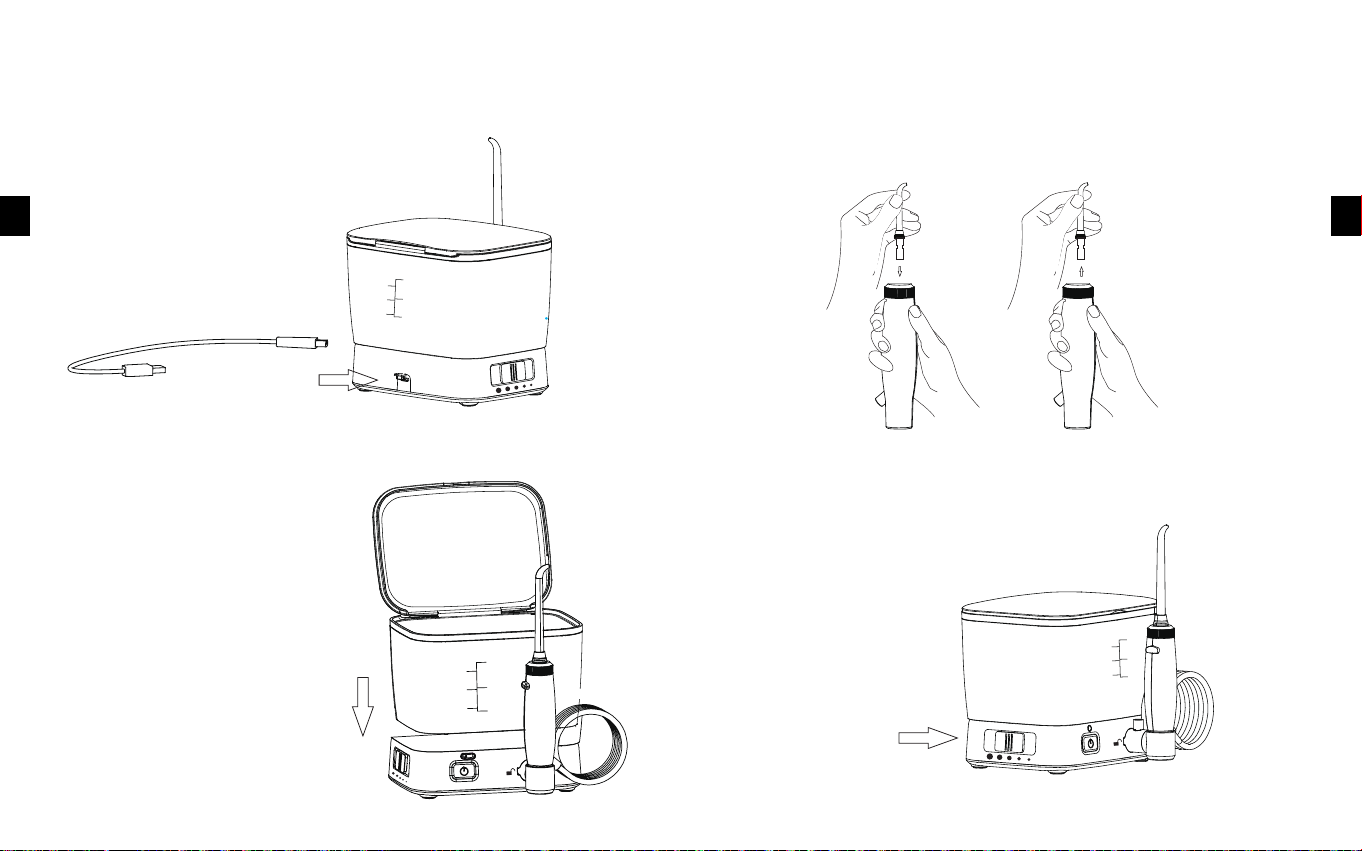
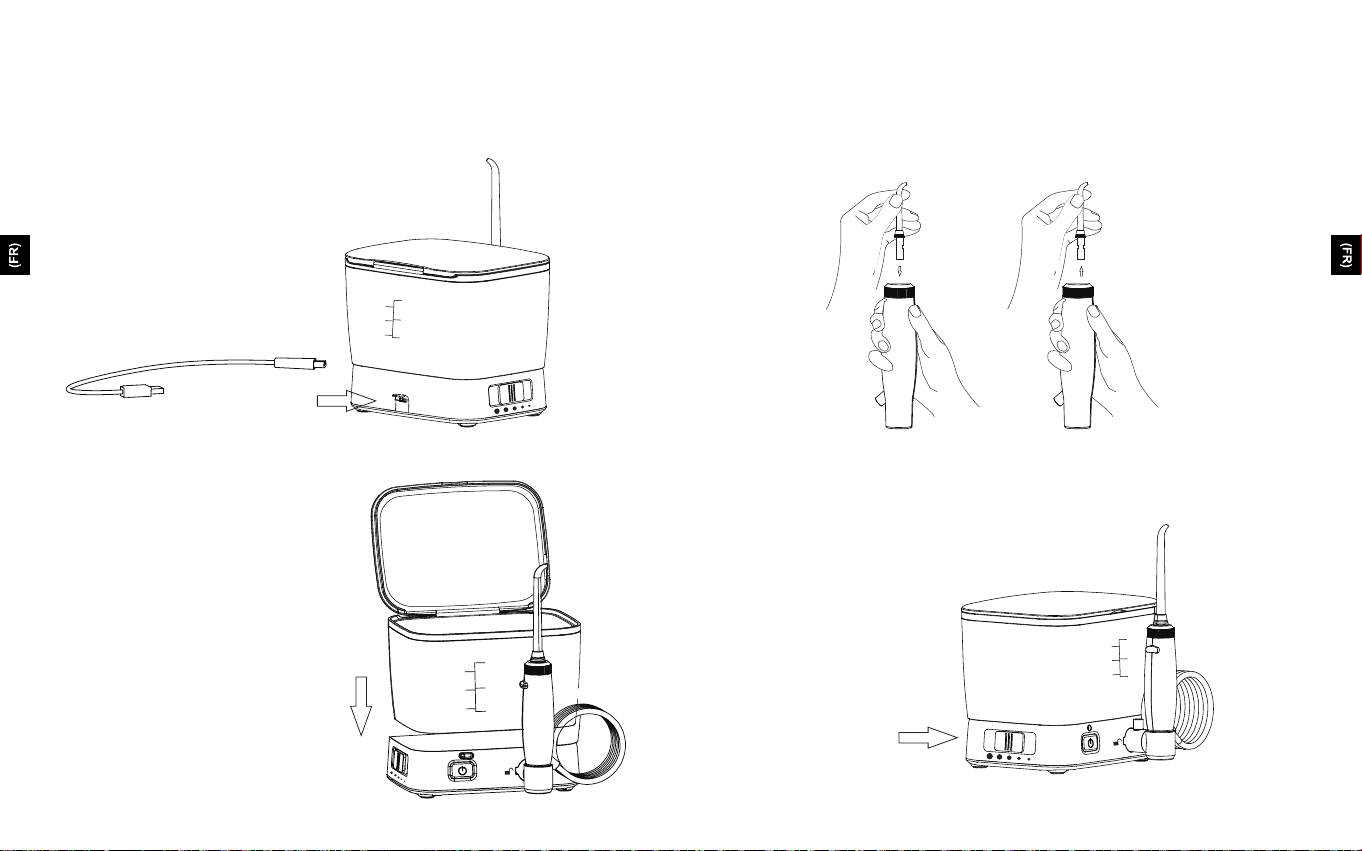
IMPORTANT ! Veuillez charger complètement la brosse à dent pour la
première utilisation en branchant le câble USB dans la prise de charge
avec le courant. Le produit ne peut pas être utilisé pendant le charge-
ment.
Mode d'emploi
Retirez le réservoir d'eau et le
couvercle du réservoir d'eau de la
base.
Verser de l'eau pure dans le
réservoir d'eau, la placer sur le
socle et l'enfoncer légèrement.
Remplissage d'eau
OZ
16
500
350
200
12
8
ML
OZ
16
500
350
200
12
8
ML
Insérez l'embout du jet dans le trou du bouton de l'embout,
assurez-vous que l'embout du jet est insérée en position jusqu'à ce
qu'un clic retentisse. Si vous devez retirer l'embout de la poignée,
appuyez sur le bouton d'éjection tout en retirant l'embout du jet de la
poignée.
Mise en place et retrait de l'embout
Poussez le bouton vers l'avant pour augmenter
la pression d'eau, poussez vers l'arrière pour la
diminuer.
Réglage de la pression d'eau
OZ
16
500
350
200
12
8
ML
8
7
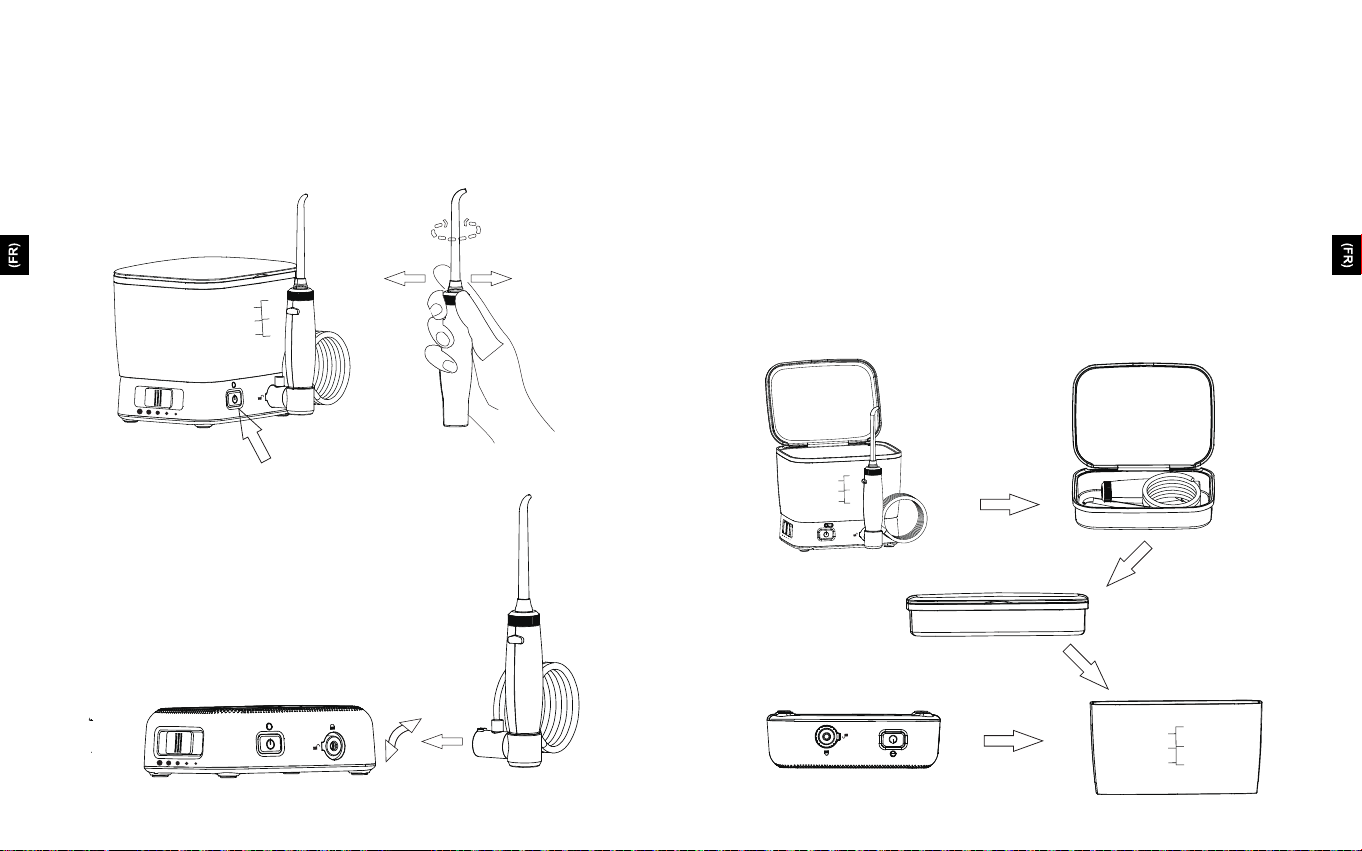
Pliez votre corps sur le lavabo, mettez l'embout du jet dans votre
bouche pour le diriger vers vos dents, appuyez sur l'interrupteur de
l'autre main et réglez votre pression préférée.
Tourner le bouton en haut de la poignée pour changer le sens
d'écoulement de l'eau.
Utilisation de la brosse à dent à eau
Raccordement de la base et de la poignée
Insérez l'extrémité de la poignée à la sortie de la base de
l'appareil comme repère, puis tournez de 90° dans le sens
horaire pour ériger la poignée. Il ne doit pas y avoir de fuite
au niveau du raccordement.
Lorsque vous enlevez la poignée de la base, tournez la base
de la poignée de 90° dans le sens inverse des aiguilles d'une
montre jusqu'à ce que vous entendiez le son, alors elle peut
être retirée.
OZ
16
500
350
200
12
8
ML
Temps de travail et charge
Le temps de fonctionnement normal du produit est de 150s, si vous
avez besoin de l'utiliser plus longtemps, remettez-le sous tension.
On peut l'arrêter en appuyant sur l'interrupteur pendant le travail.
Lorsque la batterie est faible, le voyant blanc clignote rapidement.
Un voyant blanc clignotera lentement pendant la charge, lorsque le
voyant est allumé pendant une longue période, cela signifie que la
charge est complète. Le produit ne peut pas être utilisé pendant le
chargement.
Installation et désinstallation
Le couvercle du réservoir d'eau peut recevoir la poignée et l'embout
du jet, le réservoir peut contenir la base du dispositif, puis couvrir le
couvercle du réservoir d'eau.
OZ
16
500
350
200
12
8
ML
OZ
16
500
350
200
12
8
ML
Notez la direction

910
Visez la gencive par l'écoulement de l'eau à
90°, fermez légèrement la bouche pour éviter
les éclaboussures d'eau partout, mais laissez
l'eau s'écouler le long du coin de votre bouche
vers le bassin. Pour un meilleur nettoyage,
vous devriez commencer le nettoyage de votre
molaire à l'incisive. Déplacez légèrement la
pointe du jet le long de la gencive et restez un
moment. Répétez la même opération jusqu'à
ce que toutes vos dents soient nettoyées.
Conseils d'utilisation
4
Instruction de l'embout
Embout jet standard
Vous pouvez arrêter la machine en appuyant sur le bouton d'alimenta-
tion ou en tournant la pression à la valeur minimale.
Pause
360° de propreté. Et atteint des endroits
qu’une brosse à dent ne peut atteindre
c’est mieux que du fil dentaire et plus
sain pour vos gencives.
OZ
16
500
350
200
12
8
ML

12
11
Nettoyage :
Maintenance
Si une solution spécifique est stockée dans le réservoir d'eau, prenez peu de temps
pour nettoyer le réservoir d'eau après utilisation.
Remplissez le réservoir d'eau avec de l'eau tiède (pas chaude) et dirigez l'embout du
jet d'eau vers le lavabo. Allumez la machine pour la faire fonctionner jusqu'à ce que
l'eau soit vidée. Ceci permet d'éviter le blocage et d'augmenter la durée de vie du
produit.
Si nécessaire pour le lavage, nettoyez-le produit avec un chiffon doux et un détergent
neutre sans usure.
1. Après chaque utilisation de la brosse à dent à eau, inverser le réservoir d'eau,
jusqu'à ce qu'il n'y ait plus d'eau ou de nettoyant et le sécher, et le placer dans un
endroit frais et sec avec un appareil propre. Si la machine n'est pas utilisée
pendant une longue période, elle doit être placée dans son emballage et bien
stockée.
2. En cas de problème avec la machine, vous pouvez consulter le revendeur.
3. Veuillez ne pas démonter ou essayer de démonter le produit vous-même, et
l'échec causé par ce fait ne sera pas inclus dans la garantie.
4. Si le câble de charge est cassé, veuillez le réparer à l'atelier de réparation
désigné par la Société ou à l'atelier possédant les qualifications de réparation
appropriées.
5. Nous fournissons toujours un service pour le fil dentaire qui a dépassé la période
de garantie, mais le coût du matériel et les frais d'entretien manuel seront facturés.
Dépannage courant
La Société assure aux consommateurs et propriétaires initiaux de ce nouveau produit
qu'il ne présente aucun défaut de matériel ou de procédé et que la période de
garantie est d'un an à compter de la date d'achat.
Merci encore une fois d'avoir acheté la brosse à dent à eau everbright !
Fuite entre l'extrémité
du jet et la poignée
Fuite du réservoir d'eau
Pression insuffisante Mauvais emplacement
pour l'installation du
réservoir d'eau
Remonter le réservoir
d'eau en exerçant une
pression vers le bas
Failure to start Panne moteur
Vérifiez si l'alimentation
électrique est sous
tension ; contactez le
service après-vente
Il se peut qu'il n'y ait pas de
vanne au fond du réservoir, ou
que la vanne soit montée de
façon opposée
Remplacer la vanne ou
la monter dans le bon
sens
Fuite de la conduite d'eau Tuyau endommagé
Remplacez-le par l'intermédi-
aire du vendeur ou réparez-le
par le service après-vente
L'embout du jet n'est
pas installé en place
Retirez l'embout et
installez-le au bon endroit
Phénomènes d'erreur
Raison
Méthode de traitement
Table of contents
Languages:


