Everdure CBES611 Guide

EASY DECISION
INSTALLATION, OPERATION
& MAINTENANCE INSTRUCTIONS
FOR EVERDURE 4 ELEMENT ELECTRIC COOKTOPS
Models Included:
CBES611
KIMBERL
Y

EASY DECISION
INSTALLATION, OPERATION AND MAINTENANCE INSTRUCTIONS
FOR EVERDURE 4 ELEMENT ELECTRIC COOKTOP RANGE
CBES611 ELECTRIC COOKTOPS
CONGRATULATIONS
Welcome to the Everdure Kitchen Community and thank you for choosing one of our many
fantastic cooking appliances. We are confident that you will now be able to meet your cooking
needs. Before you use the cooktop we strongly recommend that you read though the whole
user manual which provides the description of this product and the proper use of its functions.
To avoid the ever-present risks involved with using an electrical appliance it is vital that the
appliance is installed correctly and that you read the safety instructions carefully to avoid
misuse and hazards.
It is important that you retain these instructions and your proof of purchase along with any
other important documents about this product for future reference. Due to continual product
development, Everdure reserves the right to alter specifications or appearances without notice.
CONTENTS
SECTION PAGE NO.
Important Safety Instructions ………….. 3
Appliance Details ………………………… 4
Electrical Connections ……………………. 5
Installation ………………………………… 6-7
Operating Instructions …………………… 8
Cleaning ………………………………….. 9
Troubleshooting …………………….…… 10
Data Label & Electrical Diagram …….. 11
It is important that you retain these instructions, proof of purchase as well as
other important documents about this product for future reference.
Due to continual product development, Everdure reserves the right to alter
specifications or appearances without notice.
Dispose of packaging responsibly – recycle where facilities are available.
2

EASY DECISION
IMPORTANT SAFETY INSTRUCTIONS
IMPORTANT: Read the assembly instruction section and safety precautions of this booklet
carefully before removing the contents of this carton.
1. This appliance is not intended for use by persons (including children) with reduced physical, sensory or mental
capabilities, or lack of experience or knowledge, unless they have been given supervision or instruction concerning
the use of the appliance by a person responsible for their safety. Children should be supervised to insure that they
do not play with the appliance.
2. In certain circumstances electrical appliances may be a safety hazard.
3. Do not place heavy objects on this appliance.
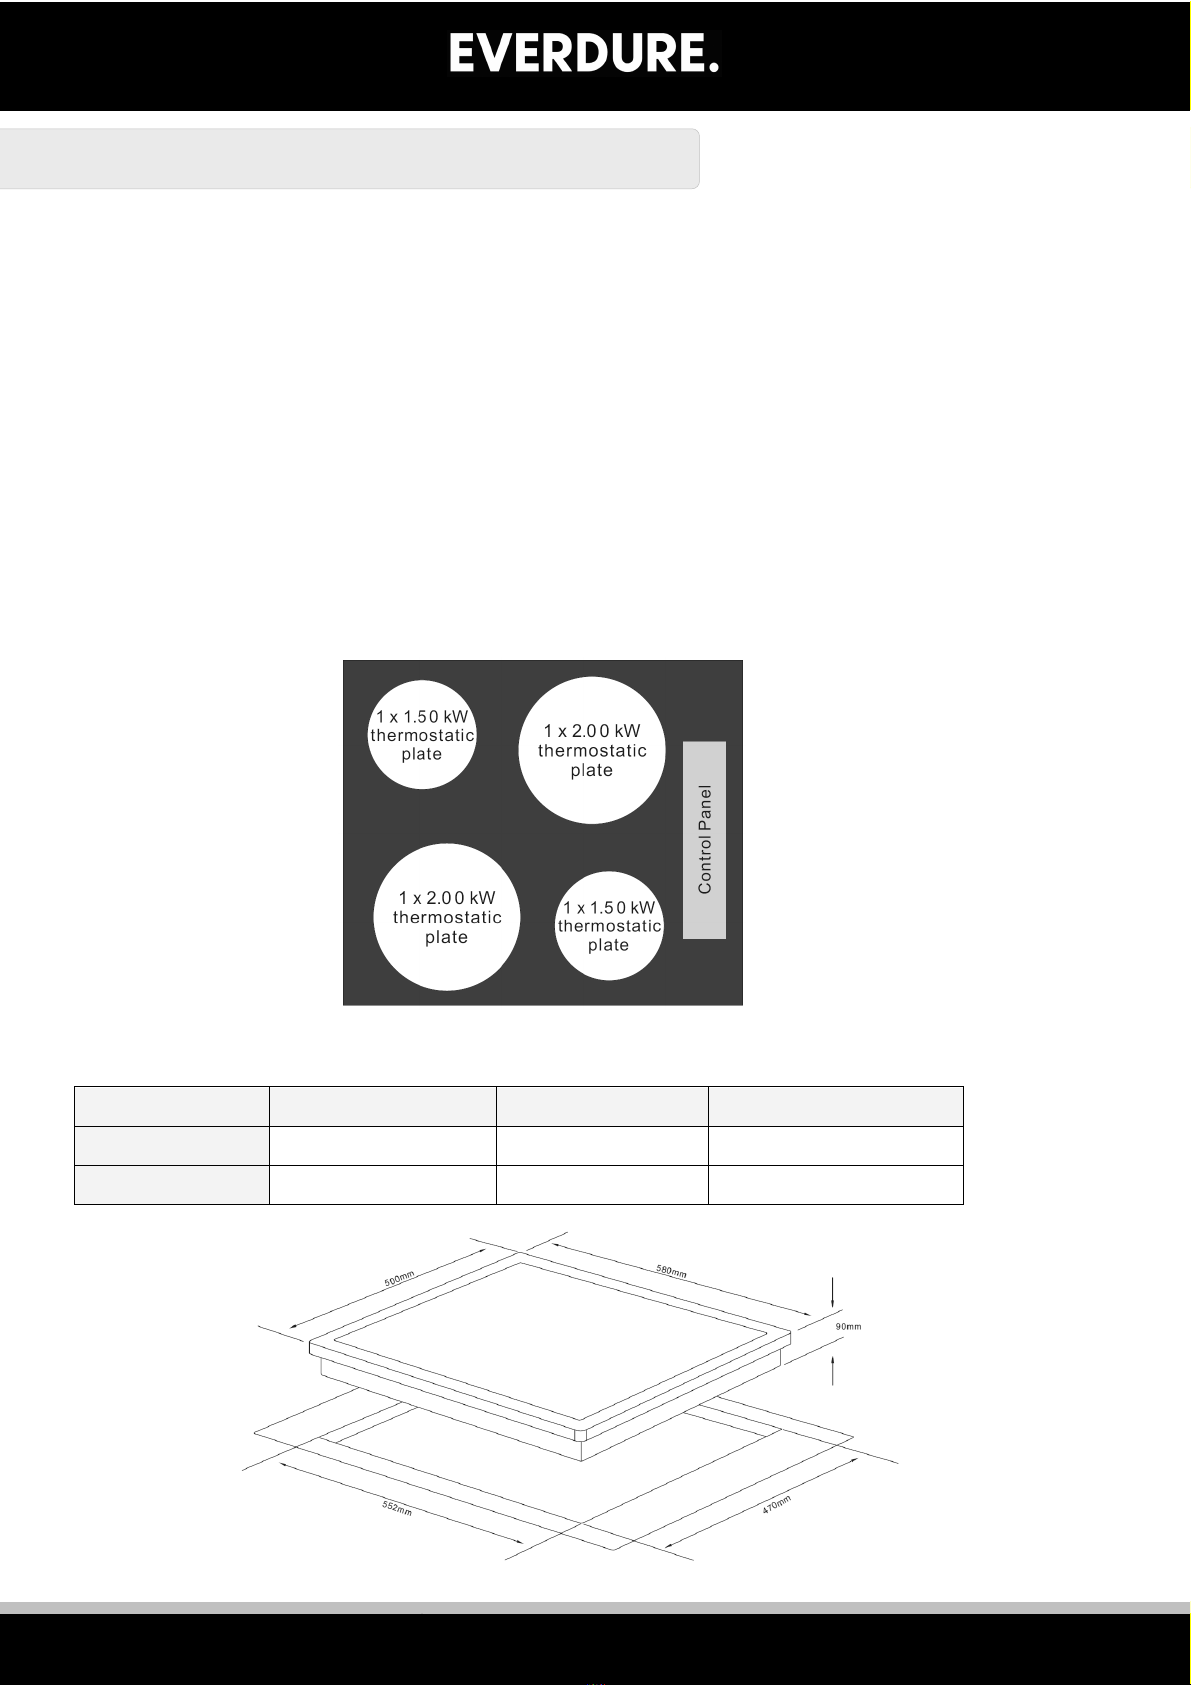
4. Damage can occur to bench tops if pots and pans are able to overlap the bench top. This can result in heat being
transferred to the bench top. Ensure that correct sized pots & pans are used. Refer to guide in booklet.
5. This unit is fitted with resettable thermal fuses, which will temporarily disable single elements or the complete unit if
internal temperatures exceed the normal operational temperature range due to abnormal conditions. Operation will re-
start after the unit has cooled down to within the normal operating temperature range.
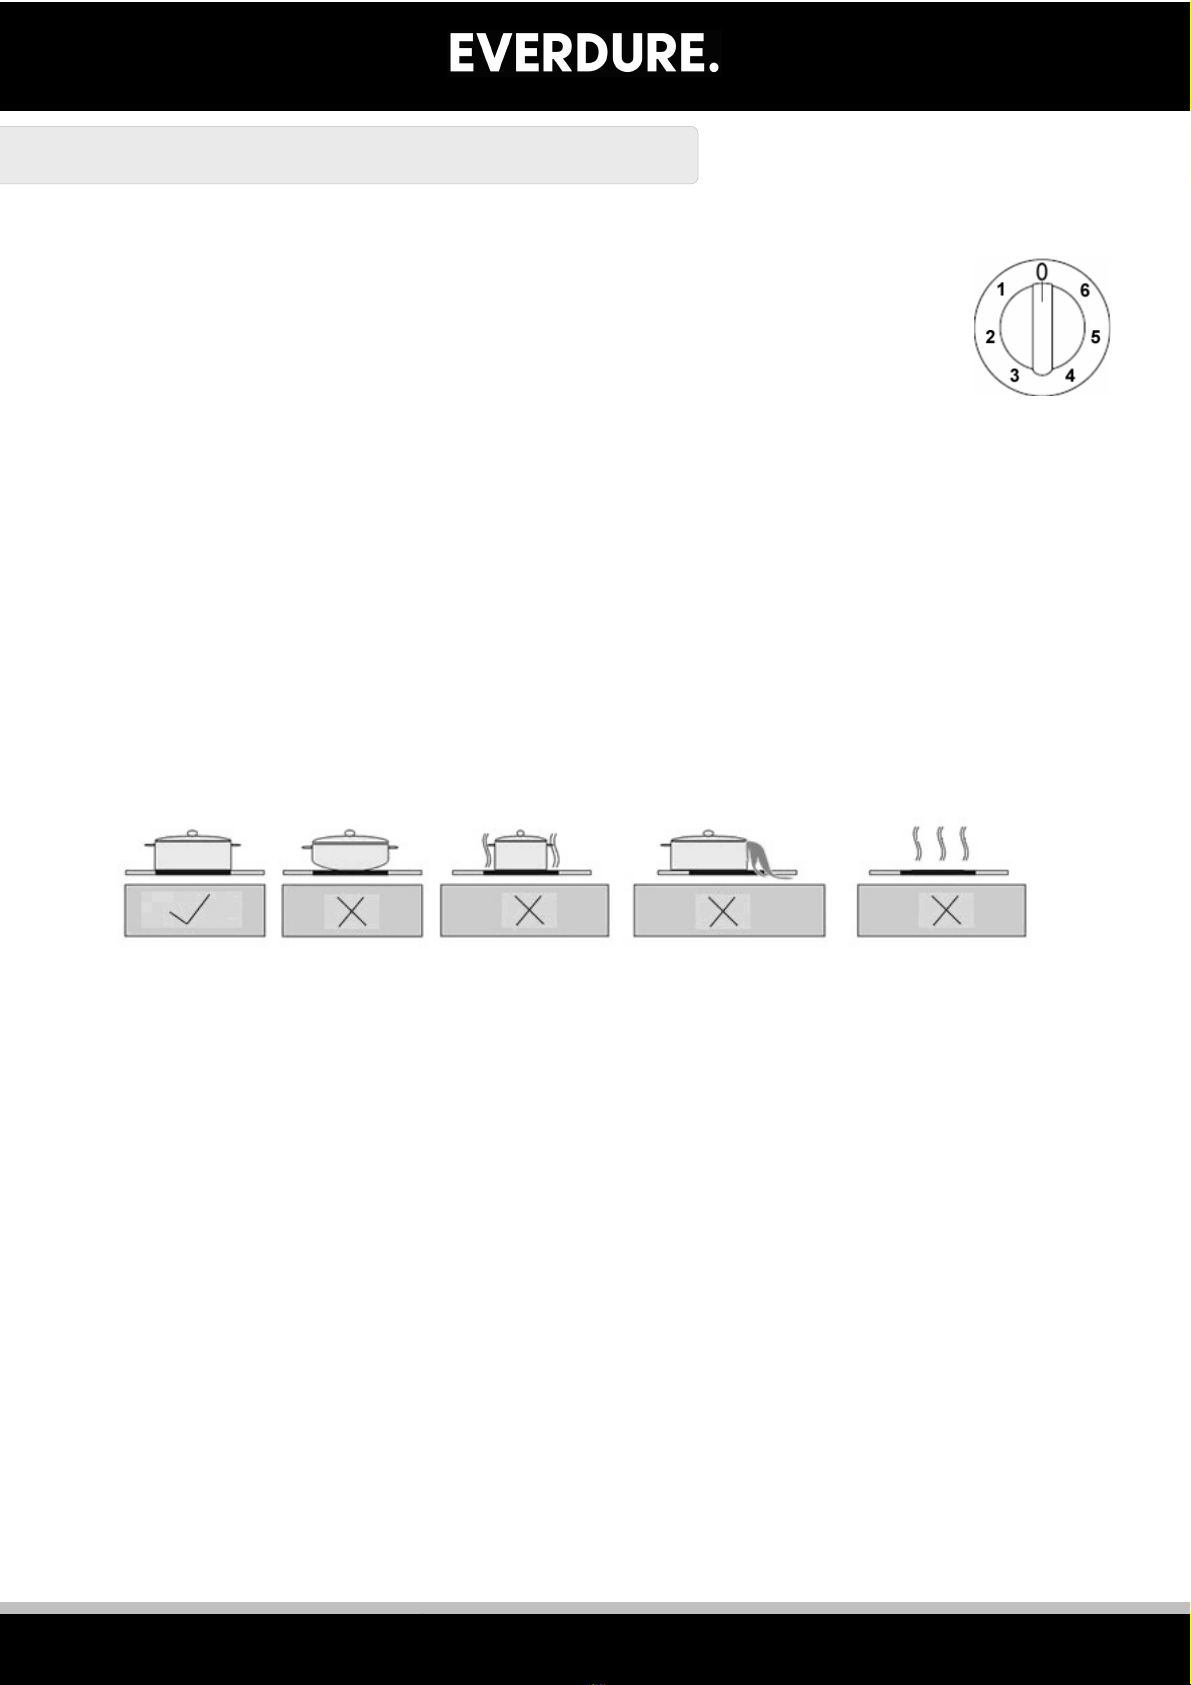
6. Do not allow pot handles or utensils to be placed near electric elements which are operating, as they can cause the
handles to become hot to touch. Always turn handles away when small children are nearby. It is recommended that
children are kept away from the cooktop at all times. Cast iron and cast aluminium cookware with damaged bases may
scratch the cooktop surface if they are dragged across it. Pans should be lifted on and off the hob surface and not
dragged. Cooking zones should not be switched on without cookware placed on it. Also the cookware should not be
empty.
7. This appliance is designed for domestic household use only and for the cooking and frying of domestic food products.
Use as a commercial appliance will void the warranty.
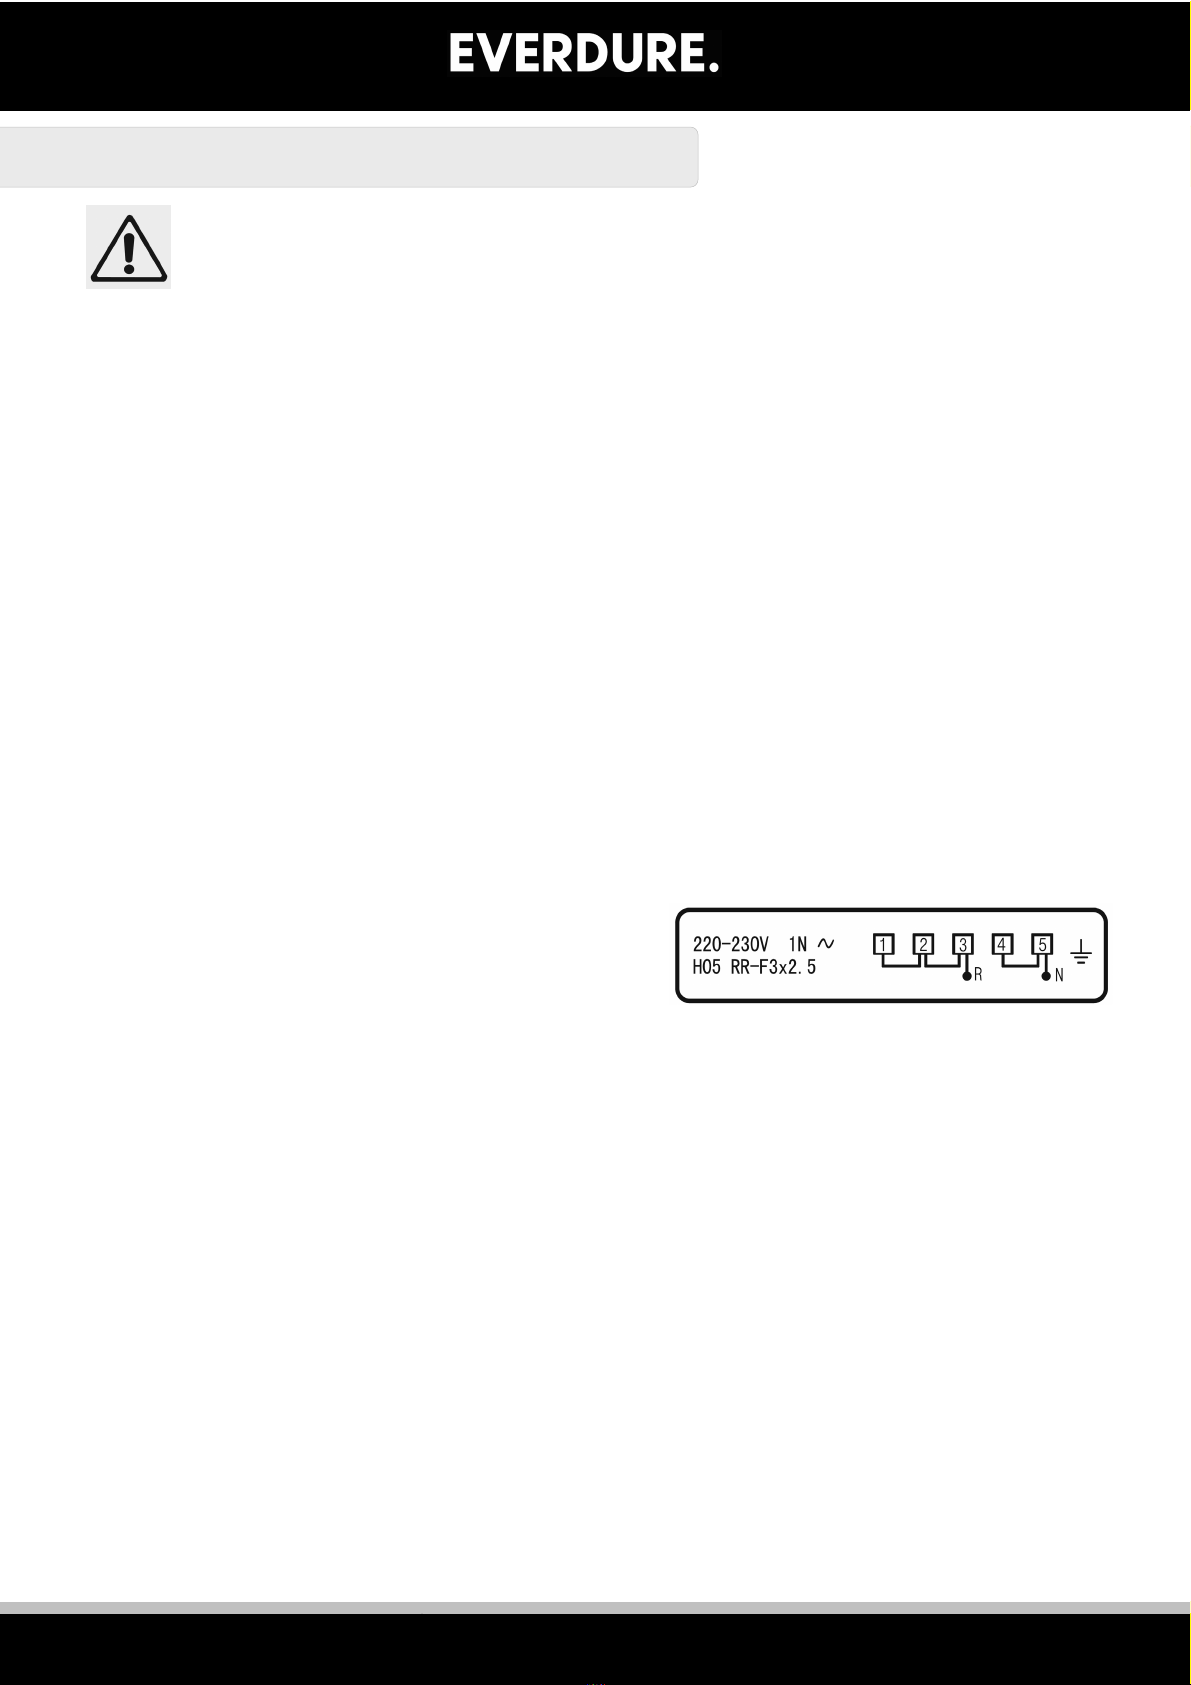
8. A means for disconnection must be incorporated in the fixed wiring in accordance with the wiring rules.
9. The electrical connection must be accessible after installation. The appliance must be electrically isolated before any
maintenance can be performed.
10. The appliance is not intended to be operated by means of an external timer or separate remote control system.
11. Electrical connection must be made as per local wiring rules and regulations. Do not disconnect the appliance with wet
hands and do not disconnect the power cord with extreme force.
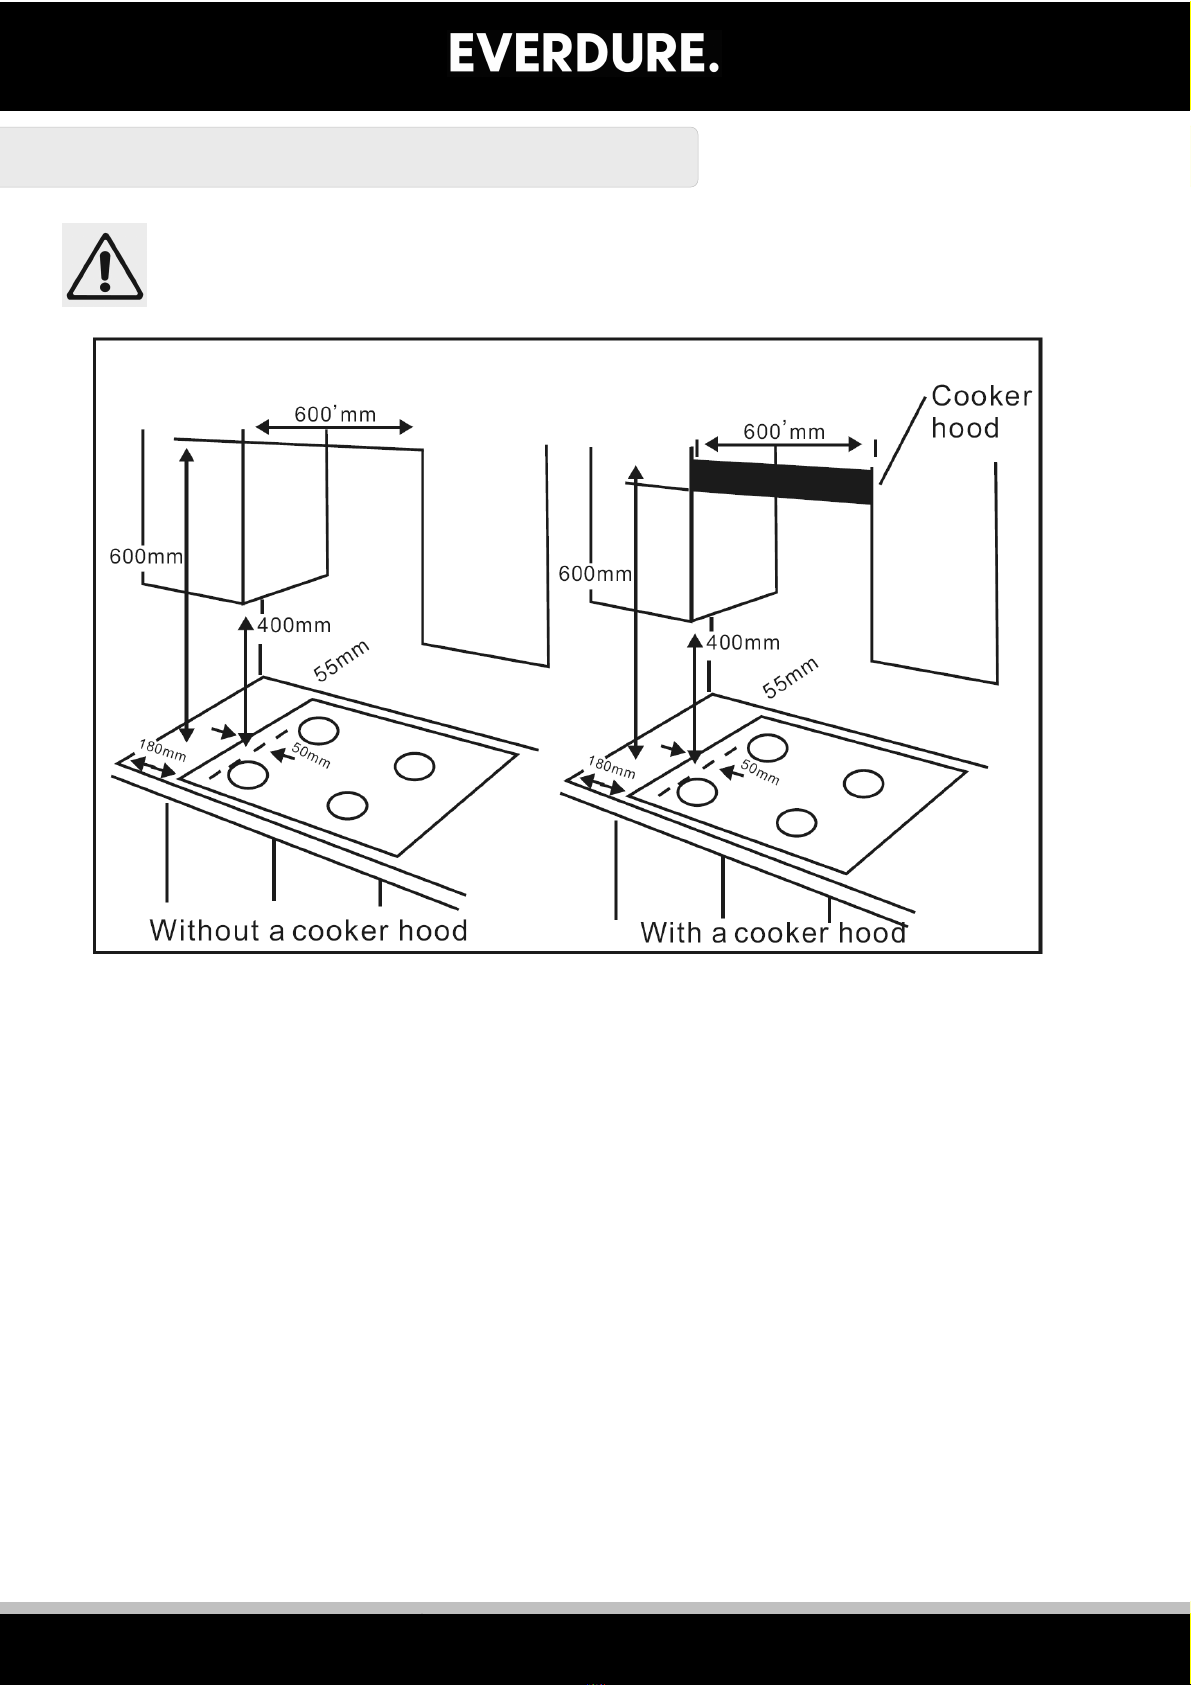
12. Ensure that the kitchen is well ventilated or mechanical ventilation is in use while cooking on the electric cooktop.
13. Do not store or use flammable materials or aerosols near the cooktop. Items made from aluminium, plastic or plastic film
should also be kept away from the appliance, as they may fuse to the surface.
14. WARNING – The surface temperature of this appliance exceeds 95°C. To avoid a hazard, under bench access must be
restricted. A board must be installed underneath the cooktop.
15. WARNING - The cooktop will become hot during and directly after use. Do not touch any components during this time,
as they may be hot and can cause burns.
16. Cleaning may only be commenced on the appliance once it has cooled down and turned off. Do not use a steam jet or
any other high pressure cleaning equipment to clean the appliance.
17. When the appliance is not being used, the knobs must be kept in the ‘OFF’ position.
18. Not to be used in a marine environment.
19. Do not modify this appliance.
20. All cabinetry and materials used in the installation must be able to withstand a minimum temperature of 50°C above the
ambient temperature of the room it is located in, whilst in use. Certain types of vinyl or laminate kitchen furniture are
particularly prone to heat damage or discolouration at temperatures below the guidelines given above. Any damage
caused by the appliance being installed without adhering to the temperature limits set out above will be the liability of
the owner.
21. This appliance must be correctly installed by a suitably qualified person, strictly in accordance with the manufacturer’s
instructions. Please see the specific section of this booklet that refers to installation.
DO NOT OPERATE THIS APPLIANCE BEFORE READING THE INSTRUCTION BOOKLET
DO NOT PLACE ARTICLES ON OR AGAINST THIS APPLIANCE
DO NOT STORE CHEMICALS OR FLAMMABLE MATERIALS OR SPRAY AEROSOLS
NEAR THIS APPLIANCE
3

EASY DECISION
APPLIANCE DETAILS
ELECTRICAL DETAILS:
Rated Voltage: 220-240 Vac 50 Hz
Supply Connection: 30 A (double pole switched fused outlet with 3mm contact gap)
Max Rated Inputs: 7.00 kW
Mains Supply Lead: 3 core x 2.5 mm² (not supplied)
This information can be found on the rating plate (data label) affixed to the underside of the appliance
PRODUCT SPECIFICATIONS:
2 x 2.00 kW thermostatic plates (diameter 180 mm)
2 x 1.50 kW thermostatic plates (diameter 145 mm)
Side control operation
COOKTOP SURFACE LAYOUT:
COOKTOP SIZES:
Relevant Sizes: LENGTH (mm) WIDTH (mm) HEIGHT (mm)
Cooker size 580 500 45 (90 incl. knobs)
Cut-out size 552 470 -
3
4

EASY DECISION
ELECTRICAL CONNECTIONS
LOCAL AUTHORITY REQUIREMENTS
Installation is only permitted by an authorized person, and carried out according to instructions
provided by the manufacturer. Incorrect installation might cause harm and damage which the
manufacturer accepts no responsibility.
INSTALLATION
This cooktop must be connected to a 220-240V 50Hz power supply. It is earthed via the cord.
Before carrying out the connection to the power supply, the voltage rating of the appliance (stamped on
the appliance identification plate) must be checked for correspondence to the available mains supply
voltage, and the mains electric wiring should be capable of handling the hob’s power rating (also indicated
on the identification plate);
The switched fused spur outlet must be connected to a suitable earth wiring, in conformity to current safety
regulations.
This appliance must be wired into a 30A double pole switched fused spur outlet, having 3 mm contact
separation and placed in an easily accessible position adjacent to the appliance. It should not be located
above the appliance and no more than 1.25m away from it. The power supply cord must not touch against
any hot surfaces and must be placed so that its temperature does not exceed 75 °C at any point along its
length. Cable type: H05 RRF 3 core x 2.5 mm².
After having installed the appliance, the double pole switched fused spur outlet must always be in an
accessible position.
NOTE: For connections to the mains power supply, never use adapters, reductions or multiple power points
as these may overheat and catch fire.
The mains terminal block is located on the underside of the hob and the terminals are accessible by
removing the terminal block cover by removing the cover screw.
The cable connections must be in accordance with the
diagram located on the bottom of the cooktop.
The brass links must be positioned as marked in the
appropriate diagram and once established ALL terminal
screws must be tightened down firmly. If when the hob is first switched on, only two of the zones work, you
should recheck that the terminal screws are all fully tightened between the links. The cable can be looped if
necessary, but make sure that is not kinked or trapped when the hob is in position.
IMPORTANT: The appliance must NOT be connected to the mains supply by means of a 10A or 15A plug
and socket and installation is only permitted by an authorised person.
If the mains supply cable is damaged, then it must be replaced by an appropriate replacement which can
only be installed by a qualified person. The mains supply cable should be replaced in accordance with the
following instructions:
Switch the appliance off at the control switch. Open the terminal block on the underside of the hob.
Unscrew the terminal screws fixing the cable. Replace the cable with one of the same length and in
accordance with the specification given above. The “green-yellow” earth wire must be connected to the
terminal marked. It must be about 10 mm longer than the live and neutral wires. The “blue” neutral wire
must be connected to the terminal marked with letter (N) - the live wire must be connected to the terminal
marked with letter (L).
The installation will require connection and modifications to the mains supply wiring system. This can only
be carried out by a qualified technician to the relevant local regulations.
The technician will also have to verify that the cross-section of the electric cables on the power point match
the appliance’s power rating.
5

EASY DECISION
INSTALLATION
The adjacent furniture must be able to withstand a minimum temperature rise of 50°C above the
ambient temperature of the room it is located in, during periods of use – please check your
furniture is acceptable for use with a cooktop.
Please see the above drawing for minimum clearances. Also see the following minimum distances stated
below:
600 mm between the hob surface and the underside of any horizontal surface above it.
50 mm clearance around the appliance and between the hob surface and any combustible materials.
UNPACKING THE APPLIANCE
When unpacking the appliance please check that the following items are contained within the packaging:
1 Cooktop
1 Installation and instruction manual
4 Fixing screws
4 Clamps
1 Sealing strip
6

EASY DECISION
INSTALLING THE APPLIANCE CBES611
Cut a hole in the worktop that corresponds with the drawings shown above.
IMPORTANT: You must have a gap of 25mm – 75mm between the underneath of the appliance and any
surface that is below it.
Carefully turn the cooktop upside down and place it on a cushioned mat. Apply the sealing strip provided
around the edge of the appliance. The protective covering must be removed from both sides. Do not
leave a gap in the sealing agent or overlap the thickness.
IMPORTANT: Do not use a silicon sealant to seal the appliance against the bench top. This will make it
difficult to remove the cooktop from the bench top in future, particularly if it needs to be serviced.
(A) Sealing strip
(B) Clamp
(C) Screw
Place the clamp (B) over the holes that match the size of the screws. There are one set of screw holes in
each corner of the hob. Slightly tighten a screw (C) through the clamp (B) so that the clamp is attached to
the hob, but so that you can still adjust the position of it.
Carefully turn the hob back over and then gently lower it into the aperture hole that you have cut out.
On the underneath of the hob, adjust the clamps into a position that is suitable for your worktop. Then fully
tighten the screws (C) to secure the hob into position.
7

EASY DECISION
OPERATING INSTRUCTIONS
CONTROL KNOBS:
All operations are performed by means of the 4 control knobs that can be found on the
right hand side of the cooktop.
The control knobs can be turned either clockwise or anti-clockwise to select a heating
level. The numbers around the outside of each control knob indicates the power level
that you have set the zone to.
A marking to the bottom right of each control knob, indicates which zone that it controls.
COOKTOP GUIDELINES
The first few times the cooktop is used, it may give off an acrid, burning smell and in some cases a small
amount of smoke will appear from inside the unit, as oils used in the manufacturing process burn away. Any
smoke or smell will disappear after repeated use - you will also notice the stainless steel will bronze in colour
particularly on the element support rings as the heat transfers to the cooktop.
The cooktop surface is fitted with cooking areas of different diameter and power. See previous pages.
The positions where the heat will radiate from are clearly marked on the cooktop. The saucepans must be
positioned exactly on these zones for efficient heating to occur. Pans should have the same diameter as the
cooking zone that they are being used on.
WARNING: Using cookware that is too large can cause discolouration or damage to the cooktop surface
around the heat zones, which is NOT covered under warranty.
You should not use saucepans with rough bottoms, as this can scratch the solid plates.
Before use, make sure that the bottoms of the saucepans are clean and dry.
When cold, the bottom of the pans should be slightly concave, as they expand when hot and lie flat on the
surface of the cooktop. This will allow the heat to transfer more easily.
The best thickness for the bottom of the pans is 2 – 3 mm of enamelled steel and 4 – 6 mm for stainless
steel with sandwich type bottoms.
If the above is not adhered to, then there can be a great loss of heat and energy. Heat not absorbed by the
saucepan, will spread to the hob, frame and surrounding cabinets.
Preferably cover pans with a lid to permit cooking at a lower heat.
Always cook vegetables and potatoes, etc. in as little water to reduce cooking times.
Food or liquid that has high sugar content may damage the cooktop if it comes into contact with the
cooktop surface. Any spillages should be wiped up immediately, however this may not prevent the cooktop
surface from becoming damaged.
Always place the cookware on the cooking zone before it is switched on. If possible, always place the
lids on the cookware. The bottom of any cookware used must not be smaller or larger than the cooking
zones; they should be at the proper size as indicated below, so as not to waste energy.
The cooktop is fitted with resettable thermal fuses. If the normal operating temperature range is
exceeded, the element(s) will be disabled temporarily until the unit cools down. This will help prolong
the life time of your cooktop.
8

EASY DECISION
CLEANING
NOTE: Cleaning and maintenance operations must only be carried out when the cooktop is cool.
The appliance should be turned off at the isolation switch before commencing any cleaning
process.
CLEANING THE COOKTOP
Any residues that are left on the cooktop surface from cleaning agents may damage it. You should remove
any residues with water and a little washing up.
Abrasive cleaners or sharp objects will damage the cooktop surface. The cooktop should be cleaned using
water and a little washing up liquid.
Although it is easier to clean some deposits whilst the cooktop surface is still warm, you should take extra
care not to burn yourself. It is recommended to only clean the cooktop when cold.
AFTER EACH USE
Wipe the appliance over with a damp cloth and a little washing up liquid.
Dry the appliance by rubbing the surface with a clean cloth.
If the cooktop is heavily soiled, it is recommended that a stainless steel cleaner be used, but only on
stainless steel appliances.
IMPORTANT: If a stainless steel cleaner is not used regularly, then it is possible for the surface of the
cooktop to change colour over a period of time.
For other cooktop surfaces, a mild, non abrasive cream cleaner may be used.
MAINTAINING THE SOLID PLATES
If something is spilt onto the plate itself, then it can be removed using a soft brush, plastic or nylon scourers
and warm water.
To keep the solid plates in good condition, you should put a little olive oil onto a kitchen towel and rub it
onto the surface of the plate. The next time the plate is used, it may produce a little smoke.
Alternatively you can use a hotplate cleaner; these products can normally be found at larger supermarkets
and hardware stores. The manufacturer’s instructions should be followed when using these products.
IMPORTANT: If the solid plates are not maintained regularly with olive oil or a hotplate cleaner, then they
may rust.
9

EASY DECISION
TROUBLESHOOTING
1. The cooking zones are not functioning or will not switch on.
Check that the mains electrical supply to the appliance is correct and working. Check the mains fuse.
2. A humming sound is heard when a cooking zone is selected.
This is normal; the sound will disappear when the zone heats up.
3. The cooking zones have become discoloured
This maybe caused by burnt on remnants of food. This will not affect the working of the appliance. However
you should make sure that the cleaning instructions are being followed regularly.
4. Element(s) are not working.
The cooktop is fitted with resettable thermal fuses, which will temporarily disable single elements or the
complete unit if internal temperatures exceed the normal operational temperature range due to abnormal
conditions. Operation will re-start after the unit has cooled down to within the normal operating
temperature range.
IMPORTANT: If your appliance appears not to be operating correctly, turn off the appliance
at the isolation switch and then contact the Service Department.
DO NOT ATTEMPT TO REPAIR THE APPLIANCE YOURSELF.
The appliance must be accessible for a qualified person to perform any necessary repair.
10

EASY DECISION
DATA LABEL & ELECTRICAL DIAGRAM
11

EASY DECISION
A division of Shriro Australia Pty Ltd
104 Vanessa Street, Kingsgrove NSW 2208
AUSTRALIA: 1300 355 541
www.everdure.com
NEW ZEALAND: (09) 415 6000
www.everdure.co.nz
IM Ref: CBES611 24/2017/01FC
FOR INDOOR USE ONLY
Table of contents
Other Everdure Cooktop manuals
Popular Cooktop manuals by other brands

BS GROUP
BS GROUP PCR 58 N TC12 4K E0 manual

Electrolux
Electrolux Libero Line 601595 Specification sheet

LG
LG LCE30845 - 30in Induction Cooktop Service manual

GE
GE Monogram ZGU375NS installation instructions

Kuppersbusch
Kuppersbusch GMS 6540.0 E Instructions and advice for the use, installation and maintenance

KitchenAid
KitchenAid KGCP467JTL0 parts list