EVERLAST CLIMBING KERSPLASH User manual

KERSPLASH®POOL CLIMBING WALL INSTALLATION INSTRUCTIONS
WWW.EVERLASTCLIMBING.COM |1335 MENDOTA HEIGHTS ROAD, MENDOTA HEIGHTS, MN 55120
©2013 EVERLAST CLIMBING, A PLAYCORE COMPANY
®
©2013 EVERLAST CLIMBING, A PLAYCORE COMPANY
KERSPLASH®POOL CLIMBING WALL INSTALLATION INSTRUCTIONS
2
Congratulations! You have purchased a Kersplash Pool Climbing
Wall from Everlast Climbing. Providing the unit is installed
correctly and properly maintained, it will furnish you with many
years of trouble free use. It is important to read this entire
manual prior to beginning assembly or operation.
Shipping Information:
Each wall module will arrive partially assembled in a crate. Before accepting
the unit from the carrier, inspect for visible damage and match the contents
with those listed below. Everlast Climbing is not responsible for lost or
damaged freight.
The crate will contain all structural components, hardware, and panels.
The following is a list of the components included with your shipment from
Everlast Climbing. Use Components and Hardware Figure A, page 3, as a
reference to identify each item listed.
16’ Climbing Wall: Part Number 70537 Crystal Clear®Panel, 42639 Color
1304L Stainless Steel
Climbing Frame 4 4’ x 4’ Climbing Panels
1 2’ x 4’ Safety Panel 1 Hardware Package
6 Anchoring Brackets 3 Kersplash Climbing Wall Rules Signs
36 Groperz™ Hand Holds
12’ Climbing Wall: Part Number 70536 Crystal Clear Panel, 42638 Color
1 304L Stainless Steel
Climbing Frame
3 4’ x 4’ Climbing Panels
1 2’ x 4’ Safety Panel 1 Hardware Package
4 Anchoring Brackets 3 Kersplash Climbing Wall Rules Signs
27 Groperz Hand Holds
8’ Climbing Wall: Part Number 42627 Crystal Clear Panel, 42648 Color
1 304L Stainless Steel
Climbing Frame
2 4’ x 4’ Climbing Panels
1 2’ x 4’ Safety Panel 1 Hardware Package
4 Anchoring Brackets 3 Kersplash Climbing Wall Rules Signs
18 Groperz Hand Holds

©2013 EVERLAST CLIMBING, A PLAYCORE COMPANY
KERSPLASH®POOL CLIMBING WALL INSTALLATION INSTRUCTIONS
3
Components & Hardware Figure A
2’ X 4’ SAFETY PANEL
4’ X 4’ CLIMBING PANEL
CLIMBING FRAME
ANCHORING BRACKET

©2013 EVERLAST CLIMBING, A PLAYCORE COMPANY
KERSPLASH®POOL CLIMBING WALL INSTALLATION INSTRUCTIONS
4
4’
CLEAR DECK SPACE FIGURE B
Installation Overview
Please make sure to read all instructions before attempting to assemble
or install the wall. Due to the wide variety of pool deck configurations, it is
recommended that you contact Everlast Climbing for a drawing packet that will
configure the mounting holes, spacers, and setback for your deck application.
Tools & Equipment Required:
• Hammer Drill
• 5/8” Hammer Drill Bit
• Compressed Air
• Steel Brush
• 7/32” Allen Wrench (included)
• 9/16” socket and ratchet
• Vise Grip
• Hammer
CLEAR DECK SPACE
To be compliant with most state and local guidelines there must be at least
4’ of clear deck space from the back of the frame on the deck to any
obstruction. Please verify your local and state codes prior to installation.
SEE FIGURE B
POOL DEPTH
Pool depth requirements vary by state. Check your state and local codes
to ensure your configuration complies. Everlast Climbing recommends the
following depths for its different panel configurations: SEE FIGURE C
WALL HEIGHT RECOMMENDED WATER DEPTH
8 FEET 5 ft
12 FEET 6 ft
16 FEET 9 ft
CLIMBING WALL ASSEMBLY
Assembly will take place in four steps.
1) Attach holds to panels
2) Attach panels to frame
3) Tip up first frame and install two anchors. Tip up second frame, bolt
frames together and install two additional anchors on second frame.
Repeat until all frames are standing.
4) Anchor frames to deck with the remaining Hilti Kwik Bolts
5’ DEPTH
6’ DEPTH
9’ DEPTH
POOL DEPTHS FIGURE C

©2013 EVERLAST CLIMBING, A PLAYCORE COMPANY
KERSPLASH®POOL CLIMBING WALL INSTALLATION INSTRUCTIONS
5
Installation Instructions
Prior to assembly, be sure to gather all of your tools and prepare all
materials. If a Crystal Clear wall is chosen, the protective wrapping will
need to be removed from the panels prior to assembly, and care taken
not to scratch the panels during the installation process.
ATTACHING THE HAND HOLDS
1. Place the Hand Hold over the desired set of holes in the wall panel.
2. Insert 2” button head bolt, 3/8” lock washer, and 3/8” washer through
the Hand Hold and through the 1/2” clear panel. Attach the 3/8” rubber
sleeve washer over the bolt threads and thread on the 3/8” lock nut.
3. Using an Allen Wrench (included) and a 9/16” box wrench or socket
wrench, hand tighten.
4. Repeat steps 2 and 3 for the second bolt.
a b c g
dh
ef
a. Allen Wrench
b. 2” Button Head Bolt
c. 3/8” Lock Washer
d. 3/8” Washer
e. Hand Hold
f. Panel
g. Seal Washer
h. 3/8” Lock Nut
©2013 EVERLAST CLIMBING, A PLAYCORE COMPANY
KERSPLASH®POOL CLIMBING WALL INSTALLATION INSTRUCTIONS
6
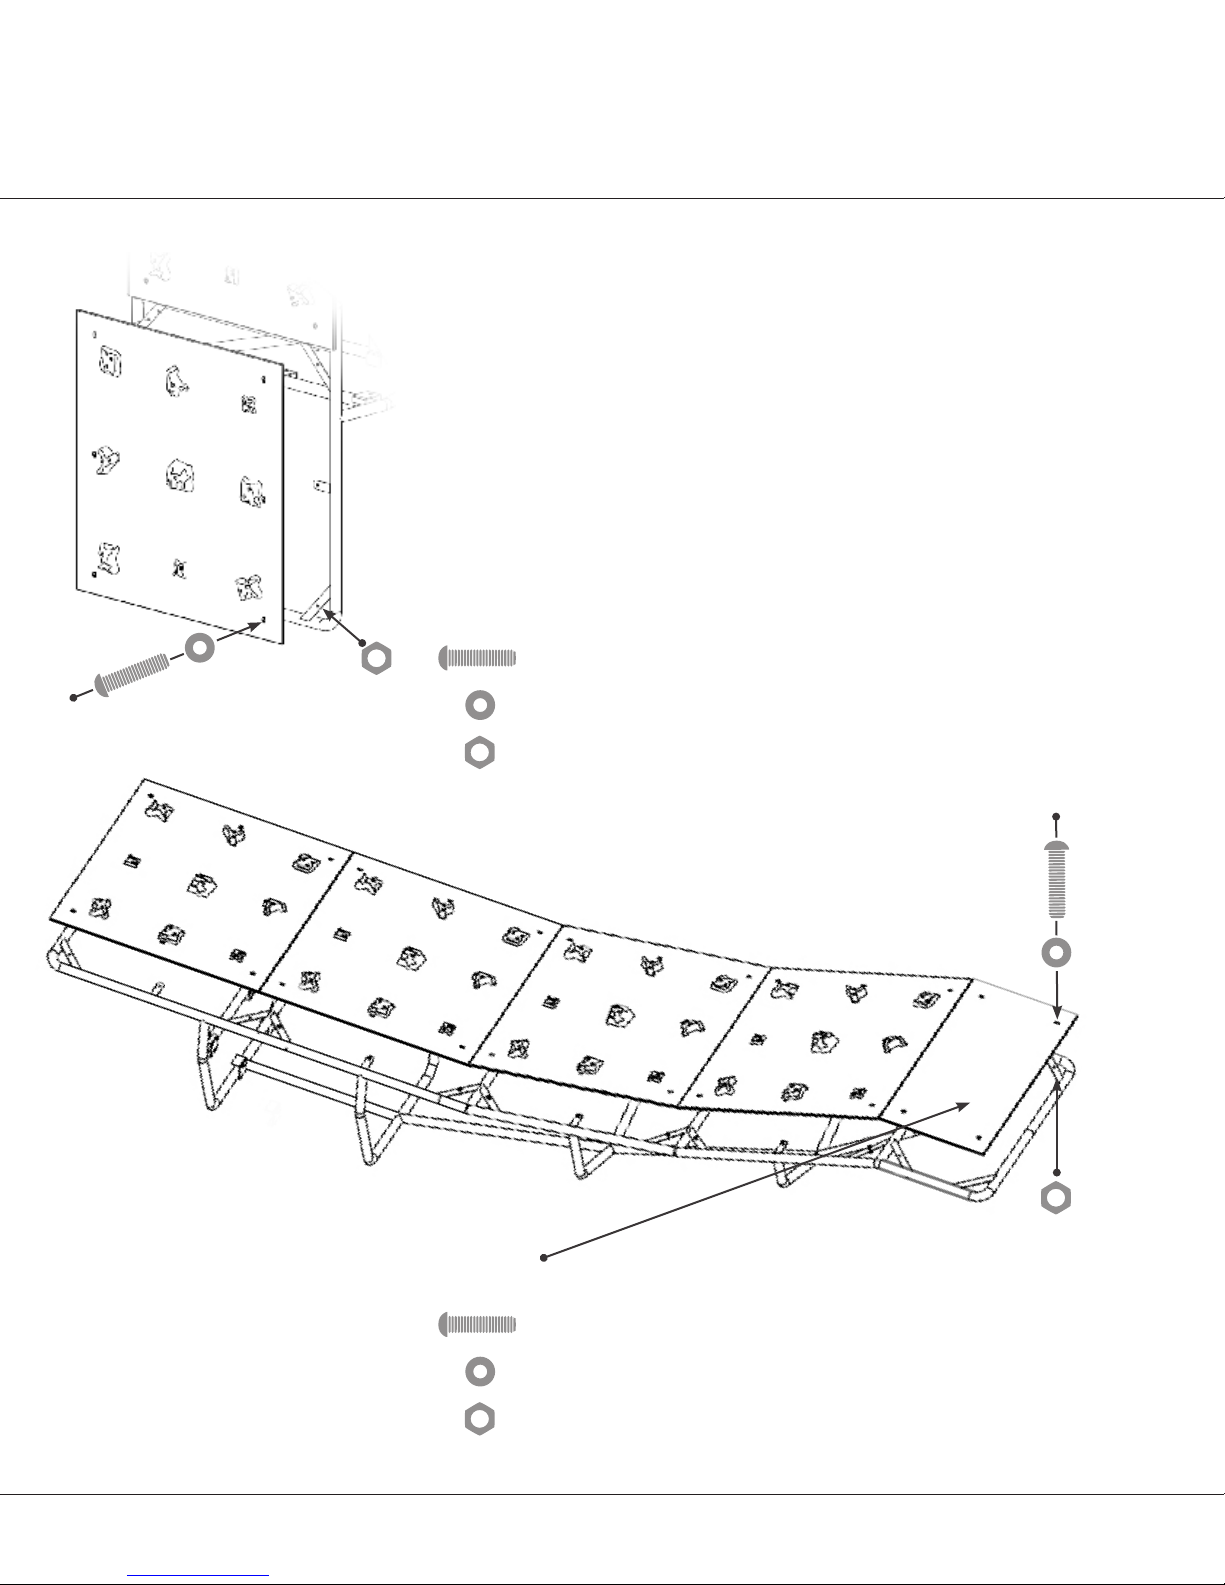
ATTACHING THE CLIMBING PANELS TO THE FRAME
NOTE: If your environment is humid, we recommend applying an extra coat of Spectra Shield to
the frame. To order, contact Spectrum Aquatics (Part Number 202050-00), at 800.791.8056.
Lay the stainless steel frame on its back with the spine towards the ground.
Place the panels on top of the frame and drop in button head screws to
hold the panels in place, but do not tighten. For ease of installation and to
accommodate manufacturing and temperature variances, each climbing
panel has 6 mounting slots that allow for adjustment when attaching the
panels to the frame. For the bottom panel, center the fasteners in each of
these slots.
Attach the climbing panel to the climbing frame as shown
below using the following hardware:
6 - 3/8” x 1 ¼” Button Head Socket Screw
6 - 3/8” Flat Washers
6 - 3/8” Nylock Nuts
Affix the 2’ x 4’ safety panel to the top of the climbing frame using:
4 - 3/8” x 1 ¼” Button Head Socket Screws
4 - 3/8” Flat Washers
4 - 3/8” Nylock Nuts

©2013 EVERLAST CLIMBING, A PLAYCORE COMPANY
KERSPLASH®POOL CLIMBING WALL INSTALLATION INSTRUCTIONS
7
POSITIONING, TEMPORARY ANCHORING,
AND CONNECTING THE FRAMES:
•Themainframeoftheclimbingwallshouldbesetsothatthereisnoless
than 1” and no more than 4” of clearance between the climbing wall and
the existing pool wall (verify local and state codes). SEE FIGURE D
•Positiontherstframeuprightonthepooldeck.Settheframewitha
mechanical anchor in the front middle bracket and rear middle bracket.
SEE FIGURE E
•Positionthesecondframenexttotherst.Therearetwoplaceswhere
the frames must be fastened together, one about 2’ down from the top
and the next about 1’6” up from the pool deck. Fasten the two frames
together using fasteners. SEE FIGURE F
2 - 3/8” x 4 1/2” Hex Screws
4 - 3/8” Flat washers
2 - 3/8” Nylock Nuts
•Thensetthesecondframewithananchorinthefrontmiddlebracket
and back middle bracket. Continue in this manner until all frames are set.
SEE FIGURE E
FASTEN FRAMES TOGETHER FIGURE F
1” to 4” FROM EDGE
OF CLIMBING WALL
FRAME TO DECK
DECK
POOL
FRAME TO DECK CLEARANCE FIGURE D
POOL WALL FRAME
POSITION UPRIGHT AND SET BACK MIDDLE BRACKET FIGURE E
REAR ANCHOR POINTS
MIDDLE BRACKETS
ANCHORS
OUTSIDE BRACKETS
ANCHORS
OUTSIDE BRACKETS
ANCHORS
FRONT ANCHOR POINTS
REQUIRED BRACKET POSITIONS:
16’ WALL - 6 REQUIRED BRACKETS: 3 FRONT, 3 REAR
12’ WALL - 4 REQUIRED BRACKETS: 2 FRONT, 2 REAR
8’ WALL - 4 REQUIRED BRACKETS: 2 FRONT, 2 REAR

©2013 EVERLAST CLIMBING, A PLAYCORE COMPANY
KERSPLASH®POOL CLIMBING WALL INSTALLATION INSTRUCTIONS
8
ANCHORING THE CLIMBING WALL:
Anchoring should be done by an installer experienced with the use of 5/8”
Hilti Kwik Bolt3 (30455) anchoring systems. Hilti instructions for epoxy are
available from www.us.hilti.com or by calling 1.800.879-8000.
STEP 1) Prior to drilling and anchor install, read and follow Hilti recommended safety
precautions, and wear approved eye and ear protection.
STEP 2) There is a requirement of 6 anchoring brackets for the 16’ wall, 4 brackets
for the 12’ wall and 4 brackets for the 8’ wall. SEE FIGURE G
STEP 3) Mark or partially drill the holes following safety guidelines from Hilti. Move
the anchor brackets and finish drilling the holes as discussed in step 4.
STEP 4) Using a hammer drill and a 5/8” carbide hammer drill bit, drill the marked
holes to a minimum depth of 4”.
STEP 5) It is very important to remove the debris and dust from the borehole. Brush
the borehole with a steel brush that is slightly larger in diameter than the
borehole; twist out two times. Using compressed air, clean the borehole
again until the return stream is free of noticeable dust.
STEP 6) Reposition the anchoring bracket over the borehole and insert the threaded
anchor. Tighten to the Hilti recommended torque. SEE FIGURE H
STEP 7) Snap on the protective plastic caps over the exposed nuts and bolts.
PROPER ANCHORING ORDER FIGURE H
REQUIRED ANCHORING BRACKET POSITIONS | FIGURE G
8’ HIGH WALL |4 REQUIRED ANCHORING BRACKETS
12’ HIGH WALL |4 REQUIRED ANCHORING BRACKETS
16’ HIGH WALL |6 REQUIRED ANCHORING BRACKETS
FRONT BRACKETS
2 ANCHOR POINTS
REAR BRACKETS
2 ANCHOR POINTS
FRONT BRACKETS
2 ANCHOR POINTS
REAR BRACKETS
2 ANCHOR POINTS
FRONT BRACKETS
2 ANCHOR POINTS
REAR BRACKETS
2 ANCHOR POINTS
5/8” HILTI KWIK BOLT
9/16” X 4” DEEP HOLE
ANCHORING BRACKET

©2013 EVERLAST CLIMBING, A PLAYCORE COMPANY
KERSPLASH®POOL CLIMBING WALL INSTALLATION INSTRUCTIONS
9
BONDING THE CLIMBING WALL:
Check state and local code for bonding requirements.
ADDITIONAL INSTRUCTIONS:
WARNING! Read all operating instructions before using the Kersplash
Pool Climbing Wall. Make sure that all individuals using the wall have
read and understand the Kersplash Climbing Wall Rules. Supervision
is required.
WARNING! Rock climbing indoors and outdoors is an inherently dangerous
sport. The activity of climbing can lead to significant personal injury,
disfigurement or death. Even though one may be climbing indoors on an
artificial wall risks still exist. Artificial holds can spin, and on rare occasions
break. Individual climbers and organizations have the sole responsibility
for learning and using proper climbing technique and safety practices. The
purchasers and users of our products accept full and complete responsibility
for any and all damages or injury which may result from the use and/or
misuse of any product purchased from any EverActive™ Brands’ catalog, any
Everlast Climbing Marketing, and/or EVERLAST CLIMBING.
WARNING! This product may contain chemicals known to the State of
California to cause cancer and birth defects or other reproductive harm.

©2013 EVERLAST CLIMBING, A PLAYCORE COMPANY
KERSPLASH®POOL CLIMBING WALL INSTALLATION INSTRUCTIONS
10
OPERATOR’S GUIDE
Safety Precautions:
•EverlastClimbingrecommendsthatalifeguardbeondutyatalltimes
when the Kersplash Pool Climbing Wall is in use. This may be required by
certain states; check your state and local codes to verify.
•NODIVINGisallowedoffoftheKersplashPoolClimbingWall.
•KersplashPoolClimbingWallusersmustbeabletoswim;werecommend
for ages 5 and above.
KERSPLASH CLIMBING WALL RULES
•SwimmersonlymayusetheKersplashClimbingWall;non-swimmersand
beginners should not use the wall.
•Swimmingabilityshouldbedeterminedbya25yardswimanda30
second treading exercise.
•Climbersmustread,understand,andobeyallpostedrules,instructions
and warnings.
•OnlyoneclimberisallowedontheClimbingWallatatime.
•Onlyfeet-rstentriesareallowedwhenenteringintothewater.
NO EXCEPTIONS!
•Noclimbingonthebackorsidesofthestructure.Climbonlyonthe
hand holds.
•ClimberswhointentionallyviolatetheNODIVINGruleWILLBEBANNED
from using the Kersplash Climbing Wall.
•Whenenteringthewater,kneesshouldbebentandarmsextendedfor
safety through increased deceleration.
•Theentranceandexitpathsdictatedbytheaquaticfacilitymustbefollowed.
•WhentheClimbingWallisopenforuse,alifeguardmustsupervisetheuse
of the structure without performing any other duties or observations.
•Climbersmaynotusethewallwithoutthedirectsupervisionofalifeguard
in close proximity of the structure.
•Climbersmustlistentoandobeythelifeguardsmonitoringthestructure.
•Climbmustbeginfromthewater.
•Divingmayresultinbodilyinjuryordeath.
•Swimawayfromtheclimbingwalldropzonewhenyouaredone
with your climb.
•Reportanydamagedequipmenttothesupervisor.

©2013 EVERLAST CLIMBING, A PLAYCORE COMPANY
KERSPLASH®POOL CLIMBING WALL INSTALLATION INSTRUCTIONS
11
Care and Maintenance
Daily Maintenance:
•Sprayframe,panelsandhandholdswithcold,clean,non-chlorinatedwater.
The proper care and maintenance of your climbing wall is essential and
is your responsibility. Inspect your climbing wall and its components on
a regular basis. These inspections should include, but are not limited to,
the following:
Surface
•Panelsshouldbeinstalledaccordingtoinstallationinstructions.
•Checkpanelstomakesuretheyareingoodconditionandshownosigns
of stress.
•Checkeachpanel’sadherencetotheframe.Tightenonlywhentheyare
loose. Do not over tighten!
•Checkforsharppointsandedges.
•Removeorrepairanydamagedwallareas.
•CleanpanelswithmildsoapsorWindexcleaner.Regularlysprayingdown
panels with non-chlorinated cold water to remove chlorine water spotting
is recommended.
Hand Holds
•HandHoldsshouldbemountedaccordingtotheinstallationinstructions.
•Observeholdsforsignsofstressorbreakage.
•Removeandreplaceanydamagedholds.
•Checkhandholdsforloosenessandtighten.Donotovertighten!
•Washholdsperiodicallytoremoveoil,stains,andotherresidue.Remove
hand holds and use mild soap and water with a soft bristle brush. Do not
use a wire or brass bristle brush. You can also wash holds in a dishwasher.
Towel dry holds and then air dry for 24 hours to ensure complete drying.
Frame
•Frameshouldbeinstalledaccordingtoinstallationinstructions.
•Toclean,useonlycold,clean,non-chlorinatedwater.Donotspraywith
high-pressure water.
•Removeanydiscolorationtothestainlesssteelfamewitha3Mscratch
pad. Wipe clean with a sponge dampened with Spectra Clean. Repeat
these steps several times to passivate the stainless steel. Spectra Clean
kits are available from Spectrum Aquatics (Part Number 202050-00),
call 800.791.8056.

WWW.EVERLASTCLIMBING.COM |1335 MENDOTA HEIGHTS ROAD, MENDOTA HEIGHTS, MN 55120
©2013 EVERLAST CLIMBING, A PLAYCORE COMPANY | KERSPLASH INSTALLATION INSTRUCTIONS REV 01.14
Table of contents
Popular Lighting Equipment manuals by other brands


LIGMAN
LIGMAN TANGO 30 installation manual

ACME
ACME DAZZLED COLORLED-430 user manual

Current
Current GEPS24-180U installation guide

RPS Studio
RPS Studio RS-SB/300SLK instructions

UWE
UWE JetStream BAMBO2 Installation and operating instructions

HUBBELL LIGHTING
HUBBELL LIGHTING Dual Lite EZ-2 Series Installation, operation and service instructions


