Everlasting Comfort EC-H2 User manual

READ AND SAVE THESE INSTRUCTIONS
Ultrasonic Humidifier Manual
IMPORTANT TIP: DO NOT leave the humidifier plugged in for prolonged periods (i.e. several days or more) without use. This causes
premature failure of the circuitry. When the humidifier is not in use, turn the knob to the OFF position, then UNPLUG it.
CONSEIL IMPORTANT: Ne laissez pas l'humidificateur branché pendant de longues périodes (c'est-à-dire plusieurs jours ou plus) sans
utilisation. Cela provoque une défaillance prématurée des circuits. Lorsque l'humidificateur n'est pas utilisé, tournez le bouton en
position d'arrêt et débranchez-le.
LED
OFF
ON
MIN
MAX

LED
OFF
ON
MIN
MAX
IMPORTANT TIP: DO NOT leave the humidifier plugged in for prolonged periods (i.e. several days or more) without use. This causes
premature failure of the circuitry. When the humidifier is not in use, turn the knob to the OFF position, then UNPLUG it.
CONSEIL IMPORTANT: Ne laissez pas l'humidificateur branché pendant de longues périodes (c'est-à-dire plusieurs jours ou plus)
sans utilisation. Cela provoque une défaillance prématurée des circuits. Lorsque l'humidificateur n'est pas utilisé, tournez le bouton
en position d'arrêt et débranchez-le.
IMPORTANT TIP
LED
OFF
ON
MIN
MAX
Fig. 1
OFF POSITION
Fig. 2
UNPLUG FROM POWER SOURCE
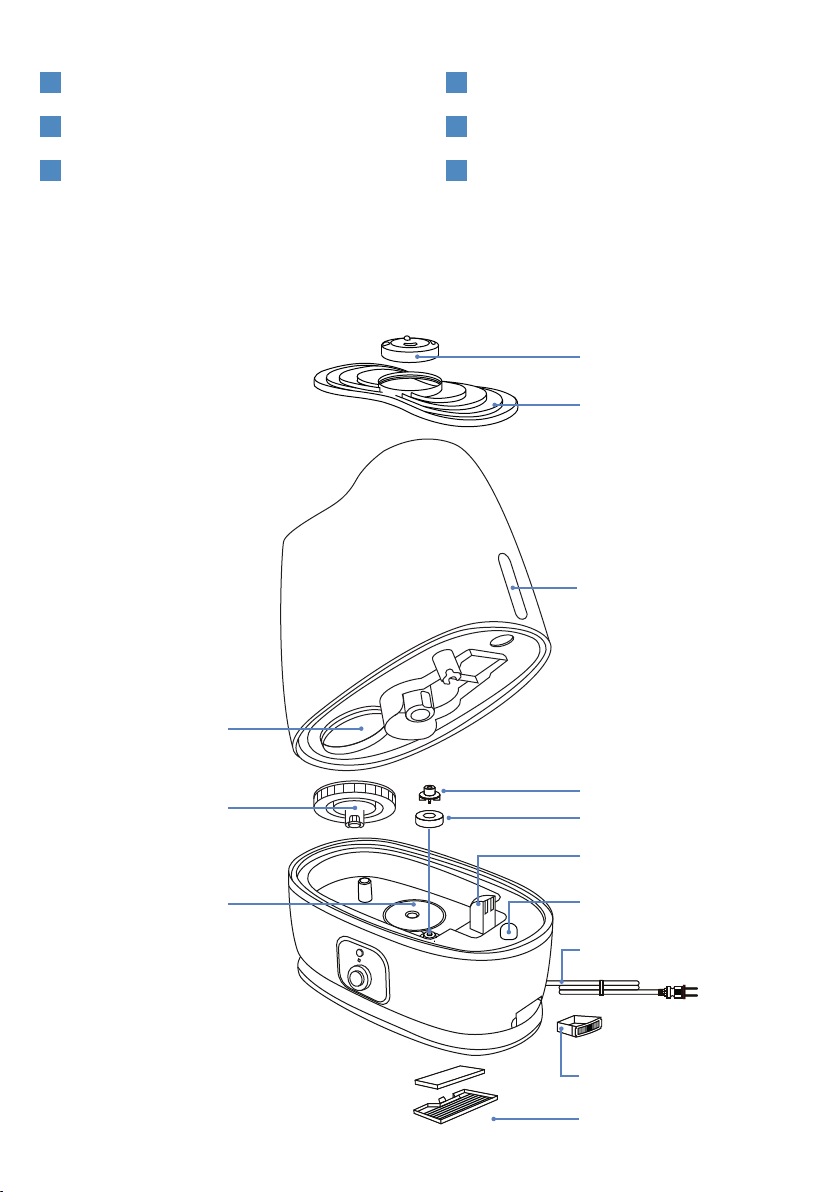
TABLE OF CONTENTS
We're experts in improving indoor air quality, and our ultrasonic humidifier will dissipate dryness and increase moisture
wherever you choose to use it. To ensure optimal performance, please read this guide carefully before use. The ultrasonic
humidifier atomizes water into ultra-fine particles using the principle of ultrasonic high-frequency oscillation, and diffuses
water into the air through a pneumatic device to evenly humidify the air.
COMPONENTS
SAFETY
OPERATION
1
2
3
TROUBLESHOOTING
SPECIFICATIONS
MAINTENANCE
4
5
6
1. COMPONENTS
Fig. 3
EXPLODED DIAGRAM
NOZZLE
DECORATIVE COVER
WATER LEVEL WINDOW
CAP
FLOATER
POWER CORD
ESSENTIAL OIL TRAY
AIR FILTER COVER
AND AIR FILTER
FAN EXHAUST
ATOMIZER
INPUT
VALVE
LED LIGHT
LED
OFF
ON
MIN
MAX ON/OFF
KNOB (FIG. A)
LED
OFF
ON
MIN
MAX INDICATOR
LIGHT(FIG. C)
LED
OFF
ON
MIN
MAX
LED NIGHT
LIGHT BUTTON
(FIG. B)
LED
OFF
ON
MIN
MAX
MIST LEVEL
ADJUSTMENT
KNOB (FIG. D)
Fig. 4
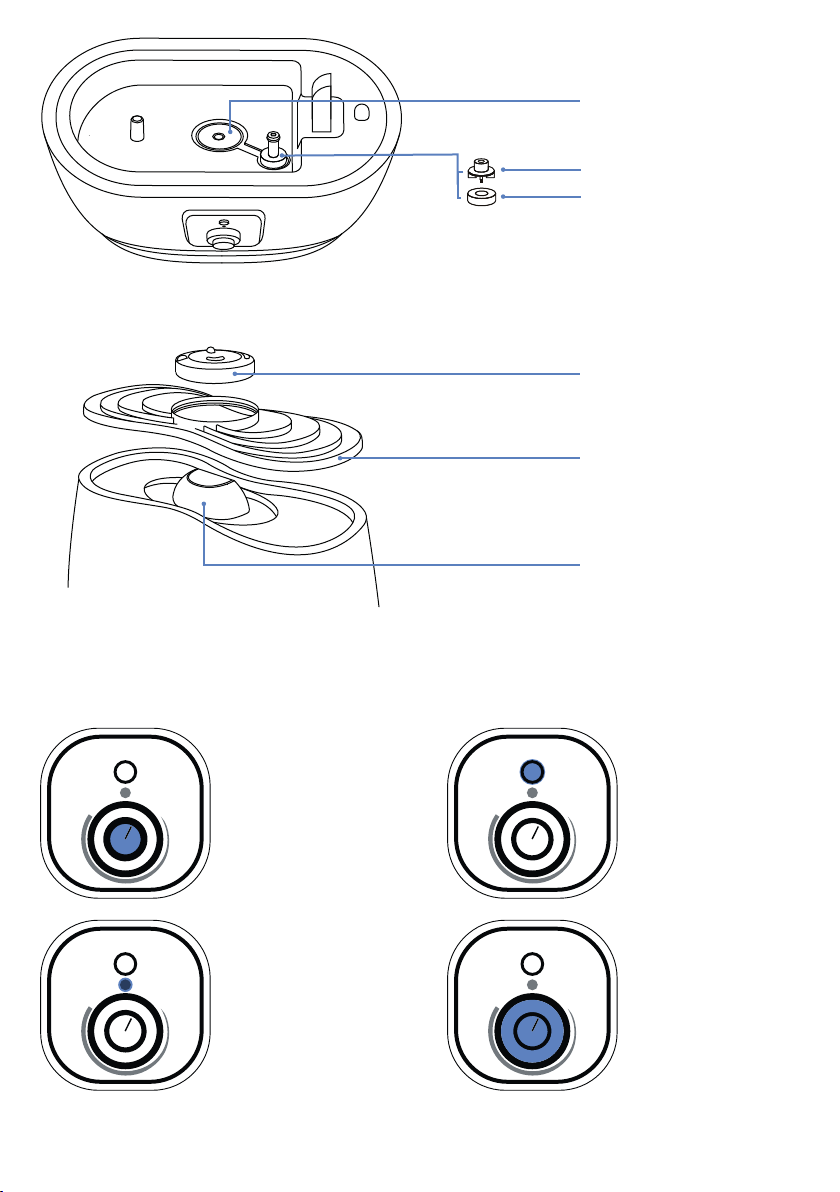
TOP VIEW OF BASE
Fig. 5
TOP VIEW
Fig. 6
CONTROLS
ATOMIZER
CAP
FLOATER
HANDLE
NOZZLE
DECORATIVE COVER

IMPORTANT TIP:
DO NOT leave the humidifier plugged in for prolonged periods (i.e. several days or more)
without use. This causes premature failure of the circuitry. When the humidifier is not in use, turn the knob to
the OFF position, then UNPLUG it.
CONSEIL IMPORTANT:
Ne laissez pas l'humidificateur branché pendant de longues périodes (c'est-à-dire
plusieurs jours ou plus) sans utilisation. Cela provoque une défaillance prématurée des circuits. Lorsque
l'humidificateur n'est pas utilisé, tournez le bouton en position d'arrêt et débranchez-le.
2. SAFETY (PLEASE READ CAREFULLY BEFORE USE)
1
Place unit on a firm, flat and dry surface.
Keep humidifier away from children and infants.
DO NOT use this appliance in any kind of inflammable environment.
Keep unit away from any heat source, i.e. heaters, furnaces, and avoid direct sunlight.
Keep unit in normal room temperatures. Do not operate the unit in freezing temperatures.
Direct nozzle to spray mist away from furniture and electric appliances, as they may become damp or be left
with a white powder like residue.
Please follow the recommendations in the illustrations below to properly operate your humidifier in your home.
OPERATING ENVIRONMENT
1
2
3
4
5
6
7
Thoroughly inspect unit in its entirety for any cracks, chips, or damage which could cause the unit to leak.
DO NOT USE if any damage is found.
Only a professional or authorized repairman should repair this appliance.
If the power supply cord is damaged, it must be replaced by the manufacturer, a certified service agent or a
similarly qualified person to avoid hazard and electrocution.
If the unit has an abnormal sound or odor while in operation, please shut it down immediately and disconnect
the power plug. Any repair must be done by a professional repairman.
Please hold the water tank using two hands when adding water to avoid dropping the water tank.
When the unit is on, DO NOT remove the water tank.
DO NOT operate the unit when the water tank is empty.
Do not add any chemical agents to the base or water tank. Do not add essential oils to the base or water tank.
Only add essential oils to the specified essential oil tray as outlined in this manual. (See Fig. 3 Exploded Diagram)
Before cleaning or moving the unit, turn off and disconnect the plug from its power source.
When in operation, never place your hand inside the base or near the atomizer as it is dangerous and may cause
electrocution.
Do not add hot water above 104 °F to the water tank to avoid discoloration and distortion.
Do not plug the unit into any type of power source with wet hands to avoid the risk of electric shock.
Connect only the electrical plug to a secure wall socket.
Ideal operating environment: Temperature: 41- 104°F, Humidity: <80% RH.
IMPORTANT: Using tap water with a high mineral content aka "hard water" with any humidifier can cause a fine
white dust to be emitted. To avoid this, use distilled or demineralized water.
Do not place any metals, chemicals or detergents into the water tank or base; may cause poor atomization.
Never pour out the remaining water from the base without unplugging and powering down the unit
(power turned to OFF), otherwise the atomizer will burn out immediately.
2
3
4
5
6
7
8
9
10
11
12
13
14
15
16
17
18

LED
OFF
ON
MIN
MAX
LED
OFF
ON
MIN
MAX
LED
OFF
ON
MIN
MAX
LED
OFF
ON
MIN
MAX
Place the unit 6ft away from TVs, audio equipment,
and any other, electronic appliances.
1
Place the unit on a firm, steady, flat and dry surface.
Avoid any inclination.
2
>6ft
Place the unit away from any heat sources, such as
furnaces, and avoid direct sunlight.
3
Do not place the unit near curtains.
4
IMPORTANT: Using tap water with a high mineral content aka "hard water" with any humidifier can cause a fine
white dust to be emitted. To avoid this, use distilled or demineralized water.
5
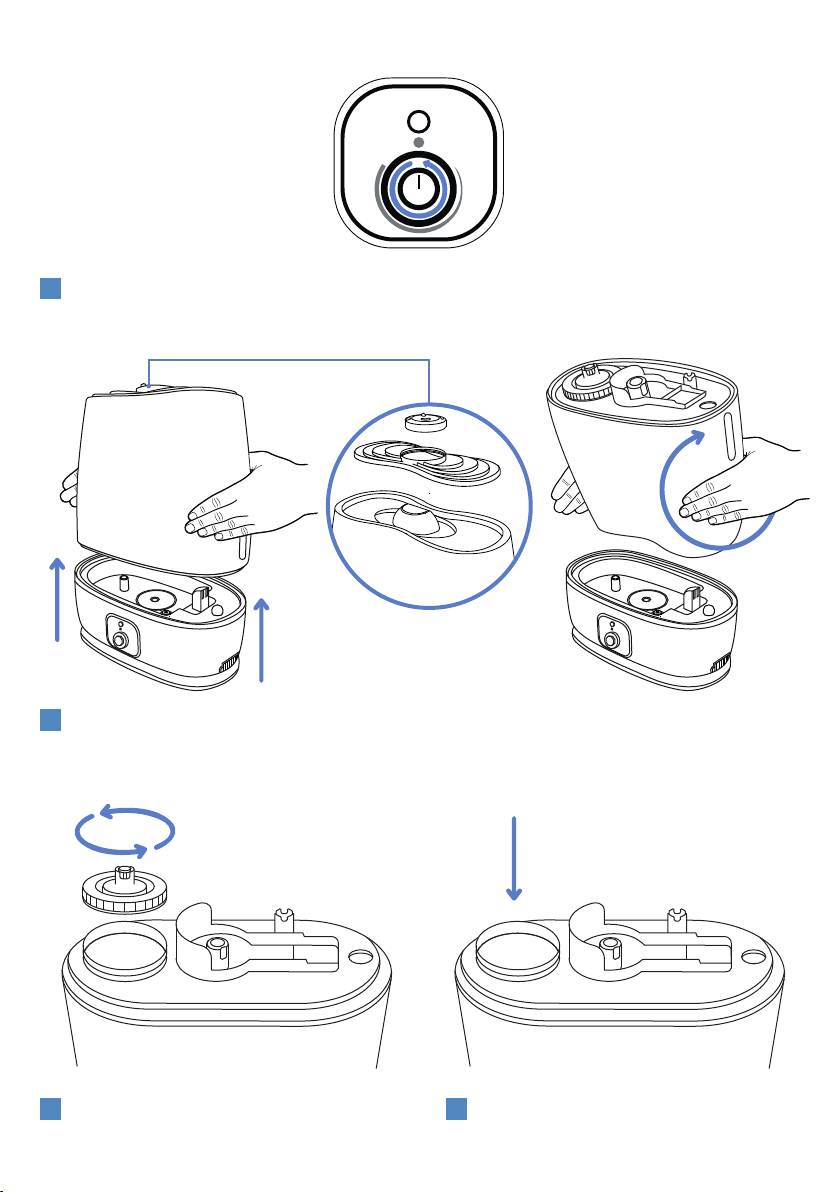
3. OPERATION
Make sure unit is unplugged and the knob is turned all the way to the left (counter-clockwise) and is set to the OFF
position. You should be able to feel and hear a small click when the unit is turned from ON to OFF and from OFF to ON.
1
LED
OFF
ON
MIN
MAX
With both hands, lift water tank off base and flip over to avoid water from dripping from bottom of tank. Optional:
Decorative cover/nozzle is removable to gain access to the handle to lift tank off the base with 1 hand. Note: Lifting the
tank using the handle may cause some water to drip from bottom of tank, so using both hands to flip tank upside down is
recommended. If decorative cover/nozzle is removed, make sure to reattach them to water tank prior to use.
2
Twist open the valve.
3
Fill with water.
DO NOT add any other substance other than tap
water or filtered water.
4
HANDLE
DECORATIVE COVER
NOZZLE

LED
OFF
ON
MIN
MAX
Reattach valve to water tank and reposition water
tank onto the base with the water level window on
the right side of the water tank. If using the handle to
reposition the water tank onto the base, place another
hand underneath the tank for support. NOTE: Allow
about 10 seconds for water to flow from water tank
into the base before you turn the unit on.
5
Add essential oil to sponge in the essential oil tray.
Note this is an additional feature and not required
to run the unit.
6
A. With the knob in the OFF position, plug unit into a wall socket. Rotate the knob clockwise and you should feel a click
and the indicator light will turn green.
B. Rotate knob clockwise to increase the intensity of the mist.
C. Press the LED button to turn on the LED night light located inside the water tank. The water level window on the right
side of the unit should light up blue. Press LED button again to turn off LED light.
D. The unit features an “Auto Shut Off" safety feature. When the unit is low on water, it will cut off the atomizer to stop
the mist and the indicator light will turn red. To refill water tank, turn knob to OFF position, unplug from wall socket and
repeat Steps 1-7.
E. IMPORTANT TIP: DO NOT leave the humidifier plugged in for prolonged periods (i.e. several days or more) without
use. This causes premature failure of the circuitry. When the humidifier is not in use, turn the knob to the OFF position
and UNPLUG it.
7

Clean tank and base and use only
demineralized or distilled water.
Use of tap water with a high
mineral content, aka “hard water".
Humidifier is emitting a
white dust/residue.
4. TROUBLESHOOTING
PROBLEM PRIMARY CAUSE SOLUTION
Indicator light not
illuminated with no mist.
Power supply cord is not properly
plugged into wall socket.
Power switch is not turned on.
Plug the power supply cord into a
wall socket. Rotate knob clockwise
to power on.
Indicator light is red
with no mist.
A. There is no water in tank.
B. Atomizer is dirty or floater is missing
or stuck to the bottom.
�. Knob was not turned to off position
during refilling.
D. Unit was turned on too quickly when
tank was attached to base.
E. Unit reset needed.
F. Too much moisture/humidity in
circuit board.
A. Add water to tank.
B. Clean base, atomizer, and floater
according to section 6 Maintenance.
Check to make sure floater is not
stuck to the bottom. With the unit
UNPLUGGED, add enough water
directly to the base and make sure
the floater floats.
C. Turn knob to off position, then
turn knob to on position.
D. Turn knob to off position and wait
10 seconds before turning back on.
E. Turn knob to off position. Unplug
unit from the wall and wait 2 min.
Plug unit back into wall, fill water
tank with water, and turn knob to on
position.
F. Unplug unit from wall. Empty base
of all water, dry with towel, turn
upside down and let dry for 24 hours.
Indicator light is green with
little or no mist.
Atomizer is dirty. Clean base and atomizer according
to section 6 Maintenance.
Mist has a bad odor. The water, tank, or base is not clean. Clean base and atomizer according
to section 6 Maintenance.
IMPORTANT TIP: DO NOT leave the humidifier plugged in for prolonged periods (i.e. several days or more) without use. This causes
premature failure of the circuitry. When the humidifier is not in use, turn the knob to the OFF position, then UNPLUG it.
CONSEIL IMPORTANT: Ne laissez pas l'humidificateur branché pendant de longues périodes (c'est-à-dire plusieurs jours ou plus)
sans utilisation. Cela provoque une défaillance prématurée des circuits. Lorsque l'humidificateur n'est pas utilisé, tournez le bouton
en position d'arrêt et débranchez-le.

6. MAINTENANCE
WARNING: Before performing any type of maintenance and cleaning, be sure to unplug the unit from its power source.
CLEAN THE WATER TANK (ONCE EVERY 2-3 WEEKS)
Turn unit OFF and lift the water tank from the base and rotate the valve counter-clockwise to unscrew it. Empty the water tank
and wash tank and valve with mild dish detergent and warm water.
CLEAN BASE (ONCE A WEEK)
Turn unit OFF and unplug from wall socket.
WARNING: Use both hands to lift the entire base and tilt to one side to pour water out as shown in (Fig.7). Use mild dish soap
and water to clean the base and clean away any residue near the floater and the atomizer with a brush or cotton swab as shown
in (Fig.7). Only pour water into the base using a cap, never direct from a faucet. Never place the base under running water as this
could cause water flow to reach the motor located at the bottom of the base.
EXTERNAL CLEANING OF HUMIDIFIER
Rinse soft cloth in warm water below 104°F, add a small amount of mild dish soap to soft cloth, and wipe off any surface stains.
Fig. 7
TOP VIEW OF BASE
5. SPECIFICATIONS
Model No.
Type
Power
Voltage
Capacity
Noise
Mist Output
EC-H2
Ultrasonic Humidifier
22 W
120V/60Hz
6.0 L
<40 dB
Lowest setting: 140ml/hr; Highest setting: 300ml/hr (+-20%)
IMPORTANT TIP: DO NOT leave the humidifier plugged in for prolonged periods (i.e. several days or more) without use. This
causes premature failure of the circuitry. When the humidifier is not in use, turn the knob to the OFF position and UNPLUG it.
FLOATER
ATOMIZER
FAN EXHAUST
POUR WATER
OUT THIS SIDE

All parts have been tested by Intertek and are ETL Certied.
HAVE AN ISSUE WITH YOUR
ULTRASONIC HUMIDIFIER?
Enjoy hassle-free replacements: if your ultrasonic humidier is defective or damaged,
we will ship you a new one ABSOLUTELY FREE.
For fast and knowledgeable service, get in touch with one of our customer
service experts right now!
Email: [email protected]
To check out more of the products we offer visit:
5011813
WRITE A MESSAGE
TO SUPPORT
everlastingcomfort.net
This manual suits for next models
1
Other Everlasting Comfort Humidifier manuals


