Evolution Aqua eaReefPro 1800S Quick guide

INSTALLATION AND INSTRUCTION MANUAL FOR
eaReefPro 1800S / 1500S / 1200S / 900S / 600SCube Aquariums
Evolution Aqua Ltd. - Evolution House - Kellet Close - Wigan - Lancashire - United Kingdom - WN5 0LP
UK
English
EAREEFPRO11501181MAN
PLEASE READ all of the instruction manual before attempting
to set-up your new eaReefPro Aquarium
IMPORTANT
Never attempt to clean the aquarium with a sharp,
blade-like object as this may damage the silicone bond
and invalidate the warranty.
CARE
This product requires Manual Handling.
Know your limitations before lifting!
For guidance please refer to: hse.gov.uk/toolbox/manual.htm
IMPORTANT
It is important to ensure that any water that is spilled
onto the cabinet is wiped off and dried immediately.
Failure to do so will invalidate the warranty


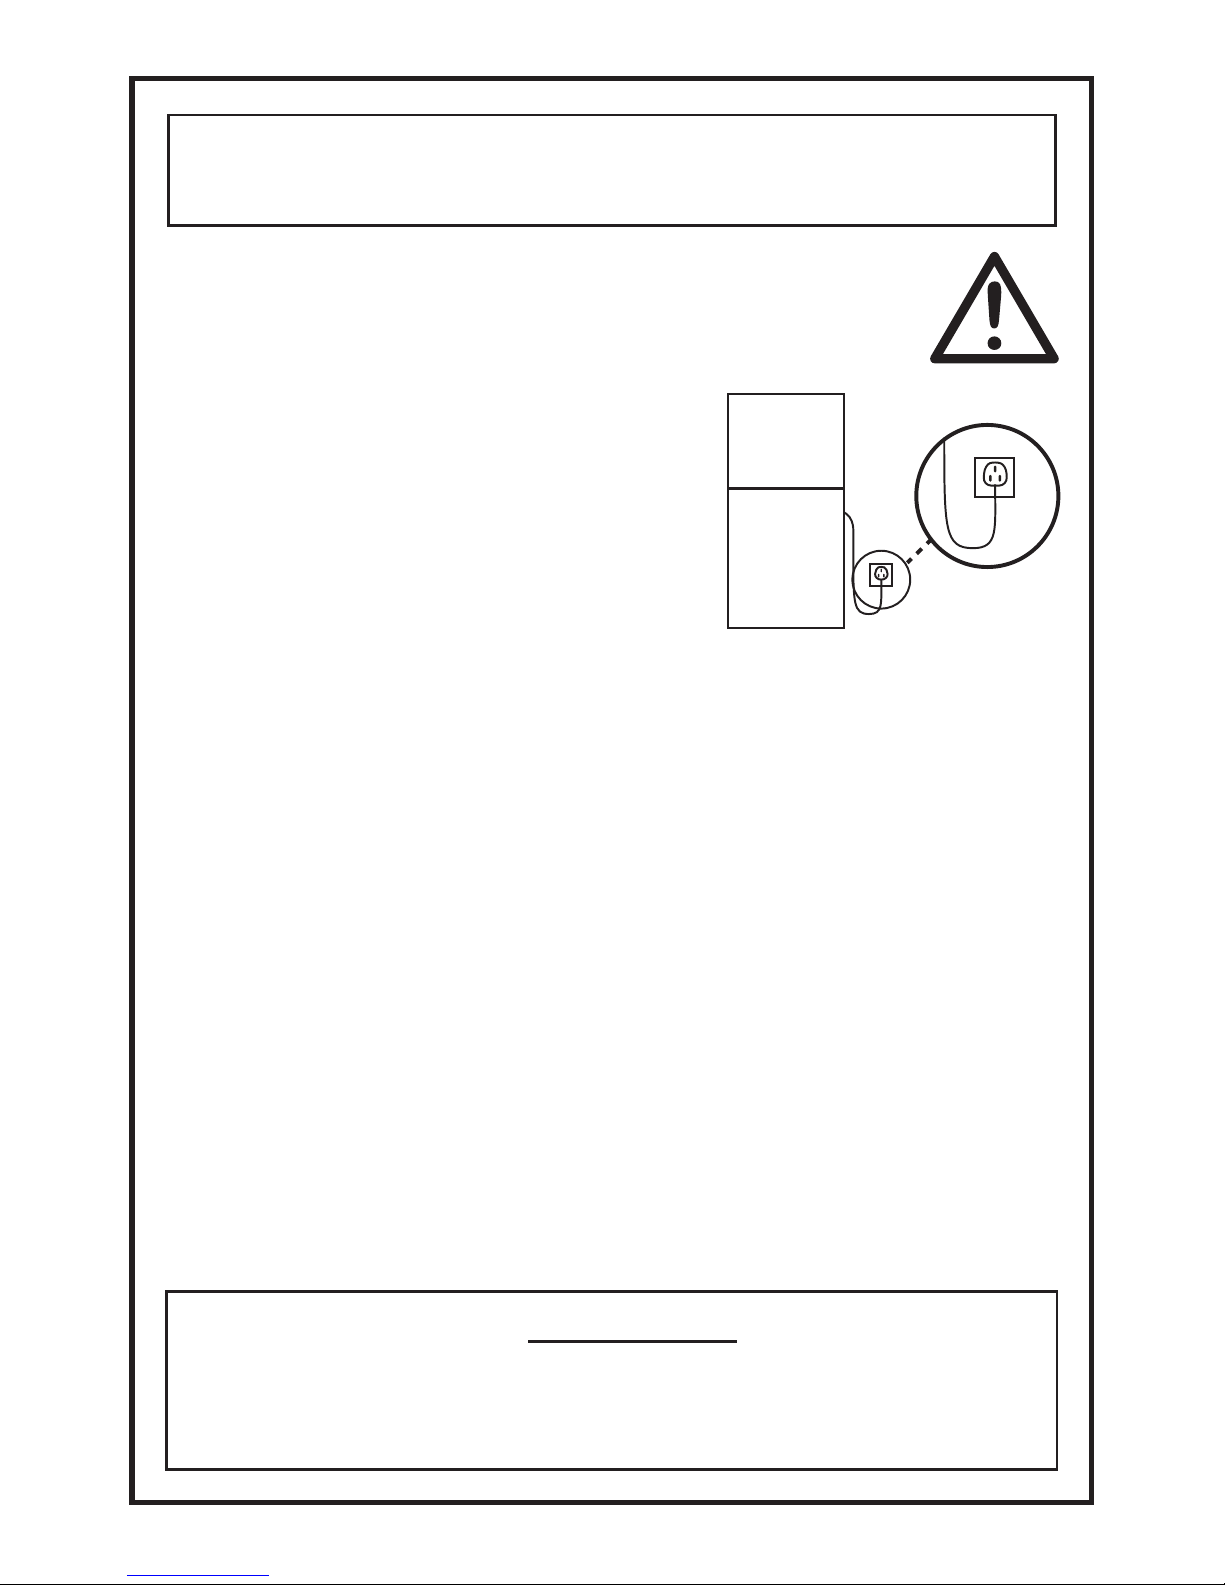
WARNING: PLEASE READ THE FOLLOWING
SAFETY INFORMATION FIRST.
DANGER: To avoid a possible electric shock, ensure all electrical devices are
switched off when carrying out maintenance. Take extra care when handling a
wet aquarium. Do not attempt repairs yourself; return the appliance to the place
of purchase for service or dispose of the appliance.
• To avoid the possibility of the appliance plug or socket
getting wet, position the aquarium cabinet and tank to
one side of a wall mounted socket to prevent water
from dripping onto the socket or plug. You should
create a “drip loop” for each cord connecting an
aquarium appliance to a socket. The “drip loop” is
that part of the cord below the level of the socket, or
the connector. Use an extension cord, if necessary,
to prevent water travelling along the cord and coming
into contact with the socket.
• Always unplug an appliance from an outlet when not in use, before putting on or taking off
parts, and before cleaning. Never pull the cord itself to remove the plug from the outlet.
Hold the plug and pull to disconnect.
• If the plug or socket does get wet, DO NOT unplug the cord. Disconnect the fuse or circuit
breaker that supplies power to the appliance. Then unplug the device and examine for presence
of water in the socket.
• Close supervision is necessary when any appliance is used by or near children.
• Do not use an appliance for anything other than its intended use. The use of attachments not
recommended or sold by the appliance manufacturer may cause an unsafe condition.
• Do not install or store the appliance where it will be exposed to the weather or to temperatures
below freezing point.
• Make sure an appliance mounted on a tank is securely installed before operating it.
Read carefully all the important notices on the appliance and the corresponding instruction manual.
NOTE: A cord rated for less amperes or watts than the appliance rating may overheat. Care should
be taken to arrange the cord so that it cannot be tripped over or pulled accidentally.
DRIP LOOP
IMPORTANT
It is important to ensure that any water that is spilled
onto the cabinet is wiped off and dried immediately.
Failure to do so will invalidate the warranty.

INTRODUCTION
Congratulations on purchasing an Evolution Aqua aquarium. The eaReefPro aquarium
range has been professionally designed for today’s reefkeepers. eaReefPro is suitable
for beginners right through to those at the cutting edge of the hobby, and combines
practicality with modern looks, durability with premium quality.
Along with eaReef, eaReefPro has been designed for marine hobbyists who like to
choose and add their own equipment, building a bespoke sump-based saltwater system
which is tailored exactly to their own methods, taste, experience and budget.
The aquarium, cabinet and sump are built from the highest quality materials,
ready to be installed and equipped at your convenience. Please read this manual
carefully before setting up your new eaReefPro aquarium.
4

CONTENTS
eaReefPro parts list PAGE 6
Specifications and dimensions PAGE 7
How the aquarium works PAGE 12
Installation instructions PAGE 14
Completing the installation and equipment PAGE 18
Setting the weir running height PAGE 19
How to get the best from your eaReefPro aquarium PAGE 21
Troubleshooting PAGE 23
Warranty PAGE 24
5

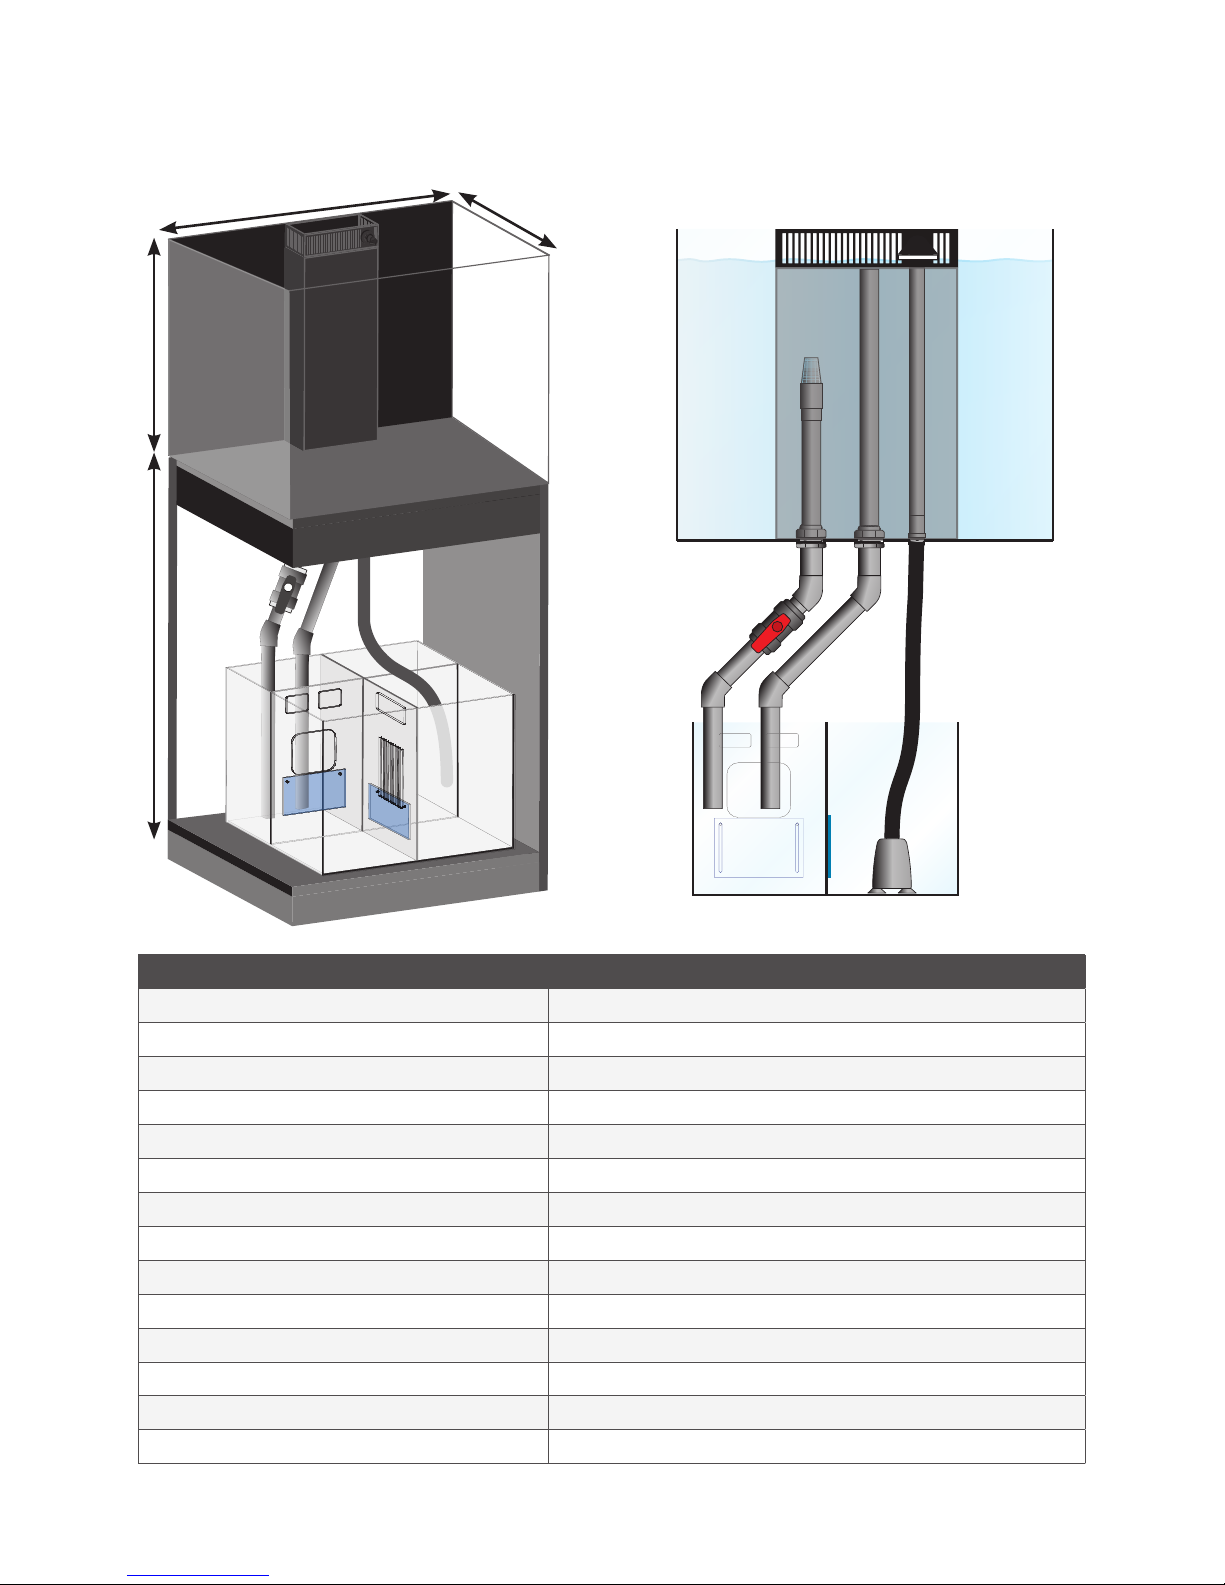
EAREEFPRO PARTS LIST
Your eaReefPro Aquarium comes complete with the following items:
2) Cabinet.
5) Removable acrylic
weir comb.
8) COMPONENT 3 -
Emergency overflow pipe.
1) eaReefPro Aquarium
with base mat fitted.
4) Adjustable baffle plates,
plastic bolts and nuts.
7) COMPONENT 2 - Outlet
assembly with double
union ball valve.
10) COMPONENT 5 - Inlet
assembly with elbow and
flare nozzle.
11) COMPONENT 6 -
Threaded hosetail.
SUMP
SIDE
SUMP
SIDE
SUMP
SIDE
WEIR
SIDE
WEIR
SIDE
WEIR
SIDE
3) Glass sump with base
mat fitted. Adjustable
baffles not factory fitted.
*eaReefPro1800 has a
separate reservoir tank
6) COMPONENT 1 - Outlet
assembly with strainer
and tank connector.
9) COMPONENT 4 -
Emergency overflow
sump side.
12) Hose for connecting
sump pump to inlet
6

SPECIFICATION eaReefPro600SCube
Aquarium dimensions 600mm(L) x 600mm(W) x 600mm(H)
Sump dimensions 500mm(L) x 380mm(W) x 400mm(H)
Cabinet dimensions 600mm(L) x 600mm(W) x 900mm(H)
Total system volume (nett) 198 litres adjustable upwards
Display tank volume (nett) 168 litres
Sump running volume (nett) 25 litres adjustable upwards
Sump top-up reservoir volume 17 litres
Skimmer chamber running height 190mm adjustable upwards
Skimmer chamber internal dimensions 240 x 180mm
Pump chamber internal dimensions 240 x 180mm
Reactor/refugium chamber internal dimensions 240 x 180mm
Top-up chamber internal dimensions 240 x 180 x 394mm
Recommended pump flow rate (not supplied) 4000lph maximum from an adjustable pump
Aquarium specifications 10mm glass all round. Low iron on five sides, black vinyl wrap background
SPECIFICATIONS AND DIMENSIONS
eaReefPro600SCube
600mm
600mm
600mm
900mm
VIEW FROM
FRONT OF TANK
7

SPECIFICATION eaReefPro900S
Aquarium dimensions 900mm(L) x 500mm(W) x 600mm(H)
Sump dimensions 800mm(L) x 350mm(W) x 400mm(H)
Cabinet dimensions 900mm(L) x 500mm(W) x 830mm(H)
Total system volume (nett) 267 litres adjustable upwards
Display tank volume (nett) 236 litres
Sump running volume (nett) 31 litres adjustable upwards
Sump top-up reservoir volume 19 litres
Skimmer chamber running height 190mm adjustable upwards
Skimmer chamber internal dimensions 250 x 338mm
Pump chamber internal dimensions 150 x 338mm
Reactor/refugium chamber internal dimensions 216 x 338mm
Top-up chamber internal dimensions 150 x 338 x 394mm
Recommended pump flow rate (not supplied) 3000lph maximum from an adjustable pump
Aquarium specifications 12mm glass all round. Low iron on five sides, black vinyl wrap background
SPECIFICATIONS AND DIMENSIONS
eaReefPro900S
VIEW FROM
FRONT OF TANK
900mm
600mm
500mm
830mm
8

SPECIFICATIONS
eaReefPro1200S
SPECIFICATION eaReefPro1200S
Aquarium dimensions 1200mm(L) x 600mm(W) x 600mm(H)
Sump dimensions 800mm(L) x 450mm(W) x 450mm(H)
Cabinet dimensions 1200mm(L) x 600mm(W) x 900mm(H)
Total system volume (nett) 441 litres adjustable upwards
Display tank volume (nett) 396 litres
Sump running volume (nett) 45 litres adjustable upwards
Sump top-up reservoir volume 24.3 litres
Skimmer chamber running height 190mm adjustable upwards
Skimmer chamber internal dimensions 250 x 438mm
Pump chamber internal dimensions 150 x 438mm
Reactor/refugium chamber internal dimensions 241 x 438mm
Top-up chamber internal dimensions 125 x 438 x 444mm
Recommended pump flow rate (not supplied) 5000lph maximum from an adjustable pump
Aquarium specifications 15mm front, 12mm all other sides. Low iron on five sides. Black vinyl wrap.
1200mm
600mm
600mm
900mm
9

SPECIFICATIONS
eaReefPro1500S
SPECIFICATION eaReefPro1500S
Aquarium dimensions 1500mm(L) x 600mm(W) x 600mm(H)
Sump dimensions 900mm(L) x 450mm(W) x 450mm(H)
Cabinet dimensions 1500mm(L) x 600mm(W) x 900mm(H)
Total system volume (nett) 536 litres adjustable upwards
Display tank volume (nett) 490 litres
Sump running volume (nett) 46 litres adjustable upwards
Sump top-up reservoir volume 29.17 litres
Skimmer chamber running height 190mm adjustable upwards
Skimmer chamber internal dimensions 300 x 438mm
Pump chamber internal dimensions 150 x 438mm
Reactor/refugium chamber internal dimensions 266 x 438mm
Top-up chamber internal dimensions 150 x 438 x 444mm
Recommended pump flow rate (not supplied) 6000lph maximum from an adjustable pump
Aquarium specifications 15mm glass all round. Low iron on five sides. Black vinyl wrap background.
1500mm
600mm
600mm
900mm
10

SPECIFICATIONS
eaReefPro1800S
SPECIFICATION eaReefPro1800S
Aquarium dimensions 1800mm(L) x 600mm(W) x 600mm(H)
Sump dimensions 800mm(L) x 450mm(W) x 400mm(H)
Cabinet dimensions 1800mm(L) x 600mm(W) x 900mm(H)
Total system volume (nett) 588 litres adjustable upwards
Display tank volume (nett) 525 litres
Sump top-up reservoir volume 49 litres
Skimmer chamber running height 190 mm adjustable upwards
Skimmer chamber internal dimensions 350mm x 438mm
Pump chamber internal dimensions 150mm x 438mm
Reactor/refugium chamber internal dimensions 272mm x 438mm
Top-up chamber internal dimensions 288mm x 394mm x 438mm
Recommended pump flow rate (not supplied) 10,000 lph maximum from an adjustable pump
Aquarium specifications 19mm glass all round. Low iron on five sides. Black vinyl wrap background.
1800mm
600mm
600mm
900mm
VIEW FROM
FRONT OF TANK
11

HOW THE AQUARIUM WORKS
The eaReefPro consists of two aquariums (*three with eaReefPro180) – the main display
tank on top of the cabinet, and the sump tank below, inside the cabinet (with separate
top-up tank in eaReefPro1800). The object of the sump tank is to hide away bulky, noisy
or unsightly aquarium equipment like pumps, heaters, protein skimmers, automatic top-up
devices, filters and reactors. A sump can also add extra volume to the main display tank
above it. The larger the water volume, the more fish you can keep, and the more stable it
becomes in terms of pollution and temperature fluctuations. Bigger water volume is always
better when it comes to accurately replicating a slice of natural coral reef.
Sump tanks are popular with reefkeepers because they increase volume and house
equipment. With equipment out of sight the main display tank can be aquascaped more
effectively, while at the same time enjoying the best possible water purification (of your
choice,) in the sump tank beneath.
CONNECTED TOGETHER
The two tanks are connected by pipework, to take system water to and from the main
display tank. PLEASE NOTE: On eaReefPro1800 models the top-up reservoir is not
connected up by pipework supplied. Water is pumped into the main display tank from the
sump via the narrow inlet pipe situated inside the weir. Water leaves the main tank first by
overflowing through the acrylic weir comb and then via two wide bore exit pipes situated
inside the weir. Note in normal operation the short exit pipe fitted with strainer should
remove 99.9% of the water from the main aquarium. The tall exit pipe, situated in the
middle of the weir, is there as an emergency overflow pipe and should take very little water
flow when in normal operation. Once back in the sump beneath, water from the main tank
can be filtered, heated and returned using the user’s choice of equipment (not supplied).
Water is circulated constantly when eaReefPro is in operation, and water height in the main
tank will be set at a permanent height regardless of evaporation. The advantage of this is
that even though evaporation will inevitably occur, no coral will ever be left high and dry
due to evaporation influence on the main display tank.
Instead water evaporates and can be topped up discretely in the sump underneath. Another
major advantage with a sump tank is that water changes, dosing and water testing can be
carried out there too, so the livestock in the main display tank above remain undisturbed.
NOTE: To avoid your sump pumps running dry, and in order for salinity to be stable,
marine sumps must be regularly topped-up with reverse osmosis or deionised water to
compensate for freshwater lost through evaporation. Every eaReefPro aquarium comes
complete with a built in reservoir chamber for RO/DI water in the sump. Evolution Aqua
recommend that all eaReefPro sumps are fitted with a reputable brand of Auto Top Up
device, not supplied.
12

WARNING
Improper use of the inlet pipe by extending it further down into the main display
tank may result in the sump overflowing in the event of a power cut. Running the
adjustable baffle plates at a high setting in the sump will risk flooding in the event of
a powercut. Powercut testing and final baffle height adjustment is essential at set up.
HOW THE AQUARIUM WORKS
WHAT HAPPENS WHEN THE POWER GOES OFF?
When power goes off, water flow to the main display tank stops. Main tank water will back
syphon down the flare nozzle and narrow inlet tube until the syphon is broken by the flare
nozzle drawing in air. This will usually happen within a few seconds of power supply going
off. Water level in the sump tank will raise by the amount of water which was in the weir,
pipework and back-siphoned from above. Every eaReefPro sump has been extensively
tested and designed not to flood when the adjustable weir plates are at their lowest setting.
Adjustable height baffles are an advanced reefkeeper feature which users adjust and set at
their own risk. If in doubt leave them at their lowest setting.
Non-return valves are also available from specialist outlets (not supplied).
The majority of system water will still be held in the main aquarium in the event of a
powercut, and when power is restored the main tank and sump will return to their normal
running levels.
EA REEF PRO
(900 / 1200 / 1500)
EA REEF PRO
(600 CUBE)
EA REEF PRO
(1800)
VIEW FROM
FRONT OF TANK
VIEW FROM
FRONT OF TANK
VIEW FROM
FRONT OF TANK
13

INSTALLATION
First your eaReefPro cabinet must be positioned.
PLEASE NOTE: Your finished aquarium should be away from doors and radiators, out of
direct sunlight and near to, but not directly over, power sockets.
POSITIONING THE CABINET
One litre of water weighs one kilogram (1kg) so your furnished aquarium with sump will
weigh at least as much in kilograms as its total volume in litres.
THE CABINET MUST BE PLACED ON A STRONG, LEVEL CONCRETE FLOOR,
AND MUST BE PERFECTLY LEVEL AND POSITIONED BEFORE BEING FILLED
WITH WATER. AN UNEVEN FLOOR WILL CAUSE STRESS TO THE CABINET
AND AQUARIUM.
INSTALLING THE SUMP
The sump comes fitted with protective mat. Do not remove this mat. The skimmer chamber
should be on the left hand side as you look into the cabinet. Be careful not to touch the
metal cabinet hinges with the glass sump as damage may occur. Push the sump to the
back of the cabinet and centre it within the space left to right.
INSTALLING THE TANK
Using a minimum of two people for the eaReefPro900s, and four people for the
eaReefPro1200 and 1500s, place the aquarium slowly onto the cabinet top, ensuring that
the protective base mat is sandwiched between cabinet top and tank base. The rear corners
of the aquarium should exactly line up with the rear corners of the cabinet. The sides
should also exactly line up, producing a smooth line. The aquarium should protrude over
the front of the cabinet top, but align with the cabinet perimeter when the cabinet doors are
closed.
ADJUSTING THE CABINET DOORS
NOTE: ONLY ADJUST DOORS AT THE END OF THE INSTALLATION AND WHEN THE
TANK IS FILLED WITH WATER.
The soft-close hinges have two points of adjustment. If necessary, adjust them until
the door(s) are level, with an even gap, and close without any obstruction.
The push-openers can also be adjusted by twisting them in or out, by hand.
EA REEF PRO 1800 MODELS
Place the separate auto-top up reservoir in the end cupboard of your choice,
on the left or right of the sump chamber.
14

INSTALLATION
FITTING THE PIPEWORK
Your eaReefPro comes with six pipework assemblies and is designed to be easy to
install with no silicone sealant or other means of sealing necessary.
If desired, the grey PVC rigid pipe can be permanently welded together using solvent
weld (not supplied). Evolution Aqua solvent weld order code is S79-0-500.
DO NOT SOLVENT WELD THE BLACK FITTINGS AS THIS WILL PREVENT
REMOVAL OF THE BLACK ACRYLIC GRILL.
*NOTE: FAILURE TO PROPERLY TIGHTEN THE TANK CONNECTORS MAY CAUSE
LEAKAGE FROM THE TANK WEIR BASE.*
EA REEF PRO 1800
Your eaReefPro 1800 is configured with two flare nozzles facing out of the left and
right sides of the central weir.
EA REEF PRO
PIPEWORK
(900 / 1200 / 1500 /
600 CUBE MODELS*)
*SEE PAGE 5 FOR 600 CUBE
PIPEWORK LAYOUT
EA REEF PRO
PIPEWORK
(1800 MODELS)
Inlet Assembly
(COMPONENT 5)
Weir Side
Tank Connector
Threaded Hosetail
(COMPONENT 6)
Weir Side
Flare Nozzle on
90°Elbow
Acrylic
Weir Comb
REMOVABLE WEIR COMB
SUMP
Emergency Overflow
(COMPONENT 3)
Weir Side
Removable Strainer
Weir Side
Outlet Assembly
(COMPONENT 1)
Weir Side
Tank Connector
Seal Ring
HOLE 1 HOLE 2 HOLE 3
Small Seal Ring
Small Seal Ring
Seal Ring
AQUARIUM BASE
Emergency Overflow
(COMPONENT 4)
Sump Side
Outlet Assembly
(COMPONENT 2)
Sump Side
Double union ball valve
Flexible Hose
View of holes in
weir from above.
FRONT
REAR
Pump
(Not
Supplied)
1 2 3
Inlet Assembly 1
Weir Side
Grey T-Piece
Grey Pipe
Flare Nozzle
Acrylic
Weir Comb
WEIR
SUMP
Flare Nozzle
Outlet Assembly 2
Weir Side
Removable Strainer
Weir Side
Outlet Assembly 1
Weir Side
AQUARIUM BASE
Outlet Assembly 2
Sump Side
Outlet Assembly 1
Sump Side
Pipework
must
terminate
175mm
from
sump
base
Flexible Hose
Black PVC
19 / 27mm
Pump
175mm
(Not
Supplied)
15

1. Disconnect nut and one seal from
component 2 and firmly push onto
component 1. Then ensure rubber
seal ring is located onto the thread.
4. Using two people, fit component
2 (sump side) onto the thread of
component 1 (weir side) and rotate
component 1 clockwise until tight.
7. Place rubber seal ring onto
component 4, sump side.
10. Place the seal from step 9, over
hole 3 inside the weir, tank side.
2. Place component 1, with rubber
seal in place, into hole 1 inside the
weir, tank side.
5. Disconnect nut and one seal from
component 4 and firmly push onto
component 3. Then ensure rubber
seal ring is located onto the thread.
8. Using two people, fit component
4 (sump side) onto the thread of
component 3 (weir side) and rotate
component 3 clockwise until tight.
11. One person needs to push
component 6 through hole 3,
sump side, ensuring that there is
a rubber washer on each side of
the glass.
3. Place rubber seal ring onto
component 2, sump side.
6. Place component 3, with rubber seal
in place, into hole 2 inside the weir,
tank side.
9. Disconnect nut and one seal from
component 6 and firmly push the
nut onto component 5. NOTE:
if component 5 is not pushed in
sufficiently, it will be too tall for the
black acrylic grill.
12. The other person places component
5 into the weir, ready to tighten
onto component 6.
STEP-BY-STEP PIPEWORK INSTALLATION
16

13. Tighten both components.
Turn component 5 clockwise
and component 6 anti-clockwise.
16. Push the flare nozzle assembly
onto the 90° elbow. PTFE tape or
silicone (not supplied) can be used
for a tighter push-fit.
DO NOT SOLVENT WELD
14. Ensure elbow on component 5 is
inline and facing the hole that is in
the weir comb. *We recommend
using solvent weld to glue the
elbow in position.
17. Take clear PVC hose ready to fit
onto component 6.
15. Place acrylic weir comb inside.
NOTE: The weir comb should be
loose to allow for expansion.
18. Firmly push the clear PVC hose
onto component 6, threaded
hosetail.
Optimum
water height
in weir
Display tank
water height
Removable
strainer
Emergency
Overflow (3)Outlet
Assembly (1)
STEP-BY-STEP OUTLET ASSEMBLY INSTALLATION
EA REEF PRO
(900 / 1200 / 1500)
EA REEF PRO
(600 CUBE)
EA REEF PRO
(1800)
VIEW FROM
FRONT OF TANK
VIEW FROM
FRONT OF TANK
VIEW FROM
FRONT OF TANK
17

COMPLETING THE INSTALLATION
EQUIPMENT
SUMP PIPEWORK
Your eaReefPro aquarium, sump and cabinet comes supplied without any equipment, so
that you can fit your own personal choice of lighting, filtration and pumps to power your
reef tank. For extra help with this please contact your marine specialist retailer.
You will also need:
Sump pump, Heater/chiller, Protein skimmer, Filter sock and holder (or other form of
mechanical filtration), Reactor(s), Lighting, Auto Top-Off device, Flow pump(s)
Components 2 and 4 have been supplied to be long enough to ensure perfect “Herbie”
style operation and water return to sump.
If using filter socks and holders, you may wish to shorten components 2 and 4 using a
hack saw.
Component 2 can also be dis-assembled at the double union ball valve.
Ensure that the double union ball valve is hand tight on both unions at all times to
prevent leaks.
We recommend cleaning the aquarium and sump at this stage and to vacuum out any bits
of silicone or debris that may be there. Be careful not to scratch the glass.
NEVER ATTEMPT TO CLEAN THE AQUARIUM WITH A SHARP, BLADE-LIKE OBJECT
AS THIS MAY DAMAGE THE SILICONE BOND AND SCRATCH THE TANK AND
INVALIDATE THE WARRANTY.
Using the 4 plastic screws and nuts provided,
simply fit the adjustable baffles into position
and thread the screws through the open
sections in the baffle plates and tighten the
nut on the opposite side. The plates can be
fitted to either side of the glass dividers.
Level the plate by adjusting the screws to
level the plate and re-tighten when happy.
Unscrew and re-screw the nuts to vary the
baffle plate heights.
HAND TIGHTEN ONLY - Never use tools
A spare nut and
bolt is provided.
SUMP - FITTING ADJUSTABLE BAFFLE PLATES
18

SETTING THE WEIR RUNNING HEIGHT
Optimum
water height
in weir
Display tank
water height
VIEW FROM
REAR OF TANK
VIEW FROM REAR OF AQUARIUM
Removable
strainer
Emergency
Overflow (3)
Outlet
Assembly (1)
STEP 1 - Ensure that main tank and sump are filled with water.
STEP 2 - Turn red handle on ball valve to fully open.
STEP 3 - Turn on sump pump.
STEP 4 - Start to close ball valve by turning red handle in small increments.
STEP 5 - Water level in back of weir will start to rise and overflow into the emergency
overflow pipe (component 3).
STEP 6 - Open and close ball valve in tiny increments until weir water level is just in line
with the top of the emergency overflow pipe (component 3).
STEP 7 - Over the next hours and days make small adjustment to ball valve to get the
system running almost silently. A DC controllable sump pump may also help to
get the water level adjustment in the weir just right (not supplied).
For more information on “Herbie” style overflow and how to regulate them, here is a useful
webpage: http://gmacreef.com/herbie-overflow-reef-tank-plumbing-method-basics
The weir overflow will
work at its optimum
performance when
the water level is at
the top during normal
operation, with a slight
trickle going down the
Emergency Overflow
(3). This is a better
method than trying to
perfectly adjust the
valve to match the
return pump flow.
19

USING THE ADJUSTABLE BAFFLES
Most closed reef systems employ the use of a protein skimmer in their sumps. Every protein
skimmer manufacturer, and model, recommend a different optimum water height for it to run
in, which may cause problems with conventional fixed baffle glass sumps.
One way is for the manufacturer or tank builder to take an average sump running height of
say 200mm, but with recommendations varying between 150mm and 250mm or more, for
some makes and models this average can be far from ideal.
eaReefPro and eaReefPro Sumps employ a clever system of moveable height baffles, enabling
the user to set the baffle height in the sump to exactly what their skimmer model needs for
best performance. By employing the same methodology in the second sump chamber, water
level can be raised there too, to best accommodate filters, reactors or algae refugiums, and
raised either single or in tandem, the water volume in the sump can be increased and set by
the user.
Adjusting the height
To raise the adjustable baffles simply slide them up, firmly, by hand. To make sure they
stay in place simply tighten the plastic nuts and bolts by hand. Don’t overtighten as they will
break. To lower the baffles simply slide them down and again tighten the nuts and bolts.
Left or right?
Every eaReefPro Sump comes complete with two blue acrylic baffles and these can be fitted
either on the left or right of the glass partitions.
What height to set it at?
The eaReefPro Sump is designed so that at its lowest setting, water depth in the (first)
skimmer chamber will be 190mm. Vertical height adjustment from 190-250mm water depth
should accommodate every sump based, home aquarium protein skimmer on the market, and
skimmer manufacturers should state the optimum water depth in their literature. The right
water level will mean the skimmer can produce the maximum amount of bubbles for the least
effort, meaning more efficient skimming.
When is a baffle too high?
Baffle height adjustment is an advanced reefkeeping feature, a certain amount of experience,
knowledge and common sense is assumed by the user. If the baffles are moved up to their
highest position and a high water flow-through is used water may back up, risking flooding.
If both baffles are operated at their highest position and large sump based skimmers and
reactors are used, the system must first be power-cut tested, to ensure it won’t flood. Not
only will the sump be holding more water before the power-cut, it will then also receive more
water from the weir above, and from the skimmer and reactor bodies as they empty.
All users should fully flood test their sumps by turning off all power after any baffle height
adjustment.
20
This manual suits for next models
4
Table of contents
Other Evolution Aqua Other manuals
Popular Other manuals by other brands

Biocontrol
Biocontrol iMan Startup guide

LAMBORGHINI
LAMBORGHINI VISA 24 CS TOP - SCHEMA manual

logicenergy
logicenergy LeNETmobile Installation and user guide

PASCO
PASCO MINI LAUNCHER ME-6825A Instruction manual and experiment guide

Panasonic
Panasonic PVD4742 - DVD/VCR DECK operating instructions

Conceptronic
Conceptronic CLLRCMCE user guide