Evolution Technologies Sierra Air User manual

ÉTAPE UN>>
Assemblage de votre ambulateur:
ÉTAPE DEUX>>
Vérification des freins et des roues:
ÉTAPE TROIS>>
Entretien et soins de votre ambulateur Sierra Air:
Pliage, dépliage et transport de votre ambulateur:
Freins de stationnement:
Ajustement des freins:
Réglez les poignées à la hauteur prescrite en ajustant les poignées
et les boulons de poignée:
Informations sur les réparations en usine>>
Installation du panier:
Assistance:
Votre concessionnaire Evolution le plus proche sera heureux de vous aider pour l'assemblage et
l'entretien de votre ambulateur.
Sierra Air
Sierra Air
1. Lorsque vous recevez votre ambulateur, vérifiez soigneusement le contenu. Signalez immédiate-
ment à votre concessionnaire ou à Evolution tout article manquant:
2. Le contenu de tous les ambulateurs « Evolution » est le suivant:
a. Ambulateur complet replié avec siège et poignées préinstallés.
b. Une paire de poignées (attacées à I’ambulateur par des câbles de freins)
c. Un panier souple pliable. d. 2 poignées, 2 boulons de poignées e. Dossier.
f. Carte d’enregistrement de la garantie g. Manuel d’utilisation h. Coussin de siège souple
3. Assemblage du dossier :
a. À l’aide d’un tournevis Philips, retirer les vis, les rondelles et les écrous de leurs points d’ancrage du
support dorsal.
b. Insérer le support dorsal sur un côté et aligner les trous du support dorsal avec le point d’ancrage
(schéma 1).
c. Insérer une vis, une rondelle et un écrou puis bien serrer (schéma 2).
d. Refaire la même opération avec l’autre côté
1. Le système de freinage d’Evolution est sécuritaire et simple d’utilisation. Tenez (en tirant) les
poignées de frein pour stationner.
2. Vérifiez le système de freinage. Les roues devraient rester verrouillées lorsque les freins de stationne-
ment sont enclenchés.
3. N’enclenchez pas les freins de stationnement lorsque l’ambulateur est en mouvement. Ceci
pourrait endommager les roues de manière permanente.
4. Enclenchez toujours les freins de stationnement avant d’utiliser le siège.
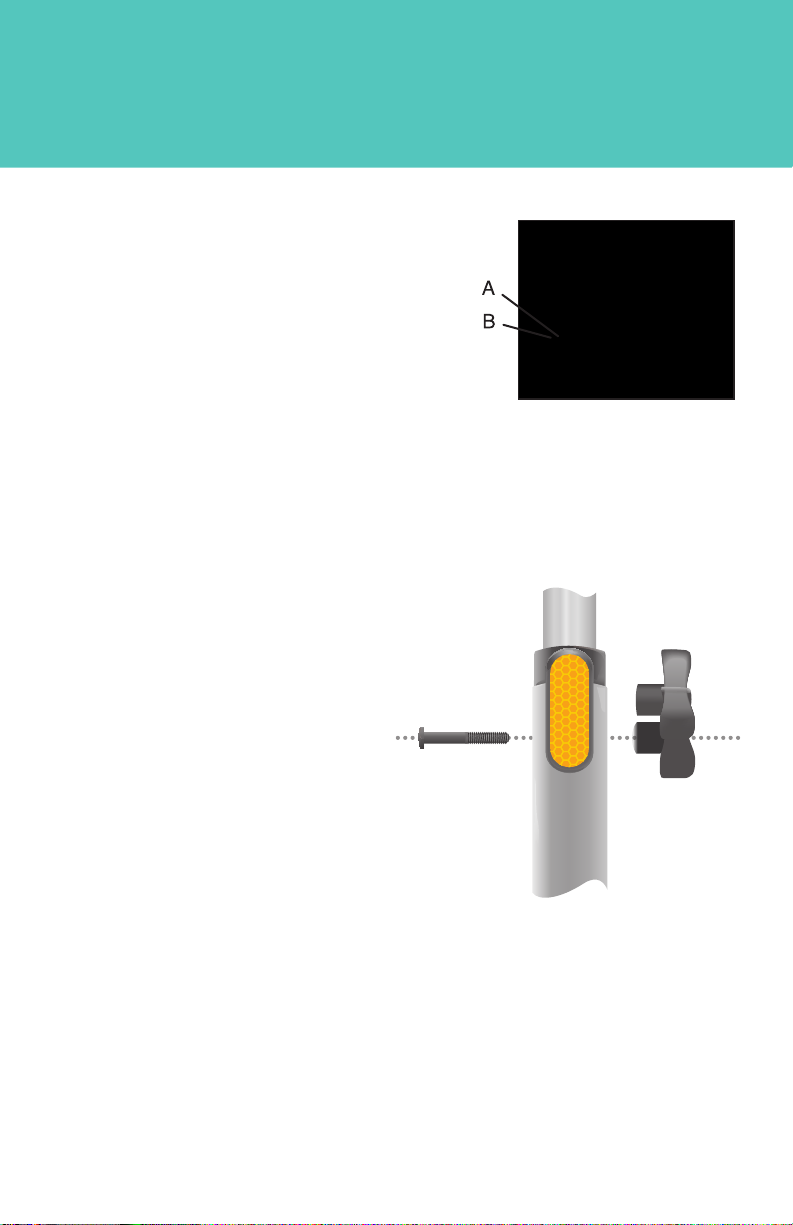
1. Réglez le câble de frein de temps en temps pour assurer un freinage
adéquat. Pour serrer le frein. desserrez le réglage des freins A & B. Testez
les freins pour assurer I’herméticité. Lorsque I’herméticité désirée est
atteinte, serrez A.
2. Vérifiez l’herméticité de l’écrou et des boulons régulièrement.
3. Vérifiez l'intégrité du cadre et des pneus au moins une fois par mois.
Pour REPLIER votre ambulateur Sierra Air, tirez sur la poignée centrale sur siège et l'ambulateur restera
debout.
Pour DÉPLIER l’ambulateur Sierra Air, poussez simplement la poignée vers le bas au milieu du siège en
vous assurant que l’ambulateur est verrouillé complètement en position ouverte.
Précaution: Assurez-vous que la poignée centrale du siège est au même niveau que le siège avant de
vous assoir.
Pour transporter l’ambulateur lorsque celui-ci est replié, prenez simplement la poignée centrale et
soulevez l’ambulateur en le transportant de côté comme une valise.
Freins:
Enclenchez les freins en tirant les deux poignées de frein vers le haut. Ne marchez pas lorsque les
freins sont enclenchés.
Pressez les deux freins vers le bas jusqu’à ce que vous entendiez un clic. Assurez-vous toujours que les
deux freins sont bien enclenchés. Tirez vers le haut pour relâcher les freins de stationnement. Lorsque
vous utilisez le siège, les deux freins DOIVENT être verrouillés pour votre sécurité.
De temps en temps, il faudra régler la tension du système de câble de frein. Pour augmenter la tension
du câble de frein, desserrez simplement le boulon de réglage A, dévissez I’extrémité de la molette B et
faites environ quatre tours complets DANS LE SENS INVERSE DES AIGUILLES D’UNE MONTRE. A et B se
trouvent à l’arrière de la poignée de frein. Lorsque la tension désirée est atteinte, resserrez I’écrou. Ce
réglage ne nécessite aucun outil.
Pour régler les poignées à la hauteur désirée,
placez-vous derrière l’ambulateur à hauteur des
épaules. Les poignées devraient se trouver à la
même hauteur ou légèrement plus haut que le
poignet de l’utilisateur. Un thérapeute pourrait
conseiller une hauteur de poignée diérente
selon les besoins particuliers de l’utilisateur.
Pour régler les poignées, enlevez la poignée et
tirez le boulon hexagonal, ajustez la poignée à la
hauteur désirée ou prescrite et insérez le boulon
hexagonal en vous assurant que la partie
hexagonale du boulon soit ajustée adéquate-
ment au trou hexagonal sur le cadre de l'Sierra
Air et serrez la poignée convenablement.
Précaution: Ne serrez pas trop fort.
Pour installer le panier pliant souple, pliez légèrement le déambulateur et enroulez l'attache
auto-agrippante autour du cadre du déambulateur
La devise d’Evolution est de « s’engager à fournir une qualité et un service inégalés ». Notre but est de
vous orir le meilleur service du secteur. Si vous rencontrez des problèmes avec votre ambulateur
Evolution ou que vous avez besoin d’aide, veuillez:
1. Examinez votre documentation: Des documents imprimés seront envoyés avec votre ambulateur
Sierra Air. Ils contiennent les guides d’entretien et les informations d’installation.
2. Appelez ou rendez visite à votre concessionnaire Evolution: Il pourra vous aider et déterminer
si la garantie de votre ambulateur est admissible.
3. Communiquez avec le service à la clientèle d’Evolution au: 1-8000-556-2558 (États-Unis et Canada)
4. Ajustez la hauteur de la poignée. Mettez les boulons de poignée de I’intérieur. Serrez convenable-
ment.
Précaution: Ne serrez pas trop fort.
Quelques points à retenir:
La garantie ne couvre que les défauts de fabrication. Si les problèmes rencontrés avec votre déambula-
teur sont dus à une mauvaise utilisation, tels que des bordures, des portes à ouverture forcée, de l'usure,
etc., ils ne seront pas couverts par la garantie. Nous nous réservons le droit de déterminer si votre
déambulateur a été mal utilisé.
De plus, la garantie ne couvre que les pièces nécessaires à la réparation des défauts.
Chaque déambulateur est livré avec une sangle de verrouillage pour maintenir le déambulateur en
position pliée lorsqu'il n'est pas utilisé. Pour utiliser la sangle de verrouillage, pliez le déambulateur et
verrouillez la sangle de verrouillage à l'extrémité opposée. Pour défaire la sangle de verrouillage,
dévissez le loquet de l'extrémité opposée et la sangle se déverrouille.
Sangle de verrouillage:

1. Upon receiving your walker, please check the contents carefully. Report any missing items to your
dealer or place of purchase immediately:
2. Contents of your walker are as follows:
a. Folded walker complete with main frame, seat, handles, and wheels already installed.
b. A pair of handles (attached to walker by brake cables)
c. A soft folding basket
d. Two handle adjustment knobs and two knob bolts
e. Back support
f. Warranty Registration Card
g. Owner’s Manual
h. Soft seat cushion
3. Backrest Assembly
a. Using a Phillips screwdriver, remove screws, washers and nylock nut from back support anchor
points.
b. Insert back support on one side and align holes of back support and anchor point (figure 1).
c. Insert screw, washer and nut and tighten securely (figure 2).
d. Repeat for second side.
STEP ONE >>
Putting your walker together:
STEP TWO >>
Checking the brakes and wheels:
1. Adjust brake cable from time to time (see Brake Adjusting)
2. Check tightness of nut and bolts regularly.
3. Check frame and tire integrity at least once a month.
To FOLD your walker, pull on the seat center handle and the walker will remain standing up.
To UNFOLD the walker, simply push down on the handle in the middle of the seat making sure the
walker locks in the fully open position.
Caution: Ensure the center seat handle is level with the seat before sitting.
To carry the walker while folded, simply pick it up by the center handle and lift the walker carrying it at
your side like a suitcase.
Apply the brakes by pulling both brake handles upwards. Do not walk with brakes on.
Press down on both brake handles unbrakes are engaged. Pull upwards to release the parking brakes.
When using the seat, press down on both brakes until you hear a distinct click sound. Always make sure
both brakes are engaged in the locked position (down) before sitting on the walker. Do not sit on the
walker without the brakes on and do not use the walker as a wheelchair.
STEP THREE >>
Maintenance and care of your walker:
Folding, Unfolding, and Carrying your walker:
Brake Adjusting:
Brakes:
Parking Brakes:
Your nearest Evolution dealer will be pleased to assist you with the assembly and/or maintenance of
your walker.
Assistance:
Adjust handles to prescribed height by adjusting the handle knobs and knob bolts:
Installing Basket:
Factory Repair Information >>
Warranty only covers manufacturer defects. If the problems with your walker are deemed to be the
result of improper use, such as hitting curbs, hit-opening doors, wear & tear, etc., it will not be covered
under warranty. We reserve the right to determine if your walker has been misused.
Furthermore, the warranty only covers the parts required to x the defects.
A few things to remember:
Sierra Air
To install the soft folding basket, fold the walker slightly and wrap
the hook-and-loop fastener around the frame of the walker
4. Adjust handle height. Put Knob Bolts through from inside. Tighten until it is snug.
Caution: Do Not Overtighten.
1. The Evolution braking system provides safety and ease of operation. Hold (squeeze) to brake and
press down on the brake handle for parking.
2. Check braking system. The wheels should stay locked while parking brake is activated.
3. Do not activate parking brake while walker is moving. This may cause permanent damage to the
wheels.
4. Always activate parking brake before using the seat.
From time to time you might need to adjust the tension on the
brake cable system. To increase the tension on the brake cable
simply loosen brake adjusting nut “A”, unscrew the knurled
end piece “B” and turn it COUNTER CLOCKWISE about four
complete turns. “A” and “B” are found at the back of the brake
handle. When desired tension is reached, retighten the nut. No
tools are necessary to perform this adjustment.
To adjust the handles to a suitable height, stand behind the walker with your shoulders level. The
handles should be at the same height or slightly higher than the user’s wrist. A therapist might suggest
a dierent handle height to accommodate a specific need for the user.
To adjust the handles, remove the knob and pull
the hex bolt out, adjust the handle to the
prescribed or desired handle height and insert the
hex bolt, ensuring that the hexagonal part of the
bolt fits properly on the hexagonal cut out on the
frame of the walker, and tighten the knob snugly.
Caution: Do not over-tighten.
Evolution’s motto is ‘Committed to Providing Unsurpassed Quality & Service’. Our goal is to provide you
the best service in the industry. If you encounter problems with your Evolution Walker or need help,
please:
1. Review your documentation: You will find printed documentation shipped with your Evolution
walker. They contain maintenance guides and installation information.
2. Call or visit your Evolution dealer: They will be able to give you the assistance you need or determine if
your walker is eligible for warranty repair.
3. Alternatively, contact Evolution Customer Service at: 1-800-556-2558 (U.S. and Canada). We will be
more than happy to assist you in locating a dealer nearby.
SA1.4
Each walker comes with a lock strap to keep the walker in the folded position when not in use. To use
the lock strap, simply fold the walker and latch the lock strap to the opposite end. To undo the lock
strap, gently twist the latch o of the opposite end and the strap will unlatch.
Lock Strap:
Table of contents
Other Evolution Technologies Mobility Aid manuals