evoralight Ethos User manual
Introduction
Tools Needed
Welcome to évoralight: Brighter Together. Our premium LED tape lights are designed and
manufactured to become purpose-centric lighting solutions. Lighting made for humans, by
humans. Continue along to read more about proper installation, safety instructions, and
warranty information.
Our products are safe to use and free from
any hazardous substances. To comply with
UL standards and inspections, please keep
in mind that:
A Class 2 power supply is to be used with
each run of lights.
Each installation of LED strip lights in
series should consume no more than
100W maximum.
Español:
Se debe utilizar un transformador de Clase 2 cuando
es necesario ajustarse a las normas de seguridad UL.
La instalación no debe exceder un máximo de 100W
cuando se conecta la tira LED en serie.
UL Listing and Compliance Information
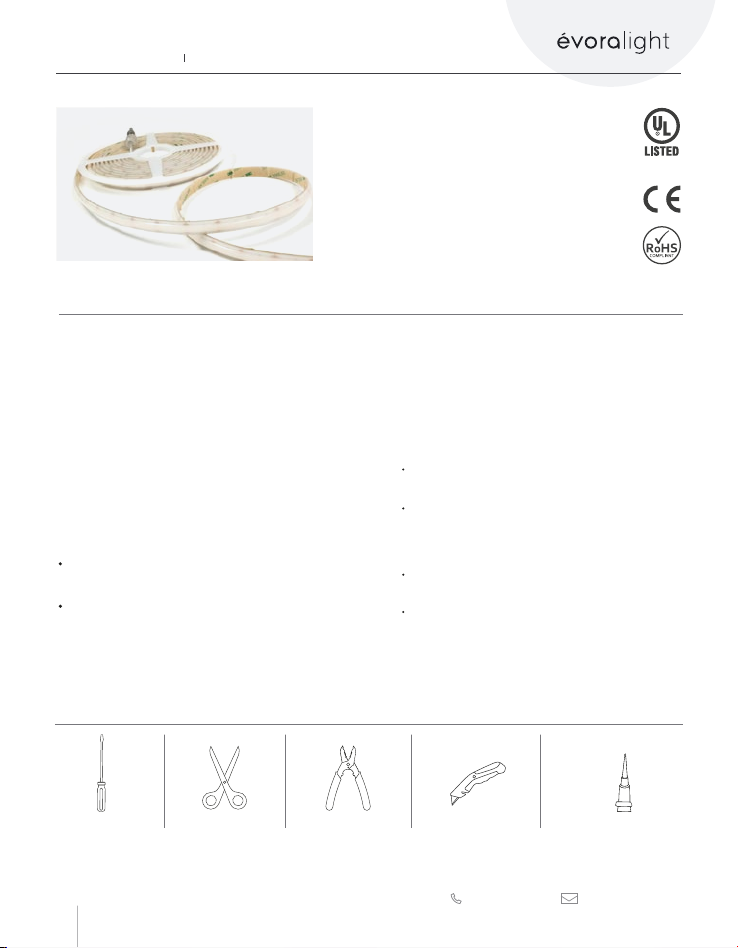
Ethos™Wet Location
LED Strip
Installation Guide
E515294
Français:
Pour être conforme aux règles de sécurité, une
source d'alimentation de Classe 2 doit être utilisée.
L'installation ne doit pas dépasser un total de 100W
lorsque les bandes LED sont montées en série.
Screwdriver Scissors Pliers Utility knife Silicone Sealant*
*Neutral-based electronics grade silicone sealant
Installation Guide Ethos™ Wet Location LED Strip
www.evoralight.com
01 844.964.1600 [email protected]

Installation Guide Ethos™ Wet Location LED Strip
Component Check
Installation Instructions
Make sure that you have everything you need to complete the installation.
Make sure that all components are compatible.
Do not exceed the maximum run length of your Ethos™ Wet Location LED Strip, as this may
cause voltage drop and unwanted effects.
Before installation, make sure to complete a mock installation to test your lights and turn
them on to make sure all components are working correctly.
Ethos™ Wet
Location
LED Strip
Front caps
(included with
the LED Strip)
End caps
(included with
the LED Strip)
EVO Wet Location
Connectors for
Single Color LED
Strip Lights
LED Driver
Complete a Mock Installation
01
Troubleshoot If Needed
02
Connect your LEDs to your dimmer and power
supply. It is very important to do this before
cutting your tapes or sticking them on a surface.
Turn on your lights and check to see if everything
is working properly.
The strips should light up after connecting them to
your dimmer and power supply. If they do not,
please check your connections and make sure the
polarity matches all the way through from the
power supply to the LED strip (positive to positive,
negative to negative).
Before installing your lights, check to see if the brightness level and color temperature you chose for your
project look the way you envisioned. You will be ready to proceed with the installation after testing your
lights and components.
www.evoralight.com
02 844.964.1600 [email protected]
Installation Guide Ethos™ Wet Location LED Strip
Turn the power off at the circuit breaker to avoid
any possible injury.
Turn Power Off
at Circuit Breaker
03
Measure the tape light to the required length. Using
sharp scissors, cut only along the indicated cut
marks. Make sure that you cut straight along the
strip’s cut point to ensure a proper seal if using end
caps or connectors. As a reminder, cutting the strip
does void the IP67 nature of the strip as customer
modifications cannot be guaranteed an IP rating.
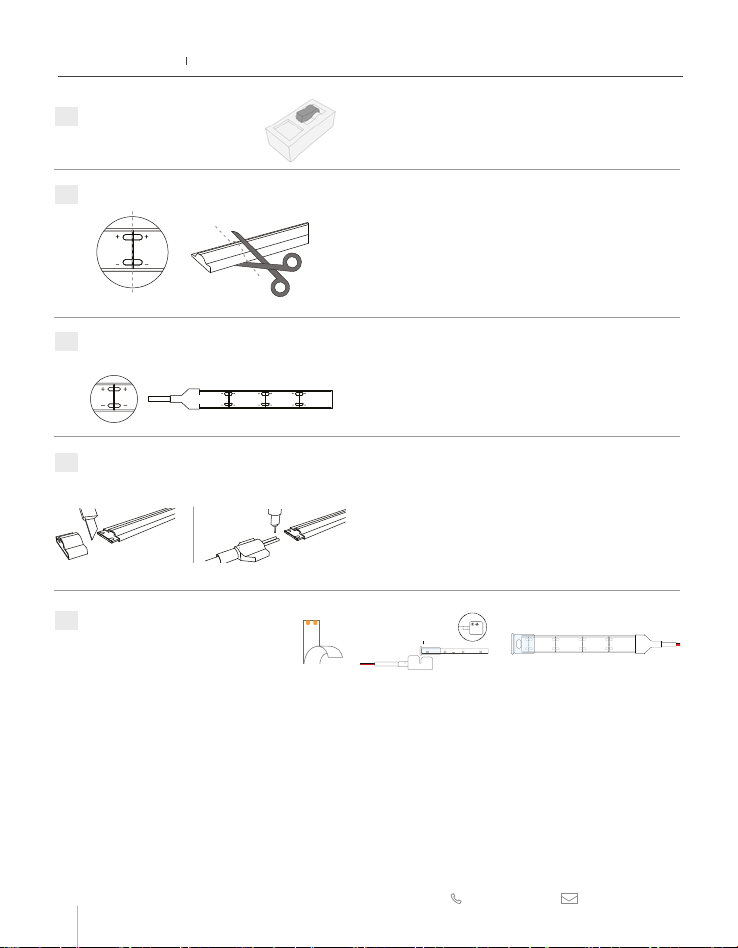
Cut LED Strip to Required Length
04
When installing separate segments of the LED
strip together by soldering or using connectors,
always make sure the polarity is matched from one
strip to the next.
Ensure Polarity is Matched
Throughout the Setup
05
For the front caps, cut 3mm off the silicone cover.
Grab the front cap and slide it through the wire.
Then, solder the wire to the solder pads on the
strip. Fill the front cap with silicone and make sure
it is properly adjusted before letting the sealant
cure according to its instructions.
When using the end caps, repeat the last step.
Solder Additional Wire
and Add End Caps
06
If you don’t want to solder wire to the strip, you can also use our EVO Wet Location connectors, sold
separately. Carefully peel off 2” of the adhesive tape and tape cover from the back of the LED strip and push
it back to make room for the connector. This will allow the silicone to seal properly and ensure that water is
not pulled into the seal.
Coat the open end of the strip and approximately 1” of the top of the strip in silicone sealant. Due to the dome
shaped nature of the strip, sealant does need to be applied to the top to fill in the gaps on the sides. Slide the
transparent case of your EVO wet location connector into the sleeve, until the strip is making proper contact
with the end of the clear plastic. Then, grab the white plastic part of your connector and push the metal
contacts through the window of the transparent case. Adjust it with pliers until you hear a click, and then let
the sealant cure according to its own instructions.
Installing EVO
Wet Location Connectors
(optional)
07
3M
3M
www.evoralight.com
03 844.964.1600 [email protected]

Apply Silicone Sealant
08 Apply silicone sealant generously around the end
of the connector to ensure that any gaps are filled
between the strip and the connector to create a
watertight seal.
Retest the Setup
09
Test the strips again to make sure they all light up
and are functioning properly before the final
installation. Once you have verified all segments
are working, you’re ready to install them.
Prepare Surface
for Installation
10 Thoroughly clean any surface where you will be
attaching your LED tape lights. The adhesive
backing is strong, but will not stick to dirty, dusty, or
porous surfaces. Before attaching the tape, make
sure to clean metallic surfaces, including aluminum
channels, with an alcohol solution.
Attach the LED Strip onto Surface
11 Peel the rest of the cover of the 3M tape a few
inches at a time, while gently pressing the strip to
the installation surface. Make sure the strip is
secured on the surface.
Complete All Connections
12 Complete the connections and wiring between
your power supply, dimmers, and controllers. For
more guidance, refer to the system diagrams
below on how to connect your LED Strip to your
driver.
Turn Power On at Circuit Breaker
13 Turn on the power. The Ethos™ Wet Location LED
Strip should light up and work properly.
Installation Guide Ethos™ Wet Location LED Strip
www.evoralight.com
04 844.964.1600 [email protected]

Installation Guide Ethos™ Wet Location LED Strip
System Diagrams
This product has a limited warranty from the date of shipment. Please see the product’s spec sheet
for more details on the actual warranty length. This warranty only includes the main product
outlined in this document and does not include the additional accessories that are used as a
reference. Complete warranty details for fixtures and additional accessories are available at
https://www.evoralight.com/ within the policies section. For warranty related questions please
Warranty
120V AC
Power
+
-
+
-
120V AC Dimmer Switch
LN
G
ELV/MLV Dimming
PWM Dimming
Leona®Smart
Home Controller
120V
AC Power
www.evoralight.com
05 844.964.1600 [email protected]
Installation Guide Ethos™ Wet Location LED Strip
Safety and Warnings
To meet UL requirements, only install with a Class 2 DC Constant Voltage LED driver.
Installation must be in accordance with local and national electrical code regulations. To ensure
safety and correct installation, our strips are intended to be installed by a qualified, licensed
electrician.
Do not turn on your LED Strip when it is still in the plastic reel. This will cause a buildup of heat
that can damage the LEDs.
Do not directly hook the DC strip up to an AC wall outlet.
Do not twist, fold or crease LED Strip.
Do not bend LED strips horizontally (sideways). It is only intended to bend vertically.
Do not place excessive pressure on the LED surface.
Pay attention to the input voltage of the LED strip light and never exceed that voltage,
even briefly.
Only cut the LED strips on the designated cut markings.
Our Ethos™ Wet Location LED Strip is IP67 rated. Please keep in mind that cutting the strip
voids the IP rating.
01
02
03
04
05
06
07
08
09
10
Contact
844.964.1600
@evoralight
@evoralight
www.evoralight.com
06 V 06-30-23
Table of contents
Other evoralight Lighting Equipment manuals

Popular Lighting Equipment manuals by other brands


Verhor
Verhor NE-028 user manual

Springdale Lighting
Springdale Lighting STA11265 Assembly instructions

Eliminator Lighting
Eliminator Lighting MEGA FLAT HEX PAK User instructions

Godox
Godox LED308W II instruction manual

Iluminarc
Iluminarc Colorist Panel 8Qa Quick reference guide

Chauvet
Chauvet MotionOrb user manual