Exabyte EXPERT 7 User manual

August 1995 EXPERT 1
User’s Guide
EXPERT 7
Exabyte Performance Evaluation Regression Tester

2 EXPERT August 1995
Copyright
Copyright 1989, 1990, 1991, 1992, 1994, 1995 by Exabyte Corporation. All rights reserved. This item and the
information contained herein are the property of Exabyte Corporation. No part of this document may be
reproduced, transmitted, transcribed, stored in a retrieval system, or translated into any language or
computer language in any form or by any means, electronic, mechanical, magnetic, optical, chemical,
manual, or otherwise, without the express written permission of Exabyte Corporation, 1685 38th Street,
Boulder, Colorado 80301.
Disclaimer
Exabyte Corporation makes no representation or warranties with respect to the content of this document
and specifically disclaims any implied warranties of merchantability or fitness for any particular purpose.
Further, Exabyte Corporation reserves the right to revise this publication without obligation to notify any
person or organization of such revision.
EXPERT, the Exabyte Performance Evaluation Regression Tester, is provided to Exabyte customers under
special agreement for internal use only. The EXPERT test software is the property of Exabyte Corporation
and may not be duplicated in full or part without the consent of Exabyte Corporation. Strict adherence to
the terms of this agreement for use is required. Exabyte may, at its discretion, revoke use previleges at any
time and require the return of all material relating to the program.
Trademark Notices
EXABYTE, EXAPAK, EXB, LANCourier, and NetSECURE are registered trademarks of Exabyte
Corporation. EXA, EXATAPE, FileSECURE, Mammoth, and SCIMON are trademarks of Exabyte
Corporation. All other brand and product names are trademarks or registered trademarks of their respective
companies.
Revision History
Rev. Date
000 October 1989
001 March 1990
002 October 1990
003 February 1991
004 June 1991
005 September 1992
006 March 1994
007 August 1995

August 1995 EXPERT 3
Contents
1 Installation and Startup.................................................................................. 5
1.1 Required Equipment........................................................................................................................6
1.2 Obtaining the Software Electronically..........................................................................................7
1.3 Installing the Software from Floppy Disk ...................................................................................8
1.4 Connecting the Cables .....................................................................................................................9
1.5 Starting EXPERT.............................................................................................................................10
1.6 Exiting EXPERT...............................................................................................................................12
2 General Program Operation ........................................................................ 13
2.1 Using the Test Control Screen......................................................................................................14
2.2 Target Selection Menu...................................................................................................................15
2.3 Test Control Menu..........................................................................................................................16
2.4 Device Status Window................................................................................................................... 17
2.5 Main Status Window......................................................................................................................19
2.6 Function Keys.................................................................................................................................. 20
3 EXPERT Tests............................................................................................... 21
3.1 General Test Guidelines................................................................................................................22
3.2 Tape Drive Tests ............................................................................................................................. 23
4 Toolbox ......................................................................................................... 25
4.1 Toolbox Menu .................................................................................................................................26
4.2 Scan Address....................................................................................................................................27
4.3 SCSI Commands.............................................................................................................................28
4.4 Firmware..........................................................................................................................................31

4 EXPERT August 1995
About EXPERT
You can use the EXABYTEPerformance Evaluation Regression Tester (EXPERT)
software to test the functionality of Exabyte’s range of tape drives or libraries. You can
perform EXPERT functional tests on the following target devices:
8mm tape drives: EXB-8200, EXB-8200SX, EXB-8500, EXB-8500c,
EXB-8205(XL), EXB-8505(XL)
8mm libraries: EXB-10i, EXB-10e, EXB-10h, EXB-60, EXB-120, EXB-210,
EXB-440, EXB-480
4mm tape drives: EXB-4200, EXB-4200c
4mm libraries: EXB-018, EXB-218
Minicartridge tape drives: EXB-2501, EXB-2501c
EXPERT runs on IBM PC-compatible computers with a SCSI host bus adapter (HBA)
card installed. The HBA card allows EXPERT and the target devices to communicate
across the SCSI bus. You can use EXPERT to test up to seven target devices on one
computer.
About This Manual
This manual provides instructions for installing and operating the EXPERT software
starting with version 7.0. Since this version differs significantly from earlier versions of
EXPERT, keep the previous revision of the EXPERT manual if you want to use older
versions of EXPERT.
This manual is intended for anyone who wants to verify proper operation of an Exabyte
product. This manual assumes that you are familiar with tape drive and library
operation and basic SCSI terminology.

August 1995 EXPERT 5
Installation and Startup
This chapter provides the following information:
• Required equipment for installing and using EXPERT
• Instructions for installing EXPERT
• Instructions for starting and exiting EXPERT

6 EXPERT August 1995
1.1 Required Equipment
Before you install EXPERT, make sure you have the following equipment:
• An IBM AT or 386, or compatible computer, with the following:
− DOS 3.3 or later (DOS 5.0 or later recommended)
− Approximately 1.5 MB free hard disk space
− 500 KB available RAM
• A CGA, EGA, or VGA color monitor. Monochrome operation is supported, but not
recommended.
• One of the following HBAs already installed in your system:
− Adaptec ASPI compliant host bus adapter with appropriate ASPI driver.
Other fully ASPI compliant HBAs may work, but have not been tested.
− ASC-88/86
Note: Starting with EXPERT version 7.0, support for Adaptec’s SDS line of
adapters has been dropped.
• A single SCSI cable with sufficient connectors attached to test the desired number of
target devices. A maximum of seven target devices can be attached to a single SCSI
bus.
Note: Although you can attach more than seven target devices to a SCSI wide
HBA and initiate tests for those extra devices, be aware that EXPERT has
not been tested for a configuration of more than seven targets.
• A power supply that meets the power supply specifications for each tape drive you
want to attach.

August 1995 EXPERT 7
1.2 Obtaining the Software Electronically
This section describes how to obtain a recent copy of EXPERT by downloading it from
one of Exabyte’s Bulletin Board Systems (BBSs). If you already have a recent copy of
EXPERT on a floppy disk, skip this section and go to section 1.3, “Installing the Software
from Floppy Disk.”
EXPERT is available for download from Exabyte’s BBSs from several locations world-
wide. (Refer to “Getting Help” in the back of this manual for the phone number of the
BBS nearest to you.) To access an Exabyte BBS, you need a modem (9600 baud or faster)
and software capable of transferring files using the X-modem, Y-modem, Z-modem, or
Kermit protocol. Check the documentation of your file transfer software for details.
1. After logging on to one of the BBSs, go to the File menu, then the List Files area.
EXPERT is located in the DIAGNOSTIC TOOLS (#22) file area.
2. Follow the instructions on the BBS and your file transfer software to download the
file EXPERTxx.EXEto your computer.
Note: The xx characters in the filename denote the version number of the
software. For example, the filename for version 7.0 is EXPERT70.EXE. New
versions of the software will be posted on the BBS when available.
Once the download has completed, you can disconnect from the BBS.
3. Insert a blank, formatted floppy disk (minimum capacity 1.2 MB) in the floppy drive
of your computer.
4. Move to the floppy disk root directory. For example, if you placed the floppy disk in
drive A:, enter the following:
A:
CD\
5. Run the file you downloaded from the BBS. For example, if you downloaded the
software in directory C:\DOWNLOAD, enter the following:
C:\DOWNLOAD\EXPERT
xx
.EXE
The software will self-extract to your floppy disk. Once completed, your distribution
disk is ready to be installed.
6. Go to section 1.3 to install the software on your hard disk.

8 EXPERT August 1995
1.3 Installing the Software from Floppy Disk
This section describes how to install the EXPERT files from the distribution floppy disk
onto the hard disk on your computer.
Important
Before you begin, make backup copies of the distribution disk. This ensures that you
will have the information you need if a disk becomes damaged or if the files are
accidentally erased.
To install the EXPERT software from floppy disk, follow these steps:
1. Move to the root directory on the hard disk of your computer system.
2. Create a separate directory for EXPERT and move to the newly created directory.
3. Insert the distribution floppy disk that contains the EXPERT software in your floppy
disk drive and copy its contents to your hard disk. For example, if your floppy disk
drive is drive A:, enter the following:
COPY A:\*.*
4. If you are using an ASPI compliant HBA, make sure the appropriate ASPI driver is
installed in your CONFIG.SYS file. For example, if you use an Adaptec 1540 series
controller, your CONFIG.SYS file should contain the following statement:
device=aspi4dos.sys
Check your SCSI HBA documentation for details on how to install ASPI for your
adapter. Note that the EXPERT distribution disk does not include ASPI drivers.
Contact your HBA vendor for ASPI drivers.
Note: Starting with EXPERT 7.0, you do not need to load ASC_EMU.COM to use
ASPI compliant host adapters.
5. Remove the distribution floppy disk from the floppy drive and place it in a safe
location in case you need to install the program again later.
6. Go to section 1.4 to connect SCSI cables and connectors.

August 1995 EXPERT 9
1.4 Connecting the Cables
You need to connect a SCSI cable between the HBA and all targets. You also need to
attach an appropriate power supply for each target that does not have an integrated
power supply. Refer to the installation guide for each target for details on SCSI cabling
and power supply requirements.
Notes:
• Make sure that pin 1 of the SCSI cable is connected to pin 1 of the SCSI connectors on
both the HBA and all target devices.
• Make sure that both ends of the SCSI bus have SCSI bus terminators installed. All
other devices on the SCSI bus should have their SCSI bus terminators removed or
disabled.
• Make sure you are using SCSI cables and connectors that meet the requirements
listed in the documentation for each target attached.
• Do not mix single-ended and differential SCSI devices on the same SCSI bus, or you
may damage the attached devices.
• Make sure all attached targets have a unique SCSI ID. Make sure none of the targets
use the same SCSI ID as the host bus adapter.

10 EXPERT August 1995
1.5 Starting EXPERT
This section describes how to start EXPERT and how to specify command line options to
run EXPERT in the mode you desire.
Note: If you have not installed the software yet, do so now by following the steps
in section 1.3.
To start EXPERT:
1. Change your current directory to the directory where EXPERT is installed.
2. Enter the following on the command line, where OPTION is one of the command
line options described below:
EXPERT
- or -
EXPERT /
OPTION
1 /
OPTION
2 ... /
OPTIONx
- or -
EXPERT -
OPTION1 -
OPTION2 ... -
OPTIONx
3. When the EXPERT logo screen is displayed, read the warning notes carefully. Then
press >(17(5@.
Command Line Options
EXPERT supports several command line options, as follows:
Host Bus Adapter options:
/ASPI Detect ASPI compliant adapters only.
/ASC Detect ASC-88/86 adapters only.
Note: If you do not specify either of the Host Bus Adapter options, EXPERT will
first try to detect ASPI-compliant adapters, and then ASC-88/86 adapters.
If it detects multiple adapters, you will need to select the adapter you want
to use from a selection menu.

August 1995 EXPERT 11
Screen options:
/25 Use 25-line screen mode, even if the screen was in 43- or 50-line mode
on startup.
/43 Use 43-line screen mode when available. Recommended for EGA
screens.
/50 Use 50-line screen mode when available. Recommended for VGA
screens.
Log File options:
/NOLOG Disable generation of a log file.
/NRLOG Generate log files for each device separately, using the serial number for
file names.
/LPTLOG Enable real-time logging to a printer attached to printer port LPT1:.
Miscellaneous options:
/SOUND Enable distinct sound generation on test pass/fail results.
When you press >(17(5@, EXPERT’s main screen is displayed. If you have more than one
SCSI Host Bus Adapter installed, you are prompted to select the adapter you want
EXPERT to use. Use the up and down arrows keys to highlight the HBA you want to
use and press >(17(5@.
12 EXPERT August 1995
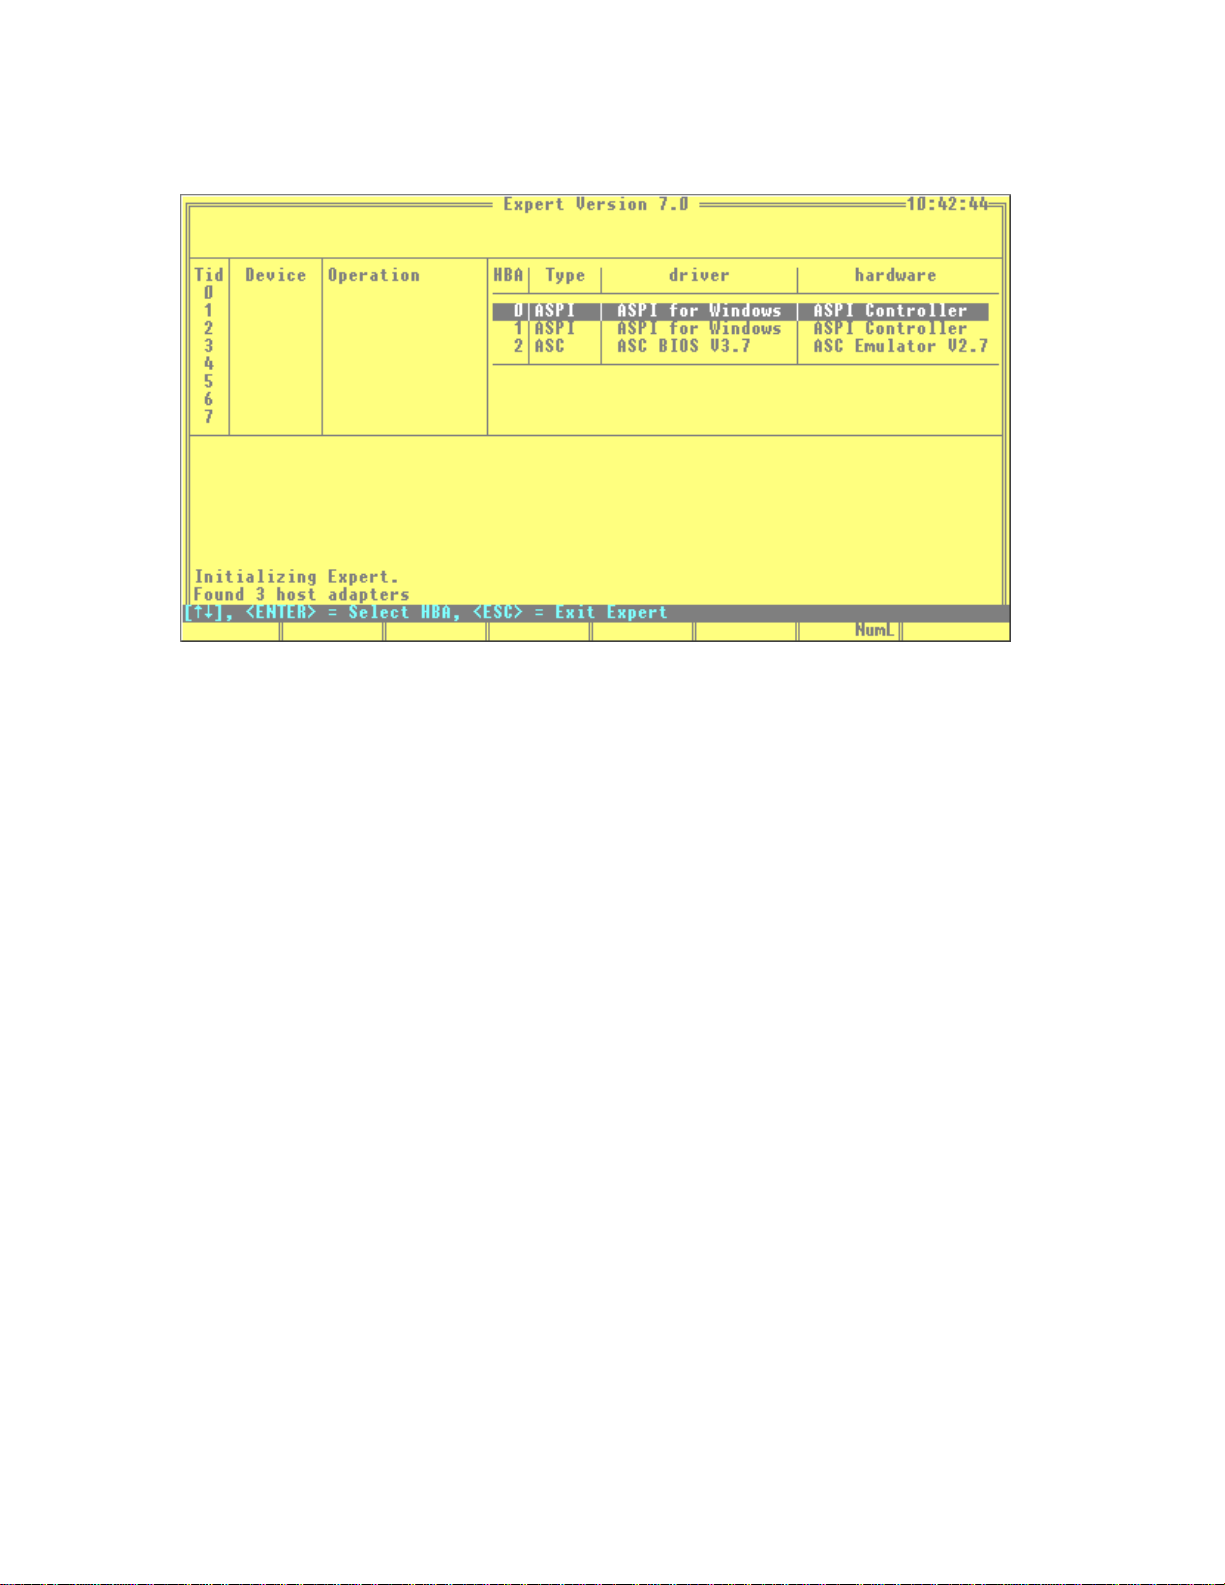
Below is an example of EXPERT’s main screen when three HBAs are detected:
EXPERT will go through its initialization, detecting the SCSI targets attached to the
selected HBA and initializing any attached tape drives and libraries. On some systems
this may take a few moments.
EXPERT is now ready to start testing the devices detected. For general information
about using EXPERT screens and menus, refer to Chapter 2. For information about
testing, refer to Chapter 3.
1.6 Exiting EXPERT
To exit EXPERT from anywhere in the program, press >(6&@ repeatedly until the Exit
Menu is visible in the top section of the screen. Highlight Exit with the arrow keys.
Press >(17(5@ to return to DOS.
EXPERT will attempt to cleanly stop tests that are still running. This may take a few
moments. A warning will be displayed, asking if you want to exit to DOS before
shutdown is completed. If a problem on the SCSI bus prevents a clean shutdown, press
><@ to return to DOS.

August 1995 EXPERT 13
General Program
Operation
This chapter provides general information about screen features, screen colors,
menus and windows, and online documentation.
14 EXPERT August 1995
2.1 Using the Test Control Screen
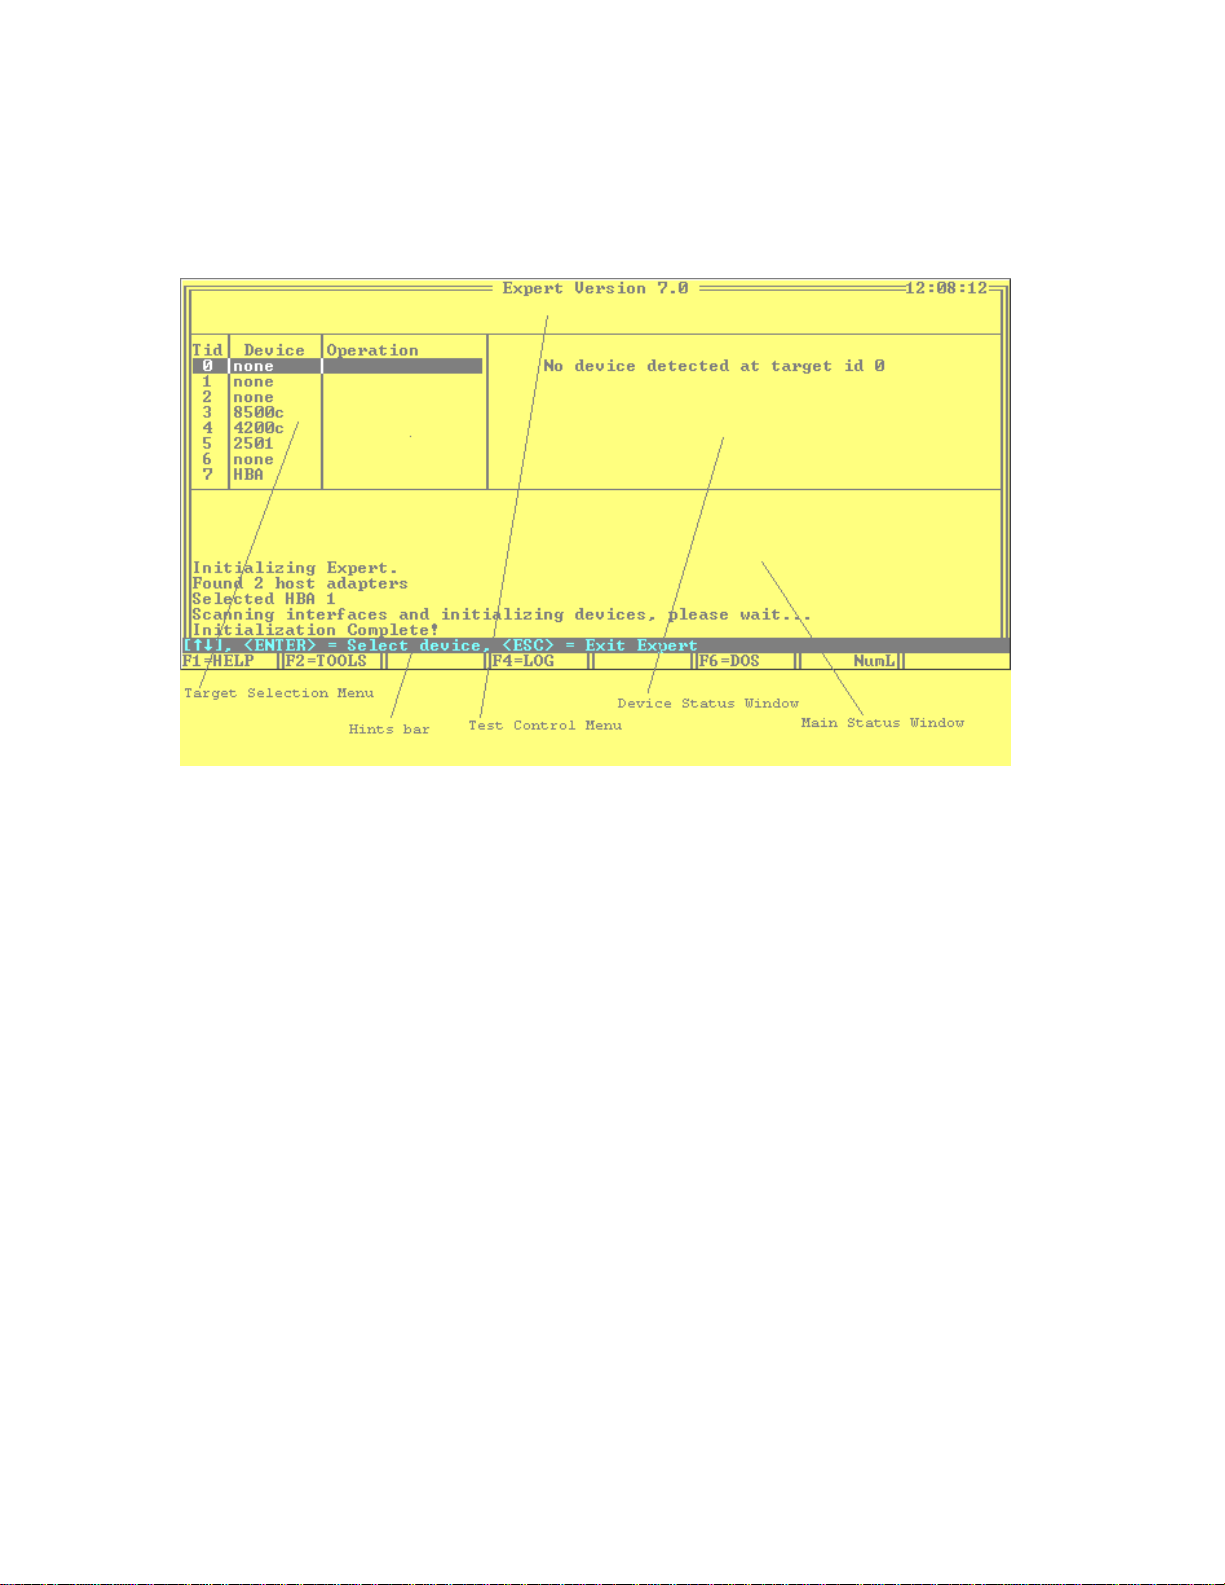
The Test Control screen, shown below, is the main screen used for program operations.
The Test Control screen contains four main windows:
• Target Selection Menu: Allows you to select the target device you want to control.
For more information, see section 2.2, “Target Selection Menu.”
• Test Control Menu: Allows you to select from the available tests, additional menus,
and system operations. For more information, see section 2.3, “Test Control Menu.”
• Device Status Window: Shows detailed information about the currently selected
target. For more information, see section 2.4. “Device Status Window.” This window
is also used by the Toolbox during SCSI command execution and firmware uploads.
For more information, see Chapter 4, “Toolbox.”
• Main Status Window: Shows messages about progress of the tests and general
program operation. This window is also used to display the online documentation
and the log file. For more information, see section 2.5, “Main Status Window.”
Other useful screen sections are a “hints” bar, showing you which control keys are
currently active, and a function key tablet, showing system functions currently
available. For more information, see section 2.6, “Function Keys.”

August 1995 EXPERT 15
2.2 Target Selection Menu
When EXPERT starts, it automatically scans for attached devices on the SCSI bus.
EXPERT determines the Exabyte device type and shows the model next to the target ID
in the Target Selection Menu.
The Target Selection Menu is shown below:
Non-Exabyte SCSI peripherals, such as scanners, hard disks, and CD-ROM drives are
shown as generic devices. EXPERT has no tests available for non-Exabyte devices.
• Use the up and down arrow keys to move the highlighted cursor bar in the Target
Selection Menu to the target you want to control. As you move the cursor bar, the
Device Status Window is updated to reflect the status of the currently highlighted
device.
Note: If you have a SCSI wide adapter installed, you will notice a down arrow
next to Target ID 7. This indicates that more SCSI IDs are available. Use the
arrow keys to move beyond Target ID 7 and show Target IDs 8 through 15.
• Press >(17(5@ to select a test to run. If the highlighted target is already running a test, a
menu is displayed that allows you to pause or abort the current test.
• Press >)@ to activate the online documentation for more details.
• Press >)@ to enter the toolbox (not available if a test is running).

16 EXPERT August 1995
2.3 Test Control Menu
The Test Control Menu consists of two lines: the upper line displays up to eight
selectable tests and the lower line explains what the currently highlighted test will do.
An example Test Control Menu is shown below:
General operation of the Test Control Menu is as follows:
• After selecting the SCSI ID of the target, press>(17(5@. The Test Control Menu appears
at the top of the screen.
• Use the left and right arrow keys to move the highlighted bar to the test you want to
select.
• Press >(17(5@ to execute the highlighted test.
• Press >(6&@ at any time if you do not want to execute any of the tests on the menu.
• Press >)@ to activate the online information on the Test Control Menu.
Note: Some tests require special preparations to run successfully. If the
highlighted test has special requirements, an extra function key >)@ is
available. See section 2.6, “Function Keys,” for more information.

August 1995 EXPERT 17
2.4 Device Status Window
The Device Status Window shows the status of the target currently highlighted in the
Target Selection Menu. It provides details such as the progress of tests currently
running, pass/fail results of previous tests, and statistical information about the
performance of the target. Since different device families have different test parameters,
the information displayed varies from device to device.
Information provided for each target includes:
• Vendor information as found in the SCSI Inquiry data.
• Model information as found in the SCSI Inquiry data. Note that this does not
necessarily correspond to the detected device in the Target Selection Menu. For
example, an Exabyte 4mm drive may return R-BYTE RB-150 in the SCSI Inquiry data
and still be correctly identified as an EXB-4200c.
• Serial number information. If the device has the ability to report its serial number
across the SCSI bus, this window is automatically filled in. If the device has no serial
number support, you are prompted to fill in the number when you start the first test.
You do not need to re-enter the serial number on subsequent tests.
• For tape drives: The amount of data read and written during test operation.
• For libraries: The number of pick and place cycles performed during test operation.
Information specific to 8mm tape drives includes:
• Percentage rewrites that occurred during write operation of the test
• Percentage of successfully performed ECC operations while reading
• Number of tracking errors that occurred during the test
• Number of rereads that occurred during the test
• The maximum allowable value for each of the above parameters
Information specific to 4mm tape drives includes:
• Percentage of write block errors that occurred during write operation of the test
• Percentage of read block errors that occurred during read operation of the test
• Number of rereads that occurred during read operation of the test
• Number of C3 ECC corrections that occurred during read operation of the test
• Internal tape drive temperature
• Number of loads of the tape currently used
• The maximum allowable value for each of the above parameters

18 EXPERT August 1995
Information specific to minicartridge tape drives includes:
• Percentage rewrites that occurred during write operation of the test
• Percentage of successfully performed ECC operations while reading
• Number of positioning errors that occurred during the test
• Number of rereads that occurred during the test
• The maximum allowable value for each of the above parameters
Information specific to libraries includes:
• Element address of each tape drive installed
• SCSI ID of each tape drive installed
Note: Some libraries do not automatically report the SCSI ID of the installed tape
drives. The SCSI ID fields are left blank for these libraries. When the first
test is started, you are prompted to fill in the SCSI ID fields manually.
• Element address of the robot arm (CHM or cartridge handling mechanism)
During execution of a test, the statistics for the highlighted device are updated
automatically every two seconds. This allows you to observe trends in the numbers
returned by the target.
To display hardware and driver information for the HBA used by EXPERT on the
Device Status Window, highlight the HBA in the Target Selection Menu.

August 1995 EXPERT 19
2.5 Main Status Window
The Main Status Window displays all messages generated by EXPERT. This includes
results of tests, failure messages, SCSI command output from the Toolbox, and general
system messages.
The Main Status Window has the following special functions:
• Displays the online documentation when >)@ is pressed
• Displays the test setup requirements when >)@ is active
• Displays the contents of the log file when >)@ is pressed
Refer to section 2.6, “Function Keys,” for more information about these function keys.
In any of the above functions, if the information is too large to fit in the window, a
scrollbar appears. You can use the following keys to browse through the information:
• Use the up and down arrow keys to scroll the information one line at a time.
• Use the >3J8S@ and >3J'Q@ keys to scroll the information one page at a time.
• Use the >+RPH@ and >(QG@ keys to move to the beginning or end of the information,
respectively.

20 EXPERT August 1995
2.6 Function Keys
EXPERT uses the following function keys:
• >)@ - HELP. This key is available throughout the program and is context sensitive. For
example, if you are ready to send a SCSI command from the Toolbox and several
option fields are available, press >)@ to display information related to the option
fields.
• >)@ - TOOLBOX. This key is available in the Target Selection Menu. The Toolbox is
available for each SCSI target address, whether there is a device detected at that
address. The Toolbox is not available for the HBA or for devices that are currently
executing a test.
• >)@ - DETAIL. This key is only available if you are about to start a test that requires
special precautions or requirements. For example, a library test may require
cartridges to be placed in a specific order. Pressing >)@ when it is available displays a
window that operates identically to the HELP function.
• >)@ - LOGFILE. This key allows you to view the contents of the EXPERT log file
while testing continues. The log file viewer has a limit of 32,000 lines. If your log file
grows beyond that size, you must use an external file viewer.
• >)@ - SHELL. This key allows you to shell to DOS without exiting EXPERT. Available
memory in the DOS shell varies with the number of tape drives running tests. Under
extreme circumstances, the available memory may be inadequate for starting a DOS
shell. During execution of the DOS shell, all EXPERT device tests are suspended.
Table of contents
Popular Test Equipment manuals by other brands


LR-Cal
LR-Cal PYROS 375 Series manual

intrepid
intrepid neoECU AVB/TSN user guide

SIRETTA
SIRETTA SNYPER-LTE graphyte quick start guide

PCB Piezotronics
PCB Piezotronics Y482C15 Installation and operation manual

Dixon
Dixon Bayco FT450 instructions

Dwyer Instruments
Dwyer Instruments TDS Series Specifications - Operating Instructions