eXact PipeCut 360 AIR User manual

PipeCut 360 AIR
patents: US 7,257,895, JP 4010941, EP 1301311, FI 108927, KR 10-0634113
FI Käyttöohje x–xx
US Manual xx–xx
FI Espanja xx–xx
FI Ranska xx–xx
23
english english
Blade information for
Exact 360 AIR pipe saws
Exact 360 AIR pipe saws use the
following blades:
• Diamond X 180 and X 165 Discs, for
cutting cast iron only
• Exact ALU 180 and 165, for cutting
aluminum and all kinds of plastics
• Exact Cermet 180 and 165, for cutting
steel and stainless steel
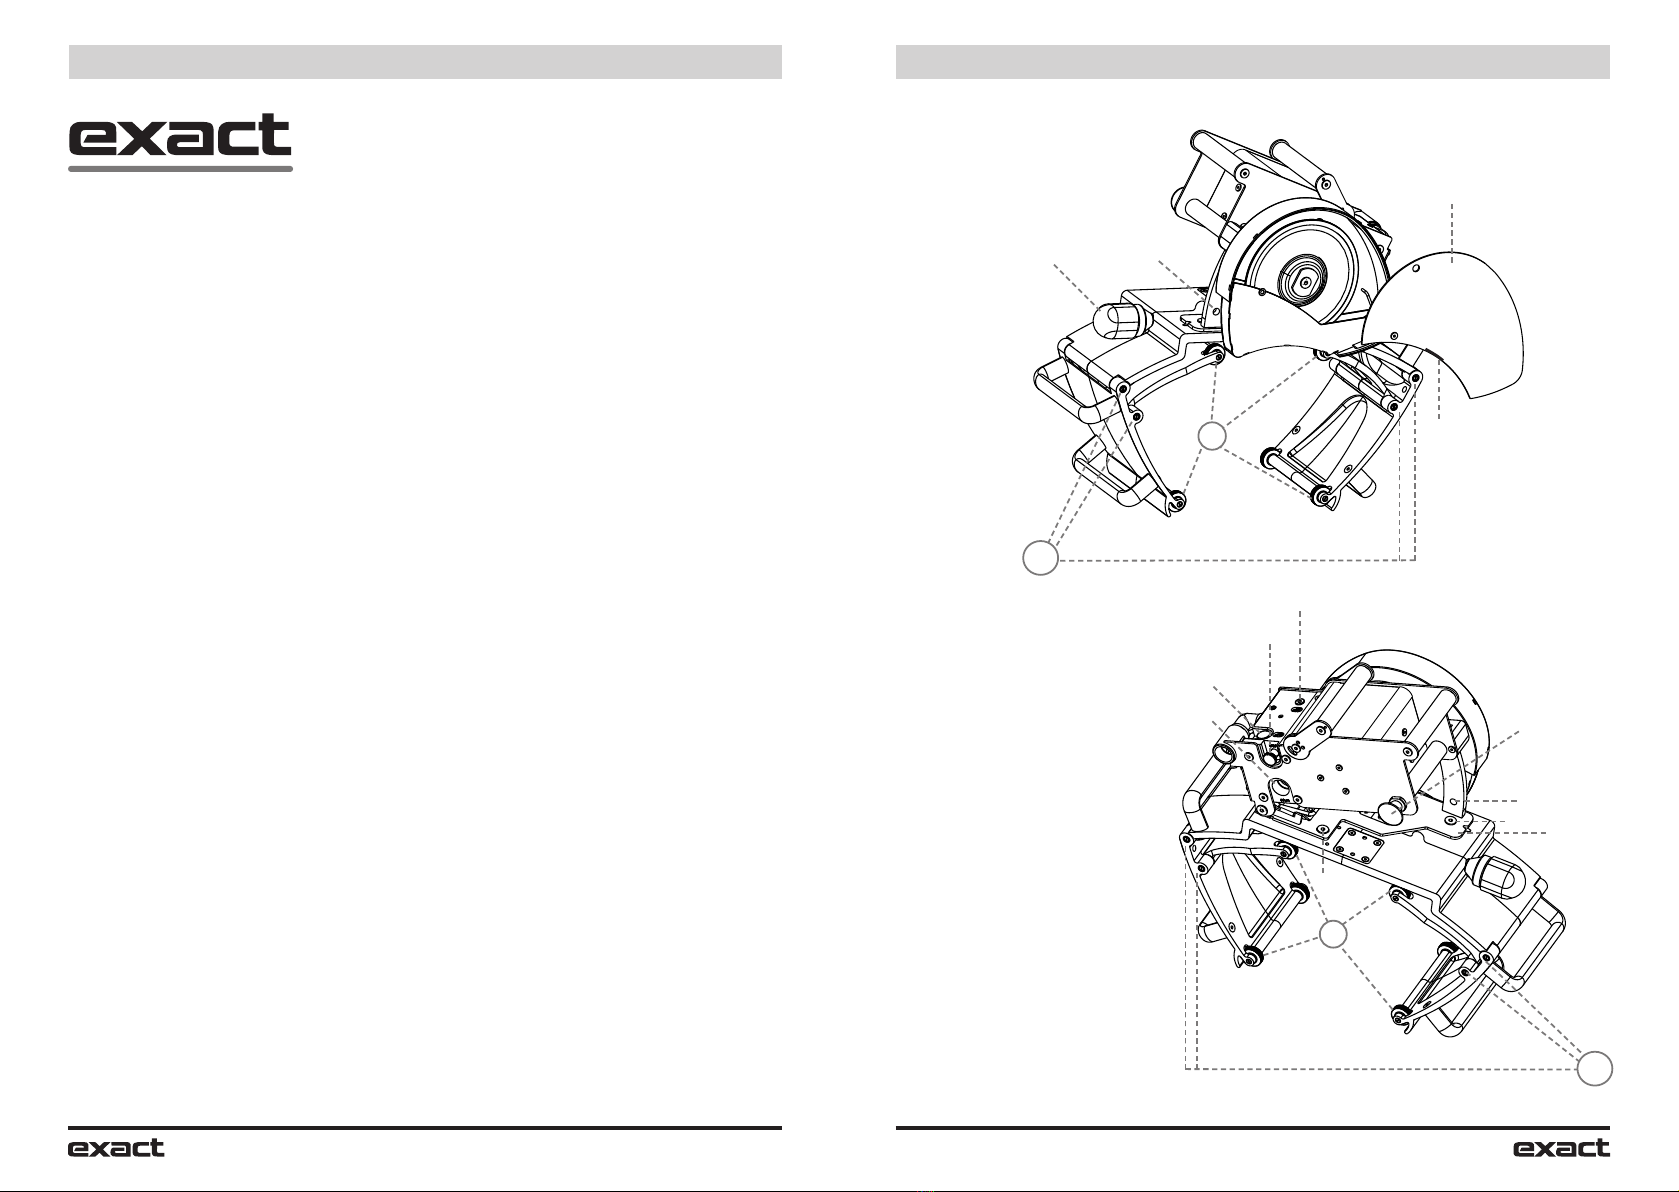
PipeCut 360 AIR
A1 START button
A2 STOP button
(air current shutoff switch)
A3 Locking pin
A4 Gripper adjustment lock
A5 Blade guard
A6 Locking pin hole
A7 Gripper’s wheels and
ball bearings
A8 Adjustment screw
A9 Adjustment screw
A10 Adjustment pointer
A11 Inlet coupling
A12 Measuring edge
A13 Oil tank cap
A14 Gripper’s joints
A4 A6
A5
A12
A14
A7
A13
A6
A3
A9
A8 A10
A1
A11
A2
A7
A14
PICTURE A

45
english english
SafetyIntroduction
Safety information
Personal protective equipment
WARNING
Intoxicants:
Drugs, alcohol, and medications may
weaken attention, judgement, and/or the
ability to concentrate. Impaired reexes,
unsteady balance, hallucinations, and
miscalculations may cause serious work-
place accidents such as personal injuries,
damage to tools and property, or death.
Never use the tool if you are under
the inuence of alcohol, intoxicating
medications, and/or drugs.
If you know about, or notice someone
using alcohol, drugs, or intoxicating
medications, make sure that he or she
is not using the tool.
WARNING
Danger of being caught in moving parts
Do not wear loose jewelry, clothing,
or uniforms. Make sure that possible
shirtsleeves, shoelaces, and/or pants
cuffs cannot be caught by the machine’s
moving parts or become entangled
with any other object or natural feature
at the job site.
To minimize the danger of choking,
make sure that any collar, tie, or hood
cannot become entangled with the
device, cords, or accessories.
To minimize the danger of entanglement,
make sure that hair and headgear
cannot be caught by the device’s
moving parts, cords, or accessories.
Personal protective equipment must conform
to the applicable health and safety require-
ments. Always use the following personal
protective equipment:
• Hard hat conforming to occupational safety
requirements.
• Sufcient hearing protection.
• Safety goggles or visor for eye protection.
• Cut-resistant safety gloves.
• Non-skid safety shoes conforming to
occupational safety regulations.
• Breathing mask.
Installation, use, and
maintenance:
precautionary measures
WARNING
Explosives and flammable materials,
liquids, and gases: Danger of explosion
If used in explosive atmospheres, the tool
may cause an explosion and/or re.
Explosions are dangerous and may cause
extremely serious accidents, injuries, or
death. Because the tool often creates
sparks while sawing, it must never be used
near any kind of potentially explosive or
highly ammable material, liquid, or gas.
Thoroughly familiarize yourself with the
national, state-specic, and local safety
instructions related to working near or
among, explosive materials.
Never use the tool near explosives or
highly ammable materials, liquids, or
gases.
Never work in highly ammable or
explosive atmospheres.
Make sure that your work area has
no hidden gas sources or explosives.
If there are explosives, highly ammable
materials, liquids, or gases at your job
site, make sure that they do not pose
a danger and cannot come into contact
with sparks created by the saw.
Operating, safety, and
servicing instructions
You now have the use of a completely new
type of tool. Developed as a safe alterna-
tive to dangerous tools used to cut round
pipes, the extremely effective Exact 360
AIR has been designed to cut various types
of metals and plastics. It is absolutely
essential that you carefully read and under-
stand these operating, safety, and servicing
instructions before using the pipe saw.
Keep this manual conveniently within reach
of all pipe saw users. Make sure that all
persons using the saw have read and
understood the dangers and operating
instructions specied in this manual, and
always follow the rules and regulations
provided by occupational safety agencies.
The Exact 360 AIR pipe saw is for profes-
sional use only.
Personal safety precautions
and requirements
Make sure that the job site where you are
working complies with all national, local,
and state-specic occupational safety
regulations. Only trained persons familiar
with all general safety regulations, as well
as the possible dangers occurring at job
sites, may use this tool. Failure to follow
the instructions specied in this manual
may cause serious personal injury, damage
to the tool, or a hazardous situation.
Installation, storage,
maintenance, and disposal
This tool may be installed, stored, main-
tained, and disposed only by persons who:
• are physically able to handle the size,
weight, and power of the device.
• are familiar with all relevant national,
state-specic, and local safety regula-
tions, as well as precautionary measures
aimed at accident prevention.
• have read and understood these
operating instructions.
• have not ingested alcohol, drugs, or
medications impairing alertness or
the ability to work.
Use
Only professionally capable persons may
use this tool.
Users are capable if they:
• are able to handle the size, weight, and
power of the device.
• are trained to use this device according
to national, state-specic, and local
instructions.
• are familiar with, and understand, all
national, state-specic, and local safety
regulations, as well as precautionary
measures aimed at accident prevention.
• have read and understood this manual.
• have not ingested alcohol, drugs, or
medications impairing alertness or the
ability to work.

67
english english
Safety Safety
WARNING
Electric shock
If the device comes into contact with electric
circuits or other power sources, it may
cause serious injury or death. Always make
sure there are no cables, wires, or circuits
running inside or near the pipe to be cut
that could conduct electricity to the device
or user.
Do not work near electrical circuits or
other sources of electric currents.
Make sure that your working area has
no hidden electrical circuits and that
the pipe to be sawn is not in contact
with any kind of electrical circuit, power
source, cable, wire, or transformer.
Make sure that any water coming
from inside the pipe or existing at the
job site does not cause the danger of
electric shock, and that no water comes
into contact with any kind of electrical
circuit, power source, cable, wire, or
transformer.
WARNING
Compressed air can cause serious injuries.
Always close the air feed, release the
pressure from the piping, and detach
the tool from the air feed when it is
not being used, repaired, or adjusted,
for example when blades are being
replaced.
Never change blades or service the
tool while it is still connected to the
compressed air source. Always make
sure the device is detached from
the compressed air source when
performing an inspection or servicing
operation. Make sure that the motor
is completely shut off and that the
hoses are not pressurized.
WARNING
Danger of vibration
Avoid exposure to vibration; it can damage
the nervous system as well as hinder blood
circulation in hands and arms. This may
in turn cause pain in sensitive joints and
possible old injuries.
Always use sharp blades whose
condition has been checked. A faulty
or damaged blade must never be used
for sawing, and should be replaced
with an intact blade. Dull, damaged, or
faulty blades may intensify vibration.
Avoid exposure to vibration. Long-term
exposure to vibration may cause
injuries to the user’s joints and/or
nervous system.
Only professional technicians may test
the Exact 360 AIR pipe saw. The pipe saw
may not be tested or serviced by persons
untrained in the servicing of pneumatic
tools. Servicing personnel must be autho-
rized to test these kinds of tools and use
a pneumatic system according to national,
state-specic, and local regulations.
Safety information
• Overspeed caused by excessive air
pressure should be avoided with the
pressure regulators. Recommended
pressures and air quantities must not
be exceeded when using the machine.
Excessive pressure or air quantities may
cause the breakage of the machine,
blade, and accessories, or a hazardous
situation resulting in serious personal
injury or damage to the equipment.
• Couplings and air hoses must be in good
condition. Check the couplings, air hoses,
and compressor before use. Never work
with a damaged coupling, air hose, or
compressor.
WARNING
Only use blades displaying
the Exact brand name:
Exact ALU 180
Exact ALU 165
Exact Diamond X 180
Exact Diamond X 165
Exact Cermet X 180
Exact Cermet X 165
Do not use other manufacturers’
blades. Exact Tools blades are high
quality and have been designed
specically for the Exact 360 AIR
pipe saw.
See the manual’s Operating Instructions,
page 17.
WARNING
Failure to comply with these operating
instructions may result in serious injuries
or death.
Make sure that the pipe being cut is
correctly supported, and that each end
of the pipe on both sides of the sawing
point cannot collapse uncontrollably as
the pipe is being cut.
Make sure that sparks do not endanger
people or materials. Sparks may cause
accidents if they come into contact with
ammable materials, liquids, or gases.
See the section Explosives and
Flammable Materials, Liquids and Gases,
page 5.
Personal protection equipment must
be used as described in the chapter
Personal Protection Equipment, page 5.
Slipping, stumbling, or falling must be
indicated as the reason for a serious
accident or fatality. Watch out for exces-
sively long hoses left at the job site.
Work carefully in unfamiliar locations.
For example, hidden electrical cables
may cause a danger.
Maintain a balanced position and a
steady foothold.
If an improperly installed or damaged
tool vibrates excessively, react quickly.
Shut off the device or cut off the air
pressure if possible.
Stay clear of spinning blades; the rotary
motion may continue for several seconds
after the air feed has been shut off. Do
not detach the pipe saw from the pipe
before the spinning motion has stopped.
Note that compressed air left in the
hose can cause an unintentional
startup. Always empty the hose care-
fully after use. Never detach a
pressurized hose.
If there is a fault in the energy feed,
press the STOP button (Picture A2).

89
english english
General safety regulations
To reduce the risk of personal injuries, any-
one who uses, installs, repairs, or services
this tool, replaces its parts or works in its
vicinity, must have read and understood
these instructions.
Our objective is to manufacture tools that
enhance working safety and efciency. The
most important safety factor for this and
any other tool is ITS USER. Your diligence
and judgement are the best protection
against accidents and injuries. Because
all possible risk factors cannot be treated
in this manual, only the most important
are mentioned. Only professionally trained
users may install, adjust, or use this com-
pressed air tool. This tool or its parts may
not be altered in any way. Do not use this
tool if it has been damaged. If the rating
plate displaying the nominal speed or
operational pressure, or stickers warning
of dangers, are no longer legible or have
become detached, they must be replaced
immediately.
Consult the following sources for further
occupational safety-related information:
• Other guidelines and bulletins provided
with the tool.
• Your employer, professional association,
and/or labor union
• “Safety Code for Portable Air Tools”,
(ANSI B186.1), at the time of publication
available from the Global Engineering
Documents organization at:
http://global.ihs.com/ or telephone
number 1 800 854 7179. If procuring
the ANSI standards is difcult, contact
the ANSI organization at:
http://www.ansi.org/
• Additional information concerning
occupational health and safety is
available from the following websites:
Safety Safety
http://www.osha.gov (USA)
http://europe.osha.eu.int (Europe)
Dangers related to the compressed air
feed and couplings
• Compressed air can cause serious injuries.
Always check the condition of the cou-
plings, compressor, and hoses before use.
• Always turn off the air feed, release the
pressure from the pipes and/or hoses,
and detach the tool from the air feed
source when it is not being used, repairs
are being made, or parts are being
changed. After the shutoff, the hose is
emptied by pushing the START button
(Picture A1) to cut off the compressed
air ow. The machine will run for a few
seconds, after which the hose will be
emptied of air. Watch out for the spinning
blade and make sure that nothing has
been caught in the saw’s blade or other
parts. Open the coupling only when you
are sure that the hose is unpressurized.
• Never point a compressed air hose at
yourself or anyone else. Always make
sure that the compressed air cannot
send objects or materials ying
dangerously towards yourself or others.
• Compressed air hoses waving around
uncontrollably are extremely dangerous
and can cause serious injuries to people,
as well as damage to equipment,
materials, and the surroundings. Always
check that the hoses and couplings are
intact and tightly closed. Make sure that
couplings are always secured with a
durable safety wire. Check the safety
wire’s condition and durability before use.
• If you use a quick coupling, always make
sure that the couplings are intact. Always
use a safety wire loop to prevent the
hoses’ uncontrolled loosening if the
coupling breaks. Check the use of the
couplings with the applicable safety
instructions provided by the manufacturer.
Read the installation instructions carefully.
• If general purpose threaded couplings are
used, locking pins must also be installed.
• The air pressure must not exceed 6.3
bar (90 PSI) or the pressure specied on
the tool’s rating plate. Exceeding the
pressure recommendation can result in
the machine’s breakage or a hazardous
situation.
• Check the hose’s condition before
installation. A broken or worn out hose
may cause a hazardous situation.
Danger of catching
• Stay clear of spinning grinding disks or
blades. Note that the blade will continue
to spin after the closing of the START valve
and it may continue spinning for several
seconds.
• Entangled clothes, gloves, jewelry, ties,
scarfs or long hair in the tool or its acces-
sories can cause choking, scalp injuries,
and/or deep wounds.
Never open the blade guard (Picture A5) if
you are not sure if the blade or grinding disk
has stopped spinning.
Danger caused by flying objects
• The machining of steel and other materials
can quickly generate ying debris. Even
small objects can injure the eyes and
cause blindness.
• Always use impact-resistant protective
goggles and a safety mask when operating
the tool, working nearby in repair and
servicing areas, or changing parts.
• Make sure that other users in the same
area are also wearing protective goggles
and safety masks.
• Make sure that the pipe to be cut is rmly
supported. A weakly or improperly supported
pipe may cause a hazardous situation.
• Make sure that the sparks generated by
the machine can never, under any circum-
stances, come into contact with ammable
and/or potentially explosive materials or
liquids.
• Make sure that sparks or shavings pose
no danger to other persons at the job site.
Equipment-related risk factors
• Before changing a blade, always shut off
the air feed, release the air pressure from
the hose and detach the tool from the air
feed source.
• Use only the recommended sizes and
types of blades.
• Never use a damaged blade. Always check
the blade’s condition before use.
• Check the blade’s attachment before use.
For more detailed instructions, see the
Changing Blades section, page 18.
Operational risks
• Users and servicers must be able to
physically handle the tool’s size, weight,
and power.
Safety information
• Hold the tool properly: be ready to react
to any abnormal or sudden movement –
keep both hands ready.
• Never use the tool unless the blade is
aligned with the material to be cut.
• The Exact 360 AIR is designed to be used
with a blade guard that must always be in
place to provide protection from shavings
and other debris. Never operate a pipe
saw if the blade guard is improperly
attached.
• Never move the machine while the motor
is running or the blade is rotating.
• Do not use the tool if you are tired or your
alertness has become impaired for health
reasons.
• Do not start working if your foothold or
balance is unsteady. Falling while holding
a saw can cause a hazardous situation.

10 11
english english
Dangers caused by repetitive movements
• When operating the tool, the user may
experience discomfort in hands, arms,
shoulders, the neck, and other parts of
the body.
• Work with a comfortable but secure
stance and avoid an awkward or un-
balanced working position. Varying your
position during longer tasks can minimize
discomfort and fatigue.
• Do not ignore symptoms such as
continuous or periodic discomfort, pain,
anxiety, ache, tingling, numbness, a
burning sensation, or stiffness. Stop
using the tool, inform your employer,
and contact a doctor.
Dangers of noise and vibration
• Loud noises can cause permanent hearing
defects and other problems such as
tinnitus. Use the hearing protectors
recommended by the employer or occupa-
tional health and safety regulations.
• Exposure to excess vibration can cause
crippling injuries to the nervous system,
as well as the blood circulation in hands
and arms. Dress warmly and keep your
hands warm and dry. If you experience
numbness, tingling, pain or paleness of
the skin, stop using the tool, inform your
employer, and contact a doctor.
• Hold the tool correctly without excess
effort; the risks caused by vibration gener-
ally increase if you grip the tool too tightly.
Avoidance of unnecessarily high noise and
vibration levels:
• Use and service the tool and select,
maintain, and change the equipment and
accessories according to these operating
instructions.
• Use sound attenuation materials to
minimize the noise generated by the
sawed pipe’s resonance.
Job site-related dangers
• Do not use the saw in areas or on terrain
where there is the danger of falling or slip-
ping. Make sure that your working position
is as steady as possible and that you have
a secure foothold.
• Always make sure that the ditch or shaft
in which you are working is properly rein-
forced and that its edges are not in danger
of collapsing. Make sure that the terrain is
not in danger of giving way or settling.
• If the cutting operation is in a ditch or
trench, access to the STOP button may be
limited. Always have a co-worker be ready
to turn off the air feed to the tool in the
event of an emergency. A separate air feed
with a shutoff device can also be used
for emergency situations.
• Make sure that there are no underground
electrical cables, gas sources, ammable
materials, or other potentially dangerous
objects that could cause a hazardous
situation.
• Slipping, stumbling, or falling can result in
a serious accident or death. Watch out for
hoses at the job site or working platform.
• Avoid the inhalation of dust and vapors, as
well as the handling of job site waste that
could cause health hazards such as, for
example, cancer, birth defects, asthma,
and/or dermatitis. Use dust extraction
equipment and a breathing mask when
the material to be cut releases airborne
particles.
• Some sawing generates dust containing
chemicals that, according to the state of
California, can cause cancer, birth defects,
and other reproductive harm.
Examples of these kinds of chemicals include:
• lead from lead-based paints,
• crystalline silica from bricks, cement, and
other masonry products,
• arsenic and chromium from chemically-
treated rubber.
Your risk from these exposures will vary
depending on how often you do this type
of work.
Safety Environment
Environment
Separate collection. When your Exact 360
AIR machine is worn out, do not dispose of
it with normal household waste; the product
must be recycled separately. The separate
collection and recycling of used products
and packaging facilitates the recovery of
materials, reduces environmental pollution,
and decreases the demand for raw
materials. Local regulations allow the
delivery of households’ pipe saws to
municipal waste dumps or a dealer when
buying a new product.
To reduce your exposure to these chemicals,
work in a well ventilated area and use
approved protective equipment such as dust
masks specically designed to lter out
microscopic particles. Working without
the appropriate protective equipment is
prohibited.
• Be extremely careful when working in
unfamiliar work surroundings; there may
be hidden dangers such as electrical
cables, as well as gas, water, or other
pipes.
• This tool is not intended for use in poten-
tially explosive atmospheres, nor is it
insulated to provide protection from
electric shock if it comes into contact
with an electrical power source.
DO NOT DESTROY – GIVE TO THE USER
Rating plate and stickers
The product is furnished with a rating plate
and stickers displaying important safety
and product information.
Rating plate with following information:
Exact PipeCut 360 AIR
Serial number ………
Pressure max. 6.3 BAR (90 PSI)
Air ow max. 3.9 m3 / min (140 cfm)
Blade 180 mm or 165 mm (7” or 6.6 inch)
Max no-load speed 4000 rpm
Exact Tools Oy
Särkiniementie 5 B 64
FI-00210 Helsinki
Finland
www.exacttools.com

12 13
english english
Guarantee Operational instructions
Operational instructions
Pipe saws are designed with a gripper unit
that ensures the saw’s secure attachment
to the pipe. The saw is attached by turning
the gripper adjustment lock (Picture A4)
and by tightening it securely to the pipe.
Make sure that all of the gripper’s wheels
turn freely and that there is no sand or
debris between the joints. If debris or sand
is present, the gripper must be cleaned
before beginning the work. If a fault is
detected in the gripper unit’s mechanism,
the saw cannot be used.
Guarantee
The guarantee’s terms became effective
on 1 January 2017. If Exact 360 AIR saw
becomes unusable due to material or
manufacturing faults during the guarantee’s
period of validity, we will repair the Exact
360 AIR pipe saw or supply a new or
factory-reconditioned Exact 360 AIR saw
free of charge according to our discretion.
Guarantee period
The Exact Tools guarantee is valid 12
months from the date of purchase.
The guarantee is valid only if:
1. a dated purchase receipt is furnished to
the authorized servicing company or it is
downloaded on our website in connection
with the registration of the guarantee.
2. the Exact 360 AIR saw has not been
misused.
3. no attempt has been made by non-
approved persons to repair the saw.
4. the Exact 360 AIR saw has been used
according to these operating, safety,
and servicing instructions.
5. the Exact 360 AIR saw has been
delivered to an authorized servicing
company during the guarantee’s period
of validity.
Note:
The Exact 360 AIR saw should be
furnished to an authorized repair shop
with delivery expenses paid. If the Exact
360 AIR saw is repaired within the scope
of the guarantee, the product will be
returned with the delivery expenses paid.
If the Exact 360 AIR saw is not repaired
within the scope of the, guarantee, the
delivery expenses will be the customer’s
responsibility.
Guarantee’s limitations:
The guarantee does not the cover following
parts, services, or damages:
- Saw blades and diamond blades
- Gripper unit’s wheels.
- Blade ange.
- Attachment ange.
- Pulling ange washer.
- Normal wear.
- Misuse or faults and damages resulting
from accidents.
- Water, re, and physical damages.
- Motor breakage or other damage caused
by dirt or an unsuitable grade of oil.
- Damages resulting from the use of
air whose purity level falls below its
reference value.
- Damages resulting from the use of air
volumes or air pressures exceeding their
reference values.
As a result of continuous product develop-
ment, the information in this manual
may change. Changes are not announced
separately.
Before using the pipe saw, check that:
• the sliding lower blade guard slides freely.
• the motor unit’s locking mechanism
functions perfectly.
• the gripper unit’s wheels turn freely.
• the compressed air’s pressure and out-
put comply with the manual’s recommen-
dations.
• the pipe to be cut is rmly supported on
both sides of the cutting point.
• the compressed air hoses have been
attached properly.
• the safety wire preventing the hose’s
detachment from the machine is securely
in place.
• you have the right type of blade,
specically designed to cut the material
to be sawed, installed in the machine.
• the blade is in good condition and is tight.
PICTURE A
A1 START button
A2 STOP button
(air current shutoff switch)
A3 Locking pin
A4 Gripper adjustment lock
A5 Blade guard
A6 Locking pin hole
A7 Gripper’s wheels and ball bearings
A8 Adjustment screw
A9 Adjustment screw
A10 Adjustment pointer
A11 Inlet coupling
A12 Measuring edge
A13 Oil tank cap
A14 Gripper’s joints
A13
A6
A3
A9
A8 A10
A1
A4 A6
A11
A2
A7
A5
A12
A14
A7
• you have the proper personal protection
equipment as specied in the operational
safety section of this manual.
• there is enough oil in the oil tank.
NOTE: the motor will not start if there is
not enough oil in the oil tank. If the oil
starts to run low during the sawing, the
motor will shut off and not start before
the oil tank has been lled.
Start the motor by pushing the START
button (Picture A1). Make sure that STOP
button (Picture A2) has been pulled to its
out-position. If the STOP button is at its
in-position, the motor will not start. Begin
sawing as soon as possible after the
motor has been turned on to avoid running
the motor unloaded or at overspeed.

14 15
english english
Determination of pipe’s sawing point
Mark the sawing point on the pipe to be cut
in a way that deducts one inch from the
required measurement. The blade’s point of
contact with the wall of the pipe is one inch
from the measuring edge in the direction of
the saw’s gripper unit. Always keep in mind
that the measuring edge is set one inch
more than, or correspondingly less than,
the required measurement depending from
which direction the required dimension is
being calculated.
Attachment of pipe saw to pipe
Place the pipe saw above the pipe to be
sawn, ensuring that the gripper encloses the
pipe to be sawn. The diameter of the pipe
saw’s gripper can be adjusted with the gripper
adjustment lock (Picture A4). Place the pipe
saw at the desired position by using the
measuring edge part of the blade guard.
(Picture A 12). Adjust the gripper unit ac-
cording to the pipe’s diameter by turning the
pipe saw’s gripper adjustment lock (Picture
A4) and tightening the saw against the pipe.
Make sure that the compressed air hose or
any other object is not caught between the
gripper and the pipe to be cut. Never begin
sawing if your ngers, or any other improperly
placed clothes or other tools, are between
the gripper and the pipe. Also remove any
possible sand and/or other debris from
under the gripper. Make sure that the saw
travels freely. If the saw is not moving proper-
ly, detach the saw from the pipe and check
the gripper’s wheels and ball bearings, (Picture
A7) cleaning and oiling them if necessary. If
the saw’s gripper unit has been damaged, the
machine cannot be used until it is repaired.
Piercing and sawing of pipe wall
Make sure that all persons working near
the pipe saw have the appropriate personal
protection equipment.
Firmly grip the saw’s operating handle
(Picture D1) with your right hand and hold
the gripper adjustment lock (Picture A4)
with your left hand.
Pierce the pipe’s wall by gently pushing
the pipe saw’s operating handle directly
downwards with an even pressure until
the blade has cut through the pipe’s wall
and the motor unit has locked in the
sawing position. You will feel the locking
when the locking pin (Picture A3) snaps
into the slot designed for it (Picture A6)
and moves slightly to the right.
Now that the pipe saw is locked in the
sawing position and you can safely begin
the pipe’s circular sawing. Never feed the
saw in the wrong direction.
Filling of oil tank
When the oil tank’s piston is visible in the
oil level sight glass, and the motor is not
running other than by pressing the Start
button, oil should be added to the oil tank.
The piston must always be pressed down-
wards when oil is being added.
Make sure that the pressure has been dis-
connected from the saw and that the intake
hose is detached. Unscrew the oil tank’s
cap. Use a clean tool such as a screwdriver
to press the oil tank’s piston into the down-
ward position. This pressing is done through
the hole in the oil cap. While pressing, make
sure that the threading inside the hole
remains undamaged. After pressing, the
piston will no longer be visible in the oil level
sight glass. The best way to ll the oil tank
is with a hypodermic syringe. The volume
of the tank is approximately 0.05 liters, or
about 3 cubic inches. After the lling, screw
the oil tank cap back in place. Any possible
oil spillage should be carefully wiped away.
NOTE! The level of the oil, for example at
the halfway mark, may be visible in the
tank’s oil level sight glass. This does not,
however, indicate the actual level of the oil.
The position of the piston, also visible in the
oil level sight glass, provides the only true
indication of the amount of oil in the tank.
When the piston has been pushed down it is
no longer visible in the oil level sight glass.
D1 D2
D3
D6
D4
D5
PICTURE D (Pipe cutting)
D1 Handle 1
D2 Handle 2
D3 Handle 3
D4 Handle 4
D5 Handle 5
D6 Handle 6
1. 2. 3. 4.
Release the motor unit to the upper posi-
tion by pulling the locking pin (Picture A3)
and press the STOP (Picture A2) button
immediately to turn off the motor. Always
avoid using the motor without loading.
Operational instructions Operational instructions
The feeding speed is selected according to
the pipe’s material and wall thickness. An
excessive feeding speed can damage the
blade, overload the pipe saw, and cause
a poor sawing result. Control the feeding
speed during the entire duration of the
cutting. Never completely let go of the saw
while cutting.
The pipe’s circumferential sawing
consists of four steps:
1. Begin the sawing by feeding the pipe
saw forward while gripping the handles
(Picture D1 and D2) until you have
sawed approximately one-fourth of
the pipe’s circumference.
2. Change your grip on the handles:
(Picture D4 and D5) now the pipe saw’s
own weight helps the feeding motion
and you can also slightly brake the
feeding speed.
3. When the pipe saw is under the pipe,
change the position of your grip on the
handles (Picture D2 and D3) and pull
the pipe saw forward and upwards until
you have sawed approximately three-
fourths of the pipe’s circumference.
4. Once again change the position of your
grip on the handles (D1 and D6) and
feed the pipe saw until the cutting is
completed.

16 17
english english
If problems, unusual noises, or excessive
vibrations occurring during the piercing or
sawing process require the sawing to be
interrupted before the pipe has been cut,
turn off the motor by pushing the STOP
button (Picture A2) and release the blade
by pulling the locking pin out (Picture A3).
When the problem that caused the interrup-
tion has been claried and xed, resume
sawing after checking that the saw or blade
has not been damaged. Never start the
motor when the motor unit is locked in its
sawing position or when the teeth of the
blade are in contact with the pipe to be sawn.
Underwater sawing
If the pipe to be cut is partially or completely
underwater, or it is possible that water coming
from within the pipe will raise the water level
at the cutting location so high that the saw
will remain submerged during the cutting
period, an additional hose should be used
in the air exhaust opening. The length of the
additional hose should enable it to reach
above the water surface during the entire
duration of the cutting. Connect the additional
hose by threading a ¾ inch thread to the
opening on the rear section of the pipe saw
(Picture A11). Make sure that the hose cannot
wave around uncontrollably, which could
cause a hazardous situation. If necessary,
use a safety wire to support the additional
hose, which should always be intact.
An exhaust pipe attached to the machine
can detrimentally affect sawing efciency,
particularly if the pipe is long or has a
small diameter. When carrying out under-
water sawing, the participation of at least
two workers is recommended. One worker
supervises the progress of the work, and
is close to the compressed air shutoff
valve in case a possible emergency shut-
down of the machine is necessary. The
other worker performs the actual sawing.
Use in cold conditions
WARNING: Use warm safety gloves when
handling the saw in cold conditions. Cold
metal may cause skin injuries.
In cold conditions, note the possible develop-
ment of brittleness in the material to be cut.
Check the blade screw’s tightness before
cutting by using the open-end wrench
(Picture B3) and hex socket key (Picture B2).
Check before use that there is no moisture or
ice inside the compressed air hose you are
using. Possible excess moisture and pieces
of ice may damage the hose, resulting in
personal injuries or damage to the materials.
Make sure that you use oil that suits the
operation of compressed air machines in
cold conditions. When the temperature falls
under –5°C (23°F), make sure that the
pour point of the machine’s lubrication oil
is lower than –25°C / –13°F.
Because moisture remaining in the pipe
saw’s motor, lubrication system, and other
channels may freeze, the pipe saw should
be stored and maintained in a warm
location. To remove any condensate water
that has entered with the compressed air,
a dry cutting should be made with the pipe
saw indoors and in dry conditions. The
stream of warm and dry compressed air fed
through the pipe saw’s motor, lubrication
system, and air vents will remove possible
moisture and reduce the risk of freezing.
Do not use solvent-borne de-icing uids
that could damage the lubrication system.
Storage
Store the pipe saw in a dry location shielded
from direct sunlight. Do not store the pipe
saw on weak structures or a wobbly shelf.
Make sure that the storage location can sup-
port the weight of the pipe saw. Protect the
pipe saw and its parts from possible dents.
Recommendation
Before connecting the Exact 360 AIR to the
compressed air hose, always run the com-
pressor until it reaches its operating tempera-
ture. When the compressor has reached its
operating temperature, blow compressed air
out of the hose to remove any possibly accu-
mulated water or debris. Connect the com-
pressed air hose to the machine only after
the hose has been cleaned.
Technical data
Technical data
While blowing air, be particularly careful
when handling the compressed air hose;
the end of a hose waving around
uncontrollably may injure the user.
• Exact PipeCut 360 AIR
• Minimum Pipe OD 60 mm (2 inch)
• Maximum Pipe OD 355 mm (14 inch)
• Weight 26.8 kg (59 lbs)
• Pressure max. 6.3 bar (90 PSI)
• Free air volume max. 3.9 m3/min
(140 cfm)
• Blade 180 mm or 165 mm (7” or 6.5”)
• Max no-load speed 4000 rpm
• Air intake and exhaust couplings ¾ NPT
inside thread
• Air quality requirement, 40 microns/m3
or better
• Operating temperature + 40°C – –20°C /
104°F – –4°F
NOTE! If the recommended pressure and
air quantity are not attained, the machine
can be used normally, but the machine’s
efciency and working speed will decrease
correspondingly. The machine is not recom-
mended for use in conditions where the
recommended pressure and air volume are
less than half of the recommended values.
Recommended motor lubrication oil
MOBIL DTE 24 ISO VG32 Temperature range
of this oil is +5°C up to +40°C (41°F up
to 104°F) If the temperature is lower than
+5°C (41°F) a thinner oil must be used.
The Exact 360 AIR machine cuts all
known pipe grades and with the following
blades:
• Diamond X 180 and X 165 Discs, for
cutting cast iron only.
• Exact ALU 180 and 165, aluminum and
all kinds of plastics.
• Exact Cermet 180 and 165, for cutting
steel and stainless steel.
Servicing, changing saw blades,
and the machine’s straightness
sawing adjustment
The motor’s interior parts should be
washed with cleaning uids, not blown
clean with air jets. Do not use strong
solvents.
Only professionally capable technicians
can test the Exact 360 AIR pipe saw.
The pipe saw cannot be tested or serviced
by persons who have not been trained
in the servicing of pneumatic tools. They
must be authorized to test these kinds
of tools and use pneumatic systems
according to national, state-specic, and
local regulations.
150/6 33.7/1.35 26.2/1.03
200/8 35.8/1.40 28.3/1.11
250/10 39.0/1.55 31.5/1.24
300/12 42.3/1.70 34.8/1.37
350/14 45.0/1.80 37.5/1.47
Cutting depths
Cutting depth mm/inch
blade 165 mm/6.5”
Pipe diameter
DN mm/inch
Cutting depth mm/inch
blade 180 mm/7”
Operational instructions
18 19
english english
WARNING
Never change the blade if the machine
is connected to a compressed air
source or you are not sure if the motor
has completely stopped.
Always use undamaged tools when changing
blades. Damaged tools will not necessarily
achieve the required tightness for the blade’s
attachment components, which may cause
loosening while sawing.
Do not use other manufacturers’ blades.
Do not use an unchecked blade.
Check the condition of the blade. Cutting
with a dull blade causes extra strain on
the machine and can lead to a signicantly
poorer sawing result. A dull or damaged blade
must be immediately replaced by a new or
sharpened blade. Sawing with a dull or
damaged blade can cause extra sparking,
detached saw teeth, and thus a hazardous
situation to persons and/or materials.
Never saw with a bent or damaged blade.
The tools used to change blades are
supplied with the machine. A blade can
also be changed with other correctly-sized
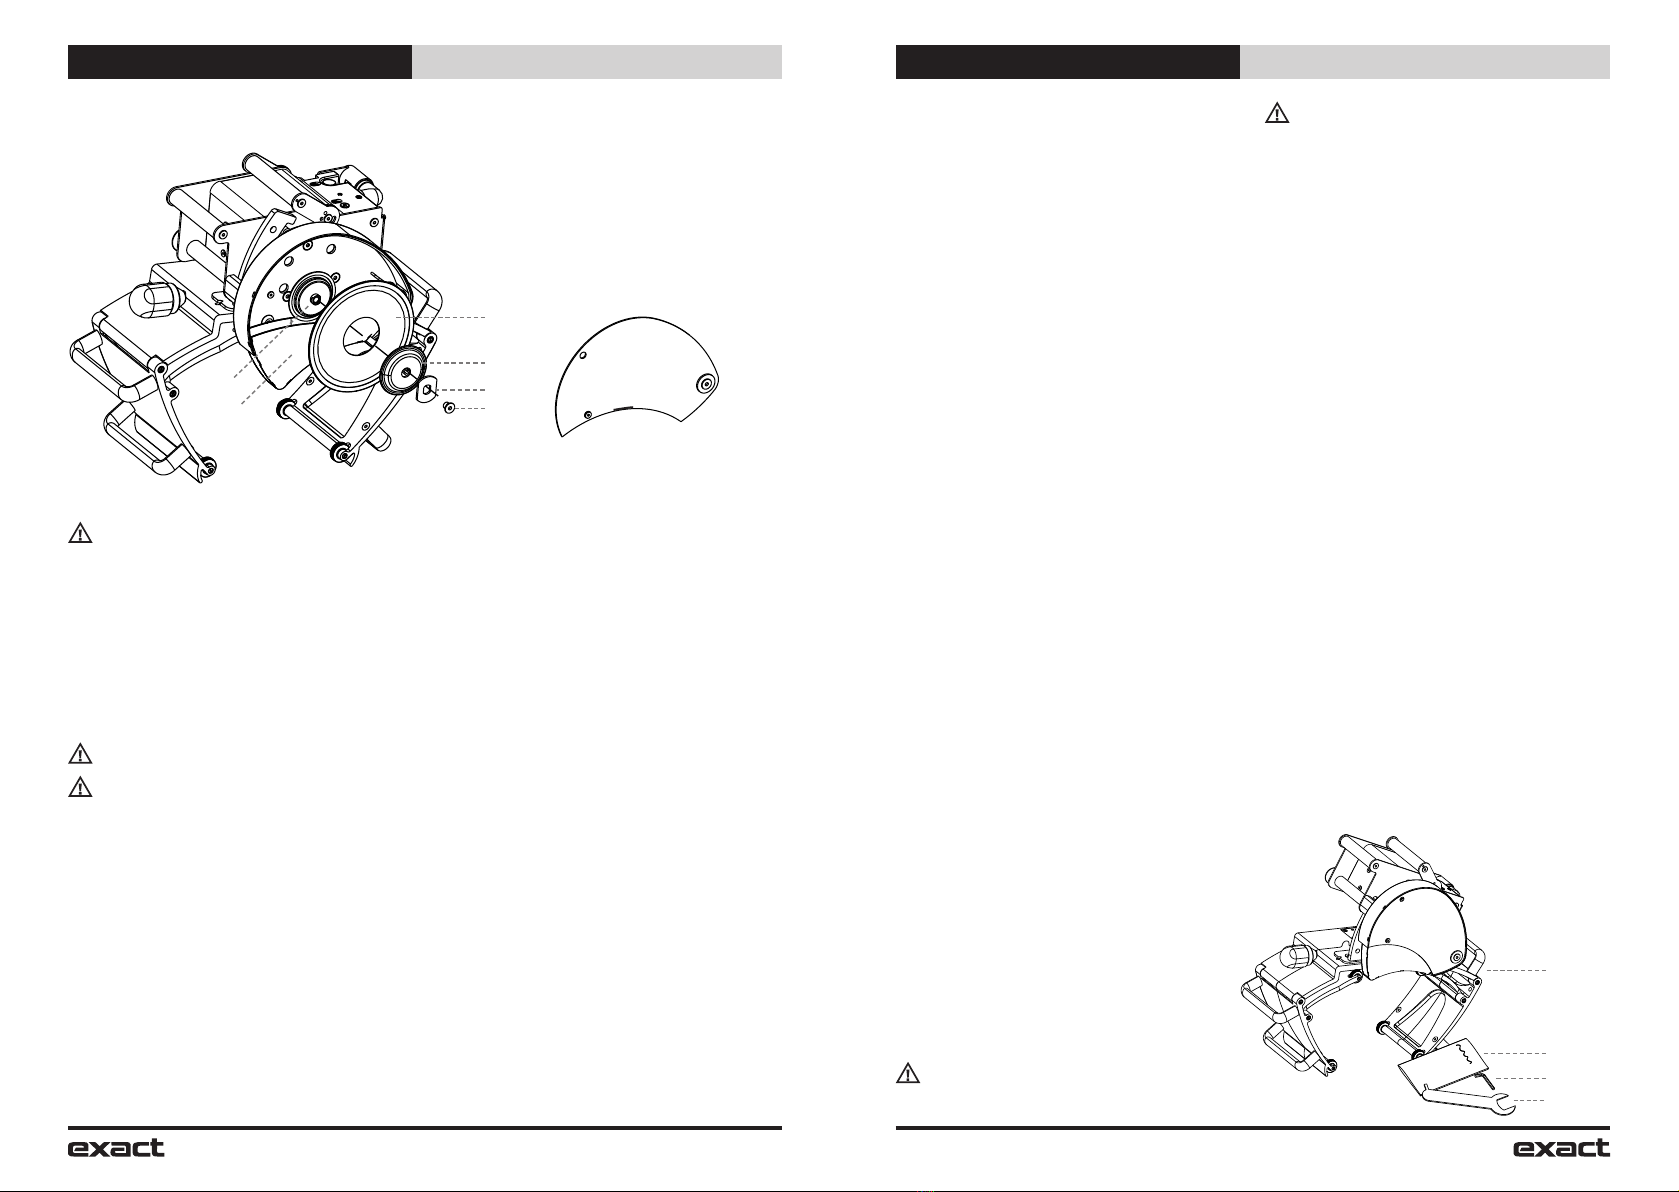
PICTURE C
Picture B
(overview and tools)
Changing blades
hex socket keys and open-end wrenches.
The Exact 360 AIR pipe saw’s blades can
be changed in job site conditions.
Open the blade guard (Picture C1) with the
hex socket key (Picture B2). After setting
the blade guard aside, open the blade
screw (Picture C2) with the hex socket key
and open-end wrench (Picture B3). Use
the open-end wrench as a counterforce
to prevent a turning motion by setting the
pulling ange washer securely in the place
designed for it, after which the blade screw
will open by turning the hex socket key.
Use force if the screw is tight. Remove the
pulling ange washer (Picture C3) and the
attachment ange (Picture C4), after which
you can set the blade (Picture C5) in place.
Make sure that the blade ange located
under the blade (Picture C6) is securely
in place and that there are no shavings,
debris, sand or other functionally detri-
mental materials between the blade ange
and the newly installed blade. Also check
that there are no shavings, debris, sand, or
other functionally detrimental materials in
the attachment ange, screws, or pulling
ange washer. If there is unwanted matter
in the blade or other parts, the parts must
be cleaned before their installation. When
the new blade has been securely placed
over the blade ange, set the attachment
ange carefully over the blade, then re-
attach the pulling ange washer and screw.
Tighten the screw with the open-end wrench
by using the pulling ange washer as a
counterforce.
Blade guard
Always clean the blade guard’s inside
surfaces (Picture C1), if you have sawed
plastic and are now sawing metal pipes.
The warming of the metal shavings and
blade from the sawing may cause the plastic
to melt or smolder, possibly releasing toxic
gases. Clean the blade guard regularly and
pay particular attention to the functioning
of the lower blade guard (Picture C7). The
lower blade guard should move freely, and
make sure that there is no debris, shavings,
or sand in its mechanism’s moving parts
that could impair its functioning.
Cleaning of gripper unit
Clean the gripper unit regularly with clean
compressed air. Lubricate the gripper’s
trapeze screw, transfer nuts, wheels, hinges
(Picture A14), and ball bearings with the
applicable oil. Check that there is no
debris, chips, or other materials that
could hinder its functioning in the gripper.
Straightness sawing adjustment
Open the adjustment screws (Picture A8) and
(Picture A9) turn the tool in the adjustment
pointer (Picture A10) as shown in the picture:
if you want that sawing to go more to the
left, turn the entire motor unit to the right.
Filling of oil tank
WARNING:
Use only the correct type of oil
specied for this purpose.
Keep debris, sand, or shavings from
passing into the oil tank. Unwanted
materials in the oil tank can damage
the lubrication system or the device’s
other precision mechanics.
Open the oil tank cap (Picture A13) by using
the hex socket key (Picture B2). Use appro-
priate effort to press the piston inside the
oil tank down by using a clean stick-like tool
such as a screwdriver. You will feel the
downward motion of the piston when it
clicks in place. Pour oil into the oil tank
using a suitable dosing feeder or funnel
to avoid spillage. When the oil tank is full,
screw the oil tank cap rmly in place. The
piston inside the oil tank will snap back to
its initial position when the motor is started.
Wintertime use
When the temperature falls under –5°C (23°F),
make sure that the pour point of the machine’s
lubrication oil is lower than –25°C / –13°F
Delivery content
- Exact 360 AIR
- Blade key/straightness sawing adjustment
key
- Operating Instructions
Note: Additional hose not included
C1 Blade guard
C2 Blade screw
C3 Pullingangewasher
C4 Attachmentange
C5 Blade
C6 Bladeange
C7 Lower blade guard
B1 Exact 360 AIR
B2 Hex socket key
B3 Open-end wrench
B4 Operating
instructions
C1
C2
C3
C4
C5
C6
C7
B3
B2
B1
B4
Operational instructions Technical data

Exact Tools Oy
Särkiniementie 5 B 64
00210 HELSINKI
FINLAND
Tel + 358 9 4366750
FAX + 358 9 43667550
www.exacttools.com
Table of contents
Other eXact Saw manuals

eXact
eXact PipeCut P400 User manual

eXact
eXact PipeCut 170 User manual

eXact
eXact PipeCut P400 User manual

eXact
eXact Pipecut 280 Pro Series User manual

eXact
eXact PipeCut V1000 User manual

eXact
eXact Pipecut 360 INOX Series User manual

eXact
eXact PipeCut 220E User manual

eXact
eXact PipeCut 220 Pro Series User manual

eXact
eXact Pro Series User manual

eXact
eXact PipeCut 280E System User manual
Popular Saw manuals by other brands


Campbell Hausfeld
Campbell Hausfeld DG420700CK Operating instructions and parts manual

Rockwell
Rockwell LithiumTech RK2516 Operation manual

Ryobi
Ryobi SC164VS Operator's manual

REMS
REMS Turbo K instruction manual

Elektra Beckum
Elektra Beckum BAS 316G DNB operating instructions

Makita
Makita LS1018LN instruction manual


