EXALUS HOME WSZF-BIDI User manual

USER'S MANUAL OF
WSZF-BIDI
WIND SENSOR
EXALUS HOME control system
EXALUS TR7
Spółka z ograniczoną odpowiedzialnością sp.k.
Kuchary 24F
63-322 Gołuchów
www.exalus.pl

1. POWER SUPPLY
a. 12V DC power supply of minimum capacity of 100mA.
b. Power consumption: ~17mA during regular work and ~23mA in the test mode.
c. Connection: red “+”, brown “-”.
2. APPEARANCE
Light threshold S2
Pairing P1
Wind threshold S1
Power
supply connection
3. DIMENSIONS
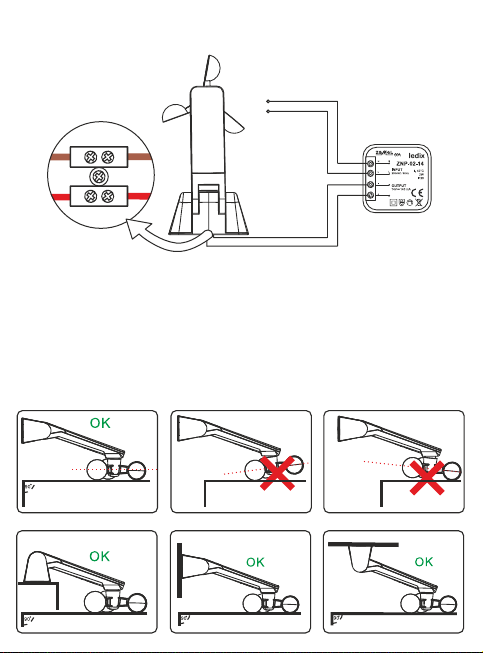
5. INSTALLATION
The system will work correctly only if the sensor is installed in a location allowing for
proper conversion of such stimuli as light intensity and wind speed.
1. Only the materials included in the packaging shall be used to assembly and fix
the product in the right location.
2. The wind sensor should be installed parallelly to the surface (see the pictures
below). Any different installation manner will have an adverse impact on the wind
speed reading.
4. CONNECTION SCHEME
230 V AC
L
N
- 12V=
+ 12V=

6. PAIRING A WSZF-BIDI SENSOR WITH A VB-BIDI
CONTROLLER
a. Adding a sensor via the PROG button on the shutter controller:
I. Press the PROG button on the controller and wait until blue LED light starts flashing. Next,
release the button (the diode will slowly blink blue).
II. Press the P1 button on the wind sensor - correct sensor pairing will be confirmed with a short
UP/DOWN (shutter) movement.
III. Analogically, the sensor pairing can be deleted from the settings.
b. Adding a sensor via a remote control:
I. Press the P2 button twice on the programmed remote control.
II. Then, press the P1 button on the wind sensor - correct sensor pairing will be confirmed with a
short UP/DOWN (shutter) movement.
III. Analogically, the sensor pairing can be deleted from the settings.
c. Adding the sensor using the application:
I. Log into the TR7 application and go to the DEVICE CONFIGURATION tab.
II. Select the NEW tab and click “Search” - after a few seconds, available devices will be displayed
on the list.
III. To add a selected device to the application, drop down the menu of a given device and next
press + button to pair it with the TR7 control unit.
● If the software update is available, a window will pop up asking you to confirm the update
process - click UPDATE (during the entire update process, do not switch off the application);
● After successful completion of the software update, the status will change to: the update has
been successfully installed. Next, click the CLOSE button.
IV. Click the CONFIGURE button. A configuration window will pop up, therein you can name the
device in the item Name of the controlled object. You can add the device to a group by selecting
its name from the drop-down menu or by adding a new group. The ADD NEW GROUP button
shall be pressed then.

7. BUTTONS FUNCTIONALITIES
Button Function Display Notes
S1 or S2 Displays the setting
thresholds for
approx. 3 sec.
Setting thresholds
in accordance
with point 5
Left digit - wind
Right digit - light
Current wind
speed reading
Wind speed in
[km/h]
The dot displayed on
the left screen means
that the display
reading concerns wind.
If you press the S2
button for a short while,
you will exit the
wind reading.
Current light
intensity reading
Light intensity in
lux/1000
The dot displayed
on the right screen
means that the display
reading concerns
light intensity.
If you press the S1
button for a short
while, you will
exit the light
intensity reading.
Setting the wind
reporting threshold
The threshold that is
currently set blinks
on the left screen
(in accordance
with point 5).
By pressing the S2
button, you can
navigate through
subsequent wind
report thresholds.
By pressing the S1
button for a short
while, you can save
the current setting.

Setting the light
intensity reporting
threshold
The threshold that
is currently set blinks
on the right screen
(in accordance
with point 5).
By pressing the S1
button, you can
navigate through
subsequent light
intensity reporting
thresholds.
By pressing the S2
button for a short while,
you can save
the current setting.
Sensor
pairing / unpairing
By pressing the P1 button
for a short while, you
will send a radio signal
transmitting information
necessary for the
controllers to carry out the
sensor pairing / unpairing
procedure.
Reset to default
settings
Top and bottom
segments show
the function
selection, middle
ones confirm
the reset.
If pressed for more
than 5s, both digits
(of top and bottom
segments) start flashing,
indicating that you
have selected
the reset function.
Then, the user has 2s
for releasing and
pressing the P1 button
for a short while again.
The reset is confirmed
with both digits
flashing (concerns
middle segments
Button Function Display Notes

8. WIND AND LIGHT INTENSITY THRESHOLDS, WHICH IF
EXCEEDED WILL BE REPORTED BY A SENSOR
9. ADDITIONAL INFORMATION:
a. The wind speed is constantly monitored - the reading is taken every 0.5s and the average value is
calculated based on last four readings.
b. If the set wind speed threshold is exceeded, the radio signal is transmitted informing thereabout. The
shutter controllers paired with the sensor will lift the shutter.
c. After lifting the shutter, the controller will block the downward movement of the shutter for 10 minutes -
this function can be deactivated by pressing the DOWN button on the remote control for 6 times or
holding the DOWN button controlling a given shutter for 7-10s (NOTE: blockade deactivation is not
confirmed with any signal, you just need to press a given button for a set time and to release it).
d. Once the sensor has identified that the set wind speed threshold has been exceeded, it reports every 2
minutes if the wind speed continues to exceed the threshold. Every next report of excessive wind
speed resets the time for which the shutter remains blocked.
e. If the sensor does not record the exceeded wind speed limit, it transmits a radio signal allowing the
paired controllers to detect the sensor defects.
f. If the controller does not receive any radio signal from the sensor for 10 minutes, the shutter will lift in the
emergency mode.
g. If the “0” reporting level is selected on the sensor, a relevant radio signal will be sent to the paired
controllers that the reporting function of the wind sensor has been switched off - the receipt of such a
signal is confirmed with a short up/down (shutter) movement.
h. Even if the selected reporting level is “0”, the sensor continues to take measurements on permanent basis
and can provide information on current wind speed and light intensity level if asked by the controller.
i. The controllers do not monitor the wind sensor operation if its functionalities are switched off.
Level Wind speed [km/h] Light intensity [lux]
No exceeded threshold reported No exceeded threshold reported
Table of contents
Popular Accessories manuals by other brands


Baumer
Baumer OADM 20I2472/S14C manual

Lightolier
Lightolier Xceed 1050RNDL_3D specification

Heatit Controls
Heatit Controls Z-HAN2 quick guide

Orno
Orno SOUL DC Operating and instalation instructions

S+S Regeltechnik
S+S Regeltechnik Thermasgard ALTF 1 Operating Instructions, Mounting & Installation

Ankom
Ankom Daisy II D200 Service Procedure


