exaSound PlayPoint Mark II User manual

PlayPoint Mark II Network Audio Player
Owner’s Manual
PLEASE READ BEFORE OPERATION
REV. 1.0.0 i – 04/2018

Page | 2
Table of Contents
Safety Information ....................................................................................................... 4
Explanation of Graphical Symbols ................................................................................................... 4
Important Safety Instructions.......................................................................................................... 4
Precautions ...................................................................................................................................... 4
Proper Device Placement................................................................................................................. 6
Welcome.......................................................................................................................... 7
Package Contents ......................................................................................................... 7
Overview ......................................................................................................................... 8
PlayPoint Mark II - New Features ........................................................................... 9
How Would I Use the PlayPoint Mark II?............................................................. 9
Roon Server and Roon Ready Player ............................................................................................... 9
UPnP /OpenHome Player and Audio Library Server......................................................................11
Network Audio Adapter for HQPlayer ...........................................................................................11
AirPlay Player .................................................................................................................................11
MPD Player.....................................................................................................................................11
Front and Rear Panels ..............................................................................................12
Quick Start Guide........................................................................................................13
Playback Screens.......................................................................................................15
PlayPoint Mark II Configuration ...........................................................................16
Resetting the DAC Connection ..............................................................................16
Device Information Screen .....................................................................................16
Zero-Configuration Networking............................................................................16
Wireless Protected Setup (WPS) for Wi-Fi Network Access........................17
Switching Between Wireless and Wired Network Connection...................19
Network Screen for Models without Wi-Fi .......................................................19
Multi-room Configuration .......................................................................................19

Page | 3
Screen Saver.................................................................................................................20
Roon Core......................................................................................................................20
DAC Power Off Timeout..........................................................................................21
Firmware Update .......................................................................................................21
Remote Support..........................................................................................................23
Volume Control ...........................................................................................................24
Volume Bypass............................................................................................................................... 25
Maximum Volume Limit................................................................................................................. 25
Using External USB Drives for Storing Audio Files .........................................26
PlayPoint Mark II Music Servers and Music Libraries...................................26
Roon Music Library ........................................................................................................................ 26
UPnP Music Library ........................................................................................................................ 27
MPD Music Library......................................................................................................................... 27
Web User Interface ....................................................................................................28
Working with the Menu................................................................................................................. 29
Dashboard for Volume Control and Input Selection...................................................................... 30
Settings ..........................................................................................................................................31
Sharing Attached USB Drives on the Network...............................................................................32
Ethernet Connection with Manual IP Address.............................................................................. 34
Manual Wi-Fi Configuration........................................................................................................... 36
Specifications...............................................................................................................40
Open-source Credits..................................................................................................42
GNU General Public License (“GPL”)....................................................................42
Limited One Year Warranty....................................................................................43

Page | 4
Safety Information
Explanation of Graphical Symbols
The lightning flash with arrowhead symbol, within an equilateral triangle, is intended to
alert the user to the presence of uninsulated “dangerous voltage” within the product’s
enclosure that may be of sufficient magnitude to constitute a risk of electric shock to
persons.
The exclamation point within an equilateral triangle is intended to alert the user to the
presence of important operating and maintenance (servicing) instructions in the literature
accompanying the Device.
Important Safety Instructions
1. Read these instructions.
2. Keep these instructions.
3. Heed all warnings.
4. Follow all instructions.
5. Do not use this apparatus near water.
6. Clean only with dry cloth.
7. Do not block any ventilation openings. Install in accordance with the manufacturer’s instructions.
8. Do not install near any heat sources such as radiators, heat registers, stoves, or other apparatus
(including amplifiers) that produce heat.
9. Do not defeat the safety purpose of the polarized or grounding-type plug. A polarized plug has two
blades with one wider than the other. A grounding type plug has two blades and a third grounding
prong. The wide blade or the third prong is provided for your safety. If the provided plug does not fit
into your outlet, consult an electrician for replacement of the obsolete outlet.
10. Protect the power cord from being walked on or pinched, particularly at plug, receptacle, and the
point where it exits from the apparatus.
11. Only use attachments/accessories specified by the manufacturer.
12. Refer all servicing to qualified service personnel. Servicing is required when the device has been
damaged in any way, such as power-supply cord or plug is damaged, liquid has been spilled or
objects have fallen into the device, the device has been exposed to rain or moisture, does not
operate normally, or has been dropped.
Precautions
•Before connecting the AC power adapter cord to the device, make sure the voltage designation of
the power adapter corresponds to the local electrical supply. If you are unsure of your power
supply, contact your local power company. The acceptable power input range is AC ~ 100V-240V,
50/60Hz

Page | 5
•The device is still receiving power from the AC power source as long as it is connected to the wall
outlet, even if the device itself has been turned off.
•Unplug the power adapter if you are not going to use the device for an extended period of time.
Hold the power adapter when unplugging. Do not pull on the cord.
•The power adapter is used as the mechanism for cutting off power, therefore make sure it is easy to
unplug.
•To ensure proper ventilation around this product, do not place this product on a sofa, bed or rug.
•High temperature will lead to abnormal operation of this device. Do not expose this device or
batteries to direct sunlight or near heating objects.
•When moving the device from a cold location to a warm one, or vice versa, moisture may condense
on components inside the device. Should this occur, the device may not operate properly. In such a
case please turn the device off for 1-2 hours to facilitate moisture evaporation.
WARNING:
TO REDUCE THE RISK OF FIRE OR ELECTRIC SHOCK, DO NOT EXPOSE THIS DEVICE TO RAIN OR MOISTURE.
DANGEROUS HIGH VOLTAGES MAY BE PRESENT INSIDE THE ENCLOSURE. DO NOT OPEN THE CABINET.
REFER SERVICING TO QUALIFIED PERSONNEL ONLY. THE DEVICE SHALL NOT BE EXPOSED TO DRIPPING
OR SPLASHING AND THAT NO OBJECTS FILLED WITH LIQUIDS, SUCH AS VASES SHALL BE PLACED ON THE
APPARATUS.
WARNING:
CHANGES OR MODIFICATIONS NOT AUTHORIZED BY THE MANUFACTURER CAN INVALIDATE THE
COMPLIANCE TO REGULATIONS AND CAUSE THE UNIT TO BE NO MORE SUITABLE TO USE. THE
MANUFACTURER REFUSES EVERY RESPONSIBILITY REGARDING DAMAGES TO PEOPLE OR THINGS DUE TO
THE USE OF A UNIT WHICH HAS BEEN SUBJECT TO UNAUTHORIZED MODIFICATIONS OR TO MISUSE OR
TO MALFUNCTION OF A UNIT WHICH HAS BEEN SUBJECT TO UNAUTHORIZED MODIFICATIONS.
FCC
Statement
This equipment has been tested and found to comply with the limits for a Class B digital
device, pursuant to Part 15 of the FCC Rules. These limits are designed to provide reasonable
protection against harmful interference in a residential installation. This equipment generates,
uses, and can radiate radio frequency energy and, if not installed and used in accordance with
the instructions, may cause harmful interference to radio communications. However, there is
no guarantee that interference will not occur in a particular installation. If this equipment does
cause harmful interference to radio or television reception, which can be determined by
turning the equipment off and on, the user is encouraged to try to correct the interference by
one or more of the following measures:
•Reorient or relocate the receiving antenna.
•Increase the separation between the equipment and receiver.
•Consult the dealer or an experienced radio/TV technician for help.
Any unauthorized changes or modifications to this equipment would void the user’s authority
to operate this device. This device complies with Part 15 of the FCC Rules. Operation is subject
to the following two conditions: (1) This device may not cause harmful interference, and (2)
this device must accept any interference received, including interference that may cause
undesired operation.
This unit is compliant with Directive 2011/65/EC (RoHS) Restriction on Hazardous Substances,
Page | 6
and is in conformity with the provisions of the EMC Directive 2004/108/EC. The following
harmonized standards were applied:
EN55022:2010/AC:2011 Class B
EN61000-3-2:2006/A1:2009 and /A2:2009, EN61000-3-3:2008
EN55024:2010 ( IEC 61000-4-2:2008, IEC 61000-4-3-2006/A1:2007/A2:2010,
IEC 61000-4-4:2004/A1:2010 , IEC 61000-4-5:2006, IEC 61000-4-6:2008,
IEC 61000-4-8:2009, IEC 61000-4-11:2004 )
1999/5/ec - Radio and telecommunication Terminal Equipment Device (R&TTE)
EN 60950-1, EN62311 - For Article 3.1(a): Health and safety of the user
EN 301 489-1, EN 301 489-17 - For Article 3.1(b): Electromagnetic Compatibility
EN 300 328, - EN 301 893 - For Article 3.2: Effective use of spectrum allocated
This product, when no longer usable, when disposed off can’t be treated as generic garbage,
but must be disposed of at a collection point for recycling of electrical and electronic
equipment, in compliance with the WEEE regulation (Waste of Electrical and Electronic
Equipment).
By making sure that this unit is correctly recycled, you will help preventing potential damages
to environment and human health, which could be caused by the incorrect treatment of this
product as generic garbage. Materials recycling helps conserve natural resources.
We use our best efforts to ensure that information in this document is complete, accurate and
current, but otherwise we make no representation concerning the same. We reserve the right
to change or modify the information any time, without prior advice. It’s up to the customer to
ensure that the manual being consulted is the latest version.
Trade
marks
ZeroJitter™, GalvanicInfinity™, ENclusiv™, FemtoMaster™ and ZeroResolutionLoss™ are
trademarks of exaSound Audio Design.
Direct Stream Digital (DSD) is a trademark of Sony Corporation.
Roon and Roon Ready and the Roon Labs logo are trademarks or registered
trademarks of Roon Labs or Roon Labs’s licensors.
The MQA logo is a trade mark of MQA Limited. © MQA Limited 2018
Designed for Windows Media, Microsoft, HDCD, and the HDCD logo are trademarks or
registered trademarks of Microsoft Corporation in the United States and/or other
countries.
Apple, Mac, AirPlay, iOS and OS X are trademarks of Apple, Inc.
All other trademarks are the properties of their respective owners.
Proper Device Placement
Place the device on a stable solid base, far from heat sources. Do not expose the device to direct
sunlight. Allow at least 2.5 cm (1'') around the device for ventilation. Do not place the device on fabrics,
inside enclosed space, or in contact with curtains. Do not place the device on top of power amplifiers or
any other equipment that emits heat. Do not expose the unit to smoke, humidity, moisture and water.

Page | 7
Welcome
Thank you for purchasing the exaSound PlayPoint Mark II Network Audio Player!
The PlayPoint Mark II offers the highest digital audio resolution, comprehensive feature set and choice
of easy to use and advanced configurations. Roon Core and Roon Ready bring the best playback and
library management experience. Support for proprietary and open audio streaming technologies makes
the PlayPoint the central digital hub in your audio system.
We hope that the exaSound PlayPoint Mark II will help you to enjoy world-class music experience for
years to come. Please take a few minutes to read right through this manual. Investing a little time now is
the best way to ensure that you will make the most of your investment.
Your satisfaction is our highest priority.
Happy listening,
exaSound Audio Design
www.exaSound.com
Package Contents
The following items should be in the box:
•exaSound PlayPoint Mark II
•Power supply
•Ethernet Cable
•Quick Start Guide
•Two Wi-Fi Antennas (except for models without Wi-Fi support)

Page | 8
Overview
The exaSound PlayPoint Mark II is a reference-quality network audio player and server. It connects your
DAC to your home network and delivers seamless, life-like music experience. It receives digital audio via
Gigabit Ethernet, Wi-Fi 802.11AC or from attached USB storage devices. It outputs digital audio to
attached USB Audio 2.0 DAC.
The PlayPoint Mark II has two build-in audio servers. A full-function Roon Core and a UPnP server can
stream audio to other network players on you your home network.
When used with exaSound DACs, the PlayPoint Mark II utilizes the exaSound's proprietary ZeroJitter™
asynchronous USB streaming technology. exaSound DACs also feature GalvanicInfinity™ USB noise
isolation and ZeroResolutionLoss™ hardware volume control. Combined, these three technologies
deliver dynamic and natural sound with vanishingly-low jitter, distortion and noise levels. When used
with exaSound DACs, the PlayPoint is certified as RoonReady device.
exaSound PlayPoint Mark II supports most high-resolution PCM music formats including FLAC, AIFF,
WAV, as well as DSD formats including DSF and DFF. PlayPoint Mark II offers ENclusiv™ High Resolution
Audio (HRA) support: PCM sampling rates up to 768kHz at 32bit resolution and DSD up to 24.576MHz
(8X DSD or DSD512). The availability of sampling rates and other features depend on the capabilities of
the attached USB DAC.
exaSound PlayPoint Mark II is managed locally via capacitive glass touch screen and remotely with a
Web browser. Playback is controlled with Roon and various apps for iPad, iPhone, Android devices, Macs
and PCs.
exaSound PlayPoint Mark II is a multi-level device. It can be used in simple and most-advanced network
configurations. It supports several network audio standards including Roon RAAT, OpenHome, UPnP,
HQPlayer NAA, MPD and AirPlay. Additional network audio protocols will be available with software
updates.
Tidal and other streaming services are available with Roon, Bubble UPnP on Android devices, and with
AirPlay from iPads and iPhones.
With features like remote upgrades and remote support, the PlayPoint Mark II is future-proof and
backed by the exceptional exaSound customer service.

Page | 9
PlayPoint Mark II - New Features
•Support for third-party USB Audio Class 2.0 DACs
•Doubled maximum sampling rates - DSD512 at 22.5792/24.576 MHz and PCM 705.6/768kHz.
•Doubled CPU power improves the performance of Roon Core
•Doubling the size of RAM memory allows support for Roon libraries up to 128,000 tracks
(approximately 8 TB of disk space)
•m.2 SSD disk storage with doubled access speed and capacity
•Two upgraded USB 3.0 ports
•All-new Web user interface
How Would I Use the PlayPoint Mark II?
Roon Server and Roon Ready Player
Roon offers engaging, enjoyable way to browse your music. exaSound PlayPoint Mark II hosts a Roon
Core, the engine that manages your music collection. It builds and stores a digital library on the
PlayPoint's internal SSD storage. Via intelligent automatic cloud service library management, Roon
delivers metadata for the user’s library and frees the user from the complexities of library management.
When used with exaSound DACs, the PlayPoint is certified as a RoonReady player. Roon Ready is the
highest level of Roon integration and means that Roon technology is customized and embedded both in
the player and the DAC for achieving best user experience.
User–friendly remote operation of the exaSound PlayPoint Mark II from a favorite listening position is
accessible via Roon Remote Apps on iOS or Android mobile devices. Together, Roon and exaSound
deliver the power, flexibility, and performance benefits of networked audio, with the easiest setup and
highest sonic fidelity.
The easiest configuration for using the exaSound PlayPoint Mark II with Roon is to store your music on a
USB drive. It is illustrated on the diagram below with red components and red connections. Here is how
it works:
•You need to connect the PlayPoint Mark II to your home router with Ethernet cable or with Wi-Fi.
•Copy your music files to a USB drive and connect it to the PlayPoint Mark II.
•Roon is a subscription service. You can find out more about the trial period and about subscription
plans on the Roon website - RoonLabs.com.
•The Roon playback engine - Roon Core is installed on the PlayPoint Mark II.
•Playback is controlled by the Roon Remote App. Roon Remote is available for Apple iPhones, iPads
and Android devices. You need to install it on your device from the App Store or Google Play.
Playback can also be controlled from PC or Mac.
•Roon connects to the Roon Service to retrieve well organized information about your music files.
•Roon provides access to the Tidal online streaming service and Internet radio stations.

Page | 10
•Music files can also be stored on Network Attached Storage (NAS) drive.
•The PlayPoint Mark II can transparently discover and connect to Roon servers running on computers
or NAS drives.
Roon supports all formats - stereo and multichannel, PCM and native DSD at all sampling rates and
resolutions. You can find more information about Roon here: How Roon works. Questions about Roon
can be posted on the Roon Community forum. Step-by-step guide for configuring the exaSound
PlayPoint Mark II for use with Roon is available on our blog: How to get started with Roon and the
exaSound PlayPoint - Quick Setup.

Page | 11
UPnP /OpenHome Player and Audio Library Server
The PlayPoint Mark II supports the public UPnP/OpenHome audio streaming standards. It can be used
as a player (also called renderer or audio endpoint). When a USB drive is attached to the PlayPoint
Mark II, it also becomes a UPnP audio library server. Playback can be controlled remotely with an app
from an iPad, iPhone, Android device, PC or Mac. Popular control apps include Bubble UPnP on Android
and Lumin, Kazoo, MconnectHD, PlugPlayer and others on iPad and iPhone.
Media files can also be stored on a Network Attached Storage (NAS), PC, Mac or Linux computer. All
network file server options require the use of third-party audio library software like MinimServer, Asset
UPnP or Twonky. You will need a fast and stable Gigabit Ethernet network or top-performance tri-band
805.11AC wireless router.
There are many other third-party UPnP /OpenHome control apps and library servers. The ones listed
here are tested with the PlayPoint Mark II and support all high-resolution formats, resolutions and
sampling rates up to DSD512 for stereo and DSD256 for multichannel sources. Step-by-step guide for
configuring the exaSound PlayPoint for use with UPnP/OpenHome is available on our blog.
Network Audio Adapter for HQPlayer
The exaSound PlayPoint Mark II supports Network Audio Adapter (NAA) protocol for network audio
streaming with HQPlayer. The Signalyst HQPlayer offers advanced upsampling and PCM to DSD
conversion algorithms. Follow the Step-by-step guide for configuring the exaSound PlayPoint for use
with HQPlayer.
AirPlay Player
AirPlay is a popular and convenient network media streaming technology. AirPlay can be used to stream
content from online services like Tidal to the PlayPoint Mark II.
AirPlay support is implemented with ShairPort, an open-source Linux emulator for Airplay. Since this is
not an official Airplay implementation, reliability may vary. Note that the AirPlay protocol has some
limitations compared to the other network streaming standards used by the PlayPoint Mark II. It
supports stereo CD-quality audio. DSD and high-sampling rate/high-resolution PCM are not supported.
MPD Player
PlayPoint Mark II has a built-in MPD player. Music files must be stored on attached USB drive. Playback
can be controlled with any MPD client, like the MPaD / MPoD apps for iPad and iPhone available on the
Apple iTunes store. This mode of operation supports all PCM formats and native DSD at all sampling
rates, resolutions and number of channels. Step-by-step guide for configuring the exaSound PlayPoint
for use with MPaD and MPoD is available on our blog.

Page | 12
Front and Rear Panels
Previous Screen
Playback Engine
Next Screen
Volume Up
Power Button
Mute On/Off
Power Light
Ethernet RJ45
Connector
(Home Network)
USB 2.0
Connector (DAC)
DP Connector Reserved
for Future Use
Wi-Fi
Antenna
USB 3.0
Connector
(Hard Disk)
Power Adapter
Connector
Network Connection
exaSound DAC Connection
Home Screen
Volume Down
USB Drive
UPnP Server
Roon Server
Page | 13
Quick Start Guide
1. Connect the power adapter to the mains and to the PlayPoint Mark II device.
2. Attach the Wi-Fi Antennas (where applicable).
3. Connect the PlayPoint Mark II to your Gigabit home network with an Ethernet CAT 6 cable.
4. Connect the USB cable between the PlayPoint Mark II and your DAC.
5. Connect the line outputs to your power amplifier or preamplifier or plug-in your headphones.
6. Press the PlayPoint Mark II power button, the power indicator light will illuminate.
7. In a moment the exaSound logo will appear. After 30 seconds or so the screen will blink. Shortly
after the home screen will appear. The three icons on the top indicate network connection, USB
connection and working audio engine.
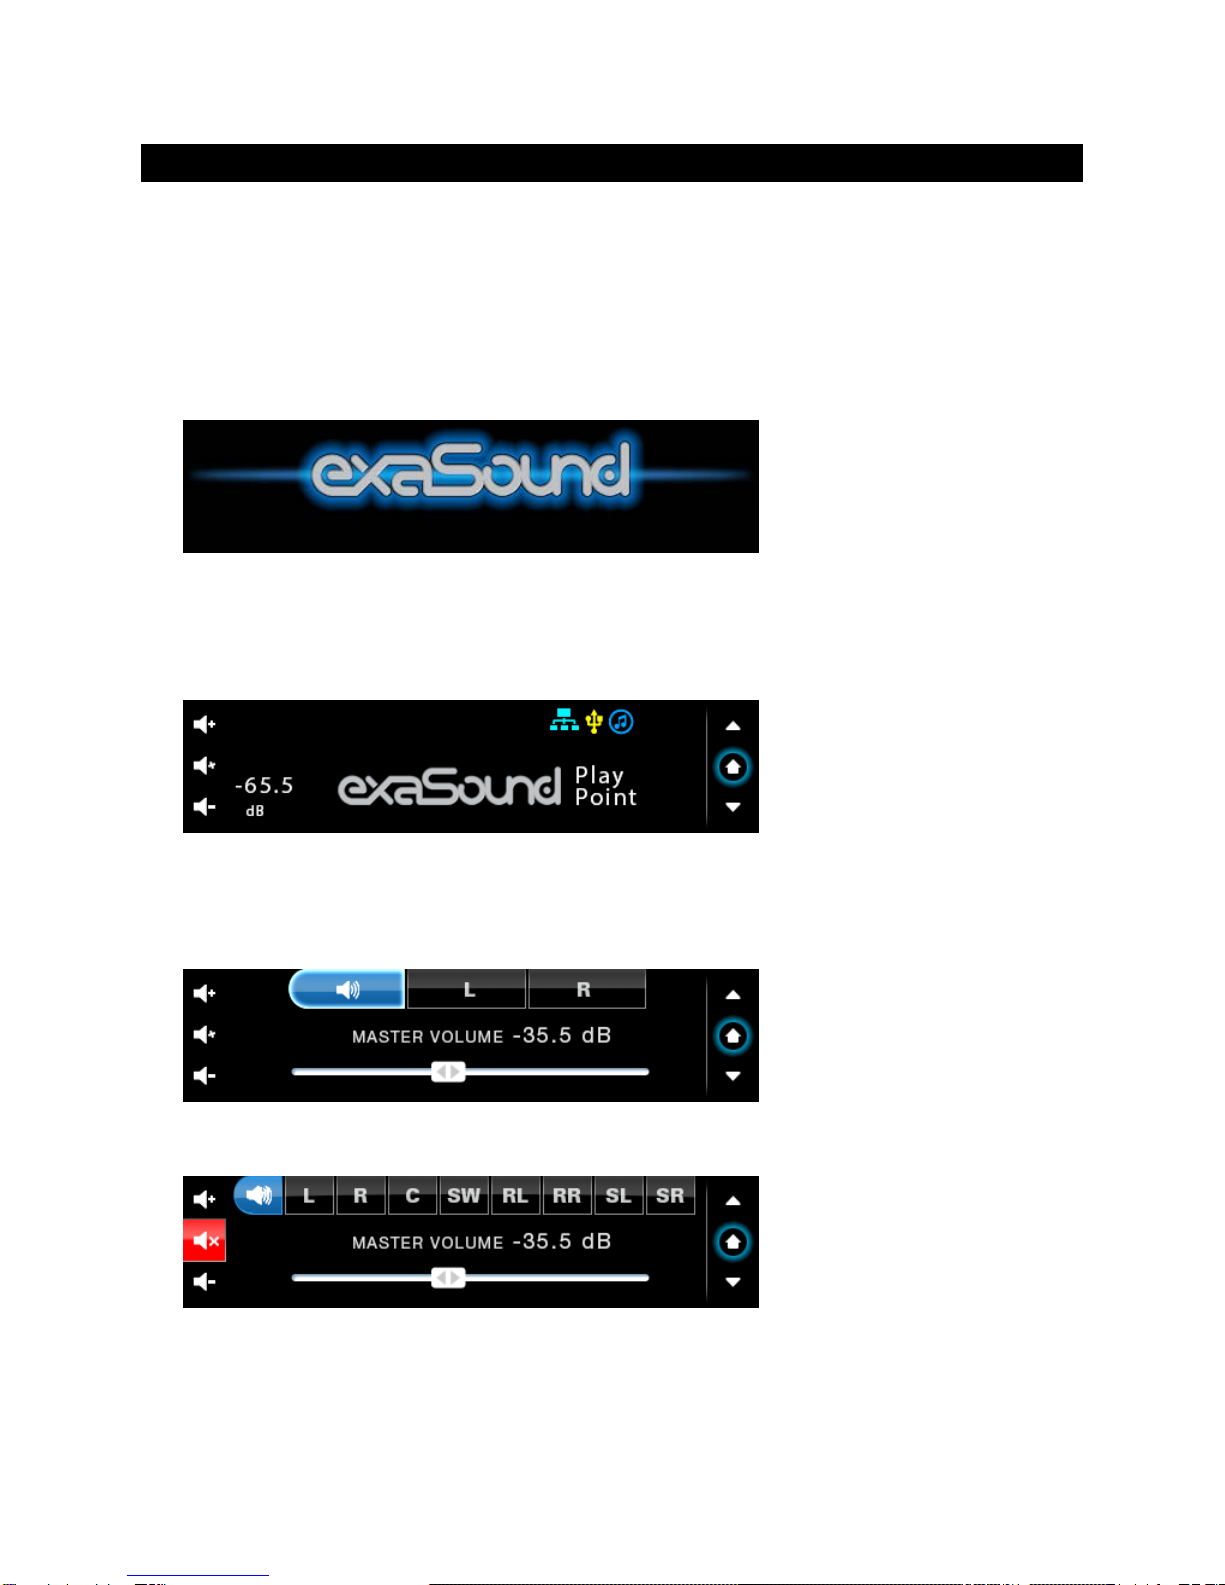
8. Navigate between screens with the buttons on the right. One screen up from the Home screen is the
volume-control slider. You can control the master volume and trim the individual channels. Digital
volume control may not be supported by your DAC.
Volume control screen for stereo DACs with digital volume control.
Volume control screen for multi-channel DACs. Mute is On.
Page | 14
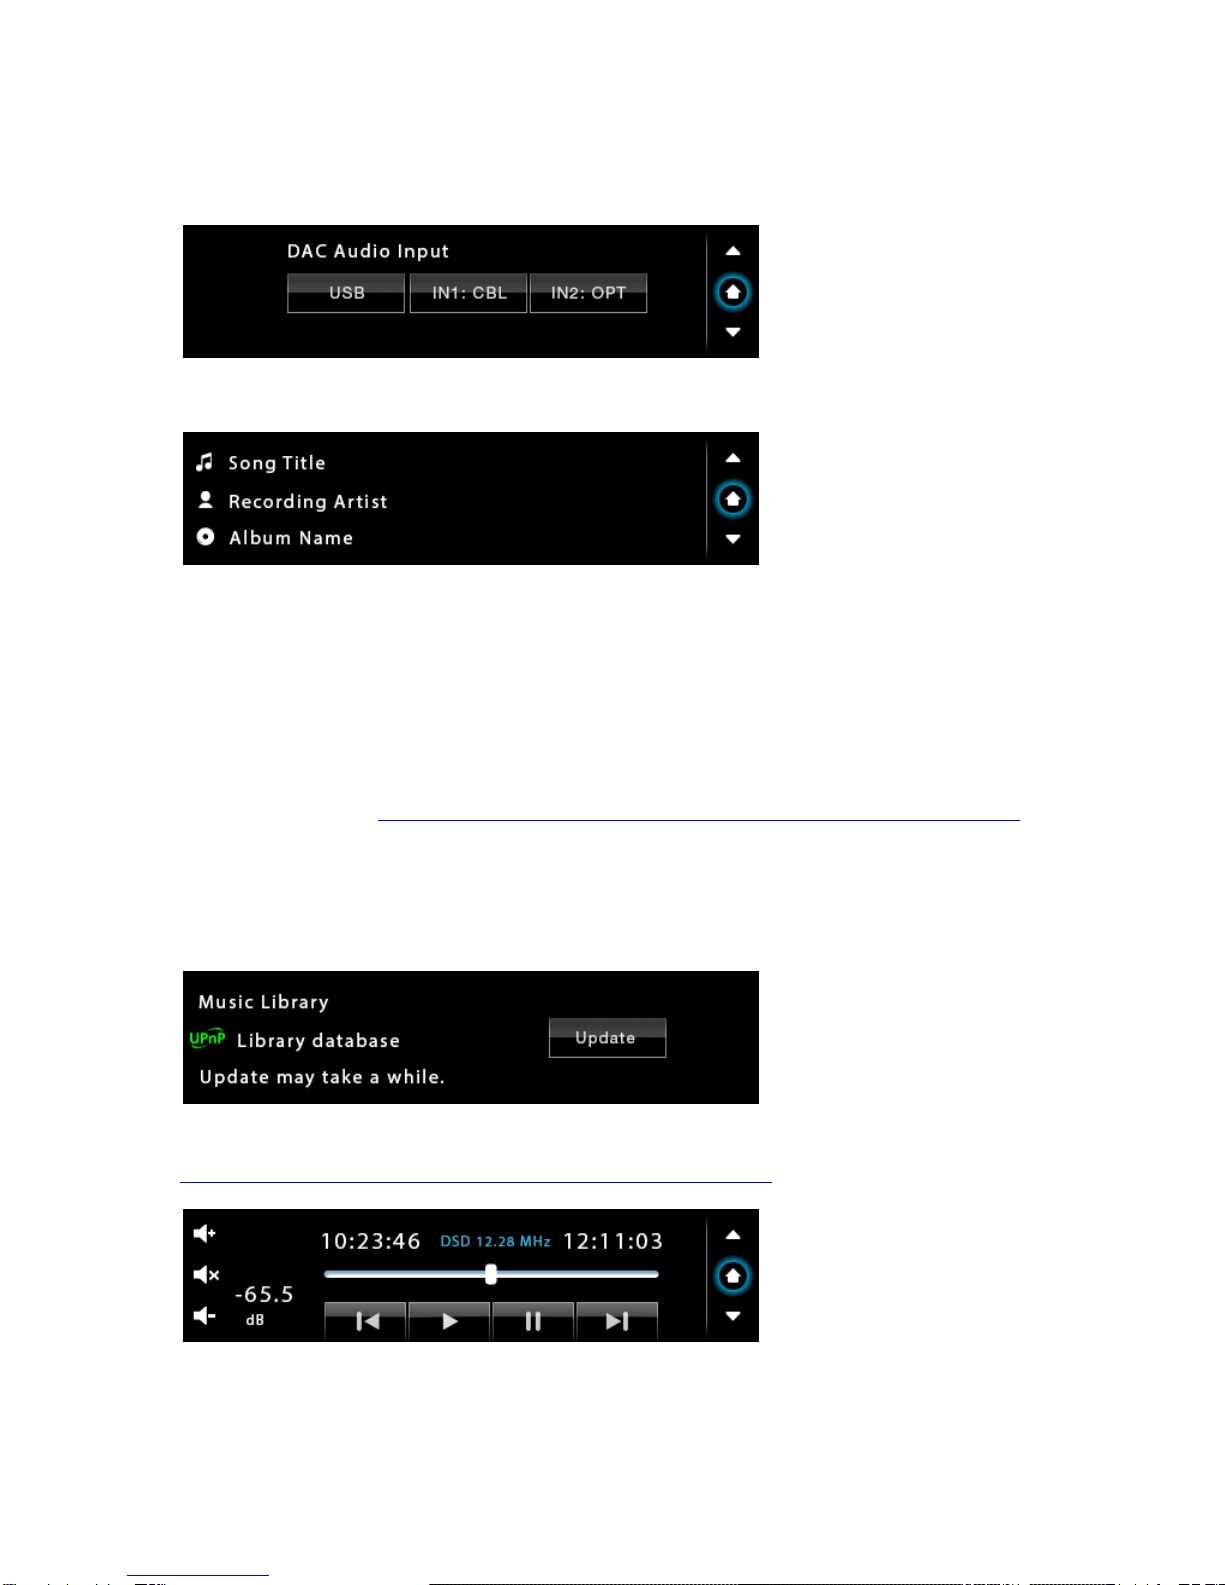
9. One screen down you will find the DAC input selection screen. This feature is available with e32,
e38 and newer exaSound DACs.
10. The next screen down displays the album, artist and title of the current track.
11. Turn on your audio components, first the DAC, then the preamp (if you use one) and finally the
power amplifier.
12. Make sure the DAC volume level is safe.
13. The easiest way to use the exaSound PlayPoint Mark II is with Roon. The PlayPoint Mark II will
appear as exaSound-PP1 on the Audio tab of the Roon Settings screen. Step-by-step instructions are
available on our blog: How to get started with Roon and the exaSound PlayPoint - Quick Setup.
14. Another easy way to use the exaSound PlayPoint Mark II is with Kazoo installed on iPad, iPhone, PC
or Mac. Connect a USB drive with music to the PlayPoint Mark II. The first time the disk will be
scanned automatically for music files. When needed, you can manually update the music library.
Configure Kazoo to use exaSound-PP1 as playback device and exaSound-PP1 Library as music server.
Step-by-step instructions for using Kazoo are available on our blog.

Page | 15
15. The exaSound PlayPoint Mark II supports Network Audio Adapter (NAA) protocol for advanced
upsampling and PCM to DSD conversion applications with the Signalyst HQPlayer. Follow the Step-
by-step guide for configuring the exaSound PlayPoint for use with HQPlayeravailable on our blog.
Playback Screens
UPnP / Open Home playback
Roon Ready playback using an
external Roon Server or the built-in
Roon Core. Available only with
exaSound DACs.
Playback with the Signalyst Network
Audio Adapter (NAA) using HQPlayer
as a streaming source.
ShairPort playback using Apple
AirPlay compatible devices as
streaming sources.
Page | 16
PlayPoint Mark II Configuration
You can configure the PlayPoint Mark II using the touch-screen or with a Web browser from a mobile
device, PC or Mac. Using the touch screen is simpler. Some advanced settings are available only with the
Web user interface. We will introduce first the PlayPoint Mark II Touch-Screen Interface and then the
Web User Interface.
Resetting the DAC Connection
Only one DAC can be attached to the PlayPoint at any time. Making a USB connection with more than
one DAC can cause unexpected behavior. Always power down the PlayPoint before connecting or
disconnecting DACs.
Device Information Screen
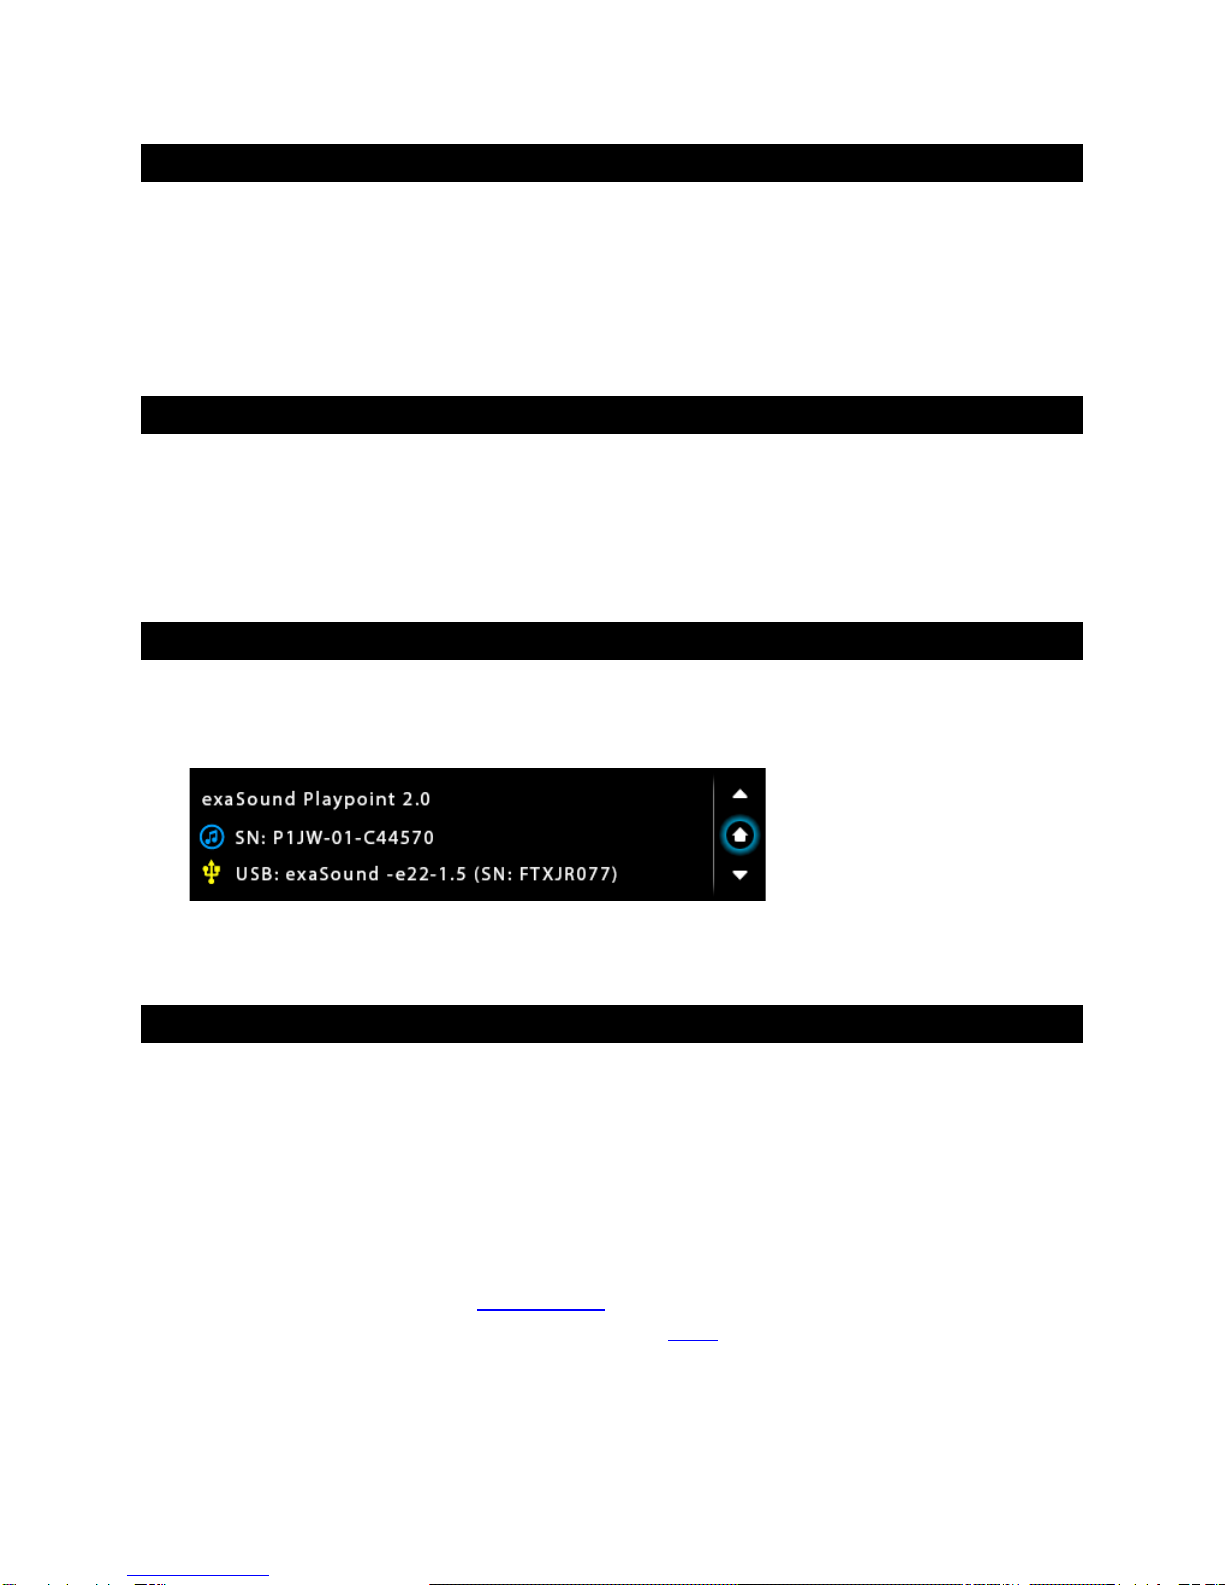
Navigating with the Down button on the touch screen you will see the model and serial numbers of the
PlayPoint Mark II and the attached DAC.
Zero-Configuration Networking
If you use an Ethernet cable connection, no configuration is required. A Gigabit Ethernet network is
required for seamless playback at high sampling rates. To obtain an IP address, DHCP must be enabled
on your router. Manual network configuration is available via the Web User Interface.
Usually you don't need to use the IP address to access the PlayPoint Mark II. Mac computers, mobile
phones and tablets will discover automatically your exaSound PlayPoint Mark II. By default it will appear
on your home network as exaSound-PP1.local. If your Windows computer is unable to see the
PlayPoint Mark II, you need to install Apple Bonjour or compatible zero-configuration networking
(zeroconf) service. On Linux computers you need to install Avahi.
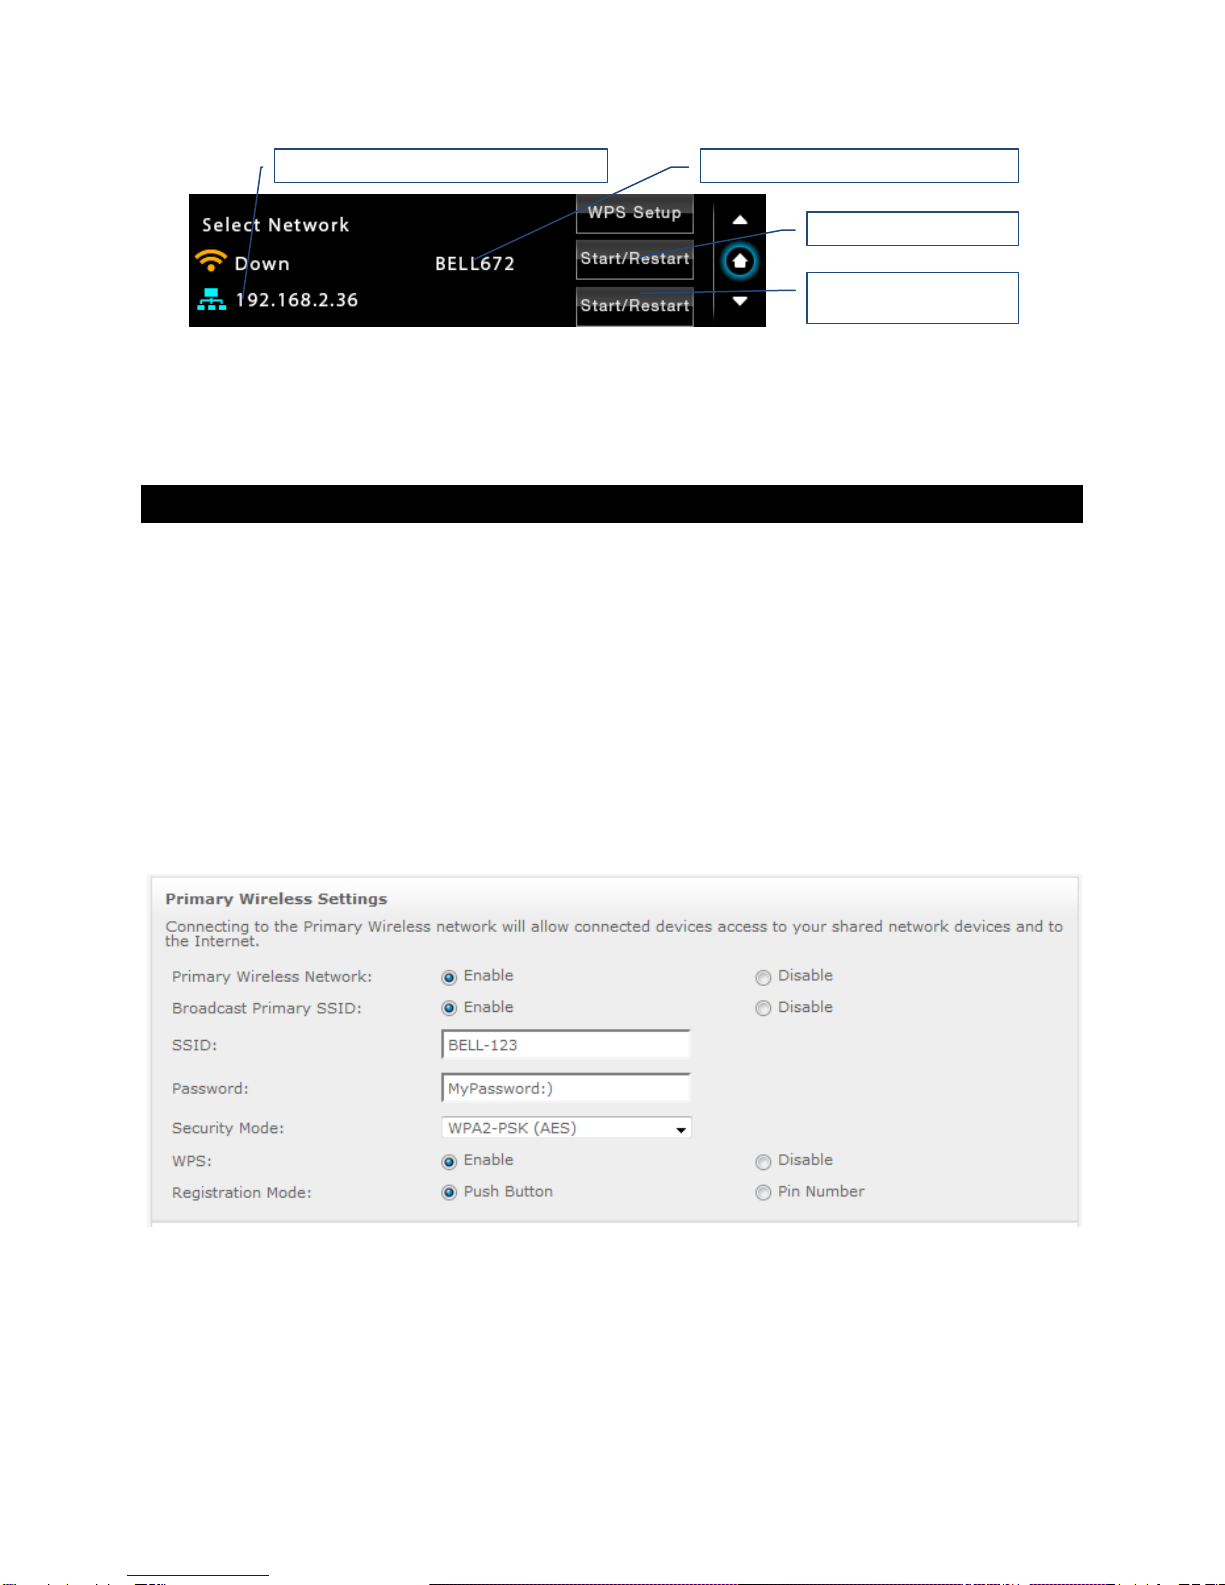
Use the Down navigation button on the right side of the touch screen to navigate to the Select Network
screen. When the network cable is connected the screen should look like this:
Page | 17
Before using the wireless connection you need to complete the WPS (Wireless Protected Setup)
procedure. Alternatively you can configure manually the wireless network via the Web User Interface.
Wireless Protected Setup (WPS) for Wi-Fi Network Access
Setup (WPS) for Wi-Fi Network Access
1. Use a Web browser to display the wireless configuration page of your home network router.
2. Make sure that SSID broadcast is enabled.
3. Mac filtering should be disabled.
4. Make sure that WPS is enabled.
5. Enable Push Button Registration Mode.
6. Set Security Mode to WPA2-PSK (AES).
Here is a sample router configuration screen. You need to use the home version of the WPA2-PSK
security mode and the Push Button mode of WPS. You need to turn off the use of Pin Number.
The SSID of your router will appear here
PlayPoint IP Address, Ethernet connection
Start/Restart for Wi-Fi
Start/Restart for Wired
Connection (Ethernet)

Page | 18
7. Use the Down navigation button on the right to navigate to the Select Network screen.
Tap WPS Setup
8. On the following screen tap again WPS Setup.
9. When you see the WPS Setup in progress message press the WPS button on your router. WPS setup
will be active for two minutes.
10. The Select Network screen will reappear. DHCP may take another two minutes to assign an IP
address to the PlayPoint Mark II.
The SSID of your router will appear here
Wi-Fi Interface is currently disconnected
Wi-Fi Network SSID (name)
PlayPoint IP Address, Wi-Fi connection
Start/Restart for Wi-Fi
Start/Restart for Wired
Connection (Ethernet)

Page | 19
Switching Between Wireless and Wired Network Connection
Only one network connection can be active at any time. Use the Start/Restart buttons to switch
between wired and wireless network connection.
The PlayPoint Mark II may restart to activate the new network settings.
Remote control apps also may have to be restarted after changing the network connection.
Network Screen for Models without Wi-Fi
If you've purchased a PlayPoint Mark II model without Wi-Fi support, the simplified Network Screen will
provide information about the network status and the IP address assigned to your PlayPoint Mark II.
Multi-room Configuration
Each PlayPoint Mark II device on your home network must have a unique name. Use the Select
PlayPoint Name screen to assign different host names to your PlayPoint Mark II players.
1. Navigate to the Select PlayPoint Name screen. The current host name will be highlighted.
2. Tap on one of the six pre-configured host names.
3. The PlayPoint Mark II will shut-down and restart.
4. Remote control apps must be reconfigured to use the new PlayPoint Mark II host name.
Page | 20
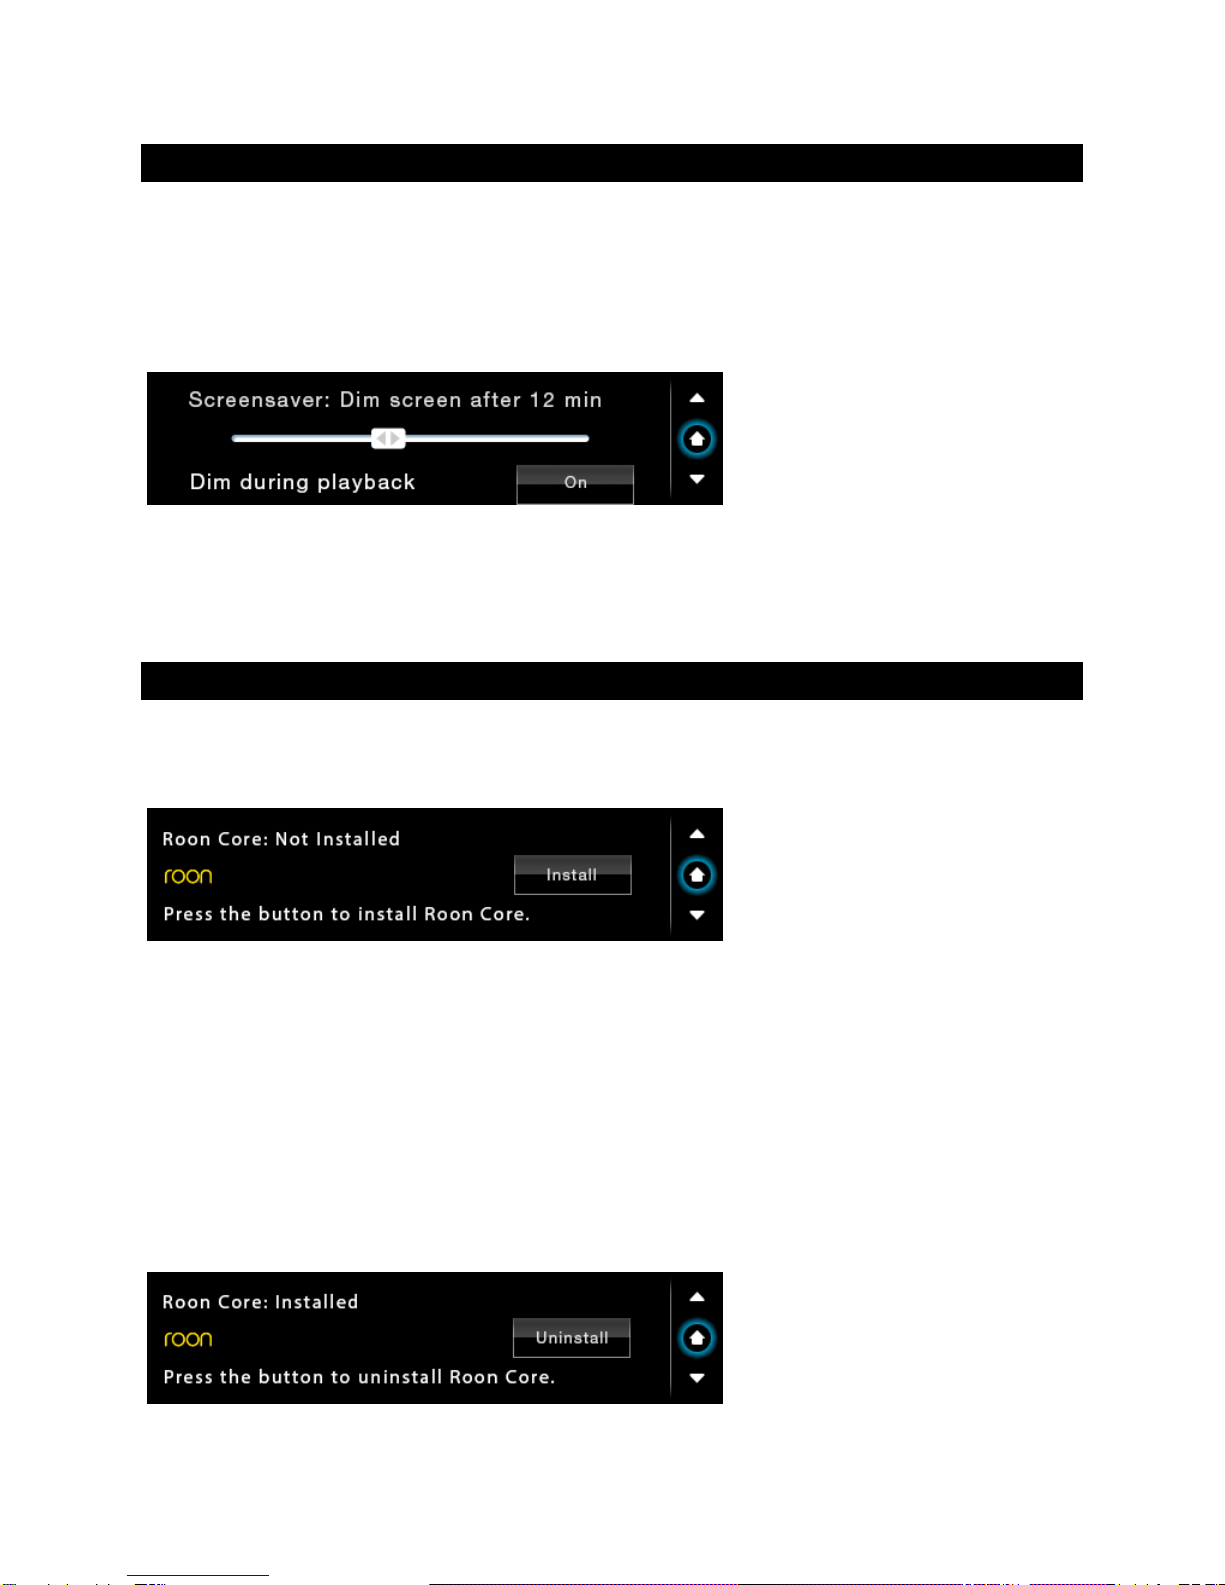
Screen Saver
The PlayPoint Mark II screen is preconfigured to fade out and become dark after 5 minutes of inactivity.
The power LED will remain illuminated. When the screen is dark any touch within the display central
area will wake it up.
Use the slider on the Screensaver screen to adjust the timeout interval.
When the Dim during playback option is set to Off, the display will wake up when playback starts. Set
the setting to On if you prefer to keep the screen dark during playback.
Roon Core
Use the Roon Core screen to install or uninstall Roon Core on your PlayPoint Mark II. The Setup files are
automatically downloaded from roonlabs.com.
Running Roon Core on the PlayPoint Mark II is simple and convenient - there is no need to use external
server hardware. In addition, using a USB drive attached to the PlayPoint Mark II to store your music
library reduces the workload on your home network and simplifies the network configuration. PlayPoint
Mark II supports Roon libraries up to 128,000 tracks (about 8TB storage space) on attached USB drives.
Alternatively, if you have a larger music library, if you want to stream hi-resolution audio simultaneously
to multiple playback Roon zones, or you need to use the CPU-intensive Roon DSP engine, you can use
an external Roon Server.
Roon core can be removed if you prefer to use other streaming services.
Table of contents


