manuals.online logo
Brands
  1. Home
  2. •
  3. Brands
  4. •
  5. Funk Firm
  6. •
  7. Turntable
  8. •
  9. Funk Firm Houdini User manual

Funk Firm Houdini User manual

Rega Arms:
Before commencing work:
Ensure the stylus guard in in place and lock arm rest. Disconnect from mains / power supply
and remove lid
Remove platter. Release the cable clamp from under the deck
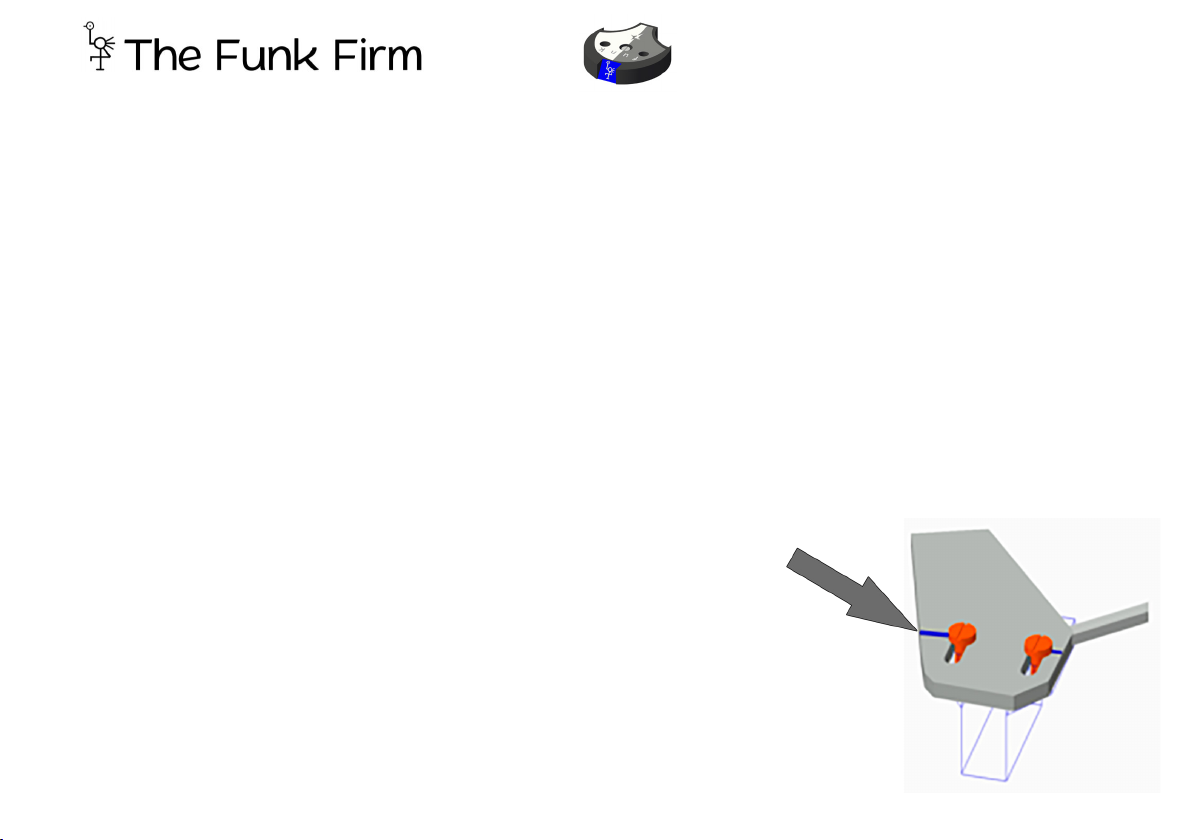
Remove The 3 Torx screws holding the arm. Pull arm free, but there is no need to remove the
arm and cable completely. Mark the screw positions in the headshell with a felt marker. (Fig 1)
Use the Allen key to undo the two or three cartridge mounting screws.
Note: There is no need to unclip the cartridge tags.
Cut the screws to length as shown both for cartridge & head shell, (FIGS 2 & 4) NOTE: For the
headshell the jig MUST be used from underneath. First fit the cartridge to Houdini using two
screws. Tighten GENTLY. Now fit the assembly to the arm using the screws cut for the top.
Before finally tightening, position by aligning the screws alongside the felt marks. Again, tighten
but GENTLY. The cartridge is now mounted and aligned.
Slide the appropriate VTA spacer(s) under the arm to compensate for Houdini, which is 6mm
depth. More may be necessary depending on mat and cartridge thickness when compared to
the original setup, when
longer M4 bolts may also be needed. The slot allows the cables to fit spacers to fit easily.
Re-locate the screws in the holes and again tighten. NEVER use excessive force. Damage can
occur easily, especially P8 & P10 This is especially so with the P8 and P10. Moreover, overtight-
ening does not help.
Relocate the arm cable in the cable clamp and tighten.
Re-assemble the deck. Bias will not need altering but tracking weight will. Re-set in the normal
manner. Select a record and play. We hope you will be delighted with the result.
OPTIONS:
Rega Arms: Please ask for Rega kit R1
SME Arms:SME IV & V: Spacer S1
Ekos Arms: Spacer S1
Technics SL1200 Series Arms:
Technics SL1200 turntables have limited 6mm
VTA capability. Ask for the dedicated
extra-height headshell that allows for the
normal operation of VTA. - T1
Houdini
Fitting the Houdini:
Houdini is 6mm thick. VTA must allow for this. The lower
plate moves relative to the top with just .9mm clearance.
To prevent shorting, top & bottom screws have to be the
correct length. Using the jig, push the relevant screws
through: Headshell + jig or Cartridge + jig. The nylon
screws can easily be cut to length with nail clippers.
If using a craft knife, cut away from yourself to avoid
injury.
Start by protecting the stylus!
Houdini’s nuts are in line. By marking the position on the
headshell of the screws with a felt marker, the original
alignment to be easily reset is achieved.
(FIG1)
Fitting Houdini is easier and quicker if the
arm is removed from the turntable.
Always fit the cartridge to the Houdini
first!
Remove cartridge from the arm. Unless
replacing cartridge wires, leave them on the
cartridge which will now hang freely.
1: Bolted Through Mounting:
The screws go upwards into Houdini.
Fit each of the long screws into the cartridge.
With the jig over the screw, cut the excess
length off. Remove jig
and screw cartridge to
Houdini.
There is no need
to use force.
Houdini
2: Mounting Threaded Cartridges.
Screw the 4mm screws halfway into
the top of the cartridge.
Fit the screwheads into the open slots
onthe underside of the Houdini and
push back as far as the cartridge will go.
Push the screwdriver through the holes
in the top to tighten the screws. Use
the screws which have been cut for the
headshell to fix the Houdini to the arm
and align against
the marks made
when removing
the cartridge.
The cartridge has
now been fitted.
Now to fit the cartridge and Houdini to the head-
shell...
Now just simply set the (approx 6mm) VTA, approx 1
to 1.5 gram tracking force (you save weight with the
supplied nylon bolts). Azimuth & Anti-skate. Fine tune
and enjoy!
Additional support: www.thefunkfirm.co.uk

Popular Turntable manuals by other brands

Pyle PVNP30BT operating instructions

Pyle

Pyle PVNP30BT operating instructions

Lenoxx TT650 instruction manual

Lenoxx

Lenoxx TT650 instruction manual

Technics SL-1200GEG operating instructions

Technics

Technics SL-1200GEG operating instructions

Crosley CR44-CD instruction manual

Crosley

Crosley CR44-CD instruction manual

Ortofon MC Anna user guide

Ortofon

Ortofon MC Anna user guide

Pro-Ject Audio Systems 6 PerspeX Instructions for use

Pro-Ject Audio Systems

Pro-Ject Audio Systems 6 PerspeX Instructions for use

Grundig PS-4200 Service manual

Grundig

Grundig PS-4200 Service manual

Pioneer PL-51 operating instructions

Pioneer

Pioneer PL-51 operating instructions

Audio-Techica AT-LP3XBT user manual

Audio-Techica

Audio-Techica AT-LP3XBT user manual

Clearaudio Innovation Compact user manual

Clearaudio

Clearaudio Innovation Compact user manual

Sovereign Mk4 owner's manual

Sovereign

Sovereign Mk4 owner's manual

Kenwood KD-291R instruction manual

Kenwood

Kenwood KD-291R instruction manual

Adastra DM-8 user manual

Adastra

Adastra DM-8 user manual

Marantz TT5005 owner's manual

Marantz

Marantz TT5005 owner's manual

Sony PS-LX430 Service manual

Sony

Sony PS-LX430 Service manual

Pioneer PL-100 Service manual

Pioneer

Pioneer PL-100 Service manual

ION PROFILE LP user guide

ION

ION PROFILE LP user guide

rek-o-kut Micropoise S-320 Instructions for installation and operation

rek-o-kut

rek-o-kut Micropoise S-320 Instructions for installation and operation

manuals.online logo
manuals.online logoBrands
  • About & Mission
  • Contact us
  • Privacy Policy
  • Terms and Conditions

Copyright 2025 Manuals.Online. All Rights Reserved.