Exit Stopper STI-6400 Series Instructions for use

Exit Stopper®
Quick Install
STI-6400 Series
Rely on STI®
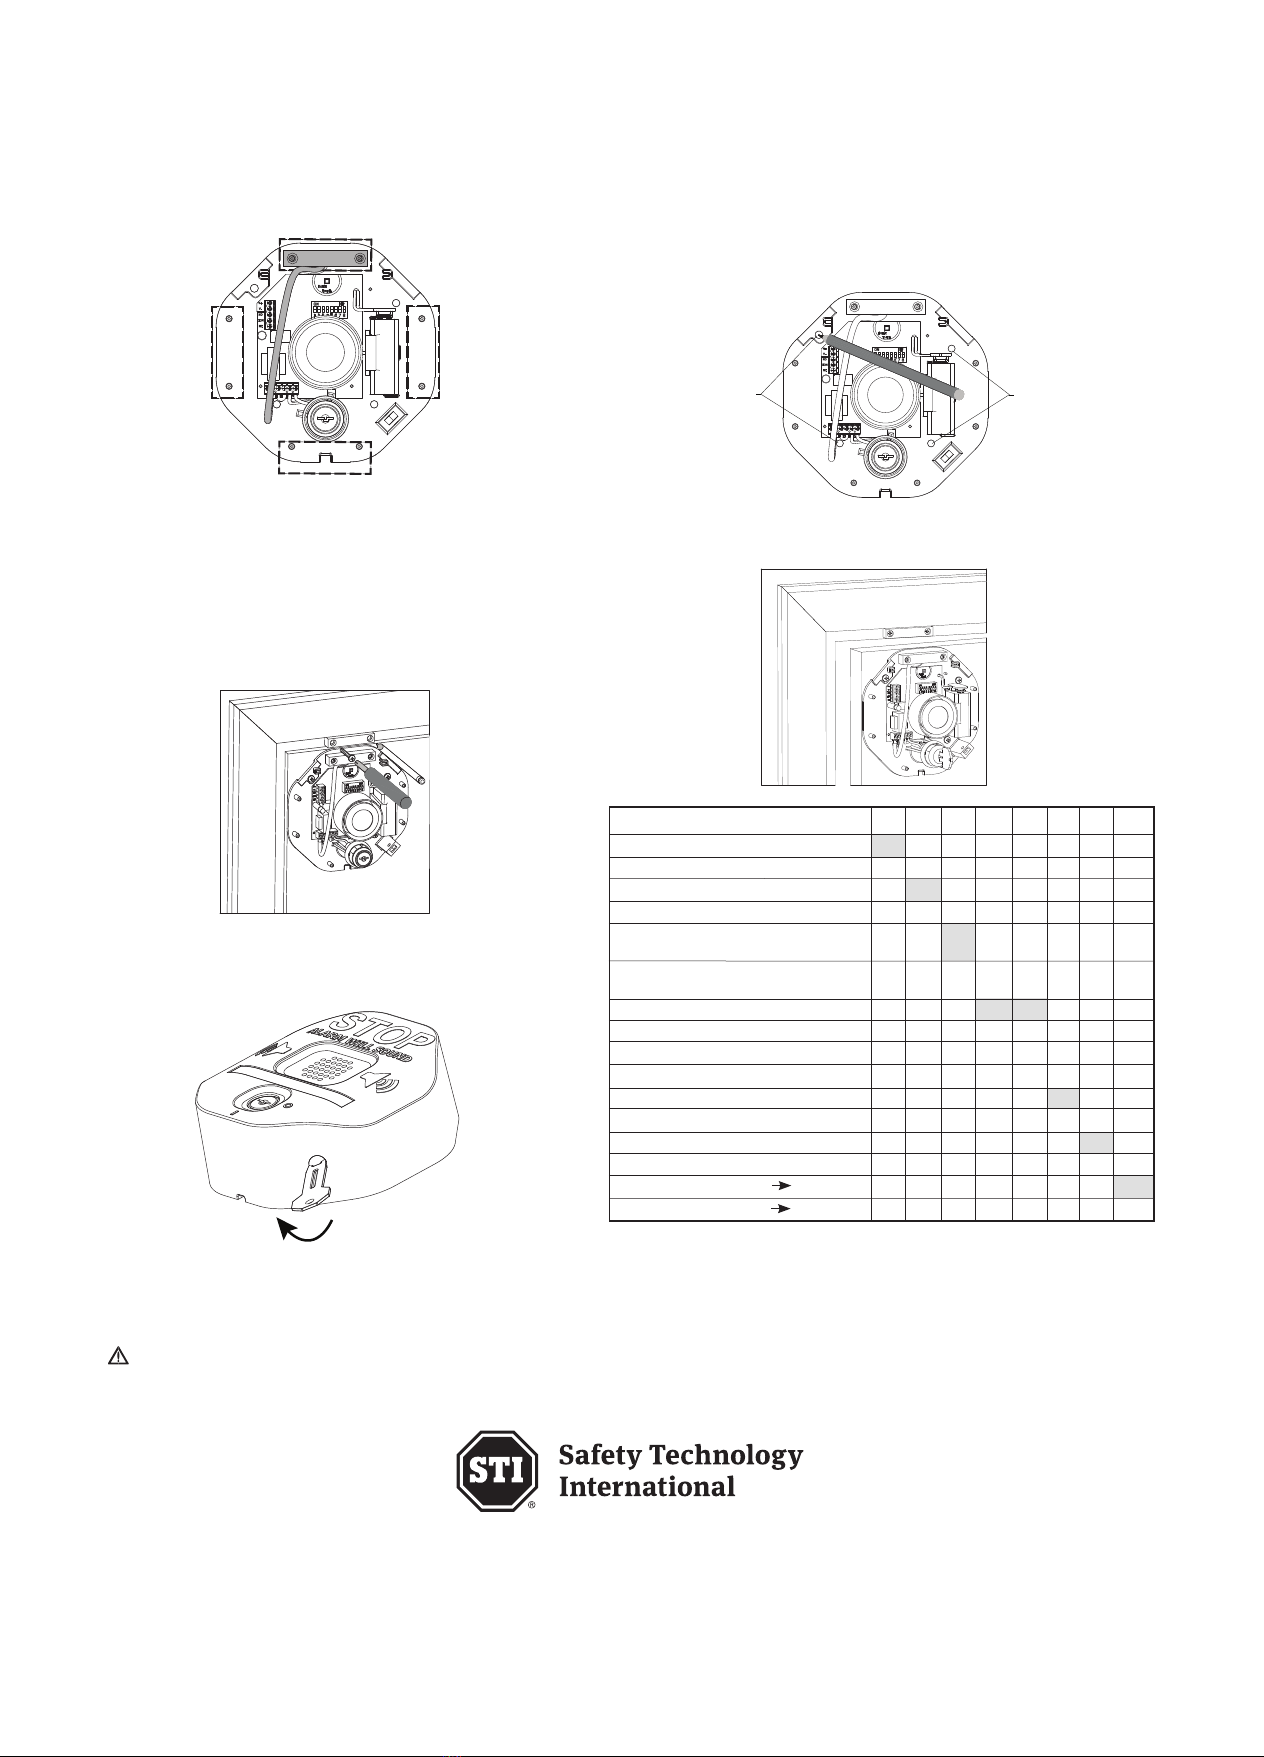
SET UP
1. Key in OFF position 3. Remove cover from base,
push on lock to separate
5. Unwrap battery
and connect
6. Terminal block (for remote and
relay options) – refer to full install
online for wiring connections
7. Test – place magnet next to reed, turn on,
separate magnet from reed
8. Apply language label if desired
1
2
4. Choose setting – refer
to switch table, default
settings shown side 2
ON
OFF
LED
DO NOT TOUCH
LED -
Do Not Touch
2. Remove security screw with
provided wrench
MOUNTING
9. Place reed at desired location
(top, right, bottom or left)
10. Position base. Mark and drill four (4) holes 1”
(25mm) deep. Using plastic anchor, drill 3/16”
(4.5mm). Install into wood or steel: drill 9/64”
(3.5mm). Mount using (4) M4 x 25mm screws.
11. Install reed magnet, mark with pencil,
drill, install using plastic anchor, drill
3/16” (4.5mm). Install into wood or
steel: drill 1/8” (3mm). Mount with (2)
M3.5 x 32mm screws.
12. Test, turn key on, open door
13. Replace cover, snap lid from top,
secure with security screw
6400 QUICK INSTALL
Oct2019
Subject to change
without notice.
2306 Airport Rd • Waterford, MI 48327, USA
Phone: 248-673-9898 • Fax: 248-673-1246
[email protected] • www.sti-usa.com
Taylor House • 34 Sherwood Road • Bromsgrove, Worcestershire • B60 3DR • England
Tel: +44 (0)1527 520 999 • Fax: +44 (0)1527 501 999 • [email protected] • www.sti-emea.com
MOUNTING HOLESMOUNTING HOLES
Mounting holes Mounting holes
Warranty
WARNING: This product can expose you to chemicals including Dichloromethane, which is known to the State of California to
cause cancer, and Bisphenol A (BPA), which is known to the State of California to cause birth defects or other reproductive harm.
For more information go to www.P65Warnings.ca.gov.
Three year warranty or a one year limited warranty (from date of purchase) on most products. See website for details.
Electronic warranty form at www.sti-usa.com/wc14.
SWITCH SETTINGS 1 2 3 4 5 6 7 8
Arming - immediate OFF*
Arming - 15 second delay ON
Trip - immediate OFF*
Trip - 15 second delay ON
Shut-off based on duration
Shut-off approx. 3 sec. after
Duration - 30 second alarm OFF* OFF*
Duration - 180 second alarm OFF ON
Duration - continuous alarm ON OFF
Duration - 30 second annunciator mode ON ON
Low battery detection on - Turn switch off OFF*
Low battery detection off - Turn switch on ON
Volume - high ON*
Volume - low OFF
Dry contact relay function OFF OFF*
Dry contact relay function ON ON
OFF*
ON
door closes
(switches 4 & 5)
*default
NOTE: Disconnect all power sources before changing switch settings.


