EXIT Toys JumpArenA Round 8ft User manual
JumpArenA Round
ø8ft / ø10ft / ø12ft / ø14ft
JumpArenA
Safety Net
User manual
Gebrauchsanweisung
Gebruikshandleiding

2
JumpArenA
Trampolines

3
JumpArenA
Trampolines
English 4
Deutsch 16
Nederlands 28
40
JumpArenA
Trampolines
4
1.0 Introduction
Congratulations on choosing a EXIT JumpArenA Safetynet!
Have fun, be active and play outdoors......
That’s what keeps driving us to develop innovative, quality toys for cool kids.
We do everything possible to develop safe products for children. As our products are
classed as toys, we comply with the toughest consumer safety regulations. Before
launching our products onto the market, we have independent tests carried out for
certication. We also continuously test our production runs and periodically have
independent tests performed again as a further check. Only products which live up to
the highest EXIT Toys standard are marked with and recognized by the EXIT-brand.
“We want to thank you for your custom and your condence in this product. We’re
sure your kids will have as much fun as we did during development. Being open-
minded, we really appreciate all comments and ideas which will help us improve our
products or develop new ones. You are invited to send your ideas to us at info@exit-
toys.com”
Please visit www.exittoys.com and discover more cool new products.
The EXIT Toys team

JumpArenA
Trampolines
5
2.0 Guidelines for safe use
Using your product as instructed in this manual will eliminate virtually all hazards.
However, please bear in mind that children have a natural urge to play and that this
may lead to unforeseen dangerous situations for which the manufacturer cannot be
held responsible. Teach your children how to use the product and point out possible
dangers to them.
BEFORE YOU BEGIN USING YOUR TRAMPOLINE:
Read and understand all this information provided to you in this manual.
As with all physical sports and activities there is the risk of participants
receiving an injury. To ensure your future enjoyment and the prevention of
injury, be sure to follow appropriate safety rules and tips.
WARNING
To avoid serious injury:
!
In case of missing or broken parts, please contact place of
purchase for assistance.
•
Read and understand the manual before use.
•
Adult supervision
- The safety net is to be assembled by an adult prior to use.
- Continuous adult supervision is required.
•
Protect children
•
- Prevent falls and strangulation - Exit through the door only,
and use caution.
- Assist young children in and out of Safety net.
We are not liable for any injuries that may occur when
using the trampoline with a safety net.
•
Only one person on the trampoline•
Max. User weight:•8ft: 90kg. 10ft: 100 kg.
12ft: 110kg. 14ft: 120 kg.

6
JumpArenA
Trampolines
2.1 General Safety Instructions
1. Please read and follow all instructions before you start exercising with your
safety net.
2. Please inspect the safety net before each use for bent steel tubes,torn mat,loose
and broken springs and overall stability of the trampoline.
3. You shall always be sure that the equipment is working normally and safety be-
fore you work out on your safety net
4. Never have more than one person bouncing on the trampoline. The safety net
has been made for only one person
5. A supervisor is absolutely necessary when children use this trampoline.
6. Safety net isn’t created in order to replace adult supervision.
7. This product is intended for home use only.
8. Wind or air movement shall be calm and gentle, Don’t use trampoline in gusty or
severe wind
9. Ensure that a person always supervises the user of the trampoline.

7
JumpArenA
Trampolines
3 SAFETY NET ASSEMBLY
STEP BY STEP CONSTRUCTION
Please read the assembly instructions before beginning to assemble the
product.
Please refer to the table below for parts description and numbering.
Make sure you have all the parts listed. If you are missing any parts, please contact
place of purchase.
Please use gloves to protect your hands from pinch points during assembly. When
you are ready to start, make sure that you have plenty of space and a clean dry area
for assembly.
8
JumpArenA
Trampolines
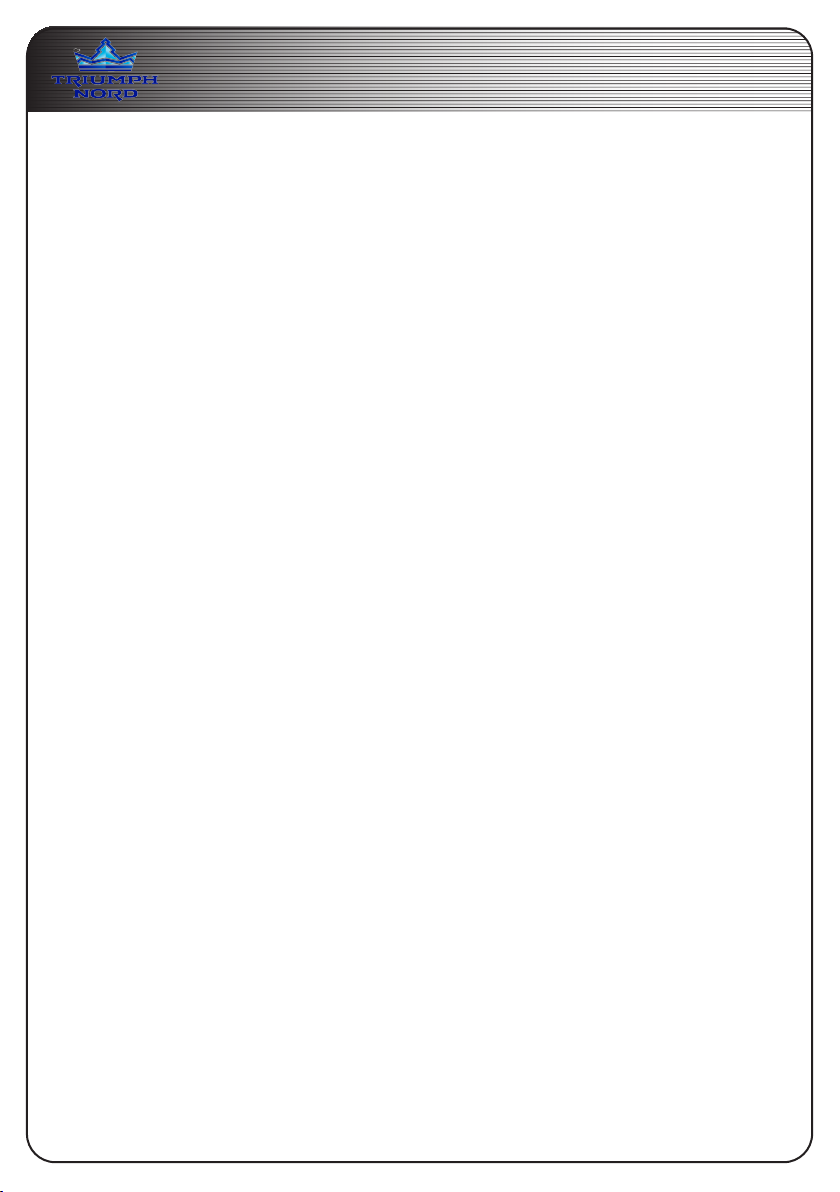
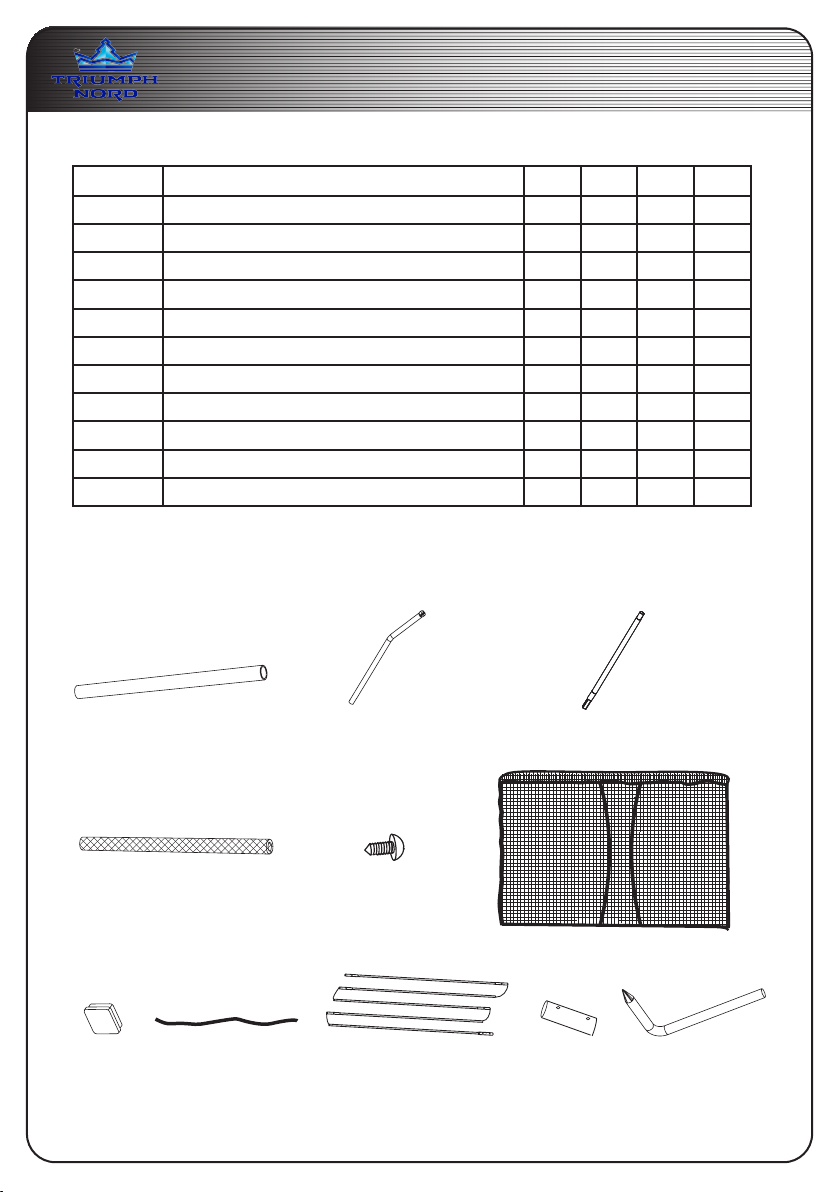
Parts list
Part.Nr. Description 8ft 10ft 12ft 14ft
1 Foam sleeve 4 8 8 8
2 Upper Tube 4 8 8 8
3 Lower tube 4 8 8 8
4 Foam 8 16 16 16
5 Screw 4 8 8 8
6 Net 1 1 1 1
7 End cap 4 8 8 8
8 Cord 2 2 3 3
9 Cable wire 2 2 2 2
10 Bushing 2 2 2 2
11 Tool 1 1 1 1
Enclosed are the current specications and product features available at time of printing, however, changes may
be made in equipment, availability, specications and features without notice.
(4)
(8)
(5)
(2)
(9)
(1)
(11)(10)(7)
(6)
(3)

9
JumpArenA
Trampolines
Step 1
Lay one upper tube(2) with foam(4)
and lower tube(3) with foam(4) on
the ground, insert the lower tube(3)
into the upper tube(2) secure with
screw(5). Then insert the assembled
tubes into the Foam sleeve(1).
Repeat this step to attach the seven
remaining Upper tubes(2) and Lower
tubes(3) together (not shown).
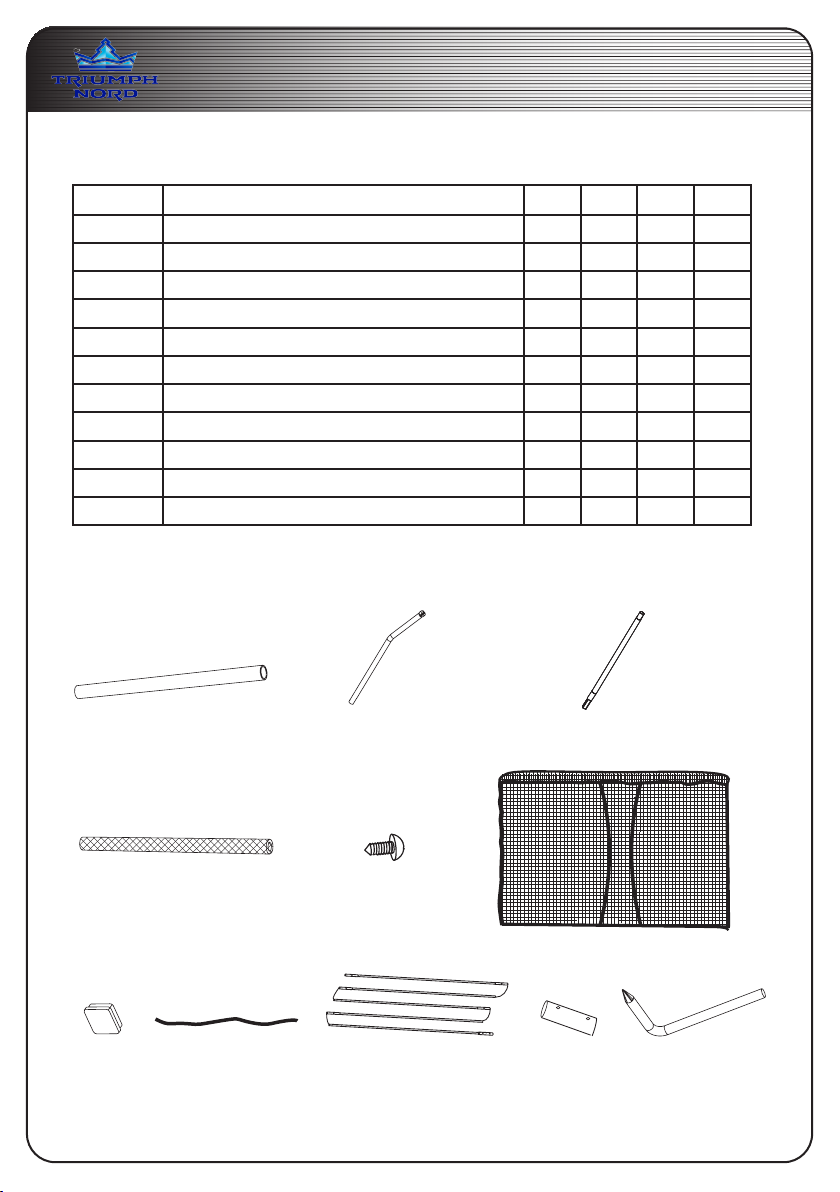
Step 2
Insert the enclosure pole into the
Socket of the trampoline as shown.
Attach other enclosure poles in the
same way.
1
5
3
2
2
10
JumpArenA
Trampolines
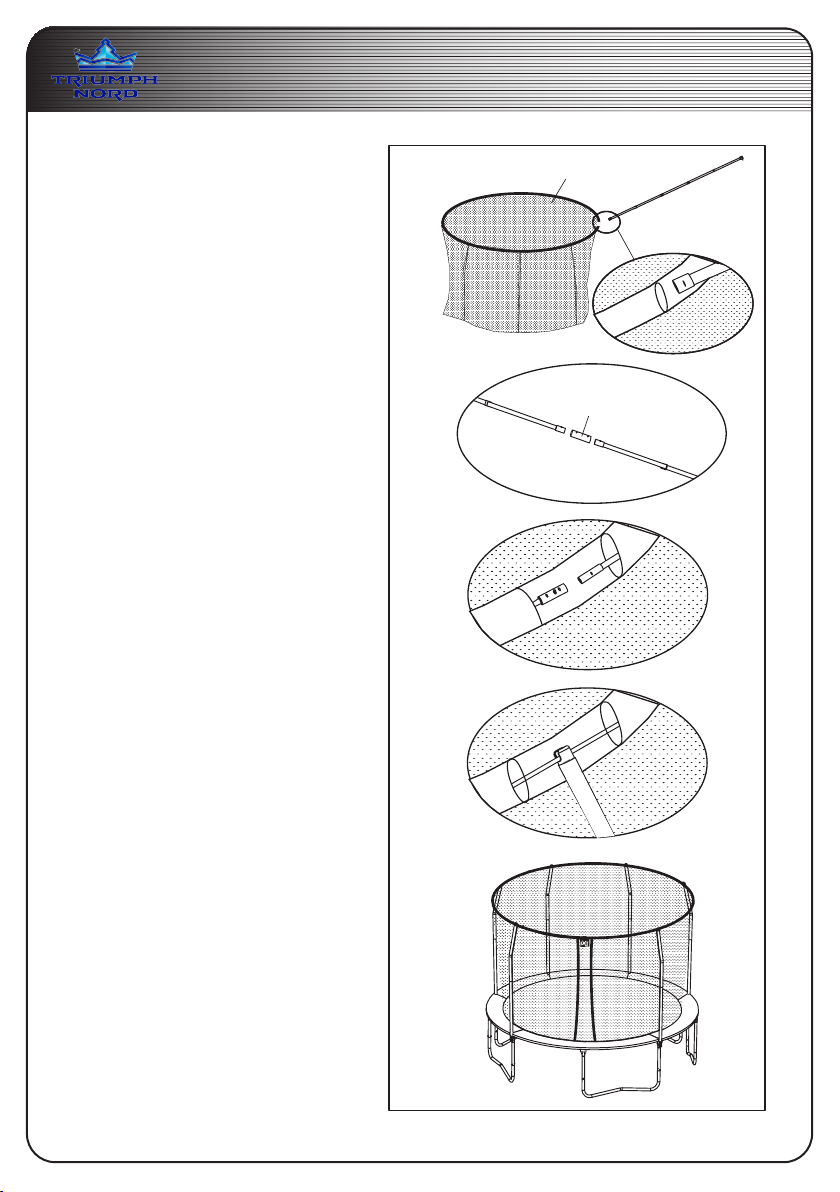
Step 3
Insert the end cap(7) into the bottom
hole of the socket.
Step 4
Identify the Cable wire with small
sections attached by thread, then
insert the end B of cable into the end
A as shown, repeat this process to at-
tach the remaining cables C,D,E,F.....
to form the rst assembled cable.
Repeat this process to attach other
set Cable wire together by same
manner.
3
7
4
A
A
B
B
E
F
H
G
C
D
11
JumpArenA
Trampolines
Step 5
A
Insert one assembled Cable wire into
sleeve on the top of the enclosure
net(6) as shown A.
Notice: Two adults are required
when assemble.
B
Insert the second assembled Cable
wire into sleeve on the top of the
enclosure net by the same manner,
then attach one end of the two Cable
wires together with Bushing(10) as
shown B.
C
Attach two ends of the entire Cable
wire together as shown C.
Place the Cable Wire with enclsoure
to the plastic cap. Make sure the ca-
ble wire t into the slot properly.
Repeat for all the cable wire and
plastic cap.
Make sure the center of the enclosure
doos and center of the two legs are
aligned.
5
A
B
C
10
6

12
JumpArenA
Trampolines
Step 6
Notice: During step6, you will “sew”
the lower edge of the Netting(6) to
the V-rings on the mat using the
Cords(8) Locate the V-ring closest to
the door. thread one end of a Cord(8)
through the lower eage of the net-
ting(6) above the V-ring and then
thread the cord through the V-ring.
Tie the Netting to the V-ring by mak-
ing a double knot in the cord.
Thread the cord(8) through the lower
edge of the netting(6) halfway be-
tween the rst V-ring and the V-ring
to the left. and then thread the cord
through the V-ring to the left, Repeat
this procedure until the entire cord is
threaded through the netting and V-
ring as shown. keep the cord taut. Tie
the end of the cord to the last V-ring
that it reaches. Repeat this process
until all the cords are attached.
Tie a second cord(not shown) to the
last V-ring reached by the rst cord.
thread the second cord through the
netting(6) and V-ring as described
above. Make sure that netting is sewn
to every V-ring on the trampoline
bed.
Congratulations! Your trampoline
enclosure is now fully assembled
(put together).
Make sure that all parts are securely
attached. Familiarize yourself and all
users with the trampoline and enclo-
sure with the safety precautions, use
and instructional materials, and care
and maintenance instructions in this
manual before using the trampoline
and enclosure.
6
6
6
8
18
Door / Tür / Deur / Porte

13
JumpArenA
Trampolines
4.0 CARE AND MAINTENANCE
This trampoline was designed and manufactured with quality materials and crafts-
manship. If proper care and maintenance is provided, it will provide all jumpers with
years of exercise, fun, and enjoyment as well as reduce the risk of injury. Please fol-
low the guidelines listed below:
This trampoline is designed to withhold a certain amount of weight and use. Please
make sure that only one person at any one time uses the trampoline. Jumpers should
either wear socks, gymnastics shoes, or be barefoot when using the trampoline.
Please be aware that street shoes or tennis shoes should NOT be worn while using
the trampoline. In order to prevent the trampoline mat from getting cut or damaged
please do not allow any pets onto the mat. Also, jumpers should remove all sharp
objects from their person prior to using the trampoline. Any type of sharp or pointed
objects should be kept off the trampoline mat at all times.
Always inspect the trampoline before each use for worn, abused or missing parts. A
number of conditions could arise that may increase your chances of getting injured.
Please be aware of:
• Punctures, holes, or tears in the trampoline mat
• Sagging trampoline mat
• Loose stitching or any kind of deterioration of the mat
• Bent or broken frame parts, such as the legs
• Broken, missing, or damaged springs
• Damaged, missing, or insecurely attached frame pad
• Protrusions of any types (especially sharp types) on the frame, springs, or mat
IF YOU FIND ANY OF THE PREVIOUS CONDITIONS, OR ANYTHING ELSE THAT
YOU FEEL COULD CAUSE HARM TO ANY USER, THE TRAMPOLINE SHOULD
BE DISASSEMBLED OR SECURED FROM USE UNTIL THE CONDITION(S) HAS
BEEN RESOLVED.
WINDY CONDITIONS
In severe wind situations, the trampoline can be blown about. If you expect windy
weather conditions, the trampoline should be moved to a sheltered area or disassem-
bled. Another option is to tie the round, outside portion (top frame) of the trampoline
to the ground using ropes and stakes. To ensure security, at least three (3) tie downs
should be used. Do not just secure the legs of the trampoline to the ground because
they can pull out the frame sockets.
MOVING THE TRAMPOLINE
If you need to move the trampoline, two people should be used. All connector points
should be wrapped secured with weather resistant tape, such as duct tape. This will
keep the frame intact during the move and prevent the connector points from dislo-
cating and separating. When moving, lift the trampoline slightly of the ground and
keep it horizontal to the ground. For any type of other move, you should disassemble
the trampoline.

14
JumpArenA
Trampolines
5.0 Warranty
1. After the date of the purchase invoice, the owner of the EXIT Toys JumpArena
has a:
- 2 year warranty on the breaking of the frame
- 1 year warranty on the tearing of the net
2. The warranty applies only to the material and construction defects with respect
to this product or its components.
3. The warranty becomes defunct if:
• This product is used incorrectly and/or carelessly and is used in such a way that
it does not comply with its purpose.
• This product is not assembled and maintained according to the instruction book-
let.
• Technical repairs to this product are not carried out professionally.
• Parts, which are mounted afterwards, do not comply with the technical specica-
tions of the product concerned or are mounted incorrectly.
• Defects are a result of climatic inuences such as corrosion, UV rays or normal
disintegration.
• The product is rented out or was made available to various unspecied persons
in any other manner.
4. EXIT Toys will repair or replace according to its choice all material and construc-
tion defects that have been ascertained by EXIT Toys during the warranty period.
5. The owner is only entitled to the warranty by presenting the product for inspec-
tion at a EXIT Toys dealer. It should be handed to the EXIT Toys dealer, accompa-
nied by the original purchase invoice.
6. In case of material and construction defects that have been ascertained by EXIT
Toys, the product or its components will be repaired or replaced – according to
its choice – free of charge during the warranty period mentioned in Article 1.
7. If the claim for warranty is not justiable, all the costs are at the expense of the
owner.
8. This warranty cannot be transferred to third parties.
9. The trampoline is designed for personal use. It is not permitted to rent out or
place the trampoline in public areas like schools or day-care centres. The guaran-
tee and any other liabilities shall expire if the playhouse is rented out or used in
public areas.

15
JumpArenA
Trampolines

16
JumpArenA
Trampolines
1.0 Einführung
Glückwunsch zur Wahl des EXIT Toys JumpArenA Sicherheitsnetzes!
Amüsier dich, sei aktiv und spiele im Freien!
Für diesen Spaß entwickeln wir innovative und hochwertige Spielzeuge für coole Kids.
Wir tun alles in unserer Macht stehende, um sichere Produkte für Kinder zu en-
twickeln. Da unsere Produkte als Spielzeuge klassiziert werden, erfüllen wir die
strengsten Sicherheitsvorschriften. Bevor unsere Produkte auf dem Markt kommen,
veranlassen wir die Dürchführung von unabhängigen Prüfungen zur Zertizierung.
Außerdem kontrollieren wir selbst ständig unsere Produktionsabläufe und lassen diese
als weitere Kontrolle regelmäßig durch unabhängige Stellen überprüfen. Nur Produk-
te, die den höchsten EXIT Toys Standards gerecht werden, werden mit dem EXIT Toys
label gekennzeichnet.
Wir danken Ihnen für Ihr Vertrauen in dieses Produkt. Und wir sind sicher, dass Ihre
Kinder genau viel Spaß haben werden wie wir ihn während der Entwicklung hatten.
Da wir aufgeschlossen sind, schätzen wir wirklich all Ihre Kommentare und Ideen, die
uns bei der Verbesserung unserer Produkte bzw. bei der Entwicklung neuer Spiel-
senden.
Besuchen Sie www.exittoys.com und entdecken Sie weitere tolle neue Produkte.
Das EXIT Toys Team

17
JumpArenA
Trampolines
2.0 Richtlinien für einen sicheren Gebrauch
Wenn das Trampolin entsprechend dieser Anleitung verwendet wird, sind praktisch
alle Gefahren ausgeschlossen. Bedenken Sie allerdings, dass Kinder einen natürli-
chen Spieldrang haben und dass dies zu unvorhergesehenen gefährlichen Situationen
führen kann, für die der Hersteller nmicht haftbar gemacht werden kann. Weisen Sie
Ihre Kinder in die sichere Verwendung des Produkts ein und auf mögliche Gefahren
hin.
BEVOR SIE IHR BIG TRAMPOLIN IN GEBRAUCH NEHMEN:
Sie müssen diese Gebrauchsanweisung vollständig lesen und verstehen.
Wie bei allen Körpersportarten und –aktivitäten trägt der Ausübende das Verletzung-
srisiko. Um Ihre künftige Freude am Gerät sicherzustellen und auch, um Verletzungen
vorzubeugen, befolgen Sie die Sicherheitsbestimmungen und –tipps.
WARNUNG
Zur Vermeidung von schweren
Verletzungen:
!
Vor Gebrauch müssen Sie die Bedienungsanleitung gelesen und
verstanden haben.
•
Falls Teile nicht mitgeliefert wurden oder fehlerhaft sind, wenden Sie sich
bitte an Ihre Verkaufsstelle.
•
Achtung: Wir können nicht haftbar gemacht werden für Verletzungen die
während des Gebrauchs des Trampolins mit Sicherheitsnetz auftreten
können.
•
- Das Spielzeug ist vor Gebrauch von einem Erwachsenen zu montieren.
Aufsicht durch Erwachsene
•
- Nur unter Aufsicht eines Erwachsenen verwenden.
- Verhindern Sie Stürze und Strangulation - Verlassen Sie das
Sicherheitsnetz nur durch die Tür; seien Sie dabei vorsichtig.
Kinder schützen
•
- Helfen Sie kleineren Kindern in das Safety Net hinein- und
hinauszukommen.
Immer nur eine Person auf dem Trampolin.
•
Max. Belastungsgewicht:
•8ft: 90kg. 10ft: 100 kg.
12ft: 110kg. 14ft: 120 kg.

18
JumpArenA
Trampolines
2.1 Allgemeine Sicherheitshinweise
1. Bitte lesen Sie die Sicherheitshinweise vollständig durch, ehe Sie mit Ihren Übun-
gen auf dem Safety Net beginnen. Befolgen Sie die Sicherheitshinweise.
2. Bitte überprüfen Sie das Safety Net vor jedem Gebrauch auf verbogene Stahl-
rohre, eingerissene Matten, lockere, bzw. gebrochene Federn und auf die allge-
meine Stabilität des Trampolins.
3. Sie müssen sich immer davon überzeugen, dass das Gerät ordnungsgemäß funk-
tioniert, ehe Sie auf Ihrem Safety Net Sport treiben.
4. Lassen Sie niemals mehr als eine Person auf dem Trampolin springen. Das Safety
Net wurde nur für eine Person konstruiert.
5. Eine Aufsicht ist unbedingt erforderlich, wenn Kinder dieses Trampolin benutzen.
6. Das Safety Net kann niemals eine erwachsene Aufsicht ersetzen.
7. Dieses Produkt ist nur für den häuslichen Gebrauch bestimmt.
8. Es müssen ruhige Wind- und Wetterverhältnisse vorherrschen. Das Trampolin
darf bei böigem oder stürmischem Wind nicht benutzt werden.
9. Stellen Sie sicher, dass immer eine Person den Benutzer des Trampolins beaufsi-
chtigt.

19
JumpArenA
Trampolines
3 ZUSAMMENBAU DES SAFETY NETS
Die Konstruktion - Schritt für Schritt
Bitte lesen Sie die Bauanleitung, ehe Sie mit dem Aufbau des Produktes be-
ginnen.
Die unten aufgeführte Teileliste enthält den Lieferumfang mit Teilebeschreibung und
Bestellnummern.
Vergewissern Sie sich, dass alle aufgelisteten Teile vorhanden sind. Wenn Teile fehlen,
setzen Sie sich bitte mit der Verkaufsstelle in Verbindung.
Bitte benutzen Sie Handschuhe, um zu vermeiden, dass Ihre Hände während des Auf-
baus eingeklemmt werden. Wenn Sie startbereit sind, sorgen Sie bitte für genügend
Platz und einen sauberen, trockenen Ort für den Zusammenbau.
20
JumpArenA
Trampolines
Teileliste
Ref.Nr. Beschreibung 8ft 10ft 12ft 14ft
1 PVC-Hülse 4 8 8 8
2 Oberes Rohr 4 8 8 8
3 Unteres Rohr 4 8 8 8
4 Schaumpolsterung 8 16 16 16
5 Schraube 4 8 8 8
6 Netz 1 1 1 1
7 Verschlussstopfen 4 8 8 8
8 Schnur 2 2 3 3
9 Fiberglas 2 2 2 2
10 Buchse 2 2 2 2
11 Werkzeug 1 1 1 1
Hierin aufgeführt sind die Spezikation und Produkteigenschaften, wie sie zum Zeitpunkt des Drucks gültig waren.
Produkt, Verfügbarkeit, Spezikationen und Eigenschaften können sich jedoch ohne vorherige Ankündigung
ändern.
(4)
(8)
(5)
(2)
(9)
(1)
(11)(10)(7)
(6)
(3)
This manual suits for next models
3
Table of contents
Languages:
Other EXIT Toys Accessories manuals


