Exmark 135-0192 User manual

135-0192
SPREADERACCESSORY
ForSerialNos.
402,082,300&Higher
PartNo.4503-424Rev.E

WARNING
CALIFORNIA
Proposition65Warning
Useofthisproductmaycauseexposure
tochemicalsknowntotheStateof
Californiatocausecancer,birthdefects,
orotherreproductiveharm.
Exmarkreservestherighttomakechangesor
addimprovementstoitsproductsatanytime
withoutincurringanyobligationtomakesuch
changestoproductsmanufacturedpreviously.
Exmark,oritsdistributorsanddealers,accept
noresponsibilityforvariationswhichmaybe
evidentintheactualspecicationsofitsproducts
andthestatementsanddescriptionscontained
inthispublication.
©2018ExmarkMfg.Co.,Inc.
IndustrialParkBox808
Beatrice,NE683102
Contactusatwww.Exmark.com.
PrintedintheUSA
AllRightsReserved

Introduction
CONGRATULATIONSonthepurchaseofyour
Exmarkequipment.Thisproducthasbeencarefully
designedandmanufacturedtogiveyouamaximum
amountofdependabilityandyearsoftrouble-free
operation.
Thismanualcontainsoperating,maintenance,
adjustment,andsafetyinstructionsforyourExmark
equipment.
BEFOREOPERATINGYOUREQUIPMENT,
CAREFULLYREADTHISMANUALINITS
ENTIRETY.
Byfollowingtheoperating,maintenance,and
safetyinstructions,youwillprolongthelifeofyour
equipment,maintainitsmaximumefciency,and
promotesafeoperation.
Important:Tomaximizesafety,performance,
andproperoperationofthismachine,itis
essentialthatalloperatorscarefullyreadand
fullyunderstandthecontentsoftheOperator’s
manualprovidedwiththeproduct.Safe
operationofExmarkequipmentisessential.
Failuretocomplywiththeoperatinginstructions
orreceivepropertrainingmayresultininjury.
Gotohttp://www.Exmark.comforadditional
safeoperationinformation,suchassafetytips,
trainingmaterials,andOperator’smanuals.
Ifadditionalinformationisneeded,orshould
yourequiretrainedmechanicservice,contactyour
authorizedExmarkequipmentdealerordistributor.
AllExmarkequipmentdealersanddistributorsare
keptinformedofthelatestmethodsofservicing
andareequippedtoprovidepromptandefcient
serviceintheeldorattheirservicestations.They
carryamplestockofservicepartsorcansecurethem
promptlyforyoufromthefactory.
AllExmarkpartsarethoroughlytestedandinspected
beforeleavingthefactory,however,attentionis
requiredonyourpartifyouaretoobtainthefullest
measureofsatisfactionandperformance.
Wheneveryouneedservice,genuineExmarkparts,
oradditionalinformation,contactanAuthorized
ServiceDealerorExmarkCustomerServiceandhave
themodelandserialnumbersofyourproductready.
Figure1identiesthelocationofthemodelandserial
numbersontheproduct.Writethenumbersinthe
spaceprovided.
g219792
Figure1
1.Modelandserialnumberlocation
ModelNo.
SerialNo.
Forcompletewarrantydetails,see
http://www.Exmark.com.Youmayalsocall
us402-223-6375torequestawrittencopyofthe
product’swarranty.
3

Contents
Introduction...........................................................3
Safety.....................................................................5
SafetyAlertSymbol.........................................5
SafeOperatingPractices..................................5
SafetyandInstructionalDecals.......................7
Specications.........................................................8
Systems...........................................................8
Dimensions.....................................................8
Setup......................................................................9
1InstallingtheFlowControlPanel...................9
2InstallingtheHopperAssembly...................10
3InstallingtheCableMountBracket...............10
4InstallingtheControlCable..........................11
5InstallingtheHarness..................................12
6InstallingtheCover......................................13
ProductOverview.................................................14
Operation..............................................................15
Controls.........................................................15
Pre-Start.........................................................16
OperatingInstructions...................................16
OperatingtheSpreaderAccessory..................16
OperatingTips...............................................20
RemovingtheSpreaderAttachment................20
Maintenance..........................................................21
RecommendedMaintenanceSchedule(s)............21
PeriodicMaintenance........................................21
CheckforLooseHardware.............................21
Adjustments......................................................21
SpreaderPatternControlCable
Adjustment................................................21
AdjustingtheGateClosure.............................22
Cleaning............................................................22
CleanDebrisFromMachine...........................22
Troubleshooting....................................................23
Schematics............................................................24
4

Safety
Safety
SafetyAlertSymbol
ThisSafetyAlertSymbol(Figure2)isusedbothin
thismanualandonthemachinetoidentifyimportant
safetymessageswhichmustbefollowedtoavoid
accidents.
Thissymbolmeans:ATTENTION!BECOME
ALERT!YOURSAFETYISINVOLVED!
g000502
Figure2
SafetyAlertSymbol
Thesafetyalertsymbolappearsaboveinformation
whichalertsyoutounsafeactionsorsituations
andwillbefollowedbythewordDANGER,
WARNING,orCAUTION.
DANGER:Indicatesanimminentlyhazardous
situationwhich,ifnotavoided,Willresultindeathor
seriousinjury.
WARNING:Indicatesapotentiallyhazardous
situationwhich,ifnotavoided,Couldresultindeath
orseriousinjury.
CAUTION:Indicatesapotentiallyhazardous
situationwhich,ifnotavoided,Mayresultinminor
ormoderateinjury.
Thismanualusestwootherwordstohighlight
information.Importantcallsattentiontospecial
mechanicalinformationandNoteemphasizes
generalinformationworthyofspecialattention.
SafeOperatingPractices
Training
•ReadtheaeratorOperator’sManualalongwith
thisspreaderaccessorymanualandothertraining
material.Iftheoperator(s)ormechanic(s)cannot
readthemanualsitistheowner’sresponsibilityto
explainthismaterialtothem;otherlanguagesmay
beavailableonourwebsite.
•Becomefamiliarwiththesafeoperationofthe
equipment,operatorcontrols,andsafetysigns.
•Alloperatorsandmechanicsshouldbetrained.
Theownerisresponsiblefortrainingtheusers.
•Neverletchildrenoruntrainedpeopleoperate
orservicetheequipment.Localregulationsmay
restricttheageoftheoperator.
•Onlyadultsandmatureteenagersshouldoperate
themachine,andevenmatureteenagersshould
haveadultsupervision.Besureateenager:
1.hasreadandunderstandstheOperator's
Manualandrecognizestherisksinvolved;
2.issufcientlymaturetousecaution;and
3.isofsufcientsizeandweighttooperatethe
controlscomfortablyandtomanagetheunit
withouttakingrisks.
•Theowner/usercanpreventandisresponsible
foraccidentsorinjuriesoccurringtohimselfor
herself,otherpeopleorproperty.
Preparation
•DoNotmodifythespreaderaccessory.
•Evaluatetheterraintodeterminewhataccessories
andattachmentsareneededtoproperlyandsafely
performthejob.Onlyuseonmachinesapproved
byExmark.
•Wearappropriateclothingincludingsafetyglasses,
substantialfootwear,andhearingprotection.
CAUTION
Themachinethatthespreaderaccessory
attachestoproducessoundlevelsinexcessof
85dBAattheoperator’searandcancause
hearinglossthroughextendedperiodsof
exposure.
Wearhearingprotectionwhenoperatingthis
machine.
•Inspecttheareawheretheequipmentistobe
usedandremoveallrocks,toys,sticks,wires,
bones,andotherforeignobjectswhichcanbe
thrownbythemachineandmaycausepersonal
injurytotheoperatororbystanders.
5

Safety
Operation
WARNING
Hands,feet,hair,clothing,oraccessoriescan
becomeentangledinrotatingparts.Contact
withtherotatingpartscancausetraumatic
amputationorseverelacerations.
•DoNotoperatethemachinewithoutguards,
shields,andsafetydevicesinplaceand
workingproperly.
•Keephands,feet,hair,jewelry,orclothing
awayfromrotatingparts.
•Operateonlyindaylightorgoodarticiallight,
keepingawayfromholesandhiddenhazards.
•Lightningcancausesevereinjuryordeath.If
lightningisseenorthunderisheardinthearea,
DoNotoperatethemachine;seekshelter.
•Beawareofweatherconditionsandcheckthat
spreaderpatternsandvolumearesuitable.
•Neveroperatethemachinewithdamagedguards,
shields,orcovers.Alwayshavesafetyshields,
guards,switchesandotherdevicesinplaceandin
properworkingcondition.
•Parkmachineonlevelground.Stopengine,wait
forallmovingpartstostop,removekeyand
engageparkingbrakewheneveryouleavethe
machine.
•Stopspreadingwhenmakingtightturnsto
minimizeunevendistributionpatternand
applicationrate.
•Reducetheweightoftheloadwhenoperating
onhillsandroughterraintoavoidtippingor
overturningoftheunit.
•Materialloadscanshift.Thisshiftinghappens
mostoftenwhileturning,goingupordownhills,
suddenlychangingspeeds,orwhiledrivingover
roughsurfaces.Shiftingloadscancausetheunit
totipover.
•Whenoperatingwithaheavyload,reduceyour
speedandallowforsufcientstoppingdistance.
Useextracautiononslopes.
•Reducespeedandloadwhenoperatingonrough
terrain,unevenground,andnearcurbs,holes,and
othersuddenchangesinterrain.Loadsmayshift,
causingthemachinetobecomeunstable.
•Heavyloadsaffectstability.Reducetheweightof
theloadandyourspeedwhenoperatingonhills.
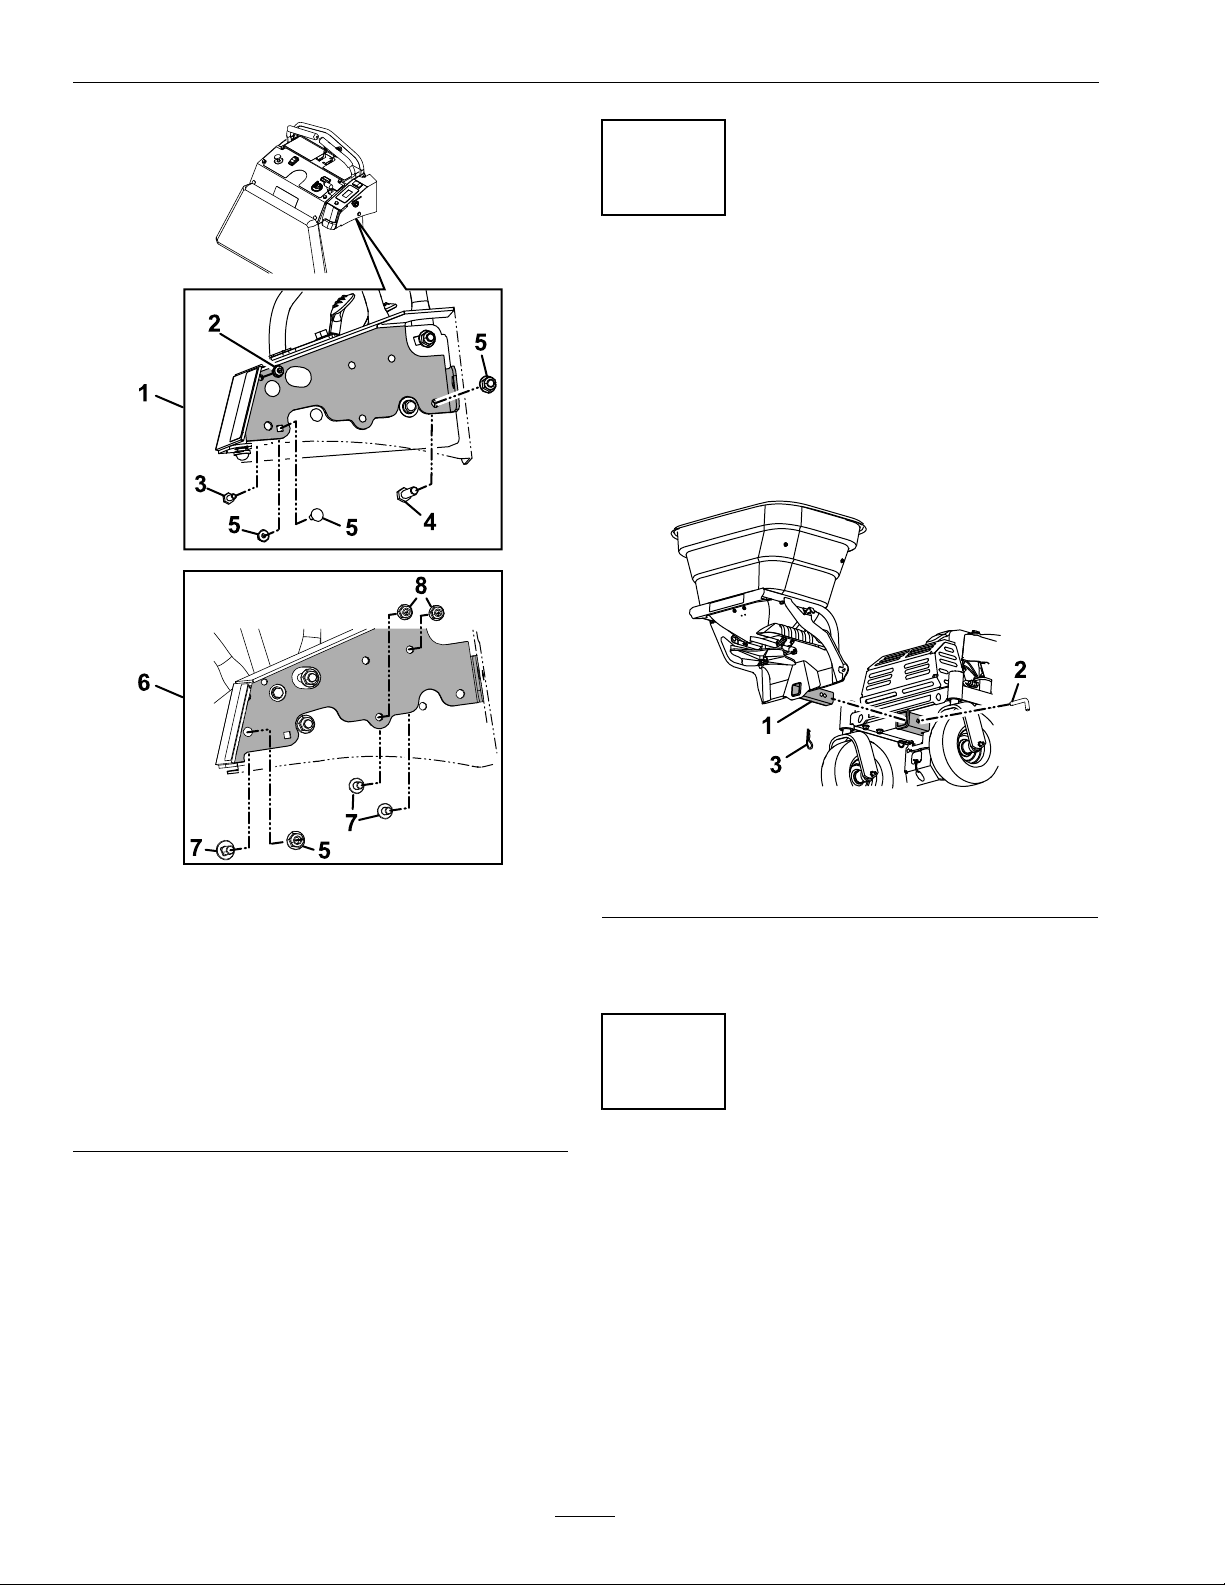
MaintenanceandStorage
•Closethespreadergate,settheparkingbrake,
stopengineandremovekeyordisconnectspark
plugwire.Waitforallmovementtostopbefore
adjusting,cleaningorrepairing.
•Emptythehopperbeforetiltingunitfor
maintenanceandbeforestoring.
•Keephandsandfeetawayfrommovingparts.
Ifpossible,donotmakeadjustmentswiththe
engineand/ortheimpellerrunning.
•Keepallguards,shieldsandallsafetydevicesin
placeandinsafeworkingcondition.
•Checkallboltsfrequentlytomaintainproper
tightness.
•Frequentlycheckforwornordeteriorating
componentsthatcouldcreateahazard.
WARNING
Removingstandardoriginalequipmentparts
andaccessoriesmayalterthewarranty,traction,
andsafetyofthemachine.Failuretouseoriginal
Exmarkpartscouldcauseseriousinjuryor
death.Makingunauthorizedchangestothe
engine,fuelorventingsystem,mayviolateEPA
andCARBregulations.
Replaceallpartsincluding,butnotlimitedto,
tires,belts,tines,andfuelsystemcomponents
withoriginalExmarkparts.
6

Safety
SafetyandInstructionalDecals
•Keepallsafetysignslegible.Removeallgrease,
dirtanddebrisfromsafetysignsandinstructional
labels.
•Replaceallworn,damaged,ormissingsafety
signs.
•Whenreplacementcomponentsareinstalled,be
surethatcurrentsafetysignsareafxedtothe
replacedcomponents.
•Ifanattachmentoraccessoryhasbeeninstalled,
makesurecurrentsafetysignsarevisible.
•Newsafetysignsmaybeobtainedfrom
yourauthorizedExmarkequipmentdealeror
distributororfromExmarkMfg.Co.Inc.
•Safetysignsmaybeafxedbypeelingoffthe
backingtoexposetheadhesivesurface.Apply
onlytoaclean,drysurface.Smoothtoremove
anyairbubbles.
•Familiarizeyourselfwiththefollowingsafetysigns
andinstructionlabels.Theyarecriticaltothesafe
operationofyourExmarkcommercialmower.
decal135-0990
135-0990
1.Spreadpattern-heavy2.Spreadpattern-light
decalimpellset
ImpellerSettingDisplay
1.Impellerswitch-Off3.Impellerswitch-On
2.Impellerswitch-Slow4.Impellerswitch-Fast
decal126-4994
126-4994
1.Cutting/dismembermenthazard—keepawayfrommoving
parts.
2.Warning—donotusetheupperfrontlocationsastiedown
points,onlyusethespeciedtie-downpoints;seethe
Operator’sManualforlocation.
7

Specications
Specications
Systems
SpreaderSystem
•MaximumHopperCapacity:80lb(36kg)
•SpreaderMotor:12VDCvariablespeedgear
motor
•SpreaderWidth:Adjustablefrom4ft(1.2m)up
to22ft(6.7m).
Dimensions
OverallWidth:
27inches(69cm)
OverallLength:
32inches(81cm)
OverallHeight:
28inches(71cm)
Weight:
70lb(32kg)
8

Setup
Setup
LooseParts
Usethechartbelowtoverifythatallpartshavebeenshipped.
DealerPack
PartNo.DescriptionQty.Use
323-7Screw-HH3/8-16x11/4[Aer30]1
104-7201Nut-Nyloc1/4-20Flg[Aer30]1
321-3Screw-HH1/4-20x5/8[Aer30]1
3234-47Screw-HHFLG5/16-18x3/4[Aer24]3
104-8300Nut-Nyloc5/16-18Flg[Aer24]3
InstallingtheFlowControlPanel
—Assembly-Hopper1
3290-256Pin-Hair1
126-8637Pin-Hitch1
InstallingtheHopperAssembly
135-0857-03Bracket-Cable[Aer24]1
3230-22Bolt-Carriage5/16-18x1Sp[Aer24]1
3229-2Bolt-Carriage1/4-20x1[Aer24]1
104-7201Nut-Nyloc1/4-20Flg[Aer24]1
126-8634-03Bracket-Cable[Aer30]1
104-7201Nut-Nyloc1/4-20Flg[Aer30]2
321-3Screw-HH1/4-20x5/8[Aer30]2
InstallingtheCableMountBracket
135-0841Cable-Control1InstallingtheControlCable
135-0700Harness1
1-303287Tie-Cable10InstallingtheHarness
126-2815Cover1
3256-22Washer4
104-7201Nut-Nyloc1/4-20Flg4
32105-15Screw-HWHMachine1/4-20x3/44
InstallingtheCover
1
InstallingtheFlowControl
Panel
Partsneededforthisprocedure:
Procedure
Important:Besurethemachineisnotrunning
andthekeyhasbeenremovedfromtheignition
switchpriortoproceedingwiththisinstallation.
1.Holdtheowcontrolpanelagainsttherightside
oftheaeratortodeterminethemountinghole
conguration.Removeandretainthemounting
hardware,wherethebracketwillbeinstalled,
fromtheaerator.
9

Setup
g239068
Figure3
Outercoverhiddenforclarity
1.Aerator30installation5.Reuseretained
hardware
2.1/4inchangednyloc
nut
6.Aerator24installation
3.1/4-20x5/8inchhex
screw
7.5/16-18x3/4inch
angedhexscrew
4.3/8-16x11/4inchhex
screw
8.5/16inchangednyloc
nut
2.Placetheowcontrolpanelontotheaeratorand
secureusingthehardwareshowninFigure3.
Note:Thereisadditionalhardwareinthebolt
bagiftheretainedhardwareisnotlongenoughto
mountthecontrolpanel.
2
InstallingtheHopper
Assembly
Partsneededforthisprocedure:
Procedure
1.Insertthehopperhitchtubeintothereceiveron
theaerator.
g213510
Figure4
1.Hopperhitchtube3.Cotterpin
2.Hitchpin
2.Usethehitchpinandcotterpintosecurethe
hopperassemblytotheaerator.
3
InstallingtheCableMount
Bracket
Partsneededforthisprocedure:
Procedure
Choosetheappropriatecablemountbracketfrom
theboltbagbymatchingtheholestotherightsideof
theaerator.UsethehardwareshowninFigure5to
installthebracket.
10

Setup
g213563
Figure5
1.Aerator30sidebracket5.5/16-18x1inchcarriage
bolt
2.1/4-20x5/8inchhex
screw
6.Reusenut
3.1/4inchangednyloc
nut
7.1/4-20x1inchcarriage
bolt
4.Aerator24sidebracket8.1/4inchangednyloc
nut
4
InstallingtheControlCable
Partsneededforthisprocedure:
Procedure
1.Makingsurethecableballjointissecurely
attachedtothecable,connectittothecontrol
armandsecurewithawasherand1/4–28inch
nylocnutasshowninFigure6.
g221603
Figure6
1.Cableballjoint5.Knob
2.Controllever6.Washer
3.1/4–28inchnylocnut7.Jamnut
4.Cablemountbracket
2.Loosentheknobandslidethecontrolcableinto
thenotchofthemountbracketandtightenthe
knob.
3.Routetheotherendofthecontrolcabletothe
gatearm.
g213569
Figure7
1.1/4-28inchnylocnut4.Cableend
2.Washer5.Hopperbracket
3.Gatearm
4.Insertthecableendintotheholeofthegatearm;
securethecableendwithawasherand1/4-28
inchnylocnut(seeFigure7).
11

Setup
5.Loosenthenutsoneachsideofthecontrolcable
andslideintothenotchofthehopperbracket.
Tightenthenutsoneachsideofthebracket.
6.Movetheowcontrolleverforwardandrearward
makingsurethegatearmisopeningandfully
closing.Ifitisnotclosing,loosentheknob
and/ornutstoadjustthecableuntilthegatecan
befullyclosed;retightenallcomponents.Make
surethejamnuthasbeensecurelytightened
againstthecableballjointafteralladjustments
havebeenmade(seeFigure6).
5
InstallingtheHarness
Partsneededforthisprocedure:
Procedure
Important:Besurethemachineisnotrunning
andthekeyhasbeenremovedfromtheignition
switchpriortoproceedingwiththeharness
installation.
1.Disconnectthenegativebatterycablefromthe
battery.
2.PlugthehourmeterandON/OFFconnectors
onthespreaderharnessintotheswitchesonow
controlpanel(seeFigure8).
g213636
Figure8
1.Harness3.On/Offswitch
2.Hourmeterconnector4.Motorconnector
3.Routetheharnessalongtherightsideofthe
machine,followingthecontrolcable.Placethe
harnessontopofthecontrolcableandslideit
intothenotchofthehopperbracket.Continue
toroutetheharnessbetweenRHhopperbracket
andhoppertube.Connectthespreaderharnessto
thespreadermotorasshowninFigure8.Insert
thethreeharnesstieclipsintotheholesofthe
hoppermainframetosecuretheharness.
4.Removethecapfromtheaccessorywireonthe
mainharnessandplugintothespreaderaccessory
harnessasshowninFigure9.
Note:On24inchmodels,removetheadapter
plugfromthemainaccessoryharness.
12

Setup
g213882
Figure9
1.Spreaderharness
2.Accessoryplug
3.Battery
4.Positivebatteryterminal
5.Spreaderharnesspositivebatteryconnection
6.Spreaderharnessnegativebatteryconnection
7.Negativebatteryterminal
5.Removeandretainthenutandscrewfromthe
positiveterminalonthebattery.Installthe
accessoryharnesspositivecable(secondtolast
terminalring–seeFigure9)andthepositivecable
ofthemainharnesstothefrontofthepositive
batteryterminalandsecurewiththenutand
screw.Repeatfornegativebatterycable.
6.UsetheedgecliptosecuretheharnesstotheRH
aeratorpanel.
7.Usetheremainingziptiestosecuretheharness
totheframeand/orcontrolcable.
On24inchmodels,securethecableandharness
tothereturn-to-upspringmountontheframe.
g253773
Figure10
1.Securetoframe
6
InstallingtheCover
Partsneededforthisprocedure:
Procedure
1.Attachthecovertothehopper,intwoplaces,by
inserting1/4–20x3/4inchmachinehexscrew
andwasherthroughthecovertabgrommetand
hopperasshowninFigure11.
13

ProductOverview
g221638
Figure11
1.Cover3.1/4-20x3/4inch
machinehexscrew
2.Washer4.1/4inchangednut
2.Securewith1/4inchangednylocnut.
3.Plugtheothertwoholesinthehopperwith
remaininghardware.
ProductOverview
g212987
Figure12
1.Controls2.Hopper
14

Operation
Operation
Note:Determinetheleftandrightsidesofthe
machinefromthenormaloperatingposition.
Important:Theintendeduseofthisspreader
attachmentisfordispersinggrassseed.Thisis
nottobeusedforfertilizeroranyotherchemical
applications.
Controls
ImpellerSpeedControl
Locatedatthetopofthespreaderaccessorycontrol
panel(seeFigure13).
Pushdownontherightsideoftheswitchonetime
toturnthespreader“ON”;continuetotaptheright
sidetoincreasetheimpellerspeed.
Taptheleftsideofthecontroltodecreasethespeed;
pushandholdtheleftsideoftheswitchtoturnit
“OFF”.
Note:Theimpellerspeedcontrolcanbeturnedoff
atanyspeedrate.Itisnotnecessarytodecreasethe
speeduntilitturnsoff.Thelastsetspeedwilldisplay
whenthecontrolispoweredbackon.
g207672
Figure13
1.Impellerspeedcontrol3.Distributionlimitlock
knob
2.Impellerspeeddisplay4.Flowcontrollever
ImpellerSpeedDisplay
Locatedbelowtheimpellerspeedcontrol.
Thisdisplayshowsthespeedsettingnumberfrom
1–10(1istheslowestspeedand10isthefastest).A
circlewilldisplaywhenthecontrolhasbeenturned
off.
FlowControlLever
Locatedtotherightofthemaincontrols.
Lifttheleverupwardtostarttheowandcontinue
liftingittoincreasethedistributionrate.Pullthelever
downwardtodecreaseorstopthedistributionrate.
DistributionLimitLockKnob
Locatedontherightpanelofthespreaderaccessory
controlpanel.
Thisknobisusedtolimitthemaximumamount
ofgrassseedbeingdispensedtohelpmaintain
consistentdistribution.
SideDeectorControlLever
Locatedontheleftsideofthehopper(seeFigure14).
g207876
Figure14
1.Sidedeectorcontrol
lever
2.Sidedeector
Usethesidedeectorcontroltotemporarilystopor
deectgrassseedawayfromsidewalks,parkinglots,
patios,oranywheregrassseedisnotdesiredtobe
dischargedfromtheleftsideofthespreader.
Totemporarilydeectthegrassseed,liftthelever
upandpulloutwarduntilthenotchcanbeseated
intothelowernarrowportionofthebracket;side
deectorlowers(seeFigure15).
15

Operation
g208735
Figure15
LeverPositions
1.Sidedeectorraises
2.Pullleveroutward
3.Pushdown—sidedeectorlowers
Toraisethedeector,lifttheleverintothewide
portionoftheslotandpushtheleverinwarduntil
itstops.
g207826
Figure16
1.Fence3.Sidedeectorlowered
2.Flowers
Pre-Start
Makesureyouunderstandthecontrols,their
locations,theirfunctions,andtheirsafety
requirements.
Ensurethatthehopperanditscomponentsarein
goodcondition,properlyattached,andlatched.
OperatingInstructions
CAUTION
Machinecanspinveryrapidlybypositioningone
levertoomuchaheadoftheother.Operatormay
losecontrolofthemachine,whichmaycause
damagetothemachineorinjury.
•Usecautionwhenmakingturns.
•Slowthemachinedownbeforemakingsharp
turns.
Note:Stoppingdistancemayvarydependingonthe
spreaderload.
OperatingtheSpreader
Accessory
Thespreaderaccessoryisdesignedtodispersegrass
seed.
BeforeOperatingtheSpreader
Makesurethespreaderhasbeencalibratedforthe
correctapplicationrateofthegrassseedtobespread
beforestarting(seeCalculatingtheApplication
Ratesection).
FillingtheSpreaderHopper
Important:Verifythattheproperapplication
ratehasbeensetpriortollingthehopper.
1.Stoptheunitonalevelsurface,movemotion
controllevertotheneutralposition,stopthe
engine,andsettheparkingbrake.
2.Ensurethatthespreadergateisclosed.
3.Removethecoverfromthehopper,addthegrass
seedtobespread,andreplacethecover.
Note:DoNotoverloadthehopper;the
maximumweightcapacityofthehopperis80lb
(36kg).
CalculatingtheApplicationRate
1.Determinethepoundsper1,000ft2(93m2)of
producttobeapplied.
2.Determinethecalibrationcourse:
A.Determinetheamountofproducttobespread
per1,000ft2(93m2).Usetherecommended
ratefromtheSpreadingChartsectionorthe
productmanufacturer’slabelasaguide.
16

Operation
B.Determineacourselengthbydividing1,000
ft2(93m2)bytheeffectivespreadwidth.
Forexample,iftheeffectivewidthis6feet
(1.8meters),thenthecalibrationcourselength
equals167ft(51m).
CourseLength
1,000ft2(93m2)
6ft(1.8m)=167ft(51m)
C.Thecalibrationcourseis6ft(1.8m)by167
ft(51m).
D.Measureandvisiblymarkthecourselength.
Makesuretoallowampledistancebeforethe
startingmarkertoensurethespreaderisat
fullspeedwhencrossingtherstmarkofthe
course.
3.Settheappropriategatesetting(referencethe
SpreadingChartsectionasastartingpoint).
4.Addgrassseedtothehopper(forexample,25
lb(11.3kg)wasadded).
5.Drivethespreaderoverthecalibrationcourse
whileapplyingthegrassseed.
6.Emptytheremaininggrassseedofthehopper
intoacleanbucket.
7.Weighthebucketcontainingthegrassseedand
recordtheweight.Pourthecontentsbackinto
thehopperandthenweightheemptybucket.
Subtractthesetwoamountstodeterminethe
amountofgrassseedremaininginthehopper
(forexample,20pounds(9kg)remains.)
8.Subtracttheamountremaininginthehopper
(step7)fromtheamountoriginallyadded(step
4);theresultistheamountappliedtothecourse.
AmountApplied
25lb(11.3kg)–20lb(9kg)=5lb(2.3kg)
Forthisexample,5lb(2.3kg)wasappliedto
1,000ft2(93m2).
9.Ifnecessary,adjusttheratelevertoachievethe
recommendedamounttobeappliedandrepeat
theprocedure.Oncethecorrectapplicationrate
isachieved,repeatthisprocedureanadditional
timetoverifytheresults.
SpreadingChart
Thechartbelowisforreferenceonly.
GrassSeedApplicationatMaximumGroundSpeed
(Coverage1,000ft2(93m2))
Typelb/1,000ft2
(93m2
Gate
Opening
Spread
Width
BlueGrass
orRedTop2lb.254ft(1.2m)
Park,
Merion,
Delta,or
Kentucky
Bluegrass
.5lb.254ft(1.2m)
Hulled
Bermuda2lb.756ft(1.8m)
Mixtures
Including
Coarse
Seeds
6lb.756ft(1.8m)
RyeGrasses
orTall
Fescue
6lb
.75to
max.
open
6ft(1.8m)
Dichondra.75lb.258ft(2.4m)
Pensacola
Bahia6lb.507ft(2.1m)
17

Operation
Spreading
SpreadingTips:
•Toensureuniformapplication,besuretooverlapthegrassseeddistribution.Thehighestamountofseed
willdispensefromthefrontofthehopperandlessfromeachside.Adjustthedistributionpatternto
achievedesiredresults.
•Watchforchangesinthedistributionpattern;unequaldistributionmayleadtostriping.
g207791
Figure17
1.Narrowdistribution-sidedeectorlowered5.Endofspreadingjob
2.Forward6.Propertyfence
3.Effectivespreadingwidth—variable4–22ft(1.2–6.7m)7.Gate
4.DoNotspreadwhenturning180degrees
1.Starttheengineandplacethethrottlemidwaybetweenthe“SLOW”and“FAST”positions.
2.Turnontheimpellerspeedcontrol.
3.Settheimpellerspeedtotheappropriatesetting.
4.Movethethrottletothe“FAST”positionanddriveforward.
5.Openthehoppergateandbeginspreading.
18

Operation
g207728
Figure18
1.Effectivespreadingwidth—variable4–22ft(1.2–6.7m)
6.Evaluatethespreadpattern.IfadjustmentsareneededseetheSpreaderPatternAdjustmentsection.
7.Whennishedspreading,closethehoppergate.
19

Operation
SpreaderPatternAdjustment
Ifthespreadpatternisskewedordispensingtoo
light/heavytooneside(seeFigure19),adjustthe
gateasfollows:
g025543
Figure19
1.Heavytoleftside3.Heavytorightside
2.Moveramppatternto
shadedposition
Note:DoNotadjusttherampstosplitproductow.
Useonlythefrontorrearramppositionsasshown.
1.Unlockthespreaderpatterncontrolknobby
turningitcounterclockwise90degrees.
g207877
Figure20
1.Spreaderpatterncontrol
knob
2.Controlhandle
Toadjustwhenthegrassseedpatternisheavy:
•totheleftside,slightlypullthecontrolhandle
rearward.
•totherightside,slightlypushthecontrol
handleforward.
2.Lockthespreaderpatterncontrolbyturningthe
controlknobclockwise90degrees.
OperatingTips
OverSeeding
Important:DoNotputdownmoreseedthan
recommendedbytheseedcompany.Over
seedingcancausethegrasstobetoothickand
causeittobesusceptibletofungus.
Note:Themachinewillseedatthesamerategoing
bothforwardandrearward.
Note:Ifthereisexcessivethatch,itmaybenecessary
toremovethethatchpriortoseeding.
RemovingtheSpreader
Attachment
1.Stopengine,waitforallmovingpartstostop,
engageparkingbrake,andremovethekey.
2.Unplugthespreaderaccessoryharness(reference
Figure9).
3.Disconnectthecableballjointfromthecontrol
lever(referenceFigure6).Loosentheknobon
thecablemountbracket.
4.Removeandretainthehitchpinfromthereceiver
(referenceFigure4)
5.Removethehopperassembly,controlcable,and
accessoryharness.
Note:Allotherspreaderattachmentcomponents
maystaymountedonthemachine.Makesure
componentsaresecureandawayfrommoving
parts.
20
Table of contents
Other Exmark Garden Machinery Accessories manuals