Exodus Trek User manual

EXODUS Trek

2
TABLE OF CONTENTS
3..............Camera Overview
4..............Button Functionality and Navigation
4-5.........A Quick Setup Reference
5-6.........Menu Overview
7-9.........Map of Menu
8-12.......Menu Settings Overview
12............Retrieving and Viewing Images
13-14.....The Exodus Warranty
14-15.....Battery and SD Card Information
CONTACTING EXODUS– If you ever need anything
at all, you can contact us by texting the word
“Call” to 330-400-3034. You’ll get a call back from
someone that knows the camera inside and out. In
normal business hours (Mon. – Fri. 9AM-6PM EST),
you can expect a call back within 5 minutes.
Don’t hesitate to reach us outside of those times,
we are always available!
Thanks!
First and foremost… If you’re reading this, you
bought the Trek, which means that you’ve
supported us in our mission to build a better
hunting industry company! We want to give you
an extremely gracious and humble “thank you”
for your business! In this manual, we’re going to
go over everything you need to know to get the
most out of your camera for many years to come.
3
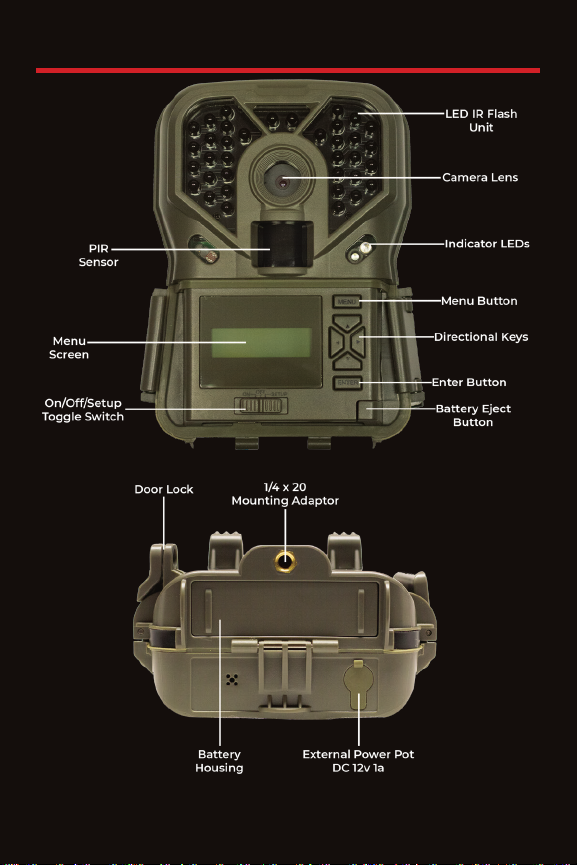
OVERVIEW

4
On/Off/Setup Slider Switch:
-On sets the camera into the startup countdown.
-O shuts the camera down.
-Setup turns the camera into setup/program.
This is where you access the user menu.
Menu – Opens the camera menu.
Directional keys – Used for navigating the menu.
Enter – Used as a selection or “select” key in menu.
A QUICK SETUP REFERENCE
1. Open the camera door and press the battery tray
release button in the bottom right hand corner. Install
8 AA batteries (Lithium Recommended). Re-insert the
battery tray until you hear it “click” into place.
2. Insert SD card until you hear a slight click as it locks
into place.
3. Turn the camera power switch to the “Setup”
position. Press the Menu button. Hit the up
directional key one time to the “format” option. Hit the
Enter button, press down directional key once so that
BUTTON FUNCTIONALITY/NAVIGATION

5
yes is ashing, then press enter to format your SD
card. Turn the camera o.
4. Pick a location and mount the camera via the
included strap or a 3rd party mounting system. We
recommend setting the camera up within 20’-25’
of where you think the target will be. (For some of
our ideas on camera setup locations, strategy, and
method, visit our site at www.exodusoutdoorgear.
com.
5. When you are happy with the setup, slide the
camera to the “On” position. The camera will start a 30
second count down, upon completion a red and blue
indicator light will blink on right side of the camera
when armed.
MENU OVERVIEW
To get to the menu, turn the power switch right to
the “Setup” position. Once the camera powers on you
will see the operating FW version listed on the single
line LCD display, hit the “Menu” button in the top right
hand side to open the user menu.

6
-To cycle through the Trek’s menu options use the
up/down direction keys.
-To change menu options press enter to select menu
option shown on the screen so the option feature
ashes.
-To change menu option feature use the directional
keys. Press enter to select and save desired change.

7
MENU SETTINGS OVERVIEW

8

9

10
MODE:Mode is the basic functionality you want the
camera set to. There are four options to chose from.
PHOTO: In photo mode, the camera captures still
images when it is activated by PIR sensor.
VIDEO: In video mode, the camera captures videos
when it is activated by PIR sensor.
TIME LAPSE: In time lapse mode the camera will take
a series of photos at a programmed specied interval
throughout the day. As in all Exodus Trail Cameras,
you also have the ability to leave the PIR sensor on
to capture images in between specied time lapse
intervals.
HYBRID MODE: Hybrid mode utilizes both video and
photo mode by capturing a photo followed by a video
when it is activated by PIR sensor.
SETUP DATE: In this menu option, you can set the
camera’s internal calendar/info strip date. It is entered
in the format of month/day/year.
SETUP TIME: In this menu option, you can set the
camera’s internal clock/info strip time. It is entered in
the AM/PM 12 hour format.
Table of contents
Other Exodus Scouting Camera manuals


