Exped Scout Hammock Combi Extreme User manual

SCOUTHAMMOCKCOMBIVER2210 |Copyright Exped AG, Switzerland.
REFINED GEAR FOR ADVENTURE
INSTRUCTIONS – PLEASE READ !
Scout Hammock Combi Extreme | Scout Hamock Combi UL
GEBRAUCHSANLEITUNG – BITTE LESEN !
Scout Hammock Combi Extreme | Scout Hamock Combi UL
INSTRUCTION −À LIRE !
Scout Hammock Combi Extreme | Scout Hamock Combi UL
30°

SCOUTHAMMOCKCOMBIVER2210 |Copyright Exped AG, Switzerland.
REFINED GEAR FOR ADVENTURE
Use
> If you are using a thin tree, wrap the
webbing which acts as tree guard
multiple times around the tree. After
wrapping the webbing around the tree,
sling the short slitline at the end of the
webbing around the webbing itself or
slitline and Insert the 2 end knots into
the slits to lock them.
> Hang the hammock at an angle of 30 to
45 degrees in relation to the horizontal
position. Beware not to hang it up at an
angle less than 30 degrees as the
maximum load capacity could otherwise
be surpassed! To be able to maintain this
angle, a ridge line is attached to the
Suspension Kit (refer to illustration last
page). This slit line is made of 100%
Dyneema.
> Prior to seating yourself in the hammock
after set up, gently apply pressure to the
hammock to ensure that knots and
supports hold securely.
> The double floor with mat sleeve holds
an insulating mat in place and hinders
mosquitos from stinging through the
hammock. Slide the inflated mat between
the 2 layers of fabric and center.
> 3 fabric sleeves sewn to the top of the
mosquito net can hold sticks or trekking
pole segmets. Combined with the
numerous tie-out-loops they allow for an
airy setup of the mesh canopy.
> The tarp is waterproof and creates a cool
shady spot. Tie it out with the included
cords, which in turn can be stowed in the
cord stuff sacks so they do not tangle
up.
Warnings
> For safety reasons in case of a fall we
recommed mounting the hammock only
approximately 8” / 20 cm off the ground.
> Prior to each setup, check all support
components like straps, cords, carabi-
ners, seams and fabrics for damage or
wear. Should you notice any damage or
changes from its original state, do not
use the hammock. Check carabiners for
fissures, sharp edges, wear or distortion.
In these cases discontinue use of the
product. The carabiner gate must be
closed completely. The carabiner should
only be used lengthwise. Do not clip
the carabiner to metal objects.
> To help prevent injury should you fall,
check that no sharp objects, rocks, tree
limbs, etc. are under the hammock.
> Always use the original knots when
retying. Pull them tight and ensure that
enough cord protrudes from the knot ends
(minimum 3 x the diameter of the cord).
> Keep sharp objects away from the
hammock. Keys, belt buckles, nut shells,
pebbles in shoe soles, etc. could
puncture or tear the fabric and lead to
sudden failure.
> Children should not use the hammock
unsupervised
> Do not jump into the hammock or swing
vigorously! Do not load above capacity!
> Do not hang multiple hammocks above
each other.
> Do not leave the hammock exposed to
ENGLISH
INSTRUCTIONS – PLEASE READ !
Scout Hammock Combi Extreme, Scout Hamock Combi UL
the sun for extended periods of time as
lightweight fabrics are not designed to
withstand constant exposure to UV
radiation. Also keep away from heat
sources and fire!
> Prevent misuse or theft - do not leave
hammock unattended.
> Test the hammock carefully each time
you use it and before putting your full
weight in it.
> Do not make changes to the hammock
as this will void the warranty.
> Insure that the trees you use for setup
are strong enough. Do not use dead
trees. Beware of dead branches that
may fall.
> To prevent abrasion of the suspension
cords, never set up the hammock by
using 2 ropes per side, e.g. by running
the setup rope around a tree and
attaching each end to a corner of the
hammock. This leads to friction between
rope and tree with every movement of
the hammock and can lead to the rope
breaking. Always set up a hammock
with only one rope per side!
> Disregarding these warnings may lead to
severe injury or death.
Care
> Remove all hardware like carabiners and
wash in lukewarm water using a soft
brush to remove stains. Dry thoroughly.
Do not clean in a washing machine.
Do not store when wet. Do not iron or
dry-clean. Never tumble dry.
> If the hammock is ripped or torn, sew it
together and we then recommend to
treat the new seam with a seamsealer
such as Seamgrip by McNett as a
backup.
Storage
> Dry thoroughly prior to storage to
prevent mold and mildew
> Store unpacked in a dry, cool and dark
place.
Tips
> We recommend a diagonal position in
the hammock in order to lie as level as
possible.
> Tie a cord to a root or tree and slip the
end into the hammock. This gives you
a lever to easily get the hammock
swinging.
> When raining, we recommend setting up
the tarp first as this will keep the
hammock dry. If the tarp is wet after
teardown, store it in the stuffsack with
the wet cords and place the hammock
separately in your pack to keep it dry.
For more information visit: exped.com.

SCOUTHAMMOCKCOMBIVER2210 |Copyright Exped AG, Switzerland.
REFINED GEAR FOR ADVENTURE
DEUTSCH
GEBRAUCHSANLEITUNG – BITTE LESEN !
Scout Hammock Combi Extreme, Scout Hamock Combi UL
Gebrauch
> Lege die Bandschlinge um den Baum
und knüpfe das Bandende mit dem
kurzen Schlitzseilstück um das Band
oder das Schlitzseil als Verschluss,
indem du beide Endknoten des kurzen
Schlitzseilstücks in die Schlitze
steckst, so dass sich diese auf Zug darin
festklemmen.
> Der Winkel zwischen der Horizontalen
und der Hängematte soll bei Belastung
immer mehr als 30 Grad betragen. Um
diesen Winkel einzuhalten zu können, ist
eine Ridge Line am Suspension Kit
befestigt (siehe Abbildung letzte Seite).
Diese Schlitzschnur besteht zu 100%
aus Dyneema.
> Beim ersten Hineinsetzen sollte die
Hängematte vorsichtig belastet und
getestet werden um sicher zu gehen,
dass sich die Befestigungen nicht lösen
oder verrutschen.
> Das Matteneinschubfach sorgt für Schutz
vor Moskitos sowie einen sicheren Sitz
(oder Halt) der Matte. Schiebe dazu die
Matte in aufgeblasenem Zustand zwi-
schen den unteren und oberen Boden-
stoff hinein und platziere diese mittig.
> Durch 3 Stoffkanäle im Moskitonetz
lassen lassen sich Stöcke schieben.
Durch zahlreiche zusätzliche Schlaufen,
kann das integrierte Moskitonetz so luftig
aufgespannt werden.
> Das Tarp ist wasserdicht und spendet
Schatten. Mit den Abspannleinen lässt
es sich individuell abspannen. Die
Abspannleinen sind mit den Abspann-
klemmen verstellbar.
> Im Innern bieten 3 Netztaschen Platz für
Brille, Taschenbuch, Uhr etc.
Warnungen
> Aus Sicherheitsgründen empfiehlt es
sich, die Hängematte nicht höher als
20 cm über dem Boden aufzuhängen.
> Versichere dich, dass sich unter der
Hängematte keine scharfen Gegenstände
befinden, die dich verletzen könnten.
> Vermeide innerhalb der Hängematte
scharfe Gegenstände wie Schlüssel,
Gurtschnallen, heruntergefallene Nüsse,
die den Stoff anritzen und zu plötzlichem
Zerreissen führen können.
> Kontrolliere vor jedem Gebrauch alle
tragenden Teile wie Bänder, Seile,
Karabiner, Nähte und Stoffe auf Beschä-
digungen und übermässige Abnutzung.
Bei jeglichem Verdacht auf Beschädi-
gung und Veränderung gegenüber dem
Neuzustand, verwende die Hängematte
nicht mehr weiter. Kontrolliere auch die
Karabiner jedes Mal auf Beschädigungen
wie Risse, Verbiegung, scharfe Kanten
oder übermässigen Verschleiss. Der
Verschluss des Karabiners muss unbe-
dingt immer ganz geschlossen sein. Der
Karabiner darf nur längs, aber nicht quer
belastet werden. Vermeide es, ihn direkt
an Gegenständen aus Metall zu befesti-
gen.
> Kinder dürfen die Hängematte ohne
Aufsicht von Erwachsenen nicht verwen-
den.
> Lass die Hängematte nicht unbeaufsich-
tigt hängen, damit sie nicht
missbräuchlich verwendet wird.
> Lass dich nicht in die Hängematte
hineinfallen, schwinge nicht heftig umher
und überlade sie nicht.
> Hänge nicht mehrere Hängematten
übereinander auf.
> Achte bei der Wahl der Bäume darauf,
dass sie die Hängematte gut tragen
können sowie auf allfällige herunterfal-
lende Äste.
> Achtung vor Leinen durchscheuern:
Knüpfe die Hängematte nie an 2 Leinen
pro Seite, z.B. indem du das Aufhänge-
seil um den Baum schlingst und die
beiden Seilenden des Schlitzseils mit
dem Hängematten-Ende verbindest.
Dies führt unweigerlich, dazu dass bei
jeder Schaukelbewegung das Aufhänge-
seil sich am Baum mehr und mehr
aufscheuert und dann plötzlich reisst!
Die Hängematte immer nur an einem Seil
pro Seite aufhängen!
> Nichtbeachten dieser Warnhinweise
kann zu schwerer Verletzung führen
oder sogar tödlich enden.
> Bei Veränderungen der Hängematte
gegenüber dem Originalzustand erlischt
die Garantie.
Pflege
> Zur Reinigung die Hängematte in
lauwarmem Wasser mit einer Bürste
vorsichtig abschrubben, dann gut
trocknen lassen.
Keine Maschinenwäsche!
> Die Hängematte nicht dauerhaft der
Sonne aussetzen. Ebenso unbedingt vor
starken Hitzequellen und Feuer fernhal-
ten!
Reparaturen
> Für Reparaturen empfehlen wir, sich vom
Hachhändler beraten zu lassen.
Aufbewahrung
> Die Hängematte am besten an einem
trockenen, kühlen und dunklen Ort
lagern. Feuchtigkeit sollte vermieden
werden, da dies zu Schimmelbildung
oder Beschichtungsablösung (Hydrolyse)
führen kann.
Tipps
> Für möglichst waagrechtes Liegen
empfiehlt es sich, sich diagonal in der
Hängematte zu legen.

SCOUTHAMMOCKCOMBIVER2210 |Copyright Exped AG, Switzerland.
REFINED GEAR FOR ADVENTURE
Utilisation
Passe la sangle autour de l’arbre et
noue-en l’extrémité avec la courte
corde fendue ou utilise la corde fendue
comme système de fermeture en pas-
sant les deux nœuds qui se trouvent
aux extrémité de la courte corde fendue
dans les fentes prévues à cet effet de
sorte qu’ils s’y fixent le système est en
traction.
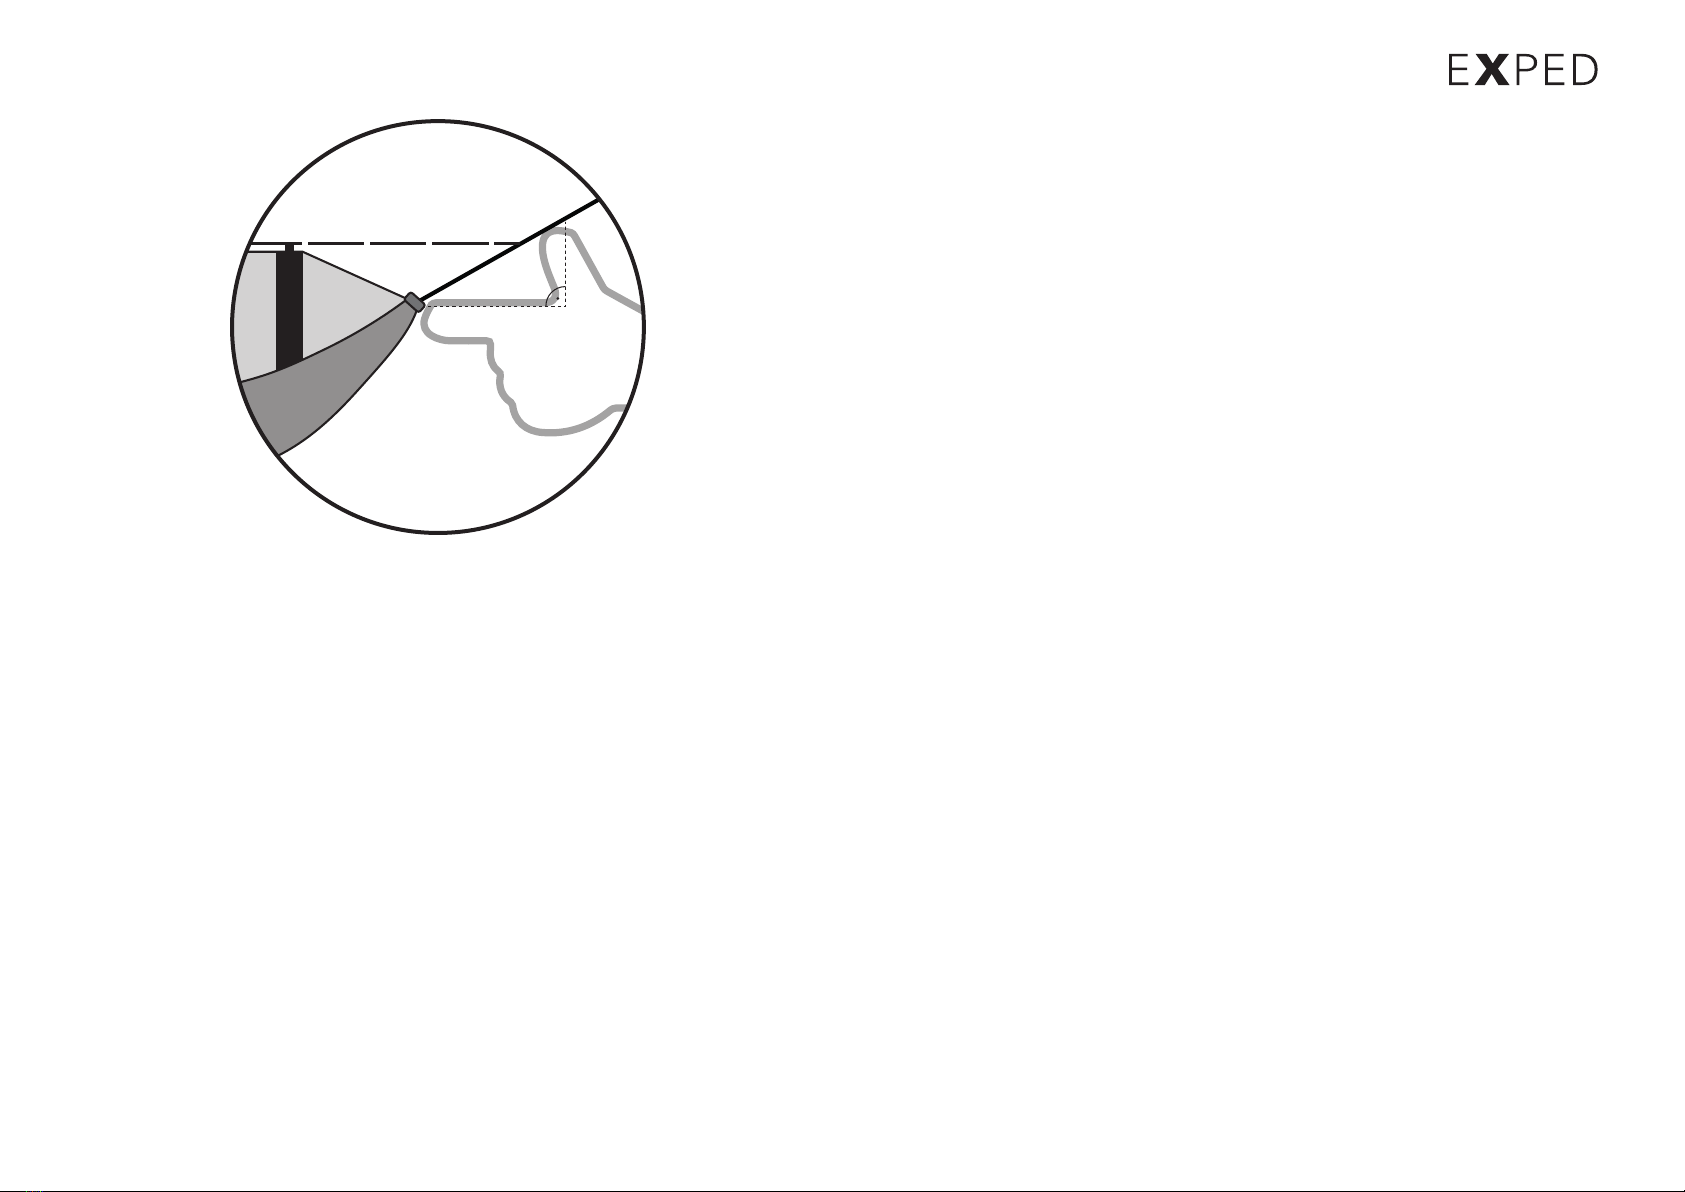
> L’angle entre l’horizontale et le hamac en
charge doit toujours être supérieur à 30
degrés. Pour pouvoir maintenir cet angle,
une Ridge Line est fixée au kit de sus-
pension (voir illustration de la dernière
page). Ce dispositif est fabriqué à 100%
en Dyneema.
> Lorsque tu installes le hamac pour la
première fois, charge-le avec précau-
tion pour être sûr que les fixations ne se
desserrent pas et ne glissent pas.
> Le compartiment d’insertion du matelas
offre une protection contre les mous-
tiques ainsi qu’un maintien sûr pour le
matelas. Pour ce faire, glisse le matelas
gonflé entre la toile de la partie inférieure
et supérieure et dispose-le bien au
centre.
> Les bâtons peuvent être insérés dans
les trois gaines en tissu dans la mous-
tiquaire. Grâce à de nombreuses bou-
cles supplémentaires, la moustiquaire
intégrée peut être disposée de façon à
être aérée.
Le Tarp est imperméable et procure de
l’ombre. Il peut être tendu individuelle-
ment avec les tendes qui sont sont régla-
bles au moyen des clips de haubanage.
> A l’intérieur, trois poches en filet of-
frent une place de rangement pour des
lunettes, un livre de poche, une montre,
etc.
Avertissements
> Pour des raisons de sécurité, il est
recommandé de ne pas suspendre le
hamac à plus de 20 cm du sol environ.
> Avant chaque utilisation, vérifie soign-
eusement que toutes parties portantes
telles que les sangles, les cordes, les
mousquetons, les coutures et les tissus
afin de t’assurer qu’elles ne sont pas
endommagées et qu’elles ne présen-
tent pas d’usure excessive. Au moindre
soupçon de dégâts ou de modifications
par rapport à l’état neuf, n’utilise plus le
hamac.
Assure-toi qu’il n’y a pas d’objets pointus
sous le hamac, tels que des pierres ou
autres, qui pourraient te blesser si tu
tombes.
> Pour attacher et détacher le hamac,
utilise les nœuds d’origine, serre-les et
laisse un bout de corde suffisamment
long derrière le nœud (minimum 3 fois le
diamètre de la corde).
> Evite tout objet pointu à l’intérieur du ha-
mac, tels que clés, boucles de ceinture,
coques de noix, cailloux provenant des
semelles de chaussures, qui peuvent en-
tamer le tissu et provoquer une déchirure
soudaine.
FRANÇAIS
INSTRUCTION −À LIRE !
Scout Hammock Combi Extreme, Scout Hamock Combi UL > Les enfants ne doivent pas utiliser le
hamac sans surveillance.
> Ne te lance pas dans le hamac et ne te
balance pas fortement! Ne surcharge
pas le hamac!
> N’installe pas plusieurs hamacs les uns
sur les autres.
> Ne laisse pas le hamac suspendu en
permanence exposé au soleil, car les tis-
sus légers ne résistent pas à un rayon-
nement UV constant. Tiens également
ton hamac à l’écart des sources de
chaleur importantes et bien sûr du feu!
> Ne laisse pas le hamac suspendu sans
surveillance afin qu’il ne soit pas mal
utilisé ou volé.
> Teste soigneusement le hamac à chaque
fois avant d’y mettre tout ton poids.
> Ne modifie pas le hamac par rapport à
son état d’origine, car cela aurait pour
effet d’annuler la garantie/responsabilité.
> Assure-toi que les arbres sont suffis-
amment solides et ne sont pas morts
et qu’aucune branche morte ne puisse
tomber. Assure-toi également que la
surface de fixation du hamac soit ro-
buste, durable et adaptée à supporter
un hamac.
> Attention au frottement: ne suspends
jamais le hamac à deux cordes par
côté, par exemple en enroulant la corde
de suspension autour de l’arbre et en
reliant les deux extrémités de la corde
fendue à l’extrémité du hamac. Cela
aurait inévitablement pour effet que la
corde de suspension frotte contre l’arbre
à chaque mouvement de balancier et se
casse soudainement! Suspends toujours
le hamac à une seule corde par côté!
> Le non-respect de ces avertissements
peut entraîner des blessures graves,
voire mortelles.
Entretien
> Pour nettoyer le hamac, frotte-le soign-
eusement à l’eau tiède avec une brosse,
puis laisse-le bien sécher. Ne pas laver
en machine!
> N’expose pas le hamac au soleil trop
longtemps. Tiens-le à l’écart de toute
sources de chaleur intense et du feu!
Entreposage
> Il est préférable d’entreposer le hamac
dans un endroit sec, frais et sombre.
Evite à tout prix l’humidité, car elle peut
entraîner la formation de moisissures
ou le détachement de son revêtement
(hydrolyse).
Conseils
> Pour être le plus horizontal possible, il
est conseillé de s’allonger en diagonale
dans le hamac.
> Pour te balancer confortablement, atta-
che une corde à une racine ou à un ar-
bre et, une fois que tu es dans le hamac,
empoigne son extrémité. Il ne reste plus
qu’à tirer sur la corde pour imprimer un
agréable balancement
Davantage d’informations à l’adresse
www.exped.com
This manual suits for next models
1
Table of contents
Languages:
Other Exped Hammock manuals
Popular Hammock manuals by other brands

Insportline
Insportline Simisus LG3400 user manual

siena GARDEN
siena GARDEN Panama N04532 Assembly instruction

Insportline
Insportline Lencura LG3318 user manual

La Siesta
La Siesta CANOA Instructions for use and Safety Instructions

moonboon
moonboon Hammock Stiffener user manual

Tropilex
Tropilex Colombian quick start guide