Expondo STAMOS soldering S-LS-47 User manual

expondo.de
DIGITAL SOLDERING STATION
USER MANUAL | INSTRUKCJA OBSŁUGI | NÁVOD K POUŽITÍ | MANUEL D‘UTILISATION | ISTRUZIONI D`USO | MANUAL DE INSTRUCCIONES
BEDIENUNGSANLEITUNG
S-LS-47
S-LS-50
2 3
25.03.201925.03.2019
PRODUKTNAME DIGITALE LÖTSTATION
PRODUCT NAME DIGITAL SOLDERING STATION
NAZWA PRODUKTU CYFROWA STACJA LUTOWNICZA
NÁZEV VÝROBKU DIGITÁLNÍ PÁJECÍ STANICE
NOM DU PRODUIT STATION DE SOUDAGE NUMÉRIQUE
NOME DEL PRODOTTO STAZIONE SALDANTE DIGITALE
NOMBRE DEL PRODUCTO ESTACIÓN DE SOLDADURA DIGITAL
MODELL
S-LS-47
S-LS-50
PRODUCT MODEL
MODEL PRODUKTU
MODEL VÝROBKU
MODÈLE
MODELLO
MODELO
NAME DES HERSTELLERS
EXPONDO POLSKA SP. Z O.O. SP. K.
MANUFACTURER NAME
NAZWA PRODUCENTA
NÁZEV VÝROBCE
NOM DU FABRICANT
NOME DEL PRODUTTORE
NOMBRE DEL FABRICANTE
ANSCHRIFT DES HERSTELLERS
UL. NOWY KISIELIN-INNOWACYJNA 7, 66-002 ZIELONA GÓRA | POLAND, EU
MANUFACTURER ADDRESS
ADRES PRODUCENTA
ADRESA VÝROBCE
ADRESSE DU FABRICANT
INDIRIZZO DEL FORNITORE
DIRECCIÓN DEL FABRICANTE
INHALT | CONTENT | TREŚĆ | OBSAH | CONTENU | CONTENUTO | CONTENIDO
DE
EN
PL
CZ
FR
IT
ES
3
8
12
17
21
26
30
Parameter
- Beschreibung
Parameter - Wert
Produktname Digitale Lötstation
Modell S-LS-47 S-LS-50
Nennspannung [V~]/
Frequenz [Hz]
230/50
Nennleistung [W] 80 100
Temperatur [°C] 150-480
Sicherung Schnelle
Sicherung
1A
Zeitverzögerte
Sicherung T1A
Abmessungen [mm] 105x90x90 105x90x130
Gewicht [kg] 0,95 2,30
Der Begri "Gerät" oder "Produkt" in den Warnungen und
Beschreibung des Handbuchs bezieht sich auf <Digitale
Lötstation>. Benutzen Sie das Gerät nicht in Räumen
mit sehr hoher Luftfeuchtigkeit / in unmittelbarer Nähe
von Wasserbehältnissen! Lassen Sie das Gerät nicht
nass werden. Gefahr eines elektrischen Schlags! Die
Ventilationsönungen dürfen nicht verdeckt werden!
2.1. ELEKTRISCHE SICHERHEIT
a) Der Gerätestecker muss mit der Steckdose
kompatibel sein. Ändern Sie den Stecker in keiner
Weise. Original-Stecker und passende Steckdosen
vermindern das Risiko eines elektrischen Schlags.
b) Vermeiden Sie das Berühren von geerdeten
Bauteilen wie Rohrleitungen, Heizkörpern, Öfen und
Kühlschränken. Es besteht das erhöhte Risiko eines
elektrischen Schlags, wenn Ihr Körper durch nasse
Oberächen und in feuchter Umgebung geerdet ist.
Wasser, das in das Gerät eintritt, erhöht das Risiko
von Beschädigungen und elektrischen Schlägen.
c) Berühren Sie das Gerät nicht mit nassen oder
feuchten Händen.
d) Verwenden Sie das Kabel nicht in unsachgemäßer
Weise. Verwenden Sie es niemals zum Tragen
des Geräts oder zum Herausziehen des Steckers.
Halten Sie das Kabel von Hitze, Öl, scharfen
Kanten oder beweglichen Teilen fern. Beschädigte
oder geschweißte Kabel erhöhen das Risiko eines
elektrischen Schlags.
e) Wenn sich die Verwendung des Geräts in feuchter
Umgebung nicht verhindern lässt, verwenden Sie
einen Fehlerstrom-Schutzschalter (RCD). Mit einem
RCD verringert sich das Risiko eines elektrischen
Schlags.
f) Es ist verboten, das Gerät zu verwenden, wenn
das Netzkabel beschädigt ist oder oensichtliche
Gebrauchsspuren aufweist. Ein beschädigtes
Netzkabel sollte von einem qualizierten Elektriker
oder vom Kundendienst des Herstellers ersetzt
werden.
g) Tauchen Sie Kabel, Stecker bzw. das Gerät nicht
in Wasser oder andere Flüssigkeiten, um einen
Stromschlag zu vermeiden. Verwenden Sie das Gerät
nicht auf nassen Oberächen.
h) ACHTUNG LEBENSGEFAHR! Tauchen und Halten Sie
das Gerät während des Reinigens oder des Betriebes
nie in Wasser oder andere Flüssigkeiten.
2.2. SICHERHEIT AM ARBEITSPLATZ
a) Halten Sie Ihren Arbeitsplatz sauber und gut
beleuchtet. Unordnung oder schlechte Beleuchtung
können zu Unfällen führen. Seien Sie voraussichtig,
beobachten Sie, was getan wird und bewahren
Sie Ihren gesunden Menschenverstand bei der
Verwendung des Gerätes.
TECHNISCHE DATEN
Das Produkt erfüllt die geltenden
Sicherheitsnormen.
Gebrauchsanweisung beachten.
Recycling-Produkt.
ACHTUNG! oder WARNUNG! oder HINWEIS!
um auf bestimmte Umstände aufmerksam zu
machen (Allgemeines Warnzeichen).
Augenschutz benutzen.
Staubschutz benutzen (Schutz der Atemwege).
ACHTUNG! Warnung vor elektrischer Spannung!
ACHTUNG! Warnung vor giftigen Stoen!
ACHTUNG! Heiße Fläche. Verbrennungsgefahr!
Gerät der Schutzklasse I mit Schutzklemme.
Löten mit bleifreiem Lötdraht.
Für einen langen und zuverlässigen Betrieb des Geräts muss
auf die richtige Handhabung und Wartung entsprechend
den in dieser Anleitung angeführten Vorgaben geachtet
werden. Die in dieser Anleitung angegebenen technischen
Daten und die Spezikation sind aktuell. Der Hersteller
behält sich das Recht vor, im Rahmen der Verbesserung der
Qualität Änderungen vorzunehmen.
ERLÄUTERUNG DER SYMBOLE
1. ALLGEMEINE BESCHREIBUNG
Diese Anleitung ist als Hilfe für eine sichere und zuverlässige
Nutzung gedacht. Das Produkt wurde strikt nach den
technischen Vorgaben und unter Verwendung modernster
Technologien und Komponenten sowie unter Wahrung der
höchsten Qualitätsstandards entworfen und angefertigt.
VOR INBETRIEBNAHME MUSS DIE ANLEITUNG
GENAU DURCHGELESEN UND VERSTANDEN
WERDEN.
Pb
Die originale Anweisung ist die deutschsprachige Fassung.
Sonstige Sprachfassungen sind Übersetzungen aus der
deutschen Sprache.
HINWEIS!In der vorliegenden Anleitung sind
Beispielbilder vorhanden, die von dem tatsächlichen
Aussehen das Produkt abweichen können.
2. NUTZUNGSSICHERHEIT
ACHTUNG!Lesen Sie alle Sicherheitshinweise und
alle Anweisungen durch. Die Nichtbeachtung der
Warnungen und Anweisungen kann zu elektrischen
Schlägen, Feuer und / oder schweren Verletzungen
bis hin zum Tod führen.
BEDIENUNGSANLEITUNG
DE
4 5
25.03.201925.03.2019
DE DE
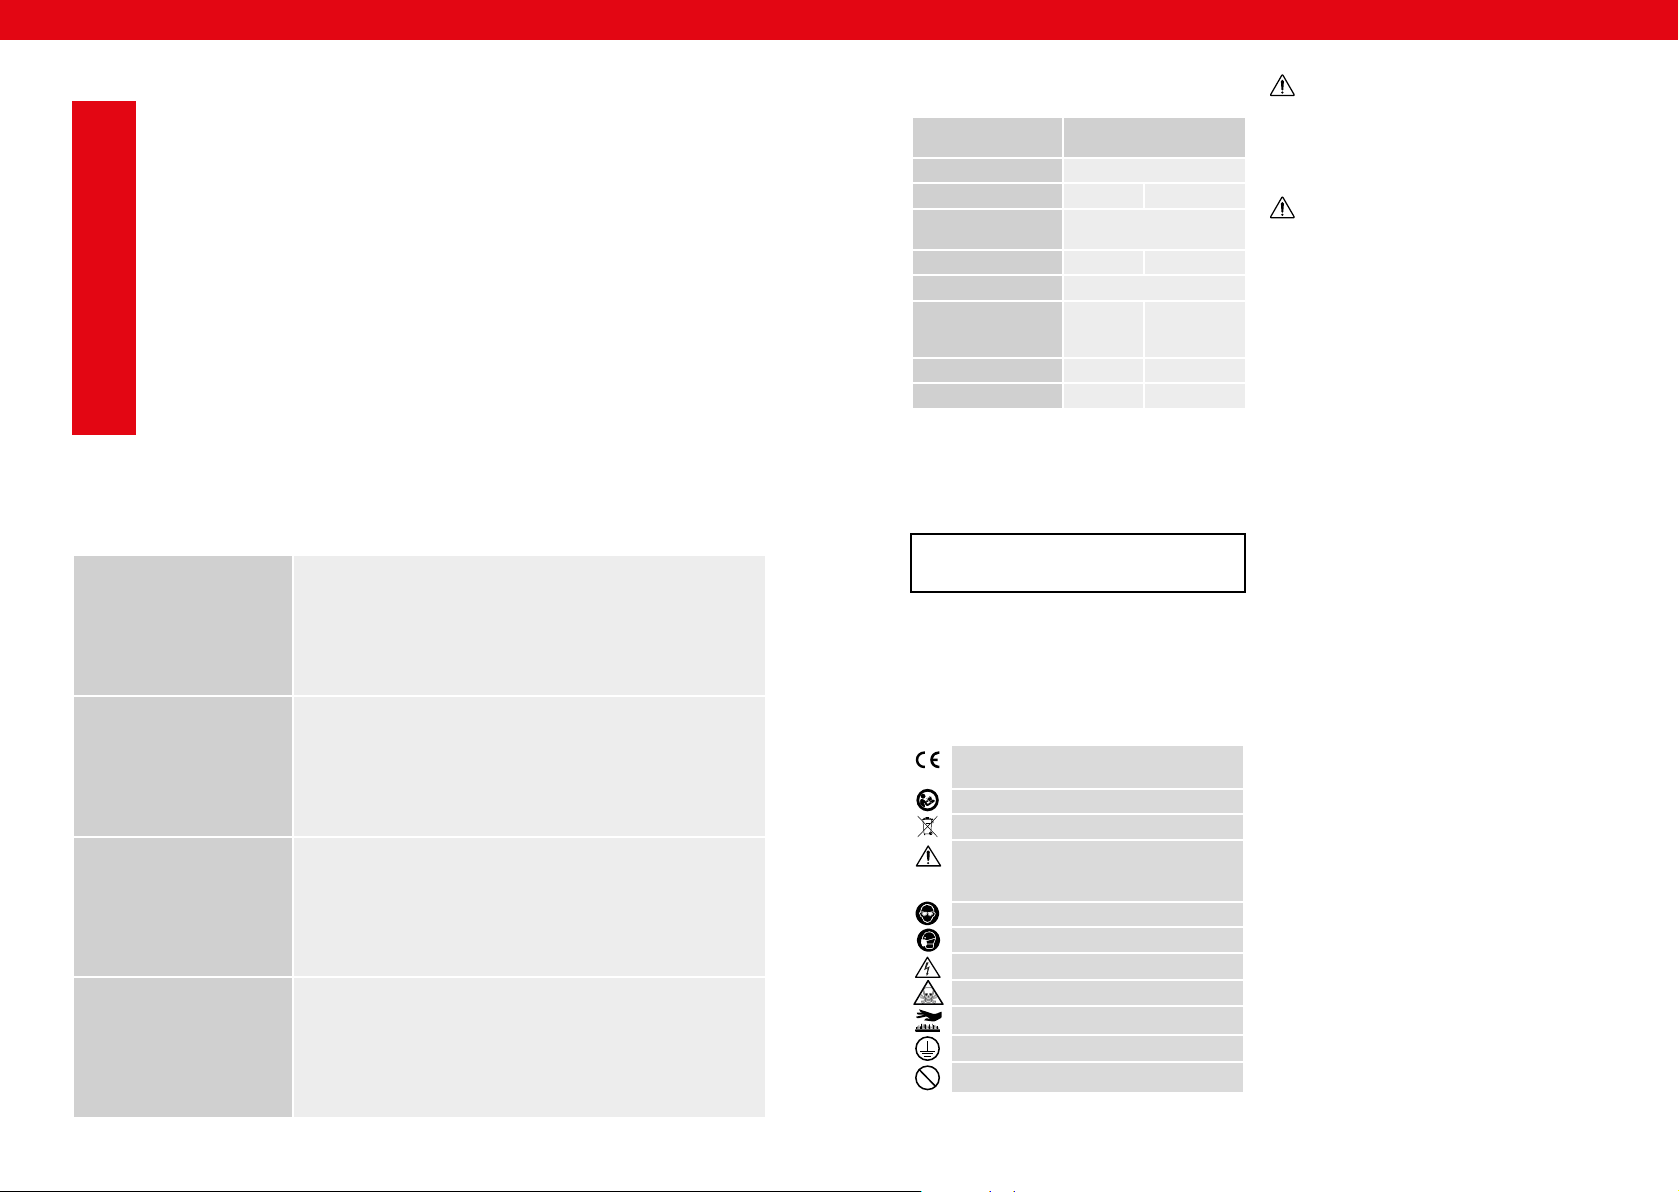
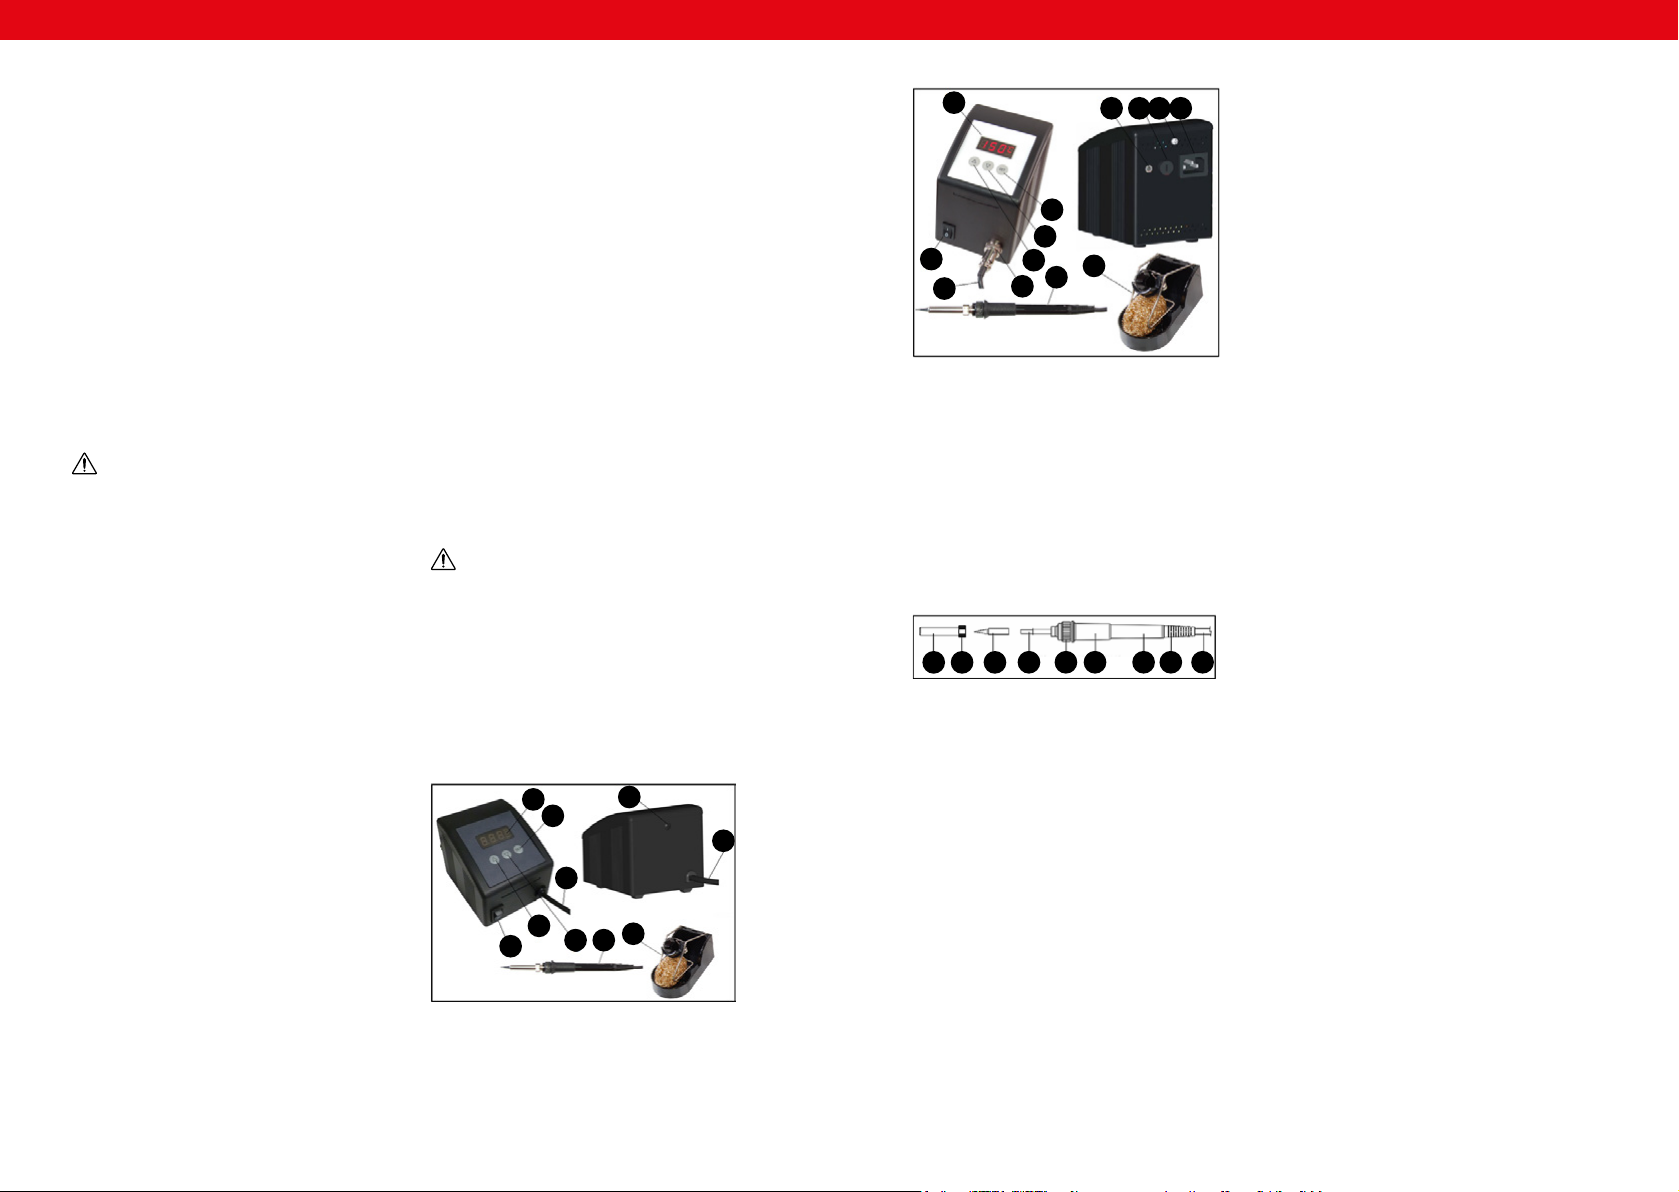
3.1. GERÄTEBESCHREIBUNG
3.1.1. GERÄT UND ZUBEHÖR
I. S-LS-47
3. NUTZUNGSBEDINGUNGEN
Das Gerät dient zum Löten, Entlöten oder Schrumpfen von
elektronischen und elektrischen Verbindungen.
Für alle Schäden bei nicht sachgemäßer Verwendung
haftet allein der Betreiber.
A. Montagemue
B. Montagemutter
C. Lötspitze
D. Heizelement
E. Heizgerätbefestigung
F. Gummikappe
G. Lötkolbengri
H. Zugentlastung
I. Netzkabel
3.2. VORBEREITUNG ZUM BETRIEB
ARBEITSSTELLE DES GERÄTES
Die Temperatur der Umgebung sollte nicht höher als 40°C
sein und die relative Luftfeuchtigkeit sollte 85% nicht
überschreiten. Stellen Sie das Gerät so auf, dass eine gute
Luftzirkulation gewährleistet ist. Es ist auf allen Seiten
ein Mindestabstand von wenigstens 10 cm einzuhalten.
Halten Sie das Gerät von allen heißen Flächen fern. Das
Gerät sollte immer auf einer ebenen, stabilen, sauberen,
feuerfesten und trockenen Oberäche und außerhalb der
Reichweite von Kindern und Personen mit eingeschränkten
geistigen, sensorischen und psychischen Fähigkeiten
verwendet werden. Platzieren Sie das Gerät so, dass der
Netzstecker jederzeit zugänglich und nicht verdeckt ist.
Achten Sie darauf, dass die Stromversorgung des Gerätes
den Angaben auf dem Produktschild entspricht.
AUFBAU DES GERÄTES
1. ACHTUNG: Bevor Sie das Gerät in Betrieb nehmen,
sollten Sie sicherstellen, dass die Stromquelle an die
Anforderungen des Geräts angepasst ist.
2. Packen Sie alle Komponenten vorsichtig aus und
überprüfen Sie ihren Zustand auf Beschädigungen
und/oder fehlende Elemente.
3. Stellen Sie sicher, dass das Gerät nicht an eine
Stromquelle angeschlossen ist.
4. Stellen Sie das Gerät auf eine ebene, stabile
Oberäche.
5. Stecken Sie den Lötkolbenstecker [9] in den
Kolbenanschluss [14] (S-LS-50)
6. Stecken Sie den Netzstecker [8] in den
Netzkabelanschluss [13] (S-LS-50).
7. Verbinden Sie den Netzstecker [8] mit der
Stromquelle.
8. Starten Sie das Gerät mit dem Ein-/Aus-Schalter [6].
3.3. ARBEIT MIT DEM GERÄT
3.3.1. GRUNDBEDIENUNG
1. Starten Sie das Gerät mit dem Ein-/Aus-Schalter [6].
2. Drücken Sie die Taste [4] und stellen Sie die
Temperatur auf 250°C (482°F) ein. Der Wert erscheint
in der Anzeige [1].
3. Durch einmaliges Drücken der Taste [4] wird die
Temperatur um 1°C erhöht. Wenn Sie die Taste [4]
gedrückt halten, wird die Temperatur kontinuierlich
erhöht.
HINWEIS: Das Senken der Temperatur mit der Taste
[3] erfolgt auf dieselbe Weise.
4. Nach dem Erwärmen der Spitze [C] ist der Lötkolben
[9] mit einer Lötschicht zu bedecken. Dies dient
dazu, die Spitze zu schützen und ihre Lebensdauer
zu verlängern.
5. Die gewünschte Temperatur wird durch Blinken des
Markers im Anzeigebildschirm [1] signalisiert.
HINWEIS: Bei Nichtgebrauch sollte der Lötkolben [9]
immer auf einem Untersetzer [10] platziert werden.
HINWEIS: Stellen Sie vor der Überprüfung oder
Reparatur von z. B. elektrischen Kabeln sicher, dass
sie nicht unter Strom stehen.
b) Benutzen Sie das Gerät nicht in explosionsgefährdeten
Bereichen, zum Beispiel in Gegenwart von
brennbaren Flüssigkeiten, Gasen oder Staub. Geräte
können unter Umständen Funken erzeugen, welche
Staub oder Dämpfe entzünden können.
c) Wenn Sie nicht sicher sind, ob das Gerät
ordnungsgemäß funktioniert, wenden Sie sich an
den Service des Herstellers.
d) Reparaturen dürfen nur vom Service des Herstellers
durchgeführt werden. Führen Sie keine Reparaturen
auf eigene Faust durch!
e) Zum Löschen des Gerätes bei Brand oder Feuer, nur
Pulver-Feuerlöscher oder Kohlendioxidlöscher (CO2)
verwenden.
f) Kinder und Unbefugte dürfen am Arbeitsplatz nicht
anwesend sein. (Unachtsamkeit kann zum Verlust der
Kontrolle über das Gerät führen).
g) Verwenden Sie das Gerät in einem gut belüfteten
Bereich.
h) Während des Gerätebetriebs werden schädliche
Dämpfe erzeugt. Der Arbeitsplatz muss gut belüftet
sein, um unbefugte Personen vor den schädlichen
Auswirkungen der Dämpfe zu schützen.
i) Überprüfen Sie regelmäßig den Zustand der
Sicherheitsinformationsaufkleber. Falls die Aufkleber
unleserlich sind, sollten sie ausgetauscht werden.
j) Bewahren Sie die Gebrauchsanleitung für den
weiteren Gebrauch auf. Sollte dieses Gerät
an Dritte weitergegeben werden, muss die
Gebrauchsanleitung mit ausgehändigt werden.
k) Verpackungselemente und kleine Montageteile
außerhalb der Reichweite von Kindern aufbewahren.
l) Halten Sie das Gerät von Kindern und Tieren fern.
2.3. PERSÖNLICHE SICHERHEIT
a) Es ist nicht gestattet, das Gerät im Zustand der
Ermüdung, Krankheit, unter Einuss von Alkohol,
Drogen oder Medikamenten zu betreiben,
wenn diese die Fähigkeit das Gerät zu bedienen,
einschränken.
b) Das Gerät ist nicht dazu bestimmt, durch Personen
(darunter Kinder) mit eingeschränkten physischen,
sensorischen und geistigen Fähigkeiten bzw. durch
Personen ohne entsprechende Erfahrung und/oder
entsprechendes Wissen bedient zu werden, es sei
denn es gibt eine für ihre Aufsicht und Sicherheit
zuständige Person bzw. sie haben von dieser Person
entsprechende Hinweise in Bezug auf die Bedienung
das Gerät erhalten.
c) Seien Sie aufmerksam und verwenden Sie Ihren
gesunden Menschenverstand beim Betreiben
des Gerätes. Ein Moment der Unaufmerksamkeit
während der Arbeit kann zu schweren Verletzungen
führen.
d) Benutzen Sie persönliche Schutzausrüstung, die für
den Betrieb des Gerätes entsprechend den in Punkt 1
der Symbolerläuterungen vorgegebenen Maßgaben
erforderlich ist. Die Verwendung geeigneter
und zertizierter persönlicher Schutzausrüstung
verringert das Verletzungsrisiko.
e) Um eine versehentliche Inbetriebnahme zu
vermeiden, vergewissern Sie sich, dass der
Schalter vor dem Anschließen an eine Stromquelle
ausgeschaltet ist.
f) Das Gerät ist kein Spielzeug. Kinder sollten unter
Aufsicht stehen, damit sie nicht mit dem Gerät
spielen.
2.4. SICHERE ANWENDUNG DES GERÄTS
a) Überhitzen Sie das Gerät nicht. Verwenden Sie
geeignete Werkzeuge für die entsprechende
Anwendung. Richtig ausgewählte Geräte und der
sorgsame Umgang mit ihnen führt zu besseren
Arbeitsergebnissen.
b) Benutzen Sie das Gerät nicht, wenn der EIN-/AUS-
Schalter nicht ordnungsgemäß funktioniert. Geräte,
die per Schalter nicht gesteuert werden können, sind
gefährlich und müssen repariert werden.
c) Trennen Sie das Gerät von der Stromversorgung,
bevor Sie mit der Einstellung, Reinigung und Wartung
beginnen. Eine solche vorbeugende Maßnahme
verringert das Risiko einer versehentlichen
Aktivierung des Geräts.
d) Nicht verwendete Werkzeuge sind außerhalb
der Reichweite von Kindern sowie von Personen
aufzubewahren, welche weder das Gerät selbst noch
die entsprechende Anleitung kennen. In den Händen
unerfahrener Personen können derlei Geräte eine
Gefahr darstellen.
e) Halten Sie das Gerät im einwandfreien Zustand.
Überprüfen Sie vor jeder Arbeit, ob allgemeine
Schäden vorliegen oder Schäden an beweglichen
Teilen (Bruch von Teilen und Komponenten oder
andere Bedingungen, die den sicheren Betrieb der
Maschine beeinträchtigen könnten). Im Falle eines
Schadens muss das Gerät vor Gebrauch in Reparatur
gegeben werden.
f) Halten Sie das Gerät außerhalb der Reichweite von
Kindern.
g) Reparatur und Wartung von Geräten dürfen nur
von qualiziertem Fachpersonal und mit Original-
Ersatzteilen durchgeführt werden. Dadurch wird die
Sicherheit bei der Nutzung gewährleistet.
h) Um die vorgesehene Betriebsintegrität des Gerätes
zu gewährleisten, dürfen die werksmäßig montierten
Abdeckungen oder Schrauben nicht entfernt werden.
i) Lassen Sie dieses Gerät nicht unbeaufsichtigt,
während es in Betrieb ist.
j) Das Gerät regelmäßig reinigen, damit sich kein
Schmutz auf Dauer festsetzen kann.
k) Das Gerät ist kein Spielzeug. Reinigung und Wartung
dürfen nicht von Kindern ausgeführt werden, wenn
diese nicht unter der Aufsicht von Erwachsenen
stehen.
l) Es ist untersagt, in den Aufbau des Geräts
einzugreifen, um seine Parameter oder Konstruktion
zu ändern.
m) Geräte von Feuer – und Wärmequellen fernhalten.
n) Bei einer Unterbrechung des Gerätebetriebs sollte
der Lötkolben immer auf einem Untersetzer platziert
werden.
o) Halten Sie die Lötspitze und Elemente, die heiß
werden können, von Körper, Kleidung und
brennbaren Gegenständen fern.
p) Die Lötspitze bleibt auch nach dem Ausschalten heiß.
Warten Sie vor dem Reinigen oder Austauschen von
Komponenten, bis das Gerät vollständig abgekühlt ist.
q) Seien Sie vorsichtig und atmen Sie keine Lötdämpfe
ein.
1. Temperaturanzeige
2. Einstelltaste
3. Taste zum Senken der Temperatur
„nach unten"
4. Taste zum Erhöhen der Temperatur
„nach oben“
5. Lötkolbenkabel
6. Ein-/Aus-Schalter
7. Befestigungsschraube des Frontbedienfelds
8. Netzkabel (nicht sichtbar in Abbildung S-LS-
50)
9. Lötkolben
10. Lötkolbenstativ mit Drahtreiniger
11. Erdungsanschluss (nur S-LS-50)
12. Sicherungshalter (nur S-LS-50)
13. Netzkabelanschluss (nur S-LS-50)
14. Lötkolbenkabel-Anschluss (nur S-LS-50)
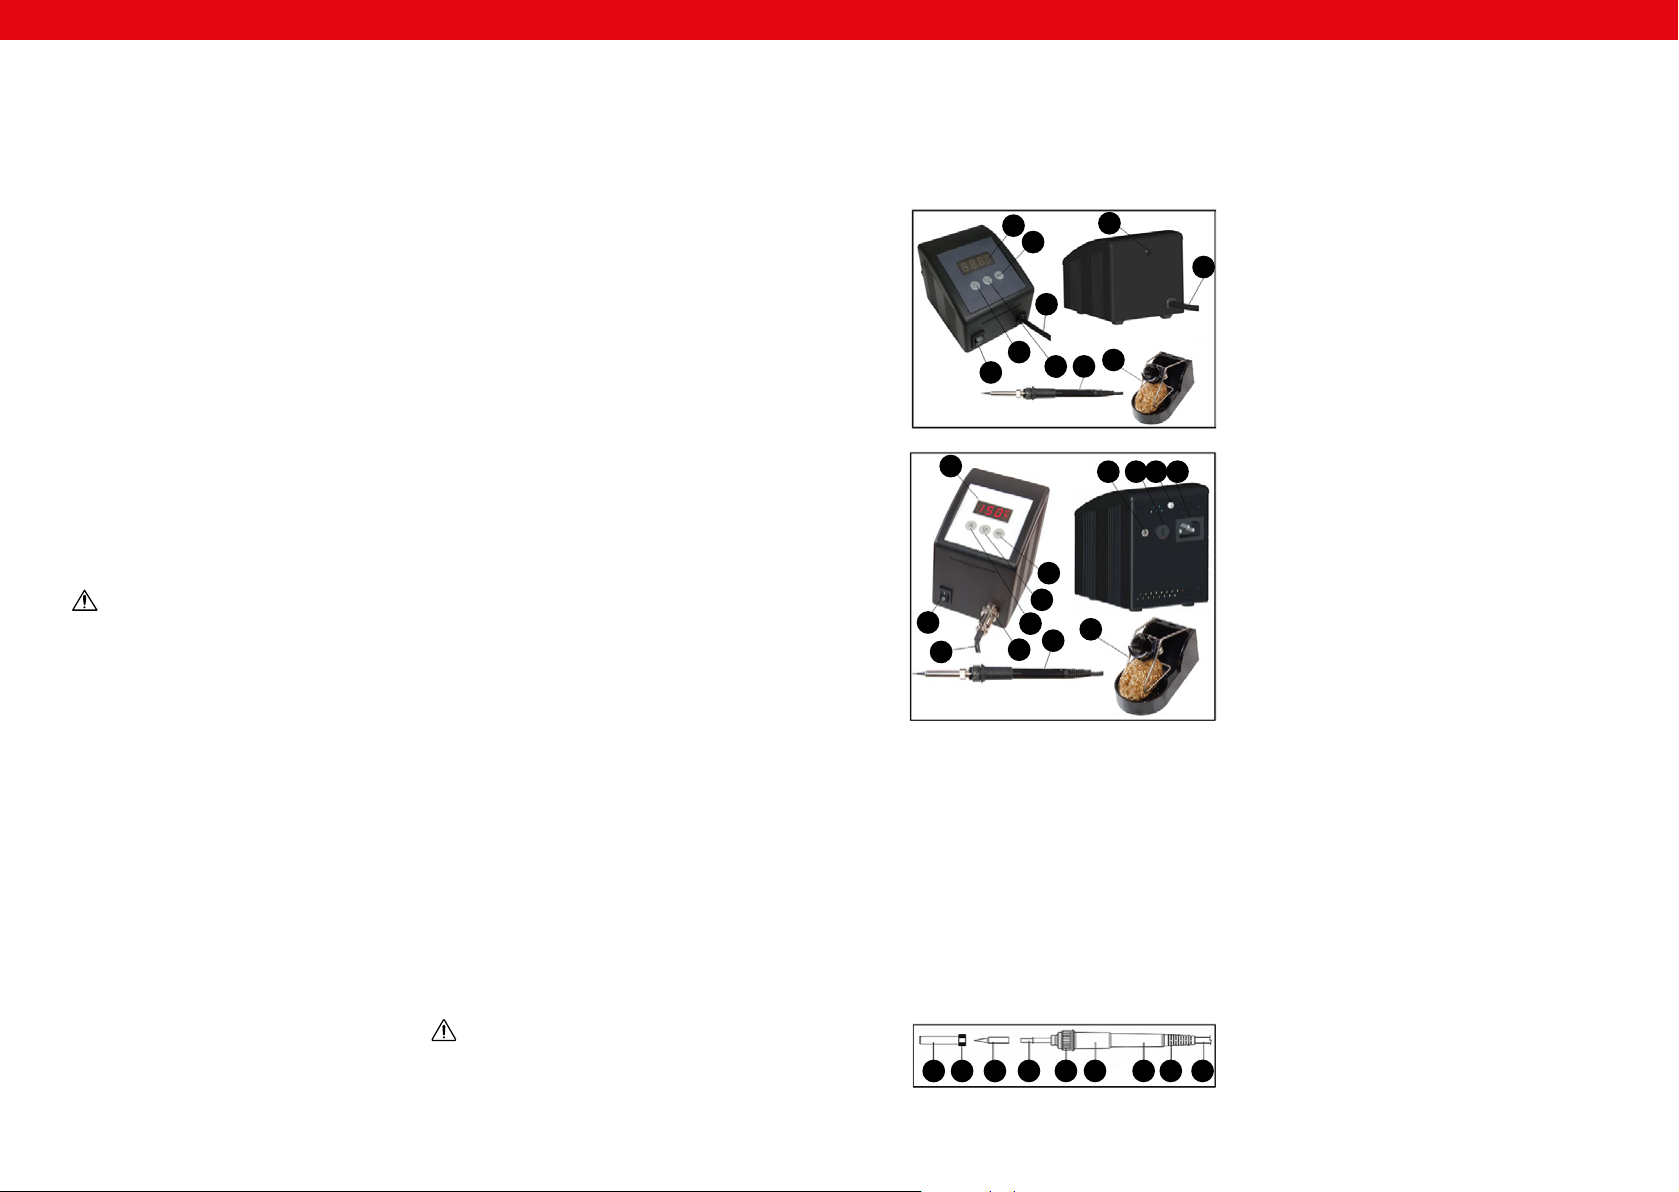
3.1.2. AUFBAU DES LÖTKOLBENS
A B C D E F G H I
II. S-LS-50
1
2
5
7
8
4
63 9 10
6
1
2
3
4
514 910
11 12 713
HINWEIS! Kinder und Unbeteiligte müssen bei der
Arbeit mit diesem Gerät gesichert werden.
ACHTUNG! Obwohl das Gerät mit dem Gedanken an
die Sicherheit entworfen wurde, besitzt es bestimmte
Schutzmechanismen. Trotz der Verwendung
zusätzlicher Sicherheitselemente besteht bei der
Bedienung immer noch ein Verletzungsrisiko. Es wird
empfohlen, bei der Nutzung Vorsicht und Vernunft
walten zu lassen.

6 7
25.03.201925.03.2019
DE DE
3.3.2 PARAMETEREINSTELLMENÜ
1. Halten Sie die Taste [2] gedrückt. Die Meldung [---]
erscheint im Display.
2. Geben Sie das Passwort [010] ein, um das
Parametereinstellmenü aufzurufen.
HINWEIS: Durch die Eingabe eines falschen
Passworts wird das Einstellmenü verlassen.
3. Nach dem Aufrufen des Menüs erscheint die
Meldung [F-0] im Display. Der Benutzer kann die
Einstellungen gemäß folgendem Schema auswählen:
F-0> F-1> F-2> F-3> F-4> F-0 mit Hilfe der Tasten
[3] und [4].
4. Passworteinstellungen [F-1]
• Bestätigen Sie die Auswahl mit der Taste [2], wenn
die blinkende Meldung [F-1] auf dem Bildschirm
erscheint.
• Verwenden Sie die Tasten [3] und [4], um den
Parameterwert auszuwählen. Der ausgewählte Wert,
beispielsweise 100, ist das neue Passwort, das die
Station schützt.
HINWEIS: Wenn Sie den Wert [000] auswählen, wird
die Station nicht durch ein Passwort geschützt.
• Drücken Sie die Taste [2], um den
Passworteinstellmodus zu verlassen.
5. Temperaturkorrektureinstellungen [F-2]
• Bestätigen Sie die Auswahl mit der Taste [2], wenn
die blinkende Meldung [F-2] auf dem Bildschirm
erscheint.
• Verwenden Sie die Tasten [3] und [4], um den
Parameterwert auszuwählen. Es ist möglich, die
Temperaturkorrektur im Bereich (-99°C bis + 99°C)
zu wählen.
• Drücken Sie die Taste [2], um den
Temperaturkorrektur-Einstellmodus zu verlassen.
6. Ruhezustandeinstellungen [F-3]
• Bestätigen Sie die Auswahl mit der Taste [2], wenn
die blinkende Meldung [F-3] auf dem Bildschirm
erscheint.
• Verwenden Sie die Tasten [3] und [4], um den
Parameterwert auszuwählen.
a) Die Auswahl des Wertes [000] bedeutet, dass der
Ruhezustand nicht aktiviert ist.
b) Die Auswahl des Wertes [100] bedeutet, dass
bei 20 Minuten Inaktivität die Temperatur der
Lötspitze durch die Station auf 150°C reduziert
wird.
• Drücken Sie die Taste [2], um den Ruhezustand-
Einstellmodus zu verlassen.
7. Temperaturskala-Einstellungen [F-4]
• Bestätigen Sie die Auswahl mit der Taste [2], wenn
die blinkende Meldung [F-4] auf dem Bildschirm
erscheint.
• Verwenden Sie die Tasten [3] und [4], um den
Parameterwert auszuwählen. Sie können zwischen
Celsius- oder Fahrenheit-Skala wählen. Die aktuelle
Auswahl wird auf der rechten Seite des Displays
angezeigt.
• Drücken Sie die Taste [2], um den Temperaturskala-
Einstellmodus zu verlassen.
3.3.3 GRÜNDE FÜR DIE FEHLENDE BENETZBARKEIT DER
LÖTSPITZE
Während des Lötprozesses tritt Benetzung auf der
Oberäche des Materials auf, deren Auftreten eine der
Bedingungen für die Erzeugung eines dauerhaften Lots ist.
Es gibt Faktoren, die den Benetzungsprozess und damit die
Qualität der gebildeten Schweißnaht negativ beeinussen:
1. Temperatur der Lötspitze > 410°C (770°F).
2. Keine Schutzschicht auf der Lötspitze im
Ruhezustand.
3. Kein Flussmittel im Lot.
4. Abwischen der Spitze mit einem verunreinigten
Schwamm oder Tuch, Verunreinigung mit
Schwefelverbindungen.
5. Kontakt mit Kunststo organischen Ursprungs.
6. Verunreinigungen im Lot.
3.3.4. BETRIEBSEMPFEHLUNGEN FÜR LÖTSPITZEN
1. HINWEIS: Schalten Sie das Gerät aus, trennen Sie es
vom Stromnetz und lassen Sie es abkühlen, bevor Sie
igendwelche Maßnahmen ergreifen.
2. Es wird empfohlen, die Lötspitze bei hohem
Arbeitsaufkommen täglich zu reinigen.
3. Bevor Sie die Spitze ruhen lassen, empehlt es
sich, eine Schutzschicht aus Lot auf die Spitze
aufzutragen.
4. Bevor Sie das Gerät in Betrieb nehmen, säubern Sie
die Spitze mit dem Reiniger.
5. Die Verwendung von hohen Temperaturen während
des Gerätebetriebs verkürzt die Lebensdauer der
Spitze.
6. Durch Reibungen und Quetschungen auf der
Arbeitsäche kann die Lötspitze beschädigt oder
deren Lebensdauer verkürzt werden.
7. Tragen Sie während des Betriebs keine Lötschicht auf
die Spitze auf, da sie sonst beschädigt werden kann.
8. Reinigen Sie die Spitze nicht mit abrasiven
Materialien.
9. Verwenden Sie keine Flussmittel, die ätzende
Substanzen enthalten.
10. Entfernung von Oxiden aus der Lötspitze:
• Entfernen Sie den Rückstand vorsichtig mit
einem Scheuerlappen (Körnung 600÷800) oder
Isopropylalkohol von der Lötspitze.
• Bedecken Sie die Oberäche mit Tinol mit einem
Kolophoniumkern.
• Die mit Lötschicht zu bedeckende Oberäche wird
mit Tinol mit einem Kolophoniumkern beschichtet
und anschließend geschmolzen.
11. Um das Innere der Montagemue richtig zu reinigen,
lösen Sie die Montagemutter und demontieren Sie
die Mue und die Spitze. Jeglicher Schmutz in der
Mue sollte mit Druckluft entfernt werden.
ACHTUNG: Seien Sie vorsichtig und lassen Sie den
ausgeblasenen Staub nicht in Ihre Augen gelangen.
3.3.5. NUTZUNG NEUER SPITZEN
1. Stellen Sie die Mindesttemperatur ein und schalten
Sie die Station ein.
2. Wenn die Temperatur 250°C erreicht, bedecken Sie
die Oberäche der Spitze mit Tinol mit einem Gehalt
an Kolophonium.
3. Warten Sie 3 Minuten bei 250°C. Verwenden Sie das
Gerät während dieser Zeit nicht.
4. Stellen Sie die Betriebstemperatur ein. Nach dem
Erreichen der Betriebstemperatur ist die Station
einsatzbereit.
HINWEIS: Damit das Gerät einwandfrei funktioniert
und die Spitze optimal beheizt wird, muss
sichergestellt werden, dass Spitze und Montagemue
nach jedem Betrieb gereinigt werden.
3.4. REINIGUNG UND WARTUNG
a) Vor jeder Reinigung und Einstellung, dem Austausch
von Zubehör oder wenn das Gerät nicht benutzt
wird, ziehen Sie den Netzstecker und lassen das
Gerät vollständig abkühlen. Bei Nichtbeachtung
dieser Anweisungen kann das Gerät beschädigt
werden.
b) Verwenden Sie zum Reinigen der Oberäche
ausschließlich Mittel ohne ätzende Inhaltsstoe.
c) Lassen Sie nach jeder Reinigung alle Teile gut
trocknen, bevor das Gerät erneut verwendet wird.
d) Bewahren Sie das Gerät an einem trockenen, kühlen,
vor Feuchtigkeit und direkter Sonneneinstrahlung
geschütztem Ort auf.
e) Es ist verboten, das Gerät mit einem Wasserstrahl zu
besprühen oder in Wasser zu tauchen.
f) Man muss vermeiden, dass Wasser durch die
Belüftungsönungen am Gehäuse ins Innere
gelangt.
g) Die Belüftungsönungen sind mit Pinsel und
Druckluft zu reinigen.
h) Hinsichtlich der technischen Ezienz und eventueller
Schäden sollte eine regelmäßige Überprüfung des
Gerätes durchgeführt werden.
i) Zum Reinigen ist ein weicher, feuchter Lappen zu
verwenden.
j) Zum Reinigen darf man keine scharfen und/
oder Metallgegenstände (z.B. Drahtbürste oder
Metallspachtel) benutzen, weil diese die Oberäche
des Materials, aus dem das Gerät hergestellt ist,
beschädigen können.
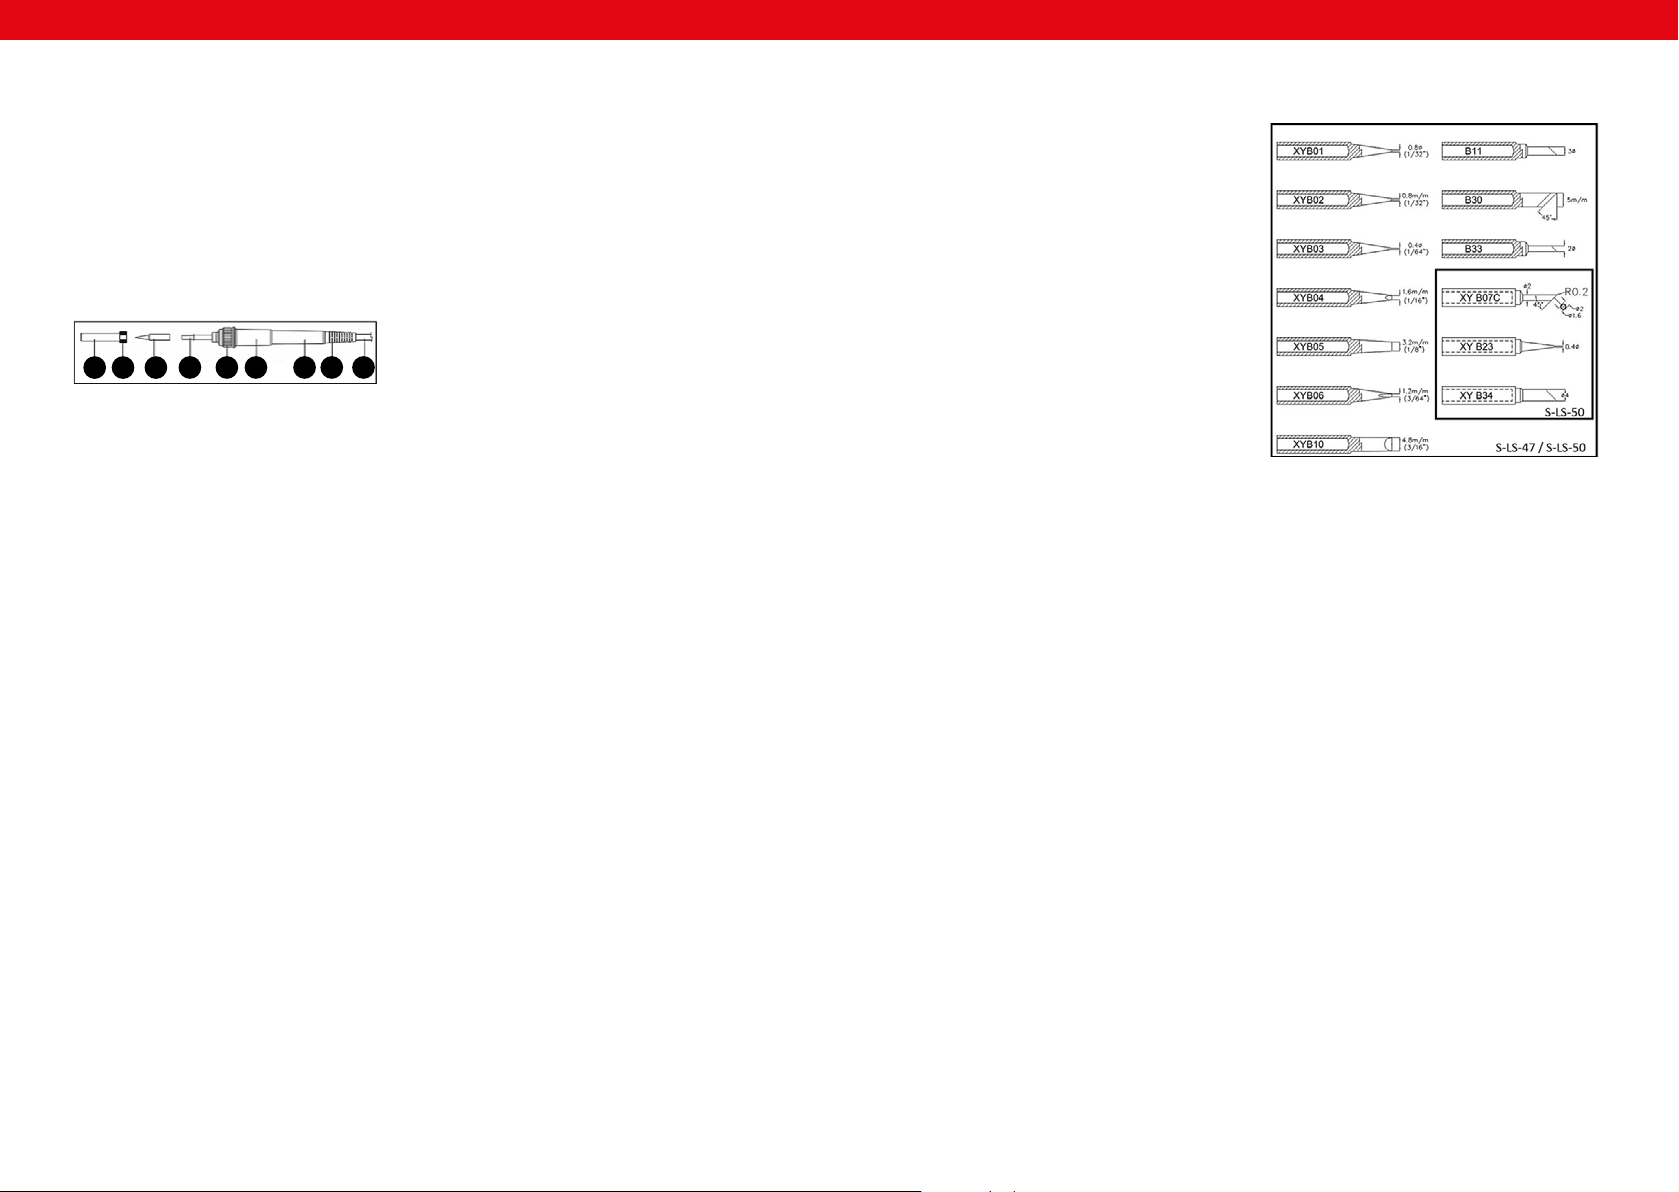
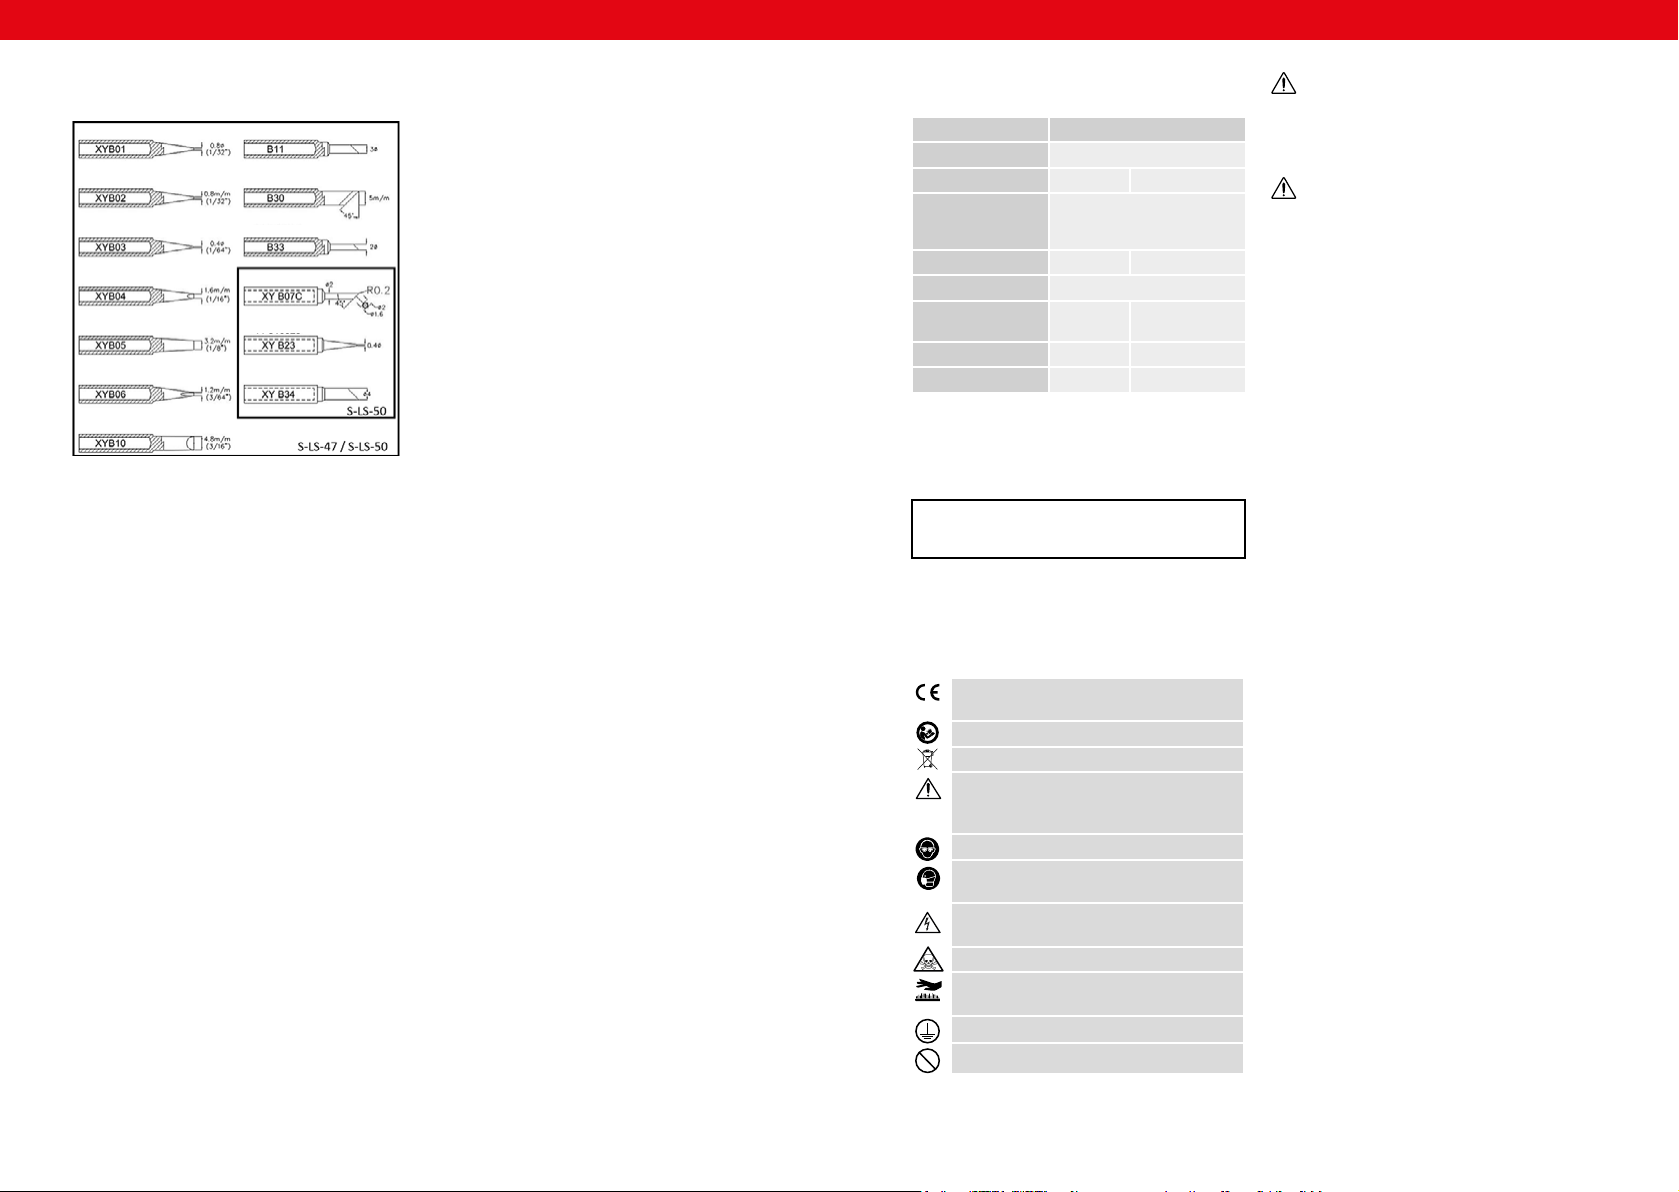
3.3.6. SCHEMATA AUSTAUSCHBARER SPITZEN
Folgende Typen von Spitzen können mit den gezeigten
Geräten verwendet werden.

8 9
25.03.201925.03.2019
Parameter description Parameter value
Product name Digital soldering station
Model S-LS-47 S-LS-50
Rated voltage [V~]/
Frequency [Hz]
230/50
Rated power [W] 80 100
Temperature [°C] 150-480
Fuse Quick blow
fuse 1A
Delayed action
T1A
Dimensions [mm] 105x90x90 105x90x130
Weight [kg] 0.95 2.30
USER MANUAL
The terms "device" or "product" are used in the warnings
and instructions to refer to < Digital soldering station>. Do
not use in very humid environments or in the direct vicinity
of water tanks. Prevent the device from getting wet. Risk
of electric shock! Do not cover the ventilation openings!
2.1. ELECTRICAL SAFETY
a) The plug must t the socket. Do not modify the
plug in any way. Using original plugs and matching
sockets reduces the risk of electric shock.
b) Avoid touching earthed elements such as pipes,
heaters, boilers and refrigerators. There is an
increased risk of electric shock if the earthed device
is exposed to rain, comes into direct contact with
a wet surface or is operating in a damp environment.
Water getting into the device increases the risk of
damage to the device and of electric shock.
c) Do not touch the device with wet or damp hands.
d) Use the cable only for its designated use. Never
use it to carry the device or to pull the plug out of
a socket. Keep the cable away from heat sources, oil,
sharp edges or moving parts. Damaged or tangled
cables increase the risk of electric shock.
e) If using the device in a damp environment cannot
be avoided, a residual current device (RCD) should
be applied. The use of an RCD reduces the risk of
electric shock.
f) Do not use the device if the power cord is damaged
or shows obvious signs of wear. A damaged power
cord should be replaced by a qualied electrician or
the manufacturer‘s service centre.
g) To avoid electric shock, do not immerse the cord,
plug or device in water or other liquids. Do not use
the device on wet surfaces.
h) ATTENTION! DANGER TO LIFE! While cleaning, never
immerse the device in water or other liquids.
2.2. SAFETY IN THE WORKPLACE
a) Make sure the workplace is clean and well lit. A messy
or poorly lit workplace may lead to accidents. Try
to think ahead, observe what is going on and use
common sense when working with the device.
b) Do not use the device in a potentially explosive
environment, for example in the presence of
ammable liquids, gases or dust. The device
generates sparks which may ignite dust or fumes.
c) If there are any doubts as to the correct operation
of the device, contact the manufacturer's support
service.
d) Only the manufacturer's service point may repair the
device. Do not attempt any repairs independently!
e) In case of re, use a powder or carbon dioxide
(CO2) re extinguisher (one intended for use on live
electrical devices) to put it out.
f) Children or unauthorised persons are forbidden to
enter a work station. (A distraction may result in loss
of control over the device).
TECHNISCHE DATEN
The product satises the relevant safety
standards.
Read instructions before use.
The product must be recycled.
WARNING! or CAUTION! or REMEMBER!
Applicable to the given situation (general
warning sign).
Wear protective goggles.
Wear a dust mask (respiratory tract protection).
ATTENTION! Electric shock warning!
WARNING! Toxic substances, danger of
poisoning!
ATTENTION! Hot surface, risk of burns!
Protection class I device with a protective
terminal.
Soldering with lead-free solder wire.
Pb
To increase the product life of the device and to ensure
trouble-free operation, use it in accordance with this user
manual and regularly perform maintenance tasks. The
technical data and specications in this user manual are
up to date. The manufacturer reserves the right to make
changes associated with quality improvement.
LEGEND
1. GENERAL DESCRIPTION
The user manual is designed to assist in the safe and
trouble-free use of the device. The product is designed and
manufactured in accordance with strict technical guidelines,
using state-of-the-art technologies and components.
Additionally, it is produced in compliance with the most
stringent quality standards.
DO NOT USE THE DEVICE UNLESS YOU HAVE
THOROUGHLY READ AND UNDERSTOOD THIS
USER MANUAL.
PLEASE NOTE! Drawings in this manual are for
illustration purposes only and in some details may
dier from the actual product.
The original operation manual is written in German. Other
language versions are translations from the German.
2. USAGE SAFETY
ATTENTION! Read all safety warnings and all
instructions. Failure to follow the warnings and
instructions may result in electric shock, re and/or
serious injury or even death.
ENEN
g) Use the device in a well-ventilated space.
h) When working with the device, harmful fumes are
generated. The workplace must be well ventilated
to protect unauthorized persons from the harmful
eects of fumes.
i) Regularly inspect the condition of the safety labels. If
the labels are illegible, they must be replaced.
j) Please keep this manual available for future
reference. If this device is passed on to a third party,
the manual must be passed on with it.
k) Keep packaging elements and small assembly parts
in a place not available to children.
l) Keep the device away from children and animals.
2.3. PERSONAL SAFETY
a) Do not use the device when tired, ill or under the
inuence of alcohol, narcotics or medication which
can signicantly impair the ability to operate the
device.
b) The device is not designed to be handled by persons
(including children) with limited mental and sensory
functions or persons lacking relevant experience
and/or knowledge unless they are supervised by
a person responsible for their safety or they have
received instruction on how to operate the device.
c) When working with the device, use common sense
and stay alert. Temporary loss of concentration while
using the device may lead to serious injuries.
d) Use personal protective equipment as required
for working with the device, specied in section 1
(Legend). The use of correct and approved personal
protective equipment reduces the risk of injury.
e) To prevent the device from accidentally switching on,
make sure the switch is on the OFF position before
connecting to a power source.
f) The device is not a toy. Children must be supervised
to ensure that they do not play with the device.
2.4. SAFE DEVICE USE
a) Do not overload the device. Use the appropriate
tools for the given task. A correctly-selected device
will perform the task for which it was designed better
and in a safer manner.
b) Do not use the device if the ON/OFF switch does not
function properly (does not switch the device on and
o). Devices which cannot be switched on and o
using the ON/OFF switch are hazardous, should not
be operated and must be repaired.
c) Disconnect the device from the power supply
before commencement of adjustment, cleaning and
maintenance. Such a preventive measure reduces
the risk of accidental activation.
d) When not in use, store in a safe place, away from
children and people not familiar with the device who
have not read the user manual. The device may pose
a hazard in the hands of inexperienced users.
e) Keep the device in perfect technical condition.
Before each use check for general damage and
especially check for cracked parts or elements and
for any other conditions which may impact the safe
operation of the device. If damage is discovered,
hand over the device for repair before use.
f) Keep the device out of the reach of children.
g) Device repair or maintenance should be carried out
by qualied persons, only using original spare parts.
This will ensure safe use.
h) To ensure the operational integrity of the device, do
not remove factory-tted guards and do not loosen
any screws.
i) Do not leave this appliance unattended while it is in use.
j) Clean the device regularly to prevent stubborn grime
from accumulating.
k) The device is not a toy. Cleaning and maintenance
may not be carried out by children without
supervision by an adult person.
l) It is forbidden to interfere with the structure of the
device in order to change its parameters or construction.
m) Keep the device away from sources of re and heat.
n) Always place the soldering iron on the holder if it is
not in use.
o) Keep the soldering tip and parts that can get hot
away from your body, clothing and ammable
objects / substances.
p) The soldering tip remains hot even after the power
is turned o. Before cleaning or replacing parts, wait
until the device has cooled down completely.
q) Exercise caution and do not inhale solder fumes.
REMEMBER!When using the device, protect
children and other bystanders.
ATTENTION!Despite the safe design of the device
and its protective features, and despite the use of
additional elements protecting the operator, there
is still a slight risk of accident or injury when using
the device. Stay alert and use common sense when
using the device.
3. USE GUIDELINES
The device is designed for soldering, desoldering or
shrinking electronic and electrical connections.
The user is liable for any damage resulting from
unintended use of the device.
3.1. DEVICE DESCRIPTION
3.1.1. DEVICE AND ACCESSORIES
I. S-LS-47
II. S-LS-50
1
2
5
7
8
4
63 9 10
6
1
2
3
4
514 910
11 12 713
10 11
25.03.201925.03.2019
ENEN
A. Clamping sleeve
B. Fastening nut
C. Soldering tip
D. Heater
E. Heater fastener
F. Rubber cap
G. Soldering iron handle
H. Cable strain relief
I. Power cord
3. By pressing the [4] key once, you can increase the
temperature by 1°C. Holding the [4] key down
increases the temperature continuously.
NOTE: The temperature can be decreased in the
same way using the [3] key.
4. After heating the [C] tip of the [9] soldering iron,
coat the tip with solder. This will protect the tip and
extend its life.
5. When the set temperature is reached, the marker on
the [1] display will ash.
NOTE: Unused soldering iron [9] should always be
left on the [10] rack.
NOTE: Before inspecting or repairing electric cables,
etc., make sure that they are not live.
3.3.2. PARAMETER SETTINGS MENU
1. Press and hold down the [2] key. The message [---]
will appear on the display.
2. Enter the password [010] to proceed to the
parameter setting menu.
NOTE: Entering an incorrect password will exit the
settings menu.
3. After entering the menu, [F-0] will appear on the
display. The user can choose settings according to
the scheme F-0> F-1> F-2> F-3> F-4> F-0 with the
[3] and [4] keys.
4. Password settings [F-1]
• Conrm the selection with the [2] key when a ashing
[F-1] message appears on the screen.
• Use the [3] and [4] keys to select the parameter
value. The selected value, e.g. 100, will be the new
password protecting the station.
NOTE: selecting the [000] value means that the
station will not be password protected.
• Press the [2] key to leave the password setting mode.
5. Temperature correction settings [F-2]
• Conrm the selection with the [2] key when a ashing
message [F-2] appears on the screen.
• Use the [3] and [4] keys to select the parameter value.
It is possible to select a temperature correction in the
range (-99°C ÷ + 99°C).
• Press the [2] key to exit the temperature correction
setting mode.
6. Hibernate mode settings [F-3]
• Conrm the selection with the [2] key when a ashing
message [F-3] appears on the screen.
• Use the [3] and [4] keys to select the parameter
value.
a) Selecting [000] means inactive hibernation mode.
b) Selecting [100] means that the device will reduce
the soldering tip temperature to 150°C after 20
minutes of inactivity.
• Press the [2] key to exit the hibernation mode.
7. Temperature scale setting [F-4]
• Conrm the selection with the [2] key when a ashing
message [F-4] appears on the screen.
• Use the [3] and [4] keys to choose between the
Celsius and Fahrenheit scale. The current option will
appear on the right side of the display.
• Press the [2] key to exit the temperature scale setting
mode.
3.3.3. CAUSES OF A DRY SOLDERING TIP
During the soldering process, the material surface is being
wetted which is one of the conditions for a durable solder.
There are factors that have a negative impact on the
wetting process and thus on the quality of the resulting
weld:
1. Temperature display
2. Settings button
3. Temperature decrease button
4. Temperature increase button
5. Soldering iron cord
6. Power on / o switch
7. Front panel fastening screw
8. Power cord (not visible in the S-LS-50 drawing)
9. Soldering iron
10. Soldering iron rack with wire cleaner
11. Grounding socket (S-LS-50 model only)
12. Fuse holder (S-LS-50 model only)
13. Power cord socket (S-LS-50 model only)
14. Soldering iron cord socket (S-LS-50 model only)
3.1.2. SOLDERING IRON CONSTRUCTION
A B C D E F G H I
1. Temperature of the soldering tip > 410°C (770°F).
2. No protective layer on the soldering tip which was
left idle
3. No ux in solder.
4. Wiping the tip with a contaminated sponge or cloth,
contamination with sulphur compounds.
5. Contact with bioplastics.
6. Pollutants in solder.
3.3.4. OPERATING RECOMMENDATIONS FOR
SOLDERING TIPS
1. Attention: Before taking any action, turn o the
device, disconnect it from the mains supply and
allow it to cool down.
2. It is recommended to clean the solder tip every day
during high work intensity.
3. Before leaving the soldering tip inactive, it is
recommended to coat it with a protective layer of
solder.
4. Before using the device, clean the tip with a cleaner.
5. The use of high temperature when operating the
device shortens the tip's life.
6. Rubbing or pressing the tip against the work surface
can reduce its life or damage it.
7. During work, do not apply solder to the tip, as this
may damage the tip.
8. Do not clean the tip with abrasive materials.
9. Do not use uxes containing corrosive substances.
10. Removal of oxides from the soldering tip:
• Gently remove the sludge from the soldering tip
using abrasive cloth (grit 600 - 800) or isopropyl
alcohol.
• Coat the surface with rosin core tinol.
• Cover the surfaces to be soldered with rosin core
tinol and melt.
11. To properly clean the inside of the clamping sleeve,
loosen the fastening nut and remove the sleeve and
the tip. Any dirt inside the sleeve should be removed
with compressed air.
NOTE: Be careful that the dust is not blown into your
eyes.
3.3.5. USING NEW SOLDERING TIPS
1. Set the minimum temperature, turn the station on.
2. When the temperature reaches 250°C, cover the
surface of the tip with tinol which contains rosin.
3. Wait for 3 minutes with the temperature at 250°C.
Do not use the device during this time.
4. Set the working temperature. After reaching it, the
station is ready for use.
NOTE: In order for the device to work properly and
the tip to be heated optimally, ensure that the tip
and the fastening sleeve are cleaned each time after
work.
3.2. PREPARING FOR USE
APPLIANCE LOCATION
The temperature of environment must not be higher
than 40°C and the relative humidity should be less than
85%. Ensure good ventilation in the room in which the
device is being used. There should be at least 10 cm
distance between each side of the device and the wall
or other objects. The device should always be used when
positioned on an even, stable, clean, reproof and dry
surface, and be out of the reach of children and persons
with limited mental and sensory functions. Position the
device such that you always have access to the power
plug. The power cord connected to the appliance must
be properly grounded and correspond to the technical
details on the product label.
ASSEMBLING THE DEVICE
1. ATTENTION: Before carrying out any soldering
work, make sure that the power source is
compatible with the device.
2. Carefully unpack all components and check them
for damage and / or missing items.
3. Make sure that the device is not connected to
a power source.
4. Place the device on an even and stable surface.
5. Connect the soldering iron cord plug [9] to the
soldering iron socket [14] (S-LS-50).
6. Connect the cord plug [8] to the cord socket [13]
(S-LS-50).
7. Connect the other plug of the cord to the power
source.
8. Start the device with the power switch [6].
3.3. DEVICE USE
3.3.1 BASIC OPERATION
1. Start the device with the power switch [6].
2. Press the [4] key and set the temperature to 250°C
(482 ° F). The value will appear on the display [1].
3.4. CLEANING AND MAINTENANCE
a) Unplug the mains plug and allow the device to cool
completely before each cleaning, adjustment or
replacement of accessories, or if the device is not
being used. Failure to follow these instructions may
result in damage to the device.
b) Use only non-corrosive cleaners to clean the surface.
c) After cleaning the device, all parts should be dried
completely before using it again.
d) Store the unit in a dry, cool place, free from moisture
and direct exposure to sunlight.
e) Do not spray the device with a water jet or submerge
it in water..
f) Do not allow water to get inside the device through
vents in the housing of the device.
g) Clean the vents with a brush and compressed air.
h) The device must be regularly inspected to check its
technical eciency and spot any damage.
i) Use a soft, damp cloth for cleaning.
j) Do not use sharp and/or metal objects for cleaning
(e.g. a wire brush or a metal spatula) because they
may damage the surface material of the appliance.
3.3.6. DIAGRAMS OF REPLACEABLE TIPS
The following types of tips can be used with the devices
shown.

12 13
25.03.201925.03.2019
PL
Opis parametru Wartość parametru
Nazwa produktu Cyfrowa stacja lutownicza
Model S-LS-47 S-LS-50
Napięcie zasilania [V~]/
Częstotliwość [Hz]
230/50
Moc znamionowa [W] 80 100
Temperatura [°C] 150-480
Bezpiecznik Szybki 1A Zwłoczny
T1A
Wymiary [mm] 105x90x90 105x90x130
Ciężar [kg] 0,95 2,30
INSTRUKCJA OBSŁUGI
Termin „urządzenie” lub „produkt” w ostrzeżeniach i w opisie
instrukcji odnosi się do <Cyfrowa stacja lutownicza>. Nie
należy używać urządzenia w pomieszczeniach o bardzo
dużej wilgotności / w bezpośrednim pobliżu zbiorników
z wodą! Nie wolno dopuszczać do zamoczenia urządzenia.
Ryzyko porażenia prądem! Nie wolno zasłaniać otworów
wentylacyjnych urządzenia!
2.1. BEZPIECZEŃSTWO ELEKTRYCZNE
a) Wtyczka urządzenia musi pasować do gniazda.
Nie modykować wtyczki w jakikolwiek sposób.
Oryginalne wtyczki i pasujące gniazda zmniejszają
ryzyko porażenia prądem.
b) Unikać dotykania uziemionych elementów, takich jak
rury, grzejniki, piece i lodówki. Istnieje zwiększone
ryzyko porażenia prądem, jeśli ciało jest uziemione
i dotyka urządzenia narażonego na bezpośrednie
działanie deszczu, mokrej nawierzchni i pracy
w wilgotnym otoczeniu. Przedostanie się wody do
urządzenia zwiększa ryzyko jego uszkodzenia oraz
porażenia prądem.
c) Nie wolno dotykać urządzenia mokrymi lub
wilgotnymi rękoma.
d) Nie należy używać przewodu w sposób niewłaściwy.
Nigdy nie używać go do przenoszenia urządzenia lub
do wyciągania wtyczki z gniazda. Trzymać przewód
z dala od źródeł ciepła, oleju, ostrych krawędzi
lub ruchomych części. Uszkodzone lub poplątane
przewody zwiększają ryzyko porażenia prądem.
e) Jeśli nie można uniknąć używania urządzenia
w środowisku wilgotnym, należy stosować wyłącznik
różnicowo-prądowy (RCD). Używanie RCD zmniejsza
ryzyko porażenia prądem.
f) Zabrania się używania urządzenia, jeśli przewód
zasilający jest uszkodzony lub nosi wyraźne oznaki
zużycia. Uszkodzony przewód zasilający powinien
być wymieniony przez wykwalikowanego elektryka
lub serwis producenta
g) Aby uniknąć porażenia prądem elektrycznym,
nie należy zanurzać kabla, wtyczki ani samego
urządzenia w wodzie lub innym płynie. Nie wolno
używać urządzenia na mokrych powierzchniach.
h) UWAGA – ZAGROŻENIE ŻYCIA! Podczas czyszczenia
lub użytkowania urządzenia nigdy nie wolno
zanurzać go w wodzie lub innych cieczach.
DANE TECHNICZNE
PRZED PRZYSTĄPIENIEM DO PRACY NALEŻY
DOKŁADNIE PRZECZYTAĆ I ZROZUMIEĆ
NINIEJSZĄ INSTRUKCJĘ.
Dla zapewnienia długiej i niezawodnej pracy urządzenia
należy dbać o jego prawidłową obsługę oraz konserwację
zgodnie ze wskazówkami zawartymi w tej instrukcji. Dane
techniczne i specykacje zawarte w tej instrukcji obsługi są
aktualne. Producent zastrzega sobie prawo dokonywania
zmian związanych z podwyższeniem jakości. Uwzględniając
postęp techniczny i możliwość ograniczenia hałasu,
urządzenie zaprojektowano i zbudowano tak, aby ryzyko
jakie wynika z emisji hałasu ograniczyć do najniższego
poziomu.
OBJAŚNIENIE SYMBOLI
1. OGÓLNY OPIS
Instrukcja przeznaczona jest do pomocy w bezpiecznym
i niezawodnym użytkowaniu. Produkt jest zaprojektowany
i wykonany ściśle według wskazań technicznych przy
użyciu najnowszych technologii i komponentów oraz
przy zachowaniu najwyższych standardów jakości.
Produkt spełnia wymagania odpowiednich norm
bezpieczeństwa.
Przed użyciem należy zapoznać się z instrukcją.
Produkt podlegający recyklingowi.
UWAGA! lub OSTRZEŻENIE! lub PAMIĘTAJ!
opisująca daną sytuację (ogólny znak
ostrzegawczy).
Założyć okulary ochronne.
Stosować maskę przeciwpyłową (ochrona dróg
oddechowych).
UWAGA! Ostrzeżenie przed porażeniem prądem
elektrycznym!
Ostrzeżenie przed niebezpieczeństwem zatrucia
substancjami toksycznymi!
Uwaga! Gorąca powierzchnia może spowodować
oparzenia!
UWAGA! Ilustracje w niniejszej instrukcji obsługi
mają charakter poglądowy i w niektórych
szczegółach mogą różnić się od rzeczywistego
wyglądu produktu.
Instrukcją oryginalną jest niemiecka wersja instrukcji.
Pozostałe wersje językowe są tłumaczeniami z języka
niemieckiego.
UWAGA! Przeczytać wszystkie ostrzeżenia
dotyczące bezpieczeństwa oraz wszystkie instrukcje.
Niezastosowanie się do ostrzeżeń i instrukcji może
spowodować porażenie prądem, pożar i/lub ciężkie
obrażenia ciała lub śmierć.
2. BEZPIECZEŃSTWO UŻYTKOWANIA
Urządzenie I klasy ochronności z zaciskiem
ochronnym.
Lutowanie drutem lutowniczym bezołowiowym
Pb
PL
UWAGA! Pomimo iż urządzenie zostało
zaprojektowane tak aby było bezpieczne, posiadało
odpowiednie środki ochrony oraz pomimo użycia
dodatkowych elementów zabezpieczających
użytkownika, nadal istnieje niewielkie ryzyko
wypadku lub odniesienia obrażeń w trakcie pracy
z urządzeniem. Zaleca się zachowanie ostrożności
i rozsądku podczas jego użytkowania.
2.2. BEZPIECZEŃSTWO W MIEJSCU PRACY
a) Utrzymywać porządek w miejscu pracy i dobre
oświetlenie. Nieporządek lub złe oświetlenie może
prowadzić do wypadków. Należy być przewidującym,
obserwować co się robi i zachowywać rozsądek
podczas używania urządzenia.
b) Nie używać urządzenia w stree zagrożenia
wybuchem, na przykład w obecności łatwopalnych
cieczy, gazów lub pyłów. Urządzenie wytwarzają
iskry, mogące zapalić pył lub opary.
c) W razie wątpliwości czy urządzenie działa poprawnie,
należy skontaktować się z serwisem producenta.
d) Naprawy urządzenia może wykonać wyłącznie
serwis producenta. Nie wolno dokonywać napraw
samodzielnie!
e) W przypadku zaprószenia ognia lub pożaru, do
gaszenia urządzenia pod napięciem należy używać
wyłącznie gaśnic proszkowych lub śniegowych (CO2).
f) Na stanowisku pracy nie mogą przebywać dzieci
ani osoby nieupoważnione. (Nieuwaga może
spowodować utratę kontroli nad urządzeniem.)
g) Urządzenie używać w dobrze wentylowanej
przestrzeni.
h) Podczas pracy z urządzeniem wytwarzane są
szkodliwe opary, miejsce pracy musi być dobrze
wentylowane aby zabezpieczyć osoby postronne
przed szkodliwym działaniem oparów.
i) Należy regularnie sprawdzać stan naklejek
z informacjami dotyczącymi bezpieczeństwa.
W przypadku gdy, naklejki są nieczytelne należy je
wymienić.
j) Zachować instrukcję użytkowania w celu jej
późniejszego użycia. W razie, gdyby urządzenie miało
zostać przekazane osobom trzecim, to wraz z nim
należy przekazać również instrukcję użytkowania.
k) Elementy opakowania oraz drobne elementy
montażowe należy przechowywać w miejscu
niedostępnym dla dzieci.
l) Urządzenie trzymać z dala od dzieci i zwierząt.
PAMIĘTAĆ! Należy chronić dzieci i inne osoby
postronne podczas pracy urządzeniem.
2.3. BEZPIECZEŃSTWO OSOBISTE
a) Niedozwolone jest obsługiwanie urządzenia
w stanie zmęczenia, choroby, pod wpływem
alkoholu, narkotyków lub leków, które ograniczają
w istotnym stopniu zdolności obsługi urządzenia.
b) Urządzenie nie jest przeznaczone do tego, by
było użytkowane przez osoby (w tym dzieci)
o ograniczonych funkcjach psychicznych,
sensorycznych i umysłowych lub nieposiadające
odpowiedniego doświadczenia i/lub wiedzy, chyba
że są one nadzorowane przez osobę odpowiedzialną
za ich bezpieczeństwo lub otrzymały od niej
wskazówki dotyczące tego, jak należy obsługiwać
urządzenie.
c) Należy być uważnym, kierować się zdrowym
rozsądkiem podczas pracy urządzeniem. Chwila
nieuwagi podczas pracy, może doprowadzić do
poważnych obrażeń ciała.
d) Należy używać środków ochrony osobistej
wymaganych przy pracy urządzeniem
wyszczególnionych w punkcie 1 objaśnienia symboli.
Stosowanie odpowiednich, atestowanych środków
ochrony osobistej zmniejsza ryzyko doznania urazu.
e) Aby zapobiegać przypadkowemu uruchomieniu
upewnij się, że przełącznik jest w pozycji wyłączonej
przed podłączeniem do źródła zasilania.
f) Urządzenie nie jest zabawką. Dzieci powinny być
pilnowane, aby nie bawiły się urządzeniem.
2.4. BEZPIECZNE STOSOWANIE URZĄDZENIA
a) Nie należy przeciążać urządzenia. Używać narzędzi
odpowiednich do danego zastosowania. Prawidłowo
dobrane urządzenie wykona lepiej i bezpieczniej
pracę dla którego zostało zaprojektowane.
b) Nie należy używać urządzenia, jeśli przełącznik ON/
OFF nie działa sprawnie (nie załącza i nie wyłącza
się). Urządzenia, które nie mogą być kontrolowane
za pomocą przełącznika są niebezpieczne, nie mogą
pracować i muszą zostać naprawione.
c) Przed przystąpieniem do regulacji, czyszczenia
i konserwacji urządzenie należy odłączyć od
zasilania. Taki środek zapobiegawczy zmniejsza
ryzyko przypadkowego uruchomienia.
d) Nieużywane urządzenia należy przechowywać
w miejscu niedostępnym dla dzieci oraz osób
nieznających urządzenia lub tej instrukcji
obsługi. Urządzenia są niebezpieczne w rękach
niedoświadczonych użytkowników.
e) Utrzymywać urządzenie w dobrym stanie
technicznym. Sprawdzać przed każdą pracą czy
nie posiada uszkodzeń ogólnych lub związanych
z elementami ruchomymi (pęknięcia części
i elementów lub wszelkie inne warunki, które mogą
mieć wpływ na bezpieczne działanie urządzenia).
W przypadku uszkodzenia, oddać urządzenie do
naprawy przed użyciem.
f) Urządzenie należy chronić przed dziećmi.
g) Naprawa oraz konserwacja urządzeń powinna być
wykonywana przez wykwalikowane osoby przy
użyciu wyłącznie oryginalnych części zamiennych.
Zapewni to bezpieczeństwo użytkowania.
h) Aby zapewnić zaprojektowaną integralność
operacyjną urządzenia, nie należy usuwać
zainstalowanych fabrycznie osłon lub odkręcać śrub.
i) Nie należy pozostawiać włączonego urządzenia bez
nadzoru.
j) Należy regularnie czyścić urządzenie, aby nie
dopuścić do trwałego osadzenia się zanieczyszczeń.
k) Urządzenie nie jest zabawką. Czyszczenie
i konserwacja nie mogą być wykonywane przez
dzieci bez nadzoru osoby dorosłej.
l) Zabrania się ingerowania w konstrukcję urządzenia
celem zmiany jego parametrów lub budowy.
m) Trzymać urządzenia z dala od źródeł ognia i ciepła.
n) W przypadku przerwy w użytkowaniu kolbę
lutowniczą należy zawsze umieszczać na podstawce.
o) Trzymać grot lutowniczy oraz elementy mogące
ulec nagrzewaniu z dala od ciała, odzieży oraz
przedmiotów i substancji łatwopalnych.
p) Grot lutowniczy pozostaje gorący także po
wyłączeniu zasilania. Przed czyszczeniem lub
wymianą elementów należy odczekać do czasu, aż
urządzenie całkowicie ostygnie.
q) Zachować ostrożność i nie wdychać oparów
lutowniczych.

14 15
25.03.201925.03.2019
PL PL
3.1. OPIS URZĄDZENIA
3.1.1. URZĄDZENIE ORAZ AKCESORIA
I. S-LS-47
3. ZASADY UŻYTKOWANIA
Urządzenie przeznaczone jest do lutowania, rozlutowywania
lub obkurczania elementów połączeń elektronicznych
i elektrycznych.
Odpowiedzialność za wszelkie szkody powstałe
w wyniku użytkowania niezgodnego z przeznaczeniem
ponosi użytkownik.
A. Tulejka mocująca
B. Nakrętka mocująca
C. Grot lutowniczy
D. Grzałka
E. Mocowanie grzałki
F. Nakładka gumowa
G. Uchwyt kolby lutowniczej
H. Odciążenie przewodu
I. Przewód zasilania
3.2. PRZYGOTOWANIE DO PRACY
UMIEJSCOWIENIE URZĄDZENIA
Temperatura otoczenia nie może przekraczać 40°C
a wilgotność względna nie powinna przekraczać 85%.
Urządzenie należy ustawić w sposób zapewniający dobrą
cyrkulację powietrza. Należy utrzymać minimalny odstęp 10
cm od każdej ściany urządzenia. Urządzenie należy trzymać
z dala od wszelkich gorących powierzchni. Urządzenie
należy zawsze użytkować na równej, stabilnej, czystej,
ognioodpornej i suchej powierzchni i poza zasięgiem
dzieci oraz osób ograniczonych funkcjach psychicznych,
sensorycznych i umysłowych. Urządzenie należy
umiejscowić w taki sposób, by w dowolnej chwili można
się było dostać do wtyczki sieciowej. Należy pamiętać
o tym, by zasilanie urządzenia energią odpowiadało danym
podanym na tabliczce znamionowej!
MONTAŻ URZĄDZENIA
1. UWAGA: Przed rozpoczęciem pracy z urządzeniem
należy upewnić się, czy źródło zasilania jest
dostosowane do wymogów urządzenia.
2. Ostrożnie rozpakować wszystkie elementy
i sprawdzić ich stan pod kątem uszkodzeń i/ lub
braków.
3. Upewnić się, że urządzenie nie jest podłączone do
źródła zasilania.
4. Ustawić urządzenie na równej i stabilnej powierzchni.
5. Podłączyć wtyczkę przewodu kolby lutownicy [9] do
gniazda kolby [14] (S-LS-50).
6. Podłączyć wtyczkę przewodu zasilania [8] do gniazda
przewodu zasilania [13] (S-LS-50).
7. Podłączyć wtyczkę przewodu zasilania [8] do źródła
zasilania.
8. Uruchomić urządzenie włącznikiem zasilania [6].
3.3. PRACA Z URZĄDZENIEM
3.3.1 DZIAŁANIE PODSTAWOWE
1. Uruchomić urządzenie włącznikiem zasilania [6].
2. Nacisnąć klawisz [4] i ustawić temperaturę 250°C
(482°F). Wartość pojawi się na wyświetlaczu [1].
3. Pojedyncze naciśnięcie klawisza [4] powoduje
zwiększenie temperatury o 1°C. Przytrzymanie
klawisza [4] powoduje ciągle zwiększanie
temperatury.
UWAGA: Obniżanie temperatury klawiszem [3]
odbywa się w sposób analogiczny.
4. Po nagrzaniu grota [C] na kolbie lutowniczej [9]
należy nałożyć warstwę lutowia na grot. Ma to za
zadanie ochronić grot i wydłużyć jego żywotność.
5. Osiągnięcie żądanej temperatury sygnalizowane
jest poprzez miganie znacznika na ekranie
wyświetlacza [1].
UWAGA: Nieużywaną kolbę lutowniczą [9] należy
zawsze umieszczać na podstawce [10].
UWAGA: Przed przystąpieniem do oględzin lub
naprawą np. przewodów elektrycznych należy
upewnić się, czy nie są one pod napięciem.
1. Wyświetlacz temperatury
2. Przycisk ustawień
3. Przycisk zmniejszenia temperatury / „w dół”
4. Przycisk zwiększenia temperatury / „w górę”
5. Przewód kolby lutownicy
6. Włącznik / wyłącznik zasilania
7. Śruba mocowania panelu przedniego
8. Przewód zasilania
(niewidoczny na ilustracji S-LS-50)
9. Kolba lutownicza
10. Statyw kolby z czyścikiem drucianym
11. Gniazdo uziemienia (tylko model S-LS-50)
12. Oprawa bezpiecznika (tylko model S-LS-50)
13. Gniazdo przewodu zasilania
(tylko model S-LS-50)
14. Gniazdo przewodu kolby lutowniczej
(tylko model S-LS-50)
3.1.2 BUDOWA KOLBY LUTOWNICZEJ
A B C D E F G H I
II. S-LS-50
1
2
5
7
8
4
63 9 10
6
1
2
3
4
514 910
11 12 713
3.3.2 MENU USTAWIEŃ PARAMETRÓW
1. Nacisnąć i przytrzymać klawisz [2]. Na wyświetlaczu
pojawi się komunikat [---].
2. Wprowadzić hasło [010], aby przejść do menu
ustawiania parametrów.
UWAGA: Wprowadzenie niepoprawnego hasła
spowoduje opuszczenie menu ustawień.
3. Po wejściu do menu na wyświetlaczu pojawi się
komunikat [F-0]. Użytkownik ma możliwość wyboru
ustawień wg. schematu F-0 > F-1 > F-2 > F-3 > F-4
> F-0 przy pomocy klawiszy [3] oraz [4].
4. Ustawienia hasła [F-1]
• Zatwierdzić wybór klawiszem [2], gdy na ekranie
pojawi się pulsujący komunikat [F-1].
• Przy użyciu klawiszy [3] oraz [4] należy wybrać
wartość parametru. Wybrana wartość, np. 100 będzie
nowym hasłem chroniącym stację.
UWAGA: wybór wartości [000] oznacza, że stacja nie
będzie chroniona hasłem.
• Nacisnąć klawisz [2] aby opuścić tryb ustawień hasła.
5. Ustawienia korekty temperatury [F-2]
• Zatwierdzić wybór klawiszem [2], gdy na ekranie
pojawi się pulsujący komunikat [F-2].
• Przy użyciu klawiszy [3] oraz [4] należy wybrać
wartość parametru. Możliwy jest wybór korekty
temperatur w przedziale (-99°C ÷ +99°C).
• Nacisnąć klawisz [2] aby opuścić tryb ustawień
korekty temperatury.
6. Ustawienia trybu hibernacji [F-3]
• Zatwierdzić wybór klawiszem [2], gdy na ekranie
pojawi się pulsujący komunikat [F-3].
• Przy użyciu klawiszy [3] oraz [4] należy wybrać
wartość parametru.
a) Wybór wartości [000] oznacza nieaktywny tryb
hibernacji.
b) Wybór wartości [100] oznacza, że w wypadku
20 minutowej bezczynności temperatura grota
lutowniczego zostanie obniżona przez stację do
150°C.
• Nacisnąć klawisz [2] aby opuścić tryb ustawień
hibernacji.
7. Ustawienia skali temperatury [F-4]
• Zatwierdzić wybór klawiszem [2], gdy na ekranie
pojawi się pulsujący komunikat [F-4].
• Przy użyciu klawiszy [3] oraz [4] należy wybrać
wartość parametru. Możliwy jest wybór skali
Celsjusza lub Fahrenheita. Aktualny wybór pojawi się
z prawej strony wyświetlacza.
• Nacisnąć klawisz [2] aby opuścić tryb ustawień skali
temperatury.
3.3.3 PRZYCZYNY BRAKU ZWILŻALNOŚCI GROTA
LUTOWNICZEGO
Podczas lutowania na powierzchni materiału zachodzi
proces zwilżania, którego pojawienie się jest jednym
z warunków powstania trwałej lutowiny. Istnieją czynniki,
które mają negatywny wpływ na proces zwilżania, a tym
samym na jakość powstałej spoiny:
1. Temperatura grota lutowniczego > 410°C (770°F).
2. Brak warstwy ochronnej grota, pozostawionego
w stanie bezczynności.
3. Brak topnika w lutowiu.
4. Wycieranie grota zanieczyszczoną gąbką lub ścierką,
zanieczyszczenie związkami siarki.
5. Kontakt z tworzywami sztucznymi pochodzenia
organicznego.
6. Zanieczyszczenia w lutowiu.
3.3.4 ZALECENIA EKSPLOATACYJNE DLA GROTÓW
LUTOWNICZYCH
1. Uwaga: Przed podjęciem jakichkolwiek czynności
należy wyłączyć urządzenie, odłączyć je od zasilania
sieciowego oraz pozwolić aż ostygnie.
2. Podczas dużego natężenia pracy zaleca się
czyszczenie grota lutowniczego codziennie.
3. Przed pozostawieniem grota w stanie bezczynności
zaleca się nałożenie na grot warstwy ochronnej
lutowia.
4. Przed eksploatacją urządzenia należy oczyścić grot
czyścikiem.
5. Stosowanie wysokiej temperatury podczas
eksploatacji urządzenia skraca żywotność grota.
6. Pocieranie lub dociskanie grota względem
powierzchni roboczej może prowadzić do skrócenia
jego żywotności lub uszkodzenia.
7. Podczas pracy nie nakładać lutowia na grot, grozi to
jego uszkodzeniem.
8. Nie czyścić grota materiałami ściernymi.
9. Nie stosować topników zawierających substancje
żrące.
10. Usuwanie tlenków z grota lutowniczego:
• Delikatnie zdjąć osad z grota lutowniczego przy
pomocy płótna ściernego (ziarnistość 600 ÷ 800) lub
alkoholu izopropylowego.
• Powierzchnię otoczyć tinolem z rdzeniem
kalafoniowym.
• Powierzchnie przeznaczone do nałożenia lutowia
pokryć tinolem z rdzeniem kalafoniowym,
a następnie przetopić.
11. Aby prawidłowo wyczyścić wnętrze tulejki mocującej,
należy poluzować nakrętkę mocującą, a następnie
zdemontować tulejkę oraz grot. Wszelkie
zanieczyszczenia wewnątrz tulejki należy usunąć
przy pomocy sprężonego powietrza.
UWAGA: należy być ostrożnym i nie dopuścić, aby
wydmuchiwany pył dostał się do oczu.
3.3.5. EKSPLOATACJA NOWYCH GROTÓW
1. Ustawić temperaturę minimalną, włączyć stację.
2. Gdy temperatura osiągnie 250°C, należy pokryć
powierzchnię grota tinolem z zawartością kalafonii.
3. Odczekać 3 minuty w temperaturze 250°C. W tym
czasie nie używać urządzenia.
4. Ustawić temperaturę roboczą. Po jej osiągnięciu,
stacja jest gotowa do pracy.
UWAGA: Aby urządzenie działało prawidłowo,
a grot nagrzewał się w sposób optymalny należy
zadbać o wyczyszczenie grota oraz tulejki mocującej
każdorazowo po zakończonej pracy.
16 17
25.03.201925.03.2019
Popis parametru Hodnota parametru
Název výrobku Digitální pájecí stanice
Model S-LS-47 S-LS-50
Jmenovité napětí
napájení [V~]/
Frekvence [Hz]
230/50
Jmenovitý výkon [W] 80 100
Teplota [°C] 150-480
Pojistka Rychlá
pojistka 1A
S časovým
zpožděním T1A
Rozměry [mm] 105x90x90 105x90x130
Hmotnost [kg] 0,95 2,30
NÁVOD K OBSLUZE
Pojem „zařízení“ nebo „výrobek“ v bezpečnostních
pokynech a návodu se vztahuje na <Digitální pájecí
stanice>. Zařízení nepoužívejte v prostředí s velmi vysokou
vlhkostí / v přímé blízkosti nádrží s vodou! Zařízení nenořte
do vody. Hrozí nebezpečí úrazu elektrickým proudem!
Nezakrývejte větrací otvory!
2.1. ELEKTRICKÁ BEZPEČNOST
a) Daná zásuvka musí být se zástrčkou zařízení
kompatibilní. Zástrčku žádným způsobem
neupravujte. Originální zástrčky a příslušné zásuvky
snižují nebezpečí úrazu elektrickým proudem.
b) Nedotýkejte se uzemněných předmětů jako jsou
trubky, topidla, kamna a chladničky. Pokud je
zařízení uzemněno, existuje zvýšené nebezpečí úrazu
elektrickým proudem v následku působení deště,
mokrého povrchu a práce se zařízením ve vlhkém
prostředí. Proniknutí vody do zařízení zvyšuje
nebezpečí jeho poškození a úrazu elektrickým
proudem.
c) Zařízení se nedotýkejte mokrýma nebo vlhkýma
rukama.
d) Napájecí kabel nepoužívejte na jiné účely, než na
které je určen. Nikdy jej nepoužívejte k přenášení
zařízení nebo k vytahování zástrčky ze síťové
zásuvky. Držte jej mimo dosah tepla, oleje, ostrých
hran nebo rotujících dílů. Poškozené nebo zamotané
elektrické napájecí kabely zvyšují nebezpečí úrazu
elektrickým proudem.
e) Pokud není možné vyhnout se práci se zařízením
ve vlhkém prostředí, používejte při tom proudový
chránič (RCD). Používání RCD snižuje nebezpečí
úrazu elektrickým proudem.
f) Je zakázáno používat zařízení, pokud je napájecí
kabel poškozený nebo má zjevné známky
opotřebení. Poškozený napájecí kabel musí být
vyměněn kvalikovaným elektrikářem nebo
v servisním středisku výrobce.
g) Aby nedošlo k zasažení elektrickým proudem,
nesmíte kabel, zástrčku ani samotné zařízení
ponořovat do vody nebo jiné tekutiny. Je zakázáno
používat zařízení na mokrém povrchu.
h) POZOR – OHROŽENÍ ŽIVOTA! Během čistění nebo
používání zařízení nikdy nesmí být ponořováno ve
vodě nebo jiných kapalinách.
2.2. BEZPEČNOST NA PRACOVIŠTI
a) a) Na pracovišti udržujte pořádek a mějte dobré
osvětlení. Nepořádek nebo špatné osvětlení mohou
vést k úrazům. Buďte předvídaví a sledujte, co se
během práce kolem vás děje. Při práci se zařízením
vždy zachovávejte zdravý rozum.
b) Se zařízením nepracujte ve výbušném prostředí,
například v přítomnosti hořlavých kapalin, plynů
nebo prachu. Zařízení vytváří jiskření, skrze které
může dojít ke vznícení prachu nebo výparů.
c) Pokud máte pochybnosti o tom, zda zařízení funguje
správně, kontaktujte servis výrobce.
TECHNICKÉ ÚDAJE
Výrobek splňuje požadavky příslušných
bezpečnostních norem.
Před použitím výrobku se seznamte s návodem.
Recyklovatelný výrobek.
UPOZORNĚNÍ! nebo VAROVÁNÍ! nebo
PAMATUJTE! popisující danou situaci (všeobecná
výstražná značka).
Používejte ochranné brýle.
Používejte protiprachovou masku (ochrana
dýchacích cest).
VAROVÁNÍ! Nebezpečí úrazu elektrickým
proudem!
VAROVÁNÍ! Nebezpečí otravy toxickými látkami!
VAROVÁNÍ! Horký povrch může způsobit
popálení!
Zařízení s I. třídou ochrany a ochrannou svorkou
Pájení bezolovnatým pájecím drátem
Pb
Pro zajištění dlouhého a spolehlivého fungování zařízení
pravidelně provádějte revize a údržbu v souladu s pokyny
uvedenými v tomto návodu. Technické údaje a specikace
uvedené v návodu jsou aktuální. Výrobce si vyhrazuje právo
provádět změny za účelem zvýšení kvality.
VYSVĚTLENÍ SYMBOLŮ
1. VŠEOBECNÝ POPIS
Návod slouží jako nápověda pro bezpečné a spolehlivé
používání výrobku. Výrobek je navržen a vyroben přesně
podle technických údajů za použití nejnovějších technologií
a komponentů a za dodržení nejvyšších jakostních norem.
PŘED ZAHÁJENÍM PRÁCE SI DŮKLADNĚ PŘEČTĚTE
TENTO NÁVOD A UJISTĚTE SE, ŽE JSTE POCHOPILI
VŠECHNY POKYNY.
Originálním návodem je německá verze návodu. Ostatní
jazykové verze jsou překladem z německého jazyka.
2. BEZPEČNOST POUŽÍVÁNÍ
POZOR!Obrázky v tomto návodu jsou pouze
ilustrační a v některých detailech se od skutečného
vzhledu výrobku mohou lišit.
POZNÁMKA! Přečtěte si tento návod včetně všech
bezpečnostních pokynů. Nedodržování návodu
a pokynů může vést k úrazu elektrickým proudem,
požáru anebo těžkému úrazu či smrti.
PL CZ
3.4. CZYSZCZENIE I KONSERWACJA
a) Przed każdym czyszczeniem, regulacją, wymianą
osprzętu, a także jeżeli urządzenie nie jest używane,
należy wyciągnąć wtyczkę sieciową i całkowicie
ochłodzić urządzenie. Niestosowanie się do tych
zaleceń grozi uszkodzeniem urządzenia.
b) Do czyszczenia powierzchni należy stosować
wyłącznie środki niezawierające substancji żrących.
c) Po każdym czyszczeniu wszystkie elementy należy
dobrze wysuszyć, zanim urządzenie zostanie
ponownie użyte.
d) Urządzenie należy przechowywać w suchym
i chłodnym miejscu chronionym przed wilgocią
i bezpośrednim promieniowaniem słonecznym.
e) Zabrania się spryskiwania urządzenia strumieniem
wody lub zanurzania urządzenia w wodzie.
f) Należy pamiętać, aby przez otwory wentylacyjne
znajdujące się w obudowie nie dostała się woda.
g) Otwory wentylacyjne należy czyścić pędzelkiem
i sprężonym powietrzem.
h) Należy wykonywać regularne przeglądy urządzenia
pod kątem jego sprawności technicznej oraz
wszelkich uszkodzeń.
i) Do czyszczenia należy używać miękkiej, wilgotnej
ściereczki.
j) Do czyszczenia nie wolno używać ostrych i/lub
metalowych przedmiotów (np. drucianej szczotki lub
metalowej łopatki) ponieważ mogą one uszkodzić
powierzchnię materiału, z którego wykonane jest
urządzenie.
3.3.6. SCHEMATY WYMIENNYCH GROTÓW
Do przedstawionych urządzeń stosować można poniższe
rodzaje grotów.
18 19
25.03.201925.03.2019
CZCZ
A. Upínací dutinka
B. Upínací matice
C. Hrot páječky
D. Topné těleso
E. Upínač topného tělesa
F. Gumová násadka
G. Držák páječky
H. Odlehčení tahu
I. Napájecí kabel
1. Zobrazení teploty
2. Tlačítko nastavení
3. Tlačítko pro snížení teploty / „dolů“
4. Tlačítko pro zvýšení teploty / „nahoru“
5. Kabel pájecí stanice
6. Vypínač napájení
7. Šroub upevnění předního panelu
8. Napájecí kabel (není zobrazen na obr. S-LS-50)
9. Páječka
10. Odkládací stojan páječky s drátěnkou
11. Zdířka uzemnění (pouze model S-LS-50)
12. Držák pojistky (pouze model S-LS-50)
13. Zdířka pro napájecí kabel (pouze model S-LS-50)
14. Zdířka pro kabel pájecí stanice (pouze model S-LS-50)
3.1.2. KONSTRUKCE PÁJEČKY
A B C D E F G H I
3.2. PŘÍPRAVA K PRÁCI
UMÍSTĚNÍ ZAŘÍZENÍ
Teplota okolí nesmí být vyšší než 40°C a relativní
vlhkost nesmí být vyšší než 85%. Zařízení postavte
takovým způsobem, aby byla zajištěna dobrá cirkulace
vzduchu. Vzdálenost zařízení od stěny by neměla být
menší než 10 cm. Zařízení se musí nacházet daleko od
jakéhokoli horkého povrchu. Zařízení vždy používejte
na rovnoměrném, stabilním, čistém a ohnivzdorném
povrchu, mimo dosah dětí a osob s omezenými
psychickými, smyslovými a duševními funkcemi. Zařízení
umístěte takovým způsobem, abyste v každém okamžiku
měli ničím nezatarasený přístup k elektrické zásuvce.
Ujistěte se, aby hodnoty proudu, kterým je zařízení
napájeno, byly shodné s údaji uvedenými na technickém
štítku zařízení!
d) Opravy zařízení může provádět pouze servis výrobce.
Opravy neprovádějte sami!
e) V případě vzniku požáru k hašení zařízení pod
napětím používejte pouze práškové nebo sněhové
hasicí přístroje (CO2).
f) Na pracovišti se nesmí zdržovat děti a nepovolané
osoby. (Nepozornost může způsobit ztrátu kontroly
nad zařízením.)
g) Zařízení používejte v dobře větraných prostorách.
h) Během práce s přístrojem vznikají škodlivé výpary,
pracoviště musí být dobře větráno, aby byly cizí
osoby chráněny před škodlivými účinky těchto
výparů.
i) Je třeba pravidelně kontrolovat stav etiket
s bezpečnostními informacemi. V případě, že jsou
nečitelné, je třeba etikety vyměnit.)
j) Návod k obsluze uschovejte za účelem jeho
pozdějšího použití. V případě předánání zařízení
třetím osobám musí být spolu se zařízením předán
rovněž návod k obsluze.
k) Obalový materiál a drobné montážní prvky
uchovávejte na místě nedostupném pro děti.
l) Zařízení mějte v dostatečné vzdálenosti od dětí
a zvířat.
2.3. OSOBNÍ BEZPEČNOST
a) Zařízení nepoužívejte, jste-li unaveni nebo pod
vlivem drog, alkoholu nebo léků, které významně
snižují schopnost zařízení ovládat.
b) Zařízení není určen k tomu, aby jej používaly osoby
(včetně dětí) s omezenými psychickými, smyslovými
nebo duševními schopnostmi nebo osoby bez
příslušných zkušeností a/nebo znalostí, ledaže
jsou pod dohledem osoby zodpovědné za jejich
bezpečnost nebo od ní obdržely pokyny, jak zařízení
obsluhovat.
c) Při práci se zařízením buďte pozorní, řiďte se
zdravým rozumem. Chvilka nepozornosti při práci
může vést k vážnému úrazu.
d) Používejte osobní ochranné pomůcky
vyžadované pro práci se zařízením, specikované
v bodě 1 vysvětlením symbolů. Používání vhodných,
atestovaných osobních ochranných prostředků
snižuje nebezpečí úrazu.
e) Zabraňte náhodnému spuštění. Ujistěte se, že je
spínač ve vypnuté poloze před připojením zařízení
k napájecímu zdroji.
f) Zařízení není hračka. Dohlížejte na děti, aby si
nehrály se zařízením.
2.4. BEZPEČNÉ POUŽÍVÁNÍ ZAŘÍZENÍ
a) Zařízení nepřetěžujte. Pro daný úkol používejte
vždy správný typ nářadí. Správně zvolené nářadí
lépe a bezpečněji provede práci, pro kterou bylo
navrženo.
b) Zařízení nepoužívejte, pokud spínač pro zapnutí
a vypnutí zařízení nefunguje správně. Zařízení, které
nelze ovládat spínačem, je nebezpečné a musí být
opraveno.
c) Před každým seřízením, čištěním a údržbou odpojte
zařízení od napájení. Toto bezpečnostní opatření
snižuje nebezpečí náhodného zapnutí.
d) Nepoužívaná zařízení uchovávejte mimo dosah
dětí a osob, které nejsou seznámeny se zařízením
nebo návodem k obsluze. Zařízení jsou nebezpečná
v rukou nezkušených uživatelů.
e) Zařízení udržujte v dobrém technickém stavu.
Kontrolujte před každou prací jeho celkový stav
i jednotlivé díly a ujistěte se, že je vše v dobrém
stavu, a uživateli tak při práci se zařízením nehrozí
žádné nebezpečí. V případě, že zjistíte poškození,
nechte zařízení opravit.
f) Udržujte zařízení mimo dosah dětí.
g) Opravu a údržbu zařízení by měly provádět
pouze kvalikované osoby za výhradního použití
originálních náhradních dílů. Zajistí to bezpečné
používání zařízení.
h) Pro zachování navržené mechanické integrity
zařízení neodstraňujte předem namontované kryty
nebo neuvolňujte šrouby.
i) Zapnuté zařízení nenechávejte bez dozoru.
j) Pravidelně čistěte zařízení, aby nedošlo k trvalému
usazovaní nečistot.
k) Zařízení není hračka. Čištění a údržbu nesmí provádět
děti bez dohledu dospělé osoby.
l) Nezasahujte do zařízení s cílem změnit jeho
parametry nebo konstrukci.
m) Udržujte zařízení mimo zdroje ohně a tepla.
n) V případě přerušení práce je třeba páječku vždycky
položit na odkládací podstavec.
o) Pájecí hrot a části, které mohou být zahřívány držte
mimo tělo, oblečení a hořlavé látky a předměty.
p) Pájecí hrot zůstává horký i po vypnutí napájení. Pře
čištěním nebo výměnou součástí je třeba vyčkat,
dokud přístroj zcela nevychladne.
q) Buďte velice opatrní a nevdechujte pájecí výpary.
3. ZÁSADY POUŽÍVÁNÍ
Přístroj je určen k pájení, odpájení nebo zmenšování prvků
elektronických a elektrických spojů.
Odpovědnost za veškeré škody vzniklé v důsledku
použití zařízení v rozporu s určením nese uživatel.
3.1. POPIS ZAŘÍZENÍ
3.1.1. PŘÍSTROJ A PŘÍSLUŠENSTVÍ
I. S-LS-47
1
2
5
7
8
4
63 9 10
PAMATUJTE! Při práci se zařízením chraňte děti
a jiné nepovolané osoby.
POZNÁMKA! I když zařízení bylo navrženo tak, aby
bylo bezpečné, tedy má vhodné bezpečnostní prvky,
tak i přes použití dodatečné ochrany uživatelem při
práci se zařízením nadále existuje malé riziko úrazu
nebo poranění. Doporučuje se zachovat opatrnost
a zdravý rozum při jeho používání.
II. S-LS-50
6
1
2
3
4
514 910
11 12 713
MONTÁŽ ZAŘÍZENÍ
1. UPOZORNĚNÍ: Před spuštěním tohoto přístroje se
ujistěte, že napájecí zdroj odpovídá požadavkům
přístroje.
2. Opatrně vybalte všechny součásti a zkontrolujte
jejich stav, tedy, zda nejsou poškozeny nebo, zda
případně nechybí.
3. Ujistěte se, že přístroj není připojen ke zdroji
napájení.
4. Postavte přístroj na rovném a stabilním povrchu.
5. Zasuňte koncovku kabelu páječky [9] do zdířky
stanice [14] (S-LS-50).
6. Zasuňte koncovku přívodního kabelu [8] do zdířky
pro přívodní kabel [13] (S-LS-50).
7. Zasuňte zástrčku přívodního kabelu [8] do zásuvky
zdroje napájení.
8. Zapněte přístroj pomocí vypínače napájení [6].
3.3. PRÁCE SE ZAŘÍZENÍM
3.3.1 ZÁKLADNÍ FUNKCE
1. Zapněte přístroj pomocí vypínače napájení [6].
2. Stiskněte tlačítko [4] a nastavte teplotu 250°C
(482°F). Hodnota se zobrazí na displeji [1].
3. Každé další stisknutí tlačítka [4] zvyšuje teplotu o 1°C.
Přidržením tlačítka [4] se bude teplota navyšovat
souvisle. Upozornění: Snížení teploty tlačítkem [3]
proveďte stejným způsobem.
4. Po zahřání pájecího hrotu [C] na páječce [9] je třeba
nanést na hrot pájku, která chrání hrot a předlužuje
jeho životnost.
5. Dosažení požadované teploty je signalizováno
blikáním symbolu na displeji [1].
UPOZORNĚNÍ: Jestliže páječku nepoužíváte [9], vždy
ji odložte do odkládacího podstavce [10].
UPOZORNĚNÍ: Před prohlídkou nebo opravou
například elektrických kabelů, se vždy ujistěte, že
nejsou pod napětím.
3.3.2. MENU NASTAVENÍ PARAMETRŮ
1. Stiskněte a přidržte tlačítko [2]. Na displeji se zobrazí
upozornění [---].
2. Zadejte heslo [010] pro vstup do menu nastavení
parametrů.
UPOZORNĚNÍ: Zadáním nesprávného hesla opustíte
menu nastavení.
3. Po vstupu do menu se na displeji zobrazí zpráva
[F-0]. Uživatel má možnost výběru nastavení podle
schématu F-0 > F-1 > F-2 > F-3 > F-4 > F-0 pomocí
tlačítek [3] a [4].
4. Nastavení hesla [F-1]
• Když se na displeji objeví blikající zpráva [F-1],
potvrďte výběr tlačítkem [2].
• Pomocí tlačítek [3] a [4] vyberte hodnotu parametru.
Vybraná hodnota např. 100 bude novým heslem pro
ochranu stanice.
UPOZORNĚNÍ: Pokud vyberete hodnotu [000],
stanice nebude chráněna heslem.
• Stiskněte tlačítko [2] pro opuštění režimu nastavení
hesla.
5. Nastavení korekce teploty [F-2]
• Když se na displeji zobrazí blikající oznámení [F-2],
potvrďte výběr tlačítkem [2],.
• Pomocí tlačítek [3] a [4] vyberte hodnotu parametru.
Výběr korekce teploty je možný v rozsahu (-99°C ÷
+99°C).
• Stiskněte tlačítko [2] pro opuštění režimu nastavení
korekce teploty.

20 21
25.03.201925.03.2019
Description des
paramètres
Valeur des paramètres
Nom du produit Station de soudage
numérique
Modèle S-LS-47 S-LS-50
Tension nominale [V~]/
Fréquence [Hz]
230/50
Puissance nominale [W] 80 100
Température [°C] 150-480
Fusible Fusible
rapide 1A
Fusible
temporisé T1A
Dimensions [mm] 105x90x90 105x90x130
Poids [kg] 0,95 2,30
Les notions d'« appareil », de « machine » et de « produit
» gurant dans les descriptions et les consignes du manuel
se rapportent à/au <Station de soudage numérique>.
N'utilisez pas l'appareil dans des pièces où le taux
d'humidité est très élevé, ni à proximité immédiate de
récipients d'eau! Ne mouillez pas l'appareil. Risque de
chocs électriques! Ne couvrez pas les orices de ventilation!
2.1. SÉCURITÉ ÉLECTRIQUE
a) La che de l’appareil doit être compatible avec la
prise électrique. Ne modiez d'aucune façon la che
électrique. L'utilisation de la che originale et d'une
prise électrique adaptée diminue les risques de
chocs électriques.
b) Évitez de toucher aux composants mis à la terre
comme les tuyaux, les radiateurs, les fours et
les réfrigérateurs. Le risque de chocs électriques
augmente lorsque votre corps est mis à la terre par
le biais de surfaces trempées et d'un environnement
humide. La pénétration d'eau dans l'appareil accroît
le risque de dommages et de chocs électriques.
c) Ne touchez pas l'appareil lorsque vos mains sont
humides ou mouillées.
d) N'utilisez pas le câble d'une manière diérant de son
usage prévu. Ne vous en servez jamais pour porter
l'appareil. Ne tirez pas sur le câble pour débrancher
l'appareil. Tenez le câble à l'écart de la chaleur, de
l'huile, des arêtes vives et des pièces mobiles. Les
câbles endommagés ou soudés augmentent le
risque de chocs électriques.
e) Si vous n'avez d'autre choix que de vous servir de
l’appareil dans un environnement humide, utilisez
un dispositif diérentiel à courant résiduel (DDR). Un
DDR réduit le risque de chocs électriques.
f) Il est interdit d‘utiliser l‘appareil si le câble
d‘alimentation est endommagé ou s‘il présente
des signes visibles d‘usure. Le câble d‘alimentation
endommagé doit être remplacé par un électricien
qualié ou le centre de service du fabricant.
g) Pour éviter tout risque d'électrocution, n'immergez
pas le câble, la prise ou l'appareil dans l'eau ou tout
autre liquide. N'utilisez pas l'appareil sur des surfaces
humides.
h) ATTENTION DANGER DE MORT! Ne trempez et
n’immergez jamais l’appareil dans l’eau ou dans
d’autres liquides pendant le nettoyage ou le
fonctionnement.
DÉTAILS TECHNIQUES
Le produit est conforme aux normes de sécurité
en vigueur.
Respectez les consignes du manuel.
Collecte séparée.
ATTENTION!, AVERTISSEMENT! et REMARQUE
attirent l'attention sur des circonstances
spéciques (symboles d'avertissement généraux).
Portez une protection oculaire.
Portez une protection contre la poussière
(protection des voies respiratoires).
ATTENTION! Mise en garde liée à la tension
électrique!
ATTENTION! Mise en garde liée à des substances
toxiques!
ATTENTION! Surfaces chaudes. Risque de
brûlures!
An de garantir le fonctionnement able et durable de
l'appareil, il est nécessaire d'utiliser et d'entretenir ce
dernier conformément aux consignes gurant dans le
présent manuel. Les caractéristiques et les spécications
contenues dans ce document sont à jour. Le fabricant se
réserve le droit de procéder à des modications à des ns
d’amélioration du produit.
SYMBOLES
1. DESCRIPTION GÉNÉRALE
L'objectif du présent manuel est de favoriser une utilisation
sécuritaire et able de l'appareil. Le produit a été conçu
et fabriqué en respectant étroitement les directives
techniques applicables et en utilisant les technologies et
composants les plus modernes. Il est conforme aux normes
de qualité les plus élevées.
LISEZ ATTENTIVEMENT LE PRÉSENT MANUEL ET
ASSUREZ-VOUS DE BIEN LE COMPRENDRE AVANT
LA PREMIÈRE UTILISATION.
Classe de protection I avec raccord de
protection.
Soudage avec l à souder sans plomb.
Pb
La version originale de ce manuel a été rédigée en
allemand. Toutes les autres versions sont des traductions
de l'allemand.
REMARQUE!Les illustrations contenues dans le
présent manuel sont fournies à titre explicatif. Votre
appareil peut ne pas être identique.
2. CONSIGNES DE SÉCURITÉ
ATTENTION!Veuillez lire attentivement toutes les
consignes de sécurité et toutes les instructions. Le
non-respect des avertissements et des consignes
de sécurité peut entraîner des chocs électriques, un
incendie, des blessures graves ou la mort.
CZ FR
MANUEL D‘UTILISATION
6. Nastavení režimu hibernace [F-3]
• Když se na displeji zobrazí blikající oznámení [F-3],
potvrďte výběr tlačítkem [2].
• Pomocí tlačítek [3] a [4] vyberte hodnotu parametru.
a) Pokud zvolíte hodnotu [000], režim hibernace
bude neaktivní.
b) Pokud zvolíte hodnotu [100], v případě 20
minutové nečinnosti přístroje pájecí stanice sníží
teplotu hrotu páječky na 150°C.
• Stiskněte tlačítko [2] pro opuštění režimu nastavení
hibernace.
7. Nastavení teplotní stupnice [F-4]
• Když se na displeji zobrazí blikající oznámení [F-4],
potvrďte výběr tlačítkem [2].
• Pomocí tlačítek [3] a [4] vyberte hodnotu parametru.
Na výběr je stupnice Celsia nebo Fahrenheita.
Aktuální výběr ze zobrazí na pravé straně displeje.
• Stiskněte tlačítko [2] pro opuštění režimu nastavení
stupnice teploty.
3.3.3. DŮVODY NEDOSTATEČNÉ SMÁČIVOSTI PÁJECÍHO
HROTU
Během pájení na povrchu materiálu probíhá proces
smáčivosti, který je jedním z podmínek vytvoření kvalitní
pájky. Existují faktory, které mají negativní vliv na smáčivost
a tím také na kvalitu vzniklého spoje:
1. Teplota pájecího hrotu > 410°C (770°F).
2. Chybějící ochranná vrstva na pájecím hrotu, který je
ve stavu nečinnosti.
3. Nedostatek tavidla v pájce.
4. Čištění hrotu špinavou houbičkou nebo hadříkem,
znečištění sloučeninami síry.
5. Kontakt s organickými umělými hmotami.
6. Nečistoty v pájce.
3.3.4. PROVOZNÍ DOPORUČENÍ PRO PÁJECÍ HROTY
1. Upozornění: Před jakýmikoliv pracemi je třeba
přístroj vypnout, odpojit od síťového zdroje napájení
a nechat přístroj vychladnout.
2. V případě, že je pájecí hrot využíván nadměrně,
doporučujeme jeho každodenní čištění.
3. Před ponecháním hrotu ve stavu nečinnosti
doporučujeme na pájecí hrot nanést ochrannou
vrstvu pájky.
4. Před použitím očistěte přístroj drátěnkou.
5. Vysoká teplota během používání páječky zkracuje
živostnost pájecího hrotu.
6. Tření nebo přitlačování hrotu na pracovní plochu
může způsobit předčasné opotřebení hrotu nebo
jeho poškození.
7. Během práce nenanášejte pájku na pájecí hrot,
mohlo by dojít k jeho poškození.
8. Nečistěte pájecí hrot abrazivními materiály.
9. Nepoužívejte tavidla, která obsahují žíraviny.
10. Odstraňování oxidů z pájecího hrotu:
• Abrazivním hadříkem (zrnitost 600 ÷ 800) nebo
izopropylalkoholem opatrně odstraňte nánosy
z pájecího hrotu.
• Povrch obtočte pájecím drátem s kalafunovým
jádrem.
• Místa určené k nanesení pájky překryjte pájecím
drátem s kalafunovým jádrem a pak roztavte.
11. Pro správné vyčištění upínací dutinky uvolněte
upínací matici a vymontujte dutinku a hrot. Veškeré
nečistoty uvnitř dutinky odstraňte stlačeným
vzduchem.
UPOZORNĚNÍ: Buďte velice opatrní a chraňte oči,
před zasažením vyfoukávaným prachem.
3.4. ČIŠTĚNÍ A ÚDRŽBA
a) Před každým čištěním, seřizováním, výměnou
příslušenství a také vždy, když zařízení nepoužíváte,
vytáhněte síťovou zástrčku a nechte zařízení úplně
vychladnout. Porušení a nedodržení uvedených
doporučení může mít za následek poškození
přístroje.
b) K čištění povrchu zařízení používejte výhradně
prostředky neobsahující žíravé látky.
c) Po každém čištění je nutno všechny prvky dobře
osušit, než bude zařízení opět použito.
d) Zařízení skladujte na suchém a chladném místě,
chráněném proti vlhkosti a přímému slunečnímu
svitu.
e) Je zakázáno zařízení polévat vodou nebo je do vody
ponořovat.
f) Dávejte pozor, aby se ventilačními otvory
nacházejícími se na krytu zařízení nedostala dovnitř
voda.
g) Ventilační otvory čistěte pomocí štětečku
a stlačeného vzduchu.
h) Pravidelně provádějte revize zařízení a kontrolujte,
zda je technicky způsobilé a není poškozeno.
i) K čištění používejte měkký, vlhký hadřík.
j) K čištění nepoužívejte ostré ani kovové předměty
(například drátěný kartáč nebo kovovou obracečku),
protože mohou poškodit povrch materiálu, z něhož
je zařízení vyrobeno.
3.3.5. POUŽÍVÁNÍ NOVÝCH HROTŮ
1. Nastavte minimální teplotu, zapněte pájecí stanici.
2. Po dosažení teploty 250°C, povrch pájecího hrotu
překryjte pájecím drátem s obsahem kalafuny.
3. Vyčkejte 3 minuty při teplotě 250°C a nepoužívejte
přístroj.
4. Nastavte pracovní teplotu. Po dosažení této teploty
je pájecí stanice připravena k použití.
UPOZORNění: Pro správné fungování stroje
a optimální zahřívání pájecího hrotu je třeba po
každém použití pravidelně čistit pájecí hrot a upínací
dutinku.
3.3.6. SCHÉMATA NÁHRADNÍCH HROTŮ
Uvedené přístroje je možno používat s následujícími
pájecími hroty:
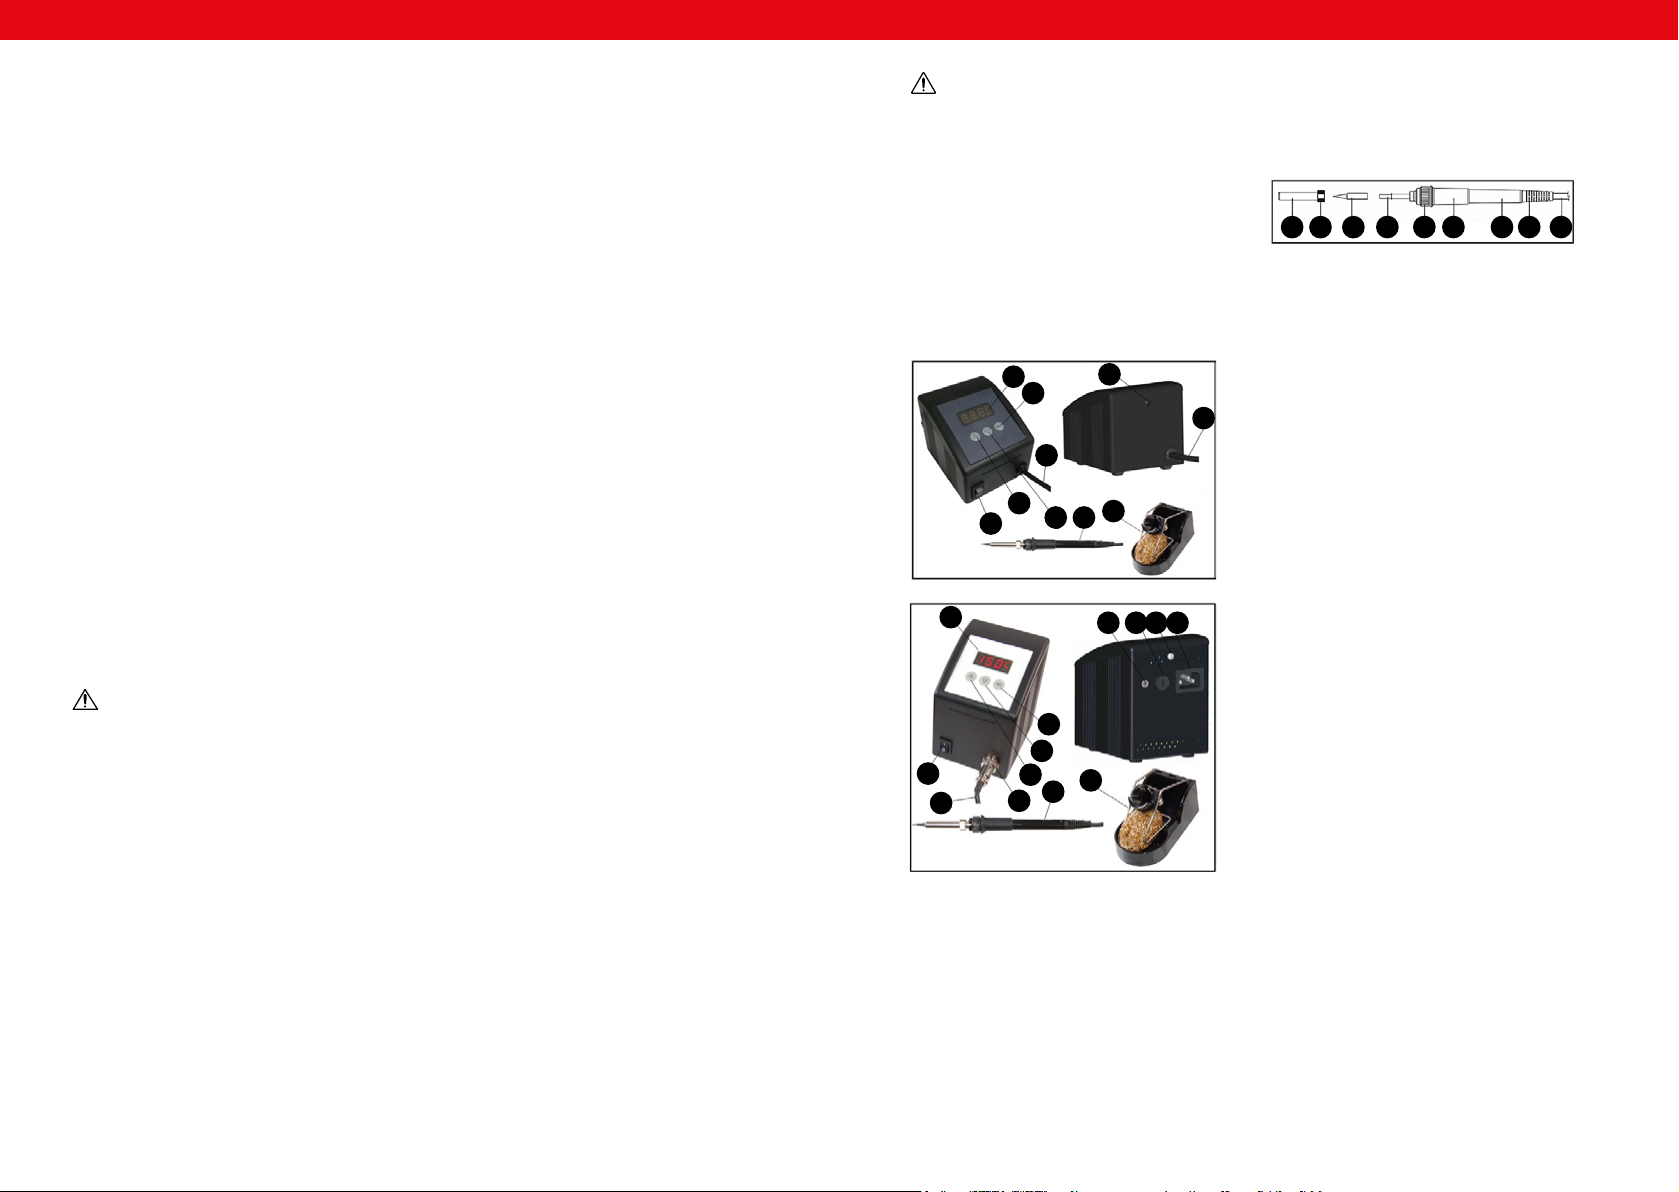
22 23
25.03.201925.03.2019
FRFR
3.1. DESCRIPTION DE L'APPAREIL
3.1.1. APPAREIL ET ACCESSOIRES
I. S-LS-47
3. CONDITIONS D’UTILISATION
L'appareil est conçu pour souder, dessouder ou rétrécir les
connexions des composants électroniques et électriques.
L’utilisateur porte l’entière responsabilité pour
l’ensemble des dommages attribuables à un usage
inapproprié.
A. Fourreau de xation
B. Écrou de xation
C. Panne
D. Élément chauant
E. Fixation de l'élément chauant
F. Revêtement en caoutchouc
G. Manche du fer à souder
H. Décharge de traction du câble
I. Câble d'alimentation
3.2. PRÉPARATION À L'UTILISATION
CHOIX DE L’EMPLACEMENT DE L’APPAREIL:
La température ambiante ne doit pas dépasser 40°C et le
taux d'humidité relative ne doit pas être de plus de 85%.
Positionnez l’appareil de sorte qu’une bonne circulation
d’air soit assurée. Vériez qu’un espace d'au moins 10
cm est libre de chaque côté de l’appareil. Tenez l’appareil
à l’écart des surfaces chaudes. Utilisé toujours l’appareil sur
une surface plane, stable, propre, ininammable et sèche,
hors de portée des enfants et des personnes présentant
des capacités physiques, sensorielles ou mentales
diminuées. Placez l’appareil de sorte que la che soit
accessible en permanence et non couverte. Assurez-vous
que l’alimentation électrique correspond aux indications
gurant sur la plaque signalétique du produit.
MONTAGE DE L’APPAREIL
1. ATTENTION: Avant de travailler avec l'appareil,
assurez-vous que la source d'alimentation est
adaptée aux caractéristiques de l'appareil.
2. Déballez soigneusement tous les composants et
vériez s'ils sont endommagés et/ou s'il manque des
pièces.
3. Assurez-vous que l'appareil n'est pas branché à une
source d'alimentation.
4. Placez l'appareil sur une surface plane et stable.
5. Branchez la che du câble du fer à souder [9] à la
prise du fer à souder [14] (S-LS-50).
6. Branchez la che du cordon d'alimentation [8] à la
prise du cordon d'alimentation [13] (S-LS-50).
7. Branchez la che du cordon d'alimentation [8] à la
source d'alimentation.
8. Allumez l'appareil avec l'interrupteur marche/arrêt
[6].
3.3. UTILISATION DE L'APPAREIL
3.3.1 FONCTIONNEMENT DE BASE
1. Allumez l'appareil avec l'interrupteur marche/arrêt
[6].
2. Appuyez sur la touche [4] et réglez la température
sur 250°C (482°F). La valeur s'ache à l'écran [1].
3. Une simple pression sur la touche [4] augmente
la température de 1 °C. Maintenez la touche [4]
enfoncée, pour faire augmenter la température
continuellement.
REMARQUE: La température peut être réduire de la
même manière avec la touche [3].
1. Achage de la température
2. Touche de réglage
3. Touche de diminution de la température/
« vers le bas »
4. Touche d'augmentation de la température/
« vers le haut »
5. Câble du fer à souder
6. Interrupteur marche/arrêt
7. Vis de xation du panneau avant
8. Cordon d'alimentation (non visible sur
l'illustration S-LS-50)
9. Fer à souder
10. Support du fer à souder avec éponge
métallique
11. Prise de terre (modèle S-LS-50 uniquement)
3.1.2. CONSTRUCTION DU FER À SOUDER
A B C D E F G H I
II. S-LS-50
1
2
5
7
8
4
63 9 10
6
1
2
3
4
514 910
11 12 713
2.2. SÉCURITÉ AU POSTE DE TRAVAIL
a) Veillez à ce que votre poste de travail soit toujours
propre et bien éclairé. Le désordre ou un éclairage
insusant peuvent entraîner des accidents. Soyez
prévoyant, observez les opérations et faites preuve
de bon sens lorsque vous utilisez l’appareil.
b) N'utilisez pas l'appareil dans les zones à risque
d'explosion, par exemple à proximité de liquides,
de gaz ou de poussières inammables. Certains
appareils peuvent produire des étincelles
susceptibles d’enammer la poussière et les vapeurs.
c) En cas d’incertitude quant au fonctionnement correct
de l’appareil, contactez le service client du fabricant.
d) Seul le service du fabricant peut eectuer des
réparations. Ne tentez aucune réparation par vous-
même!
e) En cas de feu ou d’incendie, utilisez uniquement des
extincteurs à poudre ou au dioxyde de carbone (CO2)
pour étouer les ammes sur l’appareil.
f) Aucun enfant ni personne non autorisée ne doit se
trouver sur les lieux de travail. (Le non-respect de
cette consigne peut entraîner la perte de contrôle
sur l'appareil).
g) Utilisez l'équipement dans un endroit bien aéré.
h) Lors de l'utilisation de l'appareil, des émanations
nocives sont générées. Le lieu de travail doit être
bien ventilé an de protéger les personnes tierces
contre les eets nocifs des fumées.
i) Vériez régulièrement l'état des autocollants portant
des informations de sécurité. S’ils deviennent
illisibles, remplacez-les.
j) Conservez le manuel d’utilisation an de pouvoir
le consulter ultérieurement. En cas de cession de
l’appareil à un tiers, l’appareil doit impérativement
être accompagné du manuel d’utilisation.
k) Tenez les éléments d’emballage et les pièces de
xation de petit format hors de portée des enfants.
l) Tenez l’appareil hors de portée des enfants et des
animaux.
2.3. SÉCURITÉ DES PERSONNES
a) N'utilisez pas l'appareil lorsque vous êtes fatigué,
malade, sous l'eet de drogues ou de médicaments
et que cela pourrait altérer votre capacité à utiliser
l'appareil.
b) Cet appareil n'est pas conçu pour être utilisé
par les personnes dont les facultés physiques,
sensorielles ou mentales sont limitées (enfants
y compris), ni par des personnes sans expérience
ou connaissances adéquates, à moins qu'elles se
trouvent sous la supervision et la protection d'une
personne responsable ou qu'une telle personne leur
ait transmis des consignes appropriées en lien avec
l'utilisation de l’appareil.
c) Soyez attentif et faites preuve de bon sens lors que
vous utilisez l’appareil. Un moment d'inattention
pendant le travail peut entraîner des blessures graves.
d) Utilisez l'équipement de protection individuel
approprié pour l'utilisation de l'appareil,
conformément aux indications faites dans le
tableau des symboles, au point 1. L'utilisation de
l'équipement de protection individuel adéquat
certié réduit le risque de blessures.
e) An de prévenir la mise en marche accidentelle de
l'appareil, assurez-vous que celui-ci est éteint et que
l'interrupteur se trouve sur arrêt avant de procéder
au branchement.
f) Cet appareil n'est pas un jouet. Les enfants doivent
demeurer sous la supervision d’un adulte an qu’ils
ne jouent pas avec l’appareil.
2.4. UTILISATION SÉCURITAIRE DE L'APPAREIL
a) Ne faites pas surchauer l'appareil. Utilisez les outils
appropriés pour l'usage que vous en faites. Le choix
d'appareils appropriés et l'utilisation soigneuse de
ceux-ci produisent de meilleurs résultats.
b) N’utilisez pas l’appareil si l’interrupteur MARCHE/
ARRÊT ne fonctionne pas correctement. Les appareils
qui ne peuvent pas être contrôlés à l'aide d'un
interrupteur sont dangereux et doivent être réparés.
c) Avant de procéder au nettoyage et à l’entretien
de l’appareil, débranchez-le. Une telle mesure
préventive réduit le risque de mise en marche
accidentelle de l’appareil.
d) Les outils qui ne sont pas en cours d'utilisation
doivent être mis hors de portée des enfants et des
personnes qui ne connaissent ni l'appareil, ni le
manuel d'utilisation s'y rapportant. Entre les mains
de personnes inexpérimentées, ce genre d'appareils
peut représenter un danger.
e) Maintenez l'appareil en parfait état de marche. Avant
chaque utilisation, vériez l’absence de dommages
en général et au niveau des pièces mobiles (assurez-
vous qu’aucune pièce ni composant n’est cassé et
vériez que rien ne compromet le fonctionnement
sécuritaire de l’appareil). En cas de dommages,
l’appareil doit impérativement être envoyé en
réparation avant d’être utilisé de nouveau.
f) Tenez l'appareil hors de portée des enfants.
g) La réparation et l'entretien des appareils doivent
être eectués uniquement par un personnel qualié,
à l'aide de pièces de rechange d'origine. Cela
garantit la sécurité d’utilisation.
h) Pour garantir l'intégrité opérationnelle de l'appareil,
les couvercles et les vis posés à l'usine ne doivent pas
être retirés.
i) Ne laissez pas l’appareil fonctionner sans surveillance.
j) Nettoyez régulièrement l'appareil pour en prévenir
l’encrassement.
k) Cet appareil n'est pas un jouet. Le nettoyage et
l’entretien ne doivent pas être eectués par des
enfants, à moins qu’ils se trouvent sous la supervision
d’un adulte responsable.
l) Il est défendu de modier l’appareil pour en changer
les paramètres ou la construction.
m) Gardez le produit à l’écart des sources de feu et de
chaleur.
n) Placez toujours le fer à souder sur son support quand
il n'est pas utilisé.
o) Gardez la panne et toutes les pièces susceptibles de
chauer à l'écart du corps, des vêtements, des objets
et des substances inammables.
p) La panne reste chaude même après la mise hors
tension de l'appareil. Attendez que l'appareil soit
complètement refroidi avant de nettoyer ou de
remplacer des composants.
q) Soyez prudent et n'inhalez pas la fumée de soudure.
REMARQUE! Veillez à ce que les enfants et les
personnes qui n'utilisent pas l'appareil soient en
sécurité durant le travail.
ATTENTION! Bien que l'appareil ait été conçu en
accordant une attention spéciale à la sécurité et qu'il
comporte des dispositifs de protection, ainsi que des
caractéristiques de sécurité supplémentaires, il n’est
pas possible d’exclure entièrement tout risque de
blessure lors de son utilisation. Nous recommandons
de faire preuve de prudence et de bon sens lorsque
vous utilisez l’appareil.
12. Porte-fusible (modèle S-LS-50 uniquement)
13. Prise du cordon d'alimentation
(modèle S-LS-50 uniquement)
14. Prise du câble du fer à souder
(modèle S-LS-50 uniquement)

24 25
25.03.201925.03.2019
FRFR
3.4. NETTOYAGE ET ENTRETIEN
a) Avant chaque nettoyage ou réglage, avant tout
changement d’accessoire et lorsque vous ne
comptez pas utiliser l'appareil pour une période
prolongée, débranchez l’appareil et laissez-le
refroidir complètement. Le non-respect de ces
consignes risque d'endommager l'appareil.
b) Pour nettoyer les diérentes surfaces, n'utilisez que
des produits sans agents corrosifs.
c) Laissez bien sécher tous les composants après
chaque nettoyage avant de réutiliser l’appareil.
d) Conservez l'appareil dans un endroit propre, frais et
sec, à l'abri de l'humidité et des rayons directs du
soleil.
e) Il est interdit d’asperger l'appareil d'eau ou de
l'immerger dans l'eau.
f) Évitez que de l’eau ne pénètre à l’intérieur de
l’appareil par l’intermédiaire des orices de
ventilation du boîtier.
g) Nettoyez les orices de ventilation à l'aide d'un
pinceau et d'air comprimé.
h) Contrôlez régulièrement l'appareil pour vous assurer
qu'il fonctionne correctement et ne présente aucun
dommage.
i) Il est conseillé de laver l’appareil uniquement avec un
chion mou et humide.
j) N’utilisez aucun objet présentant des arêtes
tranchantes, ni objet métallique (tels qu’une brosse
ou une spatule en métal) pour le nettoyage car ils
pourraient endommager la surface de l’appareil.
3.3.6 SCHÉMAS DES PANNES REMPLAÇABLES
Dans le cas des appareils présentés, vous pouvez utiliser les
types de pannes suivants.
4. Après avoir chaué la panne [C] du fer à souder [9],
appliquez une couche de l à souder sur la panne.
Cela protège la panne et prolonge sa durée de vie.
5. La température souhaitée est atteinte lorsque
l'indicateur sur l'écran [1] clignote.
ATTENTION: Placez toujours le fer à souder [9] sur
son support [10] quand il n'est pas utilisé.
ATTENTION: Avant de commencer l'inspection ou
la réparation, des câbles électriques par exemple,
assurez-vous qu'ils ne sont pas sous tension.
3.3.2. MENU DE CONFIGURATION DES PARAMÈTRES
1. Appuyez et maintenez la touche [2] enfoncée. Le
message [---] s'ache à l'écran.
2. Entrez le mot de passe [010] pour accéder au menu
de conguration des paramètres.
ATTENTION: Si vous entrez un mot de passe
incorrect, vous quitterez le menu de conguration.
3. Lorsque vous accédez au menu [F-0] s'ache
à l'écran. L'utilisateur peut sélectionner les
paramètres selon le schéma F-0 > F-1 > F-2 > F-3 >
F-4 > F-0 avec les touches [3] et [4].
4. Conguration du mot de passe [F-1]
• Conrmez la sélection avec la touche [2] lorsque le
message clignotant [F-1] apparaît à l'écran.
• Utilisez les touches [3] et [4] pour sélectionner la
valeur du paramètre. La valeur sélectionnée, par
exemple 100, sera le nouveau mot de passe pour
protéger la station.
ATTENTION: Si la valeur [000] est sélectionnée, la
station ne sera pas protégée par mot de passe.
• Appuyez sur la touche [2] pour quitter le mode de
conguration du mot de passe.
5. Correction de la température [F-2]
• Conrmez la sélection avec la touche [2] lorsque le
message clignotant [F-2] apparaît à l'écran.
• Utilisez les touches [3] et [4] pour sélectionner la
valeur du paramètre. Il est possible de choisir la
correction de température dans la plage (-99°C ÷
99°C).
• Appuyez sur la touche [2] pour quitter le mode de
correction de la température.
6. Conguration du mode hibernation [F-3]
• Conrmez la sélection avec la touche [2] lorsque le
message clignotant [F-3] apparaît à l'écran.
• Utilisez les touches [3] et [4] pour sélectionner la
valeur du paramètre.
a) Si la valeur [000] est sélectionnée, le mode
hibernation est inactif.
b) Si la valeur [100] est sélectionnée, la température
de la panne sera réduite à 150°C par la station
dans le cas d'une inactivité de 20 minutes.
• Appuyez sur la touche [2] pour quitter la
conguration du mode hibernation.
7. Conguration de l'échelle de température [F-4]
• Conrmez la sélection avec la touche [2] lorsque le
message clignotant [F-4] apparaît à l'écran.
• Utilisez les touches [3] et [4] pour sélectionner la
valeur du paramètre. L’échelle Celsius ou Fahrenheit
peut être sélectionnée. La sélection actuelle apparaît
sur le côté droit de l'écran.
• Appuyez sur la touche [2] pour quitter le mode
réglage de l'échelle de température.
3.3.3. RAISONS DU MANQUE DE MOUILLABILITÉ DE LA
PANNE
Au cours du soudage, un processus de mouillage se produit
sur la surface du matériau, dont l'apparition est l’une des
conditions pour la réalisation d’une soudure durable.
Certains facteurs ont un impact négatif sur le processus
de mouillage et donc sur la qualité de la soudure formée.
1. Température de la panne > 410°C (770°F).
2. Absence de couche protectrice sur la panne non
utilisée.
3. Absence de ux à souder dans le l.
4. Essuyage de la panne avec une éponge ou un chion
sale, formation d'oxyde.
5. Contact avec des plastiques d'origine organique.
6. Saleté sur le l à souder.
3.3.4. RECOMMANDATIONS D'UTILISATION DES
PANNES À SOUDER
1. Attention: Avant toute manipulation, éteignez
l'appareil, débranchez-le et laissez-le refroidir.
2. Il est recommandé de nettoyer la panne tous les
jours lors d'une utilisation intensive.
3. Il est recommandé de mettre une couche protectrice
de l à souder sur la panne non utilisée.
4. Avant d'utiliser l'appareil, nettoyez la panne à l'aide
d'une éponge métallique.
5. L'utilisation de températures élevées pendant le
fonctionnement de l'appareil réduit la durée de vie
de la panne.
6. Frotter ou presser la panne contre la surface de travail
peut réduire sa durée de vie ou l'endommager.
7. Pendant le travail, n'appliquez pas de l à souder sur
la panne, cela peut l'endommager.
8. Ne nettoyez pas la panne avec des matériaux
abrasifs.
9. N'utilisez pas de ux contenant des substances
corrosives.
10. Élimination des oxydes de la panne:
• Enlevez délicatement le dépôt d'oxyde de la panne
à l'aide d'un chion abrasif (grain 600 ÷ 800) ou
d'alcool isopropylique.
• Couvrez la surface avec du l à souder contenant du
ux.
• Les surfaces destinées à la soudure doivent être
couvertes de l à souder avec ux, puis fondues.
11. Pour nettoyer correctement l'intérieur du fourreau
de xation, desserrez l'écrou de xation, puis retirez
le fourreau et la panne. Toute saleté à l'intérieur du
fourreau doit être éliminée à l'aide d'air comprimé.
Soyez prudent et ne laissez pas la poussière éliminée
pénétrer dans les yeux.
3.3.5. UTILISATION DE NOUVELLES PANNES
1. Réglez la température minimale, allumez la station.
2. Lorsque la température atteint 250°C, couvrez la
surface de la panne avec du l à souder contenant
du ux.
3. Attendez 3 minutes à une température de 250°C.
N'utilisez pas l'appareil pendant ce temps.
4. Réglez la température de travail. Une fois
cette température atteinte, la station est prête
à fonctionner.
ATTENTION: Pour que l'appareil fonctionne
correctement et que la panne soit chauée de
manière optimale, il convient de nettoyer la panne
et le fourreau de xation après chaque utilisation.

26 27
25.03.201925.03.2019
Parametri - Descrizione Parametri - Valore
Nome del prodotto Stazione saldante digitale
Modello S-LS-47 S-LS-50
Tensione nominale
[V~]/Frequenza [Hz]
230/50
Potenza nominale [W] 80 100
Temperatura [°C] 150-480
Fusibile Fusibile
rapido 1A
Fusibile
a fusione
ritardata T1A
Dimensioni [mm] 105x90x90 105x90x130
Peso [kg] 0,95 2,30
ISTRUZIONI PER L’USO
Il termine "apparecchio" o "prodotto" nelle avvertenze
e descrizioni contenute nel manuale si riferisce alla/al
<Stazione saldante digitale>. Non utilizzare l'apparecchio
in ambienti con umidità molto elevata / nelle immediate
vicinanze di contenitori d'acqua! Non bagnare il dispositivo.
Rischio di scossa elettrica! Le aperture di ventilazione non
devono essere coperte!
2.1. SICUREZZA ELETTRICA
a) La spina del dispositivo deve essere compatibile con
la presa. Non cambiare la spina per alcun motivo. Le
spine e le prese originali riducono il rischio di scosse
elettriche.
b) Evitare che il dispositivo tocchi componenti collegati
a terra come tubi, radiatori, forni e frigoriferi. Il
rischio di scosse elettriche aumenta se il corpo viene
messo a terra su superci umide o in un ambiente
umido. L'acqua che entra nel dispositivo aumenta il
rischio di danni e scosse elettriche.
c) Non toccare l'apparecchio con mani umide
o bagnate.
d) Non utilizzare il cavo in modo improprio. Non
utilizzarlo mai per trasportare l'apparecchio
o rimuovere la spina. Tenere il cavo lontano da fonti
di calore, oli, bordi appuntiti e da parti in movimento.
I cavi danneggiati o saldati aumentano il rischio di
scosse elettriche.
e) Se non è possibile evitare che il dispositivo
venga utilizzato in un ambiente umido, utilizzare
un interruttore dierenziale. Un interruttore
dierenziale riduce il rischio di scosse elettriche.
f) Si sconsiglia l‘uso dell‘ apparecchio qualora il cavo
di alimentazione sia danneggiato o presenti segni
di usura. Il cavo di alimentazione danneggiato deve
essere sostituito da un elettricista qualicato o dal
servizio di assistenza del fabbricante.
g) Per evitare scosse elettriche, non immergere il cavo,
la spina o il dispositivo in acqua o altri liquidi. Non
utilizzare il dispositivo su superci bagnate.
h) ATTENZIONE: PERICOLO DI MORTE! Non immergere
il dispositivo in acqua o altri liquidi durante la pulizia
o la messa in funzione.
2.2. SICUREZZA SUL LAVORO
a) Mantenere il posto di lavoro pulito e ben illuminato.
Il disordine o una scarsa illuminazione possono
portare a incidenti. Essere sempre prudenti,
osservare che cosa si sta facendo e utilizzare il buon
senso quando si adopera il dispositivo.
b) Non usare il dispositivo all'interno di luoghi
altamente combustibili, per esempio in presenza di
liquidi, gas o polveri inammabili. Il dispositivo può
produrre scintille in presenza di polvere o vapore
inammabili.
c) Se non si è sicuri del corretto funzionamento del
dispositivo, rivolgersi al servizio assistenza del
fornitore.
DATI TECNICI
Il prodotto soddisfa le attuali norme di sicurezza.
Leggere attentamente le istruzioni.
Prodotto riciclabile.
ATTENZIONE o AVVERTENZA! o NOTA!
per richiamare l'attenzione su determinate
circostanze (indicazioni generali di avvertenza).
Indossare una protezione per gli occhi.
Utilizzare una protezione contro la polvere
(protezione dell'apparato respiratorio).
ATTENZIONE! Pericolo di tensione elettrica!
ATTENZIONE! Presenza di materiali tossici!
ATTENZIONE! Supercie calda. Pericolo di
ustione!
Dispositivo di classe di protezione I con
morsetto di sicurezza.
Saldatura con lo di saldatura senza piombo
Per un funzionamento duraturo e adabile del dispositivo
assicurarsi di maneggiarlo e curarne la manutenzione
secondo le disposizioni presentate in questo manuale.
I dati e le speciche tecniche indicati in questo manuale
sono attuali. Il fornitore si riserva il diritto di apportare
delle migliorie nel contesto del miglioramento dei propri
prodotti.
SPIEGAZIONE DEI SIMBOLI
1. DESCRIZIONE GENERALE
Queste istruzioni sono intese come ausilio per un uso sicuro
e adabile. Il prodotto è stato rigorosamente progettato
e realizzato secondo le direttive tecniche e l'utilizzo delle
tecnologie e componenti più moderne e seguendo gli
standard di qualità più elevati.
PRIMA DELLA MESSA IN FUNZIONE È NECESSARIO
AVER LETTO E COMPRESO LE ISTRUZIONI D'USO.
Pb
Il manuale originale è stato scritto in tedesco. Le versioni in
altre lingue sono traduzioni dalla lingua tedesca.
2. SICUREZZA NELL'IMPIEGO
AVVERTENZA!Le immagini contenute in questo
manuale sono puramente indicative e potrebbero
dierire dal prodotto.
ATTENZIONE!Leggere le istruzioni d'uso e di
sicurezza. Non prestare attenzione alle avvertenze
e alle istruzioni può condurre a shock elettrici,
incendi, gravi lesioni o addirittura al decesso.
IT IT
d) Le riparazioni devono essere eseguite esclusivamente
dal servizio assistenza del produttore. Non eseguire
le riparazioni da soli!
e) In caso di incendio, utilizzare solo estintori a polvere
o ad anidride carbonica (CO2).
f) I bambini e le persone non autorizzate non devono
essere presenti sul posto di lavoro. (La disattenzione
può causare la perdita del controllo sul dispositivo).
g) Utilizzare il dispositivo in una zona ben ventilata.
h) Durante il lavoro con l'apparecchio si sviluppano
vapori nocivi, il luogo di lavoro deve essere ben
ventilato al ne di proteggere le persone dagli eetti
nocivi dei fumi.
i) Controllare regolarmente lo stato delle etichette
informative di sicurezza. Se le etichette non sono ben
leggibili, devono essere sostituite.
j) Conservare le istruzioni d‘uso per uso futuro. Nel
caso in cui il dispositivo venisse adato a terzi,
consegnare anche queste istruzioni.
k) Tenere gli elementi di imballaggio e le piccole parti
di assemblaggio fuori dalla portata dei bambini.
l) Tenere il dispositivo fuori dalla portata dei bambini
e degli animali.
2.3. SICUREZZA PERSONALE
a) Non è consentito l'uso del dispositivo in uno stato
di aaticamento, malattia, sotto l'inuenza di alcol,
droghe o farmaci, se questi limitano la capacità di
utilizzare il dispositivo.
b) Questo dispositivo non è adatto per essere utilizzato
da persone, bambini compresi, con ridotte capacità
siche, sensoriali o mentali, così come da privi di
adeguata esperienza e/o conoscenze. Si fa eccezione
per coloro i quali siano sorvegliati da un responsabile
qualicato che si prenda carico della loro sicurezza
e abbia ricevuto istruzioni dettagliate al riguardo.
c) Prestare attenzione e usare il buon senso quando si
utilizza il dispositivo. Un momento di disattenzione
durante il lavoro può causare gravi lesioni.
d) Utilizzare dispositivi di protezione individuale
adeguati quando si utilizza il dispositivo,
conformemente alle speciche indicate nella
spiegazione dei simboli al punto 1. L'uso di dispositivi
di protezione individuale adeguati e certicati riduce
il rischio di lesioni.
e) Per evitare avviamenti accidentali, prima di collegare
il dispositivo a una fonte di alimentazione assicurarsi
che questo sia spento.
f) Questo dispositivo non è un giocattolo. I bambini
devono essere sorvegliati anché non giochino con
il prodotto.
2.4. USO SICURO DEL DISPOSITIVO
a) Non far surriscaldare il dispositivo. Utilizzare strumenti
appropriati. Dispositivi scelti correttamente e un
attento utilizzo degli stessi portano a risultati migliori.
b) Non utilizzare il dispositivo se l'interruttore ON/
OFF non funziona correttamente (non accendere
o spegnere il dispositivo). I dispositivi con
interruttore difettoso sono pericolosi quindi devono
essere riparati.
c) Scollegare l‘unità dall‘alimentazione prima di iniziare
l‘impostazione, la pulizia e la manutenzione. Tale
misura preventiva riduce il rischio di attivazione
accidentale del dispositivo.
d) Gli strumenti inutilizzati devono essere tenuti fuori
dalla portata dei bambini e delle persone che non
hanno familiarità con il dispositivo e le istruzioni
d’uso. Nelle mani di persone inesperte, questo
dispositivo può rappresentare un pericolo.
e) Mantenere il dispositivo in perfette condizioni. Prima di
ogni utilizzo, vericare che non vi siano danni generali
o danni alle parti mobili (frattura di parti e componenti
o altre condizioni che potrebbero compromettere il
funzionamento sicuro del prodotto). In caso di danni,
l'unità deve essere riparata prima dell'uso.
f) Tenere il dispositivo fuori dalla portata dei bambini.
g) La riparazione e la manutenzione dell'attrezzatura
devono essere eseguite esclusivamente da personale
specializzato qualicato e con pezzi di ricambio
originali. Ciò garantisce la sicurezza durante l'uso.
h) Per garantire l'integrità di funzionamento
dell'apparecchio, i coperchi o le viti installati in
fabbrica non devono essere rimossi.
i) Non lasciare il dispositivo incustodito mentre è in uso.
j) Pulire regolarmente l'apparecchio in modo da
evitare l'accumulo di sporcizia.
k) Questo apparecchio non è un giocattolo! La pulizia
e la manutenzione non devono essere eseguite da
bambini a meno che non siano sotto la supervisione
di un adulto.
l) È vietato intervenire sulla costruzione del dispositivo
per modicare i suoi parametri o la sua costruzione.
m) Tenere dispositivi lontano da fonti di fuoco e calore.
n) Qualora l'apparecchio non venga utilizzato occorre
posizionare sempre il saldatoio su un supporto.
o) Tenere la punta di saldatore e le parti che possono
riscaldarsi lontano dal corpo, dai vestiti e da oggetti
e sostanze inammabili.
p) La punta di saldatura rimane bollente anche dopo
lo spegnimento. Attendere che l'apparecchio si
sia completamente rareddato prima di pulire
o sostituire i componenti.
q) Prestare attenzione e non inalare i fumi di saldatura.
AVVERTENZA!Quando si lavora con questo
dispositivo, i bambini e le persone non coinvolte
devono essere protetti.
ATTENZIONE!Anche se l'apparecchiatura è stata
progettata per essere sicura, sono presenti degli
ulteriori meccanismi di sicurezza. Malgrado
l'applicazione di queste misure supplementari di
sicurezza sussiste comunque il rischio di ferirsi. Si
raccomanda inoltre di usare cautela e buon senso.
3.1. DESCRIZIONE DEL DISPOSITIVO
3.1.1. APPARECCHIO E ACCESSORI
I. S-LS-47
3. CONDIZIONI D'USO
L’apparecchio è progettato per le saldature, dissaldature
o restringimenti degli elementi di connessioni elettroniche
ed elettriche.
L'operatore è responsabile di tutti i danni derivanti da
un uso improprio.
1
2
5
7
8
4
63 9 10
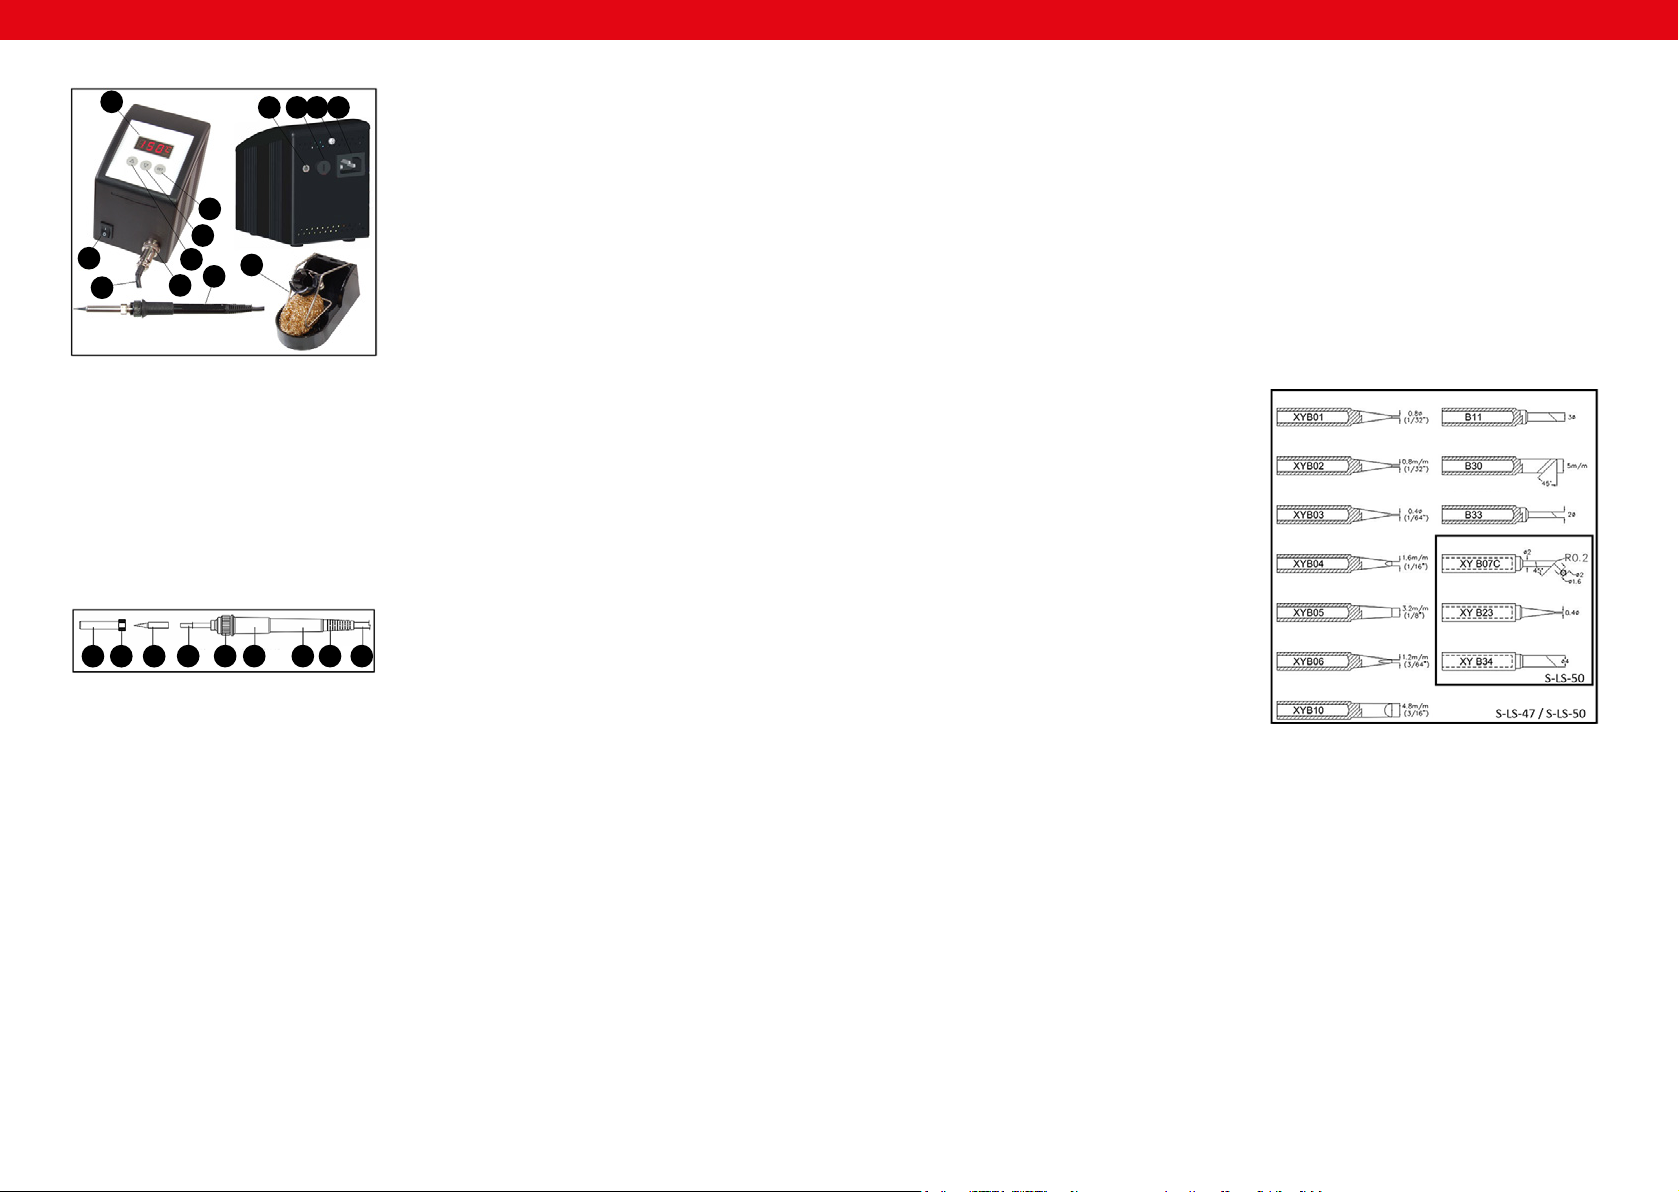
28 29
25.03.201925.03.2019
IT IT
a) La selezione del valore [000] indica che la
modalità stand-by è inattiva.
b) La selezione del valore [100] signica che la
temperatura della punta di saldatura sarà
abbassata a 150°C dopo 20 minuti di inattività.
• Premere [2] per uscire dalla modalità di impostazione
stand-by.
7. Impostazione della scala di temperatura [F-4].
• Confermare la selezione con [2] quando [F-4]
lampeggia sullo schermo.
• Utilizzando i tasti [3] e [4], selezionare il valore del
parametro. È possibile scegliere la scala tra Celsius
o Fahrenheit. La selezione corrente verrà visualizzata
sul lato destro del display.
• Premere [2] per uscire dalla modalità di impostazione
della scala di temperatura.
3.3.3 MOTIVI PER LA SCARSA BAGNABILITÀ DELLA
PUNTA DI SALDATURA
Durante la saldatura sulla supercie del materiale avviene
un processo di bagnatura, la cui comparsa è una delle
condizioni necessarie per la formazione di una saldatura
durevole. Di seguito i fattori che hanno un'inuenza
negativa sul processo di bagnatura e quindi sulla qualità
della saldatura ottenuta:
1. Temperatura della punta del saldatore > 410°C (770°F).
2. Mancanza di strato protettivo della punta del
saldatore in modalità stand-by.
3. Mancanza di usso nella saldatura.
4. Pulizia della punta del saldatore con una spugna
o un panno contaminati, contaminazione con
composti solforati.
5. Contatto con materie plastiche di origine organica.
6. Impurità nella saldatura.
3.3.4. ISTRUZIONI PER L'USO DELLE PUNTE DI
SALDATURA
1. Nota: prima di eettuare qualsiasi operazione,
occorre spegnere l'apparecchio, scollegarlo dalla
rete elettrica e lasciarlo rareddare.
2. Si raccomanda di pulire quotidianamente la punta di
saldatura durante lavori intensi.
3. Prima di lasciare la punta in stato di inattività, si
raccomanda di applicarvi uno strato protettivo.
4. Prima di utilizzare l'apparecchio, pulire la punta con
la spugna metallica pulita.
5. L'uso di alte temperature durante il funzionamento
riduce la durata della punta.
6. Lo stronamento o la pressione della punta contro
la supercie di lavoro può ridurne la vita utile
o danneggiarlo.
7. Non applicare la lega di saldatura sulla punta durante
il funzionamento dell'apparecchio, in quanto ciò
potrebbe danneggiare la punta.
8. Non pulire la punta con materiali abrasivi.
9. Non utilizzare ussanti contenenti sostanze corrosive.
10. Rimozione degli ossidi dalla punta di saldatura:
• Rimuovere delicatamente il deposito dalla punta
saldante utilizzando un panno abrasivo (abrasione
600 ÷ 800) o alcool isopropilico.
• Circondare la supercie con lo di stagno con
colofonia.
• Le superci destinate alla saldatura devono essere
rivestite di stagno con colofonia e quindi essere fuse.
11. Per pulire correttamente l'interno del manicotto
di ssaggio, allentare il dado di ssaggio, quindi
rimuovere il manicotto e la punta. Eventuali
contaminazioni all'interno del manicotto devono
essere rimosse con aria compressa.
ATTENZIONE: prestare attenzione evitando che la
polvere soata venga a contatto con gli occhi.
3.3.5. UTILIZZO DELLE NUOVE PUNTE
1. Impostare la temperatura minima, accendere la
stazione.
2. Una volta che la temperatura raggiunge i 250°C,
coprire la supercie della punta con lo stagno con la
colofonia.
3. Attendere 3 minuti a 250°C. Non utilizzare il
dispositivo durante questo periodo.
4. Impostare la temperatura di esercizio. Una volta
raggiunta, la stazione è pronta per il funzionamento.
NOTA: anché l'apparecchio funzioni correttamente
e la rete elettrica si riscaldi in modo ottimale,
è necessario pulire la rete elettrica e il manicotto di
ssaggio ogni volta che il lavoro è stato completato.
3.3.6. SCHEMA DELLE PUNTE SOSTITUIBILI
I seguenti tipi di punte possono essere utilizzati per
i dispositivi presentati.
A. Manicotto di ssaggio
B. Dado di ssaggio
C. Punta di saldatura
D. Radiatore
E. Fissaggio del radiatore
F. Cappuccio in gomma
G. Impugnatura del saldatoio
H. Alleggerimento del cavo
I. Cavo di alimentazione
2. Disimballare con cura tutti i componenti e controllare
che non vi siano danni e/o parti mancanti.
3. Assicurarsi che l'apparecchio non sia collegato alla
fonte di alimentazione.
4. Posizionare l'apparecchio su una supercie piana
e stabile.
5. Collegare la spina del cavo del saldatoio [9] alla presa
del saldatoio [14] (S-LS-50).
6. Inserire la spina del cavo di alimentazione [8] nella
presa del cavo di alimentazione [13] (S-LS-50).
7. Collegare la spina del cavo di alimentazione [8] alla
fonte di alimentazione.
8. Accendere l'interruttore di alimentazione [6].
3.3. LAVORARE CON IL DISPOSITIVO
3.3.1 PRINCIPIO DI FUNZIONAMENTO
1. Accendere l'interruttore di alimentazione [6].
2. Premere il tasto [4] e impostare la temperatura su
250°C (482°F). Il valore apparirà sul display [1].
3. Premendo il tasto [4] una volta si aumenta la
temperatura di 1 °C. Tenendo premuto il tasto [4], la
temperatura aumenta in modo continuato.
NOTA: Per abbassare la temperatura con il tasto [3] si
procede nella stessa maniera.
4. Dopo aver riscaldato la punta di saldatura [C] coprire
il saldatoio [9] con uno strato saldatura. Questo serve
a proteggere la punta di saldatore e a prolungarne
durata.
5. Al raggiungimento della temperatura desiderata,
l'indicatore sul display [1] lampeggerà.
NOTA: posizionare sempre il saldatoio inutilizzato [9]
sul supporto [10].
NOTA: prima di iniziare l'ispezione o la riparazione di
cavi elettrici, assicurarsi che non siano sotto tensione.
3.3.2. MENU DI IMPOSTAZIONE DEI PARAMETRI
1. Premere e tenere premuto il tasto [2]. Il display
mostrerà [-----].
2. Digitare la password [010] per accedere al menu di
impostazione dei parametri.
NOTA: inserendo una password errata si esce dal
menu delle impostazioni.
3. Una volta entrati nel menu, sul display apparirà [F-0].
L'utente può selezionare le impostazioni secondo lo
schema F-0 > F-1 > F-2 > F-3 > F-4 > F-0 utilizzando
i tasti [3] e [4].
4. Impostazione della password [F-1]
• Confermare la selezione con [2] quando [F-1]
lampeggia sullo schermo.
• Utilizzando i tasti [3] e [4], selezionare il valore del
parametro. Il valore selezionato, ad es. 100, sarà la
nuova password di protezione della stazione.
Nota: se si seleziona [000], la stazione non sarà
protetta da una password.
• Premere il tasto [2] per uscire dalla modalità di
impostazione della password.
5. Impostazioni di correzione della temperatura [F-2].
• Confermare la selezione con [2] quando [F-2]
lampeggia sullo schermo.
• Utilizzando i tasti [3] e [4] selezionare il valore del
parametro. È possibile eettuare una correzione di
temperatura nel campo (-99°C ÷ +99°C).
• Premere [2] per uscire dalla modalità di impostazione
della correzione della temperatura.
6. Impostazione della modalità standby [F-3].
• Confermare la selezione con [2] quando [F-3]
lampeggia sullo schermo.
• Utilizzando i tasti [3] e [4] selezionare il valore del
parametro.
1. Display di temperatura
2. Tasto di regolazione
3. Pulsante di riduzione della temperatura/"down"
4 Pulsante di aumento della temperatura/"up”
5. Cavo del saldatoio
6. Interruttore di accensione/spegnimento
7. Vite di ssaggio del pannello anteriore
8. Cavo di alimentazione (non indicato nella gura S-LS-50)
9. Saldatoio
10. Supporto del saldatoio con spugna metallica
11. Presa di messa a terra (solo modello S-LS-50)
12. Portafusibili (solo modello S-LS-50)
13. Presa del cavo di alimentazione (solo modello S-LS-50)
14. Presa del cavo del saldatoio (solo modello S-LS-50)
3.1.2. STRUTTURA DEL SALDATOIO
A B C D E F G H I
II. S-LS-50
6
1
2
3
4
514 910
11 12 713
3.2. PREPARAZIONE AL FUNZIONAMENTO
POSIZIONAMENTO DEL DISPOSITIVO:
La temperatura ambiente non deve superare i 40°C
e l‘umidità relativa non deve superare l‘85%. Posizionare
l‘apparecchio in modo da garantire una buona circolazione
dell‘aria. Garantire una distanza di almeno 10 cm tra il
dispositivo e altri apparecchi o strutture circostanti. Tenere
il dispositivo lontano da fonti di calore. Il dispositivo va
sempre utilizzato su una supercie piana, stabile, pulita,
ignifuga e asciutta, lontano dalla portata dei bambini
e di persone con capacità psichiche, sensoriali e mentali
ridotte. Posizionare il dispositivo in modo che la spina sia
facilmente accessibile e non risulti ostruita. Assicurarsi che
l‘alimentazione corrisponda a quella indicata sul quadro
tecnico del prodotto.
MONTAGGIO DEL DISPOSITIVO
1. ATTENZIONE: Assicurarsi che l'alimentatore sia
adatto all'apparecchio prima di iniziare a lavorare
con l'unità.
3.4. PULIZIA E MANUTENZIONE
a) Prima di pulire o regolare il dispositivo, prima
di sostituire gli accessori o quando il dispositivo
non viene utilizzato, staccare la spina e lasciarlo
rareddare completamente. La mancata osservanza
di queste indicazioni può causare danni
all'apparecchio.
b) Per pulire la supercie utilizzare solo detergenti
senza ingredienti corrosivi.
c) Dopo la pulizia, prima di riutilizzare l'apparecchio,
asciugare tutte le parti.
d) Tenere l'apparecchio in un luogo asciutto, fresco,
protetto dall'umidità e dalla luce diretta del sole.
e) È vietato spruzzare il dispositivo con un getto
d'acqua o immergere il dispositivo in acqua.
f) Evitare che l'acqua entri nell'alloggiamento
attraverso le aperture di ventilazione.
g) Le aperture di ventilazione devono essere pulite con
una spazzola e aria compressa.
h) Eettuare controlli regolari del dispositivo per
mantenerlo eciente e privo di danni.
i) Per la pulizia utilizzare un panno morbido e umido.
j) Non utilizzare oggetti appuntiti o / e metallici (come
una spazzola o una spatola metallica) per la pulizia,
poiché potrebbero danneggiare la supercie del
materiale con cui è fatto il dispositivo.
30 31
25.03.201925.03.2019
Parámetro - Descripción Parámetro - Valor
Nombre del producto Estación de soldadura digital
Modelo S-LS-47 S-LS-50
Voltaje [V ~]/
Frecuencia [Hz]
230/50
Potencia nominal [W] 80 100
Temperatura [°C] 150-480
Fusible Fusible
rápido 1A
De retardo
T1A
Dimensiones [mm] 105x90x90 105x90x130
Peso [kg] 0,95 2,30
MANUAL DE INSTRUCCIONES
Conceptos como "aparato" o "producto" en las
advertencias y descripciones de este manual se reeren a <
Estación de soldadura digital >. ¡No utilizar el aparato en
locales con humedad muy elevada / en las inmediaciones
de depósitos de agua! ¡No permita que el aparato se moje!
¡Peligro de electrocución! ¡Los oricios de ventilación no
deben cubrirse!
2.1. SEGURIDAD ELÉCTRICA
a) La clavija del aparato debe ser compatible con el
enchufe. No cambie la clavija bajo ningún concepto.
Las clavijas originales y los enchufes apropiados
disminuyen el riesgo de descarga eléctrica.
b) Evite tocar componentes conectados a tierra como
tuberías, radiadores, hornos y refrigeradores. Existe
un mayor riesgo de descarga eléctrica si su cuerpo
está conectado a tierra mediante supercies mojadas
o en ambientes húmedos. Si entrara agua en el
aparato aumentaría el riesgo de daños y descargas
eléctricas.
c) No toque el dispositivo con las manos mojadas
o húmedas.
d) No utilice el cable de manera inadecuada. Nunca tire
de él para desplazar el aparato o para desconectarlo
del enchufe. Por favor, mantenga el cable alejado
de bordes alados, aceite, calor o aparatos en
movimiento. Los cables dañados o soldados
aumentan el riesgo de descargas eléctricas.
e) En caso de no poder evitar que el aparato se emplee
en un entorno húmedo, utilice un interruptor de
corriente residual (RCD). Con este RCD reduce el
peligro de descargas eléctricas.
f) No utilice el dispositivo si el cable de alimentación
se encuentra dañado o presenta signos evidentes
de desgaste. Los cables dañados deben ser
reemplazados por un electricista o por el servicio del
fabricante.
g) Para evitar electrocutarse, no se debe sumergir el
cable, los enchufes ni el propio aparato en agua
o en cualquier otro uido. No utilizar el aparato en
supercies mojadas.
h) ¡ATENCIÓN, PELIGRO DE MUERTE! Nunca sumerja el
equipo en agua u otros líquidos durante su limpieza
o funcionamiento.
2.2. SEGURIDAD EN EL PUESTO DE TRABAJO
a) Mantenga el lugar de trabajo limpio y bien iluminado.
El desorden o la mala iluminación pueden provocar
accidentes. Tenga cuidado, preste atención al trabajo
que está realizando y use el sentido común cuando
utilice el dispositivo.
b) No utilice el aparato en atmósferas potencialmente
explosivas, p. ej., en la cercanía de líquidos,
gases o polvo inamables. Bajo determinadas
circunstancias los aparatos generan chispas que
pueden inamar polvo o vapores circundantes.
DATOS TÉCNICOS
El producto cumple con las normas de seguridad
vigentes.
Respetar las instrucciones de uso.
Producto reciclable.
¡ATENCIÓN!, ¡ADVERTENCIA! o ¡NOTA! para
llamar la atención sobre ciertas circunstancias
(señal general de advertencia).
Utilizar protección para los ojos.
Utilizar protección contra el polvo (para las vías
respiratorias).
¡ATENCIÓN! ¡Advertencia de tensión eléctrica!
¡ATENCIÓN! ¡Advertencia de sustancias tóxicas!
¡Atención! ¡Supercie caliente! ¡Peligro de
quemaduras!
Dispositivo de primera clase de seguridad con
abrazadera de seguridad.
Soldadura con hilo de soldar sin plomo.
Pb
Para garantizar un funcionamiento duradero y able del
aparato, el manejo y mantenimiento deben llevarse a cabo
de acuerdo con las instrucciones de este manual. Los
datos técnicos y las especicaciones de este manual están
actualizados. El fabricante se reserva el derecho de realizar
modicaciones para mejorar la calidad.
EXPLICACIÓN DE LOS SÍMBOLOS
1. DESCRIPCIÓN GENERAL
Este manual ha sido elaborado para favorecer un empleo
seguro y able. El producto ha sido estrictamente diseñado
y fabricado conforme a las especicaciones técnicas y para
ello se han utilizado las últimas tecnologías y componentes,
manteniendo los más altos estándares de calidad.
ANTES DE LA PUESTA EN FUNCIONAMIENTO,
LEA LAS INSTRUCCIONES MINUCIOSAMENTE Y
ASEGÚRESE DE COMPRENDERLAS.
El texto en alemán corresponde a la versión original. Los
textos en otras lenguas son traducciones del original en
alemán.
2. SEGURIDAD
¡ADVERTENCIA!En este manual se incluyen fotos
ilustrativas que podrían no coincidir exactamente con
la apariencia real del dispositivo.
¡ATENCIÓN!Lea todas las instrucciones
e indicaciones de seguridad. La inobservancia de
las advertencias e instrucciones al respecto puede
provocar descargas eléctricas, incendios, lesiones
graves e incluso la muerte.
ES ES
c) Si no está seguro de que la unidad funcione
correctamente, póngase en contacto con el servicio
técnico del fabricante.
d) Las reparaciones solo pueden ser realizadas por
el servicio técnico del fabricante. ¡No realice
reparaciones por su cuenta!
e) En caso de incendio, utilice únicamente extintores
de polvo o dióxido de carbono (CO2) para apagar el
aparato.
f) Se prohíbe la presencia de niños y personas no
autorizadas en el lugar de trabajo (la falta de
atención puede llevar a la pérdida de control del
equipo).
g) Utilice el equipo en un espacio bien ventilado.
h) Al trabajar con el dispositivo, se generan vapores
perjudiciales, el lugar de trabajo debe estar bien
ventilado para proteger a otras personas contra los
efectos dañinos de los vapores.
i) Compruebe regularmente el estado de las etiquetas
de información de seguridad. Si las pegatinas fueran
ilegibles, habrán de ser reemplazadas.
j) Conserve el manual de instrucciones para futuras
consultas. Este manual debe ser entregado a toda
persona que vaya a hacer uso del dispositivo.
k) Los elementos de embalaje y pequeñas piezas de
montaje deben mantenerse alejados del alcance de
los niños.
l) Mantenga el equipo alejado de niños y animales.
2.3. SEGURIDAD PERSONAL
a) No está permitido utilizar el aparato en estado de
fatiga, enfermedad, bajo la inuencia del alcohol,
drogas o medicamentos, ya que estos limitan la
capacidad de manejo del aparato.
b) Este aparato no debe ser utilizado por personas
(entre ellas niños) con capacidades físicas, sensoriales
o mentales reducidas, o con falta de la experiencia
y/o los conocimientos necesarios, a menos que
sean supervisadas por una persona responsable de
su seguridad o que hayan recibido de esta persona
responsable las indicaciones pertinentes en relación
al manejo del aparato.
c) Actúe con precaución y use el sentido común
cuando maneje este producto. La más breve falta de
atención durante el trabajo puede causar lesiones
graves.
d) Utilice el equipo de protección personal necesario
para el empleo de este dispositivo, de acuerdo con
las especicaciones del punto 1 de las explicaciones
de los símbolos. El uso de un equipo de protección
personal apropiado y certicado reduce el riesgo de
lesiones.
e) Para evitar una puesta en marcha accidental,
asegúrese de que el interruptor esté apagado antes
de conectar la clavija a una fuente de alimentación.
f) Este aparato no es un juguete. Debe controlar que
los niños no jueguen con él.
2.4. MANEJO SEGURO DEL APARATO
a) No permita que el aparato se sobrecaliente. Utilice
las herramientas apropiadas para cada trabajo.
Debe seleccionarse el aparato adecuado para cada
aplicación y utilizarse conforme al n para el que
ha sido diseñado, para conseguir así los mejores
resultados.
b) No utilice la unidad si el interruptor ON/OFF no
funcionara correctamente (no enciende o apaga).
Los aparatos que no pueden ser controlados por
interruptores son peligrosos. Estos pueden y deben
ser reparados.
c) Antes de proceder a la limpieza, ajuste
o mantenimiento, desconecte el dispositivo del
suministro eléctrico. Esta medida preventiva reduce
el riesgo de que el dispositivo se ponga en marcha
accidentalmente.
d) Mantenga las herramientas fuera del alcance de los
niños y de las personas que no estén familiarizadas
con el equipo en sí o no hayan recibido las
instrucciones pertinentes al respecto. En manos de
personas inexpertas este equipo puede representar
un peligro.
e) Mantenga el aparato en perfecto estado
de funcionamiento. Antes de cada trabajo,
compruébelo en busca de daños generales o de
piezas móviles (fractura de piezas y componentes
u otras condiciones que puedan perjudicar el
funcionamiento seguro de la máquina). En caso de
daños, el aparato debe ser reparado antes de volver
a ponerse en funcionamiento.
f) Mantenga la unidad fuera del alcance de los niños.
g) La reparación y el mantenimiento de los equipos
solo pueden ser realizados por personal cualicado
y siempre empleando piezas de repuesto originales.
Esto garantiza la seguridad durante el uso.
h) A n de asegurar la integridad operativa del
dispositivo, no se deben retirar las cubiertas o los
tornillos instalados de fábrica.
i) No deje este equipo sin supervisión mientras esté en
funcionamiento.
j) Limpie regularmente el dispositivo para evitar que la
suciedad se incruste permanentemente.
k) Este aparato no es un juguete. La limpieza y el
mantenimiento no deben ser llevados a cabo por
niños que no estén bajo la supervisión de adultos.
l) Se prohíbe realizar cambios en la construcción del
dispositivo para modicar sus parámetros o diseño.
m) Mantenga el dispositivo alejado de fuentes de fuego
o calor.
n) En el caso de una interrupción en el uso, el soldador
siempre debe colocarse en el soporte.
o) Mantenga la punta de soldadura y los elementos que
pueden calentarse lejos del cuerpo, la ropa, así como
de objetos y sustancias inamables.
p) La punta de soldadura permanece caliente incluso
después de apagar la alimentación. Antes de limpiar
o reemplazar los componentes, espere hasta que el
dispositivo se haya enfriado completamente.
q) Tenga cuidado y no inhale vapores de soldadura.
¡ADVERTENCIA!Los niños y las personas no
autorizadas deben estar asegurados cuando trabajen
con esta unidad.
¡ATENCIÓN! Aunque en la fabricación de
este aparato se ha prestado gran importancia
a la seguridad, dispone de ciertos mecanismos de
protección extras. A pesar del uso de elementos de
seguridad adicionales, existe el riesgo de lesiones
durante el funcionamiento, por lo que se recomienda
proceder con precaución y sentido común.
3. INSTRUCCIONES DE USO
El dispositivo está diseñado para soldar, desoldar o reducir
elementos de conexiones electrónicas y eléctricas.
El usuario es responsable de los daños derivados de un
uso inadecuado del aparato.
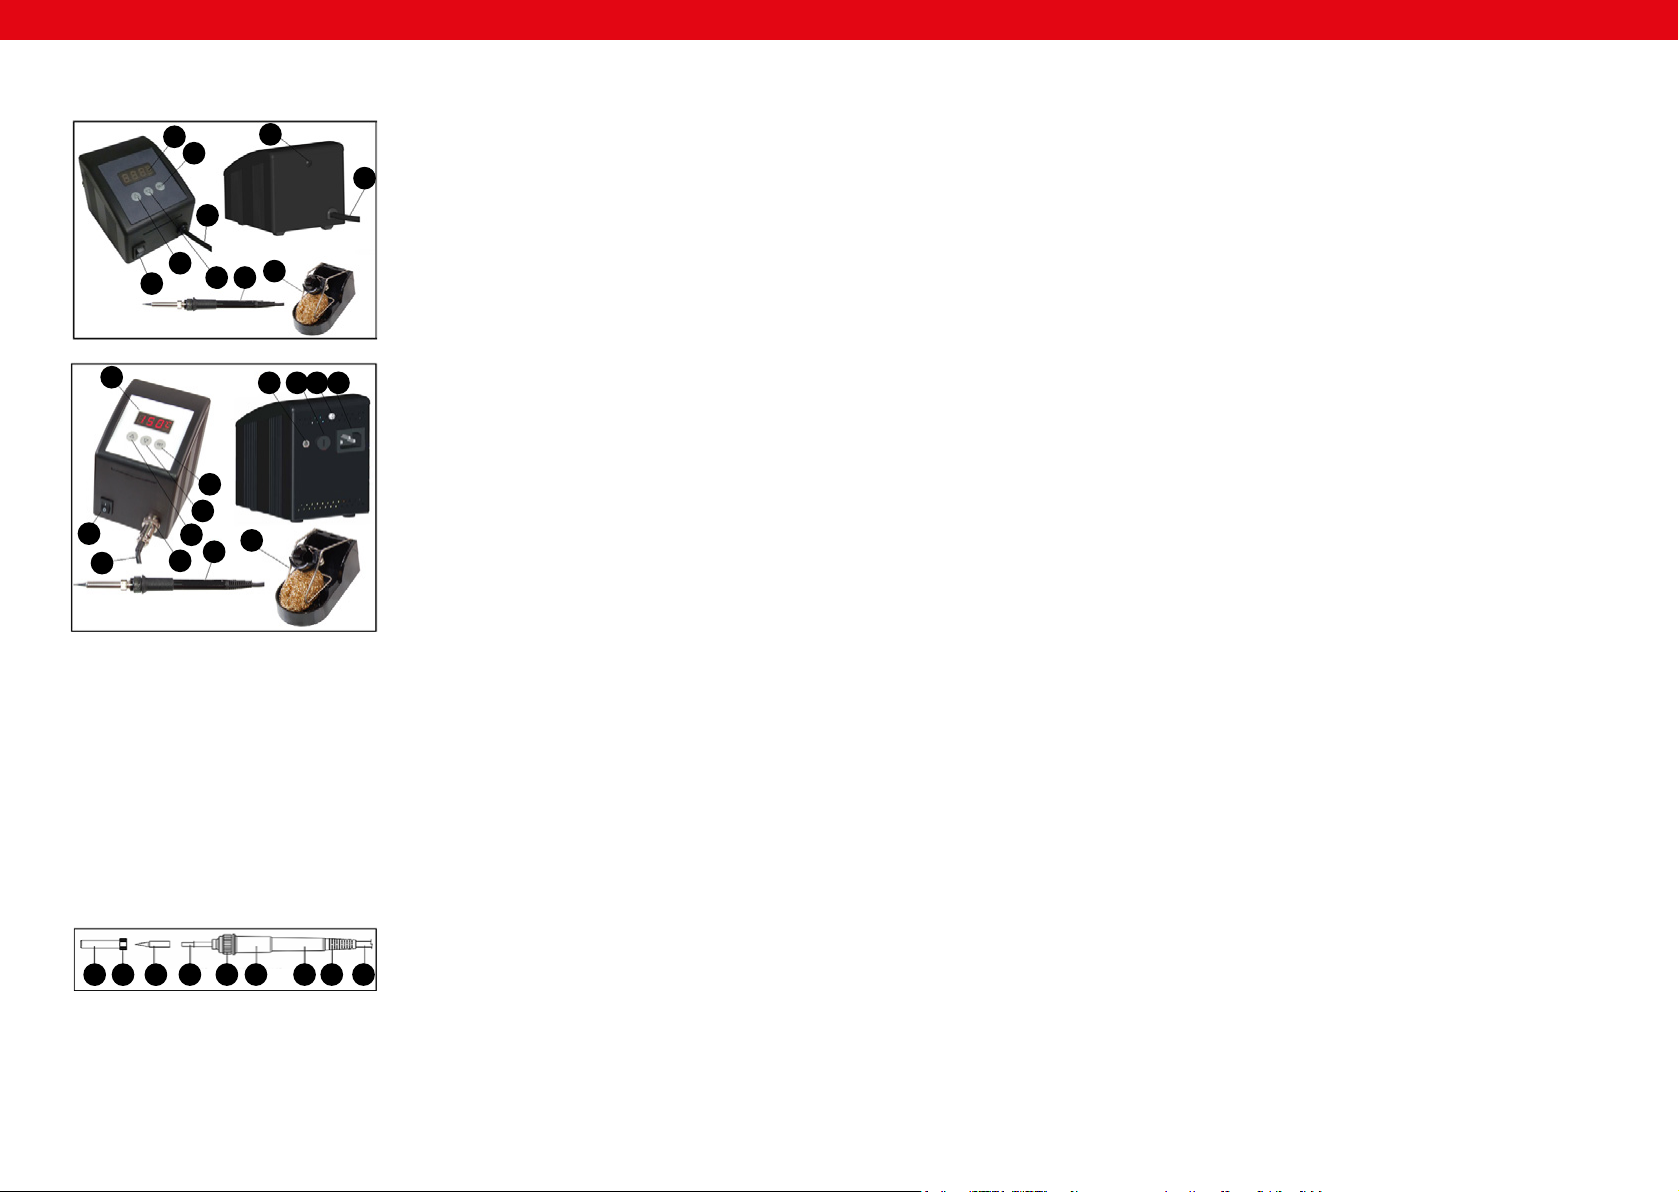
32 33
25.03.201925.03.2019
ES ES
3.1. DESCRIPCIÓN DEL APARATO
3.1.1. DISPOSITIVO Y ACCESORIOS
I. S-LS-47
A. Manguito de montaje
B. Tuerca de montaje
C. Punta de soldadura
D. Calentador
E. Sujeción del calentador
F. Almohadilla de goma
G. Soporte del soldador
H. Alivio de tensión del cable
I. Cable de alimentación
3.2. PREPARACIÓN PARA LA PUESTA EN MARCHA
LUGAR DE TRABAJO:
La temperatura ambiente no debe superar los 40°C
y la humedad relativa no debe exceder el 85%. Instale
el equipo teniendo en cuenta que debe garantizarse
una buena ventilación. Para ello hay que respetar una
distancia perimetral mínima de al menos 10 cm. Mantenga
el aparato alejado de supercies calientes. El aparato
se debe usar siempre en una supercie plana, estable,
limpia, ignífuga y seca, fuera del alcance de los niños y de
personas con funciones psíquicas, mentales y sensoriales
limitadas. Ubique el aparato de modo que el enchufe esté
siempre accesible y donde nada pueda cubrirlo. Asegúrese
de que las características del suministro eléctrico se
corresponden con las indicaciones que aparecen en la
placa de características del artículo.
MONTAJE DE LA MÁQUINA
1. ATENCIÓN: Antes de empezar a trabajar con
el dispositivo, asegúrese de que la fuente de
alimentación esté adaptada a los requisitos del
dispositivo.
2. Desempaque con cuidado todos los elementos
y compruebe su estado para vericar que no
presentan daños o carencias.
3. Asegúrese de que el dispositivo no esté conectado
a una fuente de alimentación.
4. Coloque el dispositivo en una supercie uniforme
y estable.
5. Conecte el conector del cable del cautín [9] al
enchufe del soldador [14] (S-LS-50).
6. Conecte el conector del cable de alimentación [8] al
enchufe del cable de alimentación [13] (S-LS-50).
7. Conecte el conector del cable de alimentación [8]
a la fuente de alimentación.
8. Encienda el dispositivo con el interruptor de
encendido [6].
3.3. MANEJO DEL APARATO
3.3.1. FUNCIONAMIENTO BÁSICO
1. Encienda el dispositivo con el interruptor de
encendido [6].
2. Presione la tecla [4] y ajuste la temperatura a 250°C
(482°F). El valor aparecerá en el visualizador [1].
3. Una única pulsación de la tecla [4] aumenta la
temperatura en 1°C. Mantener pulsada la tecla [4]
aumenta continuamente la temperatura.
ATENCIÓN: Bajar la temperatura con la tecla [3] se
realiza del mismo modo.
4. Después de calentar la punta [C] en el cautín [9],
debe colocar una capa de material de aporte en la
punta. Esto es para proteger la punta y alargar su
vida útil.
5. Se señalizará que se ha alcanzado la temperatura
deseada con un marcador que parpadeará en el
visualizador [1].
ATENCIÓN: El cautín [9] debe permanecer siempre
en el soporte [10] mientras no esté en uso.
ATENCIÓN: Antes de inspeccionar o reparar, por
ejemplo, los cables eléctricos, debe asegurarse de
que no tienen voltaje.
3.3.2. MENÚ DE AJUSTES DE PARÁMETROS
1. Mantenga presionada la tecla [2]. En el visualizador
aparecerá el mensaje [---].
2. Introduzca la contraseña [010] para acceder al menú
de ajustes de parámetros.
ATENCIÓN: Introducir una contraseña incorrecta
provoca la salida del menú de ajustes.
1. Visualizador de temperatura
2. Botón de ajustes
3. Botón de bajada de temperatura / “hacia abajo”
4. Botón de aumento de temperatura / “hacia arriba”
5. Cable del soldador
6. Interruptor de encendido/apagado
7. Tornillo de montaje del panel frontal
8. Cable de alimentación
(no visible en la ilustración S-LS-50)
9. Cautín
10. Soporte del soldador con limpiador metálico
11. Enchufe de toma de tierra (solo modelo S-LS-50)
12. Portafusibles (solo modelo S-LS-50)
13. Enchufe del cable de alimentación
(solo modelo S-LS-50)
14. Enchufe del cable del soldador
(solo modelo S-LS-50)
3.1.2. PARTES DEL SOLDADOR
A B C D E F G H I
II. S-LS-50
1
2
5
7
8
4
63 9 10
6
1
2
3
4
514 910
11 12 713
3. Tras haber accedido al menú, en el visualizador
aparecerá el mensaje [F-0]. El usuario puede elegir el
ajuste según el esquema F-0 > F-1 > F-2 > F-3 > F-4
> F-0 utilizando las teclas [3] y [4].
4. Ajuste de contraseña [F-1]
• Conrme la selección con la tecla [2] cuando en la
pantalla aparezca el mensaje parpadeante [F-1].
• Utilice las teclas [3] y [4] para seleccionar el valor del
parámetro. El valor seleccionado, por ejemplo, 100,
será la nueva contraseña para proteger la estación.
ATENCIÓN: La selección del valor [000] signica que
la estación no estará protegida por contraseña.
• Pulse la tecla [2] para salir del modo de ajuste de
contraseña.
5. Ajustes de corrección de temperatura [F-2]
• Conrme la selección con la tecla [2] cuando en la
pantalla aparezca el mensaje parpadeante [F-2].
• Utilice las teclas [3] y [4] para seleccionar el valor
del parámetro. Es posible elegir la corrección de
temperatura en el rango (-99°C ÷ +99°C).
• Pulse la tecla [2] para salir del modo de ajustes de
corrección de temperatura.
6. Ajustes del modo de reposo [F-3]
• Conrme la selección con la tecla [2] cuando en la
pantalla aparezca el mensaje parpadeante [F-3].
• Utilice las teclas [3] y [4] para seleccionar el valor del
parámetro.
a) Seleccionar el valor [000] signica que el modo
de reposo estará inactivo.
b) Seleccionar el valor [100] signica que, en caso
de estar 20 minutos sin actividad, la temperatura
de la punta del soldador será reducida por la
estación a 150°C.
• Pulse la tecla [2] para salir de los ajustes del modo de
reposo.
7. Ajustes de escala de temperatura [F-4]
• Conrme la selección con la tecla [2] cuando en la
pantalla aparezca el mensaje parpadeante [F-4].
• Utilice las teclas [3] y [4] para seleccionar el valor del
parámetro. Es posible elegir entre las escalas Celsius
y Fahrenheit. La selección actual aparecerá en el lado
derecho del visualizador. Pulse la tecla [2] para salir
del modo de ajustes de escala de temperatura.
3.3.3. CAUSAS DE FALTA DE HUMECTACIÓN EN LA
PUNTA DE SOLDADURA
Durante el proceso de soldadura, en la supercie del
material se produce la humectación, siendo una de las
condiciones para la creación de una soldadura duradera.
Hay factores que tienen un impacto negativo en el
proceso de humectación y, por lo tanto, en la calidad de la
soldadura resultante:
1. Temperatura de punta de soldadura > 410°C (770°F).
2. Falta de capa protectora de la punta en el estado de
inactividad.
3. Falta de fundente en la soldadura.
4. Limpieza de la punta con una esponja o paño
contaminado, contaminación con compuestos de
azufre.
5. Contacto con plásticos articiales de origen
orgánico.
6. Contaminación en la soldadura.
3.3.4. RECOMENDACIONES DE USO PARA PUNTAS DE
SOLDADURA
1. ATENCIÓN: Antes de realizar cualquier acción, se
debe apagar el dispositivo, desconectarlo de la red
eléctrica y dejarlo enfriar.
2. Si se tiene una alta intensidad de trabajo es
recomendable limpiar la punta de soldadura a diario.
3. Antes de dejar la punta en estado de reposo,
se recomienda colocar una capa protectora de
soldadura en la punta.
4. Antes de usar el dispositivo, limpie la punta con un
limpiador.
5. El uso de altas temperaturas durante el
funcionamiento del dispositivo acorta la vida útil de
la punta.
6. Frotar o presionar la punta contra la supercie de
trabajo puede reducir su vida útil o dañarla.
7. Mientras esté trabajando, no aplique soldadura a la
punta, podría dañarla.
8. No limpiar la punta con materiales abrasivos.
9. No utilizar fundentes que contengan sustancias
corrosivas.
10. Eliminación de óxidos de la punta de soldadura:
• Retirar con cuidado los sedimentos de la punta de
soldadura utilizando papel de lija (grano 600 ÷ 800)
o alcohol isopropílico.
• Envuelva la supercie con alambre de estaño con
núcleo de resina.
• Cubra la supercie a soldar con alambre de estaño
con núcleo de resina y, a continuación, derrítalo.
11. Para limpiar adecuadamente el interior del manguito
de montaje, debe aojar la tuerca de sujeción
y, a continuación, retirar el manguito y la punta.
Cualquier suciedad dentro del manguito debe
eliminarse con aire comprimido.
ATENCIÓN: Debe tener cuidado para que el polvo
expulsado no entre en contacto con sus ojos.
3.3.5. OPERAR CON NUEVAS PUNTAS
1. Ajuste la temperatura mínima, encienda la estación.
2. Cuando la temperatura alcance los 250°C, cubra la
supercie de la punta con alambre de estaño con un
contenido de resina.
3. Espere 3 minutos a que alcance una temperatura de
250°C. No utilice el dispositivo durante este tiempo.
4. Ajuste la temperatura de trabajo. Una vez alcanzada,
la estación está lista para trabajar.
ATENCIÓN: Para que el dispositivo funcione
correctamente y la punta se caliente de manera
óptima, debe asegurarse de que la punta y el
manguito de montaje se limpien después de cada
operación.

34 35
25.03.201925.03.2019
ES
3.4. LIMPIEZA Y MANTENIMIENTO
a) Antes de limpiar y ajustar, sustituir accesorios
o cuando no tenga previsto utilizar el equipo,
desenchufe el cable de alimentación y deje que la
unidad se enfríe completamente. No seguir estas
instrucciones podría dañar el dispositivo.
b) Para limpiar la supercie, utilice solo productos que
no contengan sustancias corrosivas.
c) Después de cada limpieza, deje secar bien todas las
piezas antes de volver a utilizar el aparato.
d) Guarde el aparato en un lugar seco, fresco
y protegido de la humedad y la radiación solar
directa.
e) Prohibido rociar agua sobre el dispositivo
o sumergirlo en agua.
f) Evite que el agua se introduzca por los oricios de
ventilación de la carcasa.
g) Las aberturas de ventilación deben limpiarse con un
pincel y aire comprimido.
h) En lo que respecta a la eciencia técnica y posibles
daños, el dispositivo debe ser revisado regularmente.
i) Para su limpieza utilizar un paño húmedo y suave.
j) No utilizar para la limpieza objetos de metal
puntiagudos y/o alados (p.ej. cepillos metálicos
o espátulas de metal), ya que podrían dañar la
supercie del material del que está hecho el aparato.
NAMEPLATE TRANSLATIONS
1 2 3 4 5
DE Hersteller Produktname Modell Eingangsparameter Nennleistung
EN Manufacturer Product Name Model Input Rated Power
PL Producent Nazwa produktu Model Parametry wejściowe Moc znamionowa
CZ Výrobce Název výrobku Model Vstupní parametry Jmenovitý výkon
FR Fabriquant Nom du produit Modèle Paramètres d'entrée Puissance nominale
IT Produttore Nome del prodotto Modello Parametri di ingresso Potenza nominale
ES Fabricante Nombre del producto Modelo Parámetros de entrada Potencia nominal
6 7 8 9
DE Temperaturbereic Geräteklasse Produktionsjahr Ordnungsnummer
EN Temperature Range Appliance class Production year Serial No.
PL Zakres temperatur Klasa urządzenia Rok produkcji Numer serii
CZ Teplotní rozsah Třída zařízení Rok výroby Sériové číslo
FR Plage de température Classe d'appareils Année de production Numéro de serie
IT Scala di temperatura Classe del dispositivo Anno di produzione Numero di serie
ES Rango de temperatura Clase de dispositivo Año de producción Número de serie
2
3
4
5
6
9
8
7
1
1
2
3
4
5
9
8
6
3.3.6. ESQUEMA DE PUNTAS INTERCAMBIABLES
Para los dispositivos tratados se pueden utilizar los
siguientes tipos de puntas.

expondo.de
Hersteller an Verbraucher
Sehr geehrte Damen und Herren,
gebrauchte Elektro – und Elektronikgeräte dürfen gemäß europäischer Vorgaben [1] nicht zum unsortierten Siedlungsabfall
gegeben werden, sondern müssen getrennt erfasst werden. Das Symbol der Abfalltonne auf Rädern weist auf die Notwendigkeit
der getrennten Sammlung hin. Helfen auch Sie mit beim Umweltschutz. Sorgen Sie dafür, dieses Gerät, wenn Sie es nicht mehr
weiter nutzen wollen, in die hierfür vorgesehenen Systeme der Getrenntsammlung zu geben.
In Deutschland sind Sie gesetzlich [2] verpichtet, ein Altgerät einer vom unsortierten Siedlungsabfall getrennten Erfassung
zuzuführen. Die öffentlich – rechtlichen Entsorgungsträger (Kommunen) haben hierzu Sammelstellen eingerichtet, an denen
Altgeräte aus privaten Haushalten ihres Gebietes für Sie kostenfrei entgegengenommen werden. Möglicherweise holen die
rechtlichen Entsorgungsträger die Altgeräte auch bei den privaten Haushalten ab.
Bitte informieren Sie sich über Ihren lokalen Abfallkalender oder bei Ihrer Stadt – oder Gemeindeverwaltung über die in Ihrem
Gebiet zur Verfügung stehenden Möglichkeiten der Rückgabe oder Sammlung von Altgeräten.
[1] RICHTLINIE 2002/96/EG DES EUROPÄISCHEN PARLAMENTS UND DES RATES
ÜBER ELEKTRO – UND ELEKTRONIK – ALTGERÄTE
[2] Gesetz über das Inverkehrbringen, die Rücknahme und die umweltverträgliche Entsorgung
von Elektro – und Elektronikgeräten (Elektro – und Elektronikgerätegesetz – ElektroG).
Umwelt – und Entsorgungshinweis
Utylizacja produktu
Produkty elektryczne i elektroniczne po zakończeniu okresu eksploatacji wymagają segregacji i oddania ich do wyznaczonego
punktu odbioru. Nie wolno wyrzucać produktów elektrycznych razem z odpadami gospodarstwa domowego. Zgodnie
z dyrektywą WEEE 2012/19/UE obowiązującą w Unii Europejskiej, urządzenia elektryczne i elektroniczne wymagają segregacji
i utylizacji w wyznaczonych miejscach. Dbając o prawidłową utylizację, przyczyniasz się do ochrony zasobów naturalnych
i zmniejszasz negatywny wpływ oddziaływania na środowisko, człowieka i otoczenie. Zgodnie z krajowym prawodawstwem,
nieprawidłowe usuwanie odpadów elektrycznych i elektronicznych może być karane!
For the disposal of the device please consider and act according to the national and local rules and regulations.
CONTACT
expondo Polska sp. z o.o. sp. k.
ul. Nowy Kisielin-Innowacyjna 7
66-002 Zielona Góra | Poland, EU
e-mail: info@expondo.de
This manual suits for next models
1
Table of contents
Languages:


