Exposure Lights RAW PRO User manual

EXPUG2
RAW PRO • RAW XS
RAWQSGUIDE.2.indb 1RAWQSGUIDE.2.indb 1 19/08/2020 09:1819/08/2020 09:18
USER GUIDE
RAW PRO • RAW XS
3 seconds after pressing the Function button it
becomes the fuel gauge. The colour of the button
now indicates the approximate percentage of battery
power left.
When the battery only has 5% charge remaining the
light will automatically switch to the low/ash setting
and the function button will ash red.
LED BATTERY %
GREEN 100 - 50
AMBER 50 - 25
RED 25 - 5
RED FLASH 5 - EMPTY
SPECIFICATION & OPERATION
FUEL GAUGE FUNCTION
MODE
RED LIGHT WHITE LIGHT
LUMENS BURN TIME LUMENS BURN TIME
HIGH 50 2hrs 200 1hrs
MEDIUM 15 6hrs 50 3hrs
LOW 2 25hrs 15 10hrs
STROBE – – 200 5hrs
OPERATION ACTION
SWITCH ON RED LIGHT PRESS AND RELEASE FUNCTION BUTTON
CHANGE MODE PRESS AND RELEASE FUNCTION BUTTON
SWITCH OFF PRESS AND HOLD FUNCTION BUTTON
UNTIL LIGHT SWITCHES OFF THEN RELEASE
FROM OFF SWITCH ON WHITE LIGHT TO LOW PRESS AND HOLD FUNCTION BUTTON
UNTIL WHITE LIGHT TURNS ON
FROM OFF TO SWITCH ON WHITE LIGHT TO HIGH
PRESS AND HOLD FUNCTION BUTTON UNTIL WHITE LIGHT
TURNS ON, CONTINUE TO HOLD
UNTIL WHITE HIGH IS ACTIVATED.
TO SWITCH FROM RED MODE TO WHITE LOW PRESS AND HOLD FUNCTION BUTTON, IT WILL SWITCH OFF
AND THEN BACK ON IN WHITE
TO ENTER STROBE PRESS AND HOLD FUNCTION BUTTON FROM WHITE MODE
UNTIL STROBE IS ACTIVATED
ATTENTION
The RAW head lamp is built to function in the harshest marine and outdoor environments. To guarantee a
watertight seal ensure the button cap is screwed down nger tight and the silicone band is covering the
charge port hole.
If the unit is being stored for long periods please ensure the battery is periodically charged fully.
Exposure Lights are very powerful lighting systems. Always take care when operating. Do not look directly
into the light. This may cause serious injury. Do not shine directly at others. Exposure Lights / Ultimate
Sports Engineering Ltd. accept no liability for any injuries or other damages arising from the use of their
product in any circumstances.
We design them. We make them. We are here to help.
If you are experiencing any problems with your Exposure Light or accessories please contact us directly at:
Alternatively contact your Exposure Dealer or Distributor.
Check web for details www.exposurelights.com
WARNING & WARRANTY
USB CHARGING
The function button will ash whilst charging. When the battery is fully charged the function button will turn
solid green. Charge time 1.5 hours
Fully charge your light before rst use.
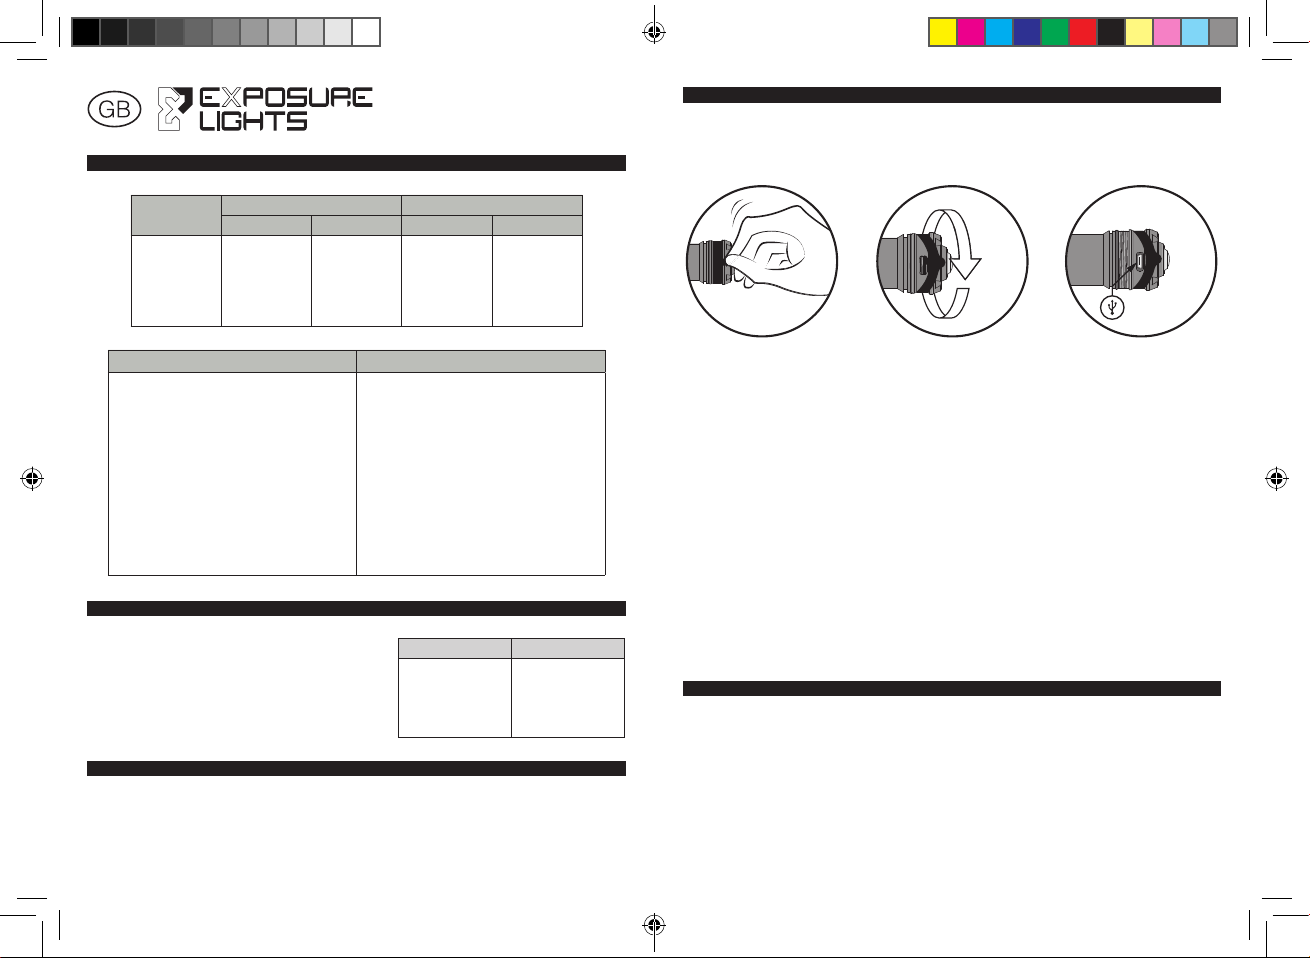
WARNING: Ensure your light is totally dry and salt free before unscrewing the button cap
2. Unscrew Button cap until
USB charge port is visible -
around 5 rotations NOTE: Do
not remove the cap completely.
3. Insert the charger cable.1. Pull back tab back towards
the button - do not remove
RAWQSGUIDE.2.indb All PagesRAWQSGUIDE.2.indb All Pages 19/08/2020 09:1819/08/2020 09:18
RAW PRO • RAW XS
3 secondes après avoir appuyé sur le bouton
Fonction, la jauge s’afche. La couleur du bouton
indique à présent le pourcentage approximatif de la
puissance de la batterie restante.
Quand la batterie n’est plus qu’à 5% de sa capacité,
la lumière passe automatiquement en mode ash en
basse intensité et le bouton Fonction ashe en rouge.
LED BATTERIE %
VERT 100 - 50
AMBRÉ 50 - 25
ROUGE 25 - 5
FLASH ROUGE 5 - VIDE
CARACTÉRISTIQUES & FONCTIONNEMENT
FONCTIONNEMENT DE LA JAUGE DE DURÉE D’ILLUMINATION
MODE
LUMIÈRE ROUGE LUMIÈRE BLANCHE
LUMENS DURÉE LUMENS DURÉE
MODE INTENSE 50 2hrs 200 1hrs
MODE MOYEN 15 6hrs 50 3hrs
MODE BAS 2 25hrs 15 10hrs
STROBOSCOPIQUE – – 200 5hrs
FONCTIONNEMENT OPÉRATIONS CORRESPONDANTES
LUMIÈRE ROUGE ALLUMÉE APPUYER PUIS LÂCHER LE BOUTON FONCTION
CHANGER DE MODE APPUYER PUIS LÂCHER LE BOUTON FONCTION
ETEINDRE APPUYER PUIS MAINTENIR LE BOUTON FONCTION JUSQU’À
CE QUE LA LUMIÈRE S’ÉTEIGNE PUIS RELÂCHER
ALLUMER LA LUMIÈRE BLANCHE EN MODE BAS APPUYER PUIS MAINTENIR LE BOUTON FONCTION JUSQU’À
CE QUE LA LUMIÈRE BLANCHE APPARAISSE
ALLUMER LA LUMIÈRE BLANCHE EN MODE INTENSE
APPUYER PUIS MAINTENIR LE BOUTON FONCTION JUSQU’À
CE QUE LA LUMIÈRE BLANCHE APPARAISSE ET MAINTENIR
LE BOUTON JUSQU’À CE QUE LE MODE INTENSE SOIT
ACTIVÉ
PASSER DE LA LUMIÈRE BLANCHE À LA ROUGE EN MODE BAS APPUYER PUIS MAINTENIR LE BOUTON FONCTION, LA LAMPE
VA S’ÉTEINDRE PUIS REVENIR SUR LA LUMIÈRE BLANCHE
ACTIVER LE MODE STROBOSCOPIQUE
APPUYER PUIS MAINTENIR LE BOUTON FONCTION QUAND
LA LUMIÈRE BLANCHE EST ACTIVÉE JUSQU’À CE QUE LE
MODE STROBOSCOPIQUE SE METTE EN MARCHE
NOTICE D’UTILISATION
CHARGEUR USB
Le bouton Fonction ashe pendant la durée de chargement. Quand la batterie est complètement chargée,
le bouton Fonction s’allume en vert constant. Le chargement dure 1H30
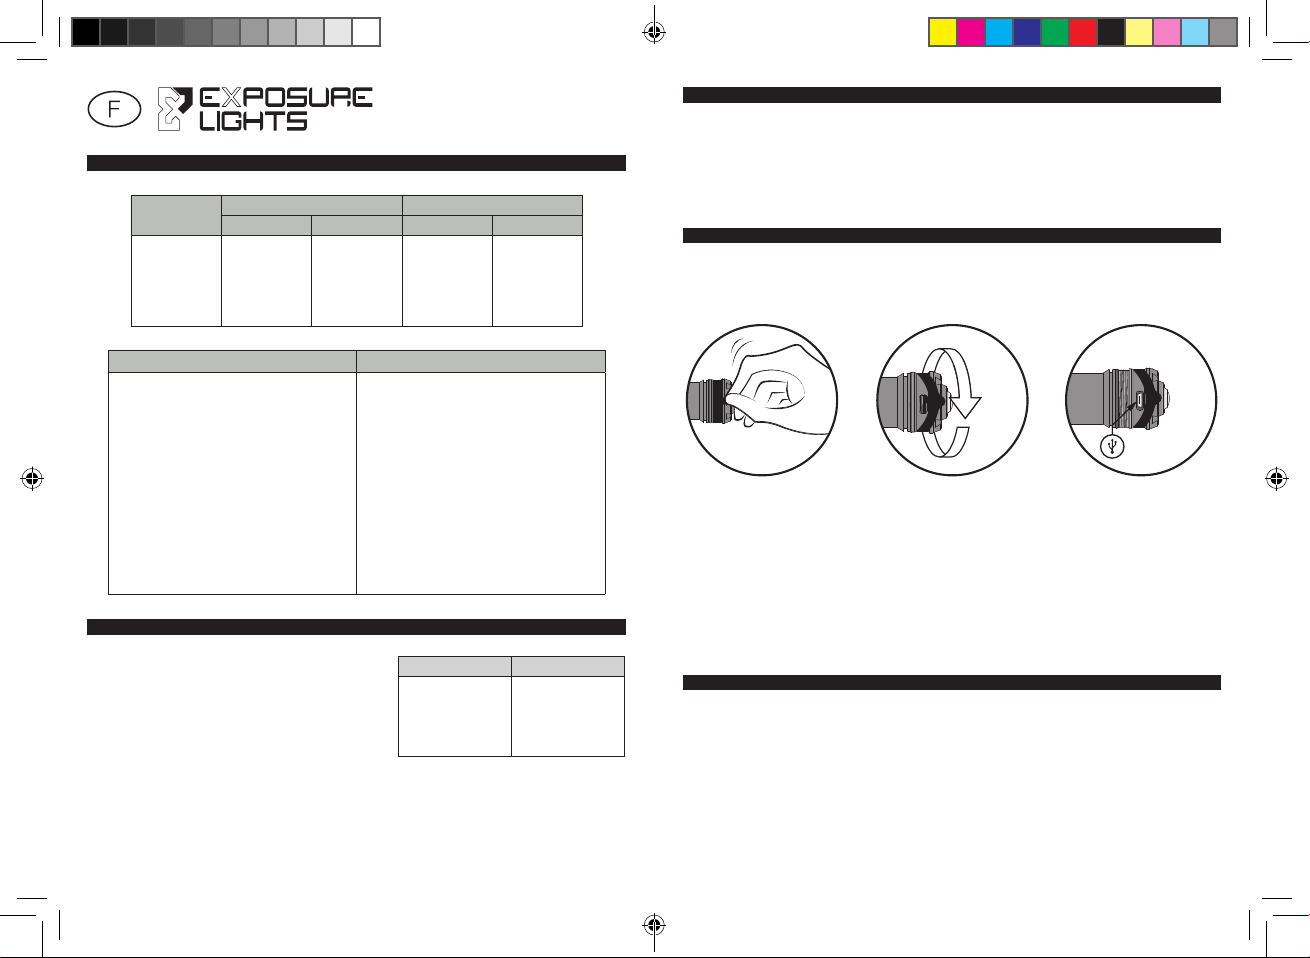
Avertissement : assurez-vous que votre lampe est complètement sèche et nettoyée (sans sel) avant de
dévisser le capuchon.
2. Dévissez le capuchon du
bouton jusqu’à ce que le port
du chargeur USB soit visible
– environ 5 rotations
3. Insérez le câble du chargeur
des lampes EXPOSURE
1. Repoussez la languette à
l’arrière vers le bouton – ne
l’enlevez pas
Les lampes Exposure Lights sont des systèmes d’éclairage extrêmement puissants. Soyez toujours très
vigilant lors de leur utilisation. Ne xez jamais le faisceau lumineux an d’éviter tout risque de lésion oculaire
grave. Ne dirigez jamais le faisceau lumineux vers les yeux d’une autre personne.
La société Exposure Lights / Ultimate Sports Engineering Ltd décline toute responsabilité en cas de
dommages corporels ou matériels résultant de l’utilisation de ses produits.
Nous les concevons. Nous les fabriquons. Et nous sommes également là pour vous aider à les utiliser.
Si vous rencontrez des problèmes avec votre lampe Exposure Lights ou avec l’un de ses accessoires,
n’hésitez pas à contacter notre service client :
Vous pouvez également contacter votre revendeur ou votre distributeur Exposure Lights. Retrouvez leurs
coordonnées sur notre site web www.exposurelights.com
AVERTISSEMENT
ATTENTION
La lampe frontale RAW est conçue pour fonctionner dans les conditions marines et en plein air les plus
extrêmes. Pour garantir une étanchéité optimale assurez-vous que le capuchon est bien vissé et que le
silicone couvre bien l’emplacement du port.
Si la lampe a été stockée pendant une longue période , merci de vous assurer que la batterie est
régulièrement rechargée.
RAWQSGUIDE.2.indb All PagesRAWQSGUIDE.2.indb All Pages 19/08/2020 09:1819/08/2020 09:18

RAW PRO • RAW XS
3 segundos después de presionar el botón de
función, el medidor se activa. El color del botón ahora
indica el porcentaje aproximado de batería restante.
Cuando la batería está sólo al 5%, la luz del medidor
se enciende automáticamente en el modo ash en baja
intensidad y el botón de función parpadea en rojo.
LED BATERÍA %
VERDE 100 - 50
AMBAR 50 - 25
ROJO 25 - 5
FLASH ROJO 5 - AGOTADA
CARACTERÍSTICAS & FUNCIONAMIENTO
FUNCIONAMIENTO DEL MEDIDOR DE DURACIÓN DE BATERÍA
MODO
LUZ ROJA LUZ BLANCA
LÚMENES DURACIÓN LÚMENES DURACIÓN
INTENSO 50 2hrs 200 1hrs
MEDIO 15 6hrs 50 3hrs
BAJO 2 25hrs 15 10hrs
ESTROBOSCÓPICO – – 200 5hrs
OPERACIÓN ACCIÓN CORRESPONDIENTE
ENCENDER LA LUZ ROJA PRESIONAR Y SOLTAR EL BOTÓN DE FUNCIÓN
CAMBIAR EL MODO PRESIONAR Y SOLTAR EL BOTÓN DE FUNCIÓN
APAGAR MANTENER PRESIONADO EL BOTÓN DE FUNCIÓN HASTA
QUE LA LUZ SE APAGUE. SOLTAR EL BOTÓN
ENCENDER LA LUZ BLANCA EN MODO BAJO MANTENER PRESIONADO EL BOTÓN DE FUNCIÓN HASTA
QUE LA LUZ BLANCA SE ENCIENDA
ENCENDER LA LUZ BLANCA EN MODO INTENSO
MANTENER PRESIONADO EL BOTÓN DE FUNCIÓN
HASTA QUE LA LUZ BLANCA SE ENCIENDA, CONTINUAR
PRESIONANDO HASTA QUE EL MODO INTENSO SE ACTIVE
CAMBIAR DE LA LUZ ROJA A LA BLANCA EN MODO BAJO MANTENER PRESIONADO EL BOTÓN DE FUNCIÓN. LA LUZ
ROJA SE VA A APAGAR Y SE VA A ENCENDER LA BLANCA
ACTIVAR LA LUZ ESTROBOSCÓPICA
MANTENER PRESIONADO EL BOTÓN DE FUNCIÓN CUANDO
LA LUZ BLANCA ESTÉ ACTIVADA CONTINUAR PRESIONANDO
HASTA ENCENDER LA LUZ ESTROBOSCÓPICA
ATENCIÓN
El frontal RAW está construido para ser usado en el severo ambiente marino. Para garantizar el hermetismo
de la junta, asegúrese que la tapa està enroscada completamente y que la banda de silicona cubre el
puerto de carga.
Si el frontal es guardado por periodos largos, asegúrese que la batería es cargada al máximo periódicamente.
MANUAL DEL USUARIO CARGA CON USB
El botón de función va a parpadear mientras se carga la batería. Cuando la batería esté cargada el botón de
función cambiará a verde. Tiempo de carga: 1h30
Advertencia: Asegúrase que su linterna está totalmente seca y libre de sal antes de desenroscar la tapa.
2. Desenrosque la tapa hasta
que el puerto USB sea visible
- unas 5 vueltas. NOTA: No
quite la tapa completamente.
3. Conecte el cable cargador
Exposure Lights.
1. Empuje la tapa hacia el botón.
No la quite completamente.
Las luces Exposure son sistemas de iluminación muy potentes. Tenga siempre cuidado al operar. No mire
directamente a la luz ya que esto puede causar lesiones graves. No enfoque directamente a los ojos a los demás.
Exposure Lights / Ultimate Sports Engineering Ltd. no acepta responsabilidad alguna por lesiones u otros
daños derivados del uso de su producto en cualquier circunstancia.
Nosotros los diseñamos y fabricamos. Estamos aquí para ayudar.
Si experimenta algún problema con su Exposure Light o accesorios, por favor contáctenos directamente en:
Alternativamente, póngase en contacto con su concesionario de Exposure o distribuidor. Consulte la web
para obtener más detalles www.ausmar.com
ADVERTENCIA
RAWQSGUIDE.2.indb All PagesRAWQSGUIDE.2.indb All Pages 19/08/2020 09:1819/08/2020 09:18

EXPUG2
RAWQSGUIDE.2
RAW XS - LANYARD/CORDON/ACOLLADOR
RAWQSGUIDE.2.indb 8RAWQSGUIDE.2.indb 8 19/08/2020 09:1819/08/2020 09:18
This manual suits for next models
3
Table of contents
Languages:
Other Exposure Lights Lighting Equipment manuals


Popular Lighting Equipment manuals by other brands


Robus
Robus DRACO RDR6D2W-11 quick start guide

Clas Ohlson
Clas Ohlson 31-5225 quick start guide

Keldan
Keldan VIDEO 8X 15000lm CRI82 operating instructions

Telefunken
Telefunken MAL 20520 TF Series Mounting instructions

SECO-LARM
SECO-LARM SL-126-A24Q installation manual

Lupine
Lupine SL NANO CLASSIC quick start guide


