ExtractCraft Source Turbo User manual

Turbo Mode User Manual

TURBO MODE USER MANUAL
Version 07 September 14, 2017
Part # 1007-1051
ExtractCraft
105 South Sunset Street, Unit M,
Longmont, CO, 80501
United States
Phone: 720-307-8628

The Source User Manual Contentsiii
CONTENTS
Safety...............................................1
Safety & Plant extract warning
The Source: Main Function............2
Appliance for Plant Extractions
Alcohol Solvent
Source Operation &
Making a Plant Extract...............3
Care & Cleaning..............................9
Mobile Application........................10
Installing the Mobile App
Setting up Bluetooth
Launch the Source App
Using the Menu
Understanding the Control Screen
Altitude Tuning..............................13
Botanical Recipies........................14
Troubleshooting............................15
Technical Specifications...............16
Warranty.........................................16
Glossary.........................................16

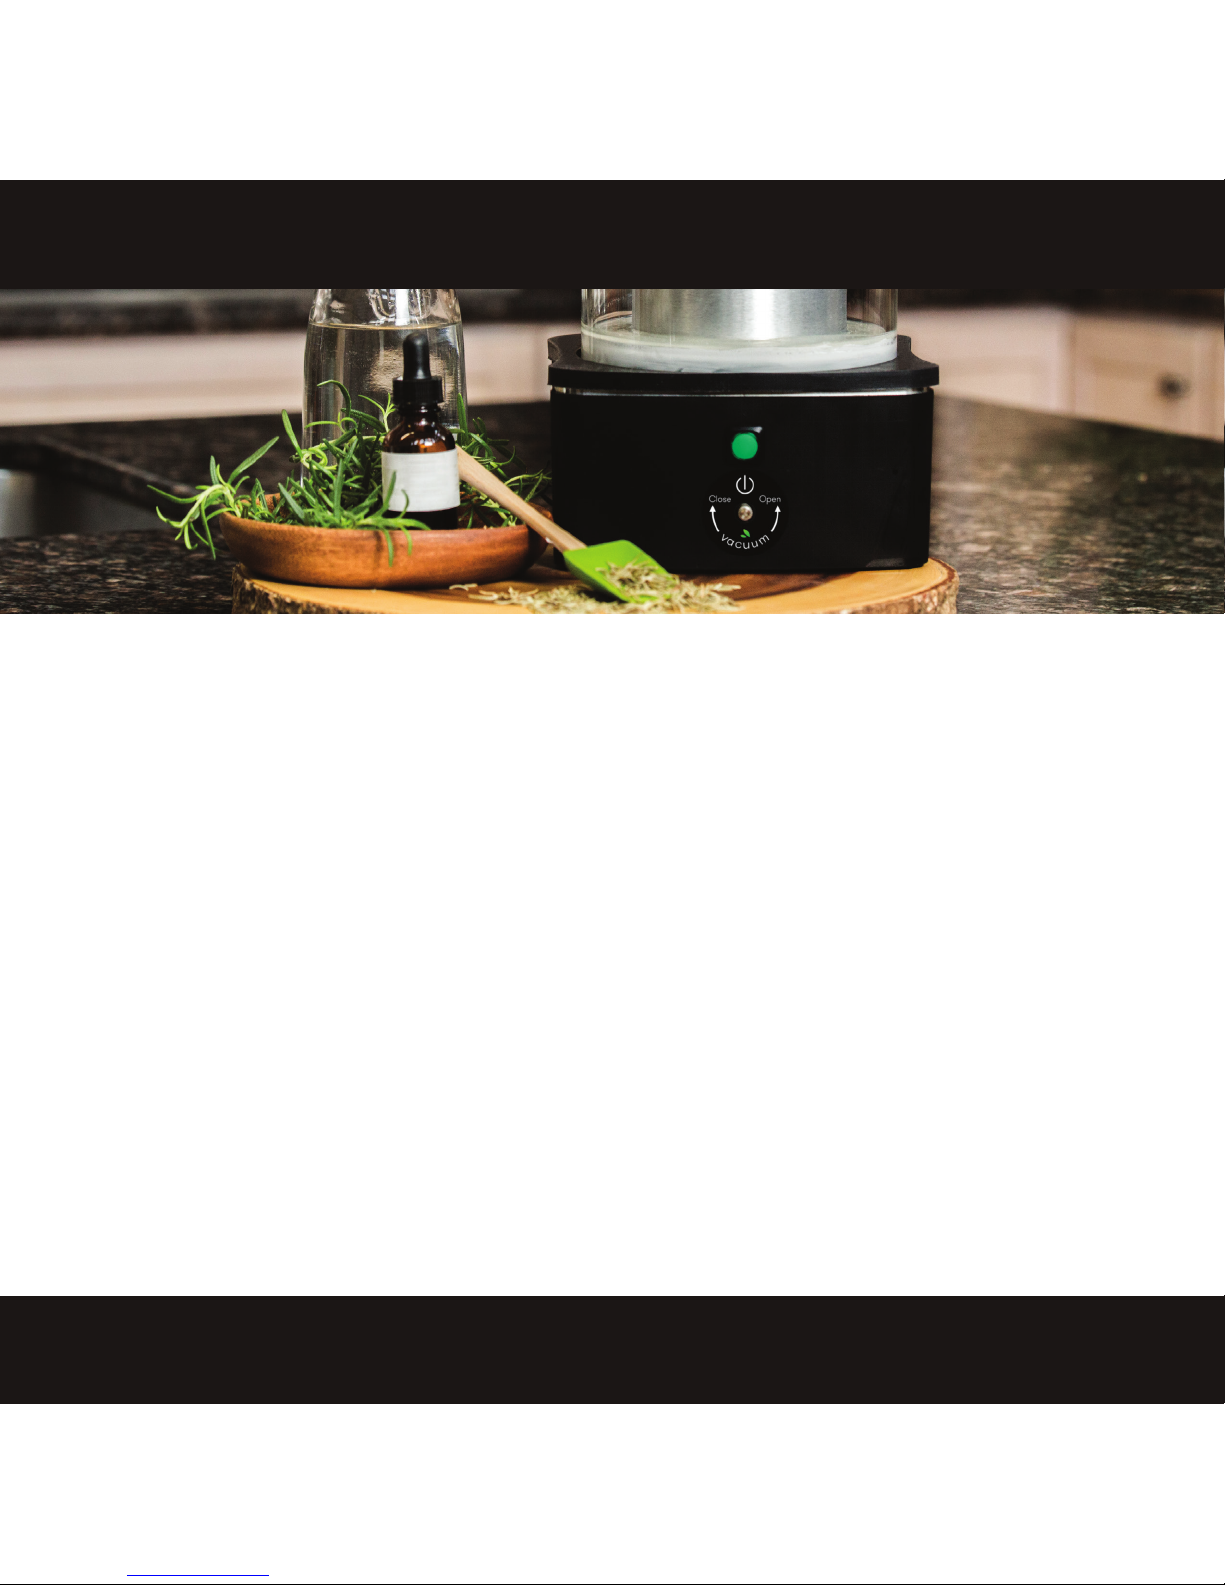
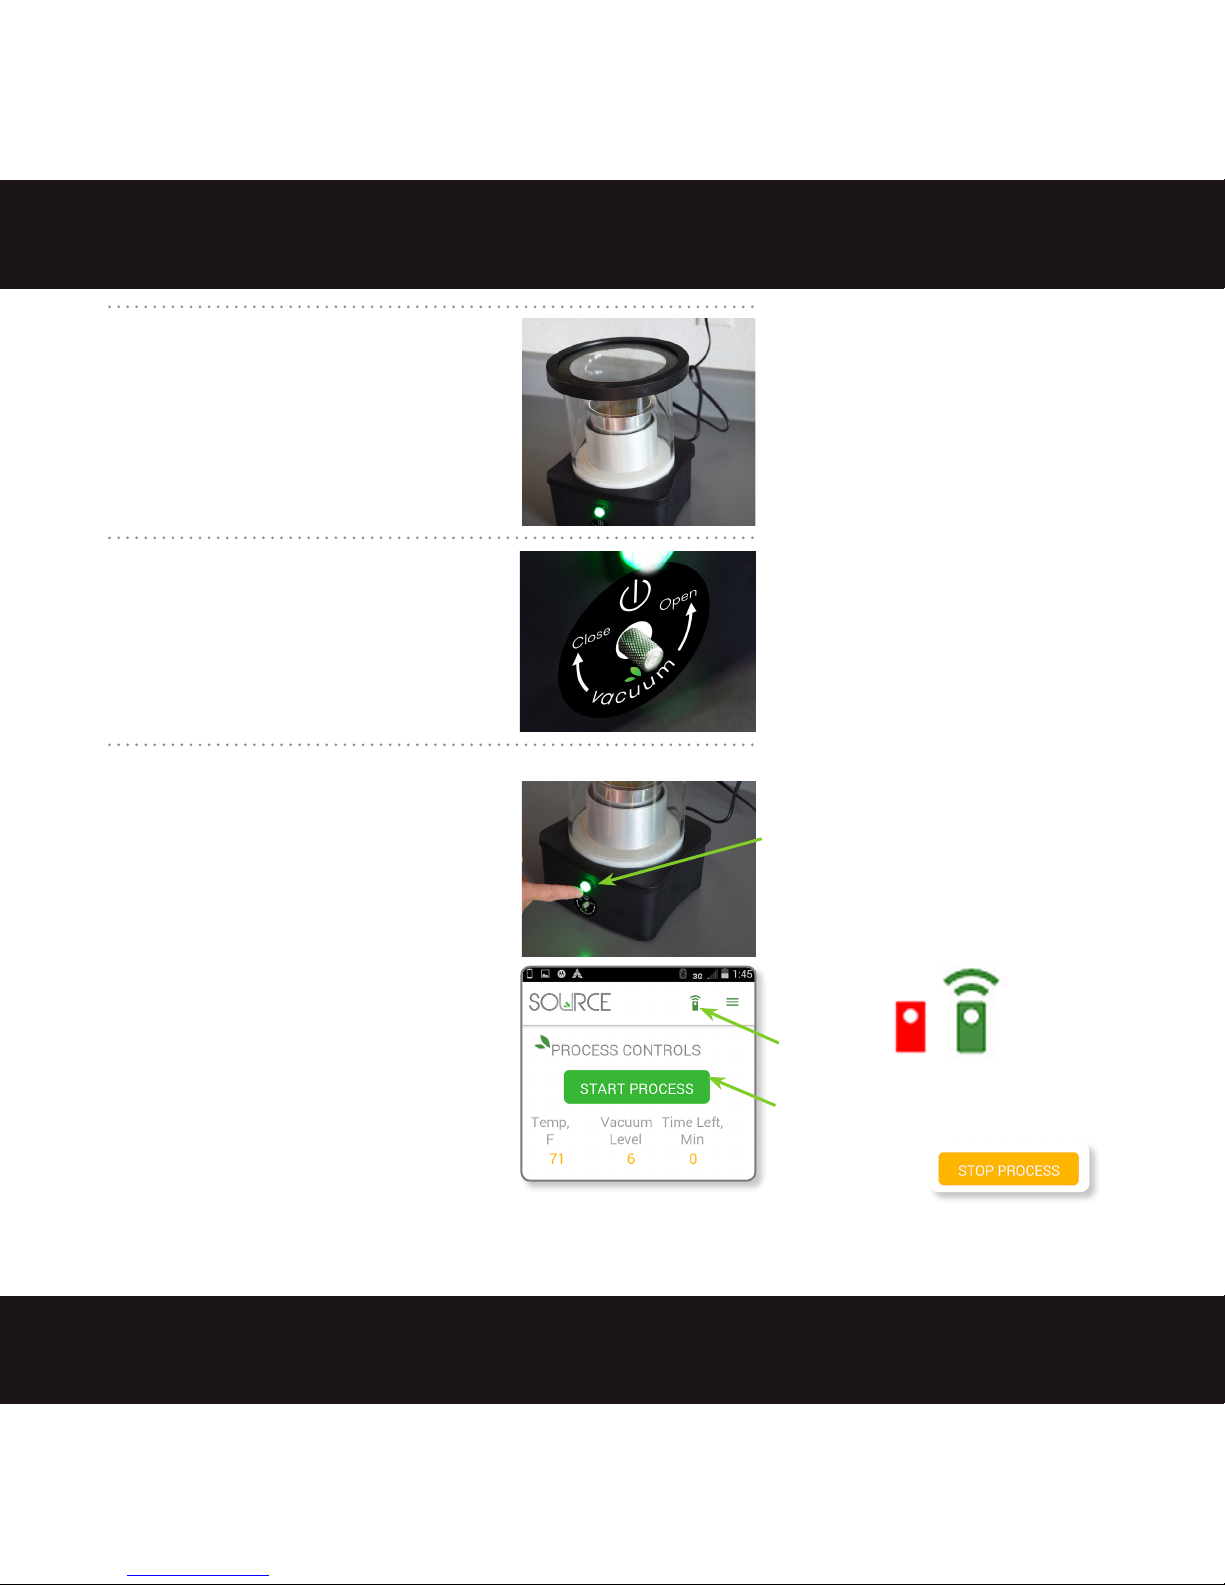
1The Source User Manual Safety
SAFETY
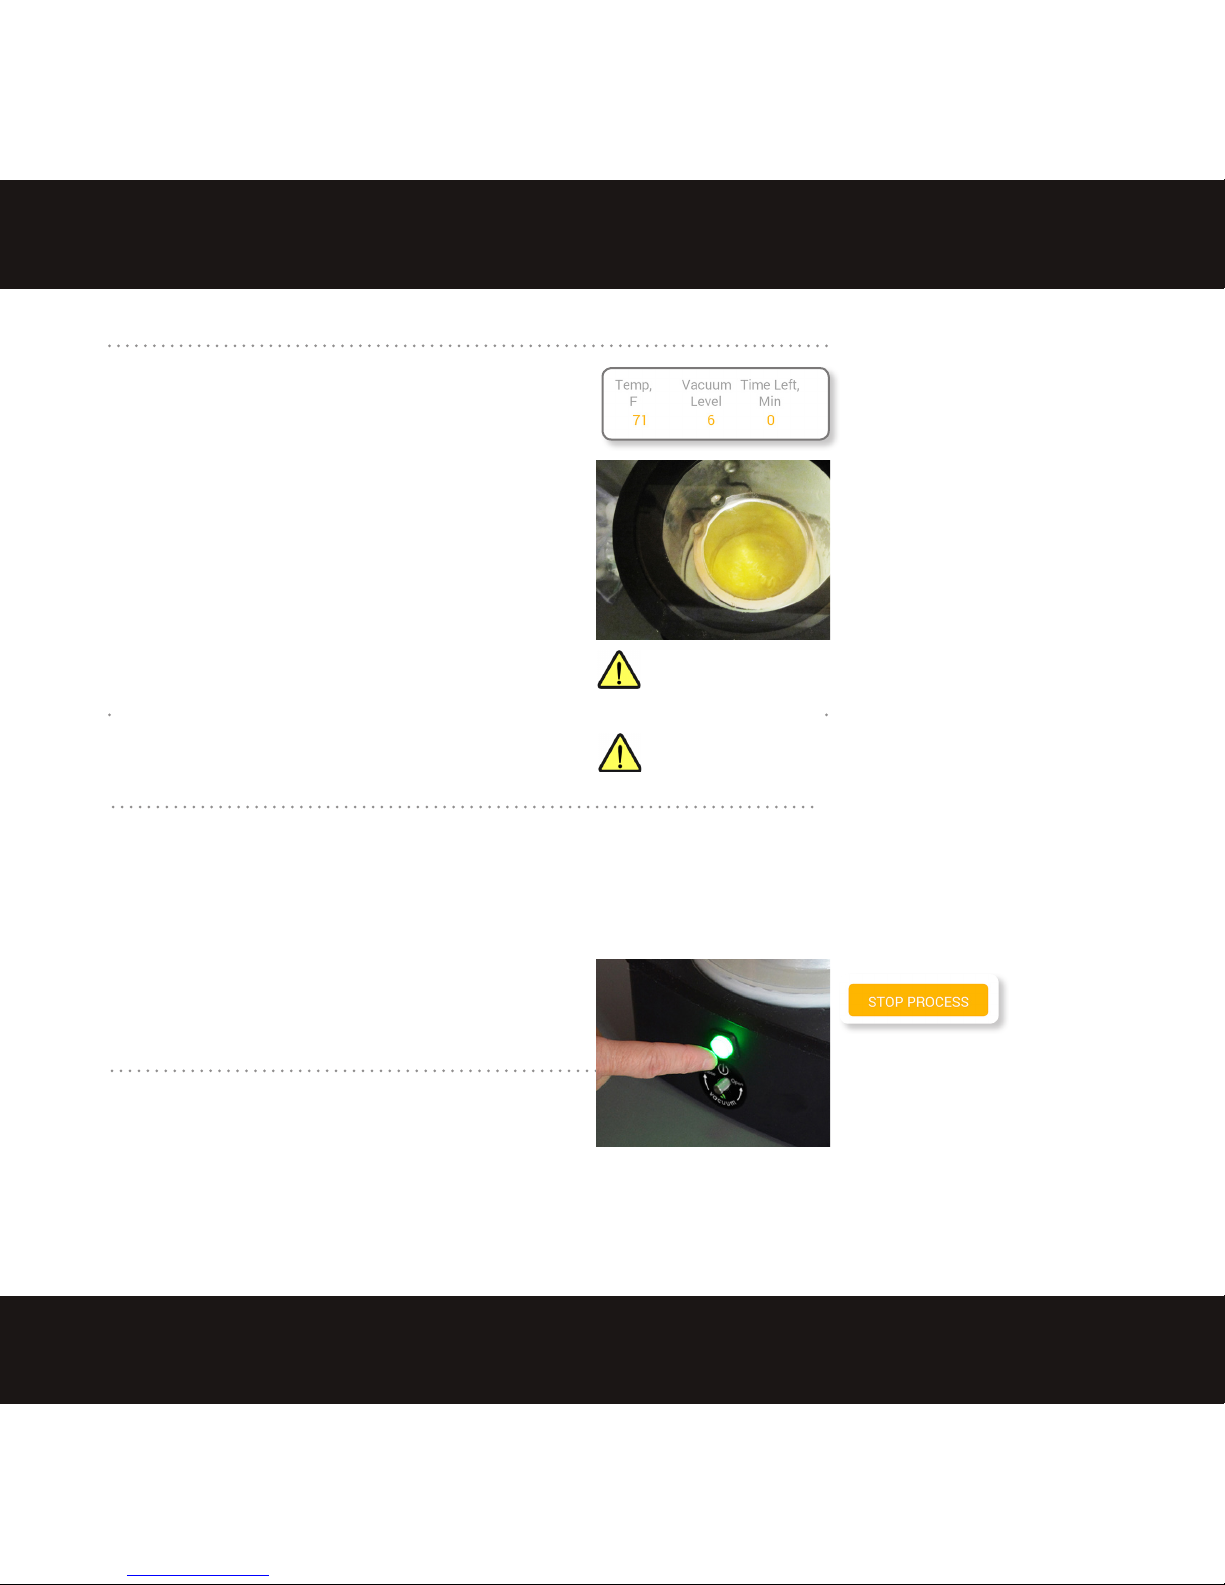
WARNING: For your safety always allow all
metal parts of the Source to completely cool
before handling. The reservoir cup, collector,
and metal top on the base can get very hot.
WARNING: For your safety and convenience
always follow these safety guidelines:
•Place the Source well away from heat
sources, direct sunlight, or places where
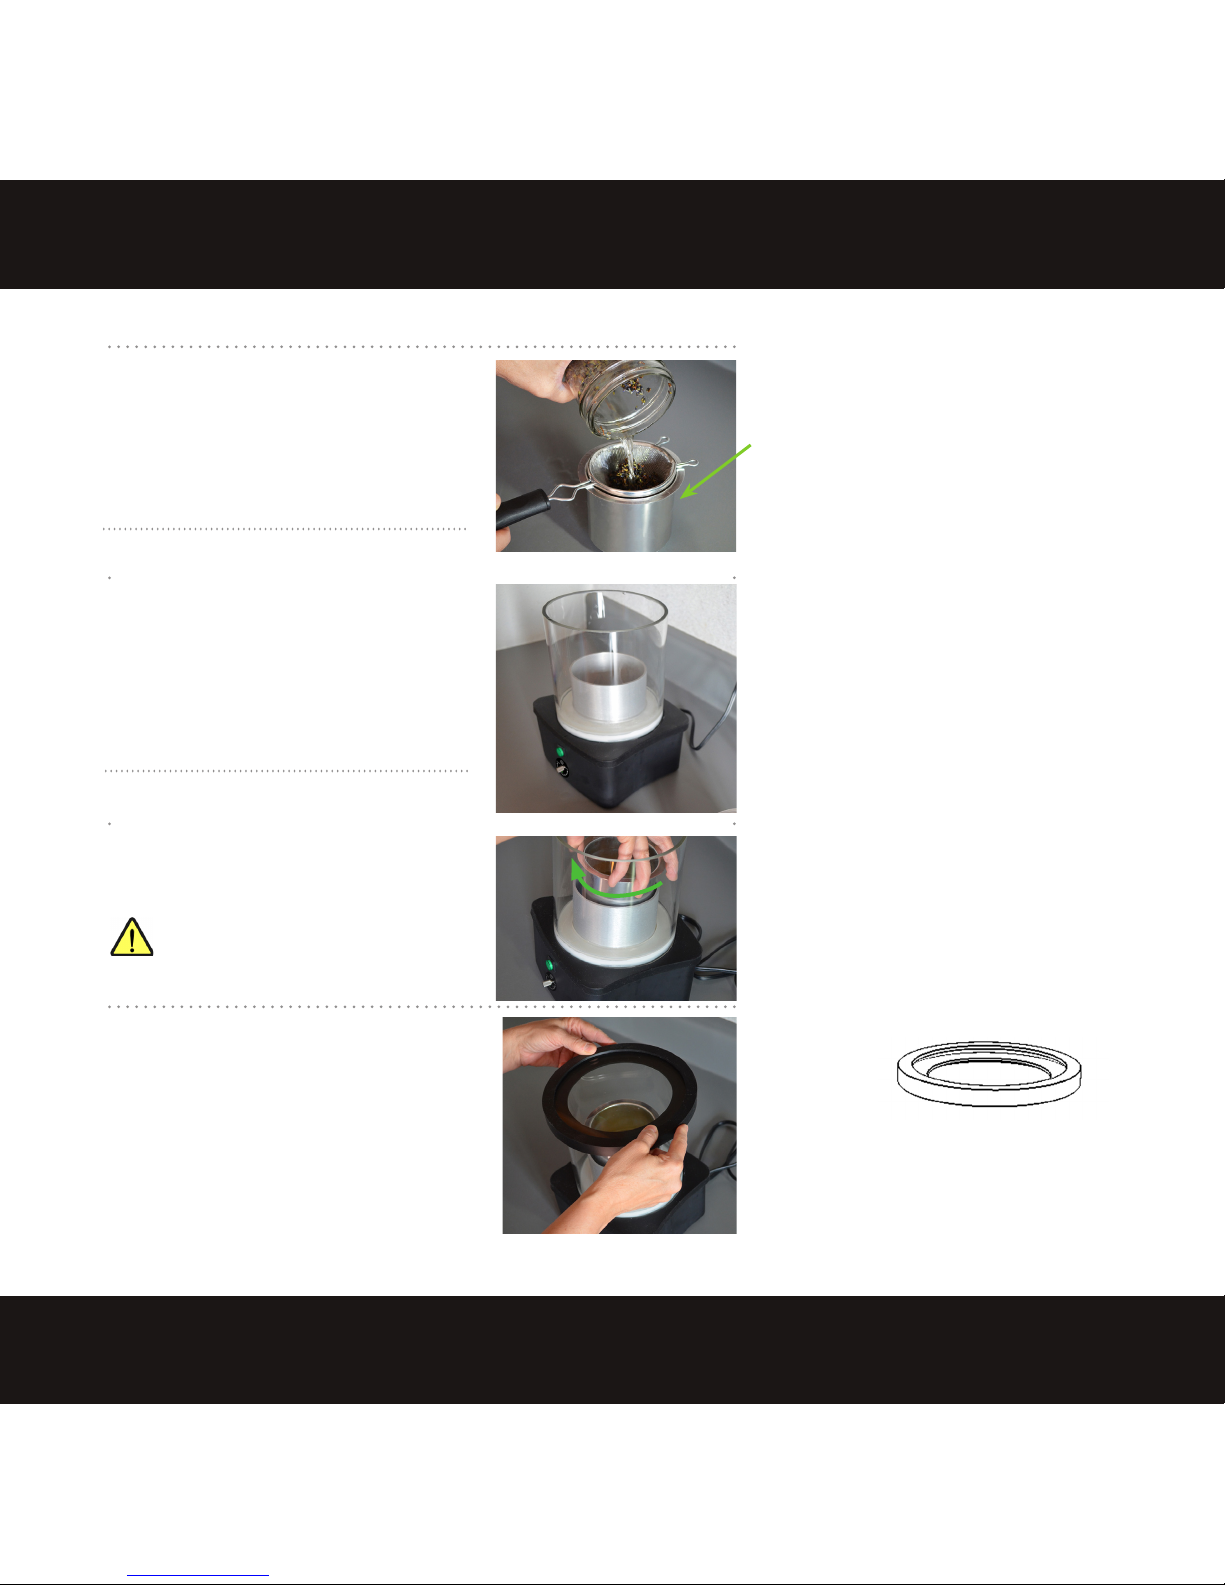
heat may become concentrated.
•Inspect the outer collector for cracks or
any defect and ensure that the lid and
lower seal fit securely. Do not use the
Source if parts are damaged in any way.
•Alcohol is inherently lammable.
However, when used as instructed, the
Source is designed to be completely safe.
The Source operates well below the ignition
temperature of alcohol. The alcohol is
contained in a vacuum where no air for its
combustion is present. Always use
caution when handling alcohol and keep it
well away from any kind of flame or
ignition source. Keep alcohol away from
children and pets.
•
Always allow the outer collector to cool
before opening the lid.
•
Do not immerse base unit in water or
liquid of any kind.
PLANT EXTRACT WARNING
WARNING: Some plant extracts are potentially
dangerous due to the toxicity of concentrated
chemical components and may be harmful or
even deadly if ingested or absorbed through
skin or membranes.
Some essential oils that would do no harm in
a diluted form may do serious harm in higher
concentrations. The internal use of essential oils
can also pose hazards to pregnant women.
The ash point (temperature at which a
compound gives o sucient vapor to ignite) of
each plant extract is dierent. Many common
oils, such as tea tree, lavender, and citrus oils
are classied as ammable liquids.
Essential oils valued for aroma-therapeutic
qualities may cause skin irritation, allergic
reactions and other health problems. You
must determine the hazards and handling
requirements of the particular oils you extract.
ExtractCraft makes no claims about essential
oils and their uses. This is simply a device for
extracting them.

The Source User Manual The Source Main Function 2
THE SOURCE MAIN FUNCTION
APPLIANCE FOR PLANT EXTRACTIONS
The Source is an easy to use home appliance for
extracting plant essences.
Plant essences are key to the smell, taste, and other
properties of plants and are used in avorings,
perfumes, herbal extracts and medicinals.
The rst step in making plant extracts is to make a
tincture. A tincture is a solution
made from the
combination
of plant matter
and
food-grade alcohol.
Lavender, mint, hops, rosemary, cinnamon, radishes,
calendula flowers and many other plants have been
used successfully. The oils of some plants, such as mint
and lavender, dissolve in alcohol very quickly (5 to 20
minutes). Others, such as vanilla or rose petals, may
take hours or longer for the best result. Some extracts
benefit from using alcohol that has been thoroughly
chilled in the freezer during the tincture process,
others are best prepared at room temperature. See
www.extractcraft.com for more information, recipes
and links and share your own results.
The second step is to
simply
use the Source to
separate
the plant essence from the tincture.
The
Source removes the alcohol from the tincture, leaving the
pure plant essence. The alcohol is captured for reuse.
ALCOHOL SOLVENT
We recommend food-grade, grain alcohol of 190-proof
and 95% alcohol. Do not use methanol (wood
alcohol). Alcohol percentages lower than 95% result
in water left in the extracted oils and may aect
quality, especially during product storage.
glass lid
upper seal
nickel platted
reservoir cup
collector
lower seal
base
The Source: Main Parts
threaded post
start/stop button
vacuum relief
screw

3The Source User Manual Source Operation &Making A Plant Extract
MAKING A PLANT EXTRACT
1. INSTALL THE MOBILE APP
The Source app is a great way to monitor
the time, temperature of heat being
applied, and vacuum. Information for
installation can be found under
'Mobile App' on page 10.
2. GATHER THE NEEDED SUPPLIES
You will need:
•a glass container
• up to 2 oz. plant matter
•190-proof grain alcohol
•strainer and lters
•funnel for rebottling the alcohol
•suitable container for storing extract
3. MAKE THE TINCTURE
Place clean plant matter in a clean glass
container. Divide large pieces into similar
smaller lengths for good t. Cover with
190-proof grain alcohol to about 1/4”
above the plant volume. Allow the plant
matter to soak for 5-20 minutes or more.
See www.extractcraft.com for recipes
specific to your botanicals.
4. UNSCREW THE NICKEL PLATED
RESERVOIR CUP
Reach inside the collector and unscrew the
reservoir cup from the base.
Make the
tincture.
Supplies
Install the
app.
nickel plated
reservoir cup

The Source User Manual Source Operation &Making A Plant Extract
4
5. STRAIN THE TINCTURE
Strain the tincture into the reservoir
cup. Use a strainer, coee lter, or
Buchner funnel to remove particles.
Tip The repeated and thorough filtering
results in a more clear end product.
6. READY THE SOURCE
Place the Source on a at surface.
Check that the lower seal is aligned
with the base. Ensure the outer
collector is seated properly in the
recess of the lower seal on the base. A
vacuum will be formed in the collector,
so it must make good contact with the
lower seal.
7. INSTALL THE RESERVOIR CUP
Carefully reach inside the collector
and gently screw the reservoir cup
onto the threaded post.
Lightly screw by hand
only. Do not 'tighten'.
8. PLACE THE LID
Place the lid flat with the wide rubber
seal facing down and in contact with
the glass collector rim.
Once the Source is in operation, a
vacuum is created and the lid will be
held firmly in place with negative
pressure.
Screw the
reservoir
cup onto the
threaded
post of the
base lightly.
Place the
lid on the
collector.
Ready the
Source.
Strain the
tincture into
the reservoir
cup.
reservoir cup
Tip The wider rubber ring
of the upper seal rests on
the rim of the collector. The
narrower rubber ring faces up.

5The Source User Manual Source Operation &Making A Plant Extract
Turn the screw
fully to the
RIGHT to seal
the chamber.
Never
remove screw
9. PLUG IN THE SOURCE
Plug the Source into a 120 VAC outlet. The
indicator button on the base glows steady
green when the Source has power and is
ready for use. If the button is not lit, then
the Source is not getting power. When
the Source is plugged in, the fan runs to
ventilate the base.
10. SEAL THE VACUUM
Turn the vacuum valve screw fully to the
right to close the vacuum release valve.
(When turned to the left, the vacuum
relief opens to allow air into the unit,
releasing the vacuum seal so the lid may
be removed.)
11. START THE SOURCE
Normal Mode
Press the green button once or select the
START PROCESS button on the app to start
in normal mode.
•1 slow ash of the green button
indicates the process starting.
•2 fast ashes indicates stopping.
Turbo Mode
Press and hold the green button on the
base for a full 3 seconds then release; 2
slow flashes indicate Turbo mode began.
(When using the app agreen comm icon indicates
the app is com
municating
with the Source via
Bluetooth. A red comm icon indicates no Bluetooth
communication: see trouble shooting p.15)
Mobile app START PROCESS button
(When the process is running, the
same button is for
STOP PROCESS.)
comm icon
completely.
1 slow flash = starting Normal Mode
2 slow flash = starting Turbo Mode
2 fast flashes = stopping process
Press the green button on the base to
start the Source or use
the mobile app.
Plug in
the Source.

The Source User Manual Source Operation &Making A Plant Ext ract 6
If the vacuum isn't
establishe within 10
seconds, try pressing
down on the lid to
help it seal.
12. CHECK THE VACUUM
When the Source is first started, the
vacuum pump will run
for a few
minutes
until
it
reaches full vacuum.
When the
vacuum pump start,
press down firmly
on the lid for 5-10 seconds. This helps to
seal the chamber while the pump
creates the vacuum.
After that, the
pump run
s
periodically to
maintain the
vacuum.
Use the mobile app to view the vacuum
level.
T
he
v
acuum
l
evel
value
will
rise
,
then
at maximum vacuum
the pump
will shut o. If a seal
is not established
within 1
0
seconds,
check the following:
•Make sure the vacuum
relief
screw, located below the
green
button on the base, closed.
•Inspect the lower seal, collector,
and upper seal and adjust them if
needed to achieve better contact.
•Try pressing down on the lid if you
haven’t done so.
•
Refer to Troubleshooting on page 15.
13. USING THE ICE TRAY
The ice tray cools the lid to increase
condensation of the alcohol vapor, which
accelerates the extraction process and
allows the vacuum pumps to run less
often. Fill the tray with ice cubes (or with
water and freeze overnight)place it on
the lid and begin the extraction.
Always use the ice
tray to help
condense the
alcohol, process
faster, and
requite less pump
activity.
After starting, this
value will begin to
quickly rise to 100
at full vacuum.

7The Source User Manual Source Operation &Making A Plant Extract
14. MONITOR EXTRACTION PROGRESS
Monitor the extraction by watching for alcohol
condensing on the lid and listening to the pump.
The liquid in the reservoir cup will begin boiling
and the alcohol will condense into the outer
collector.
The vacuum pumps will run periodically to
maintain the required vacuum level and the heat
relay will make a clicking sound, but the noise
level will be minimal. In Turbo mode expect the
pumps to run more often.
The maximum run time is 120 minutes per cycle.
It can be restarted mid-cycle or just when it ends
without the need for a cool-down period. It's very
important to closely monitor the extractionat the
end to stop the process at the exact desired
consistency.
15. DECIDE WHEN EXTRACTION IS DONE
As the alcohol is evaporated from the tincture, it
accumulates in the collector, and the plant
extracts remain in the reservoir cup.
The extraction can be ended at any point, as a
tincture, oil, sap, or wax-like substance
otherwise known as an absolute or concrete.
The target consistency depends completely on
preference and intended use.
16. STOP THE SOURCE
Press and release the green button once to
manually stop the process. On the app, you can
stop it by selecting the STOP PROCESS button.
On stopping, the green button on the base
ashes 2 times quickly
.
View heat input temperature,
vacuum level, and run time
for the extraction.
Monitor the extraction
progress. You will see
the alcohol condensing
into the collector. About
4 hours is needed to
extract the alcohol
from a completely full
reservoir.
Closely monitor process during the last 10-20 minutes.
The Source’s temperature will rise above the intended
temperature when the alcohol in the solution is gone and active
evaporation seises.
Press the button to stop
the process or use the app
STOP PROCESS button.
2 quick ashes indicates
stopping.
Never leave the Source unattended while
operating.

The Source User Manual Source Operation &Making A Plant Extract
8
17. RELEASE THE VACUUM
Turn the vacuum relief screw to the left
4-full turns (8-half turns)to relieve the
pressure so you can remove the lid in the
next step — do not remove the screw
completely. It may take up to 60 seconds
for pressure to release. Do not force the lid
o.
18. ALLOW CHAMBER TO COOL
When nished, always allow the collector
and reservoir cup to cool before handling.
If the Source is operated without alcohol
directly in the cup, the cup will become
very hot, and require extra time to cool.
19. REMOVE THE EXTRACT
Remove the lid. Unscrew the reservoir
from the post and transfer the extract into
a storage container. Store the extract in a
sealed container away from direct light and
heat, and out of reach of pets and children.
20. COLLECT ALCOHOL FOR REUSE
If the collector is full enough, spillage may
occur from the bottom when pouring out.
Emptying the collector over a large bowl is
recommended.
Most essential oils will not leave any taste
or smell in the reclaimed alcohol. Some
resinous plants, like hops, may leave a
slight trace. If so, reuse that alcohol for
similar extracts.
Always store alcohol out of reach of pets
and children and well away from heat/
combustion sources.
Loosen
screw to the
left to relieve
vacuum
pressure.
Allow
components
to cool before
handling and
removing
reservoircup.
Pour
alcohol
from
collector
into a
container
and store
safely for
reuse.

9The Source User Manual Care &Cleaning
CLEAN THE SOURCE
The removable parts, including
the glass lid, upper seal, reservoir
cup, glass collector, and lower seal,
should be hand washed with a mild
soap and water.
The base where the electronics are
housed can not be put into water
at any time. To clean the base,
gently wipe with a damp towel.
Glass lid
Narrow ring
of the upper seal
CARE FOR THE SOURCE:
It is very important to rememer the Source is an advanced piece of
technology and requires a certain degree of care to keep it in top
operating condition.
Glass Globe: The glass globe will chip or crack if dropped or with a collision with
another object. If the glass suffers any damage the ability for a vacuum to form may
become impossible. If this happens replacement globes are available for purchase.
Crucible Cup: The Crucible must never be tightened down onto the heating post.
Lightly turn the cup onto the threaded heating post until it meets resistance and
stop turning.
Vacuum Relief Screw: NEVER REMOVE the screw all the way. To release the
vacuum turn only 4 full turns to the left and wait for the pressure to equalize.
Removing the screw can result in cross threading and will make creating a
vacuum impossible. If this happens send the unit back to ExtractCraft for repairs,
but it's not covered under the manufacture defects warranty.
Green Button: Keep green button clean and clear of any debris or sticky
elements. If the button becomes stuck, you can use a small amount of alcohol on
a cotton swap then let dry over night. If free movement is not restored, send back
to ExtractCraft for repairs.

The Source User Manual Mobile App10
MOBILE APP
The mobile app works on Android or iOS mobile devices. It operates with the Source via Bluetooth and allows
you to monitor time, temperature, vacuum, and confirm the altitude setting, as well as start and stop the unit.
INSTALLING THE MOBILE APP
Download the mobile app from
your app store.
For the Google Play store, tap the
search bar and enter Extractcraft.
Tap The Source by Extractcraft
app, then tap INSTALL. Tap ACCEPT
to allow the app to use Bluetooth.
For iOS, use search to nd The
Source by Extractcraft app, then
tap the Source app, and under the
app image, tap GET.
Once you have the app installed, you
should see the Source app icon on
your device.
CONFIRM BLUETOOTH ON
Use Settings to verify that you have
Bluetooth ON.
LAUNCH THE SOURCE APP
Once the Source app is downloaded tap the
icon to launch the app.
comm icon
A green icon indicates when communication has been
established with the Source.
A red icon indicates no Bluetooth connection. If this
happens, confirm your mobile device Bluetooth is ON and
make sure the Source has power and the green light is
illuminated.
A blinking red/green icon means the Bluetooth connection
is weak and the app is having trouble maintaining
connectivity
OR
Be sure the Source is
plugged in and receiving
power before attempting
to connect and pair the
mobile app

11The Source User Manual Mobile App
1.Tap red comm icon at the
top to open the "Select
Appliance" Dialog box.
2.If no device appears tap
the refresh icon.
3.The refresh will display all
current available units. Tap
the unit you want to use so it
is grayed-out with a check
mark next to it.
4.With the desired unit selected close
the "Select Appliance" screen by
tapping the "x" in the top right corner.
5.The app will be connected
with all display values active.

The Source User Manual Mobile App12
START/STOP PROCESS BUTTON
Select this button to start or stop the
process. The green illuminated button on
the base of the unit will flash to confirm
the app's command.
INTERPRETING THE DISPLAY VALUES
Process control readouts for the Source are available from the Control
screen:
Current Temp, F: Displays the heat being pumped into the unit at any
given time. When the heater is at rest it may display a low value, and
when it is active it may display a higher value. Those heat input temps
change to keep the alcohol in the cup at a constant 100°F-105°F.
Vacuum level %: Indicates the current vacuum as a percentage of total
achievable vacuum. The internal controls will determine when it's
necessary for the pumps to engage and reestablish 100%.
Time Left, Min: Shows the time remaining for the current cycle. This can
be reset to the max 120 min by turning the machine off and on.
Altitude, Ft: Reflects the default altitude that has been programmed into
the unit. If the displayed value is not the closest 1,000 feet of elevation
for where you are located, follow the Altitude Tuning directions on page
13 to set accordingly.
Current Source: This area lists the ExtractCraft Source unit that is
connected.
CAUTIONS ABOUT USING THE APP AND CONNECTIVITY
Only one device can be paired to the Source at any time. If the unit is still
paired to a different device from a previous session it will not appear in
the "Select Appliance Screen".
The app must stay connected to the Source for the entire process.
Removing the device from bluetooth range and reconnecting mid-
process will shut the machine off and it will wait for a new cycle.
If the comm icon flashes between green and red that means the
bluetooth connection is low quality and having trouble maintaining
connection.

13The Source User Manual ALTITUDE TUNING
ALTITUDE TUNING
In order for your Source to perform at its full potential it’s very important to program the elevation where it will
be used to the closest 1,000 feet of elevation. Once you program an elevation it will remain as the default until it’s
manually changed to a dierent elevation.
DETERMINING ELEVATION
STEPS TO PROGRAM ELEVATION
Option 1- Ask Siri “What’s my current elevation?”
Option 2- Visit www.whatismyelevation.com and enter your current location.
1) Plug in the Source and wait for the green lighted button to illuminate.
2) Push and hold the button for a full 10-seconds and release.
3) Observe the lighted button ash quickly 10-times.
4) Push the button once for every 1,000 feet of elevation up to 8,000 feet:
Sea Level.................no pushing (just wait for 10-seconds)
1,000-feet...............1-time
2,000-feet...............2-times
3,000-feet...............3-times
4,000-feet...............4-times
5,000-feet...............5-times
6,000-feet...............6-times
7,000-feet...............7-times
8,000-feet...............8-times
5) After entering your elevation the Source will pause for 10-seconds and the green lighted button will
ash the same number of times it was pushed, once for every 1,000 feet.
6) If the Source repeats back the correct number of ashes you’re nished and ready to start your extract
crafting. If it's incorrect repeat steps 1-6 again. The elevation setting is stored permanently until the
elevation is reprogrammed.

The Source User Manual Botanical Recipes14
BOTANICAL RECIPES
ROSE EXTRACT
Ingredients: 100 grams dried rose petals, 12 oz.
food-grade, grain alcohol of 190-proof (95%) alcohol
Tincture directions: Fill mason jar with rose petals. Fill
alcohol to 1” above the level of the petals. Allow rose
petal tincture to soak for 36 hours.
Strain tincture into Source reservoir cup. Follow typical
extraction process.
LAVENDER EXTRACT
Ingredients: 20 grams of lavender, 12 oz. food-grade,
grain alcohol of 190-proof (95%) alcohol
Tincture directions: Fill jar with cleaned lavender, hand
break or crush the leaves, do not grind. Cover to 1/4”
past the plant volume with alcohol. Allow tincture to
soak for 30 minutes.
Strain tincture into Source reservoir cup. Follow typical
extraction process.
PEACH HABANERO OIL MARGARITA ADDITIVE
Ingredients: 3 ripe peaches (pitted), 2 habanero
peppers (remove stems), 7 oz. of freezer chilled
food-grade, grain alcohol of 190-proof (95%) alcohol
Tincture directions: Blend all ingredients for 5 seconds
in blender. Allow the mixture to soak 30 minutes.
Strain tincture into Source reservoir cup. Follow typical
extraction process.
For this volume, the processing will take 240 minutes.
Restart the Source after it automatically stops after
120 minutes. Check the consistency and taste, and
continue to your desired result for the peach habanero
extract.
Add full solution directly to a full bottle of tequila or
add 1–5 drops per drink.
LAVENDER, CAYENNE, LEMON TOPICAL RUB
Ingredients:
28 grams lavender, 2 dried cayenne
peppers, 1/4 cup dried lemon peel, 5-7 oz. chilled food-
grade, grain alcohol of 190-proof (95%) from freezer.
Tincture directions: Use an 8 oz. mason jar in which to
combine all ingredients. Allow soak time of 30 minutes.
Strain tincture into Source reservoir cup. Follow typical
extraction process. Processing should take 90 minutes.
Stop the processing. Pour in bottle and allow the extract
to settle before use.
Use oil directly on sore muscles or mix with coconut oil
for topical cream.
Optionally you can prepare separate oils of lavender,
cayenne (be careful!), and lemon. Warm up coconut
oil to soft but not melted consistency, mix in lavender,
cayenne, lemon oil and allow it to cool.
SOAK TIMES FOR TINCTURES
The following are some general times for soaking
your tinctures that may help your results.
3–5 MINUTES ...............................................................
Hops Basil Ground Coee Mint
Thyme Oregano Ground Vanilla
30 MINUTES .................................................................
Cayenne Jalapeno Habanero
Resins Lobelia Citronella
Aloe Vera Clove Rosemary
Lavender Eucalyptus Star Anise
12 HOURS .....................................................................
Propolis Avocado Nuts
Dried Fruit Marcuja
24–96 HOURS ...............................................................
Rose Petal Oak Dried Citrus Peel Pine
Dried Beans Cedar Whole Roots

15The Source User Manual Troubleshooting
TROUBLESHOOTING
Problem Possible cause Solution
Vacuum
pump runs
continually
Outer collector is not
sealing.
Check the lower seal and collector are securely in place and clear of
any debris. Try pressing down on the lid gently while the vacuum pump
is running. Confirm the pressure relief screw is turned fully to the right
and has not been crossthreaded. Use the mobile app to view the
vacuum level. When the pump is running, the vacuum level should be
steadily rising and will turn off when it reaches 100%. If the problem
persists inspect the glass cylinder composing the collector for chips
and damage. If the glass is obstructed or damaged a vacuum seal is
not possible.
Comm icon
in mobile
app is red
Bluetooth not on/
Source not pairing
Check your mobile device settings and make sure you have Bluetooth ON.
Plug in the Source and make sure the green light on the base is ON before
launching the Source app.
The Source
process
turned o
but the
extraction
is not
nished
Automatic shut
down due to time
allowance
The Source process runs for a maximum of 120 minutes, then
automatically shuts o. To run a longer extraction, simply restart it by
pressing the green button or by using START PROCESS from the mobile
app.
Power outage or
circut breaker
To restart, unplug the Source and allow it to cool. Once it is cool, plug it
back in and restart the process.
The green
light does
not
illuminate
The power cord is
not plugged in/outlet
not getting power
Check that the power cord is rmly plugged into the outlet. Check your
breaker or switches that control your outlet. Test another appliance in that
outlet to verify it is working.
Cannot
tell if the
process is
running
Green button is lit,
but the Source is
quiet.
Once the Source has been started, if you are unsure whether the process
is stopped or running, you can check two ways: observing the green
illuminated button which will blink once every 10-15 seconds when in
operation; or by using the app to view the status.

The Source User Manual Technical Specications16
TECHNICAL SPECIFICATIONS
Performance: Processes 1/2- 2 oz of
dry material
Power: 110-120 VAC 60 Hz, 2.1 A
Connectivity: Bluetooth BLE
Dimensions: The Source stands 10-inches tall.
The base is 7-inches long by 7-inches wide.
Safety Feature: 120 minute maximum run time per
start
WARRANTY
Our goal is to have you enjoy the Source. ExtractCraft
shall repair or replace the Source, at its sole discretion,
for any manufacturing defect for a period of 12 months
from shipment of the device.
Damage resulting from
insufficient packaging in shippin gis not covered under
warranty
.
Before sending
in
a
repair
contact ExtractCraft at
info
@extractcraft.
com for help resolving the issue.
If needed, we will send instructions and a Return
Merchandise Authorization Number (RMA#), and
a shipping label (within the 48 contiguous United
States only)to allow shipping of the unit for
resolution as quickly as possible.
Save your box! Original packing materials are
required for valid warranty service and returns.
GLOSSARY
absolutes aromatic concentrated oily mixtures
extracted from plants requiring the use
of solvent extraction techniques
concrete a more concentrated form than
absolutes, resulting in a wax-like
substance
ash point temperature at which a compound gives
o sucient vapor to ignite in air
tincture a solution of plant matter in alcohol

ExtractCraft.com | 720-307-8628 | [email protected] | Like us on Facebook
Table of contents
Popular Scrubber manuals by other brands

Hakko Electronics
Hakko Electronics 494 instruction manual

Pacific
Pacific ScrubMaster 20B Operating & maintenance instructions

Nilfisk-Advance
Nilfisk-Advance 48 LPG instruction manual

Plymovent
Plymovent ECONOMY ARM Installation and user manual

Nilfisk-ALTO
Nilfisk-ALTO FLOORTEC 560 P user manual

BorMann
BorMann Lite Series manual