Extralife Instruments SUPER SIXTEEN User manual

extrali fe i nstruments
Owner’s manual v1.1
Documents available at:
http://extralifeinstruments.com/
PITCH Adjusts
pitch output for
selected step.
Range +/- 12
semitones
DATA this stepped
encoder adjusts the
selected sequence
parameter, like patch
number or tempo.
CLOCK input accepts
a 1-pulse-per-step clock
signal and advances the
sequencer in sync to
external gear.
RESET input
accepts a pulse to
restart the sequence
at the beginning, for
synchronized looping.
CV output sends
out an unquantized
control voltage
controlled by the CV
parameter for each
step (0-8v)
PITCH output sends
quantized control
voltage set by the
PITCH and OCTAVE
parameters for each
step (0-8v)
GATE output sends
5V gate signals for
each active step, the
duration of which is
set by each step’s
LENGTH parameter
STEP BUTTONS
select and toggle steps
on and o. Press once
to select and again to
toggle. Inactive steps are
activated automatically
when selected.
RECORD enables
motion recording. Press
and hold while adjusting
PITCH, OCTAVE,
LENGTH, or CV to
record changes to the
currently playing steps in
realtime.
MUTATE activates
the selected “mutation”
eect. Adjust DATA while
holding MUTATE to
change the eect depth.
OCTAVE Adjusts
pitch output for
selected step in
increments of 12
steps. Range +/- 4.
LENGTH Adjusts
the duration of the
selected step, as
a percentage of a
single step’s length.
Range 0-400%.
CV Adjusts the
value of the
secondary CV
output for the
selected step.
Range 0-100%
GLIDE Activates
portamento, or
a “slide” to the
selected note over
its duration.
SUPER SIXTEEN

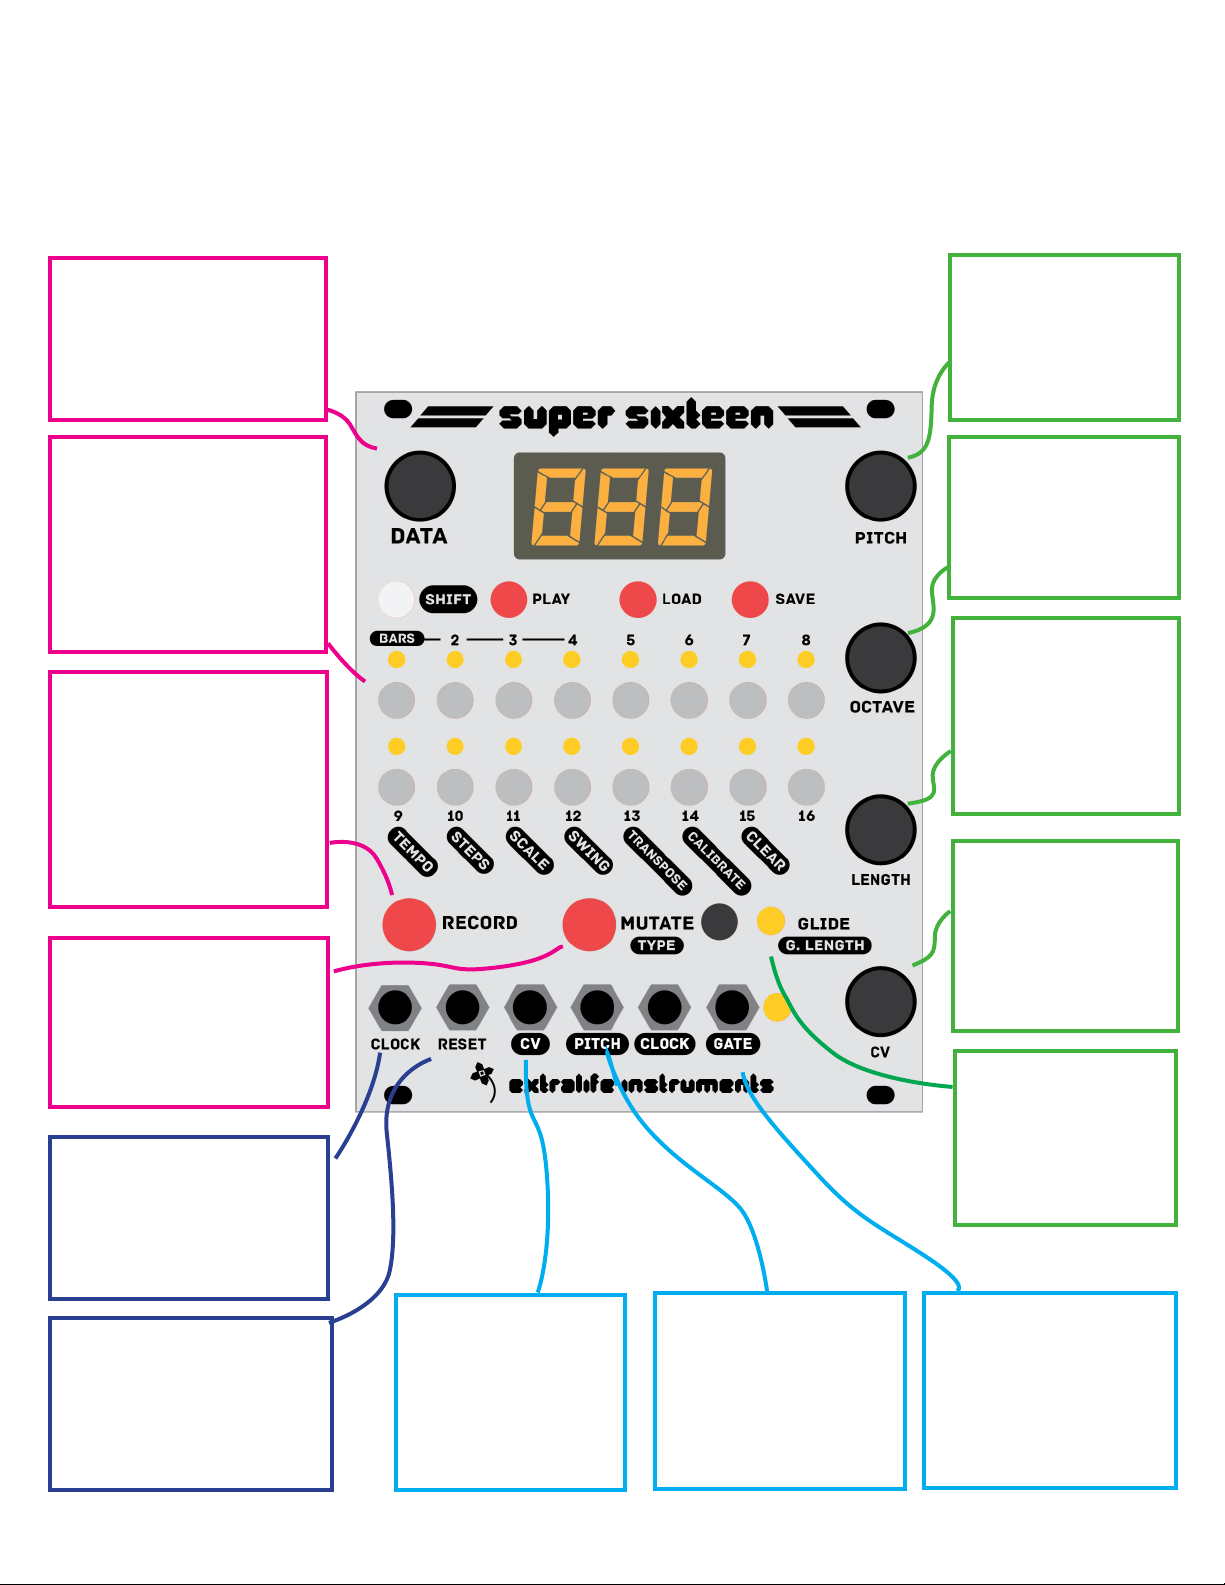
SHIFT Press [SHIFT] plus another
button simultaneously to access its
secondary or “shift” function (these
are outlined in black labels on the
panel). Buttons that have shift
functions include Steps 9-16, Record,
Mutate, Glide, and Play. When
you are editing a parameter, press
[SHIFT] again to exit back to the
main note data display.
PLAY Start or stop the internal
sequencer playback. [SHIFT]+Play
resets to the start, the same as a
pulse to the RESET input. A pulse to
the CLOCK input will stop the internal
sequencer.
Note: Pressing play while the
CLOCK input is receiving a signal
generally has no eect - if the internal
tempo is set much faster than the
external clock, however, pressing
play may cause the sequencer to
gain a step relative to the external
clock before it syncs again.
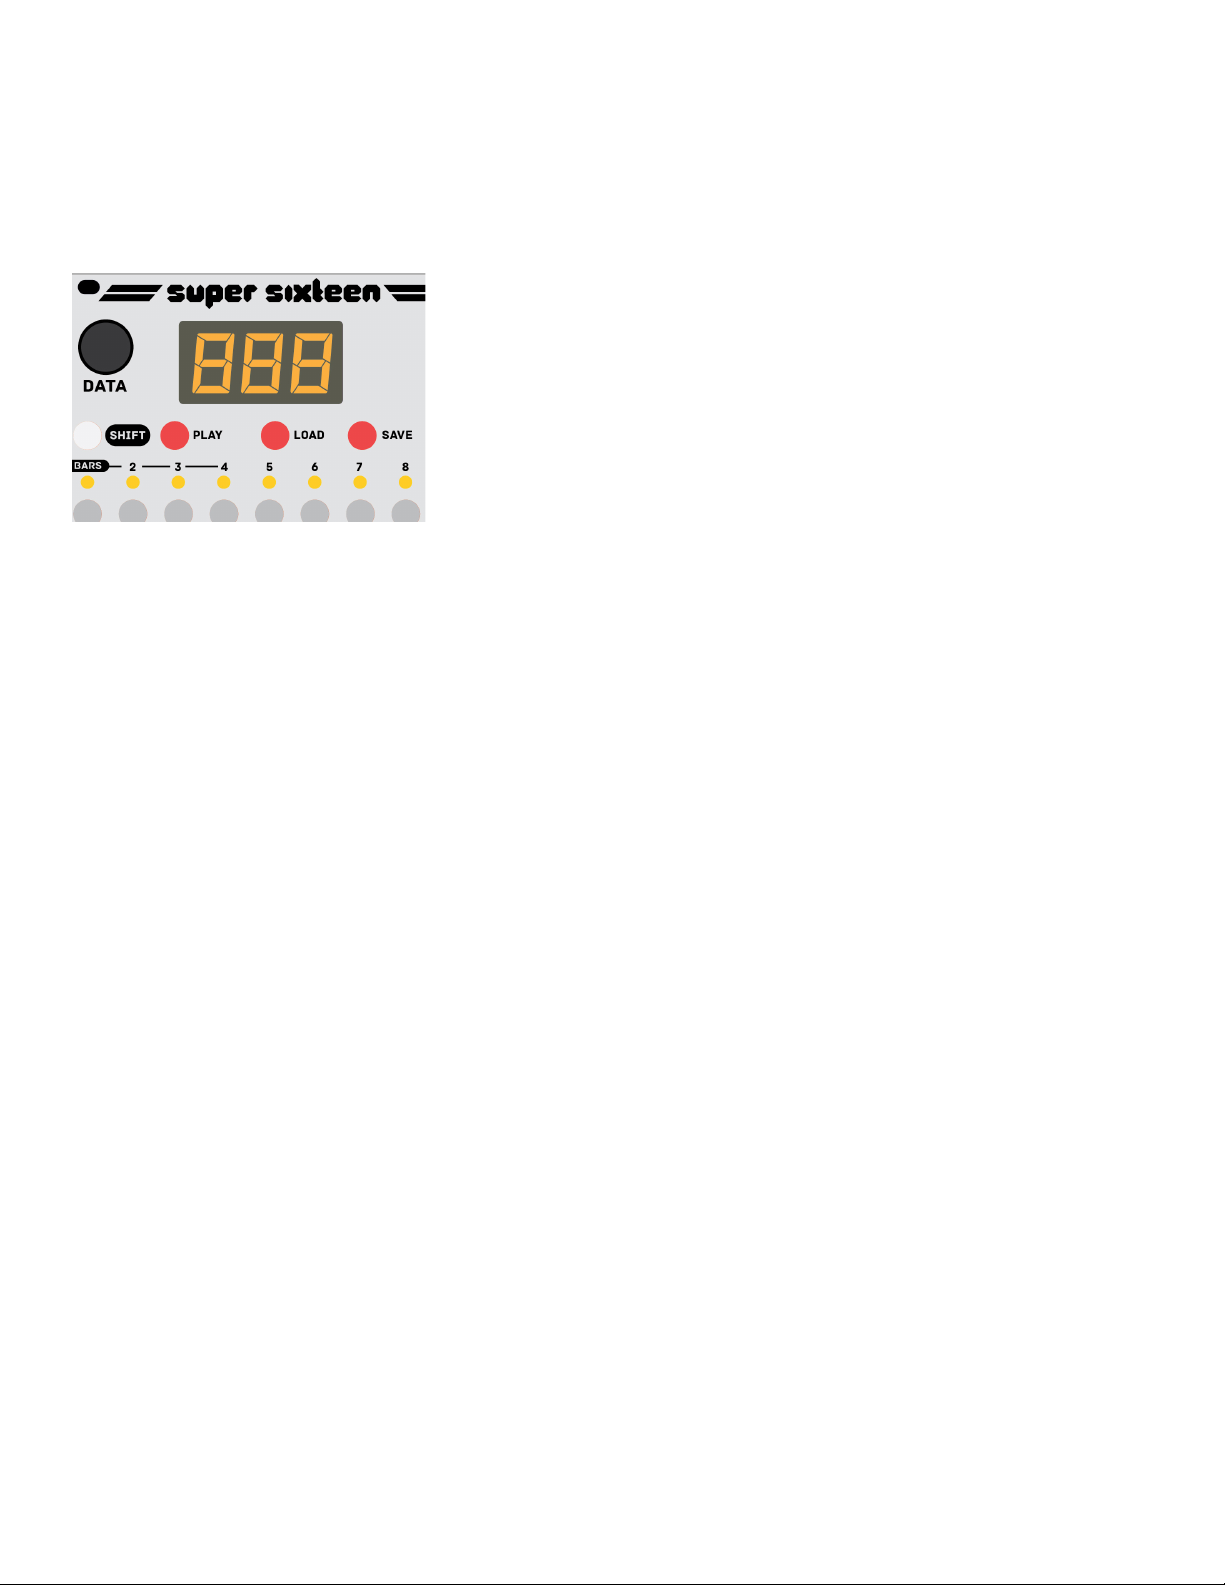
LOAD/SAVE enables you to save the active
sequence or load a new one. To save a
sequence to memory, press SAVE once, and
then use the DATA knob to choose the PATCH
NUMBER (1-99) [0-99] where this sequence
will be saved. To conrm it, press SAVE
again. Press [SHIFT] to cancel saving. Once
saved, the sequence can be recalled at any
time. It’s a good idea to save your sequences
frequently, since it’s easy to radically alter the
patch memory.
Note: While selecting a patch number, the
decimal point after the number indicates
that there is already a sequence saved at that
patch number.
Once you’ve chosen a PATCH NUMBER
to save your sequence, you can double-tap
SAVE to overwrite it with the active sequence.
Get in the habit of doing this whenever you
make a change you like! You can likewise
double-tap LOAD to reload the last-saved
sequence if you make a change you dislike.
To load a sequence, press LOAD once, and
then use the DATA knob to choose a PATCH
NUMBER to load. Press LOAD again to
conrm and load the sequence
Note:If there is no sequence in that patch
number, a blank sequence will be loaded.
When a new sequence is loaded, the
sequence will “pick up” playback in real-time at
the same place in the last bar of the sequence,
making synchronized songs and pickup
phrasing dead simple.
1. Sequence controls

2. Step editing
Step editing is accomplished by pressing the the 16 step
buttons in the center of the panel. The LEDs adjacent
to each button indicate whether that step is active or
inactive. This display indicates the 16-step rhythm of the
sequence.When selected for editing, its LED will blink on
and o. If the selective step is active, it will be mostly on
and blink o briey. If it’s inactive, it will be mostly o and
blink on briey.
To select a step, press the corresponding
button once.
If inactive, that step will be automatically
activated when selected. To deactivate a
step, press it again.
Once a step is selected, you can edit its
PITCH, OCTAVE, DURATION, CV, and
GLIDE values with the corresponding
knobs and button on the right side of the
panel. These values only change when the
knobs are moved and the display updates
to reect the new value. When a step is
selected, the display will update to show its
value for the last edited parameter.
Only active steps will trigger the gate
output and change the PITCH/CV outputs.
Inactive steps do not have any eect on
the seqeuncer, but their values are saved
with the sequence.
While the sequencer is playing, the LEDS
will blink as each step is played to show a
“Running light” indicating the current step.
Tap once to select/activate a step
Tap again to deactivate
Press a button to select a
step then edit it by turning
the knobs.
PITCH & OCTAVE
together control the Pitch
output voltage.
CV controls the CV
output voltage.
DUR ATION controls the
length of the pulse sent
to the GATE output.

5. Multi-bar sequences
To view and edit a bar of 16 steps,
press SHIFT and STEP 1, 2, 3, or 4,
indicated by the “BARS” label. This
will update the step display LEDs to
show the active steps for that bar.
The default sequence length is 16 steps, but sequences of any length
from 1-64 steps can be programmed. To access steps 17-64, make
use of the BARS buttons (SHIFT+1 thru 4) and the STEPS parameter
(SHIFT+10). This feature is analogous to “Pages.”
Note: A subsequent bar may be edited and
have active steps, but it will not play unless
the STEPS parameter is adjusted so the
sequence is long enough to reach it.
Bars may be COPIED and PASTED within
a sequence to create repetitions. To copy
and paste a bar, press SHIFT, then press
the button for the bar you wish to copy (the
source), then (while holding SHIFT+source)
press the button for the bar you want to
paste it to (the destination). The display
will ash “CPY” when a bar is successfully
pasted.
To adjust the sequence length, select STEPS
(SHIFT+10), and then select a number of
steps using the DATA knob. If you continue
holding shift, the knob will skip through
common sequence lengths divisible by 4 (4,
8, 12, 16, 24, 32, 48, 64). Release SHIFT to
adjust 1 step at a time and create odd-length
sequences if desired.
Copy/paste a bar:
[SHIFT]+ SOURCE + DESTINATION
Example:
[SHIFT] + 1 + 2 = Copy bar 1 to bar 2
[SHIFT] + 2 + 4 = Copy bar 2 to bar 4
Change seq. length:
[SHIFT] + 10 (STEPS)
Adjust with DATA knob
View and edit BARS:
[SHIFT] + 1 (Steps
1-16)
[SHIFT] + 2 (17-32)
[SHIFT] + 3 (33-48)
[SHIFT] + 4 (49-64)

4. Motion recording
Step parameters can also be editing in real-time using the
RECORD button.
While the sequencer is playing, press and hold RECORD
and adjust any of the knobs for PITCH, OCTAVE,
DURATION, or CV to record those changes to the
sequence as it plays.
The changes are only recorded while the button is held
down, and only the rst knob adjusted during recording
is recorded. Only active steps will be updated. To record
another parameter, release the record button and press it
again as the sequence loops during playback. It is good to
get in the habit of releasing the record button quickly as it
is easy to overwrite your sequence with new notes.
It is also a good idea to SAVE your sequence before
recording in new data. Double-tap the SAVE button to
write it to the last-used patch number. Then record your
new part. If you aren’t happy with the change, just double-
tap LOAD to “undo” the changes and reload the previous
version.
Hold RECORD
while adjusting
PITCH,
OCTAVE,
DURATION,
or CV to
make quick
changes to the
sequence
Real-time rhythm:
hold SHIFT and
tap a rhythm on
RECORD to activate
steps during sequence
playback.
Note: during a live performance, motion-recording using
the PITCH parameter can be quite dangerous as it can
introduce non-diatonic “wrong notes” into your sequence.
These can be avoided by selecting a SCALE for the
sequence to exclude such notes and allow greater
improvisation (see the SCALE section). However, in a
typical patch, recording real-time changes to OCTAVE,
DURATION and usually CV is relatively “safe” for live
performance, though it is still a good idea to save your
patches frequently for reloading.

6. [Shift] functions
Additional sequence parameters can
be edited by pressing and holding
[SHIFT] and pressing another button,
then adjusting that parameter using the
DATA knob. These values are saved with
each sequence (except CALIBRATE and
CLEAR).
Most buttons which have a secondary
function show that function in
outlined text.
TEMPO SHIFT + 9
Controls the speed of the sequence, in beats per minute (BPM).
NOTE: When loading a new sequence, the sequencer tempo is only adjusted if the
sequencer is PAUSED. When a new sequence is loaded during playback, it will continue at
the same tempo as the previous sequence to avoid sudden jumps.
STEPS SHIFT + 10
Controls the number of steps in the sequence (Range: 1-64). See the section on MULTI-
BAR SEQUENCING (p 11).
SCALE SHIFT + 11
Selects a musical scale to constrain the values for the PITCH parameter.
See SCALES (page 10).
SWING SHIFT + 12
Adjusts the timing of even-numbered steps to create a “swing” or “shue” rhythm. A default
value of 50 produces a “straight” rhythm, while higher values produce more swing. The
sequencer can accept a straight Clock input signal and still play swung notes, but will
produce a “swung” clock output when the swing parameter is adjusted.

TRANSPOSE SHIFT + 13
Adjusts the pitch output of the entire sequence up and down in increments of 1 semitone.
This enables dierent sequences to be played in dierent “keys” without adjusting oscillator
tuning or step editing. Range +/- 36.
CALIBRATE SHIFT + 14
Enters calibration mode to tune the voltage scaling. See CALI BRATION (pg. 13)
CLEAR SHIFT + 15
Deactivates all steps and resets all note values to their default (zero for PITCH, OCTAVE,
and CV, and 80 for DURATION).
FACTORY RESET SHIFT + 15 (ve times)
To reset the module to factory settings and erase all stored sequences, hold SHIFT and
then the 15 button ve times in a row. The screen will show “CLR” then “E - R - S” (one letter
each press), then blink “ERS.” Press 15 a fth time to erase all sequences.
SONG MODE SHIFT + 16
This lets you choose a sequence and loop counter to chain sequences together. See the
SONG MODE section for more details.
NEXT SEQUENCE SHIFT + LOAD
Immediately loads the next sequence selected in SONG MODE.
RESET CLOCK SHIFT + PLAY
To reset the sequence clock to Step 1, hold shift and press play. When the play button is
pressed or the next clock pulse is received, the sequence will restart. The same thing can be
achieved by sending a pulse to the RESET input jack.
SELECT BAR SHIFT + 1/2/3/4
To edit steps after 1-16, you can jump to the next BAR by pressing SHIFT+[BAR NUMBER].
Buttons 1-4 are marked BAR to indicate this function. Keep in mind than in order for steps
after 16 to be played, the STEPS parameter must be adjusted as well.

7. Mutations
Pressing and holding the MUTATE button activates the selected mutation eect
while the button is held. While MUTATE is held, you can turn the DATA knob
to adjust its eect depth. This does dierent things depending on the selected
mutation - see the table below.
Pressing SHIFT+MUTATE will enter the mutation selection menu. Use the DATA knob to
select a mutation. Press SHIFT or another button to exit the menu. The available mutations
are shown in the table.
To RECORD a mutation sequence, you can press and hold RECORD, then tap the MUTATE
button on each step that you want the mutation to be active, just as you would when using it
in real-time, then release the RECORD button.
To ERASE a mutation sequence, you must simply record over it. So, press and hold
RECORD, then tap MUTATE once to initate recording of mutation data, then release the
MUTATE button and continue holding record to “erase” mutation data for as long as you like
(one complete loop of the sequence will erase it all).
Suggested uses:
Mutations can be used creatively to add real-time variation to recorded sequence. Try
“playing” the mutate button rhythmically to introduce varied repetitions or “lls” in your
sequences. While holding the mutate button, adjust the eect depth step-by-step to create
variations of increasing intensity (this works especially well with REPEAT, TRANSPOSE,
OCTAVE SHIFT, and ROLL modes).
Recording mutation data can be especially fun with the RANDOMIZE mode, because you
can create semi-random sequences in which certain sections vary each time it’s played. Use
it in combination with a particular SCALE mode to create a generative sequence that never
quite repeats itself twice.
The “Turing” mutation modes can be used for generative sequencing inspired by their
namesake module. Turing 1 will alter your pitch data, Turing 2 will create new rhythms, and
Turing 3 will create brand new sequences from scratch.

Display Mutation Adjustment Description
rep Repeat Number of steps Repeats a short section of the
sequence
rev Reverse N/A Reverses playback while held
OCT Octave
shift
Num. of octaves up/
down Transposes pitch up/down by 12 steps
TRS Transpose Num. of steps up/down Transposes pitch by steps (within
scale)
gld Auto-glide Glide duration Activates glide for every step while
held
frz Freeze N/A Holds the current pitch and activates
the gate
5tp Stop Duration Pitch slowly ramps down to 0V
rnd Randomize Randomness Transposes pitch by random amount
(w/in scale)
5tt Stutter Stutter-step duration Adds short repeated steps on inactive
notes
rol Roll Step subdivision Subdivides clock and doubles, triples,
etc notes
tu1 Turing 1* Randomness
Melody generator: Same as
“Randomize,” but new pitches are
stored in the active sequence.
tu2 Turing 2* Density
Rhythm generator: Randomly adds
new steps using existing pitch data
to create new rhythms but preserves
harmony.
tu3 Turing 3* Density
Sequence generator: creates
completely new random sequence
data including pitch, octave (+/-2),
gate(20-170), CV (0-90), and glide
(10% rate).
* Only available in rmware version 1.1 and later

8. Glide/portamento
Glide (aka “portamento” or “slide”) may be activated for
any active step by selecting a step and then pressing
the GLIDE button. When active, the pitch output will
slowly ramp up or down to that step’s pitch over its
duration. The ramp time begins at the beginning of the
step.
The glide duration may be adjusted by pressing
SHIFT+GLIDE and adjusting the value with the
encoder. The value goes from 0-400, and like the
“duration” knob represents a percentage fo the current
step length. (A value greater than 100 will take longer
than one step to complete, and the pitch output may
not reach the nal value before the next step activates.)
The glide duration is saved along with the other
sequence data.
A sequence of control voltages showing the sharp transitions without glide (above)
and the smoother “ramp” transition with glide (below)

9. Scales
Pressing SHIFT+11 will enter the scale selection
menu, where you can use the DATA knob to
select a scale.
The selected scale will quantize the sequence
to and restrict pitch selection to notes within the
scale. Any previously entered sequence data will
remain unedited, but will be quantized in real-
time to the selected scale.
RANDOMIZE and TRANSPOSE mutations will
also obey the selected scale quantization and
produce variations which remain in-key with the
sequence.
When a scale type besides Chromatic is
selected, non-diatonic pitch values will be
skipped when adjusting the PITCH knob for any
step.
Display Scale
chr Chromatic
MAJ Major
min Minor
pen Pentatonic
pem Minor pentatonic
Blu Blues
BLM Minor blues
phr Phrygian
dor Dorian
Who Whole tone

10. Song mode
Sequences can be chained together one after another using SONG MODE.
Enabling chaining consists of setting two special parameters for a given
sequence:
1. SONG SEQUENCE (5n9) - the patch number of the sequence to be played
after the current sequence. [0-99]. Setting this to zero will deactivate song mode
(default).
2. SONG LOOPS (lp5) - the number of times the current sequence should
loop before advancing to the next sequence [0-99]. Setting this to Zero will loop
the current sequence indenitely (default).
Both parameters can be edited by pressing SHIFT+16 in sequence mode. The
display will show either 5n9 or Lp5 to indicate which parameter is selected.
To edit the other, simply press SHIFT+16 again. Turn the DATA knob to edit each
parameter as desired.
IMPORTANT: Editing these parameters during playback can produce unexpected
jumps to the next sequence, erasing your changes! It is best to edit these
parameters while paused.
After both parameters are set, save the sequence to memory by double-tapping
SAVE (otherwise these settings will be lost when the next sequence is loaded!).
Then reset playback by pressing SHIFT+PLAY (this resets the sequence loop
counter). Start playback by pressing PLAY or using an external clock.
The sequence will play through the number of times specied in the LOOPS
parameter, then the patch number selected in SONG SEQUENCE will be loaded
automatically and start playing in time. This can be used to create longer, song-
length compositions that play in sequence.
If either parameter is set to zero, or if the selected patch is empty, the current
patch will simply continue playing.
Song mode can be used without automatic advance by choosing a next sequence
and setting the LOOPS parameter to zero. Just press SHIFT+LOAD to instantly
load the next sequence whenever desired. This can be used to create sequential
“sets” of sequences without adhering to a strict song format and length.
Note: Song mode is only available in rmware version 1.1 and later.

11. Calibration
To achieve accurate tuning of the analog 1v/octave pitch output, it must be calibrated using
digital multimeter, or an electronic tuner and well calibrated oscillator.
Multimeter
Connect a 3.5mm TS cable to the PITCH output of the Super Sixteen. Set your multimeter to
read DC volts (10V range minimum). Connect the negative/ground/common (black) input of
the multimeter to the SLEEVE of the TS cable using an alligator clip. Connect the positive/red
input of the multimeter to the TIP of the cable.
Electronic tuner
Connect the PITCH output to the 1V/OCT input of a well-calibrated oscillator. Using a simple
waveform (like a sine or triangle wave), connect the output of the oscillator to a digital tuner.
(Make sure to attenuate the output if necessary, as eurorack level signals can damage
equipment made for instrument or line level inputs).
Enter calibrate mode on the Super Sixteen and select the lowest output voltage (button 1).
Turn on the tuner and use the COARSE tune of the oscillator to set the pitch to the lowest
note that the tuner can easily pick up. Use the FINE tune of the oscillator to set it to an exact
concert pitch (typically C1 or A1).
Connect a multimeter to the pitch output as shown. Alligator clips are helpful to
secure the multimeter probes if a direct 3.5mm to banana adapter is unavailable.

Press SHIFT+14 to enter calibration mode. In this mode buttons 1-9 let you choose
dierent octaves, which will set the PITCH output to exact voltages, from 0v, 1v, 2v,
3v up to 8v.
Press 1 and use the encoder to set the calibration of the lowest step to zero (0). The
lowest possible output of the DAC is not very accurate at 0v, and cannot be made to
go lower (this will cause it to “wrap around” to 8V, so avoid this at all costs! Because
of this limitiation, this lowest octave is the least accurate range.
Press 2 and use the encoder to set the calibration to exactly 1 volt, or 1 octave
above your tuned pitch at 0V. It is common to have to adjust by 5-20 “units” of
correction. Each unit represents about 0.002 volts, or about 3 cents of concert pitch.
Press 3 and repeat the tuning at 2 volts. Continue all the way up to 9 (8 volts). You
may have to tune your oscillator lower than initially in order to use your tuner at the
top of the pitch range.
IMPORTANT: When you are satised that all octaves are playing in tune, press
SAVE to store the calibration values to memory. These values are saved to
EEPROM and will persist even after a factory reset. If you have made and error and
want to discard the new calibration values, press SHIFT to return to sequence mode.
Calibration procedure (continued)
Note name display setting:
While in calibration mode, you can press buttons 15 and 16 to choose between
two types of note display. This will aect what shows on the display when editing
PITCH and OCTAVE values.
Press 15 to choose “Note” mode (not). Notes will display as C0, B1, D3, etc,
reecting traditional MIDI/piano note names.
Press 16 to choose “Numeric” mode (num). Notes will display as numbers from
-12 to +12 and octaves from -4 to +4, reecting chromatic scale degrees.
This option is only available in rmware version 1.1 and later.

11. Specifications
Dimensions:
Height: 129.5mm
Width: 102mm / 20 HP (horizontal pitch)
Rear Depth: 38mm
Front Depth: 16mm (aka knob height)
Total Depth: 55mm
Electrical characteristics:
Max current draw: 90mA (+12v) / 5mA (-12v)
Pitch output voltage: 0-8 volts
CV output voltage: 0-8 volts
Gate output voltage: 0-5 volts
Clock output voltage: 0-5 volts
Clock input voltage: 10v maximum
Reset input voltage: 10v maximum
Copyright 2020, Extralife Instruments, LLC
Power connector:
Super Sixteen requires a standard “Eurorack” -12V / +12V power supply (2x5 pin
connector). The red stripe of the ribbon cable (-12V side) must be oriented on the
same side as the “Red stripe” marking on the circuit board.
The complete manual can be found online at:
http://extralifeinstruments.com/docs/super-sixteen/manual.pdf
Other manuals for SUPER SIXTEEN
1
Table of contents