EYEZONE P102-8 User manual

EYEZONE P102-8
User Manual
Oct 26, 07
34412F13
FCC Notices
It’s herewith confirmed to comply with the requirements of FCC Part 15 Rules. Operation is subject
to the following two conditions:
zThis device may not cause harmful interference.
zThis device must accept any interference received, including interference that may cause
undesired operation.
Note: This equipment has been tested and found to comply with the limits for a Class B digital
device, pursuant to part 15 of the FCC Rules. These limits are designed to provide reasonable
protection against harmful interference when the equipment is operated in a residential installation.
This equipment generated uses and can radiate radio frequency energy and if not installed and used
in accordance with the instruction manual may cause harmful interference to radio communications.
However, there is no guarantee that interference will not occur in a particular installation. If this
equipment does cause harmful interference to radio of television reception, which can be determined
by turning the equipment off or on, the user is encouraged to try to correct the interference by one or
more of the following measures:
zReorient or relocate the receiving antenna.
zIncrease the separation between the equipment and receiver.
zConnect the equipment into an outlet on a circuit different from that to which the receiver is
connected.
zConsult the dealer or an experienced radio TV technician for help.
CE Declaration
This device complies with CE class B.
*EN55013
EN61000-3-2
EN61000-3-3
EN55020
Printed in Taiwan R.O.C.
All contents are subject to change without notice.
All trademarks are the property of their respective owner.

1. Package Contents……………………..…………………….. 1
2. Introduction………………………………….……………... 1
3. Features…………………………………..………………… 1
4. Hardware Overview…………………………….…………... 2
5. Remote Control…………………………………………….. 3
6. Setting Up……………………………………..……..…….. 4
6.1 SLIDE SETUP……………………………………..…. 4
6.2 MUSIC SETUP…………….………………………… 4
6.3 MOVIE SETUP…………….………………………… 4
6.4 SLIDESHOW SETUP…………….……………………. 5
6.5 PREFERENCE……………….………………………… 5
7. Using the P102-8……….…………………………………... 6
7.1 Play Picture File……………………………………..…. 6
7.2 Play Music File……….………………………………… 7
7.3 Play Movie File……………..………………………..… 8
7.4 File Library…………………………….…….……….… 9
7.5 Hot Key……….………………………………….…….. 9
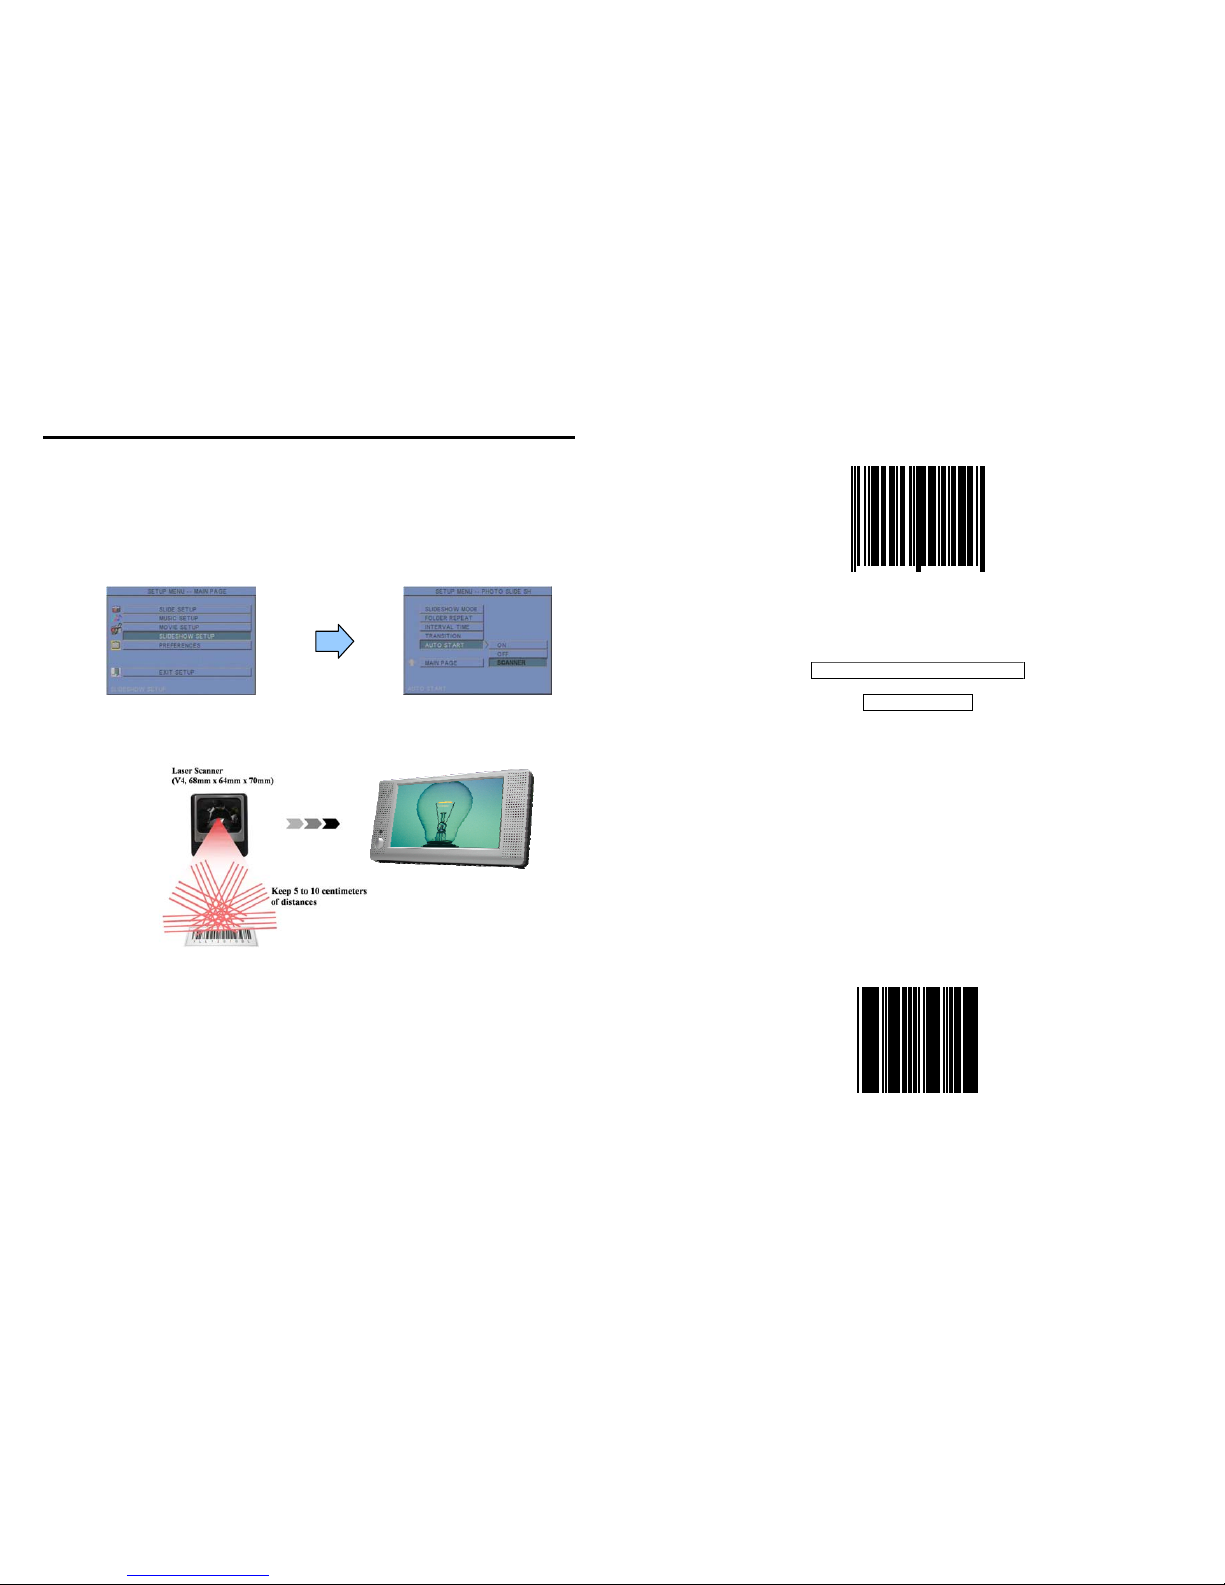
8. Using the Laser Scanner..…………………………………... 10
8.1 Set the Laser Scanner…..…………………………..…. 10
9. Troubleshooting…………….………………………………. 27
CONTENTS
1
1. P102-8
2. User Manual
3. Remote Control
4. Power Adapter (DC 12V, 2A)
5. Scanner Cable
6. Laser Scanner & Connection Cable
7. Protect Cover
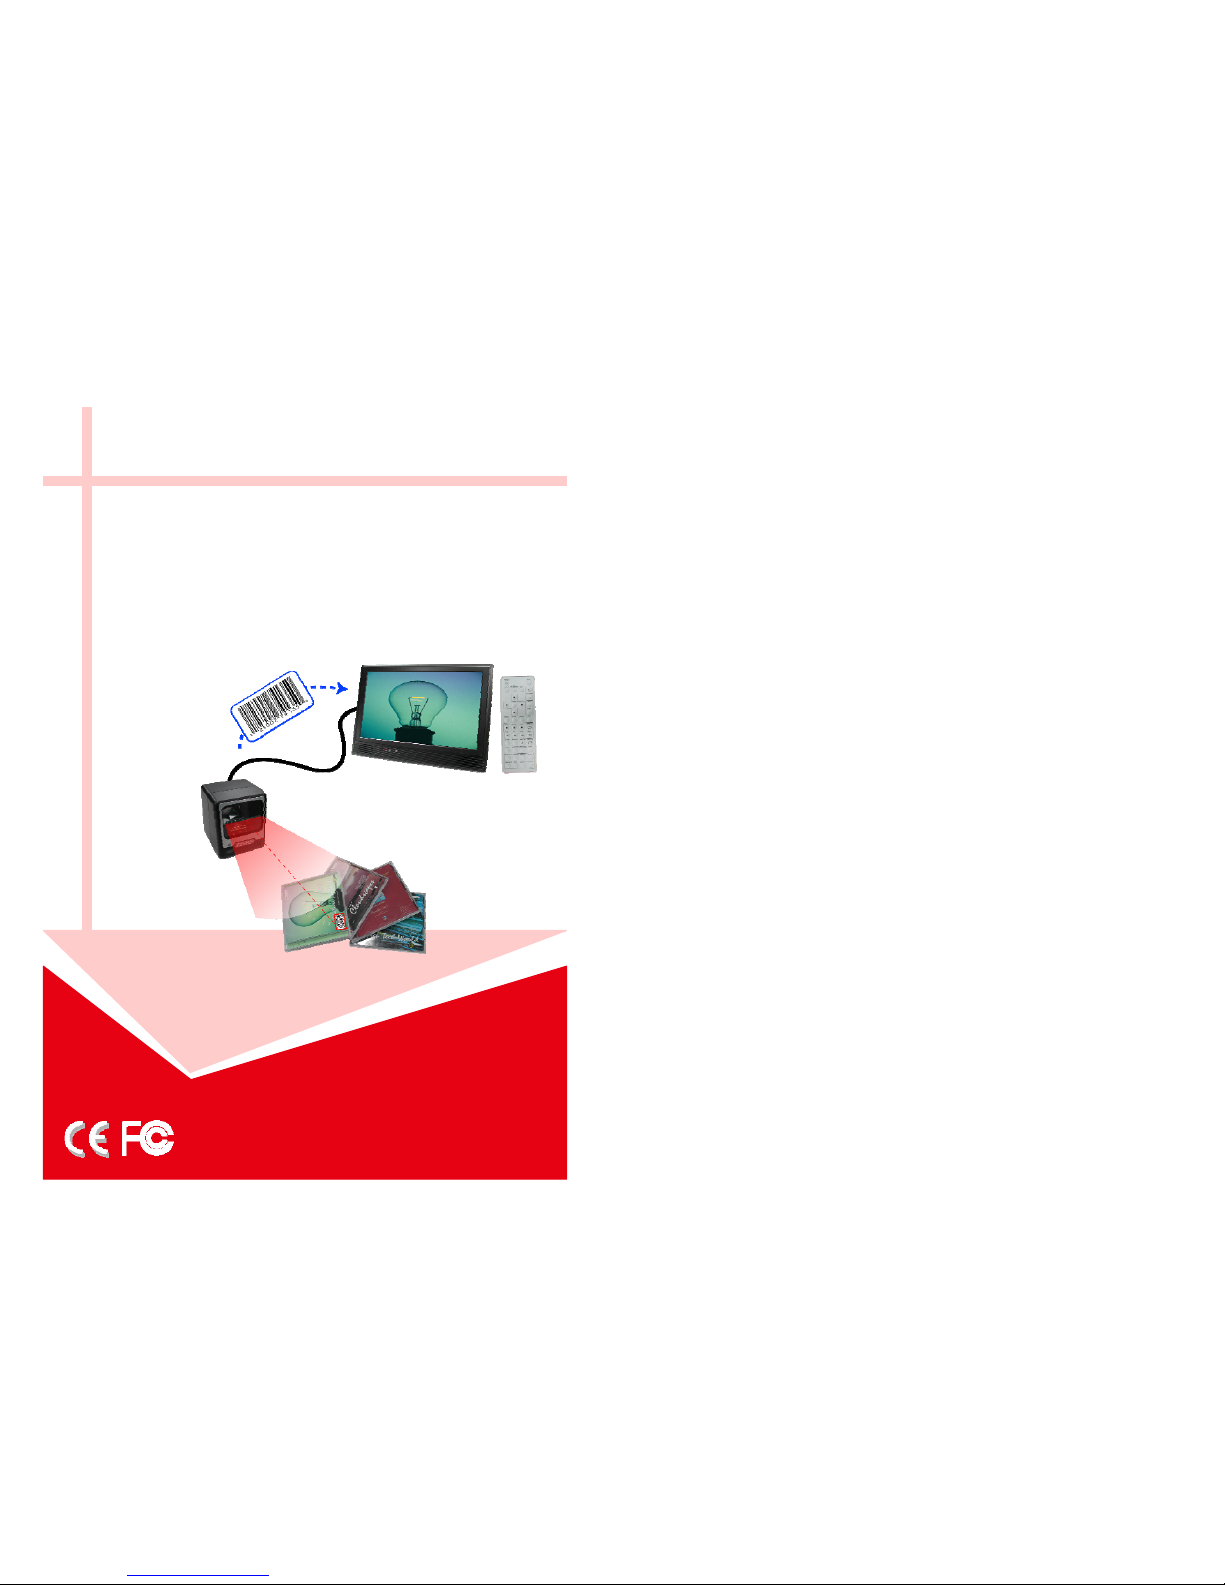
The Eyezone P102-8 is a digital signage that works with laser scanner. It can play the
corresponding file automatically when the laser scanner scans the bar-code. It uses media files
from CF, SD, MMC and MS (Pro) memory card and displays them on a 10.2” TFT-LCD with
audio-out from the built-in speakers.
The Eyezone P102-8 is an ideal Digital Signage Display solution for advertising,
presentations, training, and other media applications.
Supports multiple file formats: Picture, Music and Video.
Supports CF, SD, MMC and MS (Pro) memory card.
Built-in 10.2” TFT-LCD display and stereo speakers.
External color and brightness adjustment control buttons.
Includes a full-function infrared remote control.
Laser Scanner Function:
-The P102-8 will play the corresponding file (up to 1000 files) automatically when scan the
bar-code.
-Performs 5 directions of scan filed with a 20 line scan pattern cycling at 1200 scan per
second for quick accurate reads.
-Supports Bar-Code Type
UPC / EAN/ JAN Japanese Bookland Interleaved 2 of 5
UPC A & UPC E Code 39 Addendum 2 of 5
EAN 8 & EAN 13 Codabar MSI / Plessy
JAN 8 & JAN 13 Code 128 & EAN 128 China Postal Code
ISBN / ISSN Code 93 Code 32
3. FEATURES
2. INTRODUCTION
1. PACKAGE CONTENT

2
Multi-Language OSD:English, French, German, Italian, Portuguese, Spanish, Netherlands,
Japanese and Chinese.
Supports SLIDE SHOW Function: With 14 kinds of transition effects.
Supports SLIDE TIME (INTERVAL) Mode:Interval time with 1, 3, 5, 10, 30, 60 seconds.
Supports MUSIC SLIDE Show:Music and pictures play at the same time.
Supports ZOOM IN (ON) 4x & PAN, ROTATE, MIRROR, PREVIEW and REPEAT.
3. FEATURES
(
continued
)
4. HARDWARE OVERVIEW
3
1
2
3
4
5
6
7
8
9
10
11
12
13
14
15
16
17
18
19
20
21
22
23
24
25
26
27
28
29
30
Power on/ off
Mute sound
Open the setup menu
Memory card selection
Show the information of the file selected
Volume up/ down
Move the cursor
Confirm the selection/ entry
Go to the previous/ next page or image
Display all photo files
Display all music files
Display all movie files
Go to file library (all files)
Pause/ resume playback
Stop playback
Play the selected file
Select the repeat mode
Rewind/ forward movies
View the previous/ next file
Play the previous/ next file if in playback
Set the slideshow interval to 1, 3, 5, 10, 30,
60 seconds
Set the transition effect
Rotate photo 90 degrees clockwise on the
screen
Play music and pictures at the same time
Zoom in the image up to 4x magnification
Mirror the image horizontally
Set the screen type to 16:9 or 4:3
Select the output mode
Set the Brightness/ Contrast/ Color/ Hue/
Sharpness of the panel
To save and quit the setting screen of panel
Adjust the Brightness/ Contrast/ Color/ Hue/
Sharpness of the panel
5. REMOTE CONTROL

4
Press the “SETUP” button on the remote control to open the
“SETUP MENU – MAIN PAGE” shown in the following
figure. There are five groups of sub-menu in the setup menu.
Use the “▲、▼、
▲
、
▼
” buttons to select an item or to
adjust values, and use the “ENTER” button to go into the
function or to confirm the command.
6.1 SLIDE SETUP
THUMBNAIL DIGEST:Thumbnails load faster and
allow you to browse photos easily.
DIGEST STYLE:Choose the slide preview mode. (2x2 /
3x3)
6.2 MUSIC SETUP
REPEAT MODE
•ONE:Repeat the selected song.
•ALL:Repeat all the songs on the memory card.
•OFF:Turn off the repeat function.
6.3 MOVIE SETUP
REPEAT MODE
• ONE:Repeat the selected movie.
•OFF:Turn off the repeat function.
•ALL:Play all the movies on the memory card.
DIGEST STYLE:Choose the movie preview mode. (2x2 / 3x3)
6. SETTING UP
5
6.4 SLIDESHOW SETUP
SLIDESHOW MODE:Set the slideshow to start automatically.
FOLDER REPEAT:Set all files (picture, music or movie)
in the folder to show only once or continuously (loop).
INTERVAL TIME:Set the time each photo is shown to 1, 3,
5, 10, 30 or 60 seconds.
TRANSITION (EFFECT):Set the transition effect and
auto slide with sequential or random playback.
AUTO START:Enable/ disable auto playing media files on the memory card when the device
is turned on.
6.5 PREFERENCE
TV TYPE: Choose the TV TYPE.
•MULTI . SYSTEM:Set the TV type automatically.
•NTSC: Set the TV type to NTSC.
•PAL: Set the TV type to PAL.
VIDEO OUTPUT:Select the video output mode.
OSD LANG: Select the OSD language (ENGLISH, FRENCH, GERMAN, ITALIAN,
JAPANESE, PORTUGUESE, SPANISH and NEDERLANDS).
OSD MESSAGE: Turn the OSD message function on/ off.
RESET: Reset all settings to the original (factory) settings.
FIRMWARE : New F/W can upgraded from the memory card.
• EDITION : Show the F/W versions.
•UPDATE : Used to update the F/W.

6
Copy files (music, picture and movie) to the memory card first.
7.1 PLAY PICTURE FILE
Step 1: Press the “SLIDE” button on the remote control from any menu.
Step 2: The preview mode will show all the picture files on the memory card.
Use the “▲、▼、
▲
、
▼
” buttons to select the picture file, and press the “ENTER”
button to play the picture file.
Step 3: If the “SLIDESHOW MODE” is disabled, press the “NEXT” button to play the next
picture file, the “PREV” button to play the previous file.
7. USING THE P102-8
7
7.2 PLAY MUSIC FILE
Step 1: Press the “MUSIC” button on the remote control from any menu.
Step 2: The “MUSIC LIBRARY” will show all the music files on the memory card.
Usethe“▲、▼” buttons to select the music file, and press the “ENTER” button to play
themusicfile.
Step 3: Press the “NEXT” button to play the next music file, the “PREV” button to play the
previousfile.

8
7.3 PLAY MOVIE FILE
Step 1: Press the “MOVIE” button on the remote control from any menu.
Step 2: The preview mode will show all the video files on the memory card.
Use the “▲、▼、
▲
、
▼
” buttons to select the movie file, and press the “ENTER”
button to play the movie file.
Step 3:Press the “NEXT” button to play the next movie file, the “PREV” button to play the
previousfile.
9
7.4 FILE LIBRARY
Step 1:Press the “FILE” button on the remote control from any menu.
Step 2:You can see all the files (including picture, music and movie) on the left panel of the “FILE
LIBRARY”.Pressthe“▲、▼” buttons to select a file, and the information of the file will
be shown on the right panel.
7.5 HOT KEY
You can use the “S-TIME”, “S-MODE” or “S-MUSIC” hot key on the remote control without
selecting from the “Setup Menu”. (These functions are only used for playing picture files.)
S-TIME:Interval time with 1, 3, 5,.10, 30, 60 seconds.
S-MODE:With sequential, random auto slide shows etc 14 kind of selections
S-MUSIC:Play the picture and music files at the same time.

10
Copy the media files that you want play to the memory card. The Bar-code and the name of the
corresponding file must be the same.
For example:Bar-code is 1234567, and names the corresponding file “1234567.xxx”. (xxx is the
extension)
Make sure the “SCANNER” function is enabled first.
“SLIDESHOW SETUP” → “AUTO START” → “SCANNER”
Use the laser scanner to scan the bar-code, and the P102-8 will find out and play the
corresponding file in the memory card automatically on the screen.
NOTE:Keep 5 to 10 centimeters of distances between scanner and bar-code.
If the P102-8 can’t find the corresponding file, the message “NO FILE” will be showed on the
screen.
If the message “READ AGAIN” will be showed on the screen, please scan again.
8.1 SET THE LASER SCANNER
Please follow the step below to change the scanner setting.
Step1. Scan Enter/ Exit programming mode barcode (2 beeps Low—high).
Step2. Scan barcode for the desired feature (1beep).
Step3. Scan Enter/ Exit programming mode barcode to save the configuration (2 beeps,
long---short).
8. USING THE LASER SCANNER
11
Enter/Exit Programming Mode
All framed barcode names represent
as default settings.
RESET
※ The reading of the “RESET” label turns all the parameters back to default values.

12
Code 39 Enable
Code 39 Disable
13
Codabar Enable
Codabar Disable

14
UPC/EAN/JAN Enable
UPC/EAN/JAN Disable
15
ITF 2 of 5 Enable
ITF 2 OF 5 Disable

16
Chinese Post Code Enable
Chinese Post Code Disable
17
Code 128 Disable

18
Code 93 Enable
Code 93 Disable
19
EAN-128 Enable
EAN-128 Disable

20
Code 32 Enable
(Italian Pharmacy Code)
Code 32 Disable
(Italian Pharmacy Code)
21
MSI enable
MSI Disable

22
EAN-13 Convert to ISBN/ISSN Enable
EAN-13 Convert to ISBN/ISSN Disable
23
UPC/EAN ADD ON OFF
ADD ON 5 only

24
ADD ON 2 only
ADD ON 2 or 5
25
EAN/UPC +Add on (none mandatory)
EAN/UPC + Add on ( mandatory)

26
Force UPC-A to EAN-13 format enable
Force UPC-A to EAN-13 format disable
27
Situation Check Point
No Picture
1. Check if the power supply is connected.
2. Make sure the P102-8 is turned on.
No response from
the remote control
1. Make sure there is a clear view between the remote
control and the device.
2. Change the remote control’s batteries.
The Laser Scanner is
on, but cannot read
bar-codes.
1. The scanner window is dirty and must be cleaned.
2. The presented barcode type is not enabled. (refer to 8)
3. The barcode type presented is not supported .
Memory card
1. Push cards gently and securely.
2. If the card does not insert easily, check the direction.
3. Confirm format of the card. The P102-8 supports CF, SD,
MMC and MS (Pro) memory card.
No sound
1. Check if the mute function is on.
2. Check if the volume is turned up.
8. TROUBLESHOOTING
Table of contents
Popular Barcode Reader manuals by other brands

Datalogic
Datalogic Gryphon I GD44XX Quick reference guide

Newland
Newland NLS-HR12XX-7X user guide

Symbol
Symbol M2004-I418 Special operating instructions

RIOTEC
RIOTEC iLS6300FBQ quick guide

Motorola
Motorola MK1250-0N0DAKBNTWR - Symbol Micro Kiosk MK... Product reference guide

NCR
NCR RealScan 7872 Installation & owners guide