EYEZONE B1080P-6 User manual

EYEZONE B1080P-6
User Manual
Jul 27, 09
FCC Notices
It’s herewith confirmed to comply with the requirements of FCC Part 15 Rules. Operation
is subject to the following two conditions:
This device may not cause harmful interference.
This device must accept any interference received, including interference that may
cause undesired operation.
Note: This equipment has been tested and found to comply with the limits for a Class B
digital device, pursuant to part 15 of the FCC Rules. These limits are designed to provide
reasonable protection against harmful interference when the equipment is operated in a
residential installation. This equipment generated uses and can radiate radio frequency
energy and if not installed and used in accordance with the instruction manual may cause
harmful interference to radio communications. However, there is no guarantee that
interference will not occur in a particular installation. If this equipment does cause harmful
interference to radio of television reception, which can be determined by turning the
equipment off or on, the user is encouraged to try to correct the interference by one or
more of the following measures:
Reorient or relocate the receiving antenna.
Increase the separation between the equipment and receiver.
Connect the equipment into an outlet on a circuit different from that to which the
receiver is connected.
Consult the dealer or an experienced radio TV technician for help.
CE Declaration
This device complies with CE class B.
EN55022 IEC 61000-4-4
EN61000-3-2 IEC 61000-4-5
EN61000-3-3 IEC 61000-4-6
EN55024 IEC 61000-4-8
IEC 61000-4-2 IEC 61000-4-11
IEC 61000-4-3
Printed in Taiwan R.O.C.
All contents are subject to change without notice.
All trademarks are the property of their respective owner.

1. Package Contents……………………..………………………..
1
2. Introduction……………………………….……………………...
1
3. Features………………………………………….………………
2
4. Hardware Overview…………………..………………………...
3
5. Remote Control…………………………..……………………..
4
5.1 Entering Text or IP Address…………..……………………
4
6. Start the B1080P-6…………………….……………………….
5
7. Setting Up………………………………………………………..
6
7.1 Network Setup……………………..….…………………….
6
7.2 FTP Setup……………………………………………………
8
7.3 Video Setup…………………………..……………………..
10
7.4 Other Setup………………………………..………………..
11
8. Using the B1080P-6………………………..…………………...
13
8.1 Play Media Files on the CF Card………………………….
13
8.2 Download Function………………………………………….
16
8.3 Play the Media Files on the PC……………………………
19
8.4 Download/ Upload Media Files…………….………………
22
8.5 RS-232 Function……………………………………..……..
25
9. Http Command Function………….………………..…………..
26
9.1 Player Control………………….………………..…………..
27
9.2 Network Setup…………………………………..…………..
28
9.3 Timer Setup………………………………………..………..
29
10. GPS Function……………....…..…………..……….…………..
30
11. Troubleshooting……………………..……..………..…………..
32
CONTENTS
1
1. PACKAGE CONTENTS
1. B1080P-6
2. GPS Antenna
3. Remote Control
4. Audio Cable
5. S-Video Cable
6. Power Adapter
7. User Manual
2. INTRODUCTION
Eyezone B1080P-6 is a full HD digital signage that built-in Global Positioning System (GPS)
module. Eyezone B1080P-6 will receive the microwave signal from satellites and continuously
provide the current location positioned and play the associated media file according to its location.
Eyezone B1080P-6 can play HD WMV9 and WMA files from CF memory card without a
computer. Eyezone B1080P-6 supports High Definition movie hardware decode acceleration,
presents for you the smoother and clearer picture, it supports high resolution video output such as
1080P / 1080i / 720P for movie theater quality video on a big screen. By connecting to S-Video,
Y.Pb.Pr, VGA (resolution up to 1360 x 768), HDMI (1920 x 1080P) and Audio, you can play media
files on any display device.
Eyezone B1080P-6 can be installed on the tourist bus, train or taxi to play the local attractions,
station information or latest promotion.

2
3. FEATURES
Built-in Global Positioning System (GPS) module that receive the microwave signal from
satellites and play the associated media file according to its location.
Supports multiple file formats: HD WMV9 and WMA.
Supports Video, S-Video, Y.Pb.Pr, HDMI, VGAand Audio output.
HD Y.Pb.Pr output supports resolution: NTSC Mode(60Hz): 480P/ 720P/ 1080i.
PAL Mode(50Hz): 576P/ 720P/ 1080i.
HDMI Output: 480P/ 720P/ 1080i/ 1080P.
VGA output supports resolution: 640x480/ 800x600/ 1024x768/ 1280x1024/ 1360x768.
Supports RS-232 port for computer control with ASCII command (play, stop, pause…etc).
Supports CF memory card. (Suggest using the high speed (150X) CF card)
The source of HD WMV9 MP@HL (Main Profile / High Level) supports resolution up to
1920x1080 (1080P) and the maximum bit rate is 12Mbps.
Exports the Configuration Value: You can export the configuration value to the CF card. The
configuration value can be modified on your PC, and can be applied to the B1080P-6 or
others.
Supports Auto Key Lock function.
Connect using an Ethernet network cable at up to 100Mbps.
Supports HTTP Command function.
Compatible with Windows Media Player 11: Play media files stored in a network computer.
Supports FTP Auto Download Function: Connect to Remote FTP server and download data to
the CF card automatically.
Supports Download Pause / Resume Function: Continue unfinished downloads upon next
session.
Embedded FTP Server.
Supports NTP Network (G.M.T) Timer. You can also set the system time manually.
Supports Universal Plug and Play (UPnP) and DHCP.
Supports SLIDE SHOW Function.
3
4. HARDWARE OVERVIEW
Power Switch: Toggle between main power on & off.
DC Input: For the power adapter. (DC 12V / 1.5A)
VGA Out: Connects to devices that support VGAinput. (LCD、projector)
Y.Pb.Pr Out: Connects to devices that support Y.Pb.Pr input. (HDTV、projector)
HDMI Out: Connects to devices that support HDMI input.
RS-232 Connector: Used for computer control withASCII command.
RJ-45 Ethernet Connector: Connects to router or PC by RJ-45 Cable.
Audio Out: Connects to sound input. (HDTV with amplified speaker)
S-Video Out: Connects to devices that support S-Video input. (HDTV、projector)
Video Out: Connects to device that support Video input. (HDTV、projector)
GPS Antenna Connector: Connects to the provided GPS antenna.
“CF READY” LED: Steady green confirms that the CF card is inserted correctly.
CF Card Socket: Insert your CF card with media files.
“RESET” Button: To restart the B1080P-6.

4
5. REMOTE CONTROL
1
2
3
4
5
6
7
8
9
10
11
12
13
14
15
16
17
18
19
20
21
22
23
24
Power on/ off
Select the output mode
Numeric Key
Delete last entry
Select a function or to play the selected file
Open the setup menu Mute sound
OSD display function on/ off
Auto-play function on/ off
Mute sound
Volume up/ down
Move the cursor
Confirm the selection/ entry
Go back one layer
Select the TV type (NTSC/ PAL)
Shuffle on & off
Play the file selected
View the previous/ next file
Play the previous/ next file if in playback
Select the repeat mode
Rewind/ forward movie or music files
Stop playback
Show the information of the file selected
Search video (movie) timeframe
Zoom in/ out on the movie or picture
Pause the playback or play frame by frame
5.1 ENTERING TEXT OR IP ADDRESS
Keys need to be pressed multiple times to enter the letter corresponding to that key.
For Example: To enter the letter “a”. You would press the button “2” twice.
Enter The IP Address
For Example: To enter the IP address”192.168.100.100”,
Step 1: Press “1” once, then “1” is displayed, and the color of “1” is orange.
Step 2: When the color of “1”turns white, press “9” once, then “9” is displayed.
Step 3: Repeat steps 1 and 2 to enter and complete the IP address.
5
6. START THE B1080P-6
Power On
Insert the CF memory card that has Picture, Music, Movie or WMV9 files.
Press the “POWER” button to power on the Eyezone B1080P-6, and then press the “TV
MODE” button to select the output mode.
NOTE: The B1080P-6 can’t be turned on without inserting the CF card.
Status After Power On
Status 1: If the “AUTOPLAY (Movie, Picture or All Files)” function is enabled and there are
media files on the CF card, the Eyezone B1080P-6 will auto play media files after power on.
Status 2: If the “AUTOPLAY” function is disabled, after power on the main menu will appear
as shown in the following figure. There are two groups in the main menu (“/mnt/CF” and
“SETUP”).
NOTE: The pop-up window that shows the IP address will appear later, if DHCP mode is selected
when the Eyezone B1080P-6 is turned on.
Power Off: Press the “POWER” button again to power off.

6
7. SETTING UP
In the main menu, using the “▼” button on remote control to select the “SETUP” item, and then
press the “ENTER” button. You will be presented with the B1080P-6 settings screen.
You can also press the “SETUP” button on remote control to directly open the settings screen.
(If there is file that is being play, please stop first.)
There are four groups of sub-menu in the main menu (“Network Setup”, “FTP Setup”, “Video
Setup” and “Other Setup”).
In the settings screen, you can use the “▲、▼、
▲
、
▼
” buttons to select an item, and press the
“ENTER” button to confirm the selection.
Press the “SETUP” button on remote control to save and quit the settings screen.
7.1 NETWORK SETUP
Network with: Select your network connection Disable/ RJ45.
IP Assigned by DHCP: If you have a DHCP-enabled router, please select “On”, and then the
router will automatically assigns an IP address to the Eyezone B1080P-6. If you don’t have a
DHCP –enabled router, select “Off” and type the network information in “Assign IP Address”.
7
7.1 NETWORK SETUP (continued)
Assign IP Address: If the Eyezone B1080P-6 is connected to a network without a DHCP
server or you want to use Local FTPServer function, enter the fixed IP address, Mask, Gateway
and DNS for the Eyezone B1080P-6.
PS. Refer to 5.1 for how to enter IP address by remote control.
NOTE: Before setting the IP address, Mask, Gateway and DNS, check the network information of
your PC. Please follow the steps below to get the network information of your PC.
Step 1: Click on “Start” →“Run” and type in “command”, then press “ENTER”.
The MS-DOS window will appear, type in “ipconfig” and then press “ENTER” to get the network
information.
Step 2: Assign IP Address, Mask (Subnet Mask) and Gateway (Default Gateway) for the B1080P-6.
Enter the same values of the Subnet Mask and Gateway, and be careful not to enter the values of
IP address that are already used by other devices on the network.
Media Player 11 Server: Enable/ disable the Media Player 11 server.

8
7.2 FTP SETUP
Local FTP Server: Turn on/ off the Eyezone B1080P-6 server.
(If you use the Eyezone B1080P-6 server, please disable the DHCP function and input a fixed
IP address, Mask, Gateway and DNS of the Eyezone B1080P-6)
Local FTP Server Setup: Set the “Port”, “User ID” and “Password” of the Eyezone B1080P-6.
(The Default Port: 21, User ID: root, Password: admin)
FTP Auto Download: Enable/ Disable the FTP auto download function.
Remote FTP Download Setup
-Server IP: Enter the domain name or IP address of the FTP as was given to you by your
Web hosting provider.
-Port: The default port for FTP is 21. In most cases you should not change this number. If
the FTP site uses a port other than 21, you should enter the correct port.
-User ID: Enter the user name of the Remote FTP server.
-Password: Enter the Password of the Remote FTP server.
-FTP Path: Enter the folder path that you want to share.
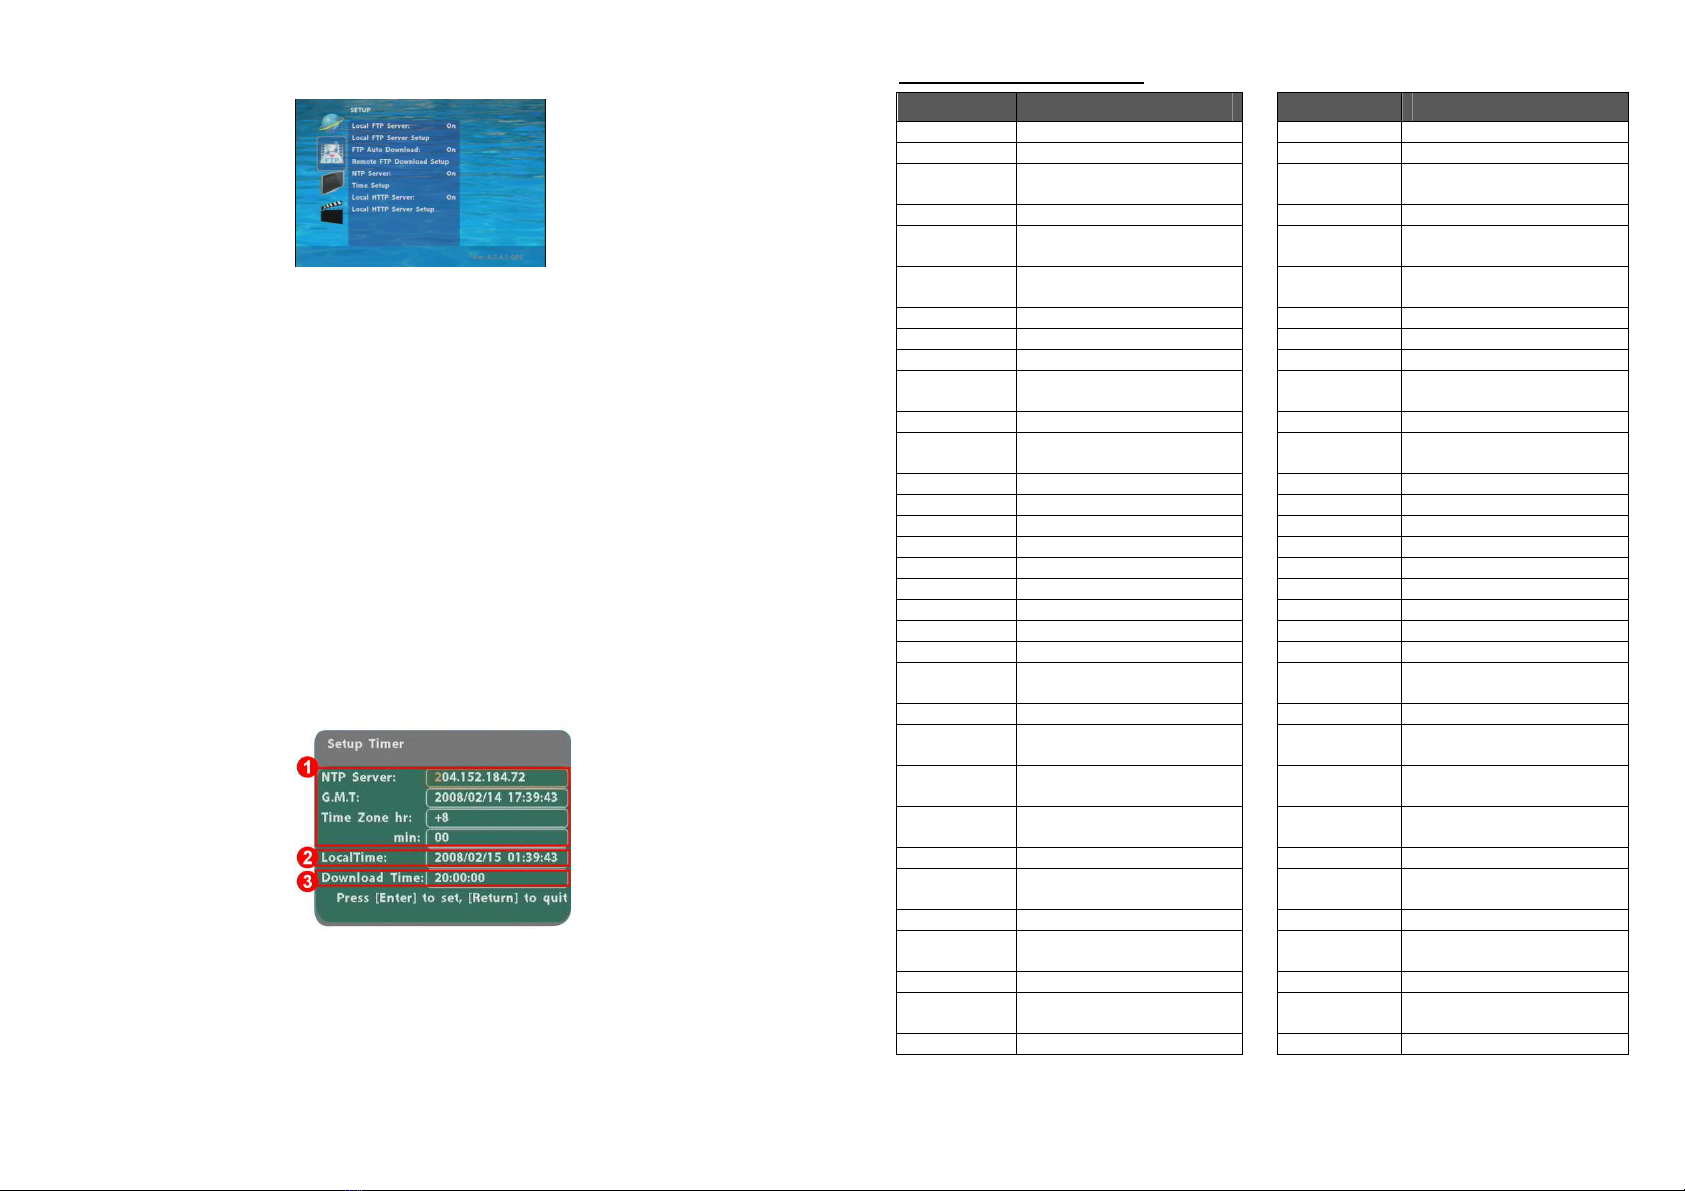
NTP Server: Enable/ Disable the NTPserver function. (if the B1080P-6 isn’t connect to internet,
please disable the NTP Server function)
Time Setup: Set the NTP Server, Local Time and Auto Download Time here.
①NTP Server (the Eyezone B1080P-6 must be already connected to the network)
-NTP Server: Enter the NTP server IP address like: 204.152.184.72.
-G.M.T: After B1080P-6 get the time from NTP server, it will update the G.M.T field.
-Time Zone: Use the Volume +, -and Numeric Key to set the time zone of your location.
(time zone must be set properly for the Auto-Download and Schedule functions)
9
NOTE: GMT and applied regions
Time Zone Region Time Zone Region
(GMT-12:00) Eniwetok, Quazalen (GMT+02:00) Helsinki, Riga, Tallinn
(GMT-11:00) Midway, Ireland, Samoa (GMT+03:00) Nairobi
(GMT-10:00) Hawaii (GMT+03:00) Moscow, Saint Petersburg,
Volgograd
(GMT-09:00) Alaska (GMT+03:00) Baghdad
(GMT-08:00) Pacific GMT (U.S. & Canada);
Tijuana (GMT+03:00) Kuwait, Raid
(GMT-07:00) Continental GMT (U.S. &
Canada) (GMT+03:30) Tehran
(GMT-07:00) Arizona (GMT+04:00) Baku, Tbilisi, Ere van
(GMT-06:00) Mexico city (GMT+04:00) Abu Dhabi, Muscat
(GMT-06:00) Saskatchewan (GMT+04:30) Kabul
(GMT-06:00) Eastern Coast GMT (U.S. &
Canada) (GMT+05:00) Yekaterinburg
(GMT-06:00) Indiana (Eastern Coast) (GMT+05:00) Islamabad, Karachi, Tashkent
(GMT-04:00) Atlantic GMT (Canada) (GMT+05:30) Calcutta, Chennai, Mumbai, New
Delhi
(GMT-04:00) Santiago (GMT+05:45) Katmandu
(GMT-04:00) Caracas, La Paz (GMT+06:00) Sri Jayewardenepura Kotte
(GMT-04:00) Newfoundland (GMT+06:00) Astana, Dakar
(GMT-03:00) Greenland (GMT+08:00) Irkutsk, Ulan Bator
(GMT-03:00) Buenos Aires, Georgetown (GMT+08:00) Kuala Lumpur, Singapore
(GMT-03:00) Brasilia (GMT+08:00) Taipei
(GMT-02:00) Mid-Atlantic (GMT+08:00) Perth
(GMT-01:00) Capo Verde Is. (GMT+09:00) Seoul
(GMT-01:00) Azores (GMT+09:00) Yakutsk
(GMT-00:00) Greenwich GMT; Dublin,
Edinburgh, Lisbon, London (GMT+09:00) Osaka, Sapporo, Tokyo
(GMT-00:00) Casablanca, Monrovia (GMT+09:30) Darwin
(GMT+01:00) Beograd, Bratislava, Budapest,
Ljubljana, Prague (GMT+09:30) Adelaide
(GMT+01:00) Brussels, Copenhagen, Madrid,
Paris (GMT+10:00) Guam, Port Moresby
(GMT+01:00) Sarajevo, Skopje, Sofia, Vilnius,
Warsaw, Zagreb (GMT+10:00) Brisbane
(GMT+01:00) Midwest Africa (GMT+10:00) Vladivostok
(GMT+01:00) Amsterdam, Berlin, Bern, Rome,
Stockholm, Vienna (GMT+10:00) Canberra, Melbourne, Sydney
(GMT+02:00) Bucharest (GMT+10:00) Hobart
(GMT+02:00) Athens, Istanbul, Minsk (GMT+11:00) Magadan, Solomon Is., New
Caledonia
(GMT+02:00) Jerusalem (GMT+12:00) Auckland, Wellington
(GMT+02:00) Cairo (GMT+12:00) Fiji, Kamchatka Pen., Marshall
Is.
(GMT+02:00) Harare, Pretoria (GMT+13:00) Nuku'alofa

10
② Local Time: Set the system time manually.
NOTE: If the NTP Server and Local Time have been set, the NTP Server will be the first
priority (the Eyezone B1080P-6 is already connected to the network).
③ Download Time: Set the FTP auto-download time.
Local HTTP Server: Enable/ Disable the HTTP command function.
Local HTTP Server Setup: To set the “Port”, “User ID” and “Password” of the Eyezone
B1080P-6. (The Default Port: 80, User ID: root, Password: admin)
NOTE: Press the “SETUP” button on the remote control to save the settings, and it
will auto exit the settings screen, then restart the Eyezone B1080P-6.
7.3 VIDEO SETUP
TV Standard: Select the output TV video format (NTSC / PAL).
NTSC Active Output: Select the output mode. (HDMI/ SD Video/ VGA/ HD Y.Pb.Pr)
You can also press directly the “TV MODE” button on the remote control to select output mode.
Aspecl-ratio: Select TV mode 4:3, 16:9 or 16:10.
HDMI: Select the HDMI output resolution among 480i / 480p/ 720p / 1080i/ 1080p.
Select the “Auto EDID”, the Eyezone B1080P-6 will scan the display device connected and set
the correct resolution automatically.
SD Video: Select the SD output mode. (“Video/ S-Video” or “Y.Cb.Cr”)
VGA 60Hz: Select the VGA output resolution.
(640*480 / 800*600/ 1024*768/ 1280*1024/ 1360*768)
HD Y.Pb.Pr 60Hz: Select the Y.Pb.Pr output resolution among 480p / 720p / 1080i.
11
7.4 OTHER SETUP
Play OSD Display: Enable or disable the OSD display.
Auto Play
- Movies: Auto play movie files on the CF card after power on.
- Pictures: Auto play picture files on the CF card after power on. (slideshow function)
- All Files: Auto play all the media files on the CF card after power on.
- Off: Turn off the Auto Play function.
SlideShow Interval Times: Set the time each photo is shown (10/ 15/ 30 seconds, 1/ 10/ 15/
30 minutes or 1 hour).
Lock Remote Controller: Enable/ disable the auto key lock function. (The B1080P-6 will auto
lock when there is no further input for 1 minute.)
Lock Password Setup: Press the “Enter” button to open the “Set Password” window. Enter the
password with numeric buttons and press the “Enter” button to save the new password (The
default password: 123).

12
7.4 OTHER SETUP (continued)
Export Setting File: Press the “Enter” button to export the configuration value to the CF card.
Copy the file “HDPlayerSetting.txt” on CF card to your PC. Use the “Wordpad” to open the file,
and you can see all the configuration value of B1080P-6.
You can modify directly the configuration value on your PC.
Example. [AutoPlay] Off Options: Movies, Pictures, Off
The “Auto Play” function is turned off, you can change directly the mode to Movies or
Pictures.
Copy the completed file “HDPlayerSetting.txt” from PC to CF card. Insert the CF card to the
B1080P-6, the B1080P-6 will apply the new settings automatically.
Play Button: Use for configuring the Repeat method of B1080P-6 when use it with other
accessory, like “Play Button”, “Touch Sensor Button” and “GPS” function. The Eyezone
B1080P-6 supports two options, Repeat Default / Repeat All.
-Repeat All : When “Repeat Default” is selected, the B1080P-6 will repeatedly play the first
demo file in the CF card.
-Repeat Default: On the other hand, when “Repeat All” is selected, the B1080P-6 will
repeatedly play all the demo files in the CF card, in turns of the file name’s alphabetical order.
Auto Power On/ Off: Enable/ Disable the Auto Power On/ Off function.
Auto Power Setting: Set the time of power on/ off.
Transition effect: Set transition effects between photos.
13
8. USING THE B1080P-6
8.1 PLAY MEDIA FILES ON THE CF CARD
Step 1: Insert the CF card with media files, then turn on the Eyezone B1080P-6 and press the “ENTER”
button on the remote control when “’mnt/CF” is highlighted to take you into the CF card.
Step 2: Select the type of data (VIDEO/ AUDIO/ PICTURES) you want to play, and then press the
“ENTER” button on remote control to take you into the “VIDEO LIBRARY”, “AUDIO LIBRARY” or
“PICTURE LIBRARY”. You can also select the ALL FILES item, and it will list all the media files on the
CF card.
PS. If the symbol (return) appears on the screen, you can use “RETURN” button of the remote
control to go back one layer.
Step 3: Select the file you want to play, and press “ENTER” or “PLAY” button on the remote control to
play the file.
VIDEO LIBRARY AUDIO LIBRARY PICTURE LIBRARY ALL FILE LIBRARY
RETURN

14
8.1.1 Using the Remote Control When Media File Is Playing
SETUP: Press the button to adjust the brightness, contrast or saturation while the video or picture
is playing. With the “+ VOLUME –” button.
- First Press: Adjust the brightness.
- Second Press: Adjust the contrast.
- Third Press: Adjust the saturation.
Brightness Contrast Saturation
MUTE: Mute the sound while the movie or music is playing.
+ VOLUME -: Increase/ decrease the volume while the video or music is playing.
SHUFFLE: Turn on/ off the shuffle function.
PREV / NEXT: Play the previous/ next file.
REPEAT: Select the repeat mode.
REV / FWD: Rewind/ forward movie or music file.
STOP: Stop playing, and go back one layer.
INFO: Display the file information.
File and Coordinate Information
SERACH: Search video (movie) timeframe.
Press the “SEARCH” button, and enter the initial time that you want to start at, then press the
“ENTER” button to play.
15
PAUSE/STEP: Pause the playback or play frame by frame.
ZOOM: Zoom in/ out on the movie or picture.
Original Size First Press:
::
:ZOOM 01
Second Press:
::
:ZOOM 02 Third Press:
::
:ZOOM 03

16
8.2 DOWNLOAD FUNCTION
Before it downloading files from the FTP server, Eyezone B1080P-6 will delete all contents on CF card
except the file on the CF card and the FTP server are the same.
8.2.1 Manual Download Function
Please confirm that the Eyezone B1080P-6 is already connected to the network. (Refer to 7.1
Network Setup)
Please use the“▼”button to select the “DOWNLOAD” item, and press “ENTER” button. The
Eyezone B1080P-6 will connect to the FTP server and download files automatically.
Before download files, Eyezone B1080P-6 will delete all contents on CF card first.
The pop-up window that shows the status of download and the screen saver will appear while the
Eyezone B1080P-6 is downloading files.After finishing downloading files, the Eyezone B1080P-6
will display the files automatically.
Screen Saver
8.2.2 Auto Download Function
If there are more than one Eyezone B1080P-6, you can use ftp tools to divide them into different
regional group.
17
For example.
-Use the ftp tool “Serv-U” to divide into three groups, and setup the “User name”, “Password” and
“FTP port number” of three groups for login ftp server.
Group 1: User name: ipmedia/ Password: 0000/ FTP port number: 21
Group 2: User name: ipmedia2/ Password: 1111/ FTP port number: 21
Group 3: User name: ipmedia3/ Password: 2222/ FTP port number: 21
FTP tool:
::
:Serv-U Setup “User name”, “Password” and “FTP port number”
-Enter the “Remote FTP Download Setup” window of Eyezone B1080P-6, and then type the same
“User name (User ID)”, “Password” and “Port”. The Eyezone B1080P-6 in group 1, please type the
“User ID: ipmedia”, “Password: 0000” and “Port: 21”.
-Please enter the “Network Timer NTP” window of Eyezone B1080P-6, and set up the “Download
Time”, then the Eyezone B1080P-6 will download all the files from the FTP server at the designated
time.
NOTE: The filename of the media files in FTP server cannot have any spaces.

18
8.2.3 Download Pause / Resume
Eyezone B1080P-6 supports download pause/resume. You can press the “STOP” button to pause
downloading media files. The Eyezone B1080P-6 can continue unfinished downloads upon next
session.
NOTE: If the network connection is unstable or broken, a pop-up window will appear as shown below.
The Eyezone B1080P-6 will attempt to resume downloading in 2 minutes. The user can terminate the
download by pressing the “RETURN” button.
19
8.3 PLAY THE MEDIA FILES ON THE PC
Using Windows Media Player Version 11 ( Windows XP/ Vista only )
Step 1: Please download and install Windows Media Player Version 11 on your PC first.
Step 2: Launch the Windows Media Player Version 11 and the window below will appear.
Step 3: Click the “Library” tab, and then click “Add to Library”.
Step 4: Click “Add” and select the folder containing the media files you want to share, and then click the
“OK” button.

20
Step 5: Click the “Library” tab, and then click “Media Sharing”.
Step 6: Select the “Share my media”, and click “OK”.
Step 7: In the Media Sharing dialog box, select the “Share my media” check box.
21
Step 8: Confirm that the Eyezone B1080P-6 is connected to the network.
In the list of devices below the “Share my media to” check box, select the device (Eyezone B1080P-6),
and click “Allow” to share the media files.
Step 9: The shared folder will appear on the screen of the Eyezone B1080P-6. Select the folder and
click the “ENTER” button on remote control to go into the folder.
Step 10: Select the type of data (VIDEO/ AUDIO/ PICTURES) you want to play, and then press the
“ENTER” button on remote control.

22
Step 11: Select the file you want to play, and press “ENTER” or “PLAY” button on the remote control to
play the file.
NOTE: If the media files shared from PC are not listed on screen, restart your PC.
8.4 DOWNLOAD / UPLOAD MEDIA FILES
Method 1: Connect by IE Browser
Step 1: Confirm the “IP Assigned by DHCP” has been disabled, then enter the “Network Setup” item,
and type IP Address (example. 192.168.1.100), Mask and Gateway for the B1080P-6 (refer to 7.1).
Step 2: Confirm the “Local FTP Server” function has been enabled (refer to 7.1).
23
Step 3: Please setup your router or firewall, and open a port 21 for the Eyezone B1080P-6. The
following figure is an example, please refer to your user’s manual of router for opening ports.
Step 4: Start IE on PC and type the FTP site or IP:
In the local PC, please type “ftp://192.168.1.100”.
In the remote PC, please type “ftp://61.30.13.40:21”.
Step 5: Then type the “User Name” and “Password” and click “Log On” to log on to the Eyezone
B1080P-6 Server. (Default User Name: root Default Password: admin)
Step 6: After logging on, all the media files in the CF card on the Eyezone B1080P-6 will be listed. You
can download and upload the media files between CF card and your PC.
NOTE: After file being download/ upload will stop playing. After downloading files, the Eyezone
B1080P-6 will display the movie files automatically.

24
Method 2: Connect by FTP Tools
For example.
- If there are multiple B1080P-6, you can use the “CuteFTP” tool to connect and manage files easily.
CuteFTP
- You can create all the Eyezone B1080P-6, and only select the Eyezone B1080P-6 that you want to
connect in the list.
- Select the files you want upload to the Eyezone B1080P-6, or download the files to your PC.
NOTE: After file being download/ upload will stop playing. After downloading files, the Eyezone
B1080P-6 will display the movie files automatically.
25
8.5 RS-232 FUNCTION (RS-232 cable is optional)
Use the tool “Tera Term” or other tools to control the Eyezone B1080P-6 with ASCII command.
NOTE. 1.Baud Rates:
- Firmware Updating: Set up the baud rate as “115200”.
- ASCII Command: The available baud rates is 38400.
2. The reaction time of B1080P-6 is around three seconds.
Keyboard Layout
q:
::
:POWER -:
::
:VOL - w:
::
:SLOW
R:
::
:RETURN *:
::
:MUTE >:
::
:NEXT
!:
::
:REPEAT S:
::
:SELECT <:
::
:PREW
~:
::
:SETUP A:
::
:Auto Download u:
::
:UP
#:
::
:TV MODE p:
::
:PLAY d:
::
:DOWN
%:
::
:AutoPlay P:
::
:PAUSE/STEP l:
::
:LEFT
i:
::
:INFO x:
::
:STOP r:
::
:RIGHT
m:
::
:NTSC/PAL f:
::
:FFW s:
::
:ENTER
$:
::
:SEARCH b:
::
:REW C:
::
:CLEAR
+:
::
:VOL + (XXXXX.XXX):
::
:Play The File (xxxxx.xxx is the file name)
NOTE:
::
:Must include the round brackets.
[number]: Play the file by index. (numbers < upper case letters < lowercase letter)
Pin Assignment
D Sub 9Pin Female D Sub 9Pin Female
Pin 1 Pin 4
Pin 2 Pin 3
Pin 3 Pin 2
Pin 4 Pin 1
Pin 5 Pin 5
Pin 6 Pin 6
Pin 7 Pin 8
Pin 8 Pin 7
Pin 9 Pin 9

26
9. HTTP COMMAND FUNCTION
Confirm that the Eyezone B1080P-6 is already connected to the network. (Refer to 7.1)
Confirm the “Local HTTP Server” function has been enabled, and the “Local HTTP Server
Setup” set has been completed (refer to 7.2).
Set your router or firewall, and open a port 80 for the Eyezone B1080P-6. The following figure is an
example, please refer to your user’s manual of router for opening ports.
Start IE on PC and type the HTTP site or IP:
In the local PC, please type “http://192.168.1.100”.
In the remote PC, please type “http://61.30.13.40:80”.
Type the “User Name”, “Password” and click “OK” to log on. (Default User Name: root
Default Password: admin)
There are three items: “Player Control”, “Network Setup” and “Timer Setup” in the window.
27
9.1 PLAYER CONTROL
Power State: Turn on/ off the B1080P-6.
Check State: Check the current state of B1080P-6.
Playback Control: Control the B1080P-6 to play file/ stop playback/ pause the playback/ play the
previous file/ play the next file/ rewind movie/ forward movie.
Play File: Enter the file name that you want play, and click “Send” to play the file immediately.
Repeat File: Select the repeat mode.
Auto Download: Click “Send” to execute the auto download function immediately.
Note: The “FTP Auto Download” function must be turned on and completed set.
Stop Auto Download: Click “Send” to stop the auto download function immediately.
Connect FTP Server: Click the FTP server address to connect to the B1080P-6, and enter the
user name and password (Default User Name: root, Default Password: admin) to log on. After
logging on all the media files in the CF card on the Eyezone B1080P-6 will be listed. You can
download and upload the media files between CF card and your PC.
Volume Control: Enter the value for volume (0-30).
Auto Play: Select the auto play mode (movies/ pictures/ All Files/ off).
Format CF Memory Card: Directly format the CF card.
Reboot System: Click “Send” to reboot the B1080P-6 immediately.

28
9.2 NETWORK SETUP
Network Interface: Select your network connection Disable/ RJ45 (Wi-Fi function only for
B1080PW).
DHCP: Enable/ Disable the DHCP function.
IP Address: Enter the fixed IP address, Mask, Gateway and DNS for the Eyezone B1080P-6.
FTP Server: Enable/ Disable the FTP Server function. You can also change the User ID,
Password and port of the FTP Server.
HTTP Server: Enable/ Disable the HTTP Server function. You can also change the User ID,
Password and port of the HTTP Server.
Media Player 11: Enable/ disable the Media Player 11 server.
The “WiFi Encryption Mode” and “WiFi SSID” items only for B1080PW.
Reboot System: After setting, click “Send” to reboot the B1080P-6.
29
9.3 TIMER SETUP
NTP Server: Set the NTP Server.
Auto Download: Set the auto download time.
Remote FTP: Set the Remote FTP Server.
Auto Power: Enable/ disable the auto power on/ off function and set the time of power on/ off.
Reboot System: After setting, click “Send” to reboot the B1080P-6.

30
10. GPS FUNCTION
The B1080P-6 supports GPS Function. When install the B1080P-6 in a vehicle, like a bus or train, user
can configure the B1080P-6 to play media files by the location of B1080P-6.
Step 1: Set the Play Button mode to “Play Default”.About howto set the Play Button Mode, please refer
to section 7.5
Step 2: Find the coordinate of the target location. User can find the coordinate of the target location via
GIS software, for example, user might search the coordinates of the target location via Google Map
service.
31
Step 3: Create a text file and name this file as “GPSPos.cfg”. Use notepad to edit this file as shown
below.
-Range: Use this value to define the distance in meter, when the actual distance between the
B1080P-6 and the target location is smaller then this value, the associated video file will be
played. For example, when this value is set to 65, the video file associated with some target
location will be played if the distance between the B1080P-6 and the target location is less than
65 meters.
-StaCount: Define how many locations will be counted as target location.
-Latdel: The latitude of the target location. Before the dot are the hour and minute parts of the
latitude. There could be up to 6 digits after the dot.
-Latorl: The orientation of the target location’s latitude, N for north and S for south.
-Londel: The longitude of the target location. Before the dot are the hour and minute parts of the
longitude. There could be up to 6 digits after the dot.
-Lonorl: The orientation of the target location’s longitude, W for west and E for east.
Step 4: Copy the GPSPos.cfg and associated video files to CF card. Plug the CF card to B1080P-6 and
turn on the B1080P-6.
The first video file (file name in alphabetical order) will be played repeatedly until the B1080P-6
approaching the target location. When the B1080P-6 approaches the target location, the video file
associated with the target location will be played.
The mapping rule between the video files and the target location is as below:
File Name in
Alphabetical Order
Corresponding Relation
00.wmv As the default video
01.wmv Associated with the first coordinate setting in GPSPos.cfg
02.wmv Associated with the second coordinate setting in GPSPos.cfg
.
.
.
.
.
.

32
11. TROUBLESHOOTING
Situation Check Point
No Picture
1. Check power cable and power switches.
2. Ensure the video cables are connected between the player and
the Eyezone B1080P-6.
3. Press the “TV MODE” button on the remote control to select the
correct output mode.
4. Make sure the file format on the CF card is correct.
5. Check if the display device is switched to correct video input
source.
No Response From
the Remote Control
1. Ensure that there are 2 batteries (AAAsize) in the remote control
and they are inserted the correctly.
2. Check for any barrier between the remote control and the product.
No sound
1. Check if the mute function is on.
2. Check if the volume is set properly.
3. Check if audio cable has been connected correctly.
Network Not Working
1. Check your IP settings on the Network Setup page. (refer to 7.1)
2. If using wired network, make sure the network cable is plugged in
on both the Eyezone B1080P-6 and your network hub.
Table of contents
Other EYEZONE Digital Signage manuals

EYEZONE
EYEZONE P070-5m User manual

EYEZONE
EYEZONE P102-1 User manual

EYEZONE
EYEZONE B1080PX-3 User manual

EYEZONE
EYEZONE P110-2 User manual

EYEZONE
EYEZONE B1080PX-2 User manual

EYEZONE
EYEZONE B1080PX-4 User manual

EYEZONE
EYEZONE P070-1 User manual

EYEZONE
EYEZONE P070-3 User manual

EYEZONE
EYEZONE P102-5m User manual

EYEZONE
EYEZONE P070-10x User manual