EZ-ON L008 User manual

Running Watch
Quick Start Guide

GETTING STARTED
ACTIVATE YOUR WATCH
·To turn on your watch, press and hold all 4 buttons simultaneously.
·Remove the label that appears on the display.
·The LCD display should be active and ready for use.
ATTENTION:
WATER RESISTANT: 3 ATM
Water damage may occur if the buttons are pressed under water.
CONTACTUS
Ifyouhavequestionsaboutourproducts,
plscontactourcustomerserviceteam
support@ezon.cn
Wewillreplyassoonaspossible

TABLE OF CONTENTS
IMPORTANT SAFETY INSTRUCTIONS AND WARNINGS.............................1
BUTTON LAYOUT............................................................................................2
ACCESS TO THE DIFFERENT MODES...........................................................3
LOCK THE BUTTONS......................................................................................4
SWITCH ON THE BACKLIGHT ........................................................................5
USING THE TIME MODE.................................................................................6
USING THE CHRO AND DATA MODES............................................................7
DATA MODE....................................................................................................9
USING THE TMR (Timer) MODE..................................................................10
USING THE ALM ( Alarm ) MODE...................................................................12
HOW TO REPLACE THEBATTERY................................................................14
HAZARDOUS SUBSTANCES CONTENT.......................................................15

IMPORTANT SAFETY INSTRUCTIONS AND WARNINGS
WARNING: This equipment is designed for sports and leisure use. It is not a medical
device.
Please read all of the information in this instruction manual before using the unit. Make
sure you fully understand the functions and limitations of this product before using it.
NOTICE TO PEOPLE WEARING PACEMAKERS: While the running watch is a passive
system and should have no direct effect on a pacemaker, we strongly recommend anyone
fitted with such a device contact their physician or cardiologist before using this product or
starting an exercise program.
Never expose the watch to chemicals or cleaning solvents.
Expose to insect repellent and sunscreen may also damage the unit.
NOTICE: The watch is 30M water resistant, Itisnot waterproof.Do not press buttons
under water, this will cause damage.
1

2
BUTTON LAYOUT
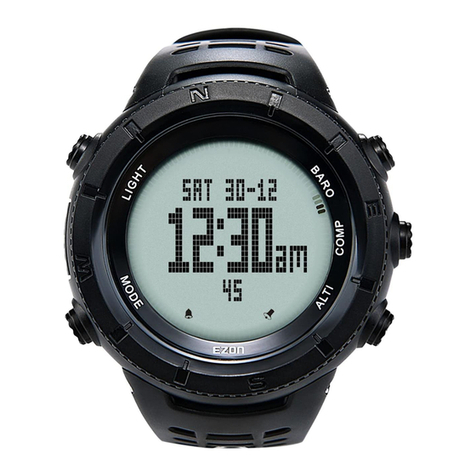
MODE
BACKLIGHT
SET
LAP
START/STOP
LOCK
+
-
Thebuttonsarenotintended for use under water.
Pressing buttons under water may cause damage.

MODE
ACCESS TO THE DIFFERENT MODES
ALM
(Alarm)
Time
CHRO
(Chronograph)
DATA
TMR
(Timer)
Press to access the
different modes.
3

LOCK THE BUTTONS
ST/STP
Press and hold to lock the buttons.
The icon will appear on the display.
While button lock in turned on ,no
buttons will work.
To unlock the buttons, Press and
hold the ST/STP button.
4

Press to activate the backlight,
the light will glow for 3 seconds
SWITCH ON THE BACKLIGHT
BACKLIGHT
5

USING THE TIME MODE
Press the MODE button until you get to Time mode.
Press and hold the LIGHT button for 2-3 seconds to enter the time setting screens.
Press the ST/STP(+) or RESET(-) buttons to adjust each value starting with “hour”.
Press and hold these buttons for fast-paced setting.
Press the MODE button to advance to the next setting value in this order:
hourminutes second 12/24 hour format year month date key tone on/off.
Repeat these steps for all time setting options.
Press the LIGHT button to save and exit time setting.
For using time zone 1(T1) and 2(T2):To view T1 or T2,press the RESET button.
To change the displayed time to T1 or T2,press and hold the RESET button.
6
Special note: when the key tone is turned
OFF, the icon will be displayed in Time
mode.

USING THE CHRO AND DATA MODES
7
Read this section carefully before your first run!
th
Your watch has a 100 hour chronograph with 1/100 second resolution for the first hour
and 1 second resolution after 1 hour.
Press the MODE button until you get to CHRO mode.
Press the ST/STP button to start the chronograph.
While the chronograph is running, press the RESET button to record a lap. The recorded
lap number and lap time will be displayed for 5 seconds. Split time will then be displayed for
5 seconds, followed by your current “counting” lap time.(the “split time” is your total run time
at the point each lap is recorded)
You can record up to 10 laps.
Your current run is automatically updated and saved in DATA mode every time you record
a lap.
Press the ST/STP button to pause the chronograph.(your current lap time will be displayed)
To reset the chronograph press and hold the RESET button while the chronograph is
stopped (NOTE: this will also automatically clear DATA mode).
While the chronograph is running, the icon is blinking in Time mode.

LAP 1 LAP 2 LAP 3
7:26 MIN
7:34 MIN 7:08 MIN
22:08 MIN
15:00 MIN
7:26 MIN
SPLIT 1
SPLIT 2
SPLIT 3
WHAT ARE LAPS AND SPLIT TIMES?
Lap time is the length of an individual segment of your workout(usually a repeated
segment, such as a lap around a track).
Split time is the total elapsed time from the beginning of your workout through the current
segment.
8
USING THE CHRO AND DATA MODES

Allow you to review the lap detail of your current or latest run.
Press the MODE button until you get to DATA mode.
Press the ST/STP button repeatedly to review your recorded laps and splits.
Press the RESET button to return to CHRO mode.
NOTE:
DATA mode is automatically cleared when the chronograph is reset.
DATA MODE
9

Press the MODE button until you get to TMR mode.
SETTING THE TIMER:
Press and hold the LIGHT button for 2-3 seconds to enter the timer setting screens.
Press the ST/STP(+) or RESET(-) button to adjust each value starting with “hour”, press
and hold these buttons for fast-paced setting.
Press the MODE button to advance to the next setting value in this order:
hour minutes second.
Repeat these steps for all timer setting options.
Press the LIGHT button to save and exit timer setting.
USING THE TMR (Timer) MODE
10

USING THE TMR (Timer) MODE
TO OPERATE THE TIMERS:
Press the MODE button until you get to TMR mode.
Press the ST/STP button to start the timer.
Press the ST/STP button to pause the timer, Press the RESET button to return to the
preset timer.
Special note:
·While the timer is running ,the icon is blinking in Time mode.
·The timer count down from 99 hours 59 minutes 59 seconds if no preset timer.
11

USING THE ALM ( Alarm ) MODE
USING THE ALM (Alarm) MODE:
Press the MODE button until you get to ALM mode.
Press the RESET button to scroll through: hourly chime alarm 1 alarm 2.
Press the ST/STP button to turn the hourly chime / alarms1 or 2 on or off.
Special note:
When hourly chime is ON ,the icon will be displayed in Time mode.·
When alarm 1 or 2 is ON, the icon will be displayed in Time mode.·
12

USING THE ALM ( Alarm ) MODE
SETTING THE ALARM:
Press the MODE button until you get to ALM mode.
Press the RESET button until you get alarm 1 or 2.
From alarm 1 or 2 screens, press and hold the LIGHT button for 2-3 seconds to enter the
alarm setting screens.
Press the ST/STP(+) or RESET(-) button to adjust the “hour” setting.
Press the MODE button to advance.
Press the ST/STP(+) or RESET(-) button to adjust the “minute” setting.
Press the LIGHT button to save and exit Alarm setting.
13
Special note:
Alarm mode allows you to set 2 individual alarms, one in time zone(T1) and one in
time zone 2(T2).When turned on ,on a day basis, when each alarm time is reached,the
chime will sound for 20 seconds.You can press any button to stop the sound.

HOW TO REPLACE THE BATTERY
Your watch uses a CR2025 3V Lithium battery.
• To ensure water resistance, all battery replacements should be performed by a trained
watch technician or jeweler.
• Remove the old battery and replace it with a new one. Be sure the battery is in the correct
polarity position---positive(+) side of the battery is visible.
KEEP the unit out of the reach of children and pets. The unit contains small parts that
may be swallowed. This is not a toy.
CAUTION: This product uses a button-cell battery. If swallowed, contact a physician
immediately, severe damage or death can occur.
NOTE: Watch battery contains chemical substances. They should be disposed properly
under local regulations. Do not dispose of in fire or water.
14

HAZARDOUS SUBSTANCES CONTENT
Pack &
Presswork
Cr(VI)
Unit
HS Watchstrap Watchcase Stainless
Steel LCD Glass Rubber
Belt
Electronic
Component
PCB Elastic
○×
Aldary
×
O-ring Plastic
Parts Wire
Pb
Hg
Cd
PBDE
PBB
○
This is the summary table which contains main parts of our products. The watch parts
depend on the actual model.
The parts and theirhomogeneous materials inthewatchwhich arenotlistedinthetable
do not containhazardoussubstances.
All the parts and their homogeneous materials containing hazardoussubstances in the
watch, meet the European Union RoHS requirement, please rest assured use.
The table is edited according to the regulations in SJ/T 11364.
: means the hazardoussubstances content in all homogeneous material of the part is
below the limit in GB/T 26572.
○
○
○
○
○
○
○
○
○
○
○
○
○
○
○
○
○
○
○
○
○
○
○
○
○
○
○
○
○
○
○
○
○
○
○
○
○
○
○
○
○
○
○
○
○
○
○
○
○
○
○
○
○
○
○
○
○
○
○
○
○
○
○
○
○
○
○
○
○
○
○
○
○
○
○
○
○
○
○
○
○
15

: means the hazardoussubstances content in one homogeneous material of the part
is over the limit in GB/T 26572.
Tips:
In order to protect the environment, when the product or its parts scrap, please separate
them from the household garbage and send them to a qualified recycle station. The recycle
stations classify, split and recycle them according to the relevant state regulations.
For more information about the recycling process of the watch, please consult with the
local government, waste management office, etc.
×
HAZARDOUS SUBSTANCES CONTENT
16

M008B-2
Table of contents
Other EZ-ON Watch manuals