EZ 2810 Specifications

Form 2-326
Rev. 09/13/18
2810 Shower Panel
Operator’s Instructions
EZ Way, Inc.
PO Box 89
Clarinda, IA 51632
1-800-627-8940
www.ezlifts.com
WARNING: Cancer and Reproductive Harm - www.P65Warnings.ca.gov.

2
Table of Content
1. Introduction 3
2Intended Use, Product description and Technical specification 4
3 Safety and control instructions 5
4 Installation Instructions 5
5 Features and Controls 8
6 Operating Procedures 9
6.1 Showering 9
6.2 Cleaning 10
6.3 Calibrating the cleaning to give a mix of approx. 2% 11
7 Options 12
7.1 Digital thermometer 12
7.2 Mechanical lock for cleaning liquid bottle 13
8 Routine Maintenance 14
9 Labels on the 2810 15
10 Maintenance record 16
11 Training record 17

3
1. Introduction
Dear Customer,
Thank you for choosing one of our quality products. We hope you enjoy the 2810 Shower panel.
This manual shall, in conjunction with staff training, ensure that the operator/user is always using and/or
operating the 2810 correctly.
The manufacturer requires that each user has read and understands the entire operating manual and that they
can apply the instructions as specified. This applies to anyone who was not present at the in-service.
This instruction manual should generally be kept easily accessible for every user. Copying the whole manual is
encouraged since its sole purpose is to improve the standard of training and safety.
Please order another copy from us if the instruction manual is lost or unusable, or if it has become illegible over
time.
If you require further information or have any questions please do not hesitate to contact EZ Way.
Please make sure you have read, understood and applied the information on the following pages.

4
2. Intended Use, Product Description and Technical Specifications
Intended use:
The 2810 l is a wall mounted Shower Panel.
The patient is typically a person who is unable to take care of their personal hygiene.
The user is any adult person who is capable of reading and understanding the operating manual and is qualified to
care for dependent persons/patients.
Before using the 2810, the user must read and understand the operating manual.
The 2810 is intended to be used in a showering area together with the EZ 1000 shower chair and EZ 2000, EZ 3000,
EZ 3200, EZ 4000 and EZ 4200 shower trolleys.
Technical Specification
Width 23"
Height
15"
Depth 5"
Recommended mounting
height from floor
49"
Min. Dynamic water
pressure
0,15 Bar
Max. Dynamic water
pressure
5 Bar

5
3. Safety and Control Instructions
The recommended maintenance procedures will
depend on the hardness of your water supply
and it is good practice to establish these routine
instructions on a weekly basis and then adjust the
frequency as your conditions indicate.
• Only qualified staff, who understand all
operating and safety procedures may operate the
Shower Panel.
• Always physically check water temperature
before and during showering and that the
thermoscopic mixer functions properly.
• Read the separate product manual for
calibrating the thermostat.
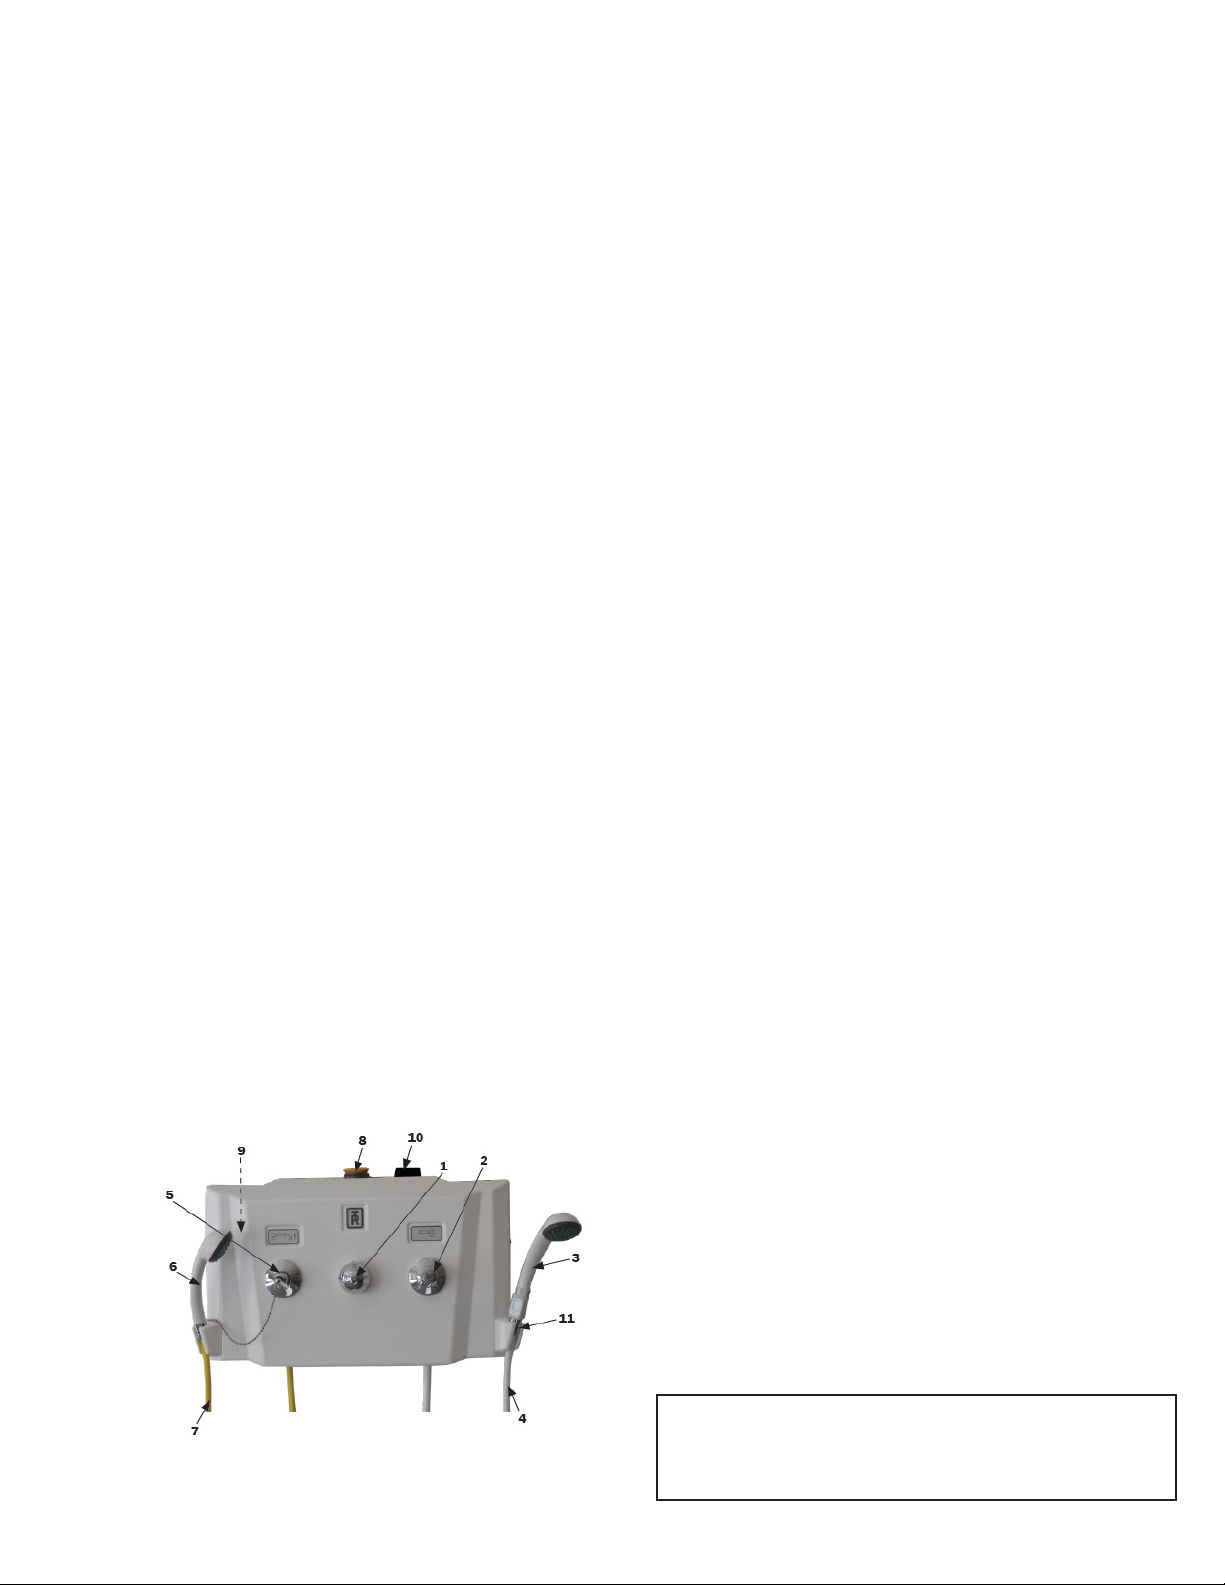
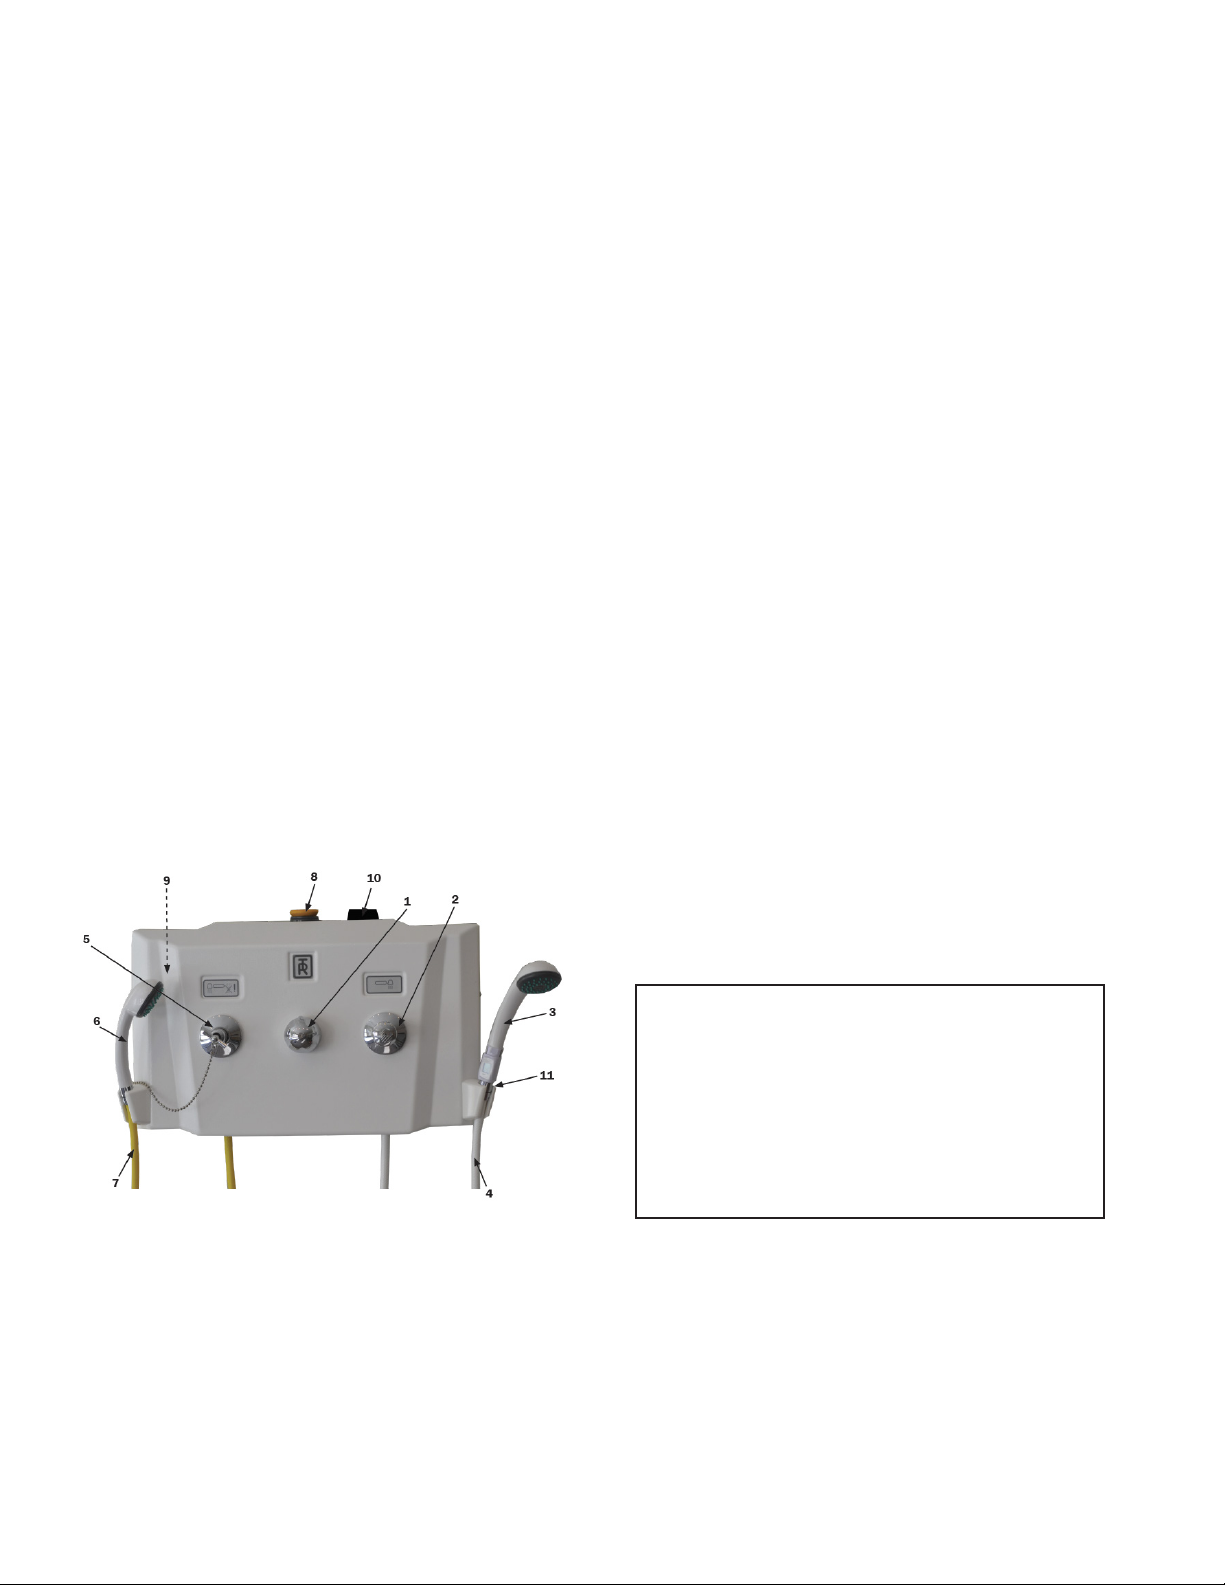
• Make sure that both valves (2 and 5) on the
front of the Panel are closed after each use.
• Make sure that the bottle (8) is filled with
concentrated cleaning detergent before
cleaning.
• Do not use solvent based cleaning liquids,
iodine based detergent, bromine or methylene
blue or a nonabrasive type cleaner.
• Do not use any cleaning detergent containing
more than 40 % of alcohol.
• After cleaning, rinse with fresh water.
• Clean the strainers on the patient and cleaning
shower heads in hot water and rub it with your
thumb.
• Make sure that hoses, controls, connections and
mixer are free from damages.
• Shower Panel should not be used if defects are
noticed. Prompt service is required.
4. Installation Instructions
Plumbing rough - In
All pipes, fittings, backflow preventors, vacuum
valves, shut-off valves and connections to panel
to be supplied and installed by others to comply
with local building and plumbing codes. The
manufacturer refers to the European standard EN
1717. To prevent backflow, any bathtub, toilet chair
or similar product may not be installed within reach
of the patient shower hose.
The patient shower system has a Rada 215-t3 oem
thermostat, a main valve on the panel front and a
shower handle without on/off trigger.
The Rada 215-t3 oem thermostat has built in filters
and check valves and is factory set to give maximum
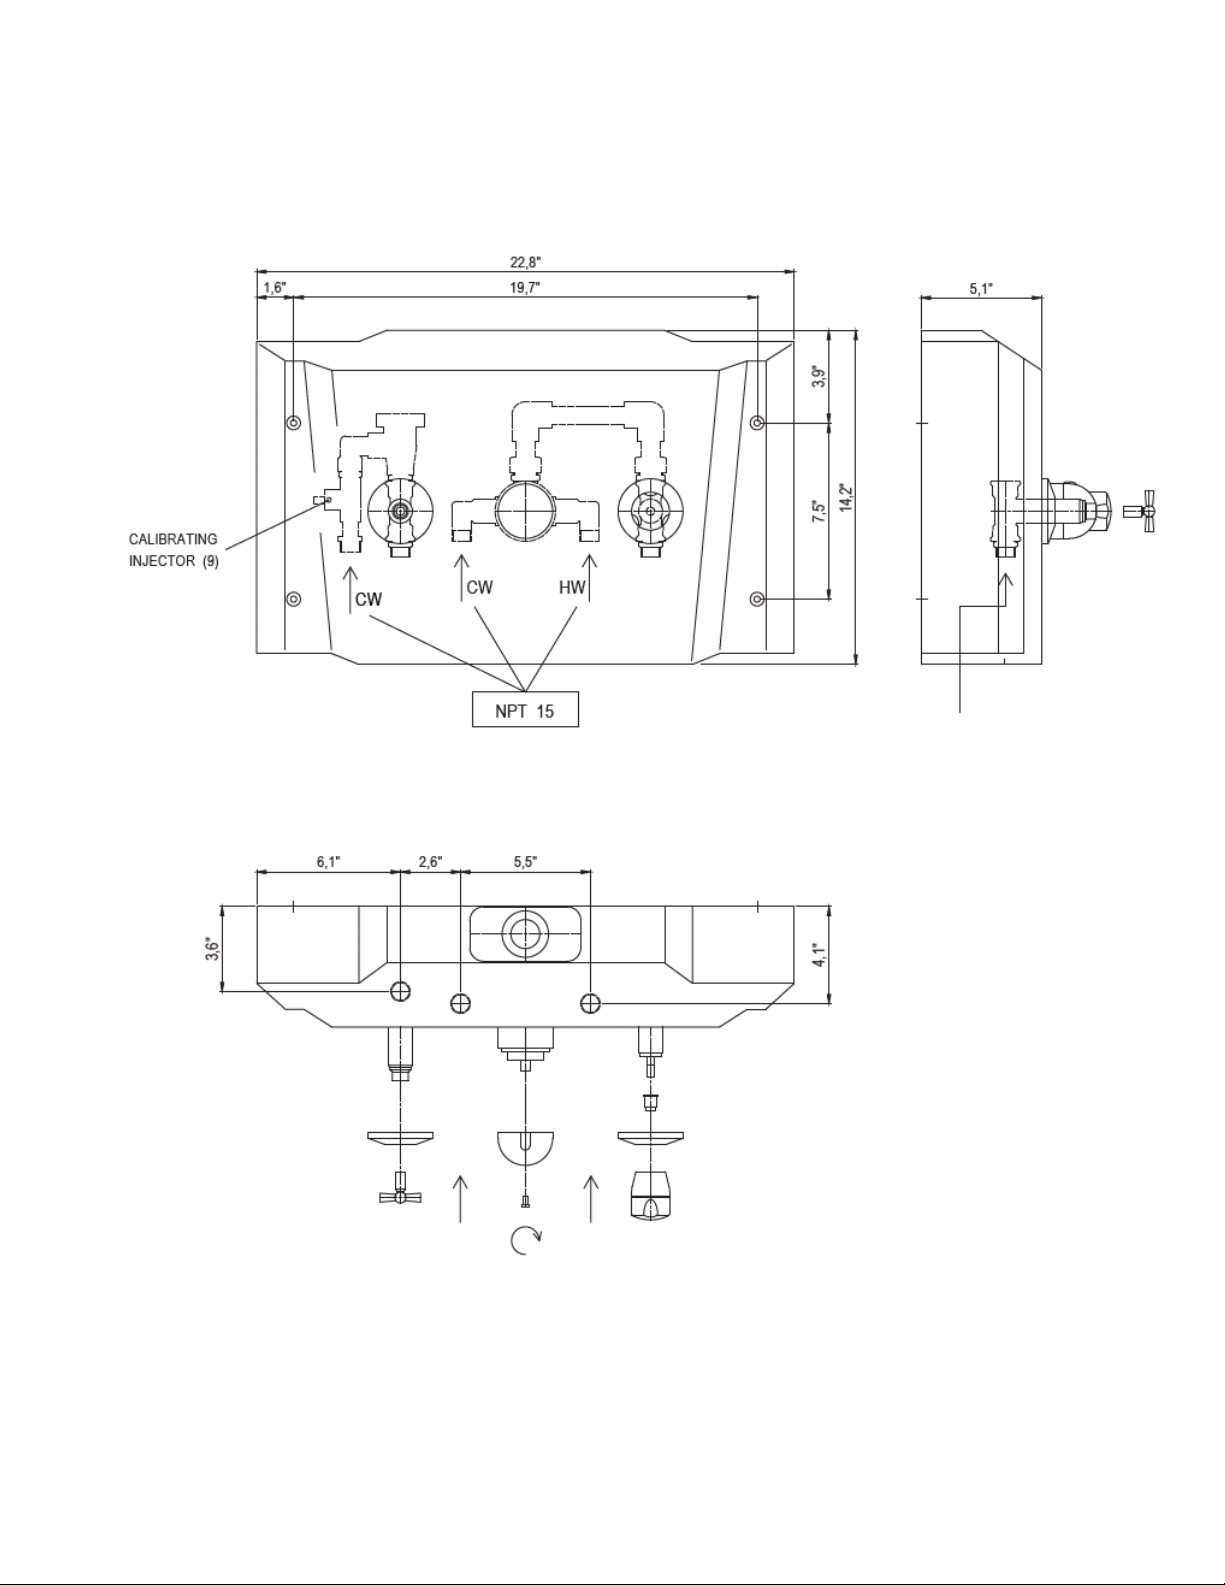
38 degrees Celsius. The thermostat shall be installed
to R15 (½”) cold and hot water supply.
We refer to the enclosed Rada 215-t3 oem
thermostat product manual.
The yellow cleaning shower (for cleaning
equipment only) has a main safety valve on the
panel front and a cleaning handle without on/off
trigger.
The cleaning shower shall be installed to a R15
(1/2") cold water supply and if demanded, to a
separate “class A tank”.
The concentrated cleaning liquid is preset to give
about 2 % mixture in the cleaning shower and
the cleaning bottle shall be filled by the cap. See
operating manual.
To eliminate pipe debris it is essential that the hot
and cold supply pipes are thoroughly flushed before
connection to the shower panel.
Recommended mounting height from floor 47".
Important: this product manual is the property of
the customer and must be retained with the product
for maintenance and operational purposes.

6
Installation Instructions

7
Installation Instructions
US Version

8
5. Features and Controls
Hot and cold water supply for patient shower:
1. Thermoscopic mixer
2. Valve for patient shower
3. Shower spray handle
4. Patient shower hose white
Cold water supply: for cleaning
5. Safety valve for equipment cleaning
6. Cleaning spray handle.
Note: Never to be used on patients.
7. Cleaning shower hose yellow
8. Cleaning detergent filling
9. Cleaning flow setting valve inside panel,
see calibration
10. Mechanical lock for cleaning detergent
bottle (Option)
11. Thermometer (Option)

9
6. Operating Procedures
6.1 Showering
The Shower/Cleaning Panel System has a
thermoscopic mixer for regulating the water
temperature and a valve for the patient shower
handle.
Shower Panel Operation when used in
combination with a Shower Trolley
The thermoscopic mixer (1) is in the centre on
the Panel and the shower valve (2) and the patient
shower handle (3) are located on the right hand
side on the Panel.
1. Remove the shower handle (3) with the white
shower hose (4) from its bracket and hold it
over the Shower Trolley, away from the patient.
2. Open the shower valve (2).
3. Set the themoscopic mixer (1) to a suitable
temperature. Physically test water temperature
on your arm and alter the thermoscopic mixer
setting(1) when necessary.
4. Adjust the water flow with the shower valve
(2).
5. Shower, shampoo and then rinse patient , with
the shower handle (3).
6. After showering, close the shower valve (2) and
return the shower handle back to its bracket on
the right hand side on the Panel.
The patient shower handle is also used for rinsing
Shower Trolley stretcher and mattress before
detergent cleaning.

10
6.2 Cleaning
Note: Never to be used on patients. Only for
equipment cleaning.
The cleaning spray handle (6) with the yellow
shower hose (7) is located on the left hand side on
the Panel in a bracket.
The cold water flow, to minimize inhalation of the
mixed cleaning detergent steam, is controlled by
a safety valve (5) located on the left side on the
Panel.
Cleaning detergent is automatically mixed with
the cold water, in a preset concentration of approx.
2 %, determined by a mixing setting screw (9)
on the injector inside the Panel. When a various
calibration is required, see separate description.
Depending on the viscosity of the cleaning
detergent, the water flow and water pressure in
the building, it might be necessary to adjust and
calibrate the system to get the desired mixture of
the concentrated cleaning detergent and the water.
Using the Cleaning System
1. Fill the bottle (inside the Panel) with (1.5
liter/0.4 gallons) concentrated cleaning
detergent.
2. Unlock the mechanical lock (10) for the
cleaning detergent with the key and then
rotate the knob 45° (option).
3. Carefully lift the bottle straight up and
remove the lid (8). After filling secure the
bottle lid and return the bottle to its place.
4. Remove the cleaning handle (6) with the
yellow hose (7) from its bracket on the left
hand side on the Panel and hold it over the
shower trolley, if used.
5. Open the safety valve (5) with the key to
the left on the Panel and briefly spray the
cold cleaning mixture onto the equipment
while you by color, smell or foam observe
the cleaning mixture.
6. Clean the equipment over all surfaces.
Remove residue and debris with cloth or
brush.
7. Close the safety valve by turning the key,
before you return the shower handle to its
bracket.
8. Use patient shower handle (3) to rinse all
surfaces with fresh water.
Warning: Avoid skin or eye contact with
cleaning/detergent, which can be highly
corrosive. Always read and follow detergent
supplier instructions carefully. If contact
is made rinse immediately with water. If
irritation occur please consult a medical
doctor.

11
6.3 Calibrating
Calibrating the detergent mixture of the Cleaning
System
Detergent is automatically mixed with the water, in a
pre-set mixture, at the factory, of 2 %.
If an alternatively calibration is needed follow the
instructions below to achieve a mixture of 2 % or what
is recommended by your detergent supplier.
To calibrate the mixing setting screw (9) placed on the
injector inside the Panel, requires a thin screwdriver a
measuring cup with a capacity of at least 20 cl/8 ounces
and a bucket with at least 10 liters/3 gallons capacity.
A. Remove the Panel cover.
B. Empty the detergent bottle by loosen its hose
from the injector. When empty connect the hose
to the injector again.
C. Fill the measuring cup with 20 cl/8 ounces
concentrated detergent, open the detergent
bottle lid (8) and pour it into the bottle.
D. Hold the cleaning spray handle (6) with yellow
hose over the 10 litres/3 gallons bucket for filling.
E. Turn the cleaning safety valve (5) to full open
position and spray into the bucket.
F. Observe level when bucket fills, while bottle
empties. Bucket should reach 10 litres/3 gallons
mark at the same time that bottle empties.
If bucket fills first, turn the detergent mixing
setting screw (9) slightly anti-clockwise, using the
screwdriver. If bottle empties first, turn the
detergent mixing setting screw (9) slightly
clockwise.
G. Repeat procedure A-F until the mixture is as
required.
H. Close cleaning safety valve (5), and return the
cleaning handle (6) to the bracket on side of
Panel.
I. Attach the Panel cover.
Warning: Avoid skin or eye contact with
cleaning/detergent, which can be highly
corrosive. Always read and follow detergent
supplier instructions carefully.
The cleaning system is now ready for use. See
detergent filling previous page.
Once the proper concentration setting is
established, no further calibration is required
unless a different detergent, is used.
Note: Mixture should be calibrated in
accordance to your detergent supplier.

12
7. Options
7.1 Digital thermometer
The simplistic design allows for quick and easy installation
within minutes. It’s minimalist frame and universal
connection means that it can be installed in majority of
shower setups.
Installation is a simple as 1-2-3.
1. Detach the shower head and hose
2. Attach the Inline Shower Thermometer to the
shower hose
3. Attach the shower head to the top of the Inline
Shower Thermometer
• 32°F to 156°F temperature range
• Accuracy ±1°F between 77°F to 122°F
• Visible alarm for temperatures exceeding 105°F
• Threads: ½” BSP male (for hose), ½” BSP female
(for shower head)
• To wake up the thermometer from sleep
(battery saving) mode, shake the unit or turn it
upside down
• Large LCD display
• Helps saving energy, very simple installation – suitable
for all standard shower facilities
• Waterproof
• Battery powered (batteries supplied)
• Art. no: 819359

13
7.2 Mechanical lock for cleaning liquid bottle
The mechanical lock (incl. keys) for the cleaning
liquid bottle is a factory mounted option with
purpose to prevent unauthorized people from
removing the bottle.
How to remove the bottle:
1. Open the lock with the supplied key
2. Turn the knob 90° and then remove the bottle.
Technical Specifications
Wing knob Polyamid PA6
Housing Zinc die-cast, Chrome plated
Cylinder Zinc die-cast, Stainless Steel cap and dust shutter
Nut Zinc die-cast, Zinc plated
Screw Steel, Zinc plated
Cam Stainless Steel

14
8. Routine Maintenance
Before each time the 2810 Shower Panel is
used:
• Visual inspection - Check the hoses so they do
not leak.
• Visual inspection - Make sure it is securely
mounted on the wall
• Always physically check water temperature by
hand before and during showering and that the
thermostatic mixer functions properly.
Daily routine maintenance:
• Clean the strainers on the patient- and cleaning
shower handles by rubbing it with your thumb.
Monthly routine maintenance made by on-site
engineer or trained staff:
• Make sure the connecting hot/cold water hoses
are fitted correctly and do not leak
• Check all screws and bolts
• For maintenance instructions see enclosed
manual from the manufacturer of the
thermostatic mixer
• Exercise the thermostatic mixing valve to
ensure that the delivery of warm water is
at a stabile and safe temperature. This is
described in the enclosed manual from the
mixer manufacturer under the headline
Commissioning.
Annually Maintenance and inspection by
the manufacturer or QUALIFIED STAFF
authorized by the manufacturer:
• Moveable components have to be maintained
and inspected regularly because they are
classified as wear parts! (e.g. fittings, hoses,
connections, pipe interrupters. Thermostatic
mixing valve.)
Every 5 Years:
• Exchanging/replacing all connecting hot/cold
water hoses.
• Replace the mixer cartridge and check valves.
Important: In healthcare applications such
as hospitals, residential care homes, etc. and
in any other applications where the user is
similarly at risk, irrespective of supply and
usage conditions or the evidence of
in-service tests. The manufacturer
recommends the critical components
replaced at intervals of no more than 5 years.
The recommended frequency of these
maintenance procedures will depend on the
hardness of your water supply and how often
the equipment is used. It is good practice
to establish these routine procedures on a
weekly basis and then adjust the frequency as
your conditions indicate.
Warning: The equipment must not be
used in any way that varies from the safety
precautions and operating procedures
detailed in this manual.
The equipment must not be operated
by anyone until the user has read and
understands the operating manual.

15
9. Labels on the 2810
1 Mandatory to
read the
operating
manual before
use
4 Filling Cleaning liquid.
Maximum 0,4 gallon
2 Showering 5 TR Equipment AB Logotype
3 Cleaning liquid 6 The identication label states
the product’s model- and part
number, serial number, date
of manufacture, the
manufacturing country and
the name and address of the
manufacturer.
REF = Model– and part
number
CE = CE marking in
accordance with the Medical
Devices
Directive 93/42/EEC as a
Medical Device Class 1.
SN = Serial number

16
DATE DESCRIPTION SIGNED BY
10. Maintenance Records

17
DATE DESCRIPTION SIGNED BY
11. Training Records

WARRANTY, CE MARK & TECHNICAL SPECIFICATIONS:
2810 Shower Panel
Warranty: EZ Way warrants that its products are free from defects in materials and workmanship for a period of one year from the
date of delivery. Disinfectant and Shower wands and hoses shall be warranted for six months from the date of delivery. This warranty
is in lieu of any other warranty or representation, expressed or implied. Warranties of MERCHANTABILITY or FITNESS FOR ANY
PARTICULAR USE OR PURPOSE are expressly excluded. EZ Way will not be responsible for any expenses, inconvenience or incidental
or consequential damages occasioned by the use, loss of use, or misuse of the products, or by the failure of the products to conform to
the warranty set forth above. This warranty becomes void if the product shows evidence of mishandling, tampering, installation or use
contrary to the applicable instruction materials, shipping damage, or repair. Routine cleaning, adjustment, and normal cosmetic and
mechanical wear are not covered by this warranty.
CE mark: Certificate of registration at the LÄKEMEDELSVERKET Medical products agency in Sweden
Dnr.452:2008/83584.
Free sales certificate at the LÄKEMEDELSVERKET Medical products agency in Sweden.
Depth 5"
Width 23"
Height 15"
Recommended mounting
height from floor 49"
Min. Dynamic water pressure
Max. Dynamic water pressure
0.15 Bar
5 Bar
TECHNICAL SPECIFICATIONS
Table of contents
Popular Bathroom Fixture manuals by other brands

Grohe
Grohe Minta 32 918 manual

Kohler
Kohler 12966T-C installation instructions

kelda
kelda BubbleSpa 95005000 manual

Hans Grohe
Hans Grohe Croma Select S 180 2jet 26522400 Assembly instructions

newform
newform DAYTIME 69050 instructions

Franke
Franke Protronic-S AQUA131 2000067774 Installation and operating instructions

Voda Plumbingware
Voda Plumbingware ECOMIX VECM040 quick start guide

miseno
miseno MNO2114ABWH installation instructions

Valore
Valore VS1208 Installation and user guide

Pegasus
Pegasus 873W-5004 Use and care guide

Fackelmann
Fackelmann COMO & LUGANO 73613 Instructions for mounting and use

Mira
Mira Azora Installation and user guide